Hello, Just Because, Love & Friendship

Four Easy Cards Featuring Stampin’ Up’s Nothing’s Better Than Stampset

Hello Friends. Happy Monday! The Nothing’s Better Than Bundle from Stampin’ Up! is a great set to create a variety of cards for any season or occasion. It has an outline stamp as well as the solid stamp for each image so if you don’t like coloring this set will work well for you. I made four similar cards using this bundle and the Scalloped Tag Topper Punch and the Delightful Tag Topper Punch. I don’t often say this about punches but I love these tag dies. I think part of it is that I a few months ago I discovered junk journaling and have been making tags and pockets and things for it. So when I saw these punches I said (to myself) “YES PLEASE!”. LOL And now I am obsessed with making tags.

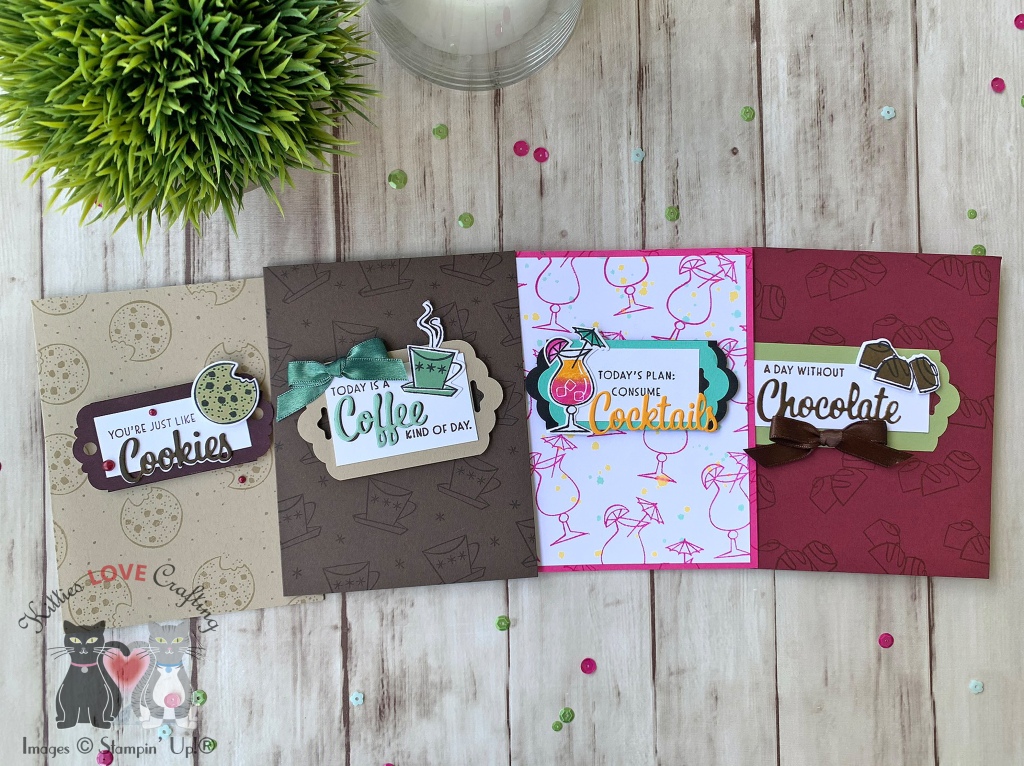
For the first card, I started by cutting a piece of Magenta Madness 8-1/2″ X 11″ Cardstock to 5-1/2 x 8-1/2″ and scored at 4-1/4″ to create a card base. I also cut a piece of Whisper White 8-1/2″ X 11″ Cardstock to 4 x 5-1/4″. I stamped the outline image of the cocktail from the Nothing’s Better Than Stampset with Magenta Madness Classic Stampin’ Ink onto the card base as well as the Whisper White panel I had previously cut. I added some ink splatters with Mango Melody Classic Stampin’ Ink and Coastal Cabana Classic Stampin’ Ink. You can also use the ink refills if you have them; I do not have them yet. I just smooshed some of the ink onto a stamp block, added some water and used a small brush to splatter it on. As an alternative, you can use a Water Painter. Once dried, I adhered the panel to the card base with Tombow Mono Multipurpose Liquid Glue.

I stamped the outline image of the cocktail again as well as the sentiment onto a scrap piece of Whisper White 8-1/2″ X 11″ Cardstock with Tuxedo Black Memento Ink. I used the solid stamps with Magenta Madness Classic Stampin’ Ink and Mango Melody Classic Stampin’ Ink to create an ombre effect for the drink. I used a Sponge Dauber to soften the line between the two colors on the stamp before stamping. I used Magenta Madness Classic Stampin’ Ink for the fruit and Coastal Cabana Classic Stampin’ Ink for the umbrella. I diecut the image using the coordinating Love You More Than Dies.

I diecut the word “Cocktails” from Mango Melody 8-1/2″ X 11″ Cardstock using the dies included in the Love You More Than Dies. Then I cut a piece of Coastal Cabana 8-1/2″ X 11″ Cardstock to 1-1/2 x 3-3/8″ and a piece of Basic Black 8-1/2″ X 11″ Cardstock to 1-1/2 x 3-3/4″ and used the Scalloped Tag Topper Punch to cut the ends of both. I stacked them on top of each other and the sentiment piece, which I cut to 1-1/4 x 2″. I adhered the cocktail image and the word “Cocktails” flat onto the sentiment piece and popped the whole piece up with Stampin’ Dimensionals.

For the inside of the card, I cut a piece of Whisper White 8-1/2″ X 11″ Cardstock to 4 x 5-1/4″ and adhered it with Tombow Mono Multipurpose Liquid Glue. I stamped another sentiment from the Nothing’s Better Than Stampset with Magenta Madness Classic Stampin’ Ink and the cocktail outline image with Mango Melody Classic Stampin’ Ink.

Dimensions


For the second card, I started by cutting a piece of Early Espresso 8-1/2″ X 11″ Cardstock to 5-1/2 x 8-1/2″ and scored at 4-1/4″ to create a card base. I stamped the outline image of the coffee cup and the little asterisk from the Nothing’s Better Than Stampset with Early Espresso Classic Stampin’ Ink onto the card base.

I stamped the outline image of the coffee cup and the steam onto a scrap piece of Whisper White 8-1/2″ X 11″ Cardstock with Tuxedo Black Memento Ink. I used the solid stamp with Mint Macaron Classic Stampin’ Ink and diecut the image using the coordinating Love You More Than Dies. I diecut the “Coffee” word from the same dieset from Mint Macaron 8-1/2″ X 11″ Cardstock and Early Espresso 8-1/2″ X 11″ Cardstock and adhered them together offset.

I stamped the sentiment onto a scrap of Whisper White 8-1/2″ X 11″ Cardstock and cut it down to 1-1/2 x 2-3/8″. I adhered it to a piece of Crumb Cake 8-1/2″ X 11″ Cardstock, measuring 2 x 3-3/4″ (I punched the sides with the Scalloped Tag Topper Punch). I adhered the coffee cup image and the “Coffee” word diecut to the sentiment piece and using Stampin’ Dimensionals added it to the card base.

To finish it off I added sparkle to the word “Coffee” with a Clear Wink Of Stella Glitter Brush and a bow made from colored white satin ribbon ( I used Mint Macaron Classic Stampin’ Ink). I just lay the ribbon down on some paper and swiped the ink pad over the ribbon. If you spray some water on the ribbon first it will help the ink sink into the ribbon better. Also, it takes a while to dry if you put a lot of ink on it. You can also use an ink refill and water to do the same.

For the inside of the card, I cut a piece of Whisper White 8-1/2″ X 11″ Cardstock to 4 x 5-1/4″ and adhered it with Tombow Mono Multipurpose Liquid Glue. I stamped another sentiment from the Nothing’s Better Than Stampset, as well as the coffee cup and steam outline images with Mint Macaron Classic Stampin’ Ink.

Dimensions


For the third card, I started by cutting a piece of Merry Merlot 8-1/2″ X 11″ Cardstock to 5-1/2 x 8-1/2″ and scored at 4-1/4″ to create a card base. I stamped the outline image of the chocolates from the Nothing’s Better Than Stampset with Merry Merlot Classic Stampin’ Ink onto the card base.

I stamped the outline image of the chocolates onto a scrap piece of Whisper White 8-1/2″ X 11″ Cardstock with Tuxedo Black Memento Ink. I used the solid stamp with Soft Suede Classic Stampin’ Ink and diecut the image using the coordinating Love You More Than Dies. I diecut the “Chocolate” word from the same dieset from Whisper White 8-1/2″ X 11″ Cardstock which I then used a direct-to-paper technique with Soft Suede Classic Stampin’ Ink to color it.

I stamped the sentiment from the Nothing’s Better Than Stampset onto a scrap of Whisper White 8-1/2″ X 11″ Cardstock with Soft Suede Classic Stampin’ Ink and cut it down to 1-1/8 x 3-1/8″. I adhered it to a piece of Pear Pizzazz 8-1/2″ X 11″ Cardstock, measuring 1-3/4 x 3-3/4″ (I punched one side with the Scalloped Tag Topper Punch). I adhered the chocolates image using Stampin’ Dimensionals and the “Chocolate” word diecut flat onto the sentiment piece and adhered it to the card base.

To finish it off I added a bow made from chocolate satin ribbon.

For the inside of the card, I cut a piece of Whisper White 8-1/2″ X 11″ Cardstock to 4 x 5-1/4″ and adhered it with Tombow Mono Multipurpose Liquid Glue. I stamped another sentiment from the Nothing’s Better Than Stampset, as well as the chocolates outline image with Mint Macaron Classic Stampin’ Ink.

Dimensions


For the last card, I started by cutting a piece of Crumb Cake 8-1/2″ X 11″ Cardstock to 5-1/2 x 8-1/2″ and scored at 4-1/4″ to create a card base. I stamped the outline image of the cookie from the Nothing’s Better Than Stampset with Crumb Cake Classic Stampin’ Ink onto the card base.

I stamped the outline image of the cookie onto a scrap piece of Whisper White 8-1/2″ X 11″ Cardstock with Tuxedo Black Memento Ink. I used the solid stamp with Crumb Cake Classic Stampin’ Ink and diecut the image using the coordinating Love You More Than Dies. I diecut the “Cookies” word from the same dieset 2x from Whisper White 8-1/2″ X 11″ Cardstock which I then used a direct-to-paper technique with Soft Suede Classic Stampin’ Ink to color one of them. I adhered them together offset (white on the bottom).

I stamped the sentiment from the Nothing’s Better Than Stampset onto a scrap of Whisper White 8-1/2″ X 11″ Cardstock with Blackberry Bliss Classic Stampin’ Ink and cut it down to 1 x 2-3/8″. I adhered it to a piece of Whisper White 8-1/2″ X 11″ Cardstock, measuring 1-1/2 x 3-3/8″, which I colored using a direct-to-paper technique with Blackberry Bliss Classic Stampin’ Ink (I don’t have the cardstock) and then punched both sides with the Delightful Tag Topper Punch. I adhered the cookie image (I used Stampin’ Dimensionals) and the “Cookies” word diecut to the sentiment piece and adhered the piece with Stampin’ Dimensionals to the card base.

To finish it off I added 3 Pearls which I colored using Blackberry Bliss Light Stampin’ Blend Marker.

For the inside of the card, I stamped another sentiment from the Nothing’s Better Than Stampset, as well as the chocolates outline image with Blackberry Bliss Classic Stampin’ Ink and the cookies with Crumb Cake Classic Stampin’ Ink.

Dimensions


Supplies

https://linkdeli.com/widget.js?id=f5e8378456858c916708

Thanks for reading this post. I hope you enjoyed and Iโ€™ve inspired you to try these easy and fun cards for yourself! Leave comments or questions below or feel free to email me. If you want to share you creations with me tag me on instagram @kittieslovecrafting. If you would like a Stampin’ Up! catalog, please email me as well. All current catalogs can be found on the right side of this post and the Stampin’ Up! page. All news and fun stuff happening at Stampin’ Up! are listed there!

Fourth of July, Halloween, Summer

Shop Your Stash Day 5: Halloween in July

Well I’m sure you have heard of Christmas in July, but have you heard of Halloween in July??? Quite frankly, I love making Halloween cards anytime of year! It’s my favorite holiday ever!!!

For this card, I started by cutting a piece of Simon Says Stamp 100# Black Card to 5-1/2 x 8-1/2″ and scored at 4-1/4″ and diecut a panel and the peekaboo panels with the Lawn Fawn Peekaboo Backdrop. I stamped the jack-o-lantern face from Papertrey Ink Pumpkin Expressions Mini Stamp Set onto a scrap of Stampin’ Up! Pumpkin Pie 8-1/2″ X 11″ Cardstock with Memento Tuxedo Black Ink, cut it to 2 x 2″ then inked up the edges with Spiced Marmalade Distress Ink. I stamped the sentiment from Stampin’ Up! (retired) Versamark Ink and WOW Embossing Powder Opaque Bright White Super Fine onto a piece of Stampin’ Up! Elegant Eggplant 8-1/2″ X 11″ Cardstock (retired), cut it to 2 x 2″ then inked up the edges with Dusty Concord Distress Oxide Ink. Then adhered both to the back of the top panel and the peekaboo windows to each respective area of the card.

I cut a piece of the aqua Lawn Fawn Perfectly Plaid Rainbow 6 x 6 Paper (not available) to 2 x 3-1/4″ and a piece of Stampin’ Up! Old Olive 8-1/2″ X 11″ Cardstock to 1-1/2 x 3-1/4″ and used the Lawn Fawn Simple Grassy Hillsides to diecut the edge. I inked the Perfectly Plaid Rainbow with Tim Holtz Distress PEACOCK FEATHERS Ink and the grass with Stampin’ Up! Old Olive Classic Stampin’ Ink and adhered the pieces together and to the back of the top panel. I cut a piece of Simon Says Stamp 100# Fog Gray Card to 2 x 3-1/4″ and created an ombre effect by using Black Soot Distress Ink.

I stamped images from Lawn Fawn’s Pick of the Patch and How You Bean Candy Corn stampset onto Neenah 110lb Classic Crest Cardstock 8.5 X 11″ with Memento Tuxedo Black Ink and colored them with COPIC markers.

I used 0 and C1, Y02 and Y06, YR12 and YR16 for the candy corn, YR16 and YR09, YG01 and YG25 for the pumpkins, Y02 and YR12 for the pumpkin guts, BV11 and BV17 for the scoop, C1 and C3, N5 and N7 for the knife and W1, W3, and W5, E15, E23, and E37 for the squirrels. I diecut the images and adhered them to their respective panels and adhered those to the back of the top panel. I used Stampin’ Dimesionals to adhere some of the images and then to the card base. Then I adhered the rest of the images around the panel.

I stamped sentiments from Lawn Fawn’s Push Here stampset with Versamark Ink and WOW Embossing Powder Opaque Bright White Super Fine to the peekaboo panels. I finished it off by adding highlights to the images with Uni-Ball Signo White Broad Point Gel Pen and VIOLET GALAXY Nuvo Drops.

On the inside of the card, I cut a piece of Neenah 110lb Classic Crest Cardstock 8.5 X 11″ to 4 x 5-1/4″ and stamped a sentiment from Lawn Fawn’s Pick of the Patch with Dusty Concord Distress Oxide Ink. I added a candy corn image and that completes this card.

Dimensions


Supplies

https://linkdeli.com/widget.js?id=f5e8378456858c916708

Thanks for reading this post. I hope you enjoyed and Iโ€™ve inspired you to Shop Your Stash and see what fun ideas you come up with and maybe rediscover supplies you forgot you had! Leave comments or questions below or feel free to email me.

Celebrations, Thank Yous

2 Cards Featuring Stitched Triangles by Stampinโ€™ Up!

I love stackable geometric dies, especially with stitched details. They are so versatile because you can create a whole card using only the shapes, or add a shape behind a sentiment or focal point to emphasize it. For this card I decided to keep it simple and bright. I combined a rainbow of Stampin’ Up!’s cardstocks, Stitched Triangles Dies and a simple sentiment. It is a very simple card to make and can easily be mass produced. This die set is available in the new 2020-2021 Annual Catalog! There is also a coordinating stamp set.

I started by cutting down a piece of Stampin’ Up! Whisper White 8-1/2″ X 11″ Thick Cardstock to 5-1/2 x 8-1/2″ and scored at 4-1/4″ to create a card base. Then I cut several triangles using the Stampin’ Up! Stitched Triangles Dies and Stampin’ Up!’s 8-1/2″ X 11″ Cardstock in Poppy Parade, Pumpkin Pie, Mango Melody, Granny Apple Green, Bermuda Bay, and Highland Heather.

I stacked sets of six triangles in rainbow order and adhered them together with Tombow Mono Multi Glue. And then adhered those to the card base, trimming the excess. I stamped a sentiment from the stamp set included in the Stampinโ€™ Up!โ€™s February 2020 Paper Pumpkin Kit – Lovely Day onto the card base with Memento Tuxedo Black Ink. I left the inside of the card blank and that completes this card. Super easy, right??

Dimensions


For the second card, I decided to create watercolor triangles. I used the ink refills to watercolor. I started by cutting down a piece of Stampin’ Up! Whisper White 8-1/2″ X 11″ Thick Cardstock to 5-1/2 x 8-1/2″ and scored at 4-1/4″ to create a card base. Then I cut down six panels of Stampin’ Up! Fluid 100 Watercolor Paper to 4-1/4 x 5-1/2″ and used ink refills for Poppy Parade, Pumpkin Pie, Mango Melody, Granny Apple Green, Bermuda Bay, and Highland Heather and a water brush to add color to each panel.

Then I cut several triangles from each panel using the Stampin’ Up! Stitched Triangles Dies. I laid all my triangles out on the card base and puzzle pieced them together basically. Once I was happy with the placement, I adhered them down with Tombow Mono Multi Glue.

I stamped a sentiment onto a scrap piece of Stampin’ Up! Whisper White 8-1/2″ X 11″ Thick Cardstock using Memento Tuxedo Black Ink and the alphabets in the Stampin’ Up! Make A Difference Photopolymer Stamp Set. On the inside I added a few extra triangles in the bottom right corner.

Dimensions


Supplies

https://linkdeli.com/widget.js?id=f5e8378456858c916708

Thanks for reading this post. I hope you enjoyed and Iโ€™ve inspired you to try these fun and quick cards for yourself! Leave comments or questions below or feel free to email me. Also if you would like a Stampin’ Up! catalog, please email me as well. All current catalogs can be found on the right side of this post and the Stampin’ Up! page. All news and fun stuff happening at Stampin’ Up! are listed there!

Birthdays, Summer

Shop Your Stash Day 4: Reveal Wheel Mason Jar Aquarium

When I was going through my die stash I remembered how much I loved my Reveal Wheel dies from Lawn Fawn as well as the Lawn Fawn How You Bean? Stamp sets so I decided to combine them and see what happens. After all fish fit in a mason jar right?? (I probably wouldnโ€™t put real fish in the mason jar but itโ€™s fine for fake fish!)

For this card I started by cutting a piece of Neenah 110lb Classic Crest Cardstock 8.5 X 11″ to 5-1/2 x 8-1/2″ and scored at 4-1/4″. Then I used the Lawn Fawn Reveal Wheel Die to diecut the 2 wheels and two panels of the reveal wheel base. I diecut the the window into one of the panels with the Lawn Fawn Reveal Wheel Semicircle Add-on Die Cut and then turned it 180 degrees and diecut it under the first window.

I inked up the panel using MFT’s Snow Drifts Coverup Die (not available) as a stencil ccombined with Salty Ocean and Mermaid Lagoon, Mowed Lawn and Tumbled Glass Distress Oxide Ink. I created a gradient using Salty Ocean and Mermaid Lagoon first, then turned the die 180 degrees and used Mowed Lawn to layer over it, and finally Tumbled Glass over all of it to mute it some. I used the same color combo on the large wheel, without the stencil. I sprayed some water on everything with my RANGER Tim Holtz DISTRESS SPRAYER and blotted it.

I set that aside to dry and stamped all the images from the Lawn Fawn FINTASTIC FRIENDS onto a piece of Neenah 110lb Classic Crest Cardstock 8.5 X 11″ with Memento Tuxedo Black Ink. I also stamped the large fishtank (I will use just the sand) and the mason jar from Lawn Fawn HOW YOU BEAN? (onto clear acetate) with Tsukineko Stazon Black Ink .

Once the inked panel was dry I added splashes of white acrylic paint and heat embossed bubbles and a sentiment from Lawn Fawn FINTASTIC FRIENDS. I prepped the surface with an anti-static tool first (make sure the acrylic paint has dried) then used Versamark Ink and WOW Embossing Powder Opaque Bright White Super Fine. I assembled the reveal wheel using 3M Foam Tape and adhered it to the card base. To see how to assemble the reveal wheel check out this video from Lawn Fawn.

I colored the images with COPIC markers. I used Y06, Y15 and YR04 for the goldfish, E53, E33, and E37 for the sandcastle, B95 and 97 for the shark, YG25 and YG03 for the plants, R05, R14, R17 and R27 for the crab, R05 and R12 for the coral, Y06, Y15, B24 and B26 for the striped fish and E53 and E33 for the sand in the jar tank.

I diecut all the images and adhered them to the card using Tombow Mono Multi Liquid Glue. I used Glossy Accents Glue Adhesive to adhere the mason jar. I stamped the arrow from Lawn Fawn’s Push Here stampset with Memento Tuxedo Black Ink onto the card base and finished it off by adding White Blizzard Nuvo Drops and a few Pretty Pink Posh 4MM ClearDroplets.

On the inside, I stamped a sentiment from the Lawn Fawn HOW YOU BEAN? with Memento Tuxedo Black Ink and an extra sandcastle I had colored.

Dimensions


Supplies

https://linkdeli.com/widget.js?id=f5e8378456858c916708

Thanks for reading this post. I hope you enjoyed and Iโ€™ve inspired you to Shop Your Stash and see what fun ideas you come up with and maybe rediscover supplies you forgot you had! Leave comments or questions below or feel free to email me.

Encouragement, Fourth of July, Fourth of July, Summer

Shop Your Stash Day 3: Making Summer Cards Using Honeybee Stamps Frappe Shake Card Dies

While it’s probably no surprise too many that I love coffee, I love coffee stamps and dies even more. This Honeybee Stamps Frappe Shake Card Dieset as well as their Honey Bee COFFEE CUP CARD Dies are my favorites! They have everything you need to make cute coffee cup and frappe cup shaped cards and shakers. And they fit in an A2 size envelope which is great!

I thought it would be fun to reuse this dieset to make some non-coffee cards, instead make brightly colored summer beverages. I don’t know if you all remember the rocket bomb popsicles that were red, white and blue. I remember many summers as a kid eating those popsicles (they were refreshing and turned my tongue red or blue, depending on which end I ate firstโ€”what could be better??). LOL That was the inspiration for my first card.

I started by diecutting card bases using the large card, coffee cup, and the whipped cream dies in the set from Neenah 110lb Classic Crest Cardstock 8.5 X 11″ 3 times. I also diecut 3 sets of the lid and its rim from Acetate.

I also went ahead and added Tim Holtz Salty Ocean Distress Oxide Ink to the lid section of the card base on all 3 cards to create a background for the lid. Then, used Tim Holtz Candied Apple Distress Oxide Ink, Tim Holtz Salty Ocean Distress Oxide Ink and Tim Holtz Chipped Sapphire Distress Oxide Ink to create an ombre effect on the coffee cup, leaving the middle area white. I sprayed some water onto it with my Tim Holtz DISTRESS SPRAYER and blotted it with a paper towel.

While the ink dried, I diecut the straw and the larger circle from the dieset from a piece of Doodlebug Designs Yankee Doodle 6 x 6 Pattern Paper (no longer available) and used the smallest star from the Sizzix Framelits Stars Die Set and Tim Holtz Idea-ology 8 x 8 Paper Stash METALLIC KRAFT STOCK to diecut a small star. I adhered the star to the circle, the coffee cup and whipped cream to the card base and then cut the straw in half and adhered it to the front of the card using Tombow Mono Multi Liquid Glue. I adhered the circle to the card front and added some silver confetti stars from Fanci-Fetti Stars (silver) Party Accessory to the whipped cream and then the clear lid on top of the stars (I used Ranger GLOSSY ACCENTS Glue Dimensional Adhesive to adhere the acetate and metallic stars).

On the inside of the card, I stamped “Happy 4th of July” with a very old stampset I had (sorry don’t know where it came from) using Tim Holtz Chipped Sapphire Distress Oxide Ink and added 3 silver stars.

Card Inside

For the second card, I decided to make a delicious watermelon smoothie. Who doesn’t like a tasty frozen watermelon beverage on a hot summer day?!? I’m now craving a smoothie while writing this post. LOL.

For this card, I started by using Tim Holtz Candied Apple Distress Oxide Ink, and Tim Holtz Mowed Lawn Distress Oxide Ink to create an ombre effect on the coffee cup. I cut a small triangle from some Neenah 110lb Classic Crest Cardstock 8.5 X 11″ and also inked it up with the distress oxide inks. I sprayed some water onto it with my Tim Holtz DISTRESS SPRAYER and blotted it with a paper towel.


While the ink dried, I diecut the straw from a piece of Brutus Monroe Fresh Melon 6 x 6 Paper Pad. I adhered the coffee cup and whipped cream to the card base and then cut the straw in half and adhered it to the front of the card using Tombow Mono Multi Liquid Glue. I added Nuvo EBONY BLACK Crystal Drops to the whipped cream and then adhered the clear lid on top of the stars (I used Ranger GLOSSY ACCENTS Glue Dimensional Adhesive to adhere the acetate). I cut a slit in the watermelon slice and adhered it to the card. I stamped a sentiment from Honey Bee Stamps SHAKE IT OFF Clear Stamp Set onto a piece of Neenah 110lb Classic Crest Cardstock 8.5 X 11″ using Memento Tuxedo Black Ink. I fussycut it and adhered it to the card front and added more Black Nuvo drops. I left the inside of the card blank.


And if I’m making fruity drinks for the summer, I can’t forget about a refreshing frozen lemonade! Yum!

For this card, I started by using Tim Holtz Squeezed Lemonade Distress Oxide Ink to create an ombre effect on the coffee cup. I sprayed some water onto it with my Tim Holtz DISTRESS SPRAYER and blotted it with a paper towel. Then I stamped a couple of slices from the Stampin’ Up! Lemon Zest Clear-Mount Stamp Set (which was retired recently) and Ranger Archival Chrome Yellow Ink onto the cup and one onto some Neenah 110lb Classic Crest Cardstock 8.5 X 11″.

While the ink dried, I diecut the straw from a piece of Catherine Pooler Designs Black Tie Gala Patterned Paper. I adhered the coffee cup and whipped cream to the card base and then cut the straw in half and adhered it to the front of the card using Tombow Mono Multi Liquid Glue. I added Nuvo DANDELION YELLOW Glossy Drops to the whipped cream and then adhered the clear lid on top (I used Ranger GLOSSY ACCENTS Glue Dimensional Adhesive to adhere the acetate). I cut a slit in the lemon slice and adhered it to the card. I stamped a sentiment from Stampin’ Up! Lemon Zest Clear-Mount Stamp Set (which was retired recently) onto a piece of Neenah 110lb Classic Crest Cardstock 8.5 X 11″ using Memento Tuxedo Black Ink and cut it out with a 1-3/4 inch punch. I adhered to the card with 3M Foam Tape

On the inside of the card, I stamped a sentiment from the Stampin’ Up! Lemon Zest Clear-Mount Stamp Set (which was retired recently) with Memento Tuxedo Black Ink and lemon slices with Tim Holtz Squeezed Lemonade Distress Oxide Ink.

Card Inside

Supplies

https://linkdeli.com/widget.js?id=f5e8378456858c916708

Thanks for reading this post. I hope you enjoyed and Iโ€™ve inspired you to Shop Your Stash and see what fun ideas you come up with and maybe rediscover supplies you forgot you had! Leave comments or questions below or feel free to email me.

Birthdays, Celebrations, Encouragement, Slimline

Shop Your Stash Day 2: Slimline Cards

In today’s tutorial, I am making slimline cards. I’ve seen these popping up all over instagram and youtube and I figured I would make one too ( I mean… I have to right?!? ๐Ÿ™‚ LOL). Since I do not have any slimline dies yet (I stress YET), I will prove you can make them with any supplies you have in your stash and no dies necessary. Even the envelope tutorial I found on YouTube makes it super simple to make a slimeline envelope.

For this first card, I began by cutting a piece of Neenah 110lb Classic Crest Cardstock 8.5 X 11″ to 7 x 8-1/2″ and scored at 3-1/2″. Then I diecut 3 balloons from Paper Accents Vellum Variety Pack 8 1/2 x 11 in. Assorted 25 pc. using the Lifestyle Crafts Quickutz Nesting Balloons (Dies). I adhered the bottom halves to the card, overlapping them. I used Tonic Medium Nuvo Glue Pen to adhere them and cut off the excess.

Balloon Birthday Front

I stamped a sentiment from Catherine Pooler Designs WooHoo Stamp Set onto a scrap of Neenah 110lb Classic Crest Cardstock 8.5 X 11″ with Memento Tuxedo Black Ink and fussycut it out. I adhered it using Tombow Mono Multi Liquid Glue. I embellished it by adding some string and bows to the balloons using my Micron 05 Pen, shimmer with the Spectrum Noir Sparkle Clear Fine Glitter Brush Pen and also added some Tonic Gloss Simply White Nuvo Crystal Drops and Tonic Gloss Midnight Blue Nuvo Crystal Drops to the balloons.

On the inside of the card, I adhered the leftover pieces of the balloons on the front of the card to the top portion and stamped ‘Happy Birthday! using the free gift stamp I received from Lawn Fawn for my birthday month and Memento Tuxedo Black Ink. Yes! you can get freebies for your birthday! ๐Ÿ™‚ I couldn’t find this anywhere so I don’t think this particular tiny sentiment stamp can be purchased but there are a ton of other Lawn Fawn Happy Birthday stamps you can use.

Balloon Birthday Inside

I also made an envelope using Neenah 110lb Classic Crest Cardstock 8.5 X 11″. I found a great tutorial on Youtube from Jenny Card Designs. She also provides a facebook link with the template. I added some more of the vellum balloons to the edge of the envelope. Go check her out on Youtube!

Balloon Birthday Card and Slimline Envelope
Jenny Card Designs Slimline Card & Envelope

Dimensions


For the second card, I decided to make some summer fruity cards. I started by cutting a piece of Neenah 110lb Classic Crest Cardstock 8.5 X 11″ to 7 x 8-1/2″ and scored at 3-1/2″ to create the card base. Next, I cut two pieces of green gingham pattern paper from Brutus Monroe Fresh Melon 6 x 6 Paper Pad to 3-1/2 x 6 and adhered it to the card using Tombow Mono Multi Liquid Glue. I made sure to have the section where the two pieces meet to not be centered so it can be covered by the watermelon slice.

Watermelon Slice Card Front

Next, I moved on to creating my watermelon slice (wedge?). For this I cut a large triangle from Neenah 110lb Classic Crest Cardstock 8.5 X 11″ that was a bit taller than my card front then using the a 5-1/2″ circle die from Simon Says Stamp NESTED CIRCLES Wafer Dies cut the edge of the wider part. To create the rind and white pith (I think that’s what it is called), I used the 5″ and 5-1/2″ circle dies to cut out a half circle from a piece of the green gingham pattern paper from Brutus Monroe Fresh Melon 6 x 6 Paper Pad and the 4-1/2″ and 5-1/2″ circle dies to to cut out a half circle from a piece of Neenah 110lb Classic Crest Cardstock 8.5 X 11″.

I added Tim Holtz Twisted Citron Distress Ink to the pith and sprayed it with water with my Tim Holtz DISTRESS SPRAYER. Then added Tim Holtz Candied Apple Distressed Ink and Festive Berries Distressed Ink to the watermelon wedge. I leftit very light towards the wider side and then sprayed water on it as well. Once the inks were dried, I adhered all three pieces to create my watermelon wedge and adhered it to the card base, trimming off any excess at the bottom. I drew on some seeds with my Sakura Pigma Micron 08 Pen and added some highlights to them with Uni-Ball Signo White Broad Point Gel Pen.

Watermelon Slice Card Closeup

For my sentiment, I used Lawn Fawn’s Baked With Love Stampset, Memento Tuxedo Black Ink and my Stampin’ Up! Stamparatus to stamp it on a curve. The easiest way to do this, I have found is to curve the text around the circle die I used for the watermelon.

To finish off this card, I added Love From Lizi Red Glitter Pinstripe peel-offs and Nuvo Drops in Autum Red. I left the inside of the card blank for this one. And again I made an envelope using Stampin Up! Real Red 8-1/2″ X 11″ Cardstock. Tutorial on Youtube from Jenny Card Designs.

Dimensions


And since lemon cards are all the rage right now. I decided to break out my lemon stampset and builder punch from Stampin’ Up!. I began this card by I started by cutting a piece of Neenah 110lb Classic Crest Cardstock 8.5 X 11″ to 7 x 8-1/2″ and scored at 3-1/2″ to create the card base. Next, I cut a piece of pattern paper from Brutus Monroe Fresh Squeeze 6 x 6 Paper Pad to 1-1/2 x 8-1/2″and adhered it to the bottom of the card front.

One of A Kind Card Front

Next, using the Stampin’ Up! Lemon Zest Clear-Mount Stamp Set (which was retired recently), I stamped several lemon slices and whole lemons onto Neenah 110lb Classic Crest Cardstock 8.5 X 11″ with Catherine Pooler Designs Limoncello Ink, one slice with Catherine Pooler Designs Party Dress and Catherine Pooler Designs Bellini Inks, and several leaved with Catherine Pooler Designs Lime Rickey Ink. I used the Stampin’ Up! Lemon Builder Punch (retred) and a 1-3/4″ Circle Punch to cut out the leaves and lemons.

I arranged them on the card front and adhered them, popping some up with 3M Foam Tape. I added some highlights to them with Uni-Ball Signo White Broad Point Gel Pen.

For the sentiment I used the Honey Bee Stamps BEE-YOU-TIFUL Sentiments stampset. I used Tsukineko Versamark EMBOSS INK PAD and WOW OPAQUE BRIGHT WHITE Super Fine Embossing Powder to heat emboss it onto a piece of Simon Says Stamp 100# Black Card Stock and then cut it down to 1/2 x 2-3/8″. I adhered it to the top portion fo teh card and then stamped the word “K-I-N-D” with Simon Says Stamp Grid Play Alphas stampset (no longer available) and Catherine Pooler Designs Midnight Ink onto some Neenah 110lb Classic Crest Cardstock 8.5 X 11″ and adhered those on top the lemons. I added some Ranger Glossy Accents Glue Dimensional Adhesive to those letters to finish off the card.

And again I made an envelope using some dark pink cardstock from my stash (not sure where it is from becasue it is soooo old). Tutorial on Youtube from Jenny Card Designs.

One of A Kind Slimline Envelope

Dimensions

Supplies

https://linkdeli.com/widget.js?id=f5e8378456858c916708

Thanks for reading this post. I hope you enjoyed and Iโ€™ve inspired you to Shop Your Stash and see what fun ideas you come up with and maybe rediscover supplies you forgot you had! Leave comments or questions below or feel free to email me.

Birthdays, Celebrations

Shop Your Stash Day 1: Birthday Shaker Card

This month I decided to challenge myself to NOT buy any new craft supplies (with the exception of necessary supplies like white cardstock and adhesive). Like many of you, I realized that I have been spending a ton of money on cleaning supplies, hygiene and groceries since I have had to order online more than usual so it was time to cut some corners. I also thought this would help people who are struggling financially but who still want to craft.

I went through my stamps, dies, stencils and picked out some that I know I have not used very often and combined with the other things I already own. I alos thought it was a good time to go through my already made card stash and see what categories I was low on โ€“birthdays is one such category so I started there.

For this card, I started by cutting a piece of Neenah 110lb Classic Crest Cardstock 8.5 X 11″ to 5-1/2 x 8-1/2″ and scored at 4-1/4″ to create a card base and a piece of Neenah 80lb Classic Crest Cardstock 8.5 X 11″ to 3-7/8 x 5-3/16″ for the top panel. Next I created a window, measuring 2-15/16 x 2-15/16″, using the Sizzix Framelits Die Set 8PK – Squares to make the card front look like a polaroid. I also wanted it to be a simple shaker. I also diecut a black frame, measuring 3-3/8 x 3-3/8 x 3/16″ from Simon Says Stamp 100lb Black Cardstock. I used the 5th largest and the 6th largest dies.

Card front

I adhered the black frame onto the front panel window and added 3M Foam Tape behind it to create the shaker element and set that aside. Next, I used a scrap piece of Neenah 80lb Classic Crest Cardstock 8.5 X 11″ and marked off the window using a pencil. I stamped the balloon from Sugarpea Designs HB2U Stamp Set. This was included in the Young At Heart Stamp of Approval Box from Catherine Pooler (SoA boxes are no longer available). I used Catherine Pooler Designs Be Mine, Bellini, Shea Butter, Garden Party, It’s A Boy, and Sweet Sixteen inks. I trimmed the panel a bit so it would fit behind the window, I added bows and strings to the balloons using my Micron 08 Pen and some sparkle with the Spectrum Noir Sparkle Clear Fine Glitter Brush Pen. Then filled the shaker with Pretty Pink Posh 4 mm Sparkling Clear Sequins and Martha Stewart Crafts Iridescent Glitter in clear (no longer available). I adhered the background to the shaker and the shaker to the card base.

Next, diecut a sentiment from Catherine Pooler Designs ‘Celebrate Die’ from Neenah 110lb Classic Crest Cardstock 8.5 X 11″ and Simon Says Stamp 100# Black Card Stock. I used a direct-to-paper technique using Catherine Pooler Designs It’s A Boy Ink to color the white sentiment. Once dry, I adhered the two together slightly offsetting the black layer to create a shadow, and adhered that to the card.

On the inside of the card, I stamped the sentiment that comes with the Sugarpea Designs HB2U Stamp Set and Catherine Pooler Designs Sweet Sixteen Ink. And that completes this card. I challenge you to Shop Your Stash and share your creations below in the comments.

Card inside

Dimensions

Supplies

https://linkdeli.com/widget.js?id=f5e8378456858c916708

Thanks for reading this post. I hope you enjoyed and Iโ€™ve inspired you to Shop Your Stash and see what fun ideas you come up with and maybe rediscover supplies you forgot you had! Leave comments or questions below or feel free to email me.

Encouragement, Love & Friendship

Totally Awesome 80s Cards

Going back to the 80s for this post. Some of you may too young to have experienced the fun of the 80s, but these composition notebook stamps and dies from Catherine Pooler remind us all of our schooldays as youngsters. And while the fashion of the 80s was pretty horrible (in my opinion), there was nothing like a new composition notebook to start a new year of school.

These cards would be fun to make with kids who are currently stuck at home. You can make the notebooks any color and tons of different items in the shaker (maybe some glitter?).

I started this card by cutting a piece of Neenah 110lb Classic Crest Cardstock 8.5 X 11″ to 5-1/2 x 8-1/2″ and scored at 4-1/4″ and a piece of Simon Says Stamp 100# Black Card Stock to 5/8 x 5-1/2″. I stamped the Catherine Pooler Designs Composition Notebook Background Stamp using Catherine Pooler Midnight Ink onto the white panel. I diecut the shaker window using the Catherine Pooler Designs Composition Label Dies. I adhered the black strip to the left side of the card panel.

Card 1 Front

I stamped the sentiment from the Catherine Pooler Designs Composition Sentiments Stamp Set as well as the label border onto a piece of Grafix Wet Media .004 Dura-Lar Film, 14-Inch by 17-Inch using Jet Black Staz-on Ink. I combined the “YOU’RE” from the “YOU’RE COOL” sentiment with the “AWESOME”. Next, I adhered the acetate to the back of the window using 1/4″ Scor-Pal Scor-Tape and cut away any access. I also added 3M Foam Tape to the back of the panel to create the shaker area.

For the shaker bits, I used the direct-to paper technique to add color to some pieces of Neenah 110lb Classic Crest Cardstock 8.5 X 11″. I used Catherine Pooler Designs Inks in Party Dress, Rockin Red, Orange Twist, Tiara, Lime Rickey, Fiesta Blue, Suede Shoes and Grape Crush. I diecut stars and hearts using the dies included in the Catherine Pooler Designs Composition Label Dies and stamped the happy face from the Catherine Pooler Designs Composition Sentiments Stamp Set onto a few of the colored papers and used a circle punch to cut them out. I added all the shaker bits inside the window and adhered a piece of Neenah 110lb Classic Crest Cardstock 8.5 X 11″ to the back of the window and adhered it to the card base. I finished it off by adding a few extra shaker bits (happy face and stars) around the sentiment window.

Card 1 Closeup

For the inside of the card, I stamped a Lined Notebook Background from My Favorite Things (unfortunately, I think this stamp is no longer available) using Catherine Pooler Midnight Ink. Then I stamped another sentiment from the Catherine Pooler Designs Composition Sentiments Stamp Set in Fiesta Blue and added some of the leftover hearts that I had diecut previously.

Card 1 Inside

Dimensions


For the second card, I started by cutting a piece of Neenah 110lb Classic Crest Cardstock 8.5 X 11″ to 5-1/2 x 8-1/2″ and scored at 4-1/4″ and a piece of Simon Says Stamp 100# Black Card Stock to 5/8 x 5-1/2″. I stamped the happy face and small star from the Catherine Pooler Designs Composition Sentiments Stamp Set onto the panel. I used Catherine Pooler Designs Inks in Be Mine, Rockin Red, Orange Twist, Tiara, Lime Rickey, Fiesta Blue, Something Borrowed and Grape Crush to create a rainbow colored background.

Card 2 Front

Next, I diecut the edge of the card panel using the Catherine Pooler Designs Spiral Notebook Border Die and added the strip of black card stock behind it.

I diecut 3 of the labels from the Catherine Pooler Designs Composition Label Dies. I cut the smallest one from Neenah 110lb Classic Crest Cardstock 8.5 X 11″ and two from Neenah 110lb Classic Crest Cardstock 8.5 X 11″ and Simon Says Stamp 100# Black Card Stock. I stamped a sentiment and the lines from the label stamp from the Catherine Pooler Designs Composition Sentiments Stamp Set on the smallest label with Catherine Pooler Midnight Ink. To make the orange label piece I used the direct-to-paper technique with Orange Twist Ink. I adhered the top white label to the orange label and that to the black one, offsetting it a bit so it looks like a shadow. And then all that was adhered to the card using some 3M Foam Tape. Before adhering it to the card base, I added some Love From Lizi Lilac Mirror Peel-offs. I adhered it to the card base at an angle and snipped off the parts that hung over the edges. To finish it off, I added some of the stars I diecut for the previous card. I diecut a ton of them. As you can see I also used them for my picture background. ๐Ÿ™‚

Card 2 Closeup

On the inside of the card I stamped a sentiment from the Catherine Pooler Designs Composition Sentiments Stamp Set with Grape Crush Ink. I also stamped the happy face with Be Mine, Rockin Red, Orange Twist, Tiara, Lime Rickey, Fiesta Blue, and Something Borrowed inks. And that completes this card. I had sooo much fun playing with these stamps and dies. Brought me back to my childhood. Oh to be young again….

Card 2 Inside

Dimensions

Supplies

https://linkdeli.com/widget.js?id=f5e8378456858c916708

Thanks for reading this post. I hope you enjoyed and Iโ€™ve inspired you to give these cards a try for yourself. Leave comments or questions below or feel free to email.

Encouragement, Just Because, Love & Friendship, Summer

When Life Gives You Lemons Make Lemonade…

Hello friends. Hope you are all safe and healthy. And if you are struggling to cope with everything going on in our world right now, hang in there because ‘this too shall pass’. Speaking of old adages, “When Life Gives You Lemons Make Lemonade” is very fitting for these times we are in as well. While it’s very easy to focus on the scary and sad stuff going on, we have to find the bright spots too — the healthcare workers saving lives, families coming together, babies being born, spending time with our pets (one of my faves right now)…

These bright and cheerful cards were made using the Catherine Pooler Designs Make Lemonade Stampset (Out of stock-maybe discontinued). It was a limited release in March, I believe. It’s a tiny stampset but was super fun to color. I made one of them into a shaker (a tiny shaker:)).

For the first card, I began by cutting a piece of Neenah 110lb Classic Crest Cardstock 8.5 X 11″ to 5-1/2 x 8-1/2″ and scored at 4-1/4. I stamped the image onto a scrap of Neenah 110lb Classic Crest Cardstock with Memento Tuxedo Black Ink and set it aside to dry.

I stamped the flower outline from the stampset with Catherine Pooler Designs Limoncello Ink onto the card base. Next, I diecut another piece with Catherine Pooler Designs Composition Label Dies and then used a direct-to-paper technique to add color with Catherine Pooler Designs Party Dress Ink Pad. I adhered the label shape to the pink cardstock and trimmed around, leaving a border.

Next, I colored the image with COPICS. I used BG000 + 0 for the bottle; Y11 +Y06 + Y13 for the lemons; Y11 +Y06 + Y13 + Y15 for the sliced lemon; YG06 + YG07 for the leaves; RV09 and Y06 + Y15 for the straw; RV10 + RV11 + RV14 for the flowers. I stamped the bubbles with Catherine Pooler Designs It’s A Boy Ink. I fussycut the image out.

I stamped the sentiment onto the top left corner of the label shape with Memento Tuxedo Black Ink. I adhered the image to the label with Tombow Mono Liquid Glue and popped up the whole thing with 3M Foam Tape. I finished off the card by adding dots of Nuvo Sea Breeze Jewel Drops to simulate bubbles, Nuvo Ebony Black Crystal Drops and some Nuvo Dandelion Yellow Crystal Drops around the tag.

Card Inside

I kept the inside of the card very simple. I stamped the image with the Catherine Pooler Designs Limoncello Ink.

Dimensions


For the second card, I decided to make a shaker card. I love shaker cards, even if they are a bit of a pain to mail. They are just fun to make and shake! I started by cutting a piece of Simon Says Stamp 100lb Orange Peel, 8-1/2 x 11″ Cardstock to 5-1/2 x 8-1/2″ and scored at 4-1/4″ to make a card base. Next, I cut a piece of Catherine Pooler Designs – 6 x 6 Patterned Paper – Black Tie Gala to 3-1/2 x 4-3/4″ and rounded the corners of that panel and the card base with my We R Memory 1/4 & 1/2″ Crop-A-Dile Corner Chomper. I also colored the paper with Catherine Pooler Designs Lime Rickey Ink and adhered it to the card base.

I diecut a piece of Neenah 110lb Classic Crest Cardstock 8.5 X 11″ with the Catherine Pooler Designs Sprinkles Mini Cover Plate Die, I stamped the sentiment from the stampset onto the smallest white rectangle and adhered it to the card.

I stamped the image onto a scrap of Neenah 110lb Classic Crest Cardstock with Memento Tuxedo Black Ink and set it aside to dry. I colored it with COPICS. I used Y13 + YG03 + YG01 + YG25 for the lime on the left; B0000 + 0 for the bottle; YR16 + YR18 and YG03 + YG25 for the straw; Y06 + Y18, R81 + R85, and V25 + BV17 for the flowers; and YG06 + G07 for the leaves .

I fussycut out the image and also cut the center of the bottle with a craft knife. I diecut a piece of Neenah 110lb Classic Crest Cardstock 8.5 X 11″ with the

Add title

Hello friends. Hope you are all safe and healthy. And if you are struggling to cope with everything going on in our world right now, hang in there because ‘this too shall pass’. Speaking of old adages, “When Life Gives You Lemons Make Lemonade” is very fitting for these times we are in as well. While it’s very easy to focus on the scary and sad stuff going on, we have to find the bright spots too — the healthcare workers saving lives, families coming together, babies being born, spending time with our pets (one of my faves right now)…

These bright and cheerful cards were made using the Catherine Pooler Designs Make Lemonade Stampset (Out of stock-maybe discontinued). It was a limited release in March, I believe. It’s a tiny stampset but was super fun to color. I made one of them into a shaker (a tiny shaker:)).

This image has an empty alt attribute; its file name is IMG_2565_watermarked.jpg

For the first card, I began by cutting a piece of Neenah 110lb Classic Crest Cardstock 8.5 X 11″ to 5-1/2 x 8-1/2″ and scored at 4-1/4. I stamped the image onto a scrap of Neenah 110lb Classic Crest Cardstock with Memento Tuxedo Black Ink and set it aside to dry.

I stamped the flower outline from the stampset with Catherine Pooler Designs Limoncello Ink onto the card base. Next, I diecut another piece with Catherine Pooler Designs Composition Label Dies and then used a direct-to-paper technique to add color with Catherine Pooler Designs Party Dress Ink Pad. I adhered the label shape to the pink cardstock and trimmed around, leaving a border.

Next, I colored the image with COPICS. I used BG000 + 0 for the bottle; Y11 +Y06 + Y13 for the lemons; Y11 +Y06 + Y13 + Y15 for the sliced lemon; YG06 + YG07 for the leaves; RV09 and Y06 + Y15 for the straw; RV10 + RV11 + RV14 for the flowers. I stamped the bubbles with Catherine Pooler Designs It’s A Boy Ink. I fussycut the image out.

I stamped the sentiment onto the top left corner of the label shape with Memento Tuxedo Black Ink. I adhered the image to the label with Tombow Mono Liquid Glue and popped up the whole thing with 3M Foam Tape. I finished off the card by adding dots of Nuvo Sea Breeze Jewel Drops to simulate bubbles, Nuvo Ebony Black Crystal Drops and some Nuvo Dandelion Yellow Crystal Drops around the tag.

This image has an empty alt attribute; its file name is IMG_2569_watermarked.jpg
Card Inside

I kept the inside of the card very simple. I stamped the image with the Catherine Pooler Designs Limoncello Ink.

Dimensions


This image has an empty alt attribute; its file name is IMG_2561_watermarked.jpg

For the second card, I decided to make a shaker card. I love shaker cards, even if they are a bit of a pain to mail. They are just fun to make and shake! I started by cutting a piece of Simon Says Stamp 100lb Orange Peel, 8-1/2 x 11″ Cardstock to 5 x 7-5/8″ and scored at 3-13/16″ to make a card base. Next, I cut a piece of Catherine Pooler Designs – 6 x 6 Patterned Paper – Black Tie Gala to 3-1/2 x 4-3/4″ and rounded the corners of that panel and the card base with my We R Memory 1/4 & 1/2″ Crop-A-Dile Corner Chomper. I also colored the paper with Catherine Pooler Designs Lime Rickey Ink and adhered it to the card base.

I diecut a piece of Neenah 110lb Classic Crest Cardstock 8.5 X 11″ with the Catherine Pooler Designs Sprinkles Mini Cover Plate Die. I used Catherine Pooler Designs It’s A Boy Ink and an ink blender tool to add color to the panel. I used a very light hand to make it very pale blue. I cut it down to a size that would fit the window in the bottle. Then I also ink blended and other piece of Neenah 110lb Classic Crest Cardstock 8.5 X 11″ and adhered it behind the piece that I previously diecut and ink blended.

I added a piece of acetate behind the shaker window in the bottle, some 3M Foam Tape, and some flat clear sequins from my stash added it to the card. I finished it off by adding some Nuvo Sea Breeze Jewel Drops around the card.

On the inside of the card, I cut out a panel of Neenah 110lb Classic Crest Cardstock 8.5 X 11″ to 3-1/2″ x 4-3/4″ and a left over piece of the pattern paper to 3/4 x 3-1/2″ and adhered it to the bottom of the panel, then rounded the corners before adhereing it to the card base.

Dimensions

https://linkdeli.com/widget.js?id=36e575d4b4503edd8f9a

Thanks for reading this post. I hope you enjoyed and Iโ€™ve inspired you to give these cards a try for yourself. Leave comments or questions below or feel free to email.

Easter, Holidays 2020

Easter Cards featuring Simon Says Stamp’s Faberge Egg Dies

Happy Friday friends! Hope you are all doing well and are safe. With Easter right around the corner, I’m sharing some more super easy cards. These were made easy using the Simon Says Stamp’s Faberge Egg Dies.

For the first card, I started by cutting a piece of Simon Says Stamp Cotton Candy 8.5 x 11โ€ Cardstock and Simon Says Stamp Mint 8.5×11 cardstock to 5-1/2 x 8-1/2″ and scored at 4-1/4″ To make a card base. Then to make the egg-shaped card, I used the outline egg and just positioned slightly off the folded edge of the card. this will produce a shaped card.

I diecut out the Faberge Egg Dies from Stampin’ Up! Shimmer Paper in Mint Macaron and Sweet Sugarplum (these are no longer available but Simon Says Stamp has tons of glitter papers). Next, I diecut two pieces of Simon Says Stamp VELLUM using the outer Faberge Egg die. This will go behind the front decorative egg. I also diecut two different pattern papers with the same die. I chose one from My Favorite Things Plaid Patterns Merry & Bright Paper Pad and one front an older Lawn Fawn Perfectly Plaid Rainbow 6 x 6 Paper Pad (no longer available I think).

Once all the diecutting was done, I assembled both cards. I adhered the vellum behind the glitter Faberge eggs with Tombow Mono Multi Liquid Glue and trimmed off the excess around the glitter egg. Then adhered that to the pattern papers and to the card bases. To embellish the cards, I used Nuvo Drops in Ripened Pumpkin Gloss for the pink card. I filled the wells at the top and bottom edges of the egg and the added dots of Nuvo Drops in Rhubarb Crumble. For the green, I added dots at the top and bottom of the egg with Nuvo Drops in Carnation Pink Gloss and filled the loop areas with Nuvo Drops in Caribbean Ocean Gloss.

Dimensions


For the second card, I wanted to make a shaker card. Unlike most shaker cards this one did not take long at all. ๐Ÿ˜€ I started by cutting a piece of Daffodil Delight 8-1/2″ X 11″ Cardstock to 5-1/2 x 8-1/2″ and scored at 4-1/4″ to create a card base and a piece of Lawn Fawn Perfectly Plaid Rainbow 6 x 6 Paper Pad (no longer available I think) to 4-1/4 x 5-1/2โ€. I diecut an egg window into the pattern paper using the outline die from the Simon Says Stamp’s Faberge Egg Dies. Then I added a piece of Acetate behind it with some Scor-Tape. I diecut the Faberge Egg from Simon Says Stampโ€™s ASSORTMENT GLITTER Cardstock 6×6 Pack and carefully adhered it to the acetate with some Tombow Mono Multi Liquid Glue.

I then added some 3M Foam Tape behind it, creating a well around the window. I added some pink sequins from my stash as well as Queen and Company Pastel Diamonds in pink, yellow and orange and Queen and Company Pops Toppings in pink, yellow and orange. I adhered a piece of the Daffodil Delight Cardstock behind the shaker as well. Instead of trying to adhere it directly to the card, adding a piece of paper behind it is much easier. I adhered the shaker element to the card base and thought it looked a little plain. Even with the sparkle of the glitter Cardstock, it was missing something so I added a strip of Stampinโ€™ Up! Melon Mambo 8-1/2″ X 11″ Cardstock, measuring 1/4 x 5-1/2โ€. To finish it off, I added some Nuvo Drops in White Blizzard.

On the inside of the card, I cut down a piece of Neenah 110lb Classic Crest Cardstock 8.5 X 11″ to 4-1/ x 5-1/2โ€ and adhered it to the inside of the card base and added a strip of the same plaid pattern paper, measuring 3/4 x 4โ€ to the bottom of the white panel.

Dimensions

Supplies

https://linkdeli.com/widget.js?id=36e575d4b4503edd8f9a

Thanks for reading this post. I hope you enjoyed and Iโ€™ve inspired you to give these cards a try for yourself. They are super quick and fun to make! Have a great Easter! Leave comments or questions below or feel free to email.