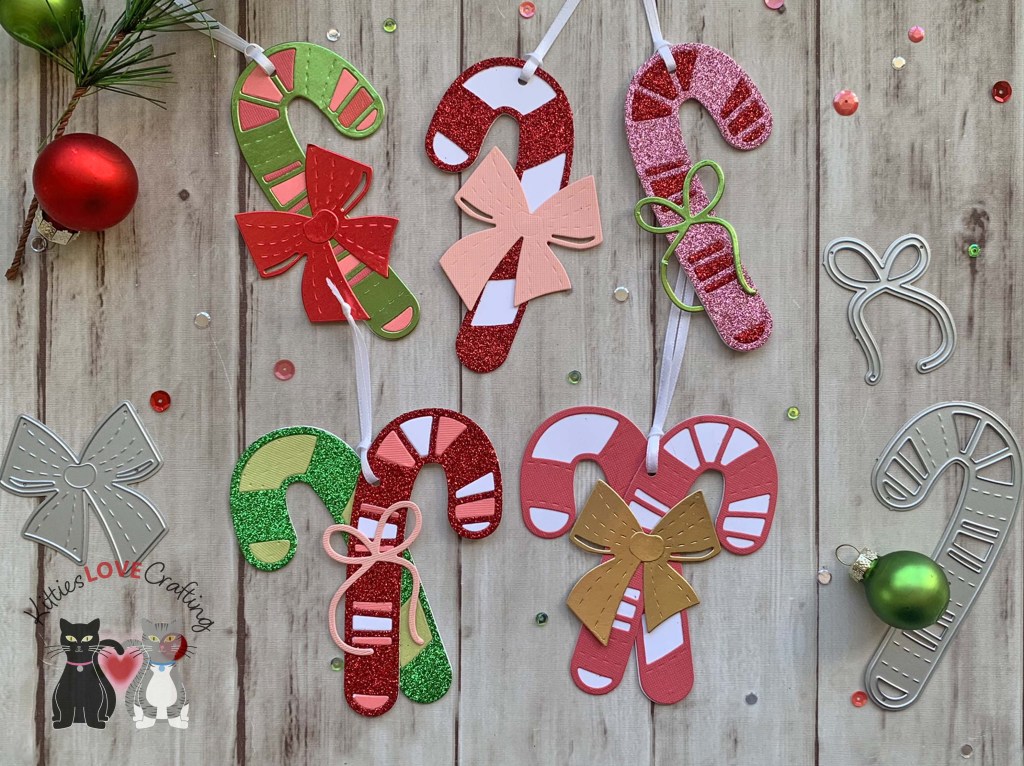
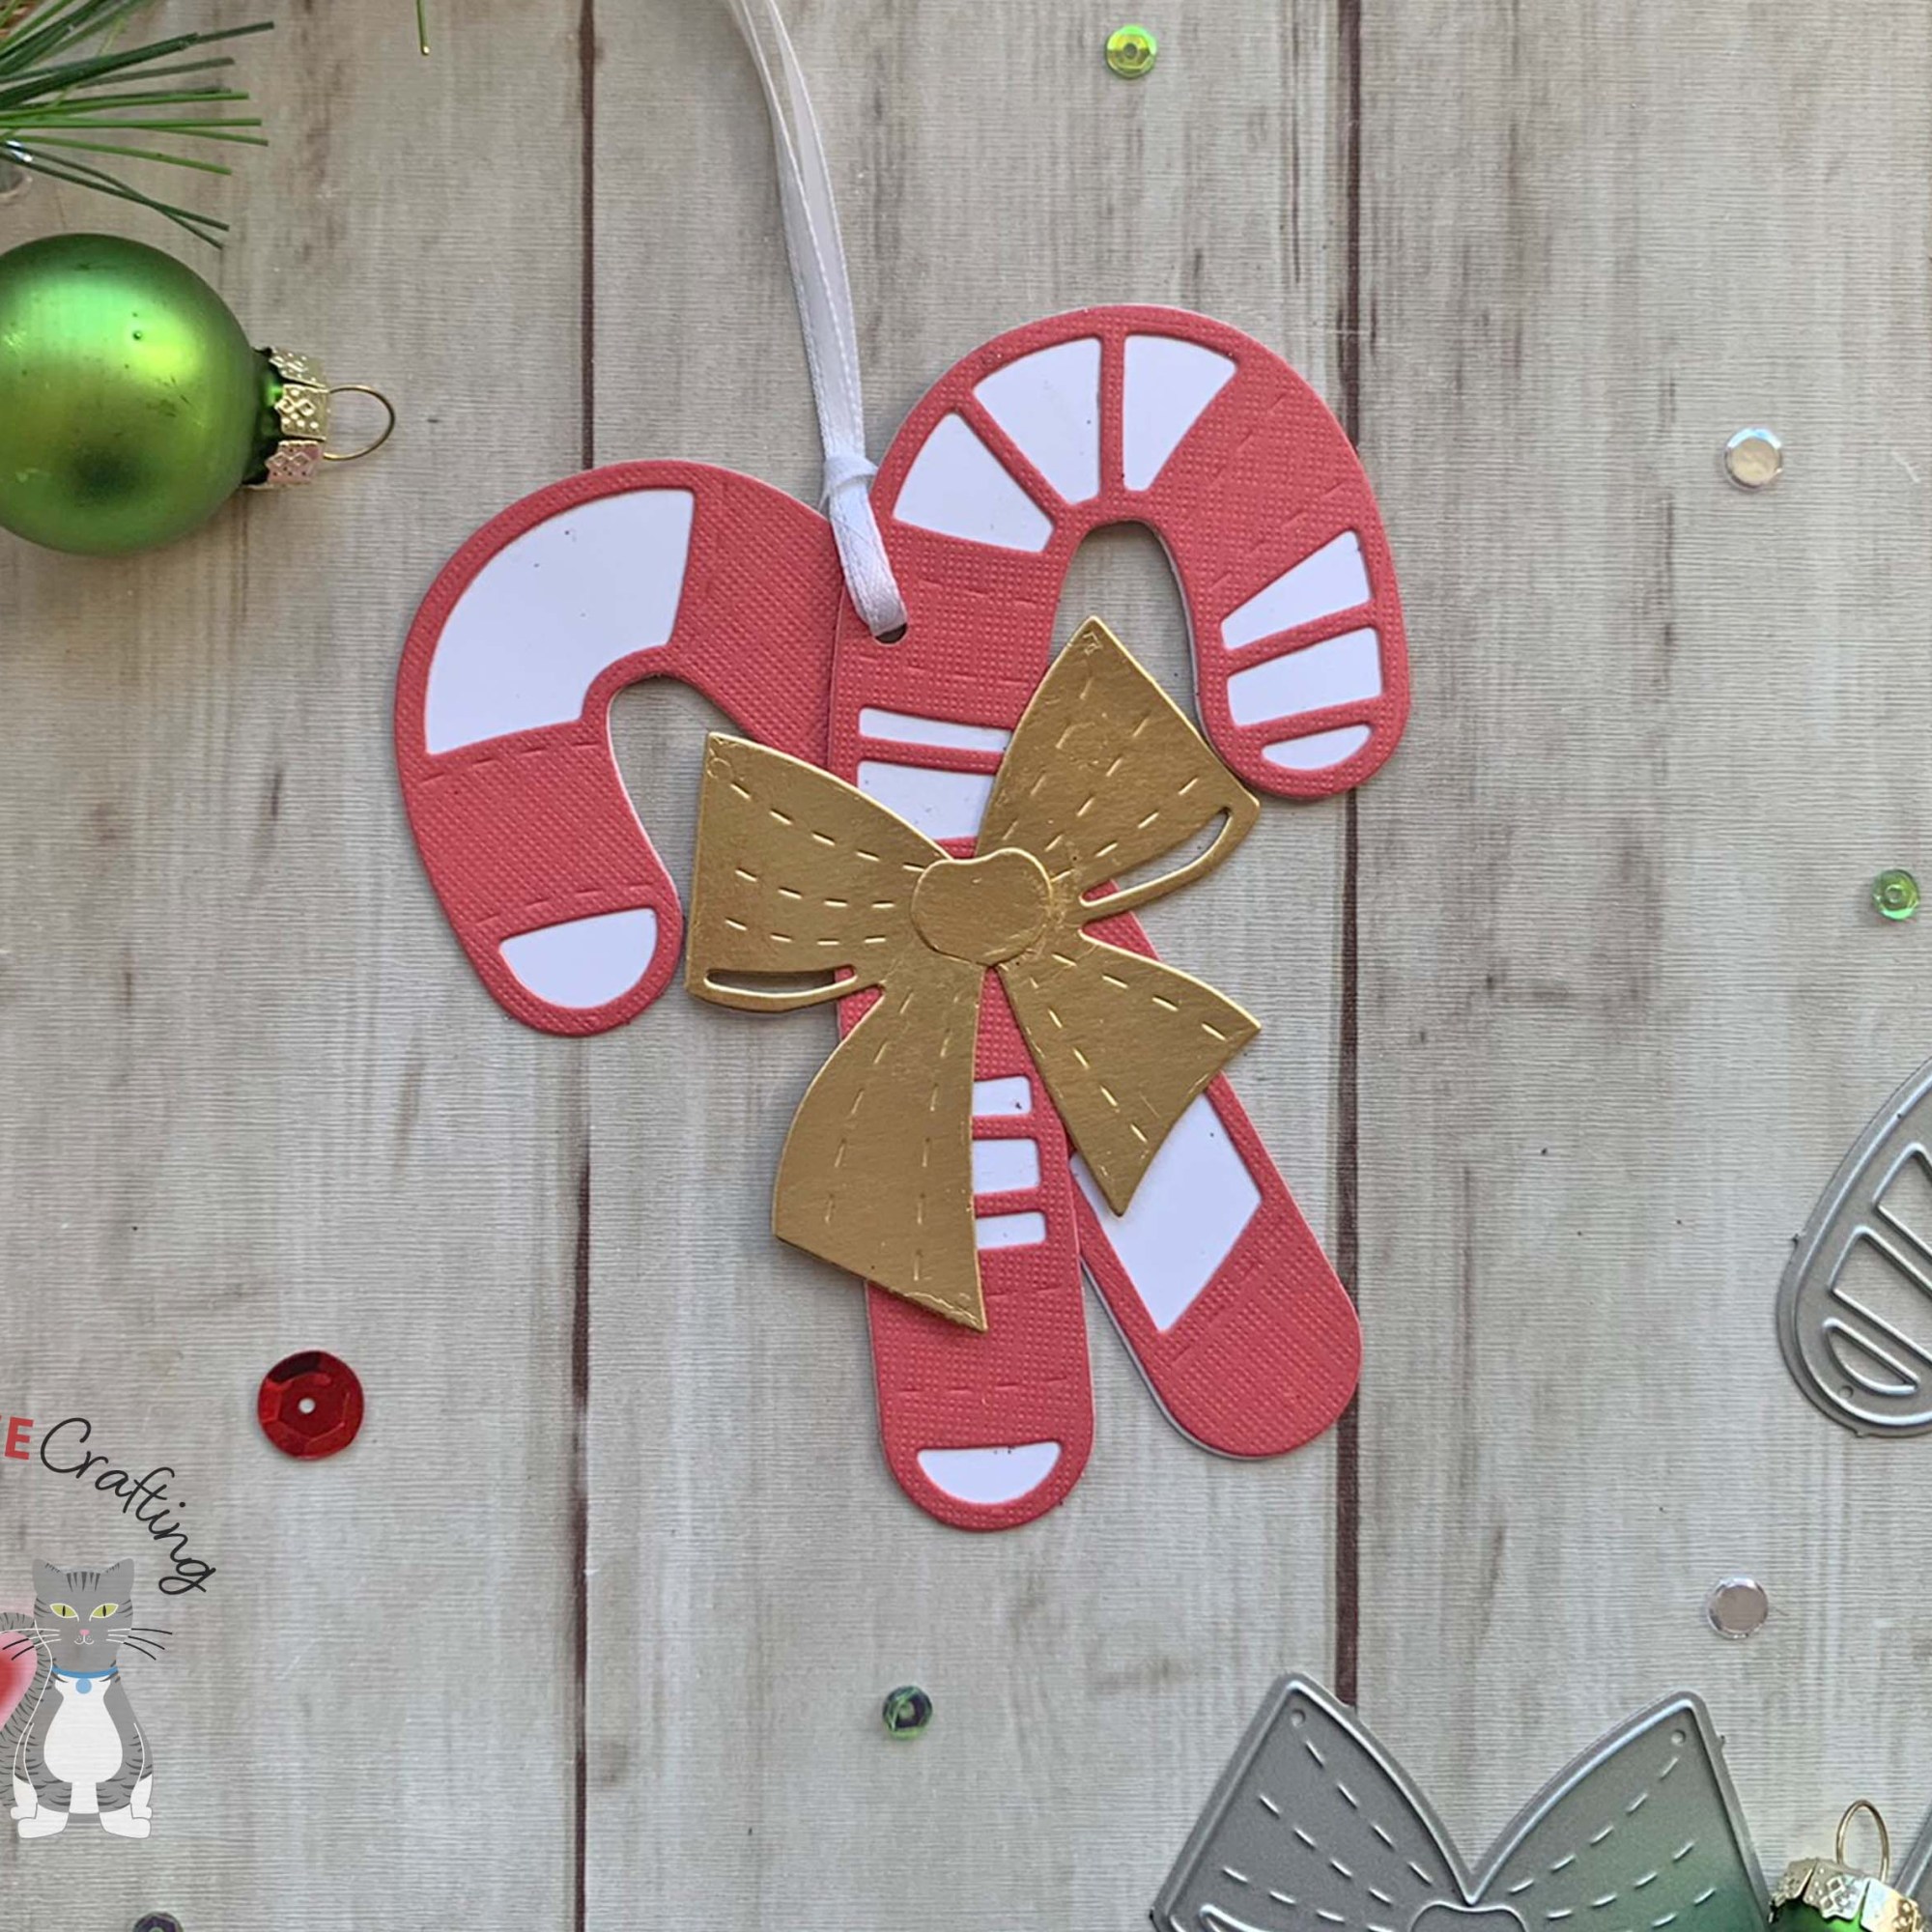
Card Kits, Gift Bags, Halloween, Halloween, Stenciled Background, Tags

3 Halloween Gift Bags featuring Simon Says Stamp Limited Edition Halloween Card Kit

Hi friends. I made some cute gift bags with the Limited Edition Simon Says Stamp Home Sweet Haunted Home Halloween Card Kit. It comes with lots of goodies you can use to decorate the gift bags! These were all very easy to make. Here’s how I made them.

The Kit includes:

For the first bag, I stenciled the background with the NEW Exclusive Halloween Candy stencils set. I used Tim Holtz Crackling Campfire, Mowed Lawn, and Wild Honey Distress Oxide Inks and Lawn Fawn YETI Pigment Ink.

Then added a piece of pattern paper from the Carta Bella Hocus Pocus 6×6 inch paper pack measuring 2-1/2 tall x 7-1/2 wide” to the top of the bag. I added a trim with the Tim Holtz Idea-ology Black Tinsel.

I used one of the cut aparts from the Carta Bella Hocus Pocus 6×6 inch paper pack on the front as well as die cut the witch hat from using Simon Says Stamp 100lb Black 8-1/2 x 11″ Cardstock and Simon Says Stamp 6 x 6 Plum Glitter Cardstock. I added some stitching to the hat with a White Gel Pen. I added one of the Tim Holtz Idea-ology Halloween Mini Flair buttons.

I covered one of the American Crafts 1.5 inch Kraft circle tags with a piece of pattern paper from the Carta Bella Hocus Pocus 6×6 inch paper pack. I cut it using a 2-inch punch. Then stamped a sentiment from the NEW Exclusive Home Sweet Haunted Home clear stamp set onto Neenah 110lb Classic Crest Cardstock with Memento Tuxedo Black Ink.

I finished the bag by adding some shimmer to the hat with a Spectrum Noir Clear Overlay Sparkle Pen and orange and white twine.


For the second bag, I stamped the images from the NEW Exclusive Home Sweet Haunted Home clear stamp set with Memento Tuxedo Black Ink. Then colored them with Prismacolor Pencils.

Then added Tim Holtz Idea-ology Fringe and a piece of pattern paper from the Carta Bella Hocus Pocus 6×6 inch paper pack measuring 1/2 tall x 7-1/2 wide” to the top edge of the bag. I stamped a sentiment from NEW Exclusive Home Sweet Haunted Home clear stamp set with Memento Tuxedo Black Ink onto one of the round kraft tags and added some black twine.


For the third bag, I sprayed it with the Tim Holtz Ranger Mica Stain in Harvest Moon. Then added black splatters with Tim Holtz BLACK SOOT Distress Spray Stain. I cut out one of the cut aparts from the Carta Bella Hocus Pocus 6×6 inch paper pack then cut a mat for it from Simon Says Stamp Black Glitter Cardstock measuring 3-1/2 x 4-1/2″.

I added some Tim Holtz Idea-ology Fringe to the bottom edge of the bag. And then added Candy Corn Repeats Stickers all around the image.

I cut a 1.5 inch circle from the Simon Says Stamp 100lb Burnt Orange 8-1/2 x 11″ Cardstock and stamped a sentiment from the NEW Exclusive Home Sweet Haunted Home clear stamp set with Memento Tuxedo Black Ink. And adhered it to one of the kraft tags. Finally I added some natural twine.

For all the above bags, you can just decorate one side or do both sides if you like. I added the trim all the way around on some of the bags.


Supplies

Thanks for reading this post! I hope you enjoyed and I’ve inspired you to make these cute Halloween gift bags yourself! If you want to share you creations with me tag me on instagram @kittieslovecrafting. Leave comments or questions below or feel free to email me.

Christmas, Holidays 2020, Stampin' Up!, Tags

Quick Christmas Cards and Tags Using Wonder of the Season Paper by Stampin’ Up! (from the new Aug-Dec Mini Catalog)

As someone who loves to use old book pages in my junk journals, when I saw Wonder of the Season 12 x 12 Designer Series Paper in the new Stampin’ Up! Aug-Dec Mini Catalog, I knew I had to have it! It’s has pages with Christmas stories, recipes and holiday news stories, and there are pages with red foil on one side and black and white print on the other side and also gold foil pages. It can be found on page 31 of the catalog and is part of the Wonder of the Season Suite. I was able to make 2 cards and tags in a short amount of time.

I started the first card by cutting a piece of Whisper White 8-1/2″ X 11″ Thick Cardstock to 5-1/2 x 8-1/2″ and scored at 4-1/4″ to make a card base. Then cut a piece of Wonder of the Season 12 x 12 Designer Series Paper to 5 x 5-1/2″, ripped approximately 3/8″ from the top and bottom of it and adhered it on a diagonal to the card base, trimming off any excess. I cut a piece of 8-1/2″ x 11″ Vellum to 5 x 4-3/4 and ripped the top and bottom again so it is shorter than the pattern piece.

I fussycut the ornaments found on one of the red foil pages of the Wonder of the Season 12 x 12 Designer Series Paper and diecut “Merry Christmas” from Red Foil Sheets with the Word Wishes Dies. I adhered the sentiment and the ornaments to the vellum piece and adhered the vellum to the card, only adding glue behind the diecut and image and trimming off any excess from the sides. I finished it off by adding Pearls (discontinued). I colored some of them with Dark Real Red Stampin’ Blends.

I left the inside of the card blank and just stamped a sentiment from the Tree Angle stampset with Real Red Stampin’ Ink.

Dimensions

I also made a cute tag to match this card. I cut a piece of Whisper White 8-1/2″ X 11″ Thick Cardstock to 2 x 3-5/8″ then using the Delightful Tag Topper Punch to make it into a pretty tag. Then cut a piece of Wonder of the Season 12 x 12 Designer Series Paper to 2-1/2 x 2-3/4″and a piece of 8-1/2″ x 11″ Vellum to 2-1/2 x 2-3/4 and ripped the top and bottom of both pieces and adhered the pattern piece on a diagonal to the card base, trimming off any excess. I added a piece of Red Foil Sheets, measuring 3/16 x 2-1/16″.

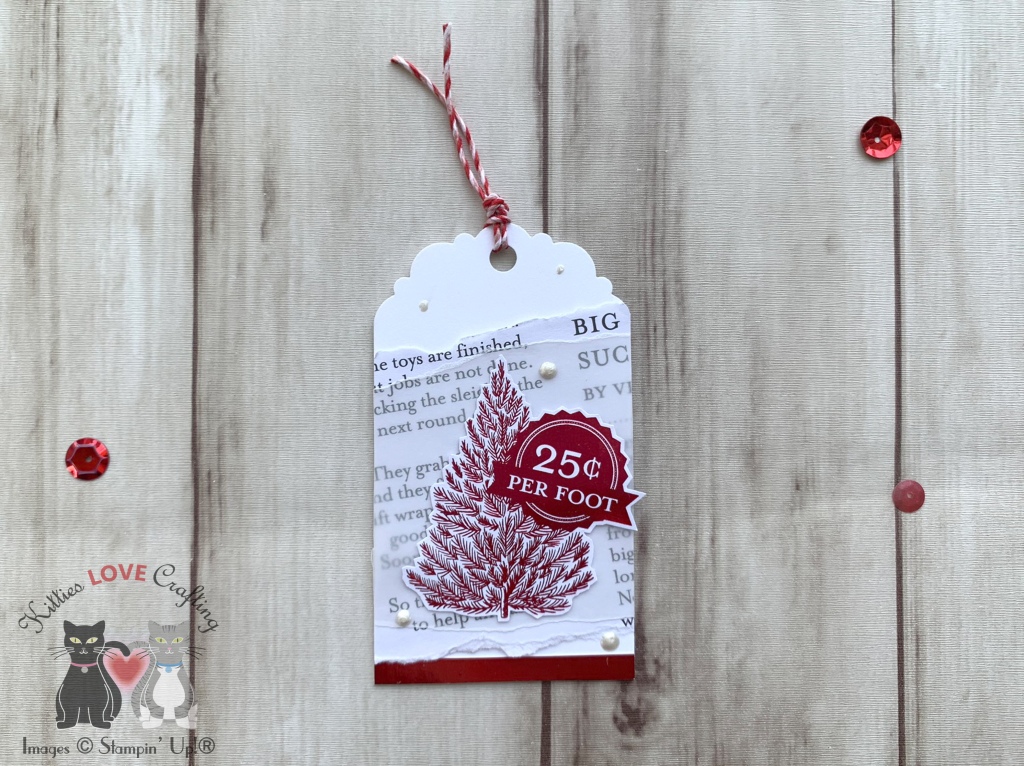
I fussycut a tree found on one of the red foil pages of the Wonder of the Season 12 x 12 Designer Series Paper and adhered it to the vellum piece and adhered the vellum to the tag, only adding glue behind the image and trimming off any excess from the sides. I finished it off by adding Pearls (discontinued) and stamping “TO” and “FROM” from the Make A Difference Stampset with Memento Black Ink. I added a piece of red and white twine as well.


Since I loved this paper so much I had to make more cards. I made one with the gold foil paper too.

I started the second card by cutting a piece of Whisper White 8-1/2″ X 11″ Thick Cardstock to 5-1/2 x 8-1/2″ and scored at 4-1/4″ to make a card base. Then cut a piece of Wonder of the Season 12 x 12 Designer Series Paper to 5 x 5-1/2″, ripped approximately 3/8″ from the top and bottom of it and adhered it on a diagonal to the card base, trimming off any excess. I cut a piece of 8-1/2″ x 11″ Vellum to 5 x 4-3/4 and ripped the top and bottom again so it is shorter than the pattern piece.

I fussycut the ornaments found on one of the red foil pages of the Wonder of the Season 12 x 12 Designer Series Paper and diecut “Merry Christmas” from Gold Foil Sheets with the Word Wishes Dies. I adhered the sentiment and the ornaments to the vellum piece and adhered the vellum to the card, only adding glue behind the diecut and image and trimming off any excess from. the sides. I finished it off by adding dots with a Tsukineko Versamark Versamarker and added Gold Stampin’ Emboss Powder and heat embossed.

I left the inside of the card blank and just stamped a sentiment from the Tree Angle stampset with Versamark Ink and added Gold Stampin’ Emboss Powder and heat embossed.

Dimensions

I also made a cute tag to for this card. I did the same exact thing except I used I added a piece of Gold Foil Sheets to the bottom, measuring 3/16 x 2-1/16″. I also I fussycut a gold tree and again made dots used the Tsukineko Versamark Versamarker and added Gold Stampin’ Emboss Powder and heat embossed and stamped “TO” and “FROM” from the Make A Difference Stampset with Memento Black Ink. I added a piece of Gold Metallic Trim as well.


Thanks for reading this post. I hope you enjoyed and I’ve inspired you to try these easy cards and tags using this beautiful paper for yourself! Leave comments or questions below or feel free to email me. If you want to share you creations with me tag me on instagram @kittieslovecrafting. If you would like a Stampin’ Up! catalog, please email me as well. All current catalogs can be found on the right side of this post and the Stampin’ Up! page. All news and fun stuff happening at Stampin’ Up! are listed there!

Distress Ink Techniques, Easter, Holidays 2020, Multimedia, Tags

Distressed Easter Tags featuring Simon Says Stamp’s Hello Easter Stampset

Happy Saturday friends! Hope you are all doing well and are safe. To go along with the cards in my previous post using the Hello Easter stampset from Simon Says Stamp, I decided to make some multimedia tags. I also dug up some items from my stash that I forgot I had (yeah that’s how old they are. LOL, Anyone else have this problem?) to use on the tags.

For the first tag, I started by adding distress ink to a Ranger Inkssentials Surfaces Manila Craft Tag (6-1/4 by 3-1/4-Inch). I used Tim Holtz MERMAID LAGOON Distress Ink and Tim Holtz SEEDLESS PRESERVES Distress Ink. I sprayed some water droplets using the Ranger Tim Holtz Distress Sprayer. Then I stamped the Catherine Pooler Composition Notebook Background Stamp with Ranger Archival JUMBO JET BLACK Ink. I didn’t stamp the whole background; I stamped a few areas. On the back of the tag, I added Simon Says Stamp 100lb COTTON CANDY Card Stock and used some of the same distress inks to add some color, sprayed some water and again used the Catherine Pooler Composition Notebook Background Stamp with Ranger Archival JUMBO JET BLACK Ink to add some texture. I set that aside and got to stamping and coloring the images.

I stamped the bunny, basket, tulips and daffodils from the Hello Easter stampset from Simon Says Stamp onto a piece of Neenah 110lb Classic Crest Cardstock 8.5 X 11″ with Memento Tuxedo Ink.

I colored them with COPICS. I used C000, C1, and 0 for the bunny and R81 and R85 for its ears; Y06, Y13 and Y18 for the bunny’s bow; YG06, YG07, and YG09, YR07 and YR16 for the egg the bunny holds; YR07, YR16 and R29 for one tulip; BG01, BG02, and BG05 for the second tulip; Y06, Y13 and Y18 for the daffodils and YG06, YG07, and YG09 for the stems; and Y00, Y06, and Y21 for the basket, V04, V06 and V09, YR07, YR16 and R29, BG01, BG02, and BG05 for the eggs inside the basket, R29 and R32 for the basket bow. Once I finished coloring the images, I fussycut them all out.

I stamped “Hello” with Versamark Ink and WOW OPAQUE BRIGHT WHITE Super Fine Embossing Powder, making sure to prep the surface with my EK Success Powder Tool beforehand. I added two strips of Doodlebug’s Fancy Frills ‘Sugar & Spice’ Adhesive Border to the bottom of the tag. I adhered the images to the tag, using 3M Foam Tape behind the basket to pop it up. I added some shimmer to the bunny’s bow, the flowers and the eggs in the basket with my Spectrum Noir Clear Overlay Sparkle Pen and I added a yellow and aqua piece of grosgrain ribbon to the hole in the tag. And that completes the tag.


For the second tag, I started by adding distress ink to a Ranger Inkssentials Surfaces Manila Craft Tag (6-1/4 by 3-1/4-Inch). I used Tim Holtz Mowed Lawn Distress Ink, Tim Holtz Broken China Distress Ink, Tim Holtz Mermaid Lagoon Distress Ink, and Tim Holtz Peacock Feathers Distress Ink. I sprayed some water droplets using the Ranger Tim Holtz Distress Sprayer.

Next, I used Simon Says Stamp Stencil WAVES and Tim Holtz Chipped Sapphire Distress Oxide Ink to add waves to the background. Again, I didn’t add it to all the background. On the back of the tag, I added Simon Says Stamp 100lb Mint Card Stock and used some of the Tim Holtz Chipped Sapphire Distress Oxide Ink to add some color to the edges. I set that aside and got to stamping and coloring the images.

I stamped the ducky with the umbrella and the large Easter egg from the Hello Easter stampset from Simon Says Stamp onto a piece of Neenah 110lb Classic Crest Cardstock 8.5 X 11″ with Memento Tuxedo Ink.

I colored them with COPICS. I used Y06, Y13 and Y18 for the ducky body, YR07 and YR16 for the feet and beak and R81 for the cheeks, V04, V06 and V09 for the bow; R32, R37 and R29 for the umbrella and V04, V06 and V09 for the umbrella bow; Y06, Y13 and Y18, YR07 and YR16 for the medallion; R81 and R85, BG000, BG01 and BG02 for the large egg, and YR07, YR16 and R29 for the egg’s bow. Once I finished coloring the images, I fussycut them all out.

I cut a piece of scallop sticker from Doodlebug’s Fancy Frills ‘Lily White’ Adhesive Border and colored it with Tim Holtz Faded Jeans Distress Spray Stain and Tim Holtz Hickory Smoke Distress Spray Stain. Once it was dry I adhered it to the right side of the tag. I stamped “Hello” with Versamark Ink and WOW OPAQUE BRIGHT WHITE Super Fine Embossing Powder, making sure to prep the surface with my EK Success Powder Tool beforehand. I adhered the two images to the tag and found some paper butterflies from my stash which I inked with distress inks and adhered to the tag. Then I added some shimmer to the images with my Spectrum Noir Clear Overlay Sparkle Pen and Nuvo Drops in Ivory Seashell. To finish off this tag, I added a piece of Lawn Fawn Lime Single Cord Twine and May Arts PINK Baker’s Twine Twisted Ribbon.

Supplies

Thanks for reading this post. I hope you enjoyed and I’ve inspired you to give these tags a try for yourself. Have a great Easter! Leave comments or questions below or feel free to email.

Distress Ink Techniques, Multimedia, Spring, Tags

We are always Stronger Together…

Now more than ever we all need to stick together to get through these tough times. And this card kit from Simon Says Stamp embodies that. This is the perfect time to send someone a card to let them know you are thinking of them. I decided to make a tag as well as a card that can be paired together. I’ve been neglectful in my tag making and it’s high time I got back to it!

This kit includes:
Simon Says Stamp Exclusive 6×8 Stronger Together clear stamp set
Simon Says Stamp Exclusive Bold Hello wafer thin die
ModaScrap Spring Flowers 6 x 6 paper pack
24 piece watercolor pencil pack
Simon Says Stamp Craft Tacky Glue
3 Suzy Plantamura custom floral watercolor cards
Simon Says Stamp 6 x 6 inch glitter paper
Simon Says Stamp Metallic Lavender envelope
Simon Says Stamp Mint envelope
Simon Says Stamp White envelope
Simon Says Stamp Mint 8.5×11 cardstock
Simon Says Stamp Lavender 8.5×11 cardstock
Simon Says Stamp Cornflower Blue 8.5×11 cardstock
Simon Says Stamp White 120# 8.5×11 cardstock

Multimedia Tag Featuring Simon Says Stamp’s March Card Kit

When I was thinking about creating the tag I knew that I wanted to have different textures and coloring mediums. That’s the fun of multimedia – no commitment to one medium. LOL I mixed papers from the card kit, ink, watercolors and embossing to do this.

Multimedia Tag

I started by pulling out a craft tag from Ranger Manila Tags #8 Craft by Inkssentials. This tag measures 6 1/4″ by 3 1/8″. I adhered a piece of the purple watercolor DSP and a torn piece of the purple floral DSP from the ModaScrap Spring Flowers 6 x 6 paper pack to the front of the tag with Tombow Mono Multi Liquid Glue and trimmed off the excess. On the back I adhered a piece of Simon Says Stamp Lavender 8.5×11 cardstock and trimmed off the excess. I had to reopen the tag hole using a craft knife.

Next I used Tim Holtz Distress Mini Ink Pad WILTED VIOLET by Ranger, Tim Holtz Distress Ink Pad Faded Jeans by Ranger, and Tim Holtz Distress Ink Pad Ground Espresso by Ranger and my Ranger Mini Round Ink Blending Tools to add color and distress the tag on both sides. While the ink dried, I stamped some of the flowers from the Simon Says Stamp Exclusive 6×8 Stronger Together clear stamp set with Midnight Ink Pad by Catherine Pooler onto a piece of Canson Montval Acid-Free Cold Press Watercolor Paper, 140 lb, 18 X 24 in, Natural White. I set that aside and prepped my tag with my EK Success Antistatic Powder Tool. Using Versamark Ink I stamped some of the flowers and stems from the Simon Says Stamp Exclusive 6×8 Stronger Together clear stamp set and heat embossed with WOW OPAQUE BRIGHT WHITE SUPER FINE Embossing Powder. I used Champagne Gold No.904 from my Zig Kuretake Gansai Tambi STARRY COLORS Set and my Angelduck Paintbrushes to add splashes over the front of the tag.

Multimedia Tag Closeup1

Next I colored the floral images I previously stamped with the Studio 71 Colored Pencils included in the card kit and my Angelduck Paintbrushes. I let them dry (I cheated by drying it wth a heat gun because I have no patience 🙂 ), fussycut them out and adhered them to the tag using Tombow Mono Multi Liquid Glue. I also stamped one of the block sentiments from the Simon Says Stamp Exclusive 6×8 Stronger Together clear stamp set onto a piece of Simon Says Stamp White 120# 8.5×11 cardstock with Midnight Ink Pad by Catherine Pooler. This sentiment comes together so I just cut the phrases apart once stamped so I can adhere them separately onto the tag. I used 3M Foam Tape to pop them up. I added a little bit of Tim Holtz Distress Ink Pad Ground Espresso by Ranger around the bottom edges, over the floral images. Lastly I added a piece of yellow and purple Embroidery Floss to the tag.

Multimedia Tag Closeup1

Watercolor Card Featuring Simon Says Stamp’s March Card Kit

This card came together pretty quickly with the use of Suzy Plantamura’s custom floral watercolor cards.

Card Front

I started by cutting down the piece of Simon Says Stamp Cornflower Blue 8.5×11 cardstock that came in the kit in half (5-1/2 x 8-1/2″) and scored one piece at 4-1/4″. I created a 1/4″ frame using the Simon Says Stamp White 120# 8.5×11 cardstock and the Lawn Fawn Small Stitched Rectangle Stackables and Lawn Fawn Large Stitched Rectangle Stackables. I used the largest die from each and nested them together with some washi tape.

Next, I colored one of the three Suzy Plantamura custom floral watercolor cards included in the kit with the 24 piece watercolor pencil pack and my Angelduck Paintbrushes. I added some shimmer with Spectrum Noir Clear Overlay Sparkle Fine Glitter Brush Pens to the flower petals. I then stamped a sentiment and two hearts from the Simon Says Stamp Exclusive 6×8 Stronger Together clear stamp set with Midnight Ink Pad by Catherine Pooler onto the card. I use a stamping platform to make sure I didn’t mess this up after I spent so much time watercoloring the card.

I adhered the watercolor panel to the card base and the frame to the watercolor card with Tombow Mono Multi Liquid Glue. I finished it off by adding some self adhesive purple and clear gems from my stash. These are so old that I have no idea who made them or where I purchased them. Sorry.

Anyway, for the inside of the card I used the leftover inside piece of Neenah 110lb Classic Crest Cardstock 8.5 X 11″ from when I cut the frame, measuring 4 x 5-1/4″, and adhered it. I stamped another sentiment from the Stronger Together stampset with Midnight Ink Pad by Catherine Pooler and that completes the card.

Card Inside

Thanks for reading this post. I hope you enjoyed and I’ve inspired you to give this card a try for yourself. Leave comments or questions below or feel free to email.

Supplies

Thanks for reading this post. I hope you enjoyed and gave you some ideas on how to use this kit for more than just cards. Leave comments or questions below or feel free to email.