Cards, Emboss Resist Technique, Spring

Emboss Resist Background Spring Card featuring Lawn Fawn

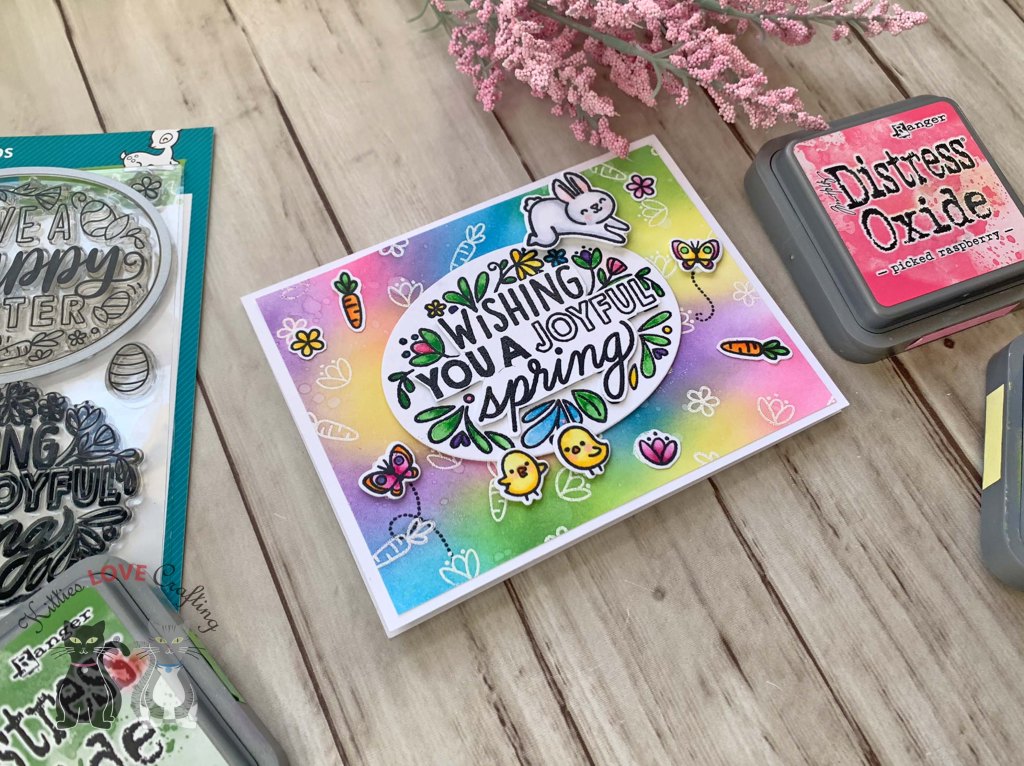
Hello friends. Here’s another cute card featuring the Lawn Fawn Giant Easter Messages. For this one I created a bright background using the emboss resist technique with Distress Oxides. I also watercolored the center panel for a softer look.

For this card, I cut a piece of Neenah 100lb Classic Crest Cardstock 8.5 X 11″ to 5-1/2 x 8-1/2″ and scored at 4-1/4″ to create a card base, another piece to 4 x 5-1/4.

For the background, I stamped the tiny images from the Lawn Fawn Giant Easter Messages using Lawn Fawn YETI Pigment Ink and heat embossed it using WOW OPAQUE BRIGHT WHITE Super Fine Embossing Powder. Then used Tim Holtz Picked Raspberry, Squeezed Lemonade, Mowed Lawn, Salty Ocean, and Villainous Potion Distress Oxide Inks.

Next, I stamped the sentiment panel 2x from the Lawn Fawn Giant Easter Messages onto Neenah 100lb Classic Crest Cardstock 8.5 X 11″ with Catherine Pooler Designs Midnight Ink and then poured Ranger Clear Embossing Powder overtop and heat set it. The second piece I will fussycut and pop up with 3M Foam Tape later.

I colored the panel with my Kuretake GANSAI TAMBI Watercolors. Heat embossing the image first makes it easier for the watercolors to stay in place and not bleed. Then I die cut the sentiment with Stampin’ Up! Layering Ovals Dies (retired). As previously mentioned I also fussycut the second sentiment panel that I had stamped and heat embossed and popped it up with 3M Foam Tape.

I stamped the tiny images from the same stampset as well as some from the Lawn Fawn Eggstraordinary Easter onto Neenah 100lb Classic Crest Cardstock 8.5 X 11″ with Memento Tuxedo Black Ink.

I colored them with Copic Markers. I used C0, C1, R20 & 0 for the bunnies; Y11, Y13 & Y18, R20, YR07 for the chics; RV52, RV19 & RV55, Y13 & Y18, V22, V25 & BV17 for the flowers; YG06 & YG67, and YR07 & YR04 for the carrots; RV52, RV19 & RV55, Y13 & Y18, V22, V25 & BV17, and YR07 & YR04 for the butterflies.

I left the inside of the card blank.

Dimensions


Supplies

https://linkdeli.com/widget.js?id=f5e8378456858c916708

Thanks for reading this post. I hope I’ve inspired you to give this cute and bright Spring card a try for yourself. Leave comments or questions below or feel free to email.

Distress Ink Techniques, Emboss Resist Technique, Halloween, Stenciled Background

Halloween Card Using Only Dies feat. Lawn Fawn

Hello friends. It’s been a few weeks since I posted a Halloween card so it’s time for some new ones. Here is one using only Lawn Fawn dies and stencils. It features the Lawn Fawn Spooky Forest Backdrop and Spooky Gate dies. It’s really easy to create fun or spooky dimensional cards with these dies.

For this card, I cut a piece of Simon Says Stamp 100lb Black Cardstock to 5-1/2 x 8-1/2″ and scored at 4-1/4″ to create a card base and a piece of Lawn Fawn Spiffier Speckles 6×6 Paper to 4-1/4 x 5-1/2″ for the background. I used the Lawn Fawn Nighttime Sky Stencil with Tim Holtz Wilted Violet, Dusty Concord, Chipped Sapphire Distress Inks, and Scattered Straw Distress Oxide Ink.

Next I die cut the forest from Simon Says Stamp 100lb Black Cardstock with the Lawn Fawn Spooky Forest Backdrop 3x, the grass from Stampin’ Up! Mossy Meadow Cardstock (retired) with the Lawn Fawn Simple Grassy Hillsides and inked it with Stampin’ Up! Mossy Meadow Ink (retired), and the gate from Simon Says Stamp Slate 100lb Gray Cardstock with the Spooky Gate and inked it with Tim Holtz Black Soot Distress Ink to add some dimension. I die cut tombstones, ghosts, stones, and owl from Neenah 100lb Classic Crest Cardstock 8.5 X 11″ and colored with Copic Markers. I used R20, C00, 0, & 110 for the ghosts; C3, C5, C9 & 110 for the owl; N1 & N4 for the tombstones; and W3 & W5 for the stones.

I stamped the sentiment from the Lawn Fawn Spooky Village Stampset onto Neenah 100lb Classic Crest Cardstock 8.5 X 11″ with Catherine Pooler Midnight Ink. I trimmed it down to 1/2 x 4″.

I finished off the card by adding some sparkle to the ghosts and the owl with a Spectrum Noir Clear Overlay Sparkle Pen.

On the inside of the card, I cut a piece of Neenah 100lb Classic Crest Cardstock 8.5 X 11″ to 4 x 5-1/4″ and stamped a sentiment and ghosts from the Lawn Fawn Spooky Village Stampset with Catherine Pooler Midnight Ink.

Dimensions


Supplies

https://linkdeli.com/widget.js?id=f5e8378456858c916708

Thanks for reading this post. I hope I’ve inspired you to give this cute Halloween card a try for yourself. Leave comments or questions below or feel free to email.

Celebrations, Emboss Resist Technique, Love & Friendship

Two Cards Using One Die: No Waste

Hello friends. In honor of Pride month I made these two rainbow cards using the Catherine Pooler Designs Retro Love Dies. This die produces a very cool sentiment that allows you to use the word by itself, with the shadow or even cut out an outline of the word. You can also use it to create shaker cards.

For this first card, I cut a piece of Neenah 100lb Classic Crest Cardstock 8.5 X 11″ to 5-1/2 x 8-1/2″ and scored at 4-1/4″ to create a card base, as well as another piece cut to 4 x 5-1/4″. I added double sided tape to the panel and then cut 1/2 inch strips of colored paper from DCWV Double-Sided Mat Stack 4.5″X6.5″ Brights (may be discontinued – link to similar stack below), Stampin’ Up! Pacific Point 8-1/2 x 11″ Cardstock (retired), and Stampin’ Up! Highland Heather 8-1/2 x 11″ Cardstock.

I trimmed the excess paper and die cut the word “LOVE” from the center of the card. I die cut the word 3x more from Simon Says Stamp 100# Black Cardstock so I can stack them and create dimension and added a piece of the black cardstock behind it.

I stamped the a sentiment from Honey Bee Stamps Autumn Buzzword stamps (retired) onto some Neenah 100lb Classic Crest Cardstock 8.5 X 11″ with Catherine Pooler Designs Midnight Ink and trimmed it down to 1/2 x 4 x 5-1/4″. Before adhering it to the card I added some Love From Lizi Silver Glitter Pin Stripe Peel-offs.

I finished off the card by adding some Pretty Pink Posh PLATINUM Pearls.

I left the inside of the card blank.

Dimensions


For the second card, I cut a piece of Neenah 100lb Classic Crest Cardstock 8.5 X 11″ to 5-1/2 x 8-1/2″ and scored at 4-1/4″ to create a card base. Then cut a piece of pattern paper from Catherine Pooler Designs Black Tie Gala 6 x 6 Paper (discontinued) to 2-1/2 x 4-1/4″. I also cut a piece of Simon Says Stamp 100# Black Cardstock to 1-3/16 x 5-1/2″ for the sentiment.

When I die cut the word “LOVE” and the shadow from the center of the previous rainbow panel, it left me with an outline which I will use for this card. I die cut the shadow from Silver Glitter Cardstock. I then stamped the sentiment from the Lawn Fawn Simply Sentiments Stampset with Versamark Ink and heat embossed with Wow White Embossing Powder.

I finished off the card by adding some Smooth Silver Sequin Discs.

On the inside of the card, I cut a piece of the same pattern paper blank to 1 x 5-1/2″.

Dimensions

Supplies

https://linkdeli.com/widget.js?id=f5e8378456858c916708

Thanks for reading this post. I hope I’ve inspired you to give these Pride cards a try for yourself. Leave comments or questions below or feel free to email.

Emboss Resist Technique, Father's Day, Masculine

Emboss Resist Background Father’s Day Card feat. Catherine Pooler Feelin’ Fizzy

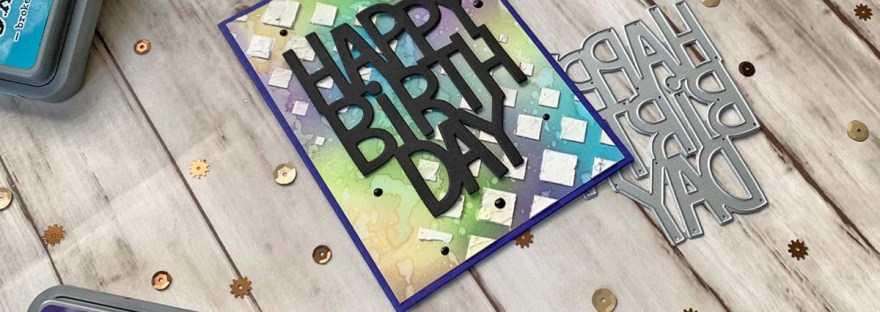
Hello friends. Father’s Day is in a few weeks and today I’m sharing a masculine card that was so much fun to make and didn’t actually take too long. The most time consuming part of this card is the heat embossing. And as you can see mine didn’t come out perfect but I left it so you can see that things don’t always work out how we want and that’s ok!

For this card, I cut a piece of Neenah 100lb Classic Crest Cardstock 8.5 X 11″ to 5-1/2 x 8-1/2″ and scored at 4-1/4″ to create a card base, as well as a piece of Strathmore 300 Series Bristol Paper, cut to 4 x 5-1/4″.

For the background, I stamped the bubbles and the bottle caps from the Catherine Pooler Designs Feelin’ Fizzy stampset with Versamark Ink and then heat embossed using WOW OPAQUE BRIGHT WHITE Embossing Powder. Then inked it with Catherine Pooler Designs Pebble, Hoodie, and Cummerbund Inks.

I stamped the bottle images onto some Neenah 100lb Classic Crest Cardstock 8.5 X 11″ with Catherine Pooler Designs Midnight Ink using the Catherine Pooler Designs Feelin’ Fizzy stampset for the outline and It’s a Girl and Party Dress; Melon Ice and Lime Rickey; and Fiesta Blue and Something Borrowed Inks for the liquid.

I stamped the sentiment from Feelin’ Fizzy stampset onto some Neenah 100lb Classic Crest Cardstock 8.5 X 11″ with Catherine Pooler Designs Midnight Ink and fussycut it out. I stamped the “Happy Father’s Day” sentiment onto some Simon Says Stamp 100# Black Cardstock with Versamark Ink and then heat embossed using WOW OPAQUE BRIGHT WHITE Embossing Powder. I cut it down to 1/2 x 3-1/4″.

Before adhering anything onto the background panel, I added Ranger GLOSSY ACCENTS to the bubbles. 

I finished off the card by adding some Key Lime Nuvo Jewel Drops.

I left the inside of the card blank.

Dimensions


Supplies

https://linkdeli.com/widget.js?id=f5e8378456858c916708

Thanks for reading this post. I hope I’ve inspired you to give this Father’s Day card a try for yourself. Leave comments or questions below or feel free to email.

Birthdays, Distress Ink Techniques, Emboss Resist Technique, Masculine, Stenciled Background, Techniques

Easy Masculine Birthday Card feat. Lawn Fawn’s Giant Happy Birthday

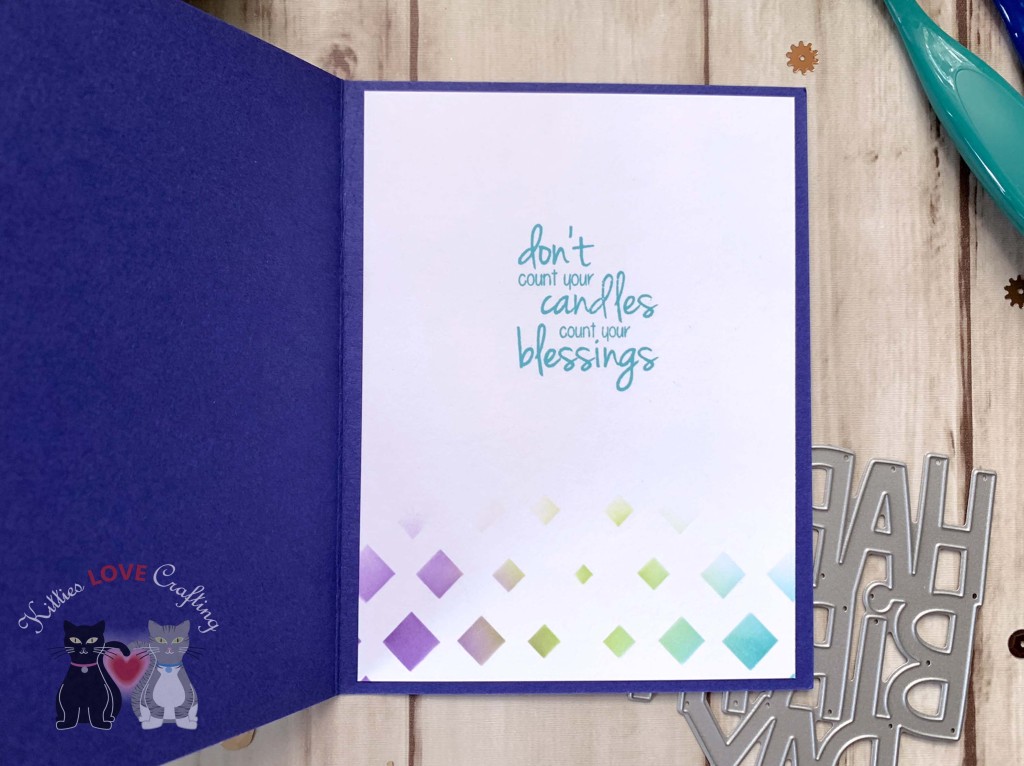
Hi friends. I needed a birthday card for my dad and even though my dad is completely fine with whatever type of card he receives I wanted to keep it kinda masculine bit modern. So I chose a geometric stencil, modeling paste and a few distress inks and made this easy background. Let me show you how easy it is to make!

For this card, I cut a piece of Simon Says Stamp Cardstock 100# Blue Violet to 8-1/2 x 5-1/2″ and scored at 4-1/4″ to create the card base. Then cut a piece of Watercolor Paper to 4 x 5-1/4″. I colored it by ink blending with Distress Oxide Inks. I used Broken China, Mowed Lawn, Antique Linen, and Villainous Poison. I sprayed water on the background and wiped it off.

I added white Modeling Paste with a palette knife using the Catherine Pooler Gradient Diamond Stencil. For the sentiment, I diecut Simon Says Stamp 100# Black Cardstock using the Lawn Fawn Giant Happy Birthday die. I diecut it 3x and stacked them for some dimension.

I finished the card by adding some Ebony Black Nuvo Drops.

On the inside of the card, I cut a piece of Neenah 110lb Classic Crest to 4 x 5-1/4″ and stamped a sentiment from Catherine Pooler Designs Young at Heart Stampset (Part of a Stamp of Approval Collection – discontinued), with Ranger Tim Holtz Broken China Distress oxide Ink and added the same pattern to the bottom of the card using Catherine Pooler Gradient Diamond Stencil and Broken China, Mowed Lawn, and Villainous Poison Distress Oxide Inks.

Dimensions


Supplies

https://linkdeli.com/widget.js?id=f5e8378456858c916708

Thanks for reading this post! I hope you enjoyed and I’ve inspired you to make this easy masculine birthday card yourself! If you want to share you creations with me tag me on instagram @kittieslovecrafting. Leave comments or questions below or feel free to email me.

Emboss Resist Technique, Halloween, Halloween, Techniques

Emboss Resist Technique: Making a Spooky Background

Hi friends. Using the emboss resist technique to create a background is super easy and creates a very high contrast, impactful visual. Let me show you how easy this was to create.

For this card, I cut a piece of Simon Says Stamp 100# Black Cardstock to 8-1/2 x 5-1/2″ and scored at 4-1/4″ to create the card base. Then cut a piece of Neenah 110lb Classic Crest measuring 4 x 5-1/4″ and embossed it with Tim Holtz Cling Mount Stamps: Halloween Silhouettes. I used Versamark Ink to stamp the background, added WOW Opaque Bright White Super Fine Embossing Powder and heat set with my heat gun. Then colored it with Tim Holtz Peeled Paint and Black Soot Distress Oxide Inks. Remember to wipe off any excess ink with apaper towel or cloth to clean off the white embossed areas.

I stamped the truck and pumpkins from Honey Bee Stamps Big Pickup Tailgate 6×6 Stamp Set and Honey Bee Loads of Fall Stamp Set onto Neenah 110lb Classic Crest Cardstock with Memento Tuxedo Black Ink and colored with Copic markers.

I used YR16, YR18, & YR09, N2, N6 & N8 for the pumpkins; G94 & G99 for the leaves; BV11, BV08, V25 & V28 for the truck bed; Y13 & Y17 for the truck head lights; C1, C3, C5, C7, & C9 for the metal on the truck; YG05, YG17 & YG67 for the license plate; and BG000 & 0 for the truck windows.

I stamped the sentiment from Papertrey ink Pumpkin Expressions Stamp Set (retired) onto Neenah 110lb Classic Crest with Catherine Pooler Midnight Ink. I fussycut the sentiments since I don’t have dies for this stampset.

On the inside of the card, I cut a piece of Neenah 110lb Classic Crest to 4 x 5-1/4″ and stamped a sentiment from Queen and Company Halloween Hoopla! Stampset with Memento Tuxedo Black Ink and added additional pumpkin and leaf vine.

Dimensions


Supplies

https://linkdeli.com/widget.js?id=f5e8378456858c916708

Thanks for reading this post! I hope you enjoyed and I’ve inspired you to make this cute Halloween card yourself! If you want to share you creations with me tag me on instagram @kittieslovecrafting. Leave comments or questions below or feel free to email me.

Emboss Resist Technique, Fall, Fall, Holidays 2021

Three Fall Cards Using the Honey Bee Stamps Patchwork Pumpkin Stampset

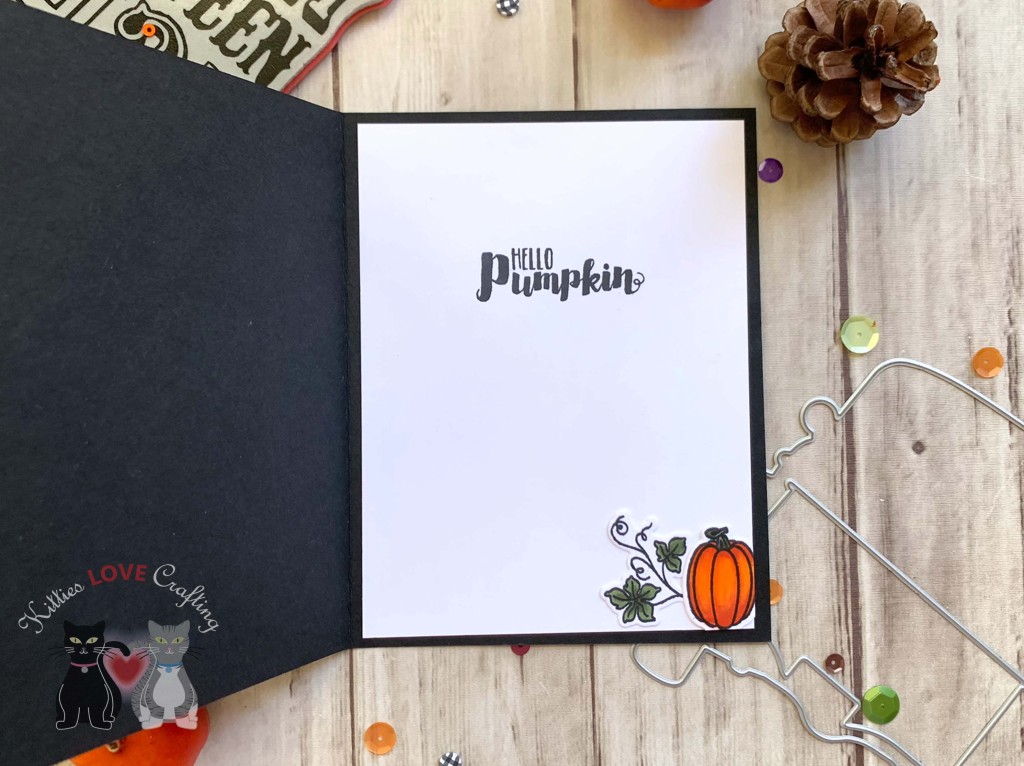
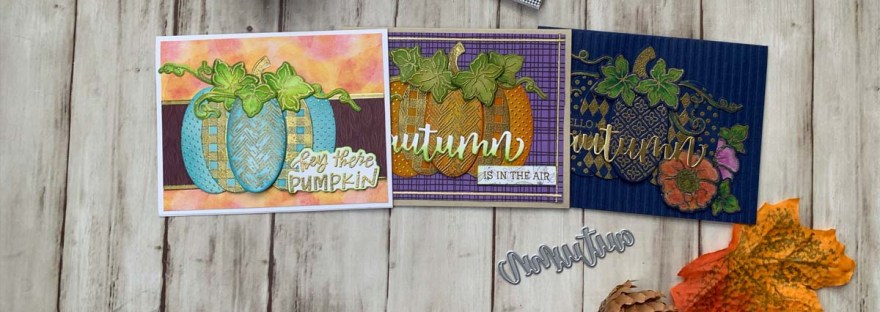
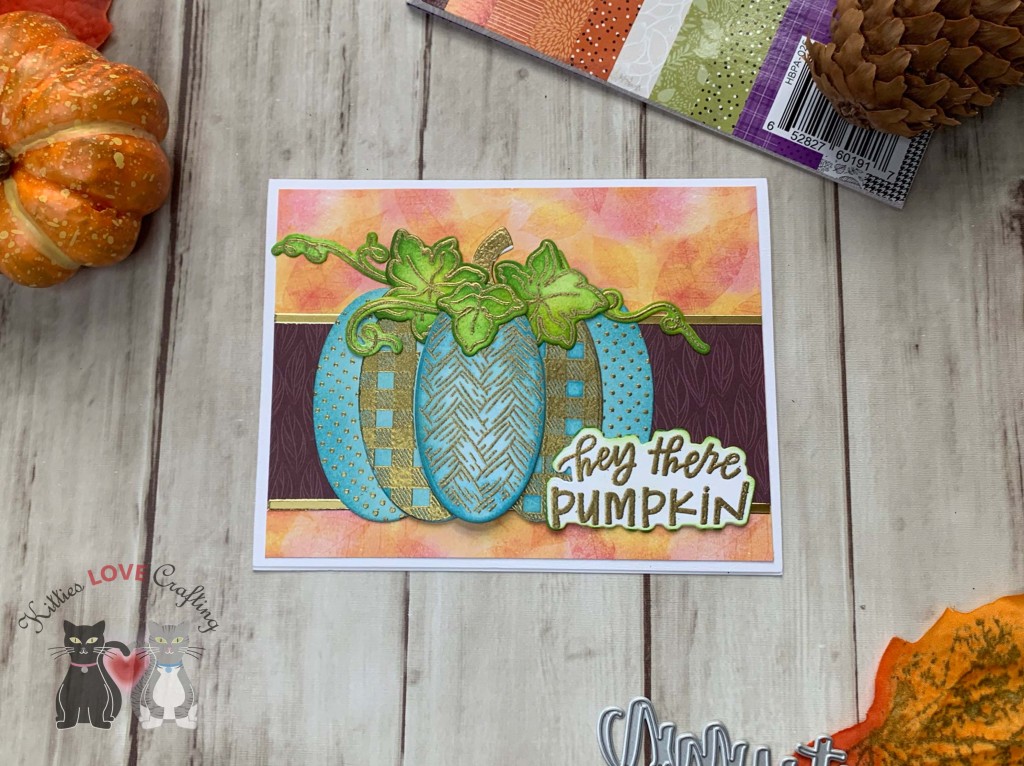
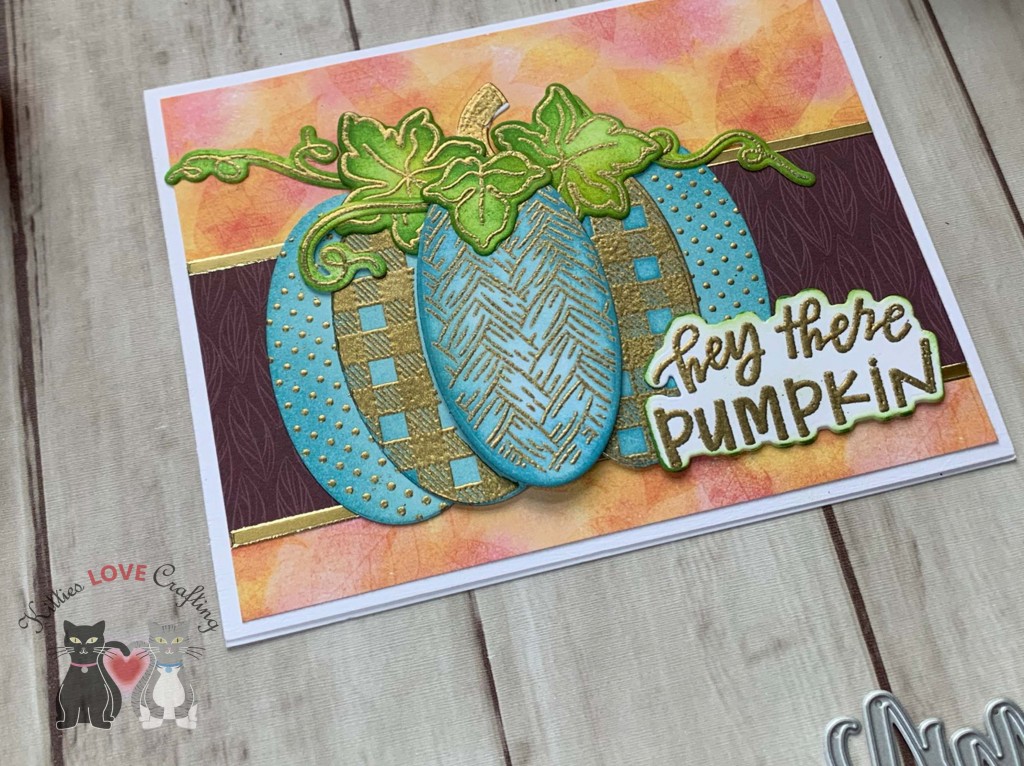
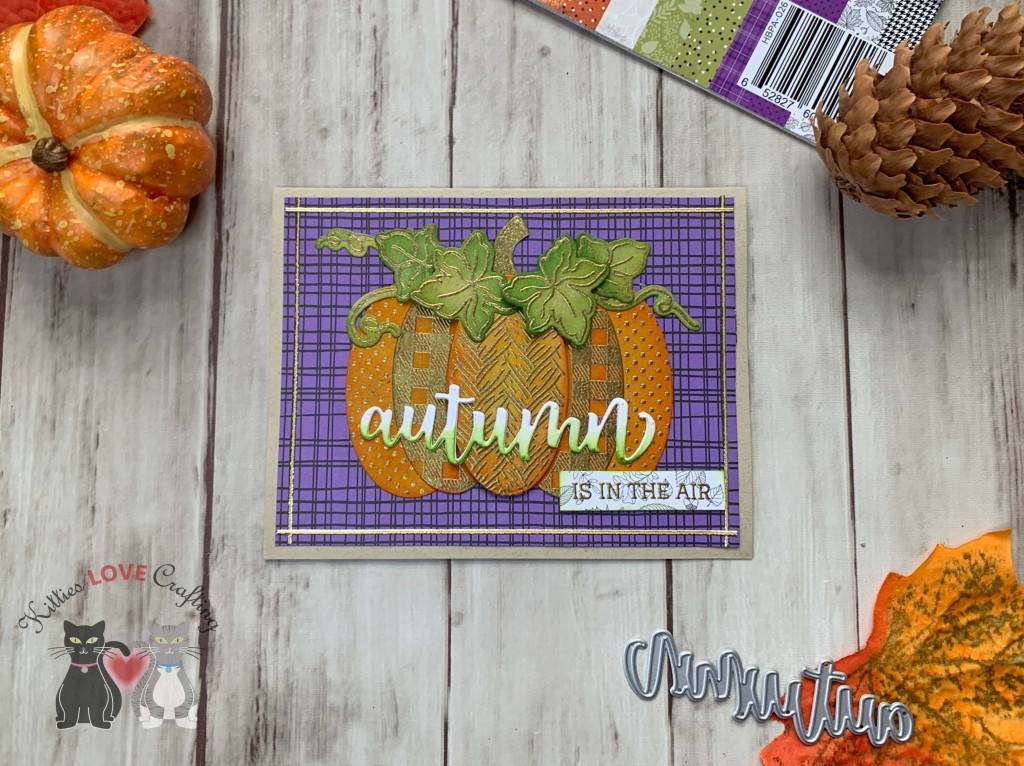
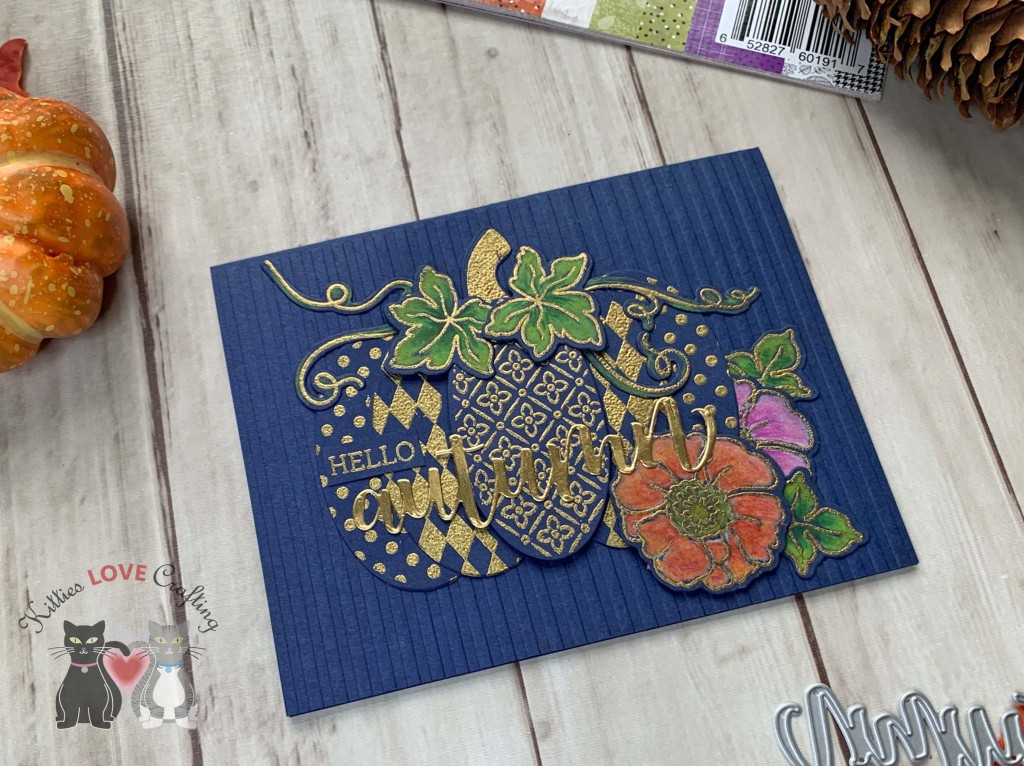
I love this new Patchwork Pumpkin Stampset from Honey Bee Stamps! You can create all kinds of cute pumpkins. You can also add flowers and the coordinating dies makes it easy to cut everything out. I made three cards using different color papers and coloring methods but with the same embossing powder. I wanted to see how to create different cards by just making subtle changes. Using pattern papers and embossing folders is also an easy way to add interest.

For the first card, I started by cutting a piece of Neenah 110lb Classic Crest Cardstock 8.5 X 11″ to 5-1/2 x 8-1/2″ and scored at 4-1/4″ to make the card base and cut a piece of the watercolor leaf paper from the Honey Bee Stamps Halloween Harvest 6×6 Paper Pad to 4 x 5-1/4″ and another of the purple leaf paper to 2 x 5-1/4″.

I used Versamark Ink to stamp several of the pattern pumpkins, leaves, curly vines and the stem from the Honey Bee Stamps Patchwork Pumpkin Stampset onto some Neenah 110lb Classic Crest Cardstock 8.5 X 11″ and heat embossed with Gold Embossing Powder. Then diecut all the pieces with the oval die included in the coordinating dieset. I used Tim Holtz Tumbled Glass and Broken China Distress Inks to color the pumpkin and Crushed Olive and Mowed Lawn to color the leaves and vines. I used 3M Foam Tape to pop up the center piece of the pumpkin and some of the leaves. Before adhering it to the card I added Love From Lizi Straight Peel-Off Stickers in Gold.

I stamped the sentiment from the Honey Bee Stamps Patchwork Pumpkin Stampset with Versamark Ink and heat embossed with Gold Embossing Powder onto a piece of Neenah 110lb Classic Crest Cardstock 8.5 X 11″ and diecut it with the coordinating dies. I added a little Mowed Lawn Distress Ink around the edges.

On the inside of the card, I cut a piece of the same watercolor leaf paper from the Honey Bee Stamps Halloween Harvest 6×6 Paper Pad to 1 x 5-1/4″ and stamped a sentiment from Honey Bee Stamps Autumn Stamp Set with Mowed Lawn Distress Ink.

Dimensions

For the second card, I started by cutting a piece of Catherine Pooler Sand Dunes 8-1/2 x 11″ Cardstock (discontinued-any kraft cardstock will work) to 5-1/2 x 8-1/2″ and scored at 4-1/4″ to make the card base and cut a piece of the purple paper from the Honey Bee Stamps Halloween Harvest 6×6 Paper Pad to 4 x 5-1/4″.

I used Versamark Ink to stamp several of the pattern pumpkins, leaves, curly vines and the stem from the Honey Bee Stamps Patchwork Pumpkin Stampset onto some Catherine Pooler Sand Dunes 8-1/2 x 11″ Cardstock (retired) and heat embossed with Gold Embossing Powder. Then diecut all the pieces with the oval die included in the coordinating dieset. I used Tim Holtz Mustard Seed and Carved Pumpkin Distress Inks to color the pumpkin and Crushed Olive and Mowed Lawn to color the leaves and vines. I used 3M Foam Tape to pop up the center piece of the pumpkin and some of the leaves.

I diecut the sentiment from the Honey Bee Stamps Autumn Honey Cuts and Neenah 110lb Classic Crest Cardstock 8.5 X 11″ 3x and adhered them together. I colored the bottom of the word with Mowed Lawn Distress Ink to create an ombre effect. I adhered it onto the pumpkin and stamped the rest of the sentiment from Honey Bee Stamps Autumn Stamp Set with Versamark Ink and heat embossed with Gold Embossing Powder onto a piece of the white leaf pattern paper from the Honey Bee Stamps Halloween Harvest 6×6 Paper Pad. I trimmed it down to 1/2 x 1-7/8″ before adhering to the card.

I finished it off by adding some Love From Lizi Pin Stripe Peel-Off Stickers in Gold Mirror Moondust.

On the inside of the card, I cut a piece of the same purple paper from Honey Bee Stamps Halloween Harvest 6×6 Paper Pad to 1 x 5-1/4″ and stamped a sentiment from Honey Bee Stamps Happy Fall Y’all Stamp Set with Carved Pumpkin Distress Ink.

Dimensions


For the third card, I kept thing a little simpler. I started by cutting a piece of Stampin’ Up! Night of Navy 8-1/2″ X 11″ Cardstock to 5-1/2 x 8-1/2″ and scored at 4-1/4″ to make the card base. I embossed the front to the card with one of the embossing folders from the Queen & Co’s Embossing Folder Bundle.

This time, I used Versamark Ink to stamp several of the pattern pumpkins, leaves, curly vines, flowers and the stem from the Honey Bee Stamps Patchwork Pumpkin Stampset onto some Stampin’ Up! Night of Navy 8-1/2″ X 11″ Cardstock to 5-1/2 x 8-1/2″ and heat embossed with Gold Embossing Powder. Tip: Make sure to use a good amount of anti-static powder when using embossing powder on dark cardstock or it will stick where you don’t want. Then diecut all the pieces with the oval die included in the coordinating dieset. I colored the leaves, vine sand flowers with Prismacolor Pencils.

I diecut the sentiment from the Honey Bee Stamps Autumn Honey Cuts and Tim Holtz Idea-ology 8 x 8 Paper Stash Metallic Kraft Stock. I adhered it onto the pumpkin and stamped the rest of the sentiment from Honey Bee Stamps Autumn Stamp Set with Versamark Ink and heat embossed with Gold Embossing Powder onto a piece of Stampin’ Up! Night of Navy 8-1/2″ X 11″ Cardstock. I trimmed it down to 3/8 x 7/8″ before adhering to the card.

On the inside of the card, I cut a piece of Neenah 110lb Classic Crest Cardstock 8.5 X 11″ to 4 x 5-1/4″ and left it blank.

Dimensions


Supplies

https://linkdeli.com/widget.js?id=f5e8378456858c916708

Thanks for reading this post. I hope you enjoyed and I’ve inspired you to give these cute Fall cards a try for yourself. Leave comments or questions below or feel free to email me.

Emboss Resist Technique, Halloween, Holidays 2021, Shaker

Boo Shaker Card featuring Honey Bee Stamps Buzzword Dies

Hello friends. I’ve got another cute Halloween card to share with you all. This is a very simple shaker card using the Honey Bee Stamps Boo Buzzword dies and the Honey Bee Stamps Halloween Harvest 6×6 Paper Pad. Very little stamping and absolutely no coloring involved. I love making these kinds of cards!

I started by cutting a piece of Simon Says Stamp 100lb Black 8-1/2 x 11″ Cardstock to 5-1/2 x 8-1/2″ and scored at 4-1/4″ to make the card base. I also cut a piece of the Honey Bee Stamps Halloween Harvest 6×6 Paper Pad to 4 x 5-1/4″. I diecut a window from it with the Catherine Pooler Designs Scallops & Dots Dies, added a piece of acetate with double-side tape and added some 3M Foam Tape to make the shaker element. I added sequins from the Honey Bee Stamps Halloween Harvest Sequin Mix and backed it with another piece of pattern paper from the Honey Bee Stamps Halloween Harvest 6×6 Paper Pad.

I diecut the sentiment with the Honey Bee Stamps BOO Dies from the Honey Bee Stamps Halloween Harvest 6×6 Paper Pad and Simon Says Stamp 100lb Black 8-1/2 x 11″ Cardstock (for the shadow). I stamped the rest of the sentiment from the Honey Bee Stamps BOO Stamp Set onto some more black card stock with Versamark Ink and and heat embossed with WOW Embossing Powder in Super Fine Opaque Bright White.

I diecut ghosts, bats and pumpkins from the Honey Bee Stamps Haunted House Add-On (this die works with the House Builder Card Base Dieset) from Neenah 110lb Classic Crest Cardstock 8.5 X 11″, Simon Says Stamp 100lb Black 8-1/2 x 11″ Cardstock, and orange cardstock from my scrap stash.

I finished it off by adding some Honey Bee Stamps Halloween Harvest Sequin Mix.

On the inside of the card, I cut a piece of Neenah 110lb Classic Crest Cardstock 8.5 X 11″ to 4 x 5-1/4” and a piece of pattern paper from Honey Bee Stamps Halloween Harvest 6×6 Paper Pad to 1 x 5-1/4″ and stamped a sentiment from the Queen and Co Halloween Hoopla Kit with Catherine Pooler Designs Orange Twist Ink.

Dimensions


Supplies

https://linkdeli.com/widget.js?id=f5e8378456858c916708

Thanks for reading this post. I hope you enjoyed and I’ve inspired you to give this cute Halloween shaker card a try for yourself. Leave comments or questions below or feel free to email me.

Emboss Resist Technique, Halloween, Halloween, Holidays 2021

Easy Halloween Wreath Card Featuring Pretty Pink Posh

Hi friends. I’m back after some unplanned time off!It’s great to be creating again. I’m cutting it close but let’s start with a cute Halloween card. This stampset from Pretty Pink Posh, Halloween Wreath is so cute! I love all the fun images. They are easy to color with markers, pencils etc or leave them uncolored. You can also make a wreath from the singular images instead of using the wreath image.

I started by cutting a piece of Simon Says Stamp 100lb Black 8-1/2 x 11″ Cardstock to 5-1/2 x 8-1/2″ and scored at 4-1/4″ to make the card base and a second piece cut to 4 x 5-1/4″ which I embossed with an embossing folders from the Queen & Co’s Embossing Folder Bundle. I added a strip of pattern paper from the Honey Bee Stamps Halloween Harvest 6×6 Paper Pad measuring 3/4 x 5-1/4″ and another measuring 1-1/4 x 5-1/4″.

I stamped the wreath and all the images as well as a sentiment in the center from the Pretty Pink Posh Halloween Wreath Stampset with Versamark Ink and heat embossed with WOW Embossing Powder in Super Fine Opaque Bright White. I colored them with Prismacolor Pencils and diecut the images with the coordinating dies. Tip: Make sure to use a good amount of anti-static powder when using embossing powder on dark cardstock or it will stick where you don’t want. I used 3M Foam Tape to pop up the wreath.

I finished it off by adding some sequins from the Honey Bee Stamps Halloween Harvest Sequin Mix.

On the inside of the card, I cut a piece of Neenah 110lb Classic Crest Cardstock 8.5 X 11″ to 4 x 5-1/4″ and the same purple paper I used on the front of the card from Honey Bee Stamps Halloween Harvest 6×6 Paper Pad to 1 x 5-1/4″ and stamped a sentiment from the Pretty Pink Posh Halloween Wreath Stampset with Catherine Pooler Designs Mandarin Spice Ink. I also added some extra images I had stamped.

Dimensions


Supplies

https://linkdeli.com/widget.js?id=f5e8378456858c916708

Thanks for reading this post. I hope you enjoyed and I’ve inspired you to give this sweet and easy Halloween card a try for yourself. Leave comments or questions below or feel free to email me.

Distress Ink Techniques, Emboss Resist Technique, Hello, Love & Friendship, Spring

A Quick Emboss Resist Background Featuring Catherine Pooler Designs Bloomin’ Wellies

Hi friends. I don;t know about you but I love a cute pair of wellies! And this stampset from Catherine Pooler Designs, Bloomin’ Wellies, is adorable. For this card I tried creating a completely covered distress resist background but I didn’t like it in the end so I diecut it into a circle and I think this works so much better. So if you make a background and you don’t quite love it, use only a portion of it and that usually solves the problem.

I started by cutting a piece of Neenah 110lb Classic Crest Cardstock 8.5 X 11″ to 5-1/2 x 8-1/2″ and scored at 4-1/4″ to create a card base and a top panel to 4 x 5-1/4″ (which will get diecut later). I used Versamark Ink to stamp the rain drops from the Catherine Pooler Designs Pitter Patterns Stamp Set, added some WOW Opaque Bright White Embossing Powder and heat set it. Then I used Ranger Tim Holtz Broken China Distress and Tumbled Glass Distress Inks and water to create a watercolored background.

I set that aside to dry and stamped the wellies image from Catherine Pooler Designs Bloomin’ Wellies stampset onto a piece of Neenah 110lb Classic Crest Cardstock 8.5 X 11″ with Catherine Pooler Designs Midnight Ink. I also stamped additional flowers from the stampset which matched the ones in this wellies pair. Then colored it with Copic Markers. I used RV 63 + RV55 + RV66 for the wellies, YR31 + YR23 for the polka dots, YG25 +YG17 + YG67 for the leaves, BV17 + BV13, BG45 +BG05, RV52 + RV63, and YR16 + YR07 for the flowers. I diecut it with the Bloomin’ Wellies Dies.

I diecut the background panel with a 3-3/4″ circle with the Sizzix Framelits Die Set and another from Simon Says Stamp BLACK 100# 8-1/2 x 11″ Card Stock and adhered both to the card base. I adhered the wellies and additional flowers to the card, using some Stampin’ Dimensionals to pop them up.

I stamped a sentiment from Catherine Pooler Designs Bloomin’ Wellies stampset onto a piece of Neenah 110lb Classic Crest Cardstock 8.5 X 11″ with Catherine Pooler Designs Midnight Ink and fussycut it out before adhering it to the card. I finished it off by adding some sequins from the Catherine Pooler Designs Porland Sequin Mix.

I left the inside of the card blank.

Dimensions


Supplies

https://linkdeli.com/widget.js?id=f5e8378456858c916708

Thanks for reading this post. I hope you enjoyed and I’ve inspired you to make this cute wellies Spring card yourself! If you want to share you creations with me tag me on instagram @kittieslovecrafting. Leave comments or questions below or feel free to email me.