Hello friends, I’m coming at you today with this cute and simple froggy card using Stampin’ Up!’s SO HOPPY TOGETHER Stamp Set. I’ve had this stampset for awhile and just got around to making some cards. It was part of the Stampin’ Up! Sale-a-bration 2019 catalog so unfortunately is no longer available but I still wanted to present some inspiration for those of you who have this stampset. And if you don’t have the stampset you can easily substitute another critter for the frogs. And if you want to own any of these cards they are both available for sale in my Etsy shop.
Celebrate Your Awesomeness Card
For this card I kept things simple. I cut a card base to 8 1/2 x 5 1/2” from Neenah Solar White 110lb Cardstock and scored it at 4 1/4”. Then cut and adhered a panel measuring 4 1/4 x 5 1/2” and a Strip to 1 3/4 x 5 1/2” from Queen and Company Flirty Florals Paper Pad to the card base. Using a paper pad is a great way to ensure that all your pattern papers coordinate. No guessing necessary.
I stamped the frog images onto Neenah Solar White 110lb Cardstock using Tuxedo Black Memento Ink and colored them with Daffodil Delight Stampin’ Blends Markers, Granny Apple Green Stampin’ Blends Markers, Highland Heather Stampin’ Blends Markers, Pool Party Stampin’ Blends Markers and Rich Razzleberry Stampin’ Blends Markers.

I fussycut all the images out then diecut the circles with the Queen and Company Foundation Dies #1. Using the Company Sentiment Stacker Dies, I diecut the ‘Celebrate’ word from Simon Says Stamp Black Card stock and the shadow from Stampin’ Up! Vellum. I adhered those two pieces together then proceeded to stamp and heat emboss the sentiment strip onto black cardstock using Versamark clear embossing ink and Wow white embossing powder. That was then cut out using the Company Foundation Dies #2.

I figured out the placement of all the images and sentiments on the card and adhered. Finished it off with some Nuvo drops in Key Lime, Purple Rain and Sea Breeze. I also stamped the froggy image on a white envelope.
Dimensions
- Card Base = 8 1/2 x 5 1/2” Neenah Solar White 110lb Cardstock
- Back Panel = 4 1/4 x 5 1/2” Queen and Company Flirty Florals Paper Pad
- Vertical Strip Panel = 1 3/4 x 5 1/2” Queen and Company Flirty Florals Paper Pad
- Sentiment Strip = 1/2 x 3 1/4” Simon Says Stamp Black Card stock
- Circle = 2 5/8″ diameter Neenah Solar White 110lb Cardstock
- Scallop Circle = 2 7/8″ diameter Queen and Company Flirty Florals Paper Pad
Supplies
- Paper – Neenah Solar White 110lb Cardstock, Queen and Company Flirty Florals Paper Pad, Simon Says Stamp Black Card stock, Stampin’ Up! Vellum
- Inks – Tuxedo Black Memento Ink, Versamark clear embossing ink, Wow white embossing powder
- Stamps – Stampin’ Up SO HOPPY TOGETHER Stamp Set (From Sale-a-bration catalog)
- Dies – Queen and Company Foundation Dies #1 and Company Foundation Dies #2, Queen and Company Sentiment Stacker Dies
- Embellishments – Tonic Nuvo Jewel Drops in Key Lime, Tonic Nuvo Jewel Drops in Purple Rain, Tonic Nuvo Jewel Drops in Sea Breeze
- Coloring Tools – Daffodil Delight Stampin’ Blends Markers Combo Pack, Granny Apple Green Stampin’ Blends Markers Combo Pack, Highland Heather Stampin’ Blends Markers Combo Pack, Pool Party Stampin’ Blends Markers Combo Pack , Rich Razzleberry Stampin’ Blends Markers Combo Pack
- Adhesives – 3M foam tape, Stampin’ Dimensionals
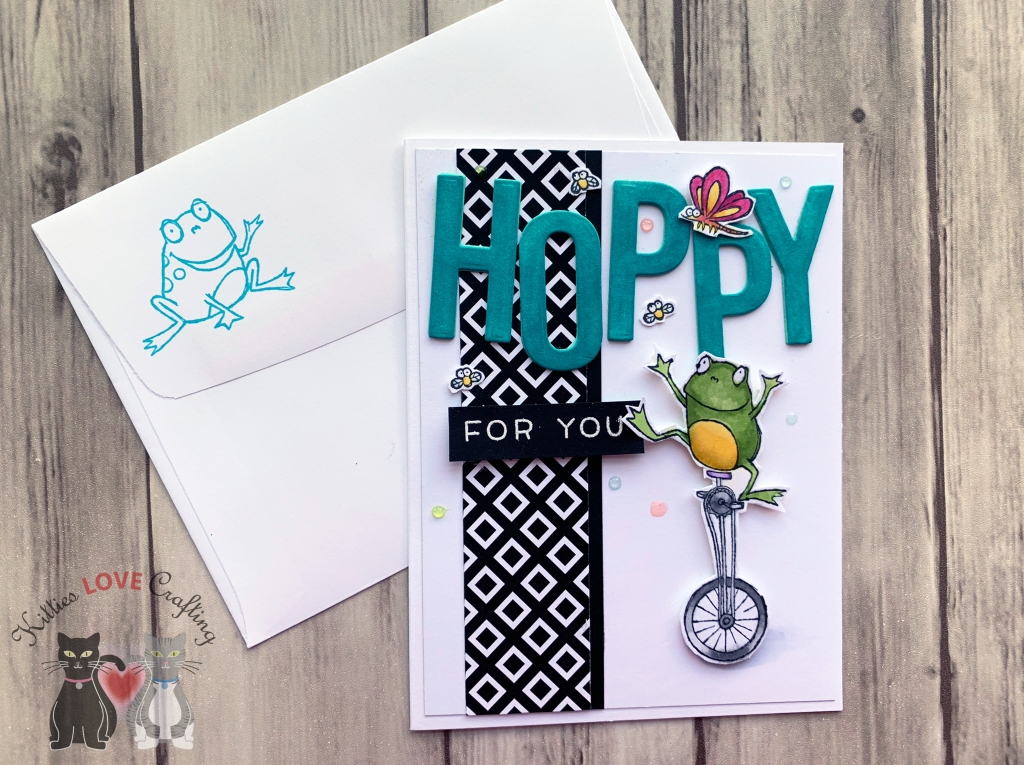
Hoppy For You
This card is my favorite of the two. Also quite easy to make. This time the pattern paper is just an accent or enhancement.
I cut a card base to 8 1/2 x 5 1/2” and a panel to 4 x 5 1/4” from Neenah Solar White 110lb Cardstock. Then cut a strip of Catherine Pooler Black Tie Gala Patterned Paper to 1 3/16 x 5 1/4” and Simon Says Stamp Black Card stock to 1 3/8 x 5 1/4″. I adhered those two pieces together and then to the card panel. Then adhered the white card panel to the card base.
I had already stamped and colored the images prior to starting this card. If I know I’m making multiple cards using the same stamp set, I like to stamp and color all the images I need (or just a bunch of I’m not sure what I want to use) before I create my cards. I will fussycut them just before I begin the cardmaking process. Onto the next step then…
I used some Neenah Solar White 110lb Cardstock and used the direct-to-paper method to color with Catherine Pooler Fiesta Blue Ink. This method is a great way to match your cardstock to your project. If you want to see this technique in action check out this video from Catherine Pooler.
Next I diecut the word “HOPPY” with the Honey Bee Bee Bold Alphabet Dies. I also cut two additional sets of the word from Neenah Solar White 110lb Cardstock. I stacked the two white sets together and adhered, followed by the colored set of letters on top of those.

I stamped the sentiment with the Lawn Fawn Happy Happy Happy Sentiments using Versamark clear embossing ink onto Simon Says Stamp Black Card stock and heat embossed with Wow white embossing powder. I cut it down to a strip measuring 1/2 x 1 3/4”. Time to adhere the sentiments and the little froggy on his unicycle as well as his fluttering friends. He’s just so cute, don’t you think?!? Finished it off with some Nuvo drops in Key Lime, Sea Breeze, and Rosewater. Lastly I stamped a little frog on a white envelope in Catherine Pooler Fiesta Blue Ink.
Dimensions
- Card Base = 8 1/2 x 5 1/2” Neenah Solar White 110lb Cardstock
- Back Panel = 4 x 5 1/4” Neenah Solar White 110lb Cardstock
- Vertical Strip Panel = 1 3/16 x 5 1/4” Catherine Pooler Black Tie Gala Patterned Paper; 1 3/8 x 5 1/4″ Simon Says Stamp Black Card stock
- Sentiment Strip = 1/2 x 1 3/4” Simon Says Stamp Black Card stock
Supplies
- Paper – Neenah Solar White 110lb Cardstock, Catherine Pooler Black Tie Gala Patterned Paper, Simon Says Stamp Black Card stock
- Inks – Tuxedo Black Memento Ink, Catherine Pooler Fiesta Blue Ink, Versamark clear embossing ink, Wow white embossing powder
- Stamps – Stampin’ Up SO HOPPY TOGETHER Stamp Set (From Sale-a-bration catalog), Lawn Fawn Happy Happy Happy Sentiments
- Dies – Honey Bee Bee Bold Alphabet
- Embellishments – 3M foam tape and Toxic Nuvo Jewel Drops in Key Lime, Tonic Nuvo Jewel Drops in Sea Breeze, Tonic Nuvo Jewel Drops in Rosewater
- Coloring Tools – Daffodil Delight Stampin’ Blends Markers Combo Pack, Granny Apple Green Stampin’ Blends Markers Combo Pack, Rich Razzleberry Stampin’ Blends Markers Combo Pack
Thanks for stopping by and I hope I’ve inspired you to make some adorable critter cards of your own. Leave comments or questions below or feel free to email me.