Hello friends. Valentine’s Day is next month and we all want to make cute decor and gifts, right? Times are tough right now, everything is ridiculously expensive so why not save some money on crafts?!? I made this cute floral decor piece using only Dollar Tree products.
Everything you see in this post except the Fabri-tac glue can be found at Dollar Tree. You can use hot glue in place of the Fabri-tac which can be found at the Dollar Tree for sure! I cannot be trusted with hot glue (second degree burns on fingers are not fun :)) so I won’t be using that!!!
I cut the floral foam down with a knife to fit inside the pail. This foam is very soft and easy to trim down. You literally can just shave the edges with a knife. You can glue down the foam to the bottom of the pail if you like. I did not need to because once I added the moss it secured it in place.
Next, I figured out how tall I wanted my flowers and trimmed them using wire cutters. Don’t try to cut these with scissors; it will not work well and you may hurt your hands (ask me how I know?:) ) I seperated out the stems so I could arrange them better. It’s much harder if you leave them in the bundle. I place them into the foam and fluffled them out. You can easily bend the stems so you can spread your flowers out better to create a full arrangement.
Next I inserted the Valentine’s Wooden Glitter Heart Picks. I used 5 but add how many you would like. I find that odd numbered items just tend to be more visually appealing. To cover all the foam and also add more stability, I added some Floral Garden Reindeer Moss inside the pail.
Thanks for reading this post. I hope I’ve inspired you to give this quick and easy Valentine’s Day floral arrangement a try for yourself. Leave comments or questions below or feel free to email.
Are you like me… You’ve been buying 12 x 12 paper pads for years and years and years and now have so many you don’t know what to do with it? Well here are just a few ways I like to use my paper pads up.
1. Use them in your junk journal. My new obsession is creating junk journals. I started watching videos on them and quickly became hooked. What is a junk journal, you ask??? It’s a journal you create using old papers, cardboards, receipts, tickets, magazine pages, junk mail. Then you can decorate it with embellishments, tags, anything you want really. Then you write in, use it as a planner or for memory keeping. If you want to learn more about it, check out this link. There are tons of videos on junk journaling.
I like to coffee dye pattern papers to age them before using them in my junk journal. Then I use them for the main pages, tags, pockets, fold outs and many, many more. It’s super easy to coffee dye paper. Mix instant coffee with hot water and either spray it onto the paper or use a metal or plastic tub/pan and dip it into coffee. Check out this video for more info.
2. Organization. Another great use for pattern paper is for organization. I used pattern papers to make dividers for my 6 x 6 paper pads. I keep mine in clear fridge bins; this one measures 8W x 14.5L x 4”H and I got this it from Amazon. I created these using old white 3 ring binder dividers I had purchased ions ago and then adding the pattern paper to the front of it. I cut the white dividers to 6-1/2”w x 7”h and the paper to 6”w x 7”h. Glue them together, add a label and you have cute dividers.
3. Make sticker books. Since I am a planner girl, I have a descent amount of stickers. And before the Happy Planner came out with their sticker books, I created my own after watching several videos on how to do this. It’s easy. You need card stock, some discs, a Happy Planner Punch or any Arc Disc Punch and extra planner pages or other paper to adhere the sticker sheets to. You can laminate your covers or leave them as is and add a sheet of clear acetate over it as I did with these since at the time I didn’t have a laminator.
For this sticker book, I cut 2 pieces of paper to 6-1/4 x 9”. You can also make dividers to organize your sticker book.
4. Make custom cover, dividers, dashboards for your planners and notebooks. Another thing I love is my planner and customizing it for the holidays. I’m a planner girl who loves to make it pretty and I found that it was easier to make my own once I bought a laminator machine. The easiest way to customize your planner is to use a paper pad that has cut aparts, stickers or other things you can use to add to your planner but no worries if you don’t. You can easily use colors from different paper pads that coordinate.
I used a paper pad from Authentique called Liberty to make my Fourth of July theme. I made mine for a Classic Happy Planner so my measurements will fit that planner. For my cover I cut the paper to 7-1/2 x 9-1/2, rounded the corners (important so you don’t stab yourself later), then I laminated it and trimmed it, leaving a 1/8″ border around it so the sides do not open so the final measures 7-3/4 x 9-3/4. Once cut, I punched the mushroom holes with my Arc Disc Punch.
For the dividers, I used dividers from my original Classic Happy Planner as a template. I find this is the easiest way to do this because they already have tabs. This will work with any size planner. But you can also just cut the paper down to the same size of your cover and then add a shape (like a star-for July 4th) as your tab. Adhere it in place before you laminate your dividers. Again, I rounded the corners before laminating then again once I trimmed them down. These measure 7-1/2 x 9-1/4″ before lamination and 7-5/8 x 9-1/4″ once laminated and trimmed.
I also cut out some of the cut aparts and laminating them to add into the pockets of my planner cover. These make great diecuts. You can also cut out images that appear on these cut aparts for a more customized diecut (i.e, cut around the liberty bell in the diecut shown below),
Another thing you can make is a bookmark or dashboard. Choose a width (I usually do half the width of my page and then use the dividers to trace a tab at the top of your bookmark. Laminate and cut it and you have a cute bookmark to mark your week or month or whatever you need.
Thanks for reading this post. I hope you enjoyed and I’ve inspired you to give these find some uses for all that paper you have in your stash. Leave comments or questions below or feel free to email.
Hello friends and Happy New Year! My first post of 2020 is this cute distressed jewelry box. I made something similar from paper years ago but it was time for a new sturdier box since the original is falling apart from so much use. This jewelry box will just hold some watches and rings and I wear daily but like to remove before bed. This way they can be safely tucked away out of reach of the kitties. Sometimes the kitties are naughty an play with things they should not so it’s my responsibility to make sure they don’t have access to those things.
Anyway let me show you how easy it was to make this box. I kept my box simple by just using some paper, paint, ribbon but you can add all kinds of embellishments. You can add fabric, flowers, jewels, brads, etc.
Art Alternatives MVPM06224 Paper-Mache Hexagon Box Set 5/Pkg
Next, I used Martha Stewart Crafts Multi Surface Satin Acrylic Paint in Sea Lavender (I think this color is discontinued) to paint the box inside and out. I applied 2-3 thin coats. I cannot stress this enough…when painting paper mache products, even smooth surfaces, it is best to apply thin layers, letting each layer dry between applications. I let each layer dry about 10-15 minutes.
Stamperia Double-Sided 12 X 12″ Paper Pad – Music and Canvas Tissuestock Printed French Script, 12-Inch by 12-Inch, Ivory, 10-Pack
Tip: When using Modge Podge to glue down paper work in small areas so you can smooth out the surface and hold it down for a few seconds so it holds properly. otherwise you can get bubbles or areas that just are not glued down.
I added ripped strips of the tissue paper to both parts of the box, adhering each time with the Modge Podge. With thin papers like tissue paper you need to add glue to both the underside and over top.
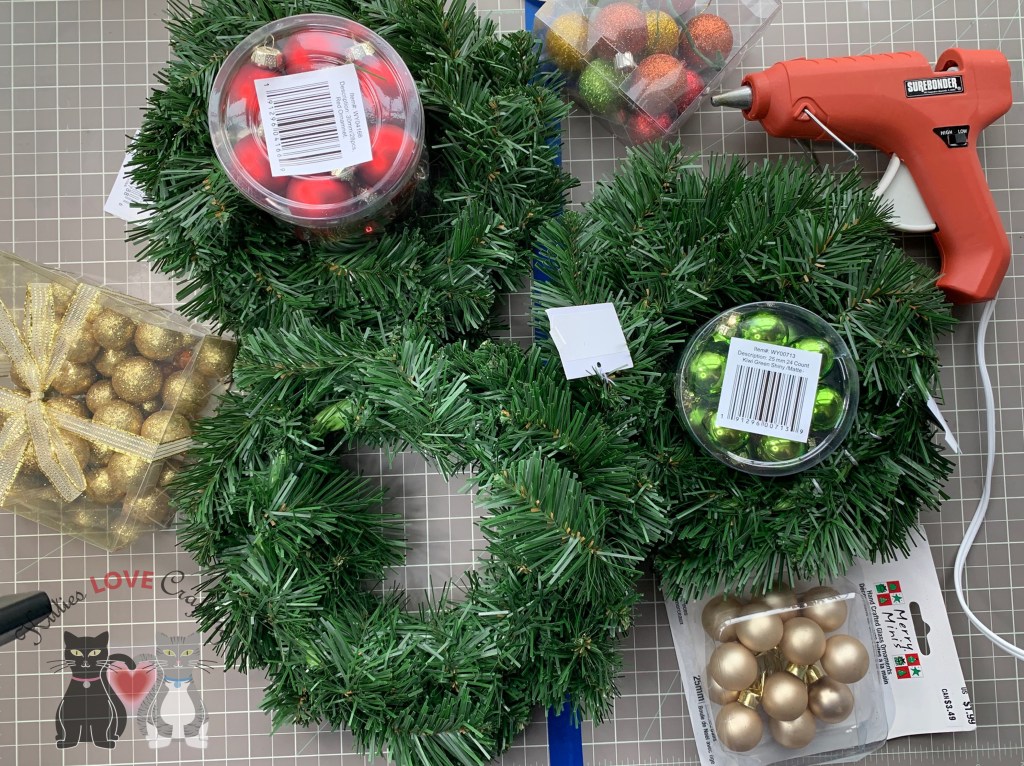
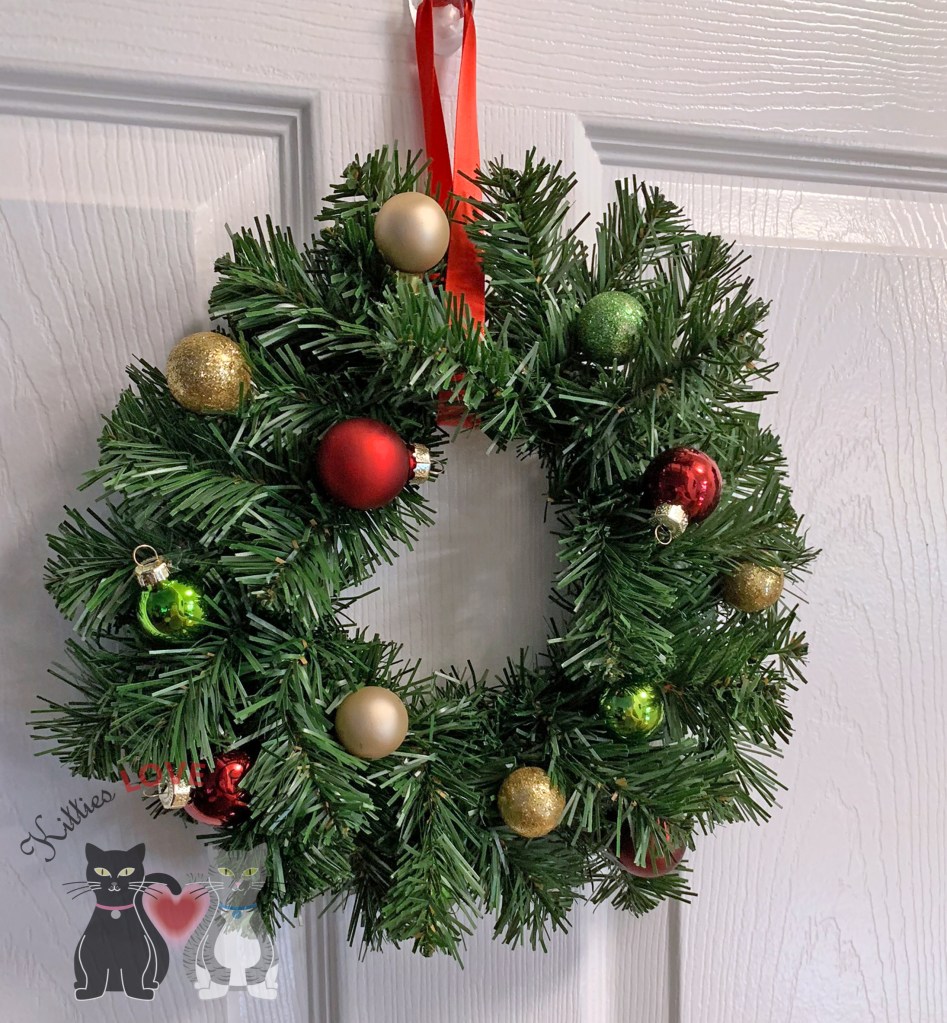
Hello friends. This weekend I made some very cute mini Christmas wreaths for some new decorations. I love to decorate with wreaths and I especially enjoy adding mini ones to doors Inside my home. They enhance your decor without being too in your face. They are also easy to store when you have limited space.
These were super easy to make and inexpensive. The supplies I used are mini wreaths, 25-30mm Ornaments, 5/8” Red Satin Ribbon, Hot Glue Gun and Gorilla Glue Hot Glue Sticks. These little wreaths would make great gifts as well or can be used around a candle for a festive centerpiece.
Supplies
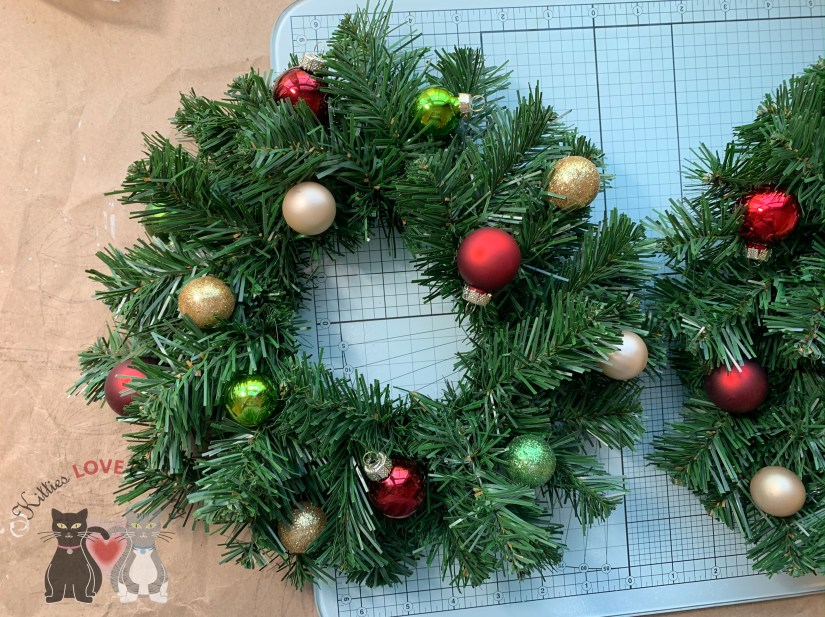
I bought three mini wreaths from Target and hot glued red, green, and gold ornaments to it, scattering them around the wreath. The pale gold, glitter gold, and red and green glitter ornaments are ones I used from my stash.
I added a 5/8” Red Satin Ribbon to each wreath to hang them. That’s all! I told you it was super easy. You can add more items, like ribbon or candies, etc to your if you like.
Thanks for reading this post and I hope I’ve inspired you to make some wreaths for your home or for a gift. Leave comments or questions below or feel free to email
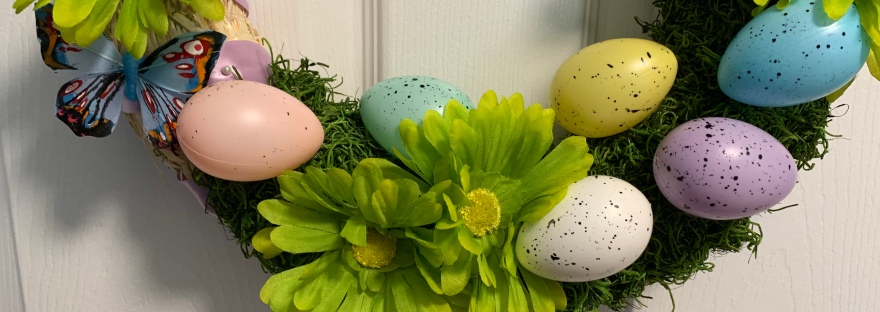
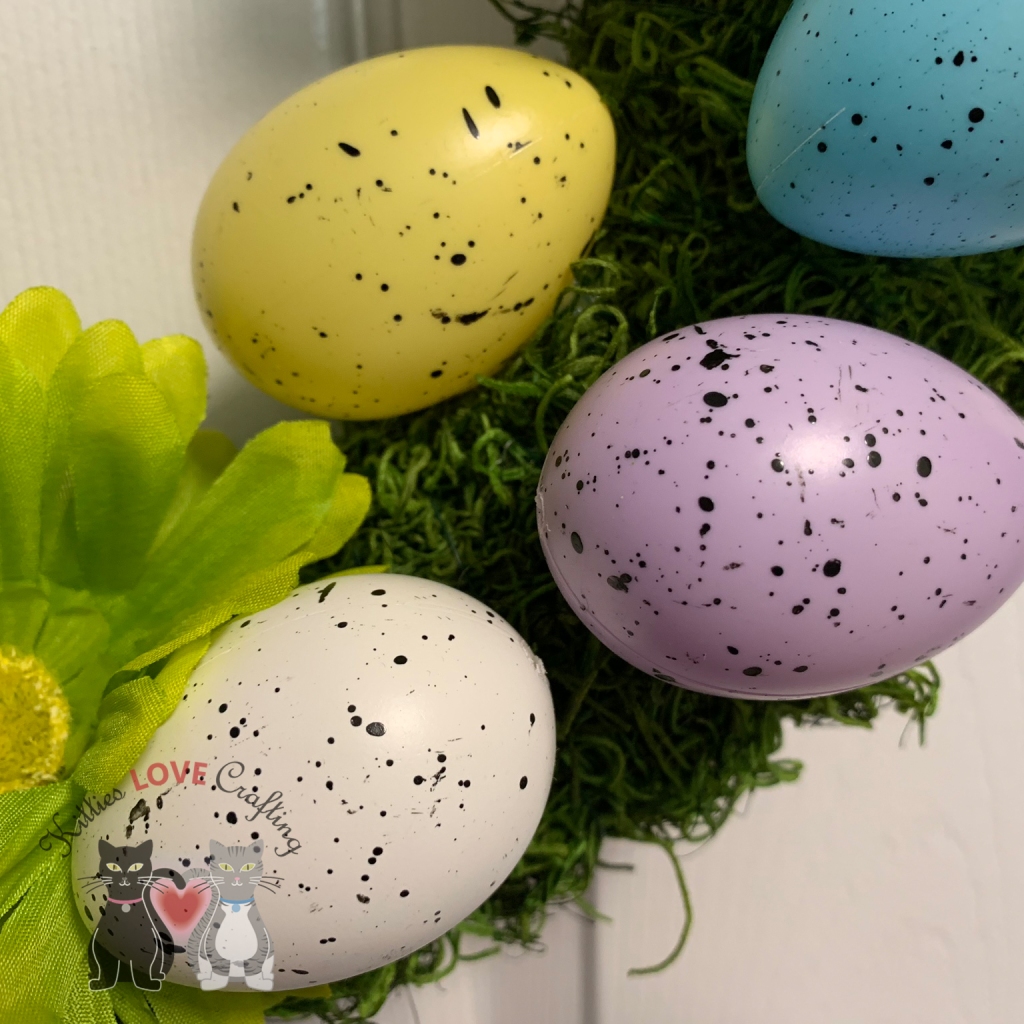
Easter is around the corner and I finally got around to making my Easter Wreath. Yay! I made this wreath using mostly Dollar Tree supplies. My store didn’t have much so I ordered from their online store and had it shipped to my house. They offer a ship-to-store option too.
A word of caution…if you order flowers online they can arrive crushed as mine did. I ordered 6 stems and only got 5 usable flower heads out of it and those were not that great as you will see in the photos. Keep that in mind.
Anyways, it was super easy and quick to make. I started off with a 10-inch straw wreath form. I got mine from Hobby Lobby, but they are readily available at other craft stores and online. Check Amazon, Michaels, Joann Fabrics, Walmart and Dollar Tree. My local store did not carry it but I’m guessing others might. I carefully removed the clear plastic wrap around it as it tends to shed. Nor,ally I would normally leave the plastic wrap on it but since I wanted this to look natural and .organic, I removed it.
After cleaning the straw debris from my desk, i wrapped some 5/8 inch wide lavender satin ribbon around the wreath, creating a stripe pattern. I get most of my ribbon from the Ribbon Retreat. This color is called purple haze. A tiny dab of hot glue on each of the ribbon ends secure it to the wreath.
I added the moss next. I used Green Spanish Moss I hot glued it onto the bottom half of the wreath. Once I had enough of the area covered, I wrapped Green Floral Wire, 22 Gauge around the moss to secure it further. Ok the hard part is done. Time to decorate.
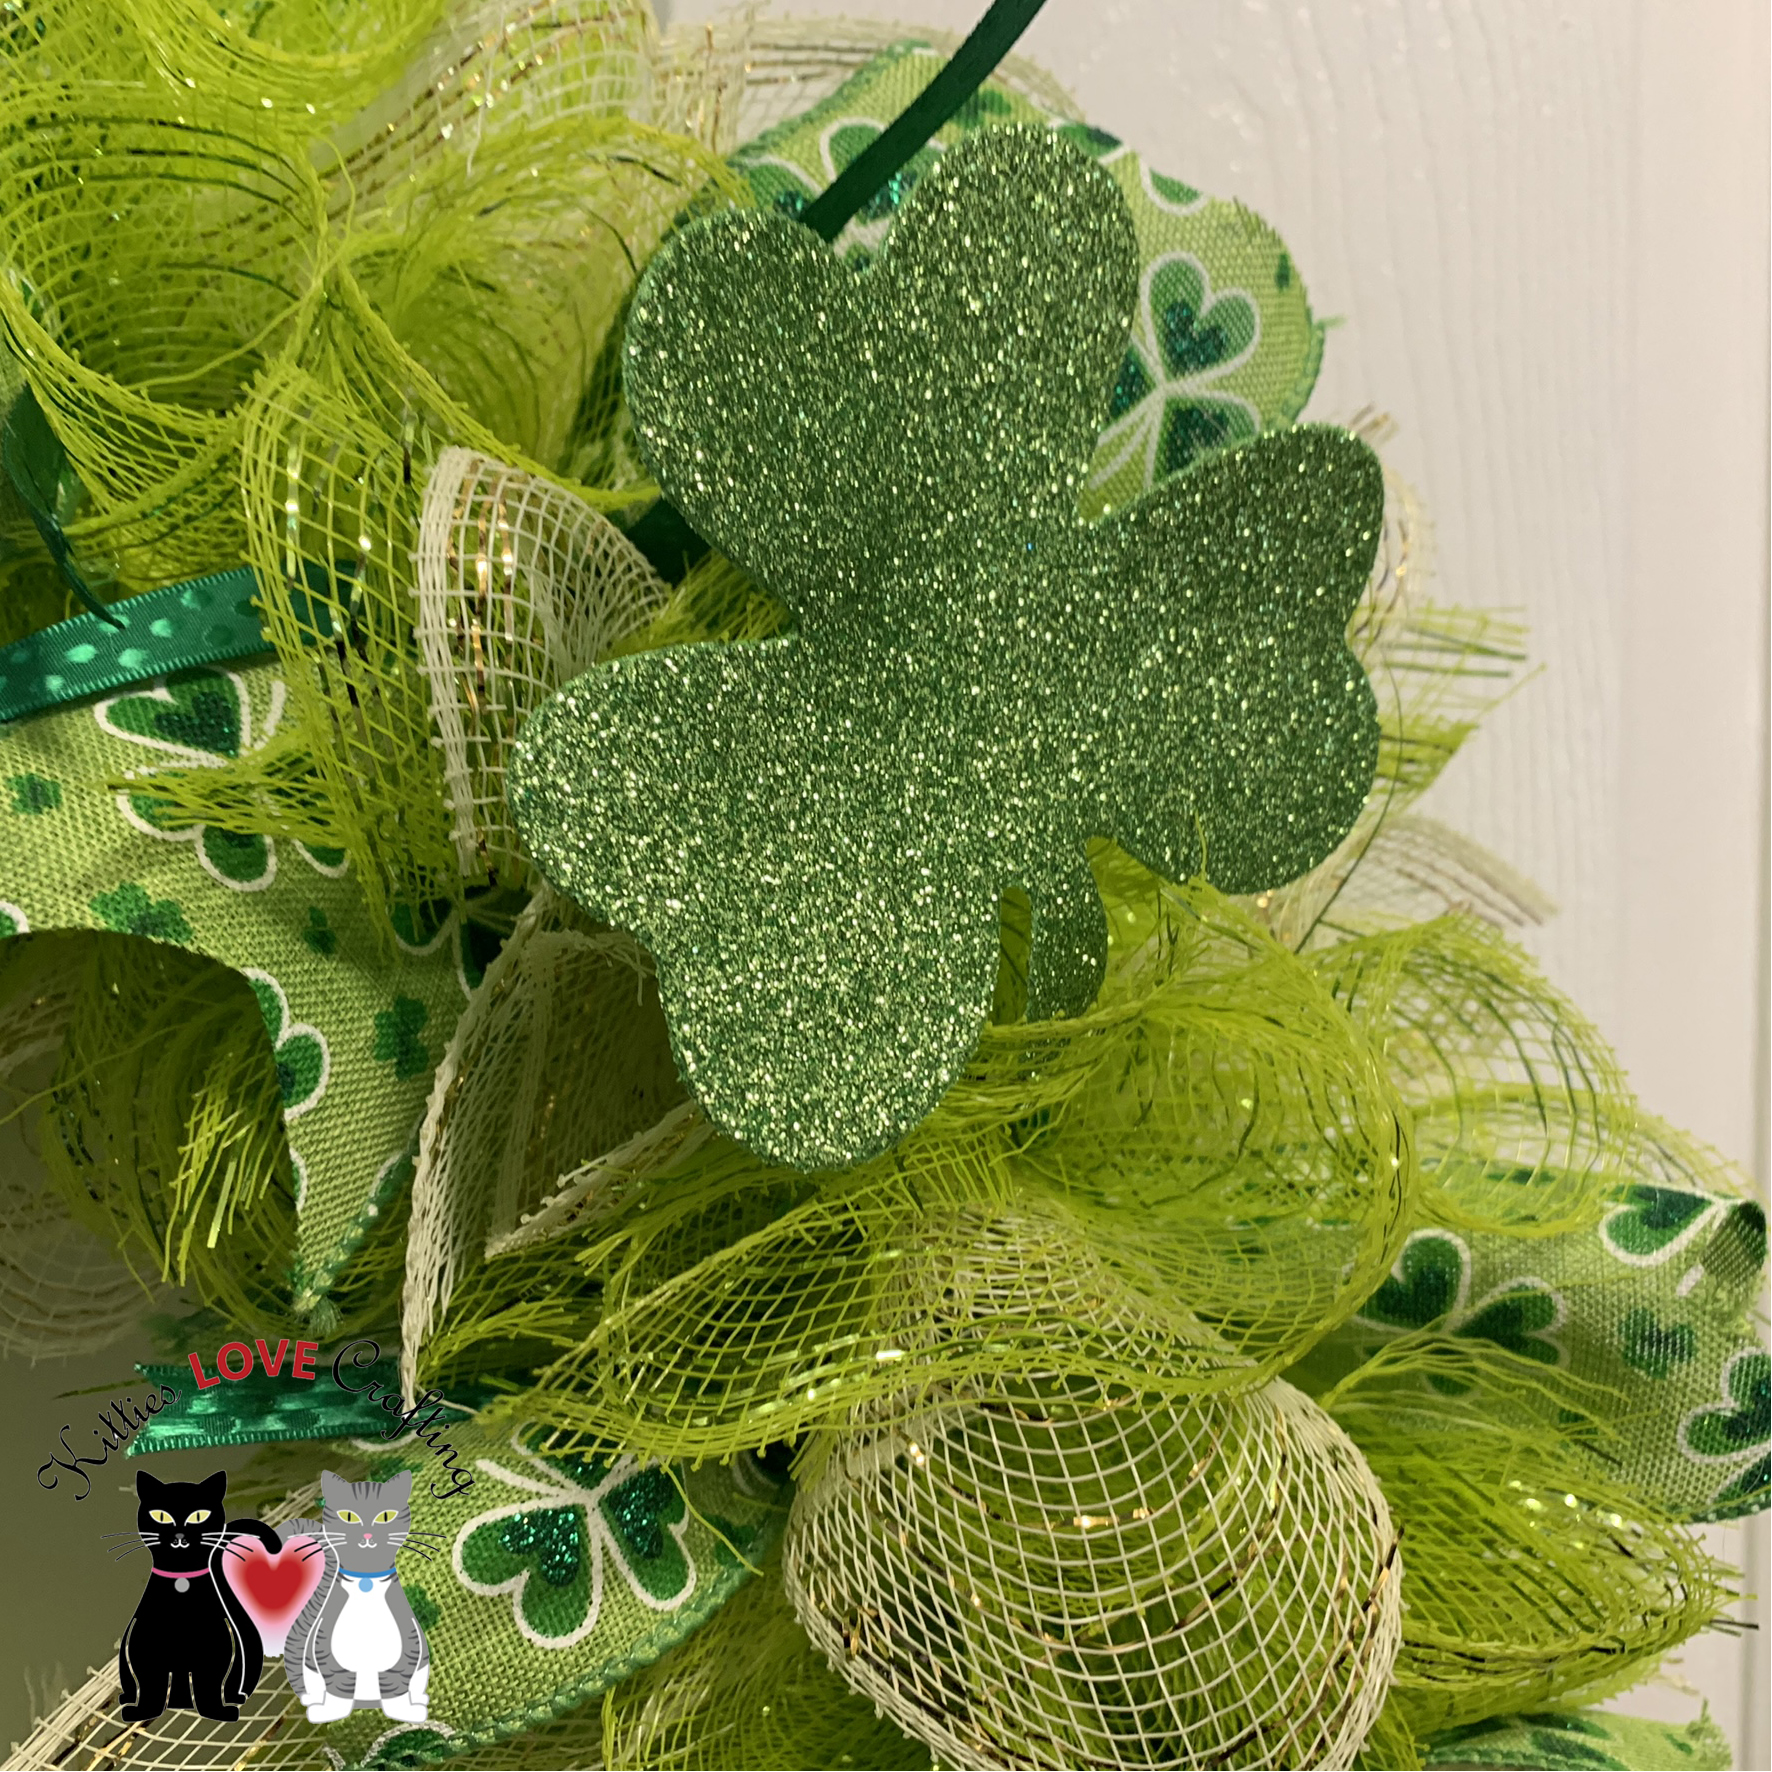
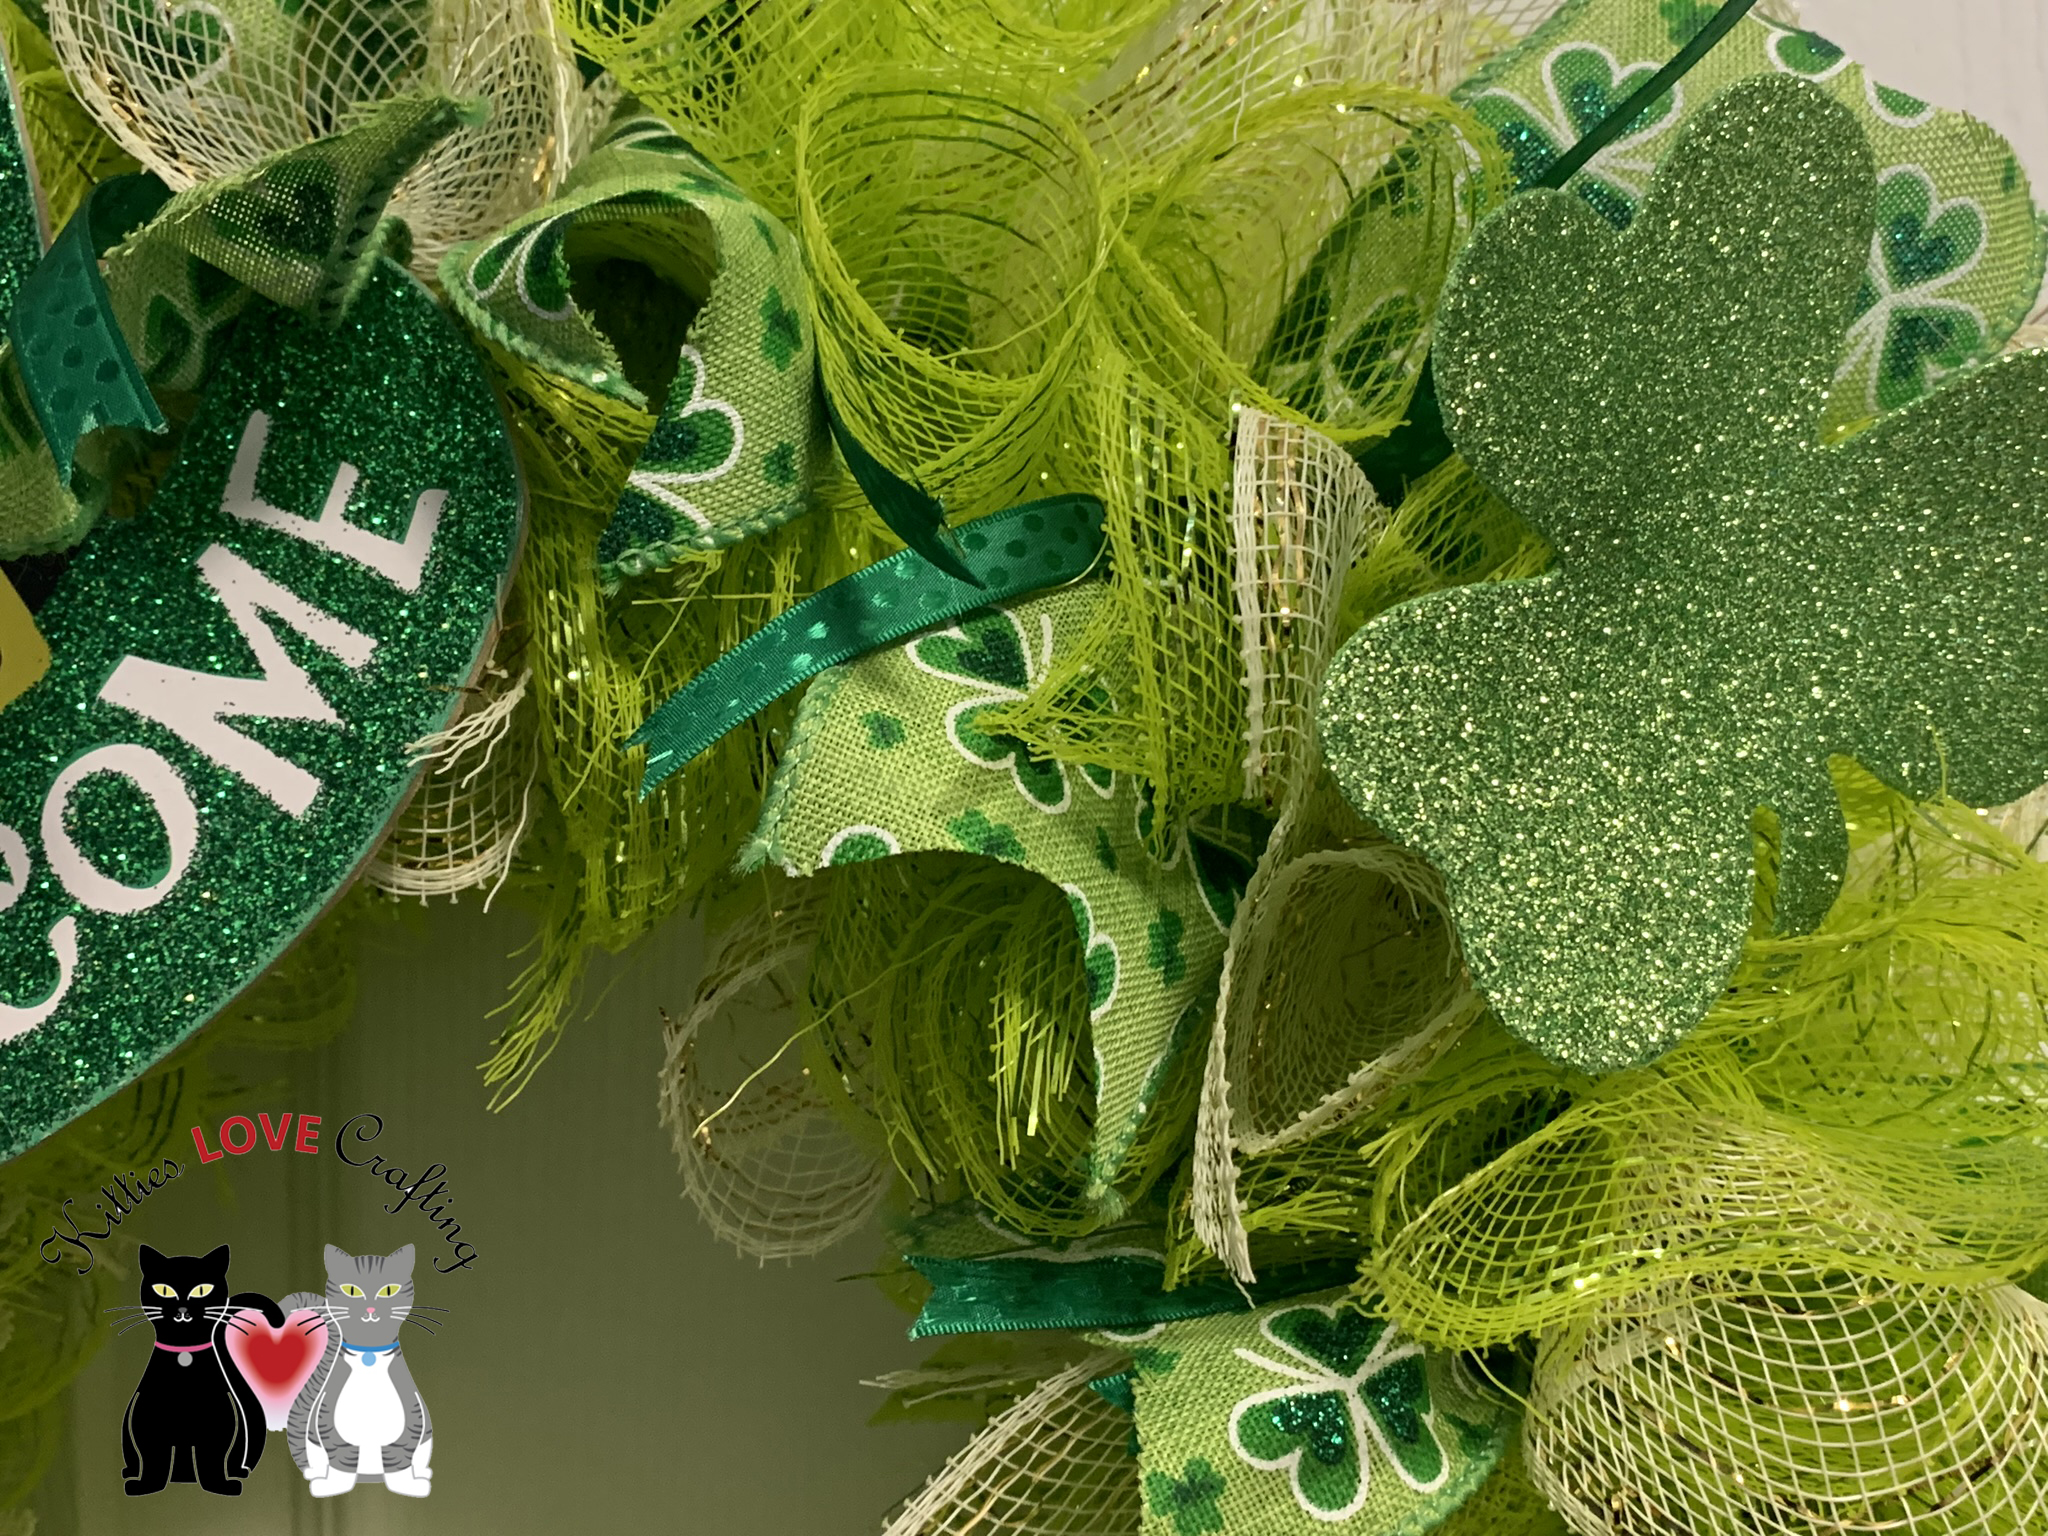
Happy Friday everyone. I don’t know about you but we are starting to get ready for spring in my house. And with Spring comes green…and lots of it. So let’s start it off by celebrating St. Patrick’s Day! My husband is Irish and so I like to put up decorations for the holiday. Since I don’t have one yet, I made a wreath for the front door. My neighbors must think I’m crazy about holidays or just plain crazy because I’ve had a different wreath and welcome mat for every holiday since we moved in last September. LOL
St. Patrick’s Day WreathSt. Patrick’s Day Wreath_Hat DetailSt. Patrick’s Day Wreath_closeupSt. Patrick’s Day Wreath_ closeup 2St. Patrick’s Day Wreath_closeup 3St. Patrick’s Day Wreath_closeup 4
Supplies:
Mesh – Dollar Tree 6-inch long deco mesh in lime green and white with gold metallic (3 rolls each color)
Embellishments – Glitter Leprechaun Hat (dollar tree), Glitter foam shamrocks (dollar tree or Michaels – you can find them in the St. Patrick’s Day section)
Thanks for stopping by to check out my post. Please feel free to leave questions or comments about any of the products listed above or feel free to email me if you prefer.
Hello everyone. I’ve always loved been making wreaths. I started making them when I lived in my small NY apartment and could not keep alot of decorations. A wreath has the ability to capture a holiday, a season, a theme or occasion in a small space. I had to put my passion on hold for awhile due to lack of space (apartment living, arrgh). Now that I have space to store and make them, it’s reignited my love of wreath-making. Look for more wreaths to come in the future!
I have never made one before so, of course, I turned to Youtube. Where else do you learn how to do everything in life, right? You can learn to change a tire, put on makeup and make a wreath all in one day. LOL. I came across this very funny Youtuber, This Southern Girl Can who makes them. She’s pretty much got it down to a science at this point. She uses dollar store supplies to make budget friendly wreaths. Check her out her Youtube channel.
Step 2. A) Cut mesh pieces that are approximately 6 inches in length. This will give you 6 x 6 squares. Alternatively, just roll each piece of mesh over itself so it makes one full loop. Cut ribbon 9 inches long (this is 1.5 times the length of the mesh pieces). B) Also cut your chenille stems (pipe cleaners) in half and then fold those pieces in half again.
Step 3. Take 3 pieces of mesh and 1 piece of ribbon. Roll mesh into coils (rolls). Hold each between your Index and 3rd fingers while you roll the other 2 pieces and pinch all together. Add ribbon with pattern side out away from your finger, then tie with a chenille stem piece. Twist once or twice to secure.
Step 4. A) Now add this bundle to your wreath form by feeding the chenille stem ends through the middle two wires on the wreath form. (see picture Step 4A). B) Continue adding bundles until you fill the whole form. I used 10 bundles per section. A section consists of the space between the 2 vertical wire pieces There are 6 sections so you will use 60 bundles when complete (you can see the sections in picture 4A).
Valentine’s Day Mesh Wreath_FinalValentine’s Day Mesh Wreath_Closeup
Supplies:
Mesh – Dollar Tree 6-inch long mesh in red and white(3 rolls each color)


 https://linkdeli.com/widget.js?id=f5e8378456858c916708


 Step 1
 Step 2A
 Step 2B
 Step 3
 Step 4A
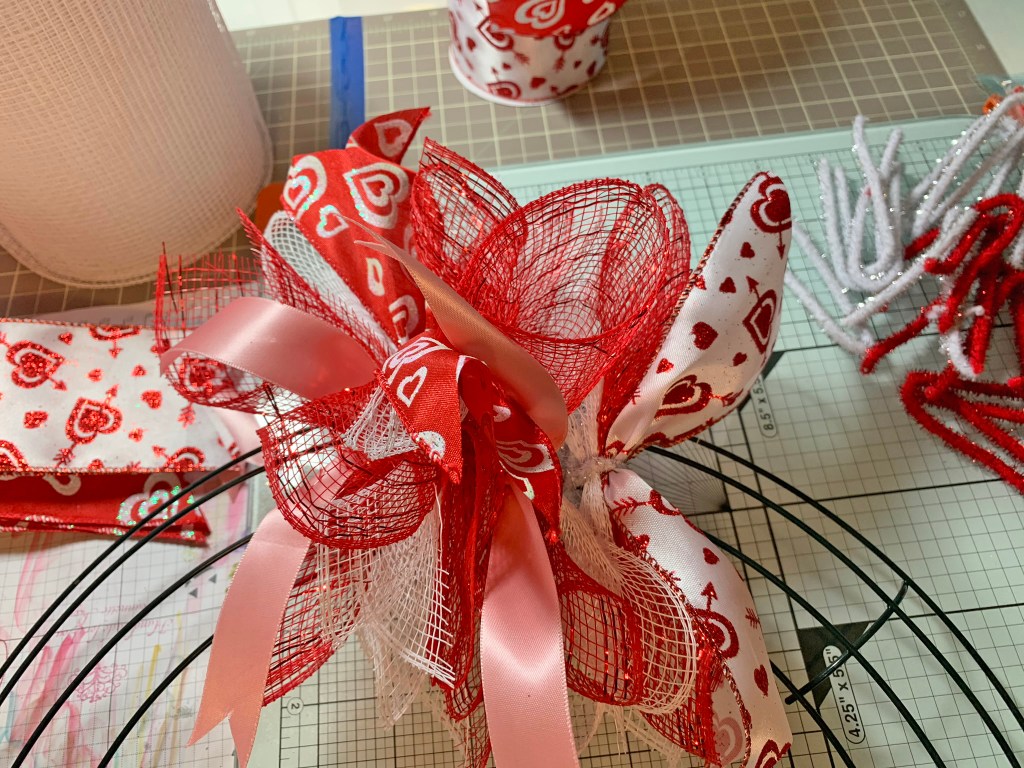 Step 4B

