Holidays 2023, St. Patrick's Day, Valentine's Day!

One Die, Two Ways feat. Lawn Fawn Lucky Clovers

Hello friends. St. Patrick’s day is going to be here soon and if you want to make some cute and quick cards, the Lawn Fawn Lucky Clovers dies set is perfect!

For the first card, I cut a piece of Neenah 100lb Classic Crest Cardstock 8.5 X 11″ to 5-1/2 x 8-1/2″ and scored at 4-1/4″ to create a card base as well as a piece of Neenah 80lb Classic Crest Cardstock 8.5 X 11″ to 4 x 5-1/4″ for the top panel.

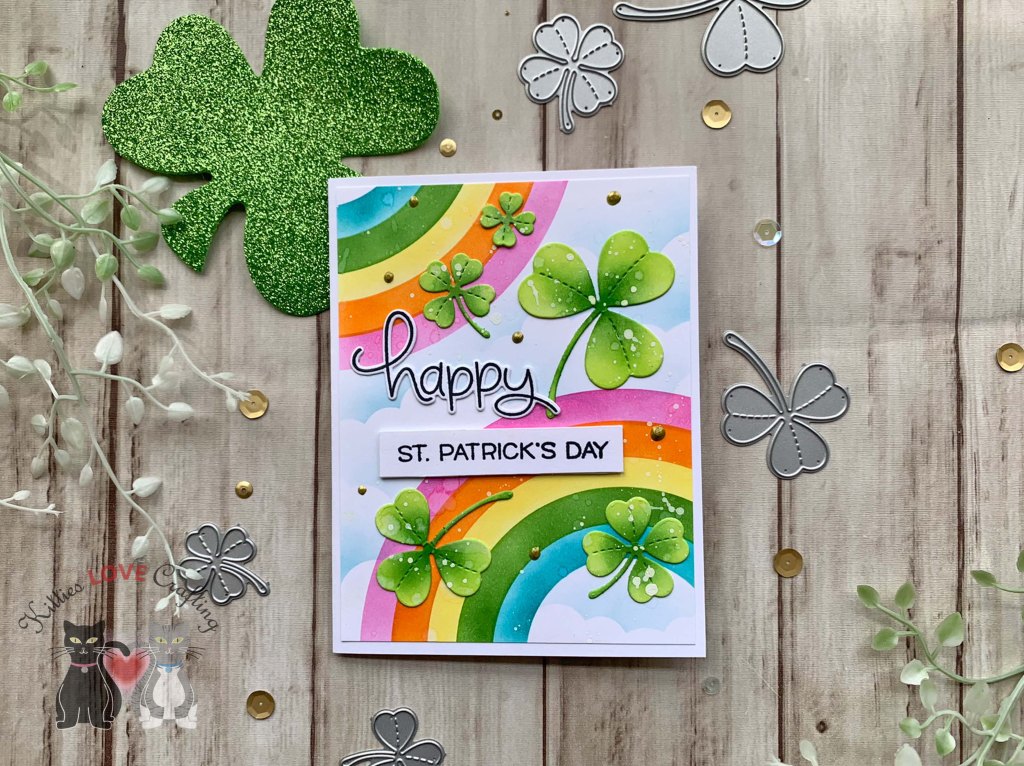
I stenciled the rainbows using the Lawn Fawn Corner Rainbow Stencils and Ranger Tim Holtz Picked Raspberry, Squeezed Lemonade, Mowed Lawn Green, and Peacock Feathers Distress Inks. Then added the clouds using My Favorite Things Mini Cloud Edges Mix-ables Stencil and Tim Holtz Broken China Distress Ink. I sprayed the background with water using the Tim Holtz Distress Sprayer. And lastly added white splatters with White Acrylic Paint.

I die cut several clovers from Neenah 80lb Classic Crest Cardstock 8.5 X 11″ with the Lawn Fawn Lucky Clovers dies and colored them with Ranger Tim Holtz Mowed Lawn Green, Twisted Citron, and Squeezed Lemonade Distress Inks. I sprayed the background with water using the Tim Holtz Distress Sprayer. And lastly added white splatters with White Acrylic Paint.

I stamped the onto Neenah 100lb Classic Crest Cardstock 8.5 X 11″ with Memento Tuxedo Black with the Lawn Fawn Happy Happy Happy and Happy Happy Happy add-on stamp sets. I die cut the “happy” with the coordinating dies.

I finished the card by adding Nuvo Drops in Bright Gold.

On the inside of the card, I added some more clovers.

Dimensions


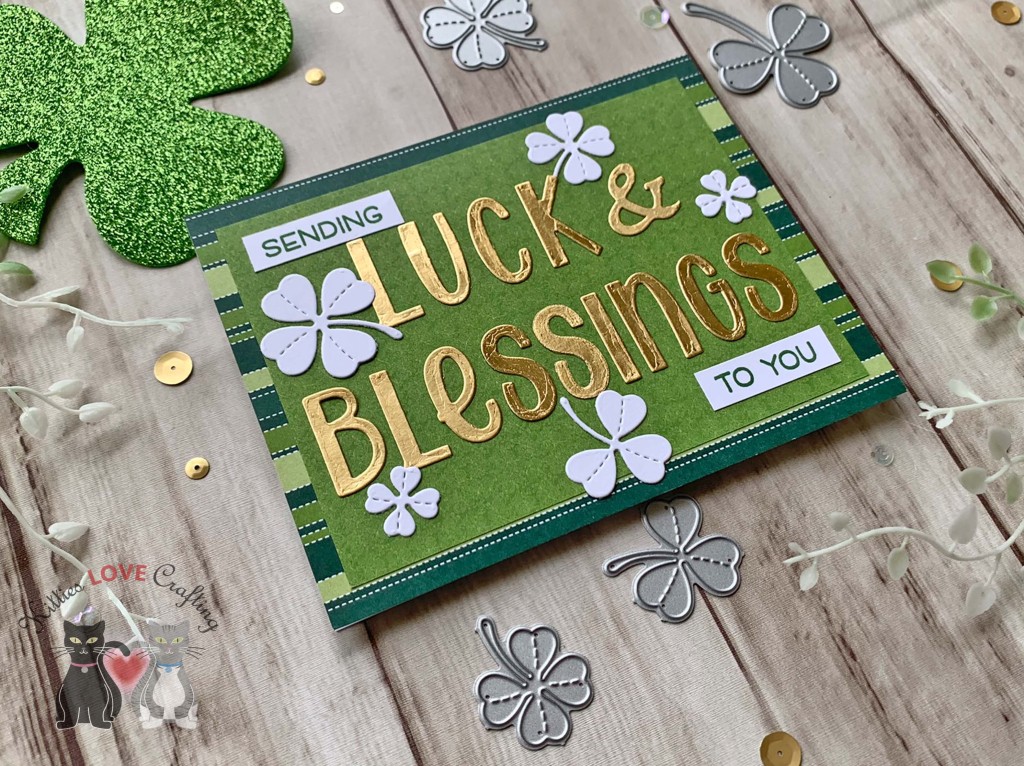
For the second card, I CASEd a card by Renata Dolezel because I loved how the greeting was bold and the focal point of the card. I cut a piece of Neenah 100lb Classic Crest Cardstock 8.5 X 11″ to 5-1/2 x 8-1/2″ and scored at 4-1/4″ to create a card base. I also cut pattern paper from Authentique 6 x 6 Emerald Paper (discontinued) to 4-1/4 x 5-1/2″ and 3-3/4 x 5″.

I die cut several clovers from Neenah 80lb Classic Crest Cardstock 8.5 X 11″ with the Lawn Fawn Lucky Clovers dies. I stamped part of the sentiment onto Neenah 100lb Classic Crest Cardstock 8.5 X 11″ with Tim Holtz Rustic Wilderness Distress Ink and Lawn Fawn’s Happy Happy Happy stampset. I cut the pieces to ~3/8 x 1-1/2″. I die cut the main part of the sentiment from Tim Holtz Idea-ology 8 x 8 Metallic Kraft Stock using the Lawn Fawn Henry’s ABCs.

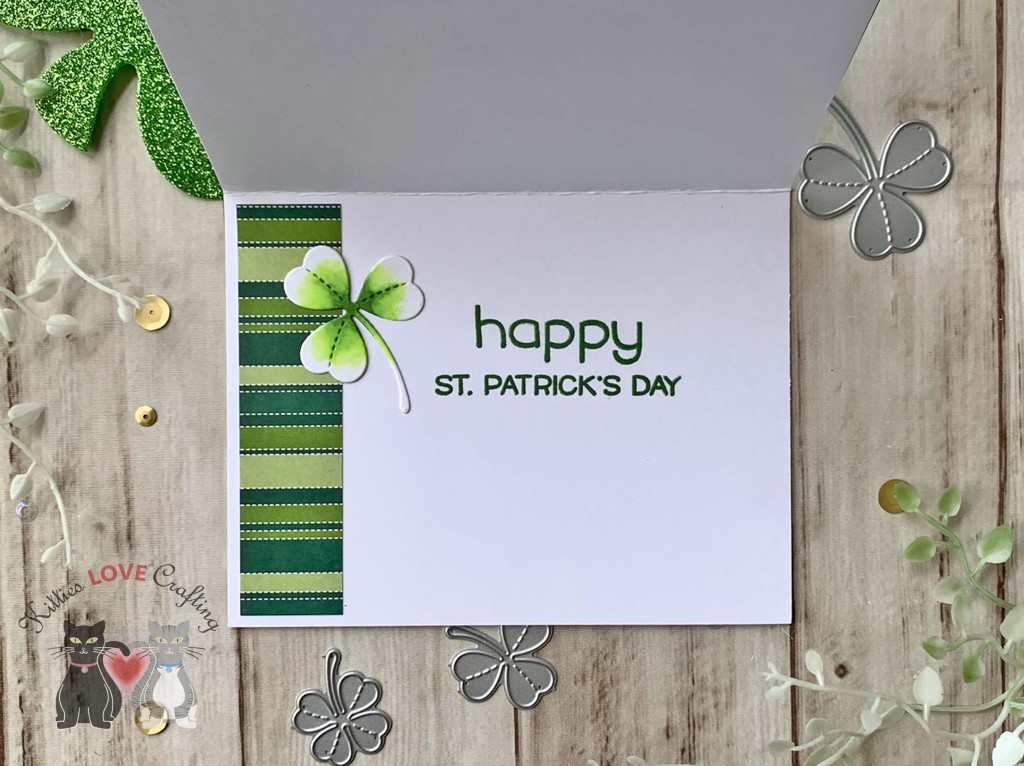
On the inside of the card, I stamped a sentiment from Lawn Fawn’s Happy Happy Happy add-on stampset and added a 1 x 4″ strip of the pattern paper from the top panel. I also added a clover which I colored with Copic Markers (YG25, G07 and 0 blender).

Dimensions

  • Card Base = 5-1/2 x 8-1/2″ and scored at 4-1/4″ Neenah 100lb Classic Crest Cardstock 8.5 X 11″
  • Top panel = 4-1/4 x 5-1/2″ and 3-3/4 x 5″ Authentique 6 x 6 Emerald Paper (discontinued)
  • Inside Panel = 1 x 4″ Authentique 6 x 6 Emerald Paper (discontinued)

Supplies

Thanks for reading this post. I hope I’ve inspired you to give these quick and easy St. Patrick’s Day cards a try for yourself. Leave comments or questions below or feel free to email.

Christmas, Holidays 2020, Stampin' Up!, Tags

Quick Christmas Cards and Tags Using Wonder of the Season Paper by Stampin’ Up! (from the new Aug-Dec Mini Catalog)

As someone who loves to use old book pages in my junk journals, when I saw Wonder of the Season 12 x 12 Designer Series Paper in the new Stampin’ Up! Aug-Dec Mini Catalog, I knew I had to have it! It’s has pages with Christmas stories, recipes and holiday news stories, and there are pages with red foil on one side and black and white print on the other side and also gold foil pages. It can be found on page 31 of the catalog and is part of the Wonder of the Season Suite. I was able to make 2 cards and tags in a short amount of time.

I started the first card by cutting a piece of Whisper White 8-1/2″ X 11″ Thick Cardstock to 5-1/2 x 8-1/2″ and scored at 4-1/4″ to make a card base. Then cut a piece of Wonder of the Season 12 x 12 Designer Series Paper to 5 x 5-1/2″, ripped approximately 3/8″ from the top and bottom of it and adhered it on a diagonal to the card base, trimming off any excess. I cut a piece of 8-1/2″ x 11″ Vellum to 5 x 4-3/4 and ripped the top and bottom again so it is shorter than the pattern piece.

I fussycut the ornaments found on one of the red foil pages of the Wonder of the Season 12 x 12 Designer Series Paper and diecut “Merry Christmas” from Red Foil Sheets with the Word Wishes Dies. I adhered the sentiment and the ornaments to the vellum piece and adhered the vellum to the card, only adding glue behind the diecut and image and trimming off any excess from the sides. I finished it off by adding Pearls (discontinued). I colored some of them with Dark Real Red Stampin’ Blends.

I left the inside of the card blank and just stamped a sentiment from the Tree Angle stampset with Real Red Stampin’ Ink.

Dimensions

I also made a cute tag to match this card. I cut a piece of Whisper White 8-1/2″ X 11″ Thick Cardstock to 2 x 3-5/8″ then using the Delightful Tag Topper Punch to make it into a pretty tag. Then cut a piece of Wonder of the Season 12 x 12 Designer Series Paper to 2-1/2 x 2-3/4″and a piece of 8-1/2″ x 11″ Vellum to 2-1/2 x 2-3/4 and ripped the top and bottom of both pieces and adhered the pattern piece on a diagonal to the card base, trimming off any excess. I added a piece of Red Foil Sheets, measuring 3/16 x 2-1/16″.

I fussycut a tree found on one of the red foil pages of the Wonder of the Season 12 x 12 Designer Series Paper and adhered it to the vellum piece and adhered the vellum to the tag, only adding glue behind the image and trimming off any excess from the sides. I finished it off by adding Pearls (discontinued) and stamping “TO” and “FROM” from the Make A Difference Stampset with Memento Black Ink. I added a piece of red and white twine as well.


Since I loved this paper so much I had to make more cards. I made one with the gold foil paper too.

I started the second card by cutting a piece of Whisper White 8-1/2″ X 11″ Thick Cardstock to 5-1/2 x 8-1/2″ and scored at 4-1/4″ to make a card base. Then cut a piece of Wonder of the Season 12 x 12 Designer Series Paper to 5 x 5-1/2″, ripped approximately 3/8″ from the top and bottom of it and adhered it on a diagonal to the card base, trimming off any excess. I cut a piece of 8-1/2″ x 11″ Vellum to 5 x 4-3/4 and ripped the top and bottom again so it is shorter than the pattern piece.

I fussycut the ornaments found on one of the red foil pages of the Wonder of the Season 12 x 12 Designer Series Paper and diecut “Merry Christmas” from Gold Foil Sheets with the Word Wishes Dies. I adhered the sentiment and the ornaments to the vellum piece and adhered the vellum to the card, only adding glue behind the diecut and image and trimming off any excess from. the sides. I finished it off by adding dots with a Tsukineko Versamark Versamarker and added Gold Stampin’ Emboss Powder and heat embossed.

I left the inside of the card blank and just stamped a sentiment from the Tree Angle stampset with Versamark Ink and added Gold Stampin’ Emboss Powder and heat embossed.

Dimensions

I also made a cute tag to for this card. I did the same exact thing except I used I added a piece of Gold Foil Sheets to the bottom, measuring 3/16 x 2-1/16″. I also I fussycut a gold tree and again made dots used the Tsukineko Versamark Versamarker and added Gold Stampin’ Emboss Powder and heat embossed and stamped “TO” and “FROM” from the Make A Difference Stampset with Memento Black Ink. I added a piece of Gold Metallic Trim as well.


Thanks for reading this post. I hope you enjoyed and I’ve inspired you to try these easy cards and tags using this beautiful paper for yourself! Leave comments or questions below or feel free to email me. If you want to share you creations with me tag me on instagram @kittieslovecrafting. If you would like a Stampin’ Up! catalog, please email me as well. All current catalogs can be found on the right side of this post and the Stampin’ Up! page. All news and fun stuff happening at Stampin’ Up! are listed there!

Christmas, DIY Projects, Holidays 2019, Wreaths

DIY: Super Easy Christmas Wreaths

Hello friends. This weekend I made some very cute mini Christmas wreaths for some new decorations. I love to decorate with wreaths and I especially enjoy adding mini ones to doors Inside my home. They enhance your decor without being too in your face. They are also easy to store when you have limited space.

These were super easy to make and inexpensive. The supplies I used are mini wreaths, 25-30mm Ornaments, 5/8” Red Satin Ribbon, Hot Glue Gun and Gorilla Glue Hot Glue Sticks. These little wreaths would make great gifts as well or can be used around a candle for a festive centerpiece.

Supplies

I bought three mini wreaths from Target and hot glued red, green, and gold ornaments to it, scattering them around the wreath. The pale gold, glitter gold, and red and green glitter ornaments are ones I used from my stash.

I added a 5/8” Red Satin Ribbon to each wreath to hang them. That’s all! I told you it was super easy. You can add more items, like ribbon or candies, etc to your if you like.

https://linkdeli.com/widget.js?1559654439292

Thanks for reading this post and I hope I’ve inspired you to make some wreaths for your home or for a gift. Leave comments or questions below or feel free to email