Autumn, Fall, Fall

Fall Card featuring Honey Bee Stamps Big Pickup Tailgate and Loads of Fall

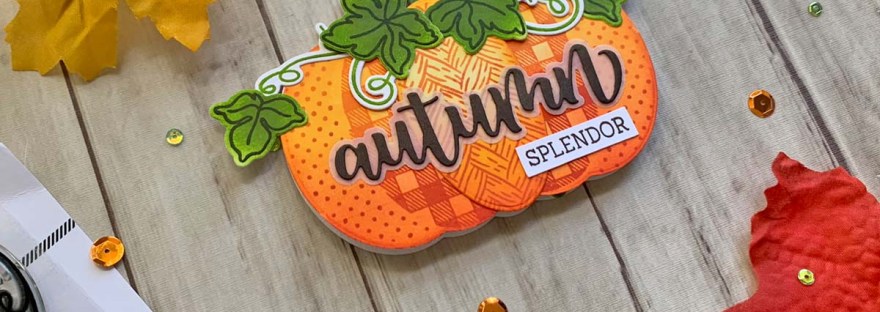
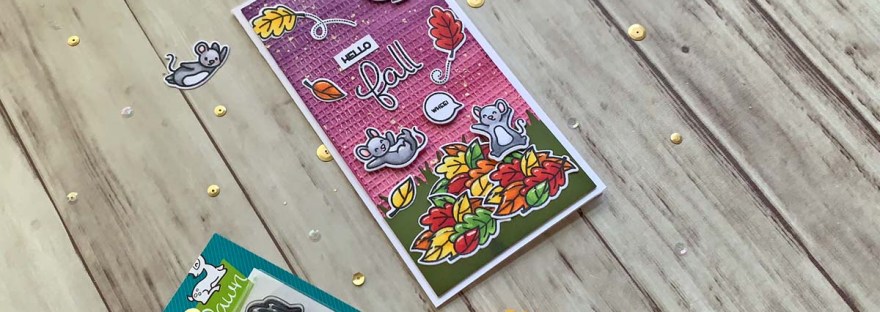
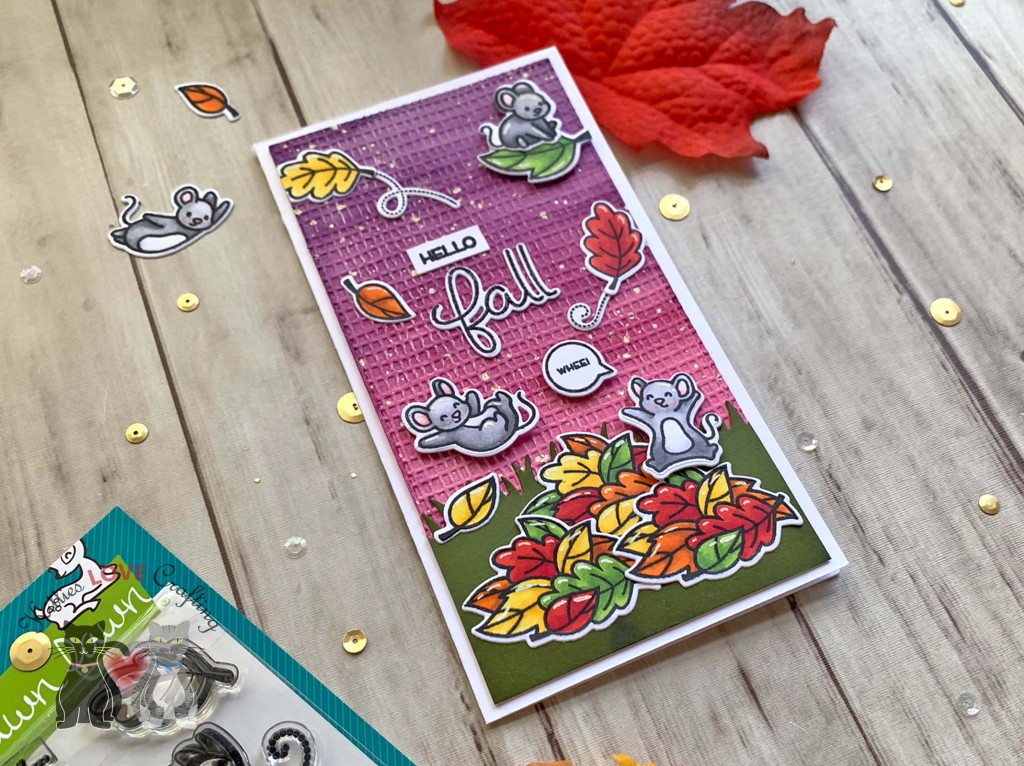
Hi friends. Here’s another cute Fall card featuring Honey Bee Stamps Big Pickup Tailgate and Loads of Fall.

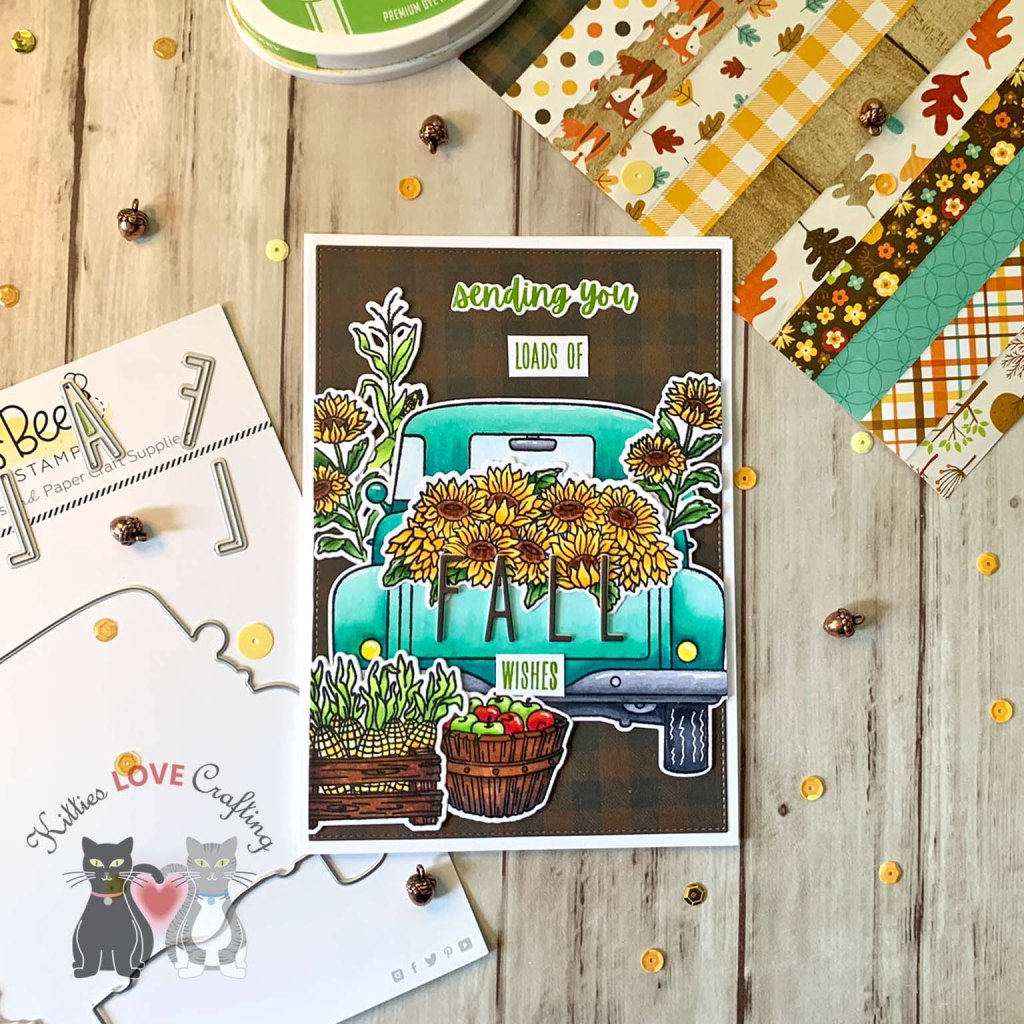
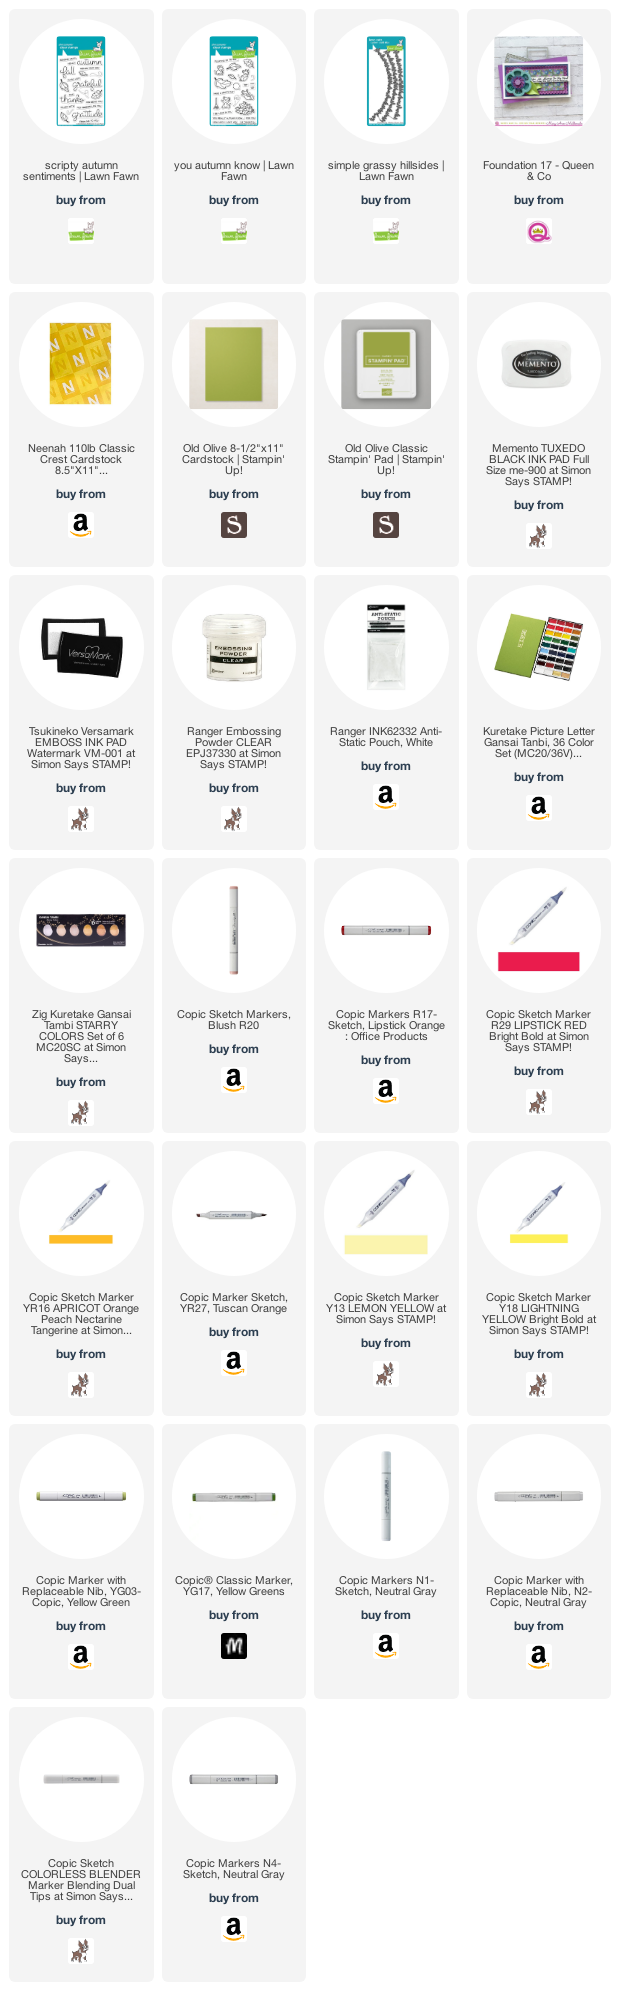
For this card, I cut a piece of Neenah 110lb Classic Crest Cardstock to 10 x 7″ and scored at 5″ to create the card base. Then die cut a piece of pattern paper from the Echo Park Paper Company 12 x 12 A Perfect Autumn Collection Kit using the Queen & Company Foundation 18 Dies.

I stamped the images from the Honey Bee Stamps Big Pickup Tailgate 6×6 Stamp Set and the Honey Bee Loads of Fall Stamp Set onto Neenah 110lb Classic Crest Cardstock with Memento Tuxedo Black Ink. I colored them with Copic markers. I used Y13, Y18, E15, E37 & E29, YG13, YG17 & G07 for the sunflowers; Y00, Y13, Y18, YG01, YG25, E29, E37 & E79 for the corn; BG11, BG63, BG18 & BG49 for the truck bed; BG000 & 0 for the windows; C1, C3, C5, C7, & C9 for the metal; Y02 & Y13 for lights; R05 & R46, YG01 & YG25, E37, E79 & E25 for the apples; Y13 & Y17 for license plate. And diecut them with the coordinating dies.

I stamped the sentiment from Honey Bee Stamps Big Pickup Cab 6×6 Stamp Set onto Neenah 110lb Classic Crest Cardstock with Catherine Pooler Designs Lime Rickey Ink and diecut it with the coordinating dies. Then I die cut Honey Bee Tailgate Alphabet Dies from a piece of pattern paper from the Echo Park Paper Company 12 x 12 A Perfect Autumn Collection Kit once as well as from white cardstock twice.

I finished it off by adding highligts with a White Gel Pen.

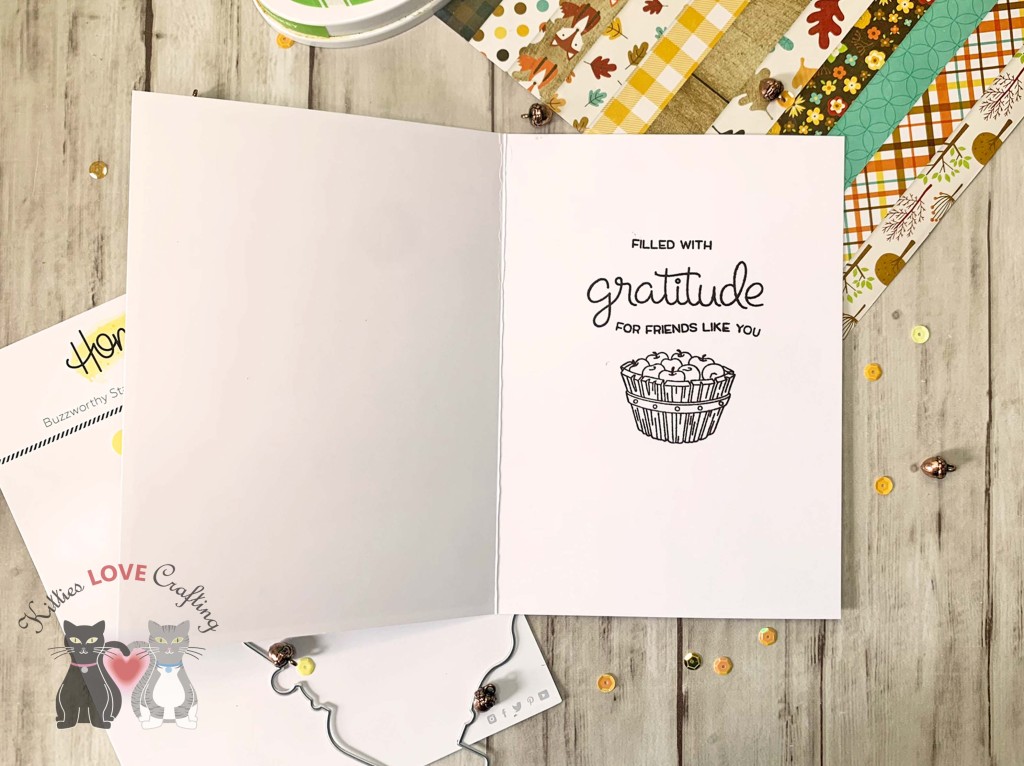
On the inside of the card, I stamped a sentiment from Lawn Fawn Scripty Autumn Sentiments as well as from Honey Bee Loads of Fall Stamp Set with Memento Tuxedo Black Ink.

Dimensions


Supplies

https://linkdeli.com/widget.js?id=f5e8378456858c916708

Thanks for reading this post! I hope you enjoyed and I’ve inspired you to make this cute Fall card yourself! If you want to share you creations with me tag me on instagram @kittieslovecrafting. Leave comments or questions below or feel free to email me.

Embossed Background, Halloween, Halloween

Creating a Dimensional Halloween Card featuring Honey Bee Stamps

Hi friends. A quick way to create a dimensional background with little effort is to use an embossing folder. We all have a bunch of embossing folders we bought when it was all the rage to emboss everything and now they sit in a drawer or craft room shelf collecting dust. Am I right?!? Come on, you know it’s true??? LOL Well thankfully they are coming back in fashion and there are so many techniques you can do with them. Today we are keeping it simple — just some ink and a blender. No fancy tools needed either.

For this card, I cut a piece of Neenah 110lb Classic Crest Cardstock to 8-1/2 x 5-1/2″ and scored at 4-1/4″ to create the card base. Then cut a piece measuring 4 x 5-1/4″ and embossed with the Stampin’ Up! Cobwebs 3D Embossing Folder (retired); any spiderweb embossing folder will work here.

I used mostly Seedless Preserves and Villainous Poison Distress Oxide Inks to color the background. Then lightly went over the raised cobwebs with some Chipped Sapphire Distress Oxide Ink. I sprayed some water on the background to distress it further.

I stamped the all the images from the Honey Bee Stamps Pumpkin Patch Stampset onto Neenah 110lb Classic Crest Cardstock with Midnight Ink and heat set with Clear Embossing Powder. Then colored the pumpkin with Spiced Marmalade and Wild Honey Distress Oxide Inks. I colored the leaves with Twisted Citron, Rustic Wilderness, and Peeled Paint Distress Oxide Inks. I used Picked Raspberry Distress Oxide Ink for the flowers.

I stamped the ghost and bat images from Lawn Fawn Happy Haunting stampset and colored them with Copic Markers. I used C00, 0 and R20 for the ghosts. And then diecut them with the coordinating dies.

I stamped the sentiment from Honey Bee Stamps Boo 3×4 Stamp Set onto Neenah 110lb Classic Crest Cardstock with Midnight Ink and die cut the ‘boo’ from Simon Says Stamp Cardstock 100# Black 8-1/2 x 11″ Cardstock 3x with the Honey Bee Boo Dies. I finished it off by adding some glitter with a Spectrum Noir Clear Overlay Sparkle Pen.

On the inside of the card, I stamped a sentiment from Queen and Company Halloween Hoopla Kit with with Midnight Ink and added an extra ghost.

Dimensions


Supplies

https://linkdeli.com/widget.js?id=f5e8378456858c916708

Thanks for reading this post! I hope you enjoyed and I’ve inspired you to make this cute Halloween card yourself! If you want to share you creations with me tag me on instagram @kittieslovecrafting. Leave comments or questions below or feel free to email me.

Autumn, Fall, Fall

Fall Shaped Card featuring Honey Bee Stamps

Hi friends. Here’s a quick pumpkin shaped card that can easily be mass produced. You can use these as cards, notes, invitations… I added additional ink over the pumpkins to give them more depth but you can easily stamp onto white cardstock or plain colored cardstock.

3or this card, I cut a piece of Neenah 110lb Classic Crest Cardstock to 7-1/2 x 4-3/4″ and scored at 3-3/4″ to create the card base. Then diecut it using the largest pumpkin from the Honey Bee Stamps Patchwork Pumpkin Dies, leaving the edge of thedie a bit off the card base so it doesn’t cut through the edge. I also cut a second piece of just the pumpkin.

I stamped the pumpkin using both Catherine Pooler Designs Orange Twist and Mandarin Spice Inks then inked with Catching Rays, Sauna, and Orange Twist Inks to create gradient. The stamped the leaves with Memento Tuxedo Ink and colored them with. the stamped the stem and spirals with Lime Rickey and Eucalyptus Inks.

I stamped the sentiment from Honey Bee Stamps Autumn 3×4 Stamp Set onto Neenah 110lb Classic Crest Cardstock with Stampin’ up! Early Espresso Ink and die cut the ‘autumn’ from Stampin’ up! Early Espresso 8-1/2 x 11″ Cardstock and the shadow from Vellum with Honey Bee Stamps Autumn – Honey Cuts.

On the inside of the card, I stamped a sentiment from Queen and Company Happy Harvest Fall Kit with Stampin’ up! Early Espresso Ink and added anextra leaf and spiral.

Dimensions


Supplies

https://linkdeli.com/widget.js?id=f5e8378456858c916708

Thanks for reading this post! I hope you enjoyed and I’ve inspired you to make this cute critter card yourself! If you want to share you creations with me tag me on instagram @kittieslovecrafting. Leave comments or questions below or feel free to email me.

Autumn, Embossed Background, Fall, Fall, Mini Slimline, Techniques, Watercolor techniques

Fall Mini Slimline Card featuring Lawn Fawn’s You Autumn Know

Hi friends. The little mice in the Lawn Fawn You Autumn Know Stampset are so stinking cute that I just had to make this mini slimline card and added some texture to the background by using an older Crafters Companion Embossing Folder.

For this card, I cut a piece of Neenah 110lb Classic Crest Cardstock to 7 x 6-1/2″ and scored at 3-1/4″ to create the card base. I also diecut a piece of Neenah white cardstock with the Queen and Company Foundation 17 dies.

Then I used my Kuretake Gansai Tambi 36 colors Watercolor Paint Set to color the background. I used a red, blue and purple color. Then created some splashes with the Zig Kuretake Gansai Tambi Starry Colors Set. I created some texture by using the Crafters Companion Textures Artist Collection Hessian Embossing Folder (retired).

I die cut the grass from Stampin’ Up! Old Olive 8-1/2″ X 11″ Cardstock with the Lawn Fawn Simple Grassy Hillsides and added some Stampin’ Up! Old Olive Ink.

I stamped the images from Lawn Fawn You Autumn Know Stampset onto Neenah 110lb Classic Crest Cardstock with Memento Tuxedo Black Ink and colored them with Copic Markers. I used Y13 & Y18, YR16 & YR27, R17 & R29, YG03 & YG25 for the leaves; and R20, N1, N2, N4 & copic blender for the mice and die cut with the coordinating dies.

I stamped the sentiment from Lawn Fawn Scripty Autumn Sentiments onto Neenah 110lb Classic Crest Cardstock with Memento Tuxedo Ink and then Versamark Ink and embossed it using Ranger Clear Embossing Powder and die cut with the coordinating die set.

I finished the card by adding some highlights with a White Signo Gel Pen.

On the inside of the card, I stamped a sentiment from Lawn Fawn Scripty Autumn Sentiments with Memento Tuxedo Ink and and added an extra leaf.

Dimensions


Supplies

https://linkdeli.com/widget.js?id=f5e8378456858c916708

Thanks for reading this post! I hope you enjoyed and I’ve inspired you to make this cute mini slimline card yourself! If you want to share you creations with me tag me on instagram @kittieslovecrafting. Leave comments or questions below or feel free to email me.