Mother's Day, Stenciled Background

Rainbow Mother’s Day Cards feat. Lawn Fawn

Hello friends. Mother’s Day is coming soon and if you need to make a quick card here’s one for you. For this very bright and happy card I used stencils to create a quick background with lots of punch.

For this card, I cut a piece of Neenah 100lb Classic Crest Cardstock 8.5 X 11″ to 10 x 7″ and scored at 5″ to create a card base, and another piece to 4-3/4 x 6-3/4.

I stenciled the background using the Lawn Fawn Corner Rainbow Stencils and Tim Holtz Kitsch Flamingo, Spiced Marmalade, Squeezed Lemonade, Mowed Lawn, and Tumbled Glass Distress Oxide Inks.

I die cut the sentiment from the top panel using the Lawn Fawn Giant Happy Mother’s Day as well as twice from Simon Says Stamp 100lb Black Cardstock. Then stamped the butterflies from the Simon Says Stamp Beautiful Day stampset (This came in the SSS April 2018 Card Kit which is now discontinued) with Memento Tuxedo Black Ink.

I finished off the card by adding some Fresh Snowfall Nuvo Glitter Drops.

I left the inside of the card blank.

Dimensions


Supplies

Thanks for reading this post. I hope I’ve inspired you to give this Mother’s Day card a try for yourself. Leave comments or questions below or feel free to email.

Mother's Day

Mother’s Day Card feat. Lawn Fawn How You Bean?

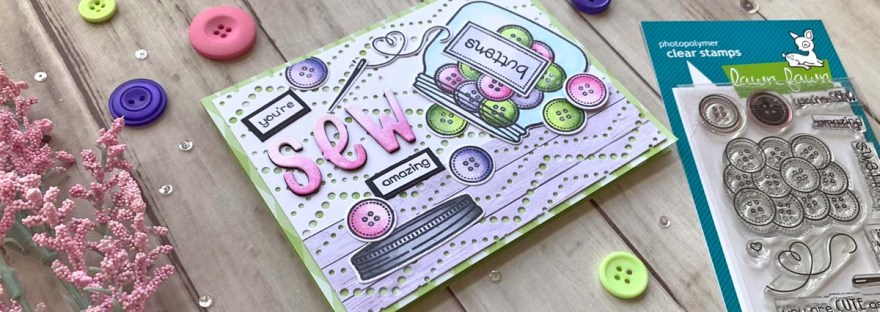
Hello friends. Are you in need of a Mother’s Day Card? Does the woman in your life love sewing? Then the new Lawn Fawn How You Bean? Buttons Add-on stampset is perfect for them. I absolutely love the How You Bean? stampset and all the add-ons Lawn Fawn has developed since it’s inception. Mason jars are super cute on cards and having lots of add-ons helps.

For the first card, I cut a piece of Simon Says Stamp 100# GREEN APPLE Cardstock to 5-1/2 x 8-1/2″ and scored at 4-1/4″ to create a card base and a piece of a piece of My Favorite Things Tranquil Textures 6 x 6 Cardstock (I think this paper is discontinued) to 4-1/4 x 5-1/2″. Then diecut another piece from the same paper pack and one from Neenah 100lb Classic Crest Cardstock 8.5 X 11″ with the Catherine Pooler Designs Dotted Zig Zag Cover Plate. I trimmed the white piece to 4 x 5-1/4″ and the pattern paper to 1-3/8 x 4″.

I stamped the images from Lawn Fawn How You Bean? Buttons Add-on stampset onto Neenah 100lb Classic Crest Cardstock 8.5 X 11″ with Memento Tuxedo Black Ink and colored them with Copic Markers. I used BV0000, BV00 & BV13, RV000, RV52 & RV55, YG01, YG03 & YG11 for the buttons; BG000 and Copic blender (0) for the mason jar; C3, C5 & N6 for the jar lid; and C00 & C1 for the label.

I stamped the sentiment from Lawn Fawn How You Bean? Buttons Add-on stampset onto Neenah 100lb Classic Crest Cardstock 8.5 X 11″ with Memento Tuxedo Black Ink and trimmed down and added some Simon Says Stamp 100# Black Cardstock behind it.

I die cut the letters from Neenah 100lb Classic Crest Cardstock 8.5 X 11″ 1x and 3x from Simon Says Stamp 100# Black Cardstock using the Lawn Fawn Henry’s ABCs and stacked them. I colored the white letters with RV000, RV52 & RV55, Copic Markers. To finish off the card, I added some shimmer with the Spectrum Noir Clear Overlay Sparkle Pens to the buttons and the die cut letters.

On the inside of the card, I cut a piece of Neenah 100lb Classic Crest Cardstock 8.5 X 11″ to 4 x 5-1/4″ and a piece of the same pale purple pattern paper to 1 x 5-1/4″. I also diecut the sentiment from the same paper pad with the Lawn Fawn Giant Happy Mother’s Day and added some addtional buttons.

Dimensions


Supplies

Thanks for reading this post. I hope I’ve inspired you to give these fun birthday cards a try for yourself. Leave comments or questions below or feel free to email.

Card Kits, Holidays 2022, Mother's Day, Mother’s Day

I Cut Apart Stamped Images to Make Them Fit My Cards! OMG!

Mother’s Day Cards featuring the Simon Says Stamp Easter Joy Stampset and Lawn Fawn Giant Sentiments

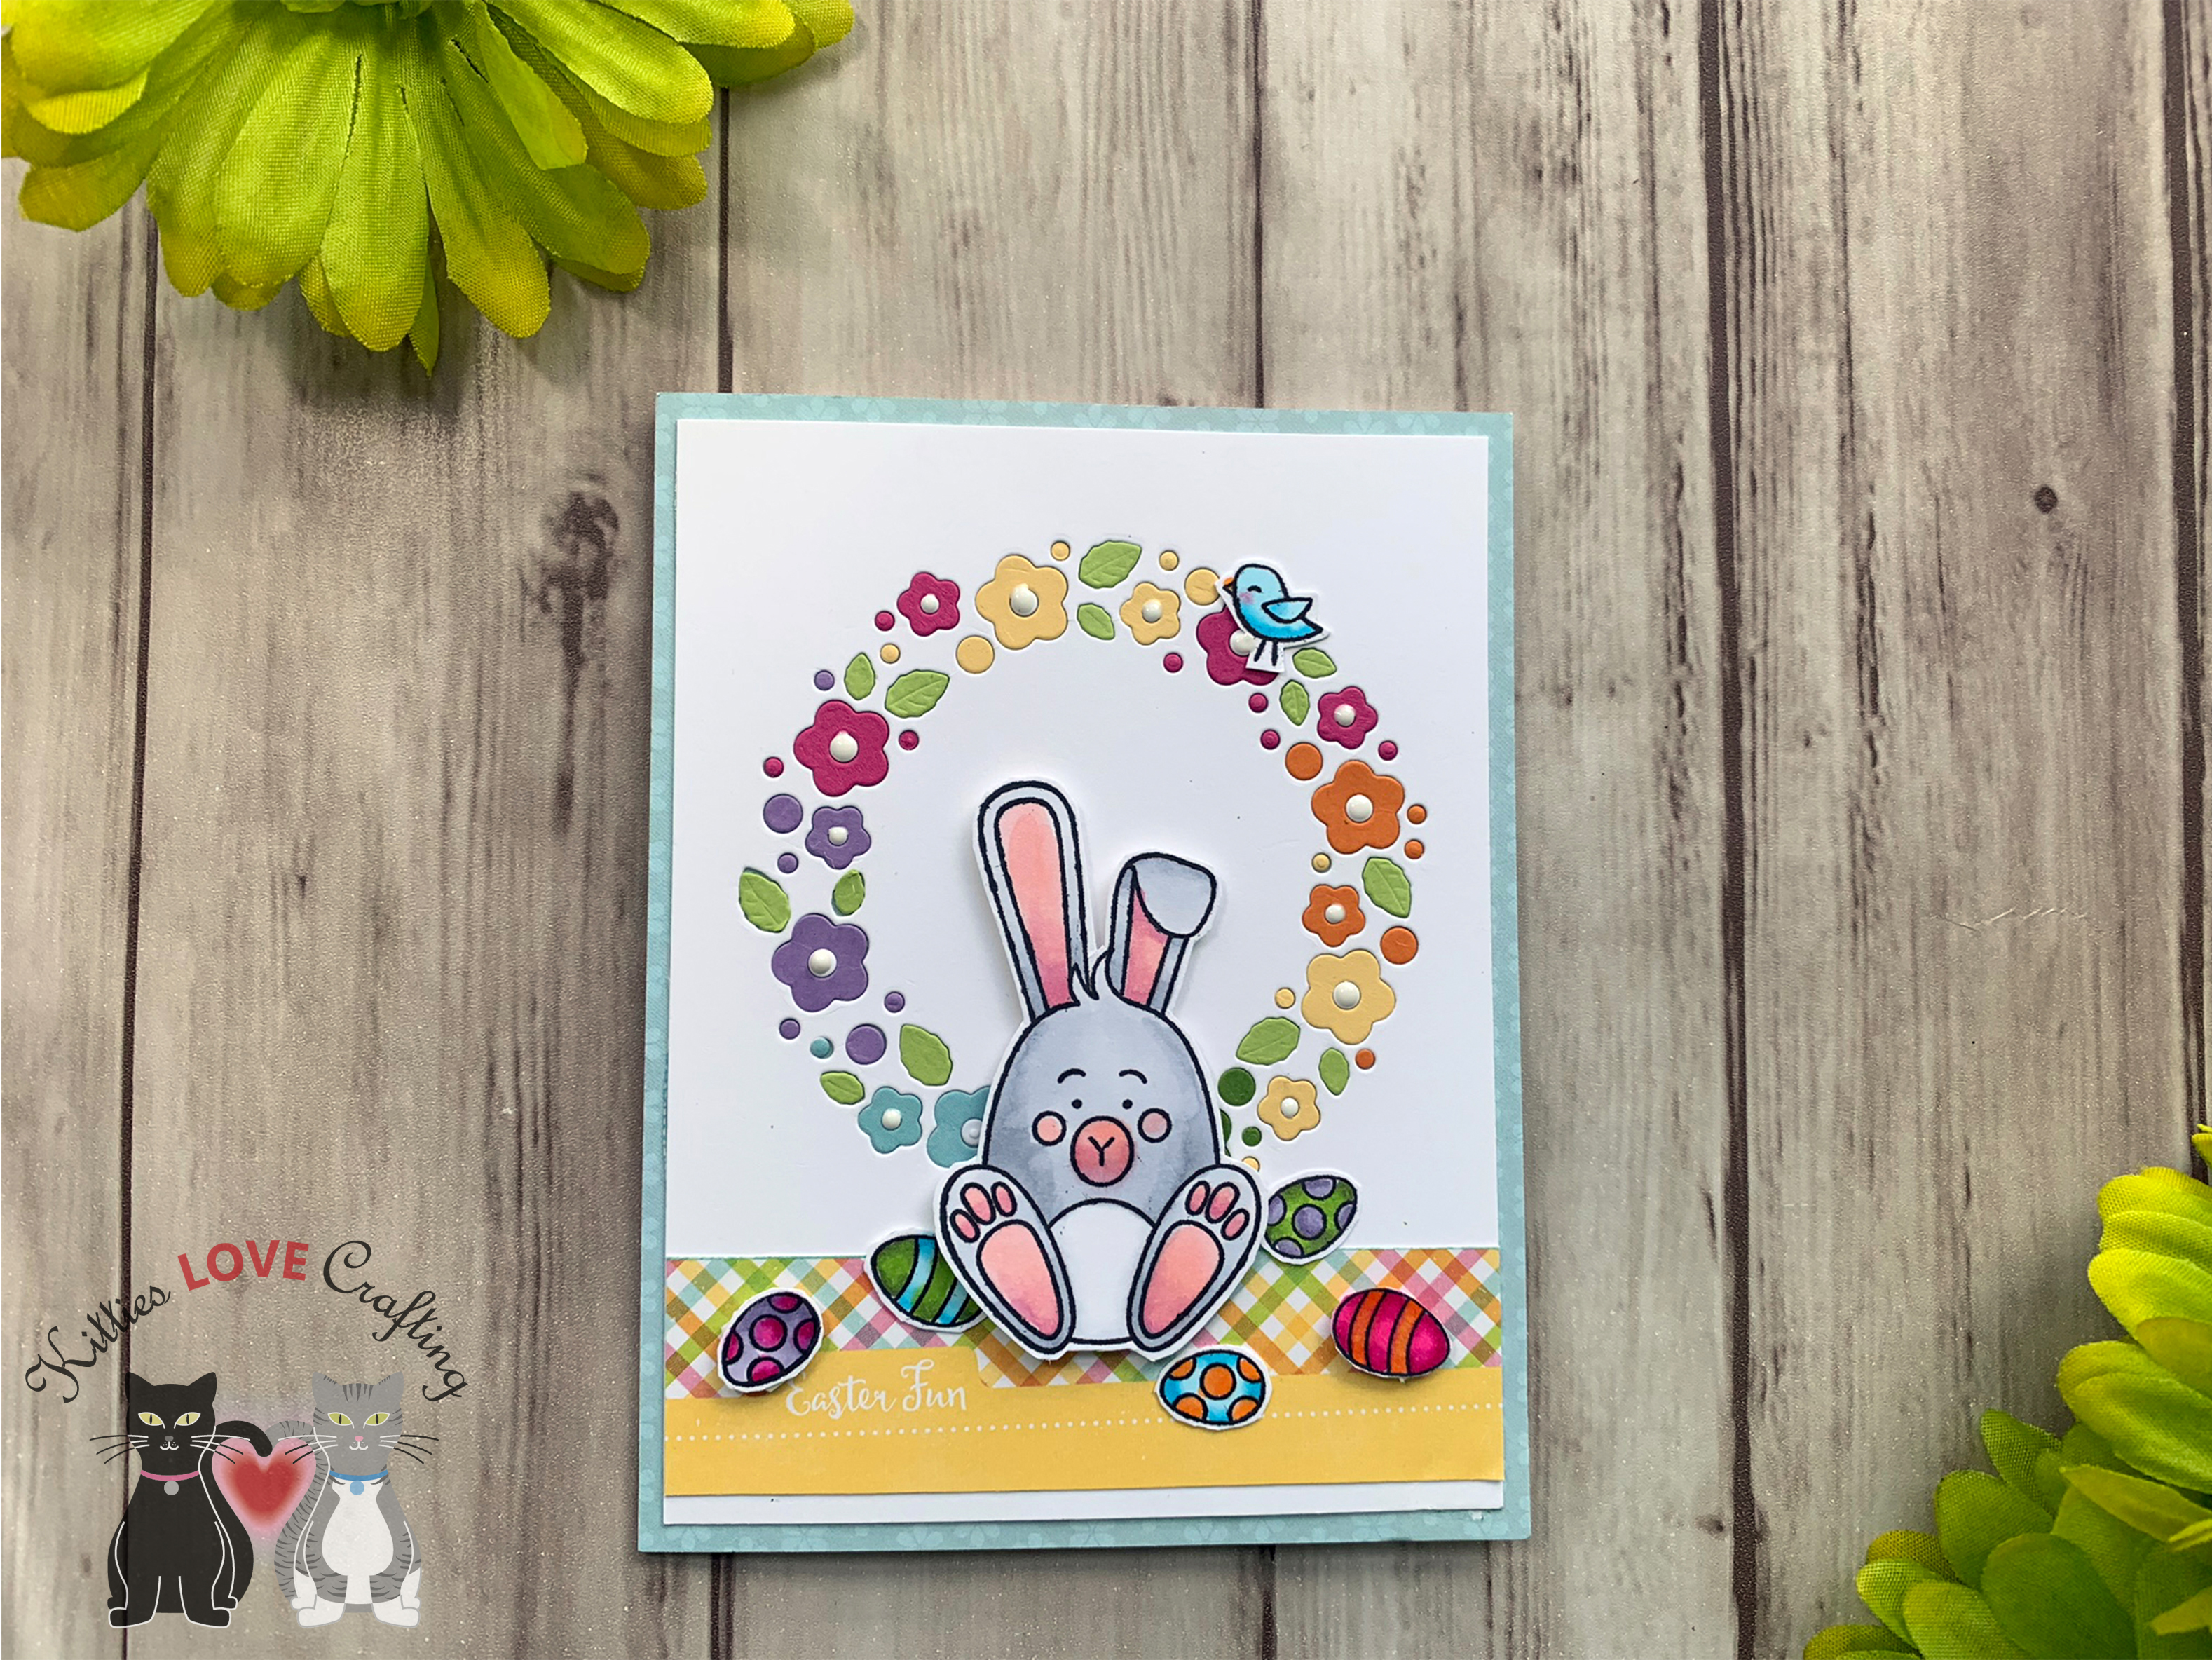
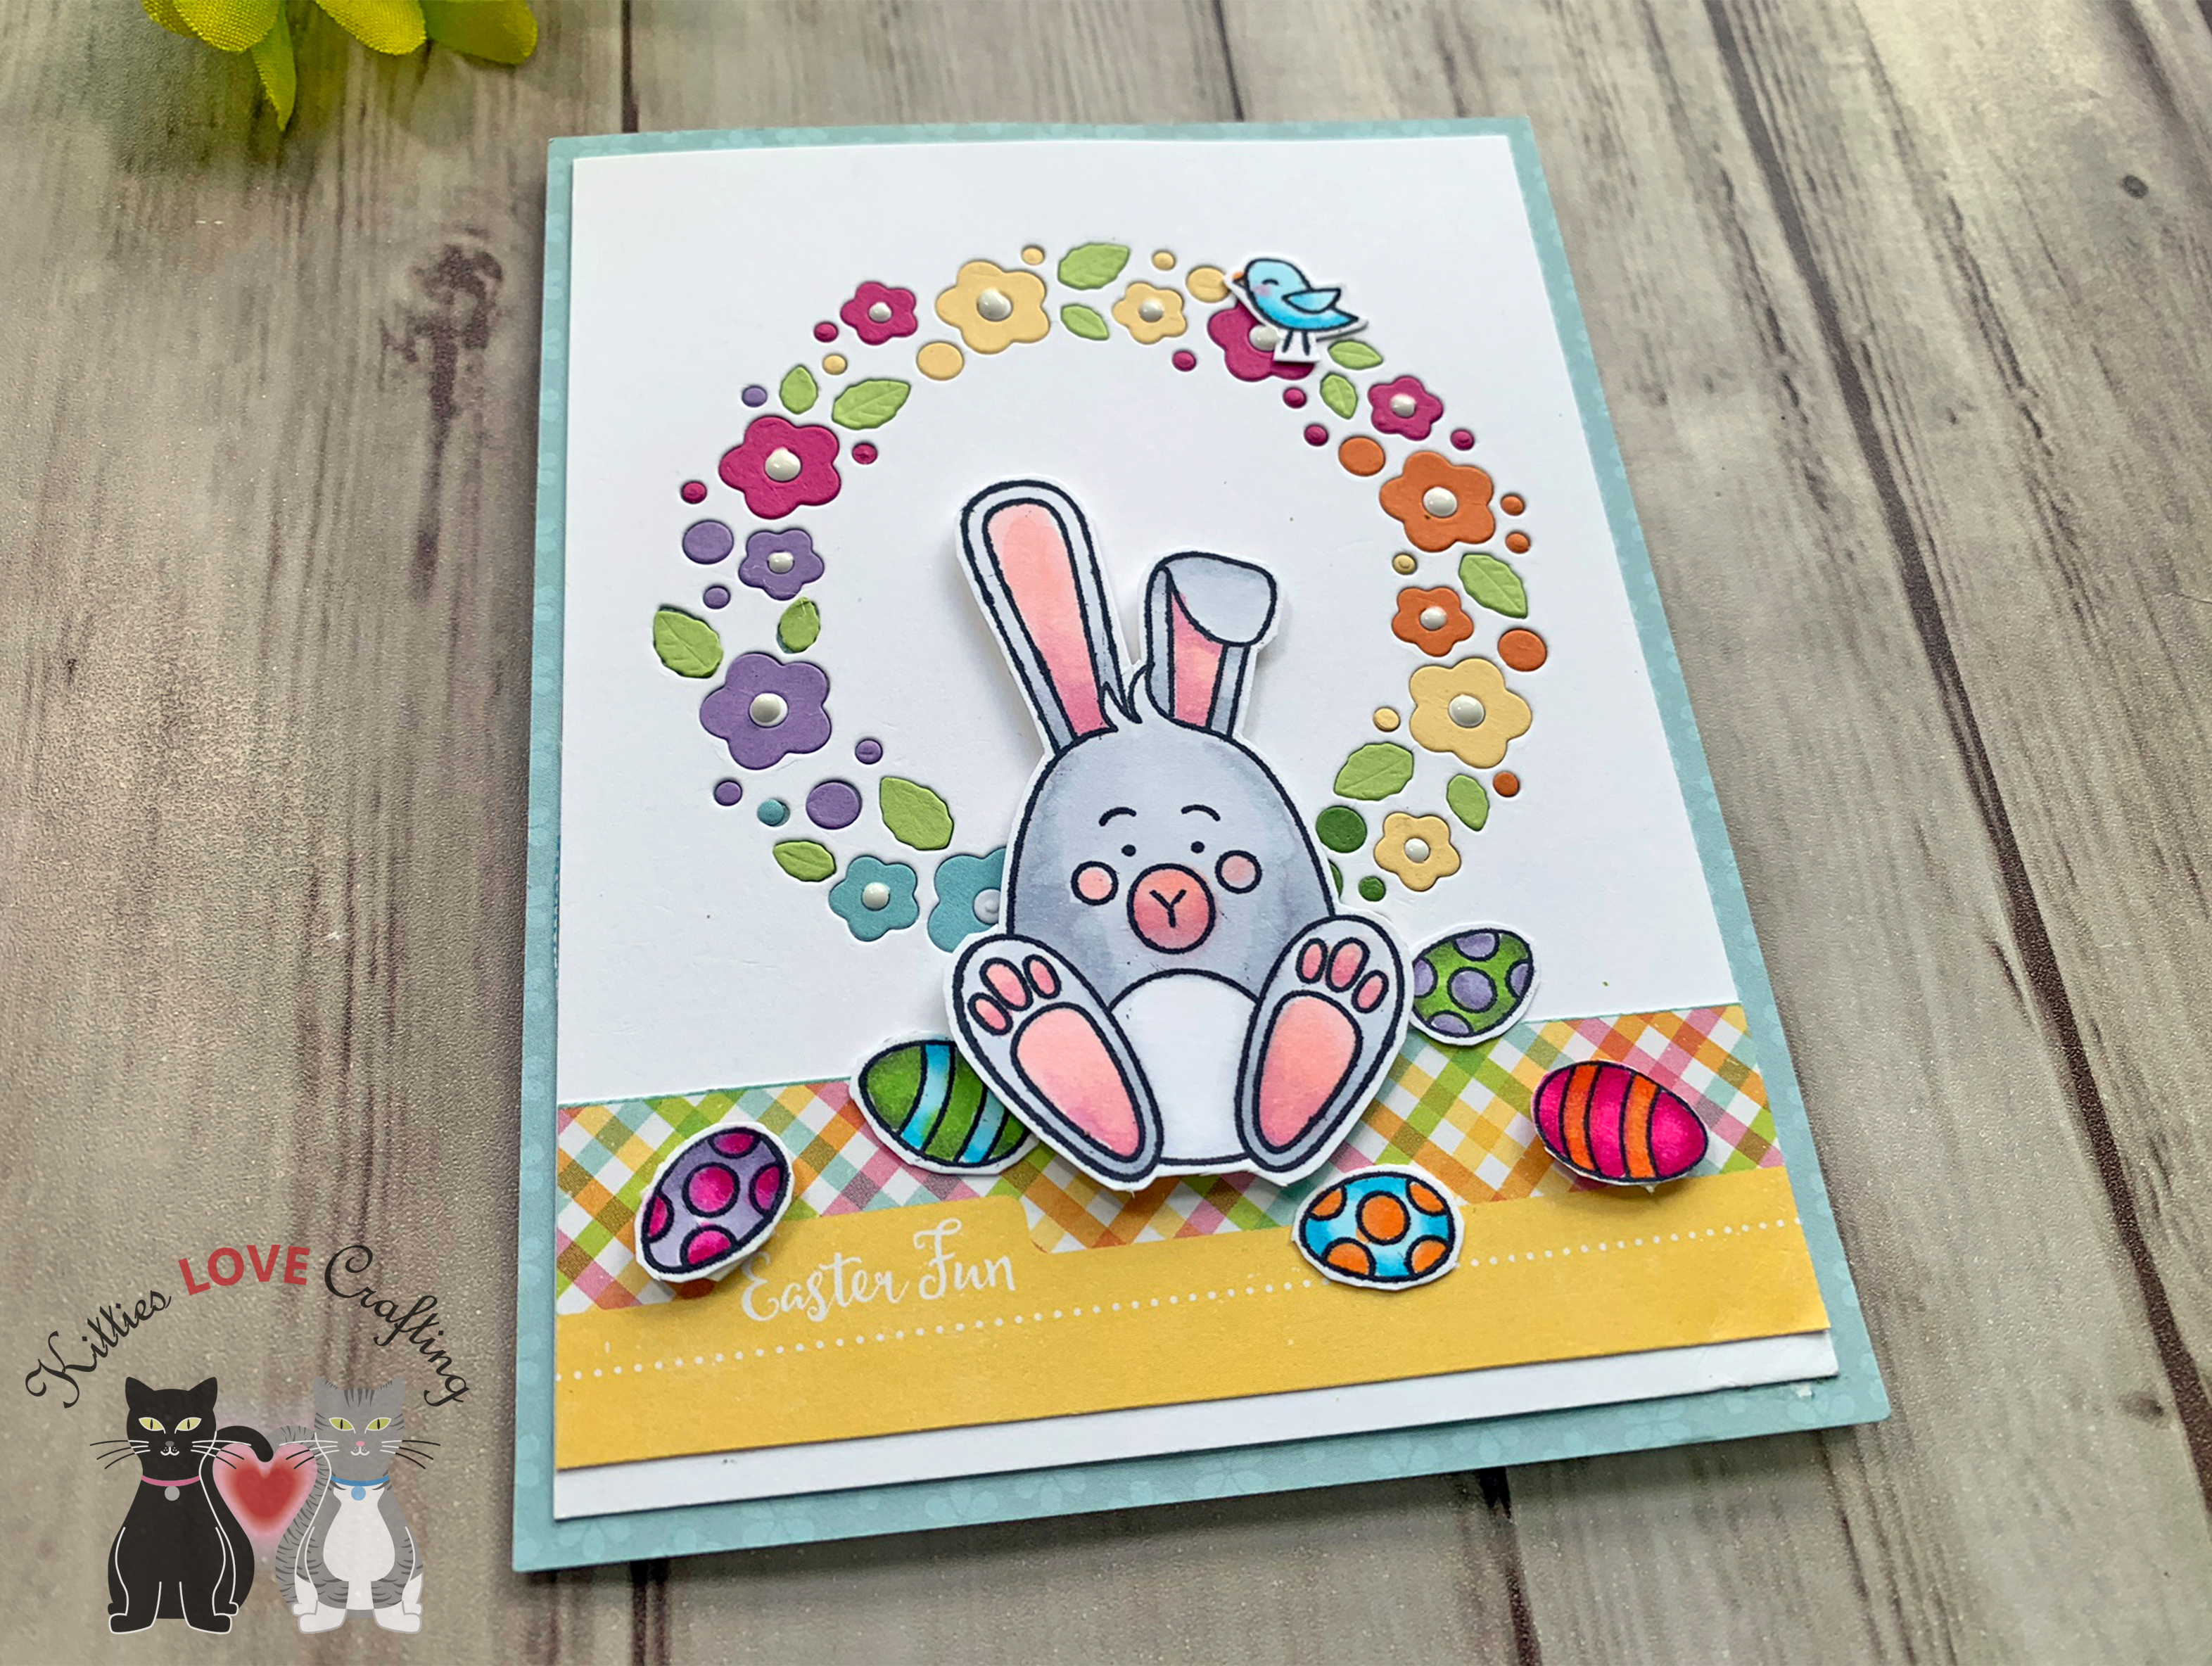
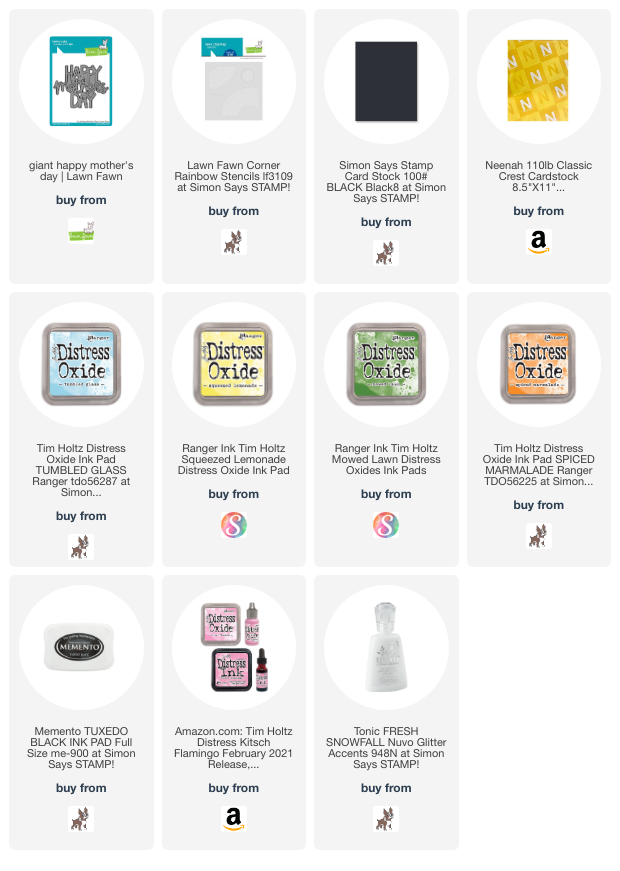
Hi friends. If you want to combine a large sentiment like the Lawn Fawn Giant Happy Mother’s Day Die and a stamped image like floral wreath from the Simon Says Stamp Easter Joy stampset but they don’t necessarily fit on the card together? Well, you can make a larger card right?!? Yes, but if you don’t want to do that you can also cut apart your stamped images. What? OMG No! If this sounds horrifying to you, you’re not alone. But I really like this wreath and obsessed with the Lawn Fawn Giant sentiment dies lately and wanted to combine them. The only solution is to cut the wreath apart. And I’m glad I did.

For the first card, I cut a piece of Neenah 110lb Classic Crest Cardstock to 5-1/2 x 8-1/2″ and scored at 4-1/4″ to create the card base. I cut another piece to 4 x 5-1/4″ and embossed it with the Darice Wire Fence Embossing Folder.

I stamped the wreath from Simon Says Stamp Easter Joy stampset onto Neenah 110lb Classic Crest Cardstock with Memento Tuxedo Black Ink. I colored the images with Copic Markers. I used YG17, YG25 and YG67 for the leaves and stems; R81, R83, & R85, Y17, Y18,BG11 & BG32, YR12, YR16, & YR09 for the flowers. I diecut it using the coordinating dies. Then cut the wreath in half and eventually further cut it apart.

I diecut the sentiment from the Lawn Fawn GOTTA HAVE GINGHAM RAINBOW 6 x 6 Collection Pack as well as two more times from Neenah 110lb Classic Crest Cardstock with the Lawn Fawn Giant Happy Mother’s Day Die. I stacked and adhered them together before adding to my card.

I stamped the wreath from Simon Says Stamp Easter Joy stampset onto Neenah 110lb Classic Crest Cardstock with Memento Tuxedo Black Ink. I colored the images with Copic Markers. I used YG17, YG25 and YG67 for the leaves and stems; R81, R83, & R85, Y17, Y18,BG11 & BG32, YR12, YR16, & YR09 for the flowers. I diecut it using the coordinating dies. Then cut the wreath in half and eventually further cut it apart.

I adhered the parts of the wreath around the sentiment using some Stampin Dimensionals to pop some of it up. I finished off the card by adding some Nuvo Drops in Ivory Shell.

On the inside of the card, I adhered a piece of the same pattern paper from the Lawn Fawn GOTTA HAVE GINGHAM RAINBOW 6 x 6 Collection Pack cut to 1 x 4-1/4″.

Dimensions


For the second card, I cut a piece of Neenah 110lb Classic Crest Cardstock to 5-1/2 x 8-1/2″ and scored at 4-1/4″ to create the card base. I also cut a piece of Lawn Fawn GOTTA HAVE GINGHAM RAINBOW 6 x 6 Collection Pack cut to 4 x 5-1/4″ for the top panel.

I diecut the sentiment 3x from Neenah 110lb Classic Crest Cardstock with the Lawn Fawn Giant Happy Mother’s Day Die. for the top one I used Catherine Pooler It’s A Girl Ink to create a gradient then adhered all 3 diecuts together, creating a very dimensional sentiment.

I stamped the individual flowers from Simon Says Stamp Easter Joy stampset onto Neenah 110lb Classic Crest Cardstock with Memento Tuxedo Black Ink. I colored the images with Copic Markers. I used YG17, YG25 and YG67 for the leaves and stems; RV21, RV14, & RV29 for the tulips; B0000, B01, B02 & Y13, Y06, Y13 & Y18 for the flowers. I diecut it using the coordinating dies. I popped up some of the flowers with some Stampin Dimensionals.

I finished off the card by splatters with White Acrylic Paint and some faux stitching with a White Gel Pen. I also added some shimmer to the sentiment diecut with a Spectrum Noir Sparkle Pen.

On the inside of the card, I adhered a piece of the same pattern paper from the Lawn Fawn GOTTA HAVE GINGHAM RAINBOW 6 x 6 Collection Pack cut to 1 x 4-1/4″ and some of the extra tulips I had stamped and colored.

Dimensions


Supplies

Thanks for reading this post and Happy Easter! I hope you enjoyed and I’ve inspired you to make some cards using this kit yourself! If you want to share you creations with me tag me on instagram @kittieslovecrafting. Leave comments or questions below or feel free to email me.

Holidays 2022, Mother's Day, Mother’s Day

Mother’s Day Card featuring Lawn Fawn Magic Iris Floral Wreath Add-on

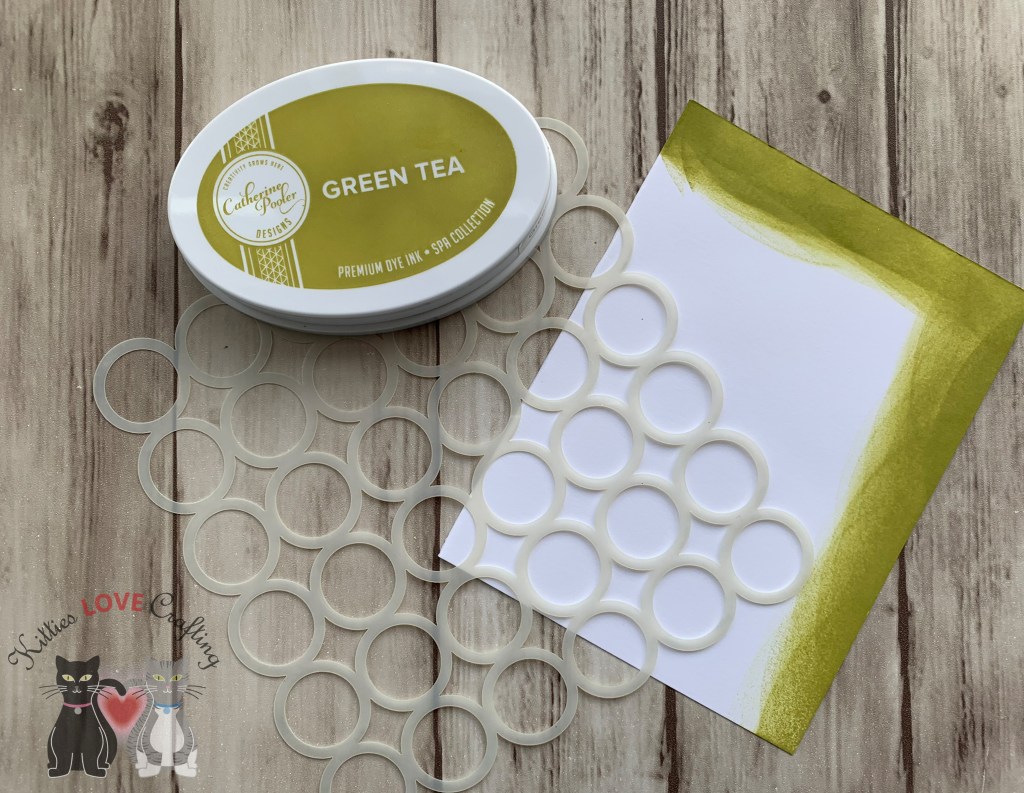
Hi friends. Mother’s Day is fast approaching and if you need a card and don’t love to stamp and color images, this one is for you! I only used dies and inks to create this card.

For this card, I cut a piece of Neenah 110lb Classic Crest Cardstock to 5 x10″ and scored at 5″ to create the card base. I also cut a piece of Echo Park My Favorite Easter 6 x 6 Paper Pad cut to 4-1/2 x 4-1/2″ for the top panel.

I stamped the wreath and many flowers from Lawn Fawn Magic Iris Floral Wreath Add-on Die Cuts twice from Neenah 110lb Classic Crest Cardstock. I colored the wreath and flowers with Distress Oxide Inks. I used Tim Holtz Twisted Citron and Mowed Lawn Distress Oxide Inks for the leaves and stems and Picked Raspberry, Squeezed Lemonade, Broken China, Milled Lavender and Wilted Violet for the flowers.

I adhered the wreath to the card. Next, I die cut a sentiment from the Queen & Co Sentiment Stacker Dies #1 from Neenah 110lb Classic Crest Cardstock and the shadow from Vellum Paper. I cut three of the”Mom” word to create a more dimensional sentiment.

Lastly, I finished it off by adding Nuvo Drops in Ivory Seashell.

On the inside of the card, I adhered a piece of Echo Park My Favorite Easter 6 x 6 Paper Pad cut to 1 x 4-1/4″ and stamped a sentiment from the Lawn Fawn Happy Happy Happy Stampset with Mowed Lawn Distress Oxide Ink. I also added a flower to the bottom.

Dimensions


Supplies

Thanks for reading this post! I hope you enjoyed and I’ve inspired you to make this Mother’s Day Card yourself! If you want to share you creations with me tag me on instagram @kittieslovecrafting. Leave comments or questions below or feel free to email me.

Mother's Day, Mother’s Day

Easy Mother’s Day Card

Hello friends. Coming to you today with a quick and easy Mother’s Day card. If you haven’t found the perfect card for mom yet, you will want to give this one a try. Only one type of paper is required. And the addition of a stencil, ink and a die makes it super easy to create a card with texture. It can also be for any other occasion–just change out the sentiment.

Supplies

I started by cutting down a piece of Neenah Solar White 110lb Cardstock to 4 x 5-1/4″. Then created a pattern in the background using Catherine Pooler Designs Rose Petals and Catherine Pooler Designs Pattern of Rings Creative Screening.

I set that aside to dry and stamped the teapot in Catherine Pooler Designs Polished and Catherine Pooler Designs Green Tea with Catherine Pooler Designs Cuppa Tea Stamp Set. I stamped the teacup and plate in Catherine Pooler Designs Green Tea and Catherine Pooler Designs Icing-on-the-Cake and the little embellishment in Catherine Pooler Designs Polished. Lastly I stamped the flower for the teapot in both Catherine Pooler Designs Green Tea and Catherine Pooler Designs Rose Petals. I diecut all the images with the coordinating dies, Cuppa Tea Dies.


Catherine Pooler Designs Cuppa Tea Stamp Set

I added a sentiment from the Lawn Fawn HAPPY HAPPY HAPPY Clear Stamps. I stamped the HAPPY in Catherine Pooler Designs Green Tea onto the card panel at the top left and the MOTHER’S DAY in Catherine Pooler Designs Polished on a scrap of Neenah Solar White 110lb Cardstock. I diecut that sentiment using the banner from Queen and Company Foundation Dies #2.

I glued that banner down to a piece of Neenah Solar White 110lb Cardstock after using the direct-to-paper method to color it with Catherine Pooler Designs Polished. I added 3M foam tape to the back of the teacup, plate and teapot and adhered it to the card.

Mother’s Day Card

I cut down a piece of Neenah Solar White 110lb Cardstock to 5 1/2 x 8 1/2″, scored at 4 1/4″ to create a card base. I then cut a piece Neenah Solar White 110lb Cardstock to 4 1/4 x 5 1/2″ and again used the direct-to-paper method to color it with Catherine Pooler Designs Green Tea. I adhered that Green Tea panel to the card base and the completed card panel with images onto that piece.

I finished off the card by adding some Tonic Nuvo drops in Carnation Pink and Tonic Nuvo Jewel Drops in Rosewater.

Supplies

Thanks for stopping by. Hope you enjoyed this process post. Leave comments or questions below or feel free to email me.

Easter, Easter, Holidays 2019, Mother's Day, Mother’s Day, Spring, Thank Yous

Spring Cards 2

3 Cards using SSS Blooming Circle and Blooming Wave Wafer Dies

Hi friends. Continuing on with some Spring inspired cards, I pulled out the Simon Says Stamp Blooming Circle Wafer Dies and Simon Says Stamp Blooming Wave Wafer Die to create 3 different cards. It was a little time-consuming to inlay all the flowers and leaves but the results are well worth it

This Easter card combines the Simon Says Stamp Some Bunny stamps and Newton’s Nook Designs Newton’s Easter Basket stamps with the Simon Says Stamp Blooming Circle Wafer Dies. I added patterned paper from both the Doodlebug 6 x 6 Double-sided Paper Pad-Easter Express (discontinued), and Queen & Co Flirty Florals 6 x 6 Mat Stack. Images were colored with Copic markers and fussycut. I inlaid the flowers after diecutting several pieces of scrap rainbow color cardstock. Finished it off by adding some Nuvo Crystal Drops in White Gloss.

Card 2 turned into a Mother’s Day Card. When I started working on these cards I had no idea what the theme would be so I didn’t pick sentiments. But after adding the daisy pattern paper (from Doodlebug 6 x 6 Double-sided Paper Pad-Easter Express (discontinued)), I decided to make into a Mother’s Day card. I used the Simon Says Stamp Blooming Wave Wafer, to create a border then inlaid the flowers after diecutting several pieces of scrap yellow and green cardstock. I used Lawn Fawn Happy Happy Happy Sentiments and the Lawn Cuts Happy Happy Happy to creqte this dimensional sentiment. Finished it off by adding Nuvo Crystal Drops in Ivory Seashell.

And for this 3rd card, I wanted to make it look like rings so I diecut the Simon Says Stamp Blooming Circle Wafer Dies and diecut 3 flower circles, centering one of them. Once again I ran the die through with several color cardstock in rainbow colors. I added a sentiment to the center wreath using Catherine Pooler Designs Good Stuff Inside.Finished it off by adding Nuvo Crystal Drops in White Blizzard Glitter Drops.

Supplies:

Hope you’ve enjoyed this process post and I hope I’ve inspired you to create some cards of your own. Thanks for stopping by and once again please leave questions in the comments or feel free to email me if you prefer.