Distress Ink Techniques, Embossed Background, Hello, Love & Friendship, Summer

Two Mini Slimline Cards featuring Lawn Fawn Zesty Lemon

Hi friends. I couldn’t resist getting the cute Zesty Lemon Die set from Lawn Fawn when I saw it! For my first cards I decided to make some embossed backgrounds and my distress sprays. These will also be available in my Etsy Shop.

For the both cards, I cut a piece of Neenah 110lb Classic Crest Cardstock to 7″ x 6″ and scored at 3-1/2″ to create the card bases. I diecut a piece of Neenah 110lb Classic Crest Cardstock with the stitched frame 3x to stack them and the scallop rectangle from the Queen & Company Foundation 17 dies. I also die cut one of the stitched smaller rectangles from the same set as well as a piece measuring 3 x 5-3/4″.

I embossed the two rectangles with the Darice 5 x 7 Plaid Embossing Folder then colored them using Distress Sprays. I used Broken China and Salty Ocean for the first card and Picked Raspberry and Carved Pumpkin for the second. In retrospect, I would water down the colors on the pink/orange background a bit more. Once all was dry, I added some splashed with White Acrylic Paint.

For the lemons and leaves, I die cut them from Neenah 110lb Classic Crest Cardstock with the Lawn Fawn Zesty Lemon set. I used Distress Oxide Inks to color them. I used Squeezed Lemonade for the lemons, Mowed Lawn and Rustic Wilderness for the leaves and Picked Raspberry for the flower centers and the cheeks.

For the sentiments, on the first card I used the Honey Bee Tailgate Alphabet Dies to spell out “ZEST” which I die cut from Neenah 110lb Classic Crest Cardstock (which I colored with Picked Raspberry Distress Oxide Ink) and Simon Says Stamp 100lb Black Card Stock. The rest of the sentiment came from the Lawn Fawn Sweet Friends Stampset and was stamped with Memento Tuxedo Black Ink onto the same white cardstock.

On the second card, I diecut the “hello” from Neenah 110lb Classic Crest Cardstock (which I colored with Picked Raspberry Distress Oxide Ink) and Simon Says Stamp 100lb Black Card Stock using the Simon Says stamp Bold Hello Die. I added some shimmer with a Spectrum Noir Clear Overlay Sparkle Pen.

I left the insides of the cards blank.

Dimensions


Supplies

Thanks for reading this post! I hope you enjoyed and I’ve inspired you to make these cute cards yourself! If you want to share you creations with me tag me on instagram @kittieslovecrafting. Leave comments or questions below or feel free to email me.

Birthdays, Celebrations, Encouragement, Fourth of July, Hello, Holidays 2021, Just Because, Love & Friendship, Summer

Farmhouse Card For Any Occasion featuring Honey Bee Stamps

Another great add-on dieset from Honey Bee Stamps! The Farmhouse Add-on Dies and Stampset coordinate with the House Builder Card Base Dies and allow you to make lots of cute cards. The last card I made was very patriotic but for this one I decided to make a more traditional farmhouse which can be used for any occasion.

For this card, I started by diecutting the house card base 2x with the House Builder Card Base Dies from Stampin’ Up! Cherry Cobbler 8.5 X 11″ Cardstock. I adhered the two houses with the pre-scored strip that comes in the House Builder Card Base Dies to create the card base. Be sure to use double-sided tape or something very strong so they don’t come apart.

Then die cut the roof and porch steps, and chimney from Simon Says Stamp Card Stock 100# FOG Gray Cardstock and stenciled bricks on the front of the house with Tim Holtz BRICKED Layering Stencil and Stampin’ Up! Smoky Slate Ink, the Lawn Fawn Yeti Ink.

I adhered the roof and chimney to the card base and diecut the porch header 2x from Neenah 110lb Classic Crest Cardstock 8.5 X 11″ and added some Simon Says Stamp Card Stock 100# FOG Gray Cardstock behind the headers. I also diecut the window frames, porch rails, porch beams/columns, porch rail beams, deck/porch foundation also from Neenah 110lb Classic Crest Cardstock 8.5 X 11″. I diecut the window backs from Stampin’ Up! Pool Party 8.5 x 11″ Cardstock, the curtains from House Builder Card Base Dies with Doodlebug Designs Yankee Doodle 6×6 Paper Pad (I believe it’s discontinued) and the door from some brown cardstock from my stash. I stamped a wood pattern on the door using Stampin’ Up! Early Espresso Ink and Stampin’ Up!’s Hardwood Clear Mount Background Stamp (retired) and used Tim Holtz Idea-ology 8 x 8 Paper Stash Metallic Kraft Stock for the doorknob. Before adhering all the diecuts to the card, I used the Scrappy Tails Slimline Brick Background Metal Craft Die and Stampin’ Up! Cherry Cobbler 8.5 X 11″ Cardstock and adhered them to the card.

I diecut the flowers and leaves from the House Builder Card Base with green, pink, yellow and navy blue cardstock from my stash.

I stamped the decorative star, two rooster weathervanes, two lanterns, two hanging pots, the table, chair, one plant and a mailbox onto some Neenah 110lb Classic Crest Cardstock 8.5 X 11″ with Memento Tuxedo Ink and colored them with Copic Markers. I used B23, B24 and B26 for the star and hanging pots, B21 and B23 for the chair, YG11 and YG17 for the plants, Y02 and Y13 for the flower pot, mailbox and lantern light, C1 and C3 for the lanterns and W3 and W5 for the table.

I left the inside of the card blank.


Supplies

Thanks for reading this post. I hope you enjoyed and I’ve inspired you to give this cute farmhouse card a try for yourself. Leave comments or questions below or feel free to email me.

Hello, Love & Friendship, Shaker, Spring

Spring Shaker Card Featuring Catherine Pooler Designs Pitter Pattern Stampset

Hi all. Need a fun card for Spring or to pick someone’s spirits up? This fun shaker using Catherine Pooler Designs Pitter Pattern Stampset is a great option.

I started by cutting a piece of Neenah 110lb Classic Crest Cardstock 8.5 X 11″ to 5-1/2 x 8-1/2″ and scored at 4-1/4″ to create a card base and a top panel to 4 x 5-1/4″. I stamped the medium and large rain drops from the Catherine Pooler Designs Pitter Patterns Stamp Set with CP Cummerbund, Suede Shoes, and Juniper Mist Inks, then dies cut four of them with the Pitter Pattern Dies. I added 3M Foam Tape to the back of the panel to create a shaker panel, added some Catherine Pooler Designs Porland Sequin Mix and adhered it to the card base.

I diecut two umbrella bases using the Catherine Pooler Designs Under the Umbrella Dies from Neenah 110lb Classic Crest Cardstock 8.5 X 11″. One I colored with CP Chiffon and Limoncello Inks, using an ink blending tool and the other I used the direct-to-paper technique with CP Black Jack Ink on the handle only, cut it out and adhered to the yellow umbrella base. Then diecut the patterned section from Neenah 110lb Classic Crest Cardstock 8.5 X 11″, adhered them to the umbrella base and adhered the umbrella to the card.

I cut a piece of Neenah 110lb Classic Crest Cardstock 8.5 X 11″ to 13/16 x 3-13/16″ which I colored with CP Chiffon Inks using the direct-to-paper technique. I stamped a sentiment from Catherine Pooler Designs Pitter Patterns Stamp Set onto another piece of Neenah Cardstock with CP Black Jack Ink and cut it to 5/8 x 3-1/16″ and adhered them to the card I finished the card by adding some sequins from the Catherine Pooler Designs Portland Sequin Mix.

I left the inside of the card blank.

Dimensions


Supplies

Thanks for reading this post. I hope you enjoyed and I’ve inspired you to make this cute umbrella card yourself! If you want to share you creations with me tag me on instagram @kittieslovecrafting. Leave comments or questions below or feel free to email me.

Distress Ink Techniques, Emboss Resist, Hello, Love & Friendship, Spring

A Quick Emboss Resist Background Featuring Catherine Pooler Designs Bloomin’ Wellies

Hi friends. I don;t know about you but I love a cute pair of wellies! And this stampset from Catherine Pooler Designs, Bloomin’ Wellies, is adorable. For this card I tried creating a completely covered distress resist background but I didn’t like it in the end so I diecut it into a circle and I think this works so much better. So if you make a background and you don’t quite love it, use only a portion of it and that usually solves the problem.

I started by cutting a piece of Neenah 110lb Classic Crest Cardstock 8.5 X 11″ to 5-1/2 x 8-1/2″ and scored at 4-1/4″ to create a card base and a top panel to 4 x 5-1/4″ (which will get diecut later). I used Versamark Ink to stamp the rain drops from the Catherine Pooler Designs Pitter Patterns Stamp Set, added some WOW Opaque Bright White Embossing Powder and heat set it. Then I used Ranger Tim Holtz Broken China Distress and Tumbled Glass Distress Inks and water to create a watercolored background.

I set that aside to dry and stamped the wellies image from Catherine Pooler Designs Bloomin’ Wellies stampset onto a piece of Neenah 110lb Classic Crest Cardstock 8.5 X 11″ with Catherine Pooler Designs Midnight Ink. I also stamped additional flowers from the stampset which matched the ones in this wellies pair. Then colored it with Copic Markers. I used RV 63 + RV55 + RV66 for the wellies, YR31 + YR23 for the polka dots, YG25 +YG17 + YG67 for the leaves, BV17 + BV13, BG45 +BG05, RV52 + RV63, and YR16 + YR07 for the flowers. I diecut it with the Bloomin’ Wellies Dies.

I diecut the background panel with a 3-3/4″ circle with the Sizzix Framelits Die Set and another from Simon Says Stamp BLACK 100# 8-1/2 x 11″ Card Stock and adhered both to the card base. I adhered the wellies and additional flowers to the card, using some Stampin’ Dimensionals to pop them up.

I stamped a sentiment from Catherine Pooler Designs Bloomin’ Wellies stampset onto a piece of Neenah 110lb Classic Crest Cardstock 8.5 X 11″ with Catherine Pooler Designs Midnight Ink and fussycut it out before adhering it to the card. I finished it off by adding some sequins from the Catherine Pooler Designs Porland Sequin Mix.

I left the inside of the card blank.

Dimensions


Supplies

Thanks for reading this post. I hope you enjoyed and I’ve inspired you to make this cute wellies Spring card yourself! If you want to share you creations with me tag me on instagram @kittieslovecrafting. Leave comments or questions below or feel free to email me.

Celebrations, Hello, Just Because, Love & Friendship

Stretching Your Background Dies featuring Honey Bee Stamps Dies

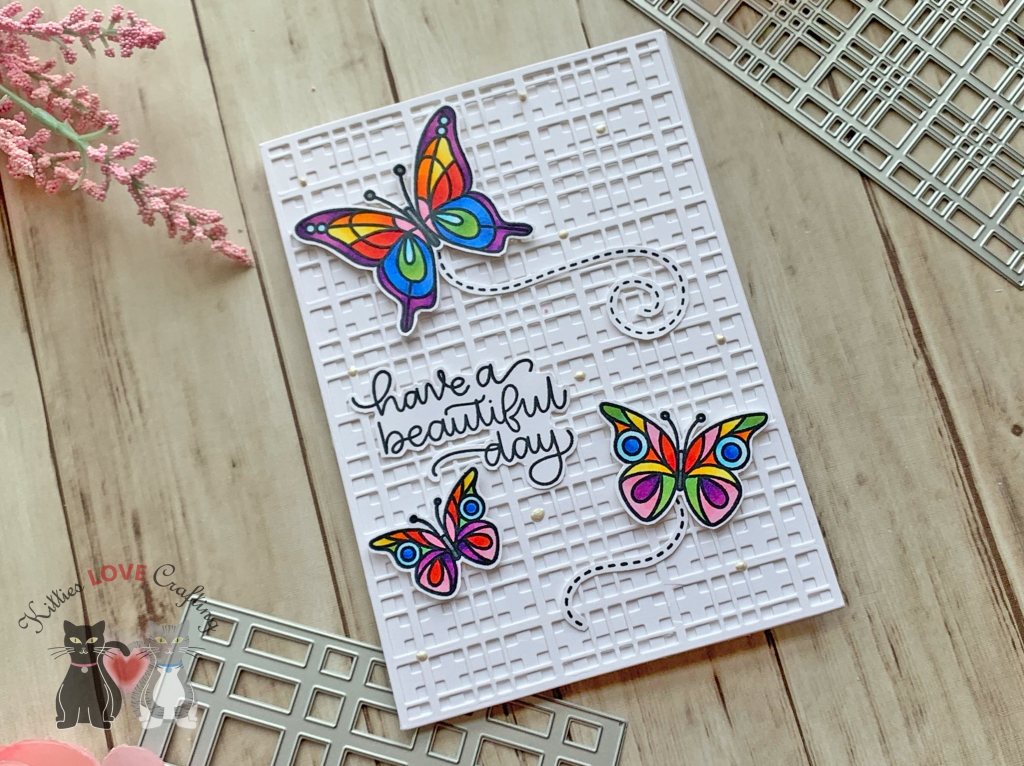
Hello crafty people. I decided to challenge myself to see how many different ways I can use one background die. I chose the Honey Bee Stamps Plaid A7 Base Cover Plate and Plaid A7 Cover Top Plate which I bought during the holidays but only got to use once. I used it as it was intended for one card, a focal image and an embellishment.

For the first card, I started by cutting a piece of Neenah 110lb Classic Crest Cardstock to 7 x 10″ and scored at 5″ to create the card base. I also diecut the Honey Bee Stamps Plaid A7 Base Cover Plate and Plaid A7 Cover Top Plate and adhered them to the card base.

I stamped the butterflies, sentiment and trails from the Simon Says Stamp Beautiful Day stampset (Unfortunately no longer available but any butterfly stamps will do). I colored the images with Copic Markers. I used R17 + R27, R81 + R83, YR09 + YR16, Y13 + Y18, YG17 + YG45, BG000 + B01, V06 + V09, and B24 + B26.

I don’t have the dies for this stampset so I fussycut the images and sentiment. I adhered the sentiment to the card using Tombow Mono Multi Glue and the butterflies with Stampin’ Dimensionals.

I finished it off by adding Nuvo Drops in Ivory Seashell. I left the inside blank. It was a super easy card to create. The only slightly time consuming thing was coloring the images but that didn’t take that long either. I love how the rainbow butterflies look against the white background!

Dimensions


For the second card, I started by again cutting a piece of Neenah 110lb Classic Crest Cardstock to 7 x 10″ and scored at 5″ to create the card base. I cut a piece of pattern paper from Doodlebug Designs 12 x 12 Milk and Cookies Paper (unavailable) and adhered it to the card base.

I diecut two 2-1/4″ circles from Neenah 110lb Classic Crest Cardstock and one from Vellum. I ran the two white circles through my diecut machine with the Honey Bee Stamps Plaid A7 Base Cover Plate and Plaid A7 Cover Top Plate and adhered all three circles together.

I used Stampin’ Up!’s Coffee Cafe Stamp & Die Bundle (retired) and Stampin’ Up!’s Fruit Basket stampset (retired) and Itty BItty Fruit Punch Pack (retired). I diecut the cup, the cupcake wrapper, two whipped creams and label from Neenah 110lb Classic Crest Cardstock, the lid from Vellum and the straw from pattern paper (Echo Park Spring Dots andSTRIPES 6 x 6 Paper Pad-discontinued).

I inked the cup with Tim Holtz SPUN SUGAR and PICKED RASPBERRY Distress Ink and the cupcake wrapper with GROUND ESPRESSO Distress Ink and I added some colore around the edges of the cupckae label with Catherine Pooler Lime Rickey Ink. I added shading to whipped cream with Copic Marker C1 + 0 and R81 and 0 and some sprinkles with the Ground Espresso Distress Marker.

I stamped the ince cubes from the Stampin’ Up! Coffee Cafe Stampset with Memento Tuxedo Black Ink onto Neenah 110lb Classic Crest Cardstock, colored with R81, BG000 + 0 Copic Markers and cut with the coodinating dies. I stamped the strawberries from Stampin’ Up!’s Fruit Basket stampset (retired) with Catherine Pooler Lime Rickey Ink and Catherine Pooler Samba Ink onto Neenah 110lb Classic Crest Cardstock and Itty BItty Fruit Punch Pack (retired) to punch them out.

I stamped the sentiment from Honey Bee Shake-It-Off Stamp Set (unavailable) onto Neenah 110lb Classic Crest Cardstock with Catherine Pooler Lime Rickey Ink and fussycut it out.

I finished it off by adding Ranger GLOSSY ACCENTS Glue Dimensional Adhesive to the ice cubes. I left the inside blank.

Dimensions


For the third card, I used the Honey Bee Stamps Donut Card Die (retired) with Catherine Pooler Sand Dunes 8-1/2 x 11″ Cardstock (unavailable) to create the card base. I used Lawn Fawn Guava 8-1/2 x 11″ Cardstock to diecut the icing and then diecut a another donut piece with Neenah 110lb Classic Crest Cardstock 8.5 X 11″ then used the Honey Bee Stamps Plaid A7 Base Cover to turn that donut shape into the donut glaze. I inked the edges of all the donut pieces using Tim Holtz Vintage Photo Distress Ink and adhered them.

I diecut the sentiment from Stampin’ Up!’s Early Espresso 8-1/2″ X 11″ Cardstock using Honey Bee Stamps Donut Worry Dies (recently retired). You can also use the Donut Worry 4×4 Stamp Set (retiring soon). I diecut the sentiment shadow from Catherine Pooler Sand Dunes 8-1/2 x 11″ Cardstock (unavailable) added Tim Holtz Vintage Photo Distress Ink and adhered them to the card.

On the inside of the card, I diecut another sentiment using the Honey Bee Stamps Donut Worry Dies (recently retired) from Neenah 110lb Classic Crest Cardstock 8.5 X 11″ and adhered it to the card.


Supplies

Thanks for reading this post. I hope you enjoyed and I’ve inspired you to take a look at your background dies/coverplates and use them in other ways. If you want to share you creations with me tag me on instagram @kittieslovecrafting. Leave comments or questions below or feel free to email me.

Hello, Just Because, Love & Friendship

Four Easy Cards Featuring Stampin’ Up’s Nothing’s Better Than Stampset

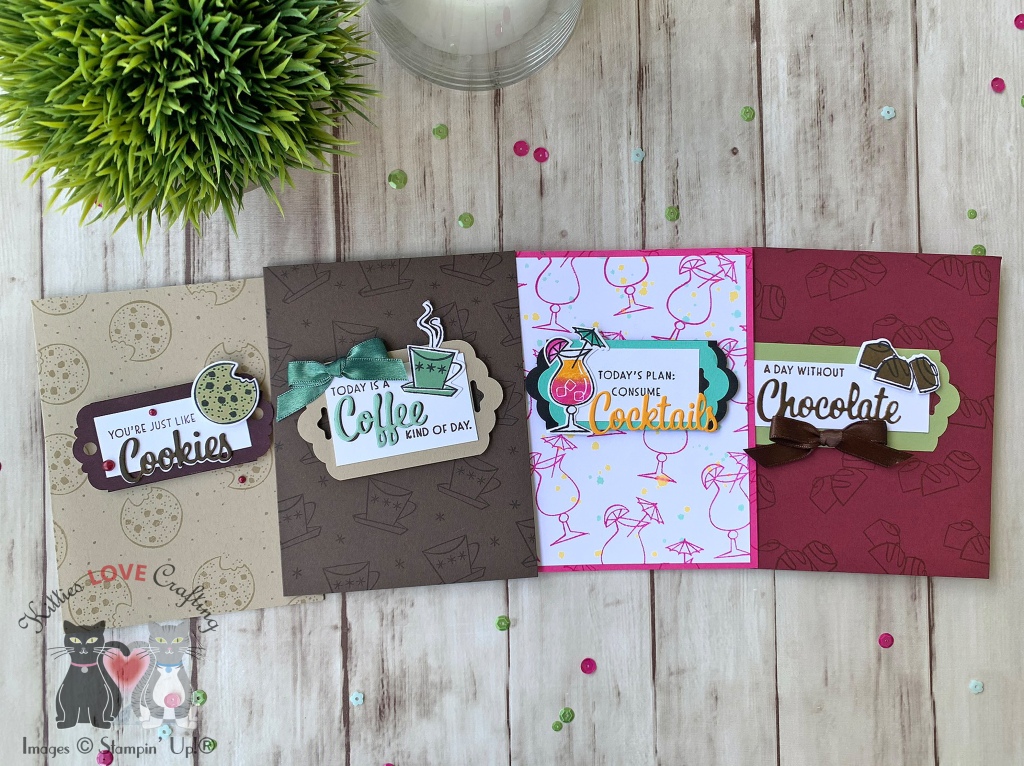
Hello Friends. Happy Monday! The Nothing’s Better Than Bundle from Stampin’ Up! is a great set to create a variety of cards for any season or occasion. It has an outline stamp as well as the solid stamp for each image so if you don’t like coloring this set will work well for you. I made four similar cards using this bundle and the Scalloped Tag Topper Punch and the Delightful Tag Topper Punch. I don’t often say this about punches but I love these tag dies. I think part of it is that I a few months ago I discovered junk journaling and have been making tags and pockets and things for it. So when I saw these punches I said (to myself) “YES PLEASE!”. LOL And now I am obsessed with making tags.

For the first card, I started by cutting a piece of Magenta Madness 8-1/2″ X 11″ Cardstock to 5-1/2 x 8-1/2″ and scored at 4-1/4″ to create a card base. I also cut a piece of Whisper White 8-1/2″ X 11″ Cardstock to 4 x 5-1/4″. I stamped the outline image of the cocktail from the Nothing’s Better Than Stampset with Magenta Madness Classic Stampin’ Ink onto the card base as well as the Whisper White panel I had previously cut. I added some ink splatters with Mango Melody Classic Stampin’ Ink and Coastal Cabana Classic Stampin’ Ink. You can also use the ink refills if you have them; I do not have them yet. I just smooshed some of the ink onto a stamp block, added some water and used a small brush to splatter it on. As an alternative, you can use a Water Painter. Once dried, I adhered the panel to the card base with Tombow Mono Multipurpose Liquid Glue.

I stamped the outline image of the cocktail again as well as the sentiment onto a scrap piece of Whisper White 8-1/2″ X 11″ Cardstock with Tuxedo Black Memento Ink. I used the solid stamps with Magenta Madness Classic Stampin’ Ink and Mango Melody Classic Stampin’ Ink to create an ombre effect for the drink. I used a Sponge Dauber to soften the line between the two colors on the stamp before stamping. I used Magenta Madness Classic Stampin’ Ink for the fruit and Coastal Cabana Classic Stampin’ Ink for the umbrella. I diecut the image using the coordinating Love You More Than Dies.

I diecut the word “Cocktails” from Mango Melody 8-1/2″ X 11″ Cardstock using the dies included in the Love You More Than Dies. Then I cut a piece of Coastal Cabana 8-1/2″ X 11″ Cardstock to 1-1/2 x 3-3/8″ and a piece of Basic Black 8-1/2″ X 11″ Cardstock to 1-1/2 x 3-3/4″ and used the Scalloped Tag Topper Punch to cut the ends of both. I stacked them on top of each other and the sentiment piece, which I cut to 1-1/4 x 2″. I adhered the cocktail image and the word “Cocktails” flat onto the sentiment piece and popped the whole piece up with Stampin’ Dimensionals.

For the inside of the card, I cut a piece of Whisper White 8-1/2″ X 11″ Cardstock to 4 x 5-1/4″ and adhered it with Tombow Mono Multipurpose Liquid Glue. I stamped another sentiment from the Nothing’s Better Than Stampset with Magenta Madness Classic Stampin’ Ink and the cocktail outline image with Mango Melody Classic Stampin’ Ink.

Dimensions


For the second card, I started by cutting a piece of Early Espresso 8-1/2″ X 11″ Cardstock to 5-1/2 x 8-1/2″ and scored at 4-1/4″ to create a card base. I stamped the outline image of the coffee cup and the little asterisk from the Nothing’s Better Than Stampset with Early Espresso Classic Stampin’ Ink onto the card base.

I stamped the outline image of the coffee cup and the steam onto a scrap piece of Whisper White 8-1/2″ X 11″ Cardstock with Tuxedo Black Memento Ink. I used the solid stamp with Mint Macaron Classic Stampin’ Ink and diecut the image using the coordinating Love You More Than Dies. I diecut the “Coffee” word from the same dieset from Mint Macaron 8-1/2″ X 11″ Cardstock and Early Espresso 8-1/2″ X 11″ Cardstock and adhered them together offset.

I stamped the sentiment onto a scrap of Whisper White 8-1/2″ X 11″ Cardstock and cut it down to 1-1/2 x 2-3/8″. I adhered it to a piece of Crumb Cake 8-1/2″ X 11″ Cardstock, measuring 2 x 3-3/4″ (I punched the sides with the Scalloped Tag Topper Punch). I adhered the coffee cup image and the “Coffee” word diecut to the sentiment piece and using Stampin’ Dimensionals added it to the card base.

To finish it off I added sparkle to the word “Coffee” with a Clear Wink Of Stella Glitter Brush and a bow made from colored white satin ribbon ( I used Mint Macaron Classic Stampin’ Ink). I just lay the ribbon down on some paper and swiped the ink pad over the ribbon. If you spray some water on the ribbon first it will help the ink sink into the ribbon better. Also, it takes a while to dry if you put a lot of ink on it. You can also use an ink refill and water to do the same.

For the inside of the card, I cut a piece of Whisper White 8-1/2″ X 11″ Cardstock to 4 x 5-1/4″ and adhered it with Tombow Mono Multipurpose Liquid Glue. I stamped another sentiment from the Nothing’s Better Than Stampset, as well as the coffee cup and steam outline images with Mint Macaron Classic Stampin’ Ink.

Dimensions


For the third card, I started by cutting a piece of Merry Merlot 8-1/2″ X 11″ Cardstock to 5-1/2 x 8-1/2″ and scored at 4-1/4″ to create a card base. I stamped the outline image of the chocolates from the Nothing’s Better Than Stampset with Merry Merlot Classic Stampin’ Ink onto the card base.

I stamped the outline image of the chocolates onto a scrap piece of Whisper White 8-1/2″ X 11″ Cardstock with Tuxedo Black Memento Ink. I used the solid stamp with Soft Suede Classic Stampin’ Ink and diecut the image using the coordinating Love You More Than Dies. I diecut the “Chocolate” word from the same dieset from Whisper White 8-1/2″ X 11″ Cardstock which I then used a direct-to-paper technique with Soft Suede Classic Stampin’ Ink to color it.

I stamped the sentiment from the Nothing’s Better Than Stampset onto a scrap of Whisper White 8-1/2″ X 11″ Cardstock with Soft Suede Classic Stampin’ Ink and cut it down to 1-1/8 x 3-1/8″. I adhered it to a piece of Pear Pizzazz 8-1/2″ X 11″ Cardstock, measuring 1-3/4 x 3-3/4″ (I punched one side with the Scalloped Tag Topper Punch). I adhered the chocolates image using Stampin’ Dimensionals and the “Chocolate” word diecut flat onto the sentiment piece and adhered it to the card base.

To finish it off I added a bow made from chocolate satin ribbon.

For the inside of the card, I cut a piece of Whisper White 8-1/2″ X 11″ Cardstock to 4 x 5-1/4″ and adhered it with Tombow Mono Multipurpose Liquid Glue. I stamped another sentiment from the Nothing’s Better Than Stampset, as well as the chocolates outline image with Mint Macaron Classic Stampin’ Ink.

Dimensions


For the last card, I started by cutting a piece of Crumb Cake 8-1/2″ X 11″ Cardstock to 5-1/2 x 8-1/2″ and scored at 4-1/4″ to create a card base. I stamped the outline image of the cookie from the Nothing’s Better Than Stampset with Crumb Cake Classic Stampin’ Ink onto the card base.

I stamped the outline image of the cookie onto a scrap piece of Whisper White 8-1/2″ X 11″ Cardstock with Tuxedo Black Memento Ink. I used the solid stamp with Crumb Cake Classic Stampin’ Ink and diecut the image using the coordinating Love You More Than Dies. I diecut the “Cookies” word from the same dieset 2x from Whisper White 8-1/2″ X 11″ Cardstock which I then used a direct-to-paper technique with Soft Suede Classic Stampin’ Ink to color one of them. I adhered them together offset (white on the bottom).

I stamped the sentiment from the Nothing’s Better Than Stampset onto a scrap of Whisper White 8-1/2″ X 11″ Cardstock with Blackberry Bliss Classic Stampin’ Ink and cut it down to 1 x 2-3/8″. I adhered it to a piece of Whisper White 8-1/2″ X 11″ Cardstock, measuring 1-1/2 x 3-3/8″, which I colored using a direct-to-paper technique with Blackberry Bliss Classic Stampin’ Ink (I don’t have the cardstock) and then punched both sides with the Delightful Tag Topper Punch. I adhered the cookie image (I used Stampin’ Dimensionals) and the “Cookies” word diecut to the sentiment piece and adhered the piece with Stampin’ Dimensionals to the card base.

To finish it off I added 3 Pearls which I colored using Blackberry Bliss Light Stampin’ Blend Marker.

For the inside of the card, I stamped another sentiment from the Nothing’s Better Than Stampset, as well as the chocolates outline image with Blackberry Bliss Classic Stampin’ Ink and the cookies with Crumb Cake Classic Stampin’ Ink.

Dimensions


Supplies

Thanks for reading this post. I hope you enjoyed and I’ve inspired you to try these easy and fun cards for yourself! Leave comments or questions below or feel free to email me. If you want to share you creations with me tag me on instagram @kittieslovecrafting. If you would like a Stampin’ Up! catalog, please email me as well. All current catalogs can be found on the right side of this post and the Stampin’ Up! page. All news and fun stuff happening at Stampin’ Up! are listed there!

Easter, Easter, Hello, Just Because, Love & Friendship, Spring

Watercolor Hello Featuring Simon Says Stamp’s Stronger Together March Card Kit

Spring is officially here friends! And when I think of Spring, I think of beautiful flowers in bloom and soft pastel colors. And this Card Kit from Simon Says Stamp is perfect for spring cards, as well as Easter cards and even Mother’s Day cards! And can we talk about the purple glitter paper included in this kit?!? OMG, just gorgeous.

Card front

The kit includes:
Simon Says Stamp Exclusive 6×8 Stronger Together clear stamp set
Simon Says Stamp Exclusive Bold Hello wafer thin die
ModaScrap Spring Flowers 6 x 6 paper pack
24 piece watercolor pencil pack
Simon Says Stamp Craft Tacky Glue
3 Suzy Plantamura custom floral watercolor cards
Simon Says Stamp 6 x 6 inch glitter paper
Simon Says Stamp Metallic Lavender envelope
Simon Says Stamp Mint envelope
Simon Says Stamp White envelope
Simon Says Stamp Mint 8.5×11 cardstock
Simon Says Stamp Lavender 8.5×11 cardstock
Simon Says Stamp Cornflower Blue 8.5×11 cardstock
Simon Says Stamp White 120# 8.5×11 cardstock

I started by cutting the Simon Says Stamp Lavender 8.5×11 cardstock to 5-1/2 x 8-1/2″ and scored at 4-1/4″ for the card base, a piece of one of the pattern papers in the ModaScrap Spring Flowers 6 x 6 paper pack to 4 x 5-1/4”, and another piece of pattern paper to 3-3/4 x 5”. I adhered the three together with Simon Says Stamp Craft Tacky Glue.

I then used the 24 piece watercolor pencil pack and watercolor brushes to color one of the Suzy Plantamura custom floral watercolor cards. I love these preprinted watercolor cards. They are fun and relaxing to watercolor and they make great quick and easy cards too. Once everything was dry, I fussycut the flowers out and adhered it to the card with some Simon Says Stamp Craft Tacky Glue. For the sentiment I diecut “hello” using the Simon Says Stamp Exclusive Bold Hello wafer thin die and Simon Says Stamp 6 x 6 inch glitter paper and adhered it to the card. I finished it off with some Nuvo Crystal Drops Tonic VIOLET GALAXY.

Dimensions

Supplies

Thanks for reading this post. I hope you enjoyed and I’ve inspired you to give this card a try for yourself. Leave comments or questions below or feel free to email.