Love & Friendship, Spring, Summer

Two Cards Using One Background Die and Trying to Be Less Wasteful

Hi friends. When I purchased the Sunburst Strips Cover Plate Die from Catherine Pooler Designs I knew that I had to try rainbow colors but also glitter paper because your sun rays need to sparkle! Rainbow sunshine rays to come for sure! Stay tuned. I decided to alternate the colors of the rays but also cut off the top of the rays with a circle and add another circle for the sun. I ended up with extra pieces of rays which I then used on a second card. No waste here!

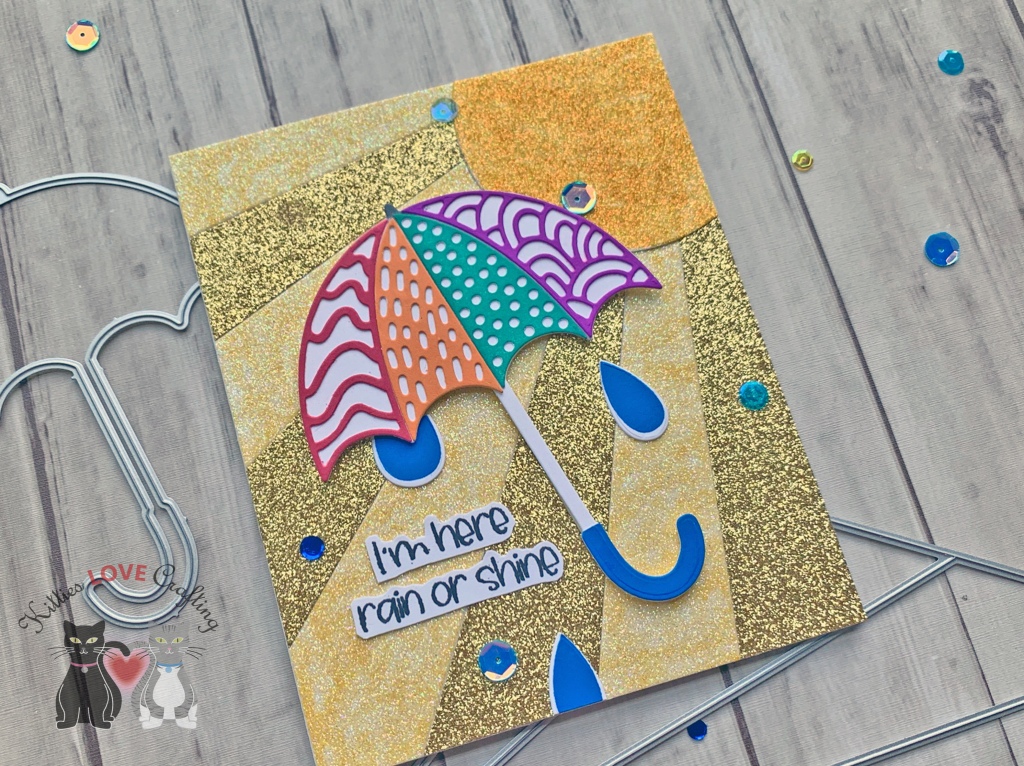
For the first card, I started by cutting a piece of Neenah 110lb Classic Crest Cardstock 8.5 X 11″ to 6-1/4 x 10″ and scored at 5″ to create a card base and to make it easier to adhere the sun, I also cut a top panel to 4-3/4 x 6″.

I diecut the Sunburst Strips Cover Plate Die from Gold and White Glitter Cardstock. I didn’t have any light yellow glitter paper so I used the white and colored with some old alcohol markers. WARNING: Coloring glitter cardstock with markers will ruin the tip of the marker so if you use a good alcohol marker like a copic make sure you have extra nibs. I taped the back of each diecut piece of cardstock and then used a 3″ circle die to cut off the narrow end. You can use whatever size you want here. Then cut a 2-1/2″ circle from the White Glitter Cardstock. I adhered all the sun pieces to the 4-3/4 x 6″ panel I previously cut and that to the card base.

I diecut two umbrella bases using the Catherine Pooler Designs Under the Umbrella Dies from Neenah 110lb Classic Crest Cardstock 8.5 X 11″. I used the direct-to-paper technique with CP Flirty Fuschia Ink on the handle only and cut it out. Then diecut the patterned sections from Neenah 110lb Classic Crest Cardstock 8.5 X 11″, and again used direct-to-paper technique with Coral Cabana, Tiki Torch, Lime Rickey, and Fiesta Blue and adhered them to the umbrella base and adhered the umbrella to the card.

I stamped the small and medium rain drops from the Catherine Pooler Designs Pitter Patterns Stamp Set with CP Something Borrowed Ink then die cut them with the Pitter Pattern Dies. I adhered three of them and the umbrella to the card.

I stamped a sentiment from the Catherine Pooler Designs Pitter Patterns Stamp Set with CP Midnight Ink and cut it to 1/2 x 3-1/2″. Then finished it off by adding some Catherine Pooler Designs Portland Sequin Mix and some Glossy Accents to the rain drops.

I left the inside of the card blank.

Dimensions


For the second card, I did the exact same things with a few exceptions. I cutting a piece of Neenah 110lb Classic Crest Cardstock 8.5 X 11″ to 9-1/2 x 5-3/4″ and scored at 4-3/4to create a card base and thIs time I adhered the sun directly to the card base and didn’t leave any border around it.

I diecut two umbrella bases using the Catherine Pooler Designs Under the Umbrella Dies from Neenah 110lb Classic Crest Cardstock 8.5 X 11″ again and used the direct-to-paper technique with CP Something Borrowed Ink on the handle only and cut it out. Then diecut the patterned sections from Neenah 110lb Classic Crest Cardstock 8.5 X 11″, and again used direct-to-paper technique with Party Dress, Orange Peel, Aquatini, and Something Borrowed and adhered them to the umbrella base and adhered the umbrella to the card.

Again, I used a few small and medium rain drops from the Catherine Pooler Designs Pitter Patterns Stamp Set stamped with CP Something Borrowed Ink then die cut them with the Pitter Pattern Dies. I adhered three of them and the umbrella to the card.

I stamped the same sentiment from the Catherine Pooler Designs Pitter Patterns Stamp Set with CP Midnight Ink and fussycut it this time. And added some Catherine Pooler Designs Portland Sequin Mix.

Dimensions


Supplies

Thanks for reading this post. I hope you enjoyed and I’ve inspired you to make this cute glittery umbrella cards yourself! If you want to share you creations with me tag me on instagram @kittieslovecrafting. Leave comments or questions below or feel free to email me.

Celebrations, Hello, Just Because, Love & Friendship

Stretching Your Background Dies featuring Honey Bee Stamps Dies

Hello crafty people. I decided to challenge myself to see how many different ways I can use one background die. I chose the Honey Bee Stamps Plaid A7 Base Cover Plate and Plaid A7 Cover Top Plate which I bought during the holidays but only got to use once. I used it as it was intended for one card, a focal image and an embellishment.

For the first card, I started by cutting a piece of Neenah 110lb Classic Crest Cardstock to 7 x 10″ and scored at 5″ to create the card base. I also diecut the Honey Bee Stamps Plaid A7 Base Cover Plate and Plaid A7 Cover Top Plate and adhered them to the card base.

I stamped the butterflies, sentiment and trails from the Simon Says Stamp Beautiful Day stampset (Unfortunately no longer available but any butterfly stamps will do). I colored the images with Copic Markers. I used R17 + R27, R81 + R83, YR09 + YR16, Y13 + Y18, YG17 + YG45, BG000 + B01, V06 + V09, and B24 + B26.

I don’t have the dies for this stampset so I fussycut the images and sentiment. I adhered the sentiment to the card using Tombow Mono Multi Glue and the butterflies with Stampin’ Dimensionals.

I finished it off by adding Nuvo Drops in Ivory Seashell. I left the inside blank. It was a super easy card to create. The only slightly time consuming thing was coloring the images but that didn’t take that long either. I love how the rainbow butterflies look against the white background!

Dimensions


For the second card, I started by again cutting a piece of Neenah 110lb Classic Crest Cardstock to 7 x 10″ and scored at 5″ to create the card base. I cut a piece of pattern paper from Doodlebug Designs 12 x 12 Milk and Cookies Paper (unavailable) and adhered it to the card base.

I diecut two 2-1/4″ circles from Neenah 110lb Classic Crest Cardstock and one from Vellum. I ran the two white circles through my diecut machine with the Honey Bee Stamps Plaid A7 Base Cover Plate and Plaid A7 Cover Top Plate and adhered all three circles together.

I used Stampin’ Up!’s Coffee Cafe Stamp & Die Bundle (retired) and Stampin’ Up!’s Fruit Basket stampset (retired) and Itty BItty Fruit Punch Pack (retired). I diecut the cup, the cupcake wrapper, two whipped creams and label from Neenah 110lb Classic Crest Cardstock, the lid from Vellum and the straw from pattern paper (Echo Park Spring Dots andSTRIPES 6 x 6 Paper Pad-discontinued).

I inked the cup with Tim Holtz SPUN SUGAR and PICKED RASPBERRY Distress Ink and the cupcake wrapper with GROUND ESPRESSO Distress Ink and I added some colore around the edges of the cupckae label with Catherine Pooler Lime Rickey Ink. I added shading to whipped cream with Copic Marker C1 + 0 and R81 and 0 and some sprinkles with the Ground Espresso Distress Marker.

I stamped the ince cubes from the Stampin’ Up! Coffee Cafe Stampset with Memento Tuxedo Black Ink onto Neenah 110lb Classic Crest Cardstock, colored with R81, BG000 + 0 Copic Markers and cut with the coodinating dies. I stamped the strawberries from Stampin’ Up!’s Fruit Basket stampset (retired) with Catherine Pooler Lime Rickey Ink and Catherine Pooler Samba Ink onto Neenah 110lb Classic Crest Cardstock and Itty BItty Fruit Punch Pack (retired) to punch them out.

I stamped the sentiment from Honey Bee Shake-It-Off Stamp Set (unavailable) onto Neenah 110lb Classic Crest Cardstock with Catherine Pooler Lime Rickey Ink and fussycut it out.

I finished it off by adding Ranger GLOSSY ACCENTS Glue Dimensional Adhesive to the ice cubes. I left the inside blank.

Dimensions


For the third card, I used the Honey Bee Stamps Donut Card Die (retired) with Catherine Pooler Sand Dunes 8-1/2 x 11″ Cardstock (unavailable) to create the card base. I used Lawn Fawn Guava 8-1/2 x 11″ Cardstock to diecut the icing and then diecut a another donut piece with Neenah 110lb Classic Crest Cardstock 8.5 X 11″ then used the Honey Bee Stamps Plaid A7 Base Cover to turn that donut shape into the donut glaze. I inked the edges of all the donut pieces using Tim Holtz Vintage Photo Distress Ink and adhered them.

I diecut the sentiment from Stampin’ Up!’s Early Espresso 8-1/2″ X 11″ Cardstock using Honey Bee Stamps Donut Worry Dies (recently retired). You can also use the Donut Worry 4×4 Stamp Set (retiring soon). I diecut the sentiment shadow from Catherine Pooler Sand Dunes 8-1/2 x 11″ Cardstock (unavailable) added Tim Holtz Vintage Photo Distress Ink and adhered them to the card.

On the inside of the card, I diecut another sentiment using the Honey Bee Stamps Donut Worry Dies (recently retired) from Neenah 110lb Classic Crest Cardstock 8.5 X 11″ and adhered it to the card.


Supplies

Thanks for reading this post. I hope you enjoyed and I’ve inspired you to take a look at your background dies/coverplates and use them in other ways. If you want to share you creations with me tag me on instagram @kittieslovecrafting. Leave comments or questions below or feel free to email me.