Christmas, DIY Projects, Holidays 2019, Wreaths

DIY: Super Easy Christmas Wreaths

Hello friends. This weekend I made some very cute mini Christmas wreaths for some new decorations. I love to decorate with wreaths and I especially enjoy adding mini ones to doors Inside my home. They enhance your decor without being too in your face. They are also easy to store when you have limited space.

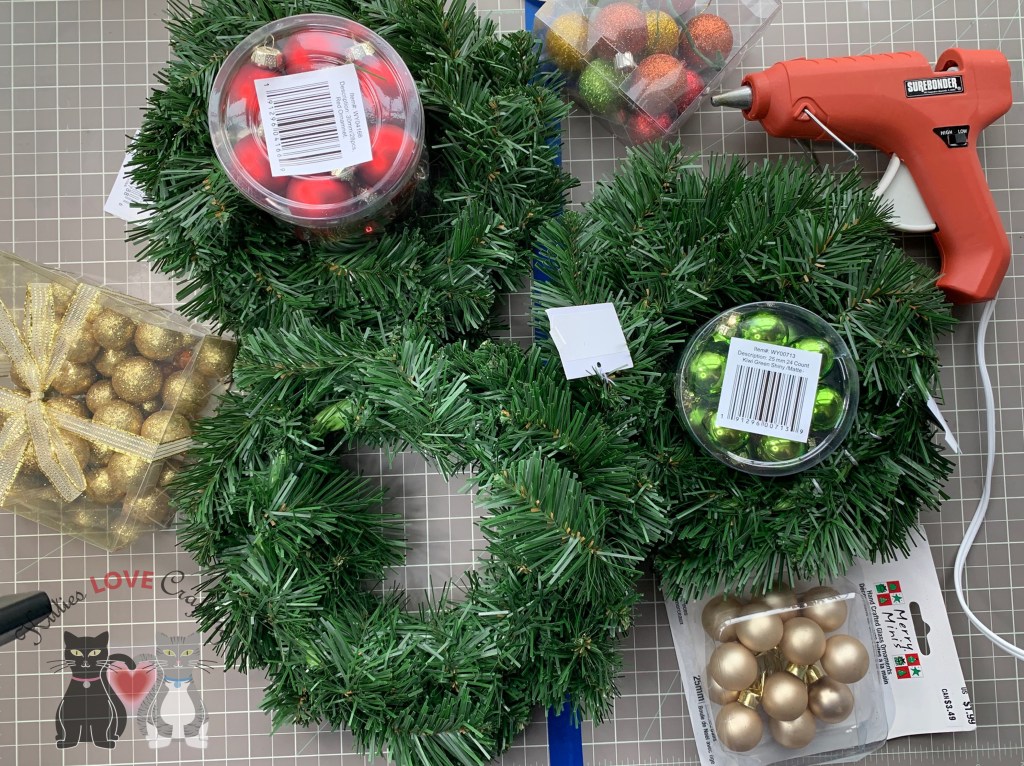
These were super easy to make and inexpensive. The supplies I used are mini wreaths, 25-30mm Ornaments, 5/8” Red Satin Ribbon, Hot Glue Gun and Gorilla Glue Hot Glue Sticks. These little wreaths would make great gifts as well or can be used around a candle for a festive centerpiece.
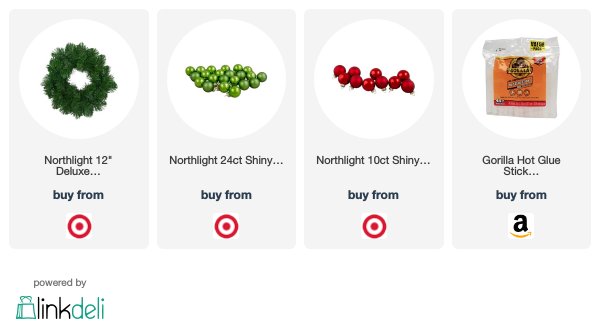
Supplies

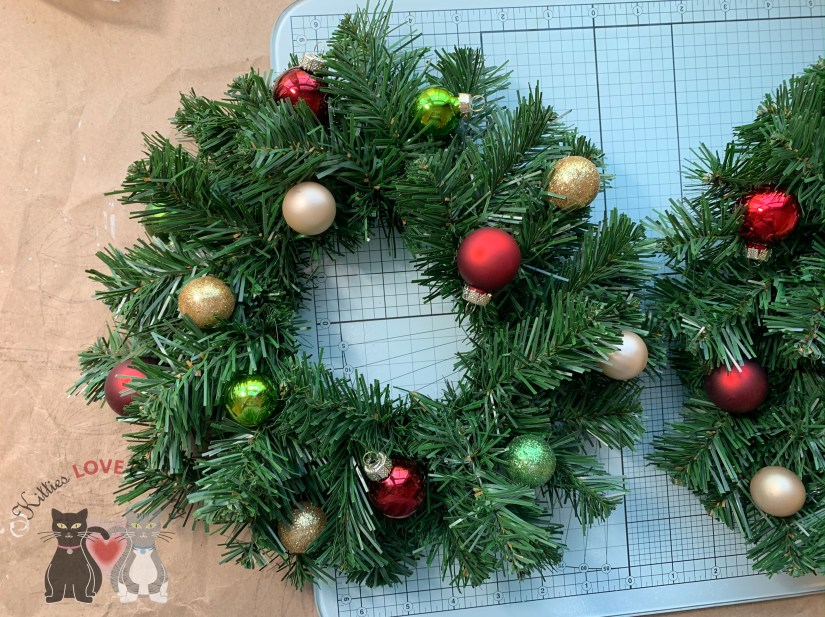
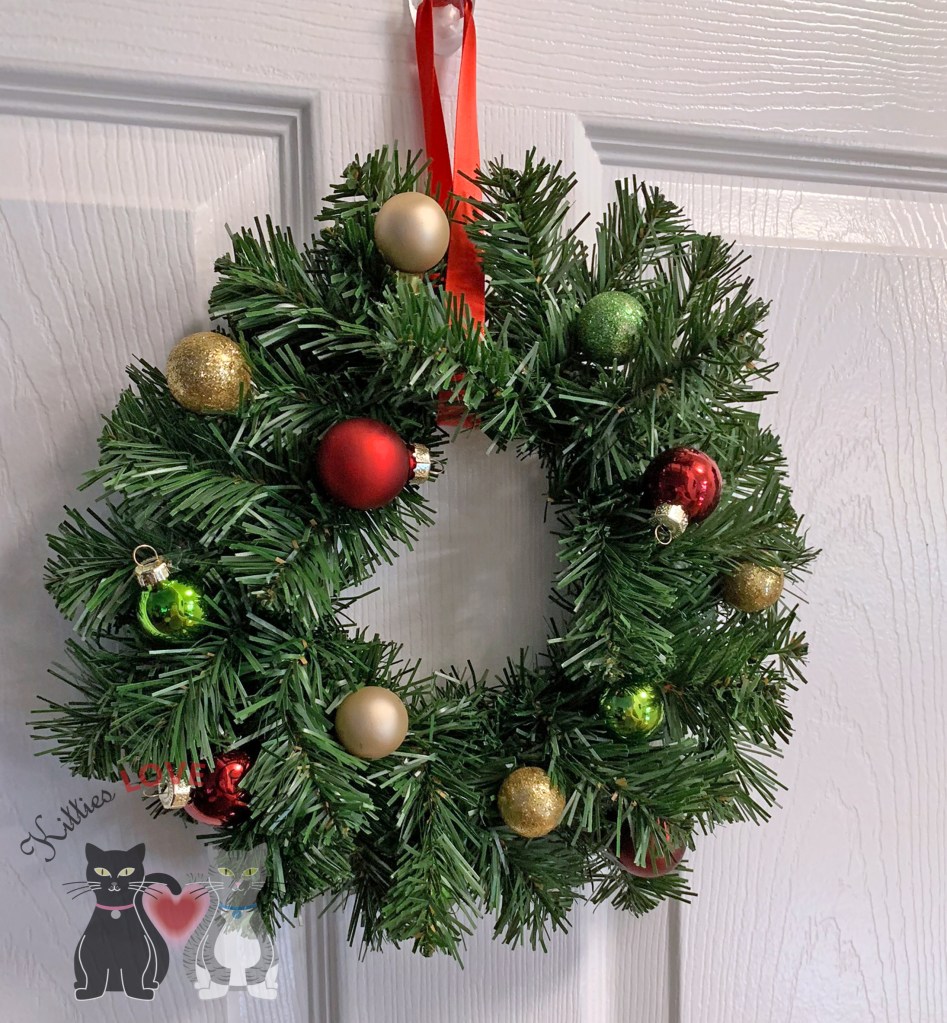
I bought three mini wreaths from Target and hot glued red, green, and gold ornaments to it, scattering them around the wreath. The pale gold, glitter gold, and red and green glitter ornaments are ones I used from my stash.

I added a 5/8” Red Satin Ribbon to each wreath to hang them. That’s all! I told you it was super easy. You can add more items, like ribbon or candies, etc to your if you like.

https://linkdeli.com/widget.js?1559654439292

Thanks for reading this post and I hope I’ve inspired you to make some wreaths for your home or for a gift. Leave comments or questions below or feel free to email

Christmas, Christmas, Holidays 2019

Lawn Fawn Build-A-House Die: Gingerbread Houses

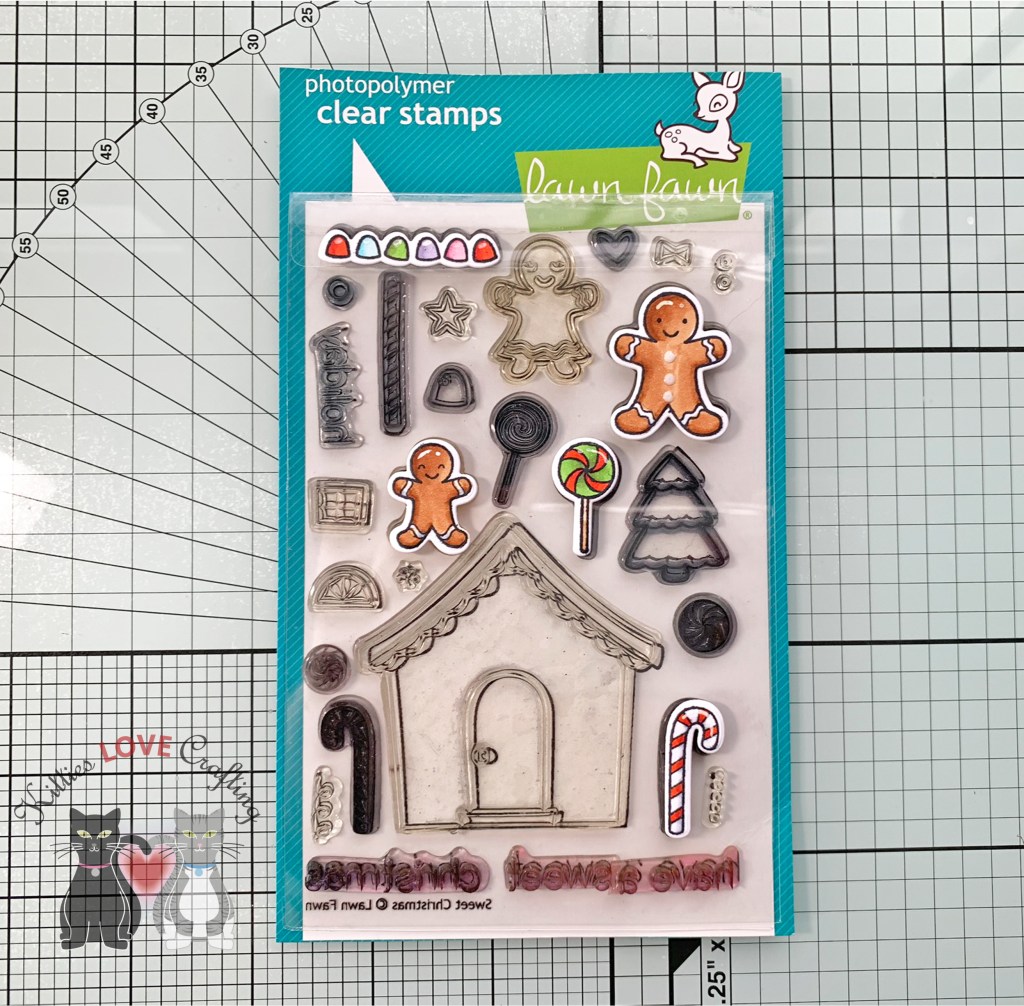
Hello friends. I’m back today with cards featuring an adorable die from Lawn Fawn. It’s the Build-A-House Die and the Build-A-House Christmas Add-On Dies. I decided to make Gingerbread Houses using the Lawn Fawn Sweet Christmas stampset. This little house can be used on a card or as a standalone card as I will show you in this post. These cards are available in my shop NOW! Go check out my Black Friday/Cyber Monday deals!

I love decorating gingerbread houses. It’s so much fun and they just look so cute. Do you like making gingerbread houses for Christmas? What holiday traditions do you and your family have?

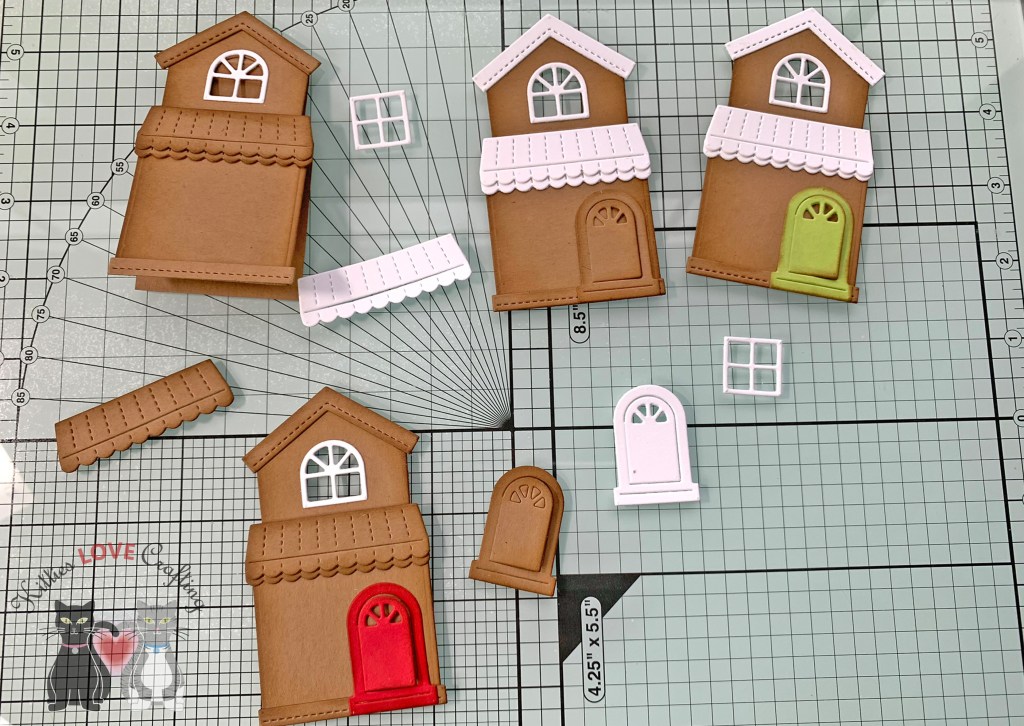
I made four gingerbread houses with this die. I was able to create several different looks using the Lawn Fawn Sweet Christmas stampset. Here’s how these came together…

I started by diecutting all the house bases from Lawn Fawn Paper Bag 8.5 x 11″ Cardstock. I also diecut two roofs from Lawn Fawn Paper Bag 8.5 x 11″ Cardstock and two from Neenah 110lb Classic Crest Cardstock 8.5″X11″, four square and four arch windows from Neenah 110lb Classic Crest Cardstock 8.5″X11″ the back pieces for the windows in Neenah 110lb Classic Crest Cardstock 8.5″X11″, four chimneys from Lawn Fawn Paper Bag 8.5 x 11″ Cardstock, and the doors, one in each of Lawn Fawn Paper Bag 8.5 x 11″ Cardstock, Neenah 110lb Classic Crest Cardstock 8.5″X11″, Simon Says Stamp Green Apple 100lb Card Stock, and Stampin’ Up! Real Red 8.5 x 11″ Cardstock. I also diecut three wreaths from the Build-A-House Christmas Add-On Dies in Simon Says Stamp Green Apple 100lb Card Stock and three bows from Stampin’ Up! Real Red 8.5 x 11″ Cardstock.

Next I inked the edges of all the pieces cut from Lawn Fawn Paper Bag Cardstock and the red and green doors with Tim Holtz Distress® Ink Pad Gathered Twigs to make them look more like gingerbread cookies since the real ones would probably have a little browned edge to them.

I assembled all the houses, but left the window off since I wanted to color the backgrounds and add images inside the windows. I turned one house into a card by tracing one of the house bases and fussycutting it out. I did it this way instead of using the die so that the window hole at the top of the house isn’t present. I scored the top edge of that piece and adhered it to one of the houses. It’s best to adhere the card back before adhering the chimney or the roof. I set those aside and moved onto the stamping…

I stamped several of each of the images from Lawn Fawn Sweet Christmas stampset onto Neenah 110lb Classic Crest Cardstock using Memento Tuxedo Black Ink. I stamped many, many more of the candy images than the trees and the gingerbread people since I knew I was going to use them to decorate my houses. After all what is a gingerbread house without lots of candy?!? I colored the images using COPIC markers. All the gingerbread people were colored using E33 and E37, C3 and the blender (0) for the white trim. I used R5 and R17 for the bow tie. I used YG13 and G94 for the trees as well as E37 and E29 for the trunk. For the candy canes and peppermint sticks I used R5 and R17. The rest of the candy and gumdrops were colored with R5 and R17, YG13 and G94, BG000 and BG01, R81 and R85, BV00 and BV11. I also colored all the window backgrounds with Y00 and Y13.

I added highlights to the images with a Uni-Ball Signo Broad Point Gel Pen – White. I added Nuvo Drops in Gloss Simply White in for the gingerbread people’s buttons and Autumn Red for the ornaments on the trees. Then I diecut them all with their respective dies. This is the most time consuming part of these cards — the coloring and diecutting. So keep that in mind if you want to make these cards, especially in multiples as I have done here. If you don’t like coloring these might not be the cards for you. But you can also just do basic coloring, no shading, with any markers.

Time to create the individual cards. I created 3 card bases using Neenah 110lb Classic Crest Cardstock 8.5 X 11″, cut to 5-1/2 x 8-1/2″and scored at 4-1/4″.

For the first card, I cut a piece of Neenah 110lb Classic Crest Cardstock 8.5 X 11″ to 4 x 5-1/4″ and ink blended Tim Holtz Distress Oxide Ink Pad TUMBLED GLASS and Tim Holtz Distress Oxide Ink Pad SALTY OCEAN to create a sky. I sprayed some water using my Tim Holtz 4oz. DISTRESS SPRAYER, let it sit for a few seconds and dabbed it with a paper towel, then added splatters with some Delta Creative Ceramcoat Acrylic Paint in White and a small paintbrush.

I diecut a hillside from Neenah 110lb Classic Crest Cardstock using Lawn Fawn’s Stitched Hillside Borders Die and inked around the bottom edge with Tim Holtz Distress Oxide Ink Pad TUMBLED GLASS. I adhered the sky panel and the snowy hillside to the card base with 3M Foam Tape. I added a tree and a yellow background to the square window and a tiny gingerbread man to the arch window and a yellow background and added those to the house. I adhered the house to the card, placing some foam tape just behind the top half of the house to even it out on the card. I decorated the house with peppermint sticks and peppermint candies. I also added a tiny peppermint candy to the door and a larger gingerbread man to the roof of the house. And added two trees in the background and some candies as well.

I stamped a sentiment from the Lawn Fawn Merry Messages onto a piece of Neenah 110lb Classic Crest Cardstock 8.5 X 11″, measuring 3-3/4 x 1/2″, with Candied Apple Distress Oxide Ink and adhered it using some 3M Foam Tape. I finished it off by adding some Nuvo Crystal Drops in Autumn Red to the door for a doorknob, Nuvo Drops in Gloss Simply White to the chimney, roof, windows and the edges to simulate frosting, and WHITE BLIZZARD Nuvo Glitter Drops to the background and the edge of the snowy hillside.

On the inside of the card, I stamped another sentiment from Lawn Fawn Merry Messages with Candied Apple Distress Oxide Ink and added peppermint candies scattered.

Dimensions


For the second card, I cut a piece of blue plaid paper from Lawn Fawn’s Perfectly Plaid Spring 6 x 6 Paper (retired) to 4 x 5-1/4″ and ink blended Tim Holtz Distress Oxide Ink Pad TUMBLED GLASS to create a sky.

I diecut a hillside from Neenah 110lb Classic Crest Cardstock using Lawn Fawn’s Stitched Hillside Borders Die and inked around the bottom edge with Tim Holtz Distress Oxide Ink Pad TUMBLED GLASS. I adhered the sky panel and the snowy hillside to the card base with Tombow Mono Multi Liquid Glue. I added a tree and a yellow background to the square window and a gingerbread man peeking from the arch window and a yellow background and added those to the house. I adhered the house to the card, placing a piece of scrap cardstock behind the top half of the house to even it out on the card. I decorated the house with peppermint sticks and peppermint candies and added a tiny wreath and bow (from the build-A-House Christmas Add-on set) to the door. I created a fence with the candy canes on the hillside. I added a gingerbread family, lollipops, and peppermint candies as well.

I stamped a sentiment from the Lawn Fawn Merry Messages onto a piece of Neenah 110lb Classic Crest Cardstock 8.5 X 11″ with Candied Apple Distress Oxide Ink, fussycut it out and adhered it flat using some Tombow Mono Multi Liquid Glue. I finished it off by adding some Nuvo Drops in Gloss Simply White to the chimney, roof, windows and the edges to simulate frosting, the sky and the door knob and WHITE BLIZZARD Nuvo Glitter Drops to the edge of the snowy hillside.

On the inside of the card, I stamped another sentiment from Lawn Fawn Merry Messages with Candied Apple Distress Oxide Ink and added candy canes at the bottom edge.

Dimensions


For the third card, I cut a piece of grey and white plaid paper from Lawn Fawn’s Perfectly Plaid Winter 6 x 6 Paper (retired) to 4 x 5-1/4″ and ink blended Tim Holtz Distress Oxide Ink Pad TUMBLED GLASS and Tim Holtz Distress Oxide Ink Pad SALTY OCEAN to create a sky.

I diecut a hillside from Neenah 110lb Classic Crest Cardstock using Lawn Fawn’s Stitched Hillside Borders Die and inked around the bottom edge with Tim Holtz Distress Oxide Ink Pad TUMBLED GLASS. I adhered the sky panel and the snowy hillside to the card base with Tombow Mono Multi Liquid Glue. I added a gingerbread man and a yellow background to the square window and just a yellow background to the arch window and added those to the house. I adhered the house to the card, placing a piece of scrap cardstock behind the top half of the house to even it out on the card. I decorated the house with gumdrops and lollipops. I also added a tiny wreath and bow (from the build-A-House Christmas Add-on set) to the door.

I stamped a sentiment from the Lawn Fawn Merry Messages onto a piece of Neenah 110lb Classic Crest Cardstock 8.5 X 11″ with Candied Apple Distress Oxide Ink, fussycut it out and adhered it flat using some Tombow Mono Multi Liquid Glue. I finished it off by adding some Nuvo Drops in Gloss Simply White to the chimney, roof, windows and the bottom of the house to simulate frosting, the sky and the door knob.

On the inside of the card, I stamped another sentiment from Lawn Fawn Merry Messages with Candied Apple Distress Oxide Ink and added Lollipops at the bottom edge.

Dimensions

For the fourth card, I added a large peppermint candy to the top window and a tree and a and a yellow background to the square window and added those to the house. I added a tiny wreath and bow (from the build-A-House Christmas Add-on set) to the door and candy canes on either side of the door. I added peppermint sticks to the roof and peppermint candies to the bottom of the house and finished it off by adding some Nuvo Drops in Gloss Simply White to the roof and chimney.

https://linkdeli.com/widget.js?1559654439292

Thanks for reading this post and I hope I’ve inspired you to give these cards a try on your own. Leave comments or questions below or feel free to email

Christmas, Christmas, Seasons, Winter

Using Sketches and Ephemera to Create Quick Christmas / Winter Cards

While I don’t often use sketches, I had these two packs of winter ephemera from Echo Park laying around for months and decided to finally make some cards with them. I also bought coordinating 6 x 6 and 12 x 12 paper pads. I used some pre-designed card sketches to take some guesswork out of the process. These cards will also be available in my shop on November 10th.

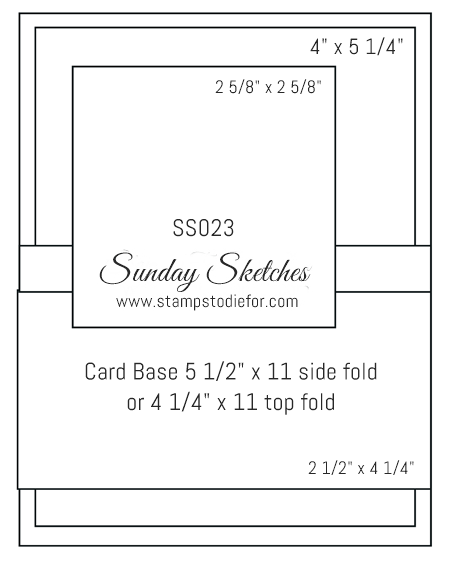
For the first card, I used Sunday Sketches SS023. For the card base, I cut a piece of Stampin’ Up! Night Of Navy 8-1/2″ X 11″ Cardstock to 5-1/2 x 8-1/2″and scored at 4 1/4″. Then cut all the pieces of pattern paper for the background from the Echo Park – Celebrate Winter Collection 6 x 6 Paper Pad as per the sketch measurements. I matted all the pattern layers with Night Of Navy 8-1/2″ X 11″ Cardstock; I made those layers 1/8-inch larger.

I adhered the largest panel (4 x 5-1/4″) to the card base and then the other two pieces of pattern paper. I trimmed those with some Love From Lizi Pin Stripe Peel-Off Stickers in Red Mirror. I used a large snowman gift tag from the Echo Park’s A Perfect Winter Frames & Tags Ephemera. I matted that with the same Stampin’ Up! Night Of Navy 8-1/2″ X 11″ Cardstock. I added a Lawn Fawn’s Peppermint Twine to the tag and added it to the card with 3M Foam Tape to pop it up. I finished it off with some Nuvo Crystal Drops in Autumn Red.

On the inside of the card, I cut a piece of Neenah 110lb Classic Crest Cardstock 8.5″X11″ to 4 x 5-1/4″ and added a strip of the blue plaid pattern paper measuring 1-1/2 x 5-1/4″. I stamped a greeting from Lawn Fawn’s Merry Messages in Stampin’ Up! Real Red Ink.

Dimensions


For the second card, I used Queen & Company’s sketch for inspiration. I did a portrait version and altered it a bit. For the card base, I cut a piece of Neenah 110lb Classic Crest Cardstock 8.5″X11″ to 5-1/2 x 8-1/2″and scored at 4 1/4″. Then cut the two pieces of pattern paper for the background from the Echo Park – Celebrate Winter Collection 6 x 6 Paper Pad as per the sketch measurements. I added Love From Lizi Pin Stripe Peel-Off Stickers in Red Mirror to the strip in the background. I rounded the corners on all the pieces and adhered them to the card.

I matted the tag with the little girl with some Stampin’ Up!’s Real Red 8-1/2″ X 11″ Cardstock and the sentiment block from Echo Park’s I Love Winter Ephemera Die Cuts with a plaid pattern paper from the Echo Park – Celebrate Winter Collection 6 x 6 Paper Pad. I adhered both to the card flat and added a bow with 1/4″ satin red ribbon. I finished it off with some WHITE BLIZZARD Nuvo Glitter Drops.

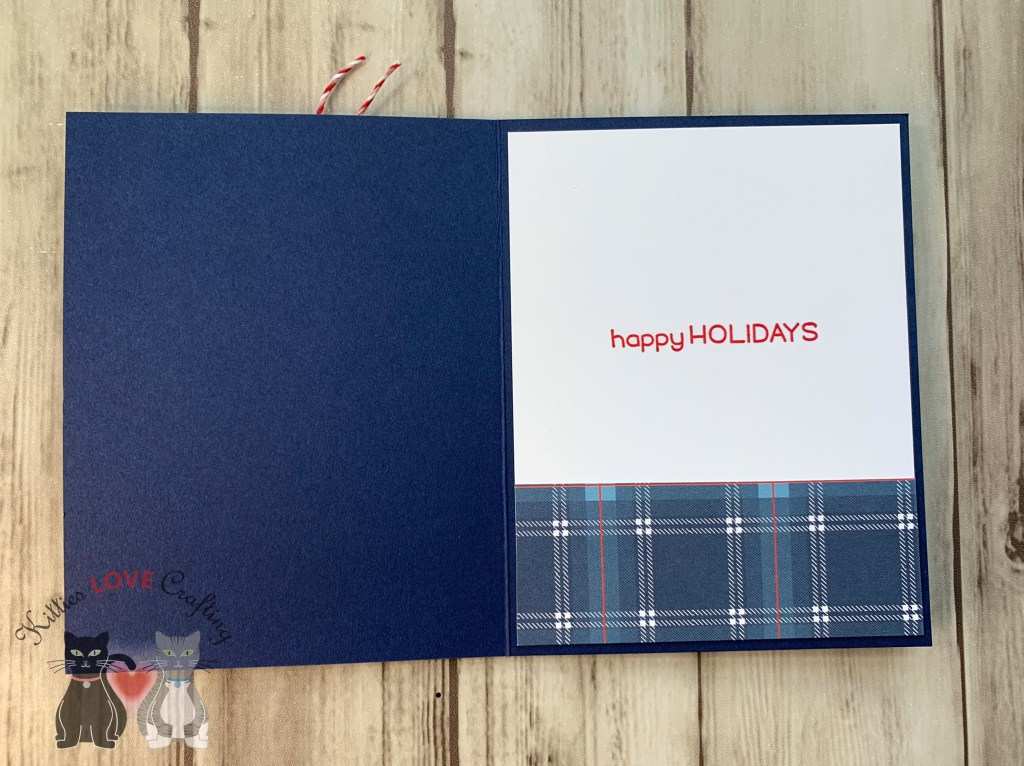
On the inside of the card, I added a strip of the mitten pattern paper measuring 1 x 5-1/2″ to the right side of the card. I stamped a greeting from Lawn Fawn’s Merry Messages in Stampin’ Up! Real Red Ink.

Dimensions


For the third card, I used paper Play Sketch 53. For the card base, I cut a piece of Neenah 110lb Classic Crest Cardstock 8.5″X11″ to 5-1/2 x 8-1/2″and scored at 4 1/4″. I cut a piece of Crafter’s Companion Shimmering Cardstock, 6 by 6-Inch, White Pearl to 4 x 5-1/4″. Then cut two pieces of pattern paper from the Echo Park – Celebrate Winter Collection 6 x 6 Paper Pad to 3/4 x 4″ and 1/2 x 4″. I adhered the two pattern pieces together, leaving about 1/4″ of the blue plaid paper exposed. I trimmed those off with Love From Lizi Pin Stripe Peel-Off Stickers in Red Glitter.

I adhered the Snow banner from Echo Park’s I Love Winter Ephemera Die Cuts to the card towards the bottom and then adhered the two strips above that. I trimmed down the sentiment block from one of the cut-apart pages of the Echo Park – Celebrate Winter Collection 6 x 6 Paper Pad and adhered it on an angle to the right side of the card. Trimmed the excess off the edge. I fussycut the snowman from one of the tags from Echo Park’s A Perfect Winter Frames & Tags Ephemera and popped him onto the card using Stampin’ Dimensionals. I finished off the card by adding some WHITE BLIZZARD Nuvo Glitter Drops.

On the inside of the card, I added a strip of the striped pattern paper measuring 3/4 x 4-1/4″ to the right side of the card. I stamped a greeting from Lawn Fawn’s Merry Messages in Stampin’ Up! Real Red Ink.

Dimensions


For the fourth card, I used Queen & Company’s sketch for inspiration. For the card base, I cut a piece of Neenah 110lb Classic Crest Cardstock 8.5″X11″ to 5-1/2 x 8-1/2″and scored at 4 1/4″. I cut a piece of Echo Park – Celebrate Winter Collection 6 x 6 Paper Pad to 4 x 5-1/4″ and a strip in another pattern to to 1 x 5-1/4″. I adhered the two pattern pieces to the card and added some Love From Lizi Sway Peel-Off Stickers in Silver Mirror.

I took the little white bear tag from Echo Park’s A Perfect Winter Frames & Tags Ephemera and adhered him to a piece of Stampin’ Up!’s Real Red 8-1/2″ X 11″ Cardstock which I diecut using a scallop rectangle from the Queen & Company’s Foundation Dies #2. I adhered that to the card and matted the sentiment strip from the same ephemera pack with Neenah 110lb Classic Crest Cardstock 8.5″X11″. I popped up the sentiment using some 3M Foam Tape.

I stamped and diecut 4 snowflakes from the Catherine Pooler Joyful Flakes Stamp Set , 2 using Stampin’ Up!’s Night Of Navy Classic Ink and 2 using Versamark Ink and Simon Says Stamp Silver Embossing Ink onto Neenah 110lb Classic Crest Cardstock 8.5″X11″. I layered two of them together and adhered all the snowflakes to the card, popping up two of them using Stampin’ Dimensionals. I finished off the card with some Nuvo Glitter Drops in Silver Moondust.

On the inside of the card, I stamped 3 snowflakes from Catherine Pooler Joyful Flakes Stamp Set with Stampin’ Up!’s Night Of Navy Classic Ink and a greeting from Lawn Fawn’s Merry Messages in Stampin’ Up! Real Red Ink.

Dimensions


For the fifth card, I used Sunday Sketches SS022. For the card base, I cut a piece of Neenah 110lb Classic Crest Cardstock 8.5″X11″ to 5-1/2 x 8-1/2″and scored at 4 1/4″. I cut a piece of snowman paper from Echo Park – Celebrate Winter Collection 6 x 6 Paper Pad to 3 x 5-1/4″ and matted it with Stampin’ Up! Crumb Cake 8-1/2″ X 11″ Cardstock and another piece of beige fabric weave texture pattern paper to 2 x 4″, matted it with Stampin’ Up! Crumb Cake 8-1/2″ X 11″ Cardstock and adhered both to the card front.

I cut a banner from Stampin’ Up! Real Red 8-1/2″ X 11″ Cardstock to 1/2 x 3-1/2″. I added the banner and circle sentiment diecut from the Echo Park’s A Perfect Winter Frames & Tags Ephemera to the card. I popped up the circle using Stampin’ Dimensionals and fussycut two of the little snowman from the pattern paper and pooped them up as well. I finished off the card with some clear, red and aqua sequins.

On the inside of the card, I cut a strip of the beige fabric weave texture pattern paper to 1″ x 4-1/4″ and the snowman paper 3/4 x 4-1/4″ and adhered them to the bottom of the inside of the card. I stamped a greeting from Lawn Fawn’s Merry Messages in Stampin’ Up! Real Red Ink.

Dimensions


For the sixth card, I cut a piece of Neenah 110lb Classic Crest Cardstock 8.5″X11″ to 5-1/2 x 8-1/2″and scored at 4 1/4″. I cut a piece of blue plaid paper from Echo Park – Celebrate Winter Collection 6 x 6 Paper Pad to 3 x 5-1/4″, a piece of the red tree pattern paper to 2-1/4 x 4″, and a piece of the stripe paper to 3/4 x 4″ and matted that strip with Neenah 110lb Classic Crest Cardstock 8.5″X11″. I added some Love From Lizi Pin Stripe Peel-Off Stickers in Red Glitter to the striped paper and adhered all the pattern paper to the front of the card.

I chose a snowman tag from Echo Park’s A Perfect Winter Frames & Tags Ephemera and Echo Park – I Love Winter Ephemera Die Cuts, matted them with Neenah 110lb Classic Crest Cardstock 8.5″X11″ and adhered them to the card. I found some chipboard snowflakes in my stash and heat embossed them with Versamark Ink and Wow Opaque Bright White Embossing Powder and adhered them to the card. I finished off the card by adding Nuvo – Jewel Drops – Sea Breeze and Nuvo Crystal Drops in Autumn Red

On the inside of the card, I cut a strip of the blue plaid pattern paper to 1″ x 4-1/4″ and adhered them to the bottom of the inside of the card. I stamped a greeting from Lawn Fawn’s Merry Messages in Stampin’ Up! Real Red Ink.

Dimensions


https://linkdeli.com/widget.js?1559654439292

Thanks for reading this post and I hope I’ve inspired you to give these cards a try on your own. Leave comments or questions below or feel free to email me.

Christmas, Christmas

Christmas in July

Hello friends. Another Monday is upon us and July is almost over. I don’t know when the whole Christmas in July phenomenon started but I look forward to it every year now. The Hallmark Channel shows Christmas movies all month long, which I just love; those cheesy Christmas movies are the best! There are crafty sales and giveaways and crafters share cute Holiday cards and crafts. What could be better? It’s also a great time to get a jump start on your holiday cards. Before we know it will be December and time to send out cards!

And since I love a good Christmas card just as much as the next gal, I had to join in the fun before July was over. I kept things simple with this card. First I cut a piece of Neenah 110lb Classic Crest Cardstock 8.5″X11″ to 8 1/2 x 5 1/2″ and scored it at 4 1/4″ for my card base. Next I cut a piece of Simon Says Stamp Card Stock 100lb Lipstick Red to 4 x 5 1/4″, grabbed my Stampers Anonymous – Tim Holtz – Holiday Script Stencil and some Therm O Web TRANSFER GEL iCraft Deco Foil and began the foiling process. It’s super easy but requires patience and drying time.

I taped the red cardstock to my work surface using some Post-it Tape and then taped in place the stencil where I wanted it. Since this stencil is narrower than the cardstock panel, if you want to cover the whole background you will have to do these steps twice. I did not have to do this however since I will be covering the left side. I used a palette knife to spread the deco foil transfer gel over the stencil, making sure to spread it evenly and thinly. You don’t want a thick uneven layer or the foil will not stick correctly. I set that aside to dry (it took a couple of hours) and took cut a piece of Stampin’ Up! Old Olive Cardstock to 1 1/8 x 5 1/4″ and ran it through my diecut machine using the Darice Diagonal Stripe Embossing Folder.

Still waiting for the first half of the deco foil gel to dry, I proceeded to diecut my snowflakes. I cut 3 snowflakes using the Delicate Snowflake Die by Catherine Pooler Designs from Neenah 110lb Classic Crest Cardstock 8.5″X11″ and adhered them together to create a dimensional snowflake.

Several hours later…

The transfer gel will look shiny once it is dried. I placed a piece of the Therm O Web Gina K Designs RADIANT RED Fancy Foils Deco Foil over the red panel, sandwiched it inside a folded piece of parchment paper and ran it through my laminator (make sure it is good and hot). It comes out so pretty! I took the embossed piece of Stampin’ Up! Old Olive Cardstock and adhered it to the left side of the red foiled panel, added a strip of the wider Pin Stripe Peel-Off Stickers – Gold Mirror Moondust from Love From Lizi and then adhered that all to my card base, leaving a 1/8″ border all around the card.

Time to add the snowflake. I adhered that 3D white snowflake roughly in the center of the card, added some Tonic PALE GOLD Nuvo Crystal Drops to the center of the snowflake, the top and bottom of the card panel. And the card is finished! Oh wait! we need a sentiment!

I added the “Merry & Bright” sentiment from Peaceful Flakes Stamp Set by Catherine Pooler Designs to the inside of the card using my Old Olive Classic Stampin’ Pad by Stampin’ Up! as well as a large snowflake from Peaceful Flakes Stamp Set by Catherine Pooler Designs in Real Red Classic Stampin’ Pad | Stampin’ Up! to the bottom right corner. Ok now this card I complete!!!!

Supplies

Thanks for stopping by and I hope I’ve inspired you to start making your Christmas/Holiday cards. Leave comments or questions below or feel free to email me.