Cards, Fourth of July, Halloween, Summer, Summer

Shop Your Stash Day 5: Halloween in July

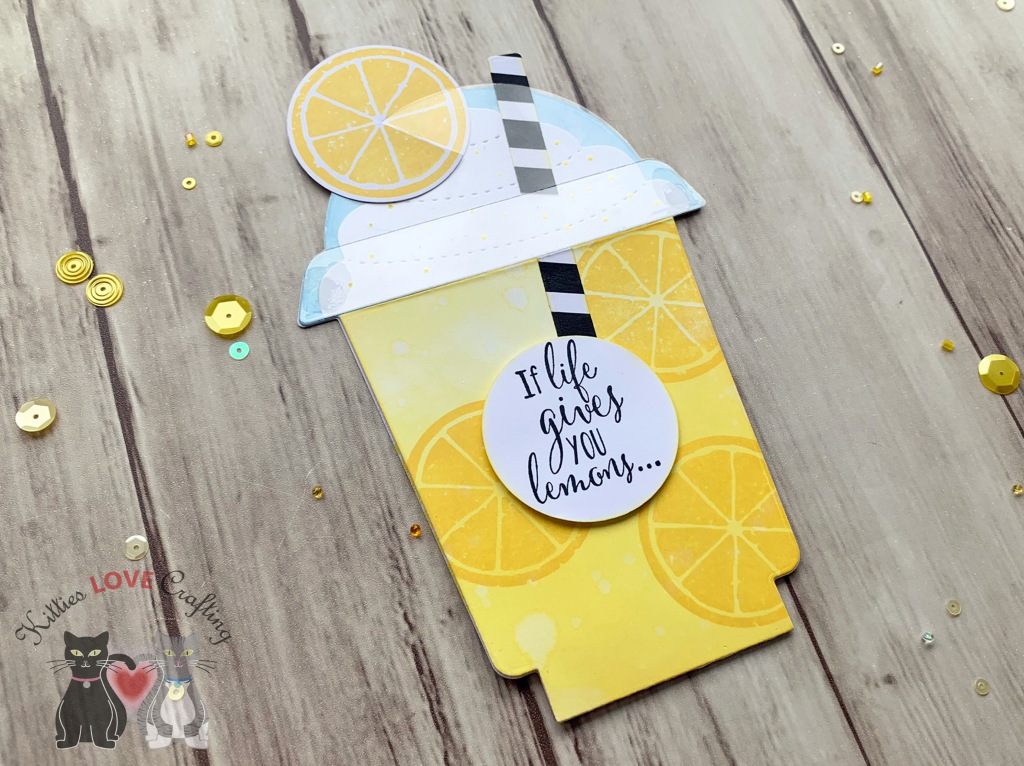
Well I’m sure you have heard of Christmas in July, but have you heard of Halloween in July??? Quite frankly, I love making Halloween cards anytime of year! It’s my favorite holiday ever!!!

For this card, I started by cutting a piece of Simon Says Stamp 100# Black Card to 5-1/2 x 8-1/2″ and scored at 4-1/4″ and diecut a panel and the peekaboo panels with the Lawn Fawn Peekaboo Backdrop. I stamped the jack-o-lantern face from Papertrey Ink Pumpkin Expressions Mini Stamp Set onto a scrap of Stampin’ Up! Pumpkin Pie 8-1/2″ X 11″ Cardstock with Memento Tuxedo Black Ink, cut it to 2 x 2″ then inked up the edges with Spiced Marmalade Distress Ink. I stamped the sentiment from Stampin’ Up! (retired) Versamark Ink and WOW Embossing Powder Opaque Bright White Super Fine onto a piece of Stampin’ Up! Elegant Eggplant 8-1/2″ X 11″ Cardstock (retired), cut it to 2 x 2″ then inked up the edges with Dusty Concord Distress Oxide Ink. Then adhered both to the back of the top panel and the peekaboo windows to each respective area of the card.

I cut a piece of the aqua Lawn Fawn Perfectly Plaid Rainbow 6 x 6 Paper (not available) to 2 x 3-1/4″ and a piece of Stampin’ Up! Old Olive 8-1/2″ X 11″ Cardstock to 1-1/2 x 3-1/4″ and used the Lawn Fawn Simple Grassy Hillsides to diecut the edge. I inked the Perfectly Plaid Rainbow with Tim Holtz Distress PEACOCK FEATHERS Ink and the grass with Stampin’ Up! Old Olive Classic Stampin’ Ink and adhered the pieces together and to the back of the top panel. I cut a piece of Simon Says Stamp 100# Fog Gray Card to 2 x 3-1/4″ and created an ombre effect by using Black Soot Distress Ink.

I stamped images from Lawn Fawn’s Pick of the Patch and How You Bean Candy Corn stampset onto Neenah 110lb Classic Crest Cardstock 8.5 X 11″ with Memento Tuxedo Black Ink and colored them with COPIC markers.

I used 0 and C1, Y02 and Y06, YR12 and YR16 for the candy corn, YR16 and YR09, YG01 and YG25 for the pumpkins, Y02 and YR12 for the pumpkin guts, BV11 and BV17 for the scoop, C1 and C3, N5 and N7 for the knife and W1, W3, and W5, E15, E23, and E37 for the squirrels. I diecut the images and adhered them to their respective panels and adhered those to the back of the top panel. I used Stampin’ Dimesionals to adhere some of the images and then to the card base. Then I adhered the rest of the images around the panel.

I stamped sentiments from Lawn Fawn’s Push Here stampset with Versamark Ink and WOW Embossing Powder Opaque Bright White Super Fine to the peekaboo panels. I finished it off by adding highlights to the images with Uni-Ball Signo White Broad Point Gel Pen and VIOLET GALAXY Nuvo Drops.

On the inside of the card, I cut a piece of Neenah 110lb Classic Crest Cardstock 8.5 X 11″ to 4 x 5-1/4″ and stamped a sentiment from Lawn Fawn’s Pick of the Patch with Dusty Concord Distress Oxide Ink. I added a candy corn image and that completes this card.

Dimensions


Supplies

Thanks for reading this post. I hope you enjoyed and I’ve inspired you to Shop Your Stash and see what fun ideas you come up with and maybe rediscover supplies you forgot you had! Leave comments or questions below or feel free to email me.

Art Journal, Custom Planner Inserts, Covers, Dividers, Dashboards and Diecuts, DIY Projects, Fourth of July, Tips and Tricks

How to Use Up Old 12 x 12 Paper Pads

Are you like me… You’ve been buying 12 x 12 paper pads for years and years and years and now have so many you don’t know what to do with it? Well here are just a few ways I like to use my paper pads up.

1. Use them in your junk journal.
My new obsession is creating junk journals. I started watching videos on them and quickly became hooked. What is a junk journal, you ask??? It’s a journal you create using old papers, cardboards, receipts, tickets, magazine pages, junk mail. Then you can decorate it with embellishments, tags, anything you want really. Then you write in, use it as a planner or for memory keeping. If you want to learn more about it, check out this link. There are tons of videos on junk journaling.


I like to coffee dye pattern papers to age them before using them in my junk journal. Then I use them for the main pages, tags, pockets, fold outs and many, many more. It’s super easy to coffee dye paper. Mix instant coffee with hot water and either spray it onto the paper or use a metal or plastic tub/pan and dip it into coffee. Check out this video for more info.


2. Organization. Another great use for pattern paper is for organization. I used pattern papers to make dividers for my 6 x 6 paper pads. I keep mine in clear fridge bins; this one measures 8W x 14.5L x 4”H and I got this it from Amazon. I created these using old white 3 ring binder dividers I had purchased ions ago and then adding the pattern paper to the front of it. I cut the white dividers to 6-1/2”w x 7”h and the paper to 6”w x 7”h. Glue them together, add a label and you have cute dividers.


3. Make sticker books. Since I am a planner girl, I have a descent amount of stickers. And before the Happy Planner came out with their sticker books, I created my own after watching several videos on how to do this. It’s easy. You need card stock, some discs, a Happy Planner Punch or any Arc Disc Punch and extra planner pages or other paper to adhere the sticker sheets to. You can laminate your covers or leave them as is and add a sheet of clear acetate over it as I did with these since at the time I didn’t have a laminator.

For this sticker book, I cut 2 pieces of paper to 6-1/4 x 9”. You can also make dividers to organize your sticker book.


4. Make custom cover, dividers, dashboards for your planners and notebooks. Another thing I love is my planner and customizing it for the holidays. I’m a planner girl who loves to make it pretty and I found that it was easier to make my own once I bought a laminator machine. The easiest way to customize your planner is to use a paper pad that has cut aparts, stickers or other things you can use to add to your planner but no worries if you don’t. You can easily use colors from different paper pads that coordinate.

I used a paper pad from Authentique called Liberty to make my Fourth of July theme. I made mine for a Classic Happy Planner so my measurements will fit that planner. For my cover I cut the paper to 7-1/2 x 9-1/2, rounded the corners (important so you don’t stab yourself later), then I laminated it and trimmed it, leaving a 1/8″ border around it so the sides do not open so the final measures 7-3/4 x 9-3/4. Once cut, I punched the mushroom holes with my Arc Disc Punch.

For the dividers, I used dividers from my original Classic Happy Planner as a template. I find this is the easiest way to do this because they already have tabs. This will work with any size planner. But you can also just cut the paper down to the same size of your cover and then add a shape (like a star-for July 4th) as your tab. Adhere it in place before you laminate your dividers. Again, I rounded the corners before laminating then again once I trimmed them down. These measure 7-1/2 x 9-1/4″ before lamination and 7-5/8 x 9-1/4″ once laminated and trimmed.

I also cut out some of the cut aparts and laminating them to add into the pockets of my planner cover. These make great diecuts. You can also cut out images that appear on these cut aparts for a more customized diecut (i.e, cut around the liberty bell in the diecut shown below),

Another thing you can make is a bookmark or dashboard. Choose a width (I usually do half the width of my page and then use the dividers to trace a tab at the top of your bookmark. Laminate and cut it and you have a cute bookmark to mark your week or month or whatever you need.

Thanks for reading this post. I hope you enjoyed and I’ve inspired you to give these find some uses for all that paper you have in your stash. Leave comments or questions below or feel free to email.

Cards, Encouragement, Fourth of July, Fourth of July, Summer, Summer

Shop Your Stash Day 3: Making Summer Cards Using Honeybee Stamps Frappe Shake Card Dies

While it’s probably no surprise too many that I love coffee, I love coffee stamps and dies even more. This Honeybee Stamps Frappe Shake Card Dieset as well as their Honey Bee COFFEE CUP CARD Dies are my favorites! They have everything you need to make cute coffee cup and frappe cup shaped cards and shakers. And they fit in an A2 size envelope which is great!

I thought it would be fun to reuse this dieset to make some non-coffee cards, instead make brightly colored summer beverages. I don’t know if you all remember the rocket bomb popsicles that were red, white and blue. I remember many summers as a kid eating those popsicles (they were refreshing and turned my tongue red or blue, depending on which end I ate first—what could be better??). LOL That was the inspiration for my first card.

I started by diecutting card bases using the large card, coffee cup, and the whipped cream dies in the set from Neenah 110lb Classic Crest Cardstock 8.5 X 11″ 3 times. I also diecut 3 sets of the lid and its rim from Acetate.

I also went ahead and added Tim Holtz Salty Ocean Distress Oxide Ink to the lid section of the card base on all 3 cards to create a background for the lid. Then, used Tim Holtz Candied Apple Distress Oxide Ink, Tim Holtz Salty Ocean Distress Oxide Ink and Tim Holtz Chipped Sapphire Distress Oxide Ink to create an ombre effect on the coffee cup, leaving the middle area white. I sprayed some water onto it with my Tim Holtz DISTRESS SPRAYER and blotted it with a paper towel.

While the ink dried, I diecut the straw and the larger circle from the dieset from a piece of Doodlebug Designs Yankee Doodle 6 x 6 Pattern Paper (no longer available) and used the smallest star from the Sizzix Framelits Stars Die Set and Tim Holtz Idea-ology 8 x 8 Paper Stash METALLIC KRAFT STOCK to diecut a small star. I adhered the star to the circle, the coffee cup and whipped cream to the card base and then cut the straw in half and adhered it to the front of the card using Tombow Mono Multi Liquid Glue. I adhered the circle to the card front and added some silver confetti stars from Fanci-Fetti Stars (silver) Party Accessory to the whipped cream and then the clear lid on top of the stars (I used Ranger GLOSSY ACCENTS Glue Dimensional Adhesive to adhere the acetate and metallic stars).

On the inside of the card, I stamped “Happy 4th of July” with a very old stampset I had (sorry don’t know where it came from) using Tim Holtz Chipped Sapphire Distress Oxide Ink and added 3 silver stars.

Card Inside

For the second card, I decided to make a delicious watermelon smoothie. Who doesn’t like a tasty frozen watermelon beverage on a hot summer day?!? I’m now craving a smoothie while writing this post. LOL.

For this card, I started by using Tim Holtz Candied Apple Distress Oxide Ink, and Tim Holtz Mowed Lawn Distress Oxide Ink to create an ombre effect on the coffee cup. I cut a small triangle from some Neenah 110lb Classic Crest Cardstock 8.5 X 11″ and also inked it up with the distress oxide inks. I sprayed some water onto it with my Tim Holtz DISTRESS SPRAYER and blotted it with a paper towel.


While the ink dried, I diecut the straw from a piece of Brutus Monroe Fresh Melon 6 x 6 Paper Pad. I adhered the coffee cup and whipped cream to the card base and then cut the straw in half and adhered it to the front of the card using Tombow Mono Multi Liquid Glue. I added Nuvo EBONY BLACK Crystal Drops to the whipped cream and then adhered the clear lid on top of the stars (I used Ranger GLOSSY ACCENTS Glue Dimensional Adhesive to adhere the acetate). I cut a slit in the watermelon slice and adhered it to the card. I stamped a sentiment from Honey Bee Stamps SHAKE IT OFF Clear Stamp Set onto a piece of Neenah 110lb Classic Crest Cardstock 8.5 X 11″ using Memento Tuxedo Black Ink. I fussycut it and adhered it to the card front and added more Black Nuvo drops. I left the inside of the card blank.


And if I’m making fruity drinks for the summer, I can’t forget about a refreshing frozen lemonade! Yum!

For this card, I started by using Tim Holtz Squeezed Lemonade Distress Oxide Ink to create an ombre effect on the coffee cup. I sprayed some water onto it with my Tim Holtz DISTRESS SPRAYER and blotted it with a paper towel. Then I stamped a couple of slices from the Stampin’ Up! Lemon Zest Clear-Mount Stamp Set (which was retired recently) and Ranger Archival Chrome Yellow Ink onto the cup and one onto some Neenah 110lb Classic Crest Cardstock 8.5 X 11″.

While the ink dried, I diecut the straw from a piece of Catherine Pooler Designs Black Tie Gala Patterned Paper. I adhered the coffee cup and whipped cream to the card base and then cut the straw in half and adhered it to the front of the card using Tombow Mono Multi Liquid Glue. I added Nuvo DANDELION YELLOW Glossy Drops to the whipped cream and then adhered the clear lid on top (I used Ranger GLOSSY ACCENTS Glue Dimensional Adhesive to adhere the acetate). I cut a slit in the lemon slice and adhered it to the card. I stamped a sentiment from Stampin’ Up! Lemon Zest Clear-Mount Stamp Set (which was retired recently) onto a piece of Neenah 110lb Classic Crest Cardstock 8.5 X 11″ using Memento Tuxedo Black Ink and cut it out with a 1-3/4 inch punch. I adhered to the card with 3M Foam Tape

On the inside of the card, I stamped a sentiment from the Stampin’ Up! Lemon Zest Clear-Mount Stamp Set (which was retired recently) with Memento Tuxedo Black Ink and lemon slices with Tim Holtz Squeezed Lemonade Distress Oxide Ink.

Card Inside

Supplies

Thanks for reading this post. I hope you enjoyed and I’ve inspired you to Shop Your Stash and see what fun ideas you come up with and maybe rediscover supplies you forgot you had! Leave comments or questions below or feel free to email me.