Hello friends. Here’s another fun summer card using the Lawn Fawn Build-A-Drink Dies. This requires minimal stamping. I used all dies except for the sentiment strip and added texture to the background using a Tim Holtz stencil. I love how bright this card turned out. Definitely some summer vibes happening here!
For this card, I cut a piece of Neenah 100lb Classic Crest Cardstock 8.5 X 11″ to 5-1/2 x 8-1/2″ and scored at 4-1/4″ to create a card base and another piece die cut using the Catherine Pooler Scallops & Dots Dies.
I added dimension to the images by inking them. I used Tim Holtz Mowed Lawn Distress Oxide Ink for the lighter leaves and limes; Rustic Wilderness Distress Oxide Ink for the darker leaves and stems; Squeezed Lemonade Distress Oxide Ink for the lemons and the drink and Stampin’ Up! Sahara Sand Ink (retired) for the fruit basket.
Thanks for reading this post. I hope I’ve inspired you to give this cute summer card a try for yourself. Leave comments or questions below or feel free to email.
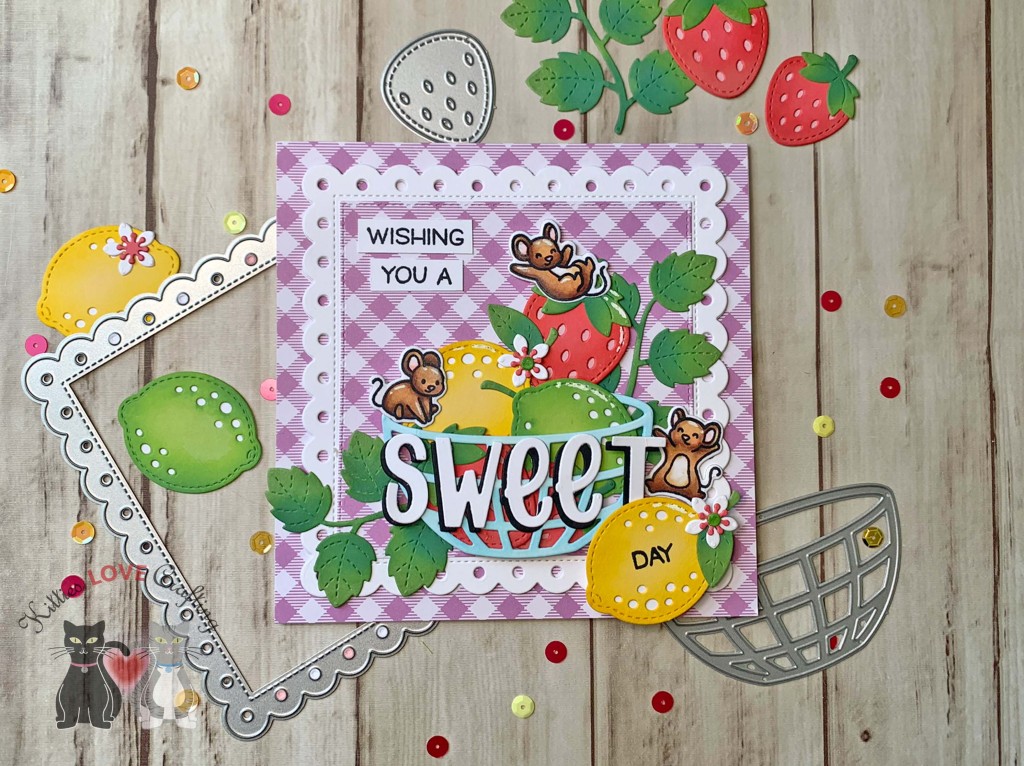
I colored them with Distress Oxide Inks. I used Tim Holtz Mustard Seed and Mowed Lawn for the lemons and limes, Festive Berries for the strawberries, Rustic Wilderness for the leaves, and Tumbled Glass for the fruit basket.
Thanks for reading this post! I hope you enjoyed and I’ve inspired you to make this sweet card yourself! If you want to share you creations with me tag me on instagram @kittieslovecrafting. Leave comments or questions below or feel free to email me.
Hi friends. I couldn’t resist but CASE this card from Lawn Fawn Design Team member, Tammy Stark, featuring the cute Zesty Lemon Die. I used similar colors on the background but a different technique, changed the sentiment and a different border.
Thanks for reading this post! I hope you enjoyed and I’ve inspired you to make these cute cards yourself! If you want to share you creations with me tag me on instagram @kittieslovecrafting. Leave comments or questions below or feel free to email me.
Hi friends. I couldn’t resist getting the cute Zesty Lemon Die set from Lawn Fawn when I saw it! For my first cards I decided to make some embossed backgrounds and my distress sprays. These will also be available in my Etsy Shop.
For the both cards, I cut a piece of Neenah 110lb Classic Crest Cardstock to 7″ x 6″ and scored at 3-1/2″ to create the card bases. I diecut a piece of Neenah 110lb Classic Crest Cardstock with the stitched frame 3x to stack them and the scallop rectangle from the Queen & Company Foundation 17 dies. I also die cut one of the stitched smaller rectangles from the same set as well as a piece measuring 3 x 5-3/4″.
I embossed the two rectangles with the Darice 5 x 7 Plaid Embossing Folder then colored them using Distress Sprays. I used Broken China and Salty Ocean for the first card and Picked Raspberry and Carved Pumpkin for the second. In retrospect, I would water down the colors on the pink/orange background a bit more. Once all was dry, I added some splashed with White Acrylic Paint.
Thanks for reading this post! I hope you enjoyed and I’ve inspired you to make these cute cards yourself! If you want to share you creations with me tag me on instagram @kittieslovecrafting. Leave comments or questions below or feel free to email me.
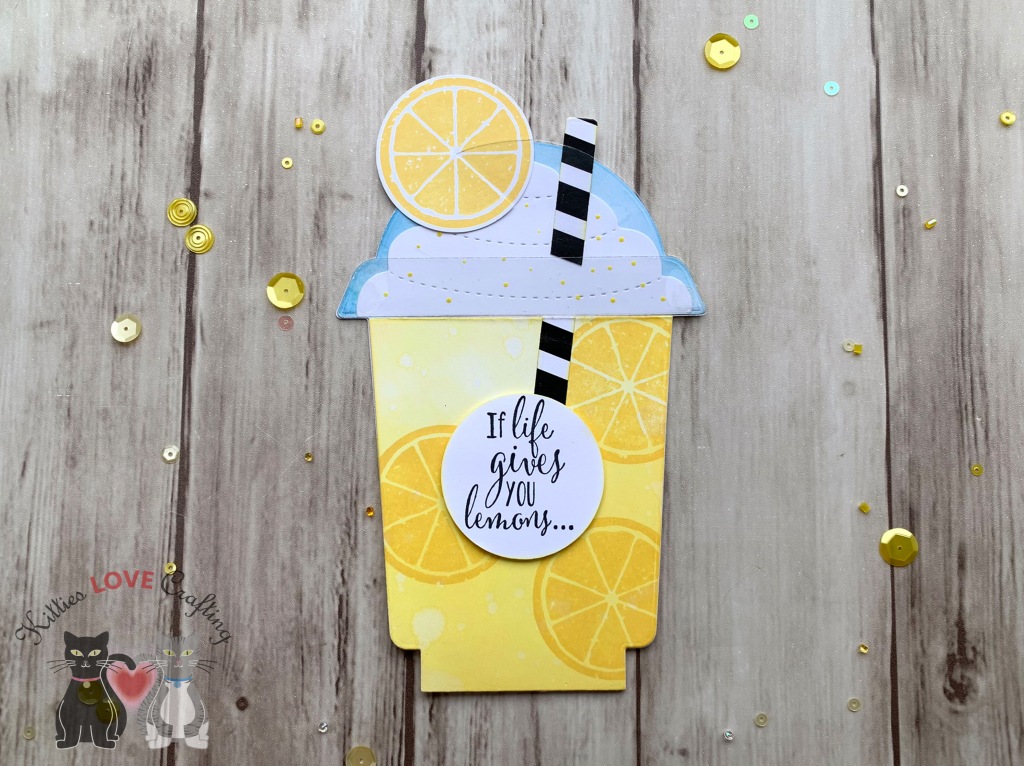
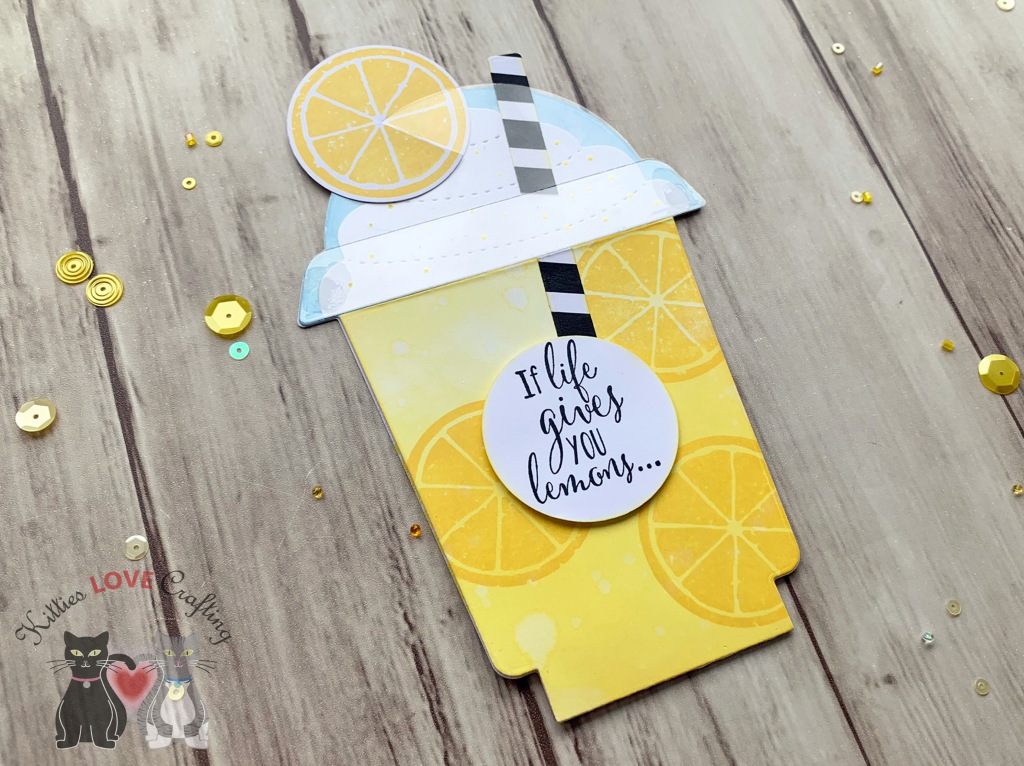
While it’s probably no surprise too many that I love coffee, I love coffee stamps and dies even more. This Honeybee Stamps Frappe Shake Card Dieset as well as their Honey Bee COFFEE CUP CARD Dies are my favorites! They have everything you need to make cute coffee cup and frappe cup shaped cards and shakers. And they fit in an A2 size envelope which is great!
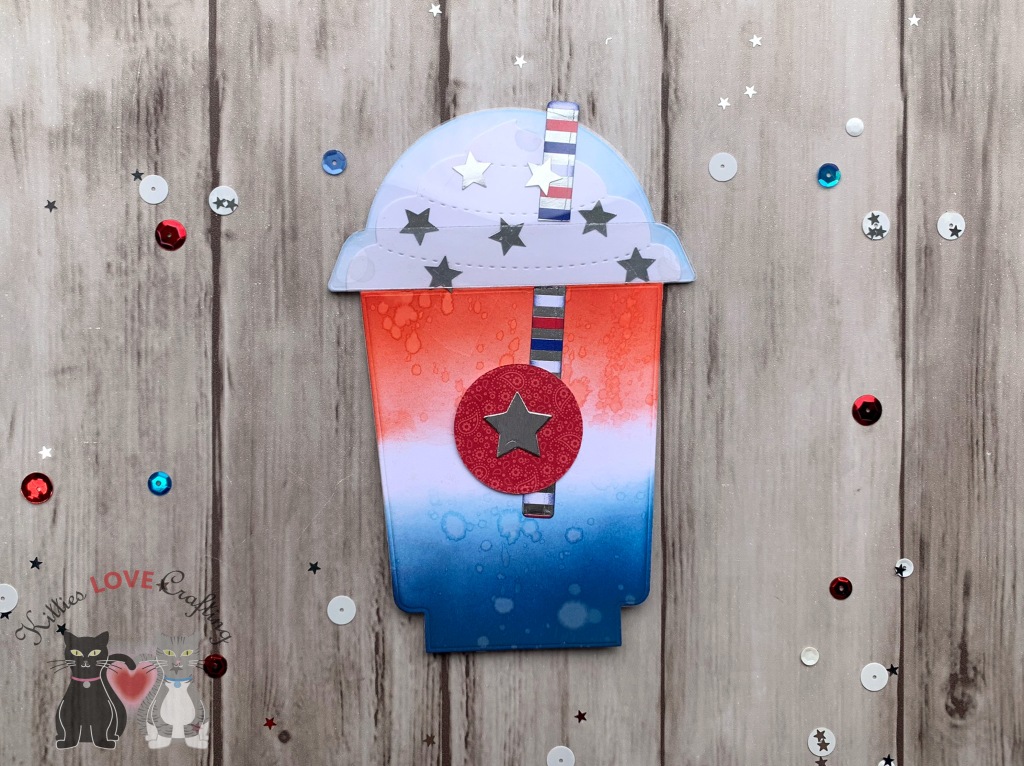
I thought it would be fun to reuse this dieset to make some non-coffee cards, instead make brightly colored summer beverages. I don’t know if you all remember the rocket bomb popsicles that were red, white and blue. I remember many summers as a kid eating those popsicles (they were refreshing and turned my tongue red or blue, depending on which end I ate first—what could be better??). LOL That was the inspiration for my first card.
I started by diecutting card bases using the large card, coffee cup, and the whipped cream dies in the set from Neenah 110lb Classic Crest Cardstock 8.5 X 11″ 3 times. I also diecut 3 sets of the lid and its rim from Acetate.
On the inside of the card, I stamped “Happy 4th of July” with a very old stampset I had (sorry don’t know where it came from) using Tim Holtz Chipped Sapphire Distress Oxide Ink and added 3 silver stars.
Card Inside
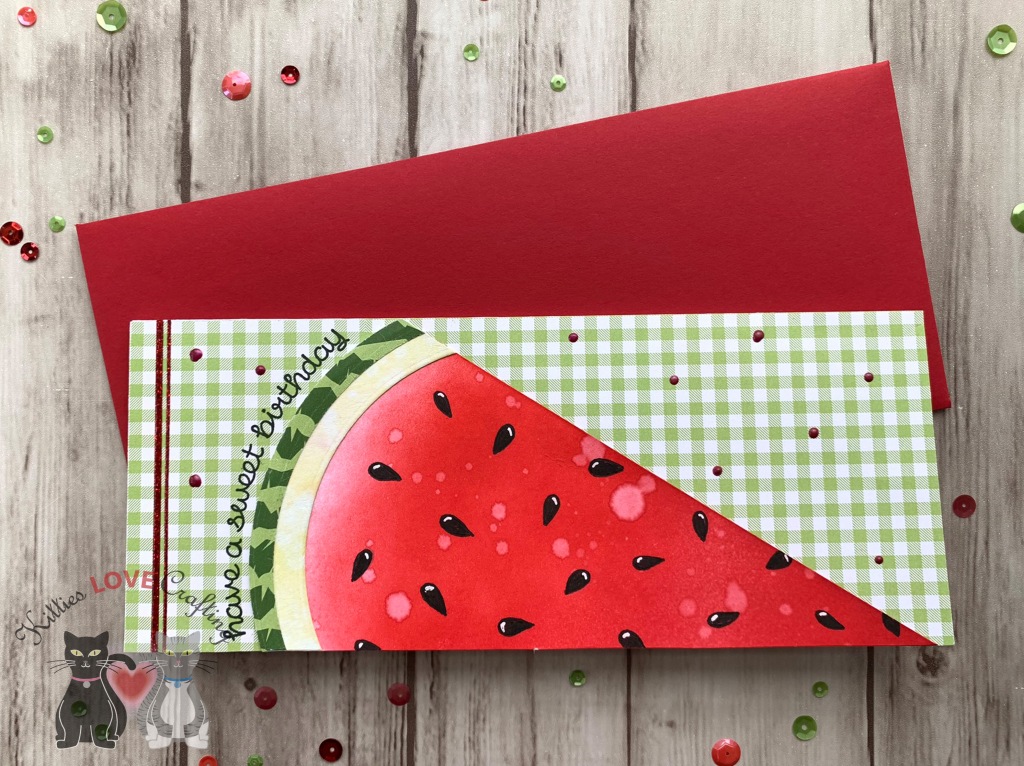
For the second card, I decided to make a delicious watermelon smoothie. Who doesn’t like a tasty frozen watermelon beverage on a hot summer day?!? I’m now craving a smoothie while writing this post. LOL.
Thanks for reading this post. I hope you enjoyed and I’ve inspired you to Shop Your Stash and see what fun ideas you come up with and maybe rediscover supplies you forgot you had! Leave comments or questions below or feel free to email me.
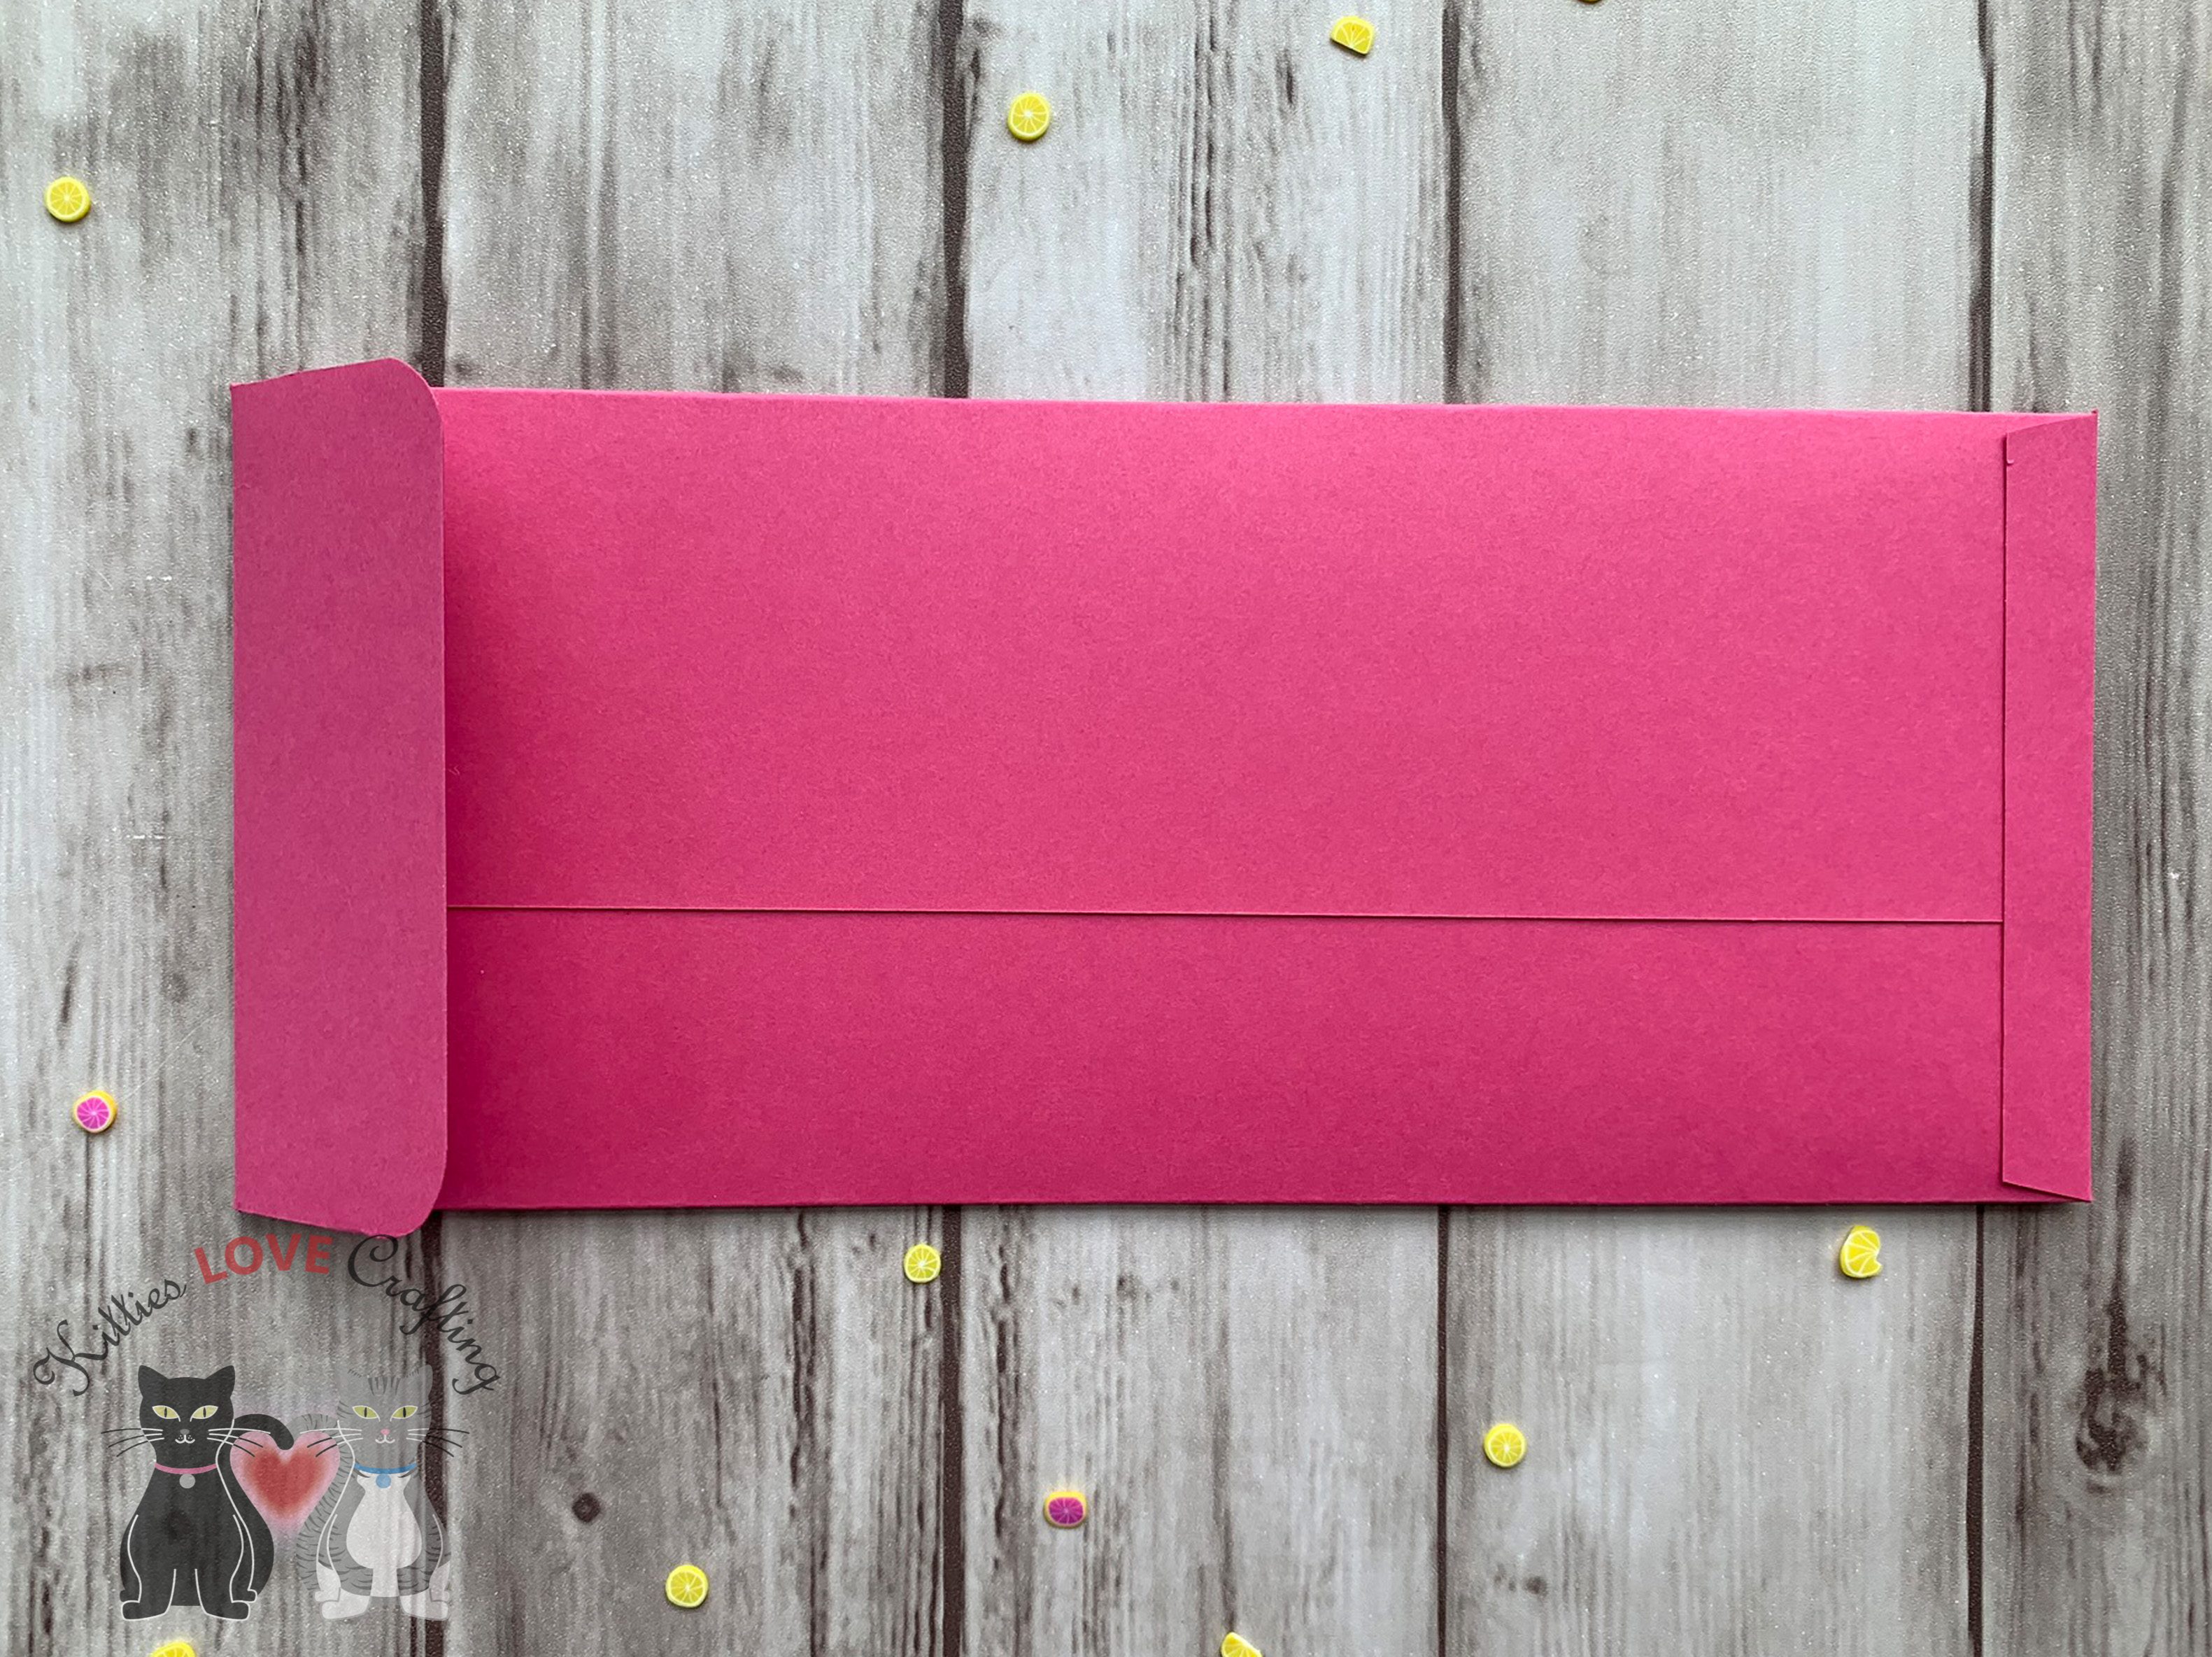
In today’s tutorial, I am making slimline cards. I’ve seen these popping up all over instagram and youtube and I figured I would make one too ( I mean… I have to right?!? 🙂 LOL). Since I do not have any slimline dies yet (I stress YET), I will prove you can make them with any supplies you have in your stash and no dies necessary. Even the envelope tutorial I found on YouTube makes it super simple to make a slimeline envelope.
On the inside of the card, I adhered the leftover pieces of the balloons on the front of the card to the top portion and stamped ‘Happy Birthday! using the free gift stamp I received from Lawn Fawn for my birthday month and Memento Tuxedo Black Ink. Yes! you can get freebies for your birthday! 🙂 I couldn’t find this anywhere so I don’t think this particular tiny sentiment stamp can be purchased but there are a ton of other Lawn Fawn Happy Birthday stamps you can use.
Balloon Birthday Inside
I also made an envelope using Neenah 110lb Classic Crest Cardstock 8.5 X 11″. I found a great tutorial on Youtube from Jenny Card Designs. She also provides a facebook link with the template. I added some more of the vellum balloons to the edge of the envelope. Go check her out on Youtube!
For the second card, I decided to make some summer fruity cards. I started by cutting a piece of Neenah 110lb Classic Crest Cardstock 8.5 X 11″ to 7 x 8-1/2″ and scored at 3-1/2″ to create the card base. Next, I cut two pieces of green gingham pattern paper from Brutus Monroe Fresh Melon 6 x 6 Paper Pad to 3-1/2 x 6 and adhered it to the card using Tombow Mono Multi Liquid Glue. I made sure to have the section where the two pieces meet to not be centered so it can be covered by the watermelon slice.
And since lemon cards are all the rage right now. I decided to break out my lemon stampset and builder punch from Stampin’ Up!. I began this card by I started by cutting a piece of Neenah 110lb Classic Crest Cardstock 8.5 X 11″ to 7 x 8-1/2″ and scored at 3-1/2″ to create the card base. Next, I cut a piece of pattern paper from Brutus Monroe Fresh Squeeze 6 x 6 Paper Pad to 1-1/2 x 8-1/2″and adhered it to the bottom of the card front.
And again I made an envelope using some dark pink cardstock from my stash (not sure where it is from becasue it is soooo old). Tutorial on Youtube from Jenny Card Designs.
Thanks for reading this post. I hope you enjoyed and I’ve inspired you to Shop Your Stash and see what fun ideas you come up with and maybe rediscover supplies you forgot you had! Leave comments or questions below or feel free to email me.
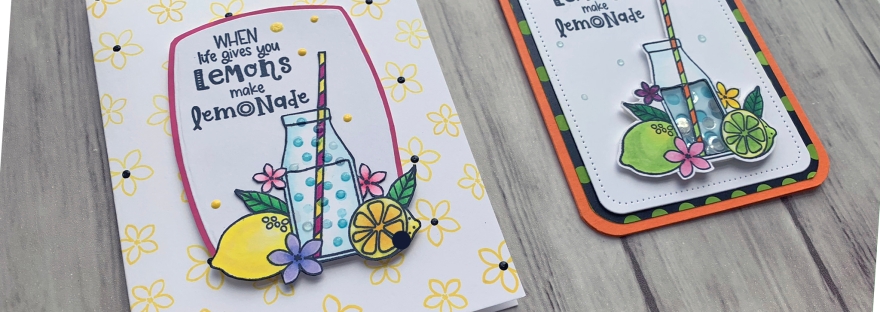
Hello friends. Hope you are all safe and healthy. And if you are struggling to cope with everything going on in our world right now, hang in there because ‘this too shall pass’. Speaking of old adages, “When Life Gives You Lemons Make Lemonade” is very fitting for these times we are in as well. While it’s very easy to focus on the scary and sad stuff going on, we have to find the bright spots too — the healthcare workers saving lives, families coming together, babies being born, spending time with our pets (one of my faves right now)…
These bright and cheerful cards were made using the Catherine Pooler Designs Make Lemonade Stampset (Out of stock-maybe discontinued). It was a limited release in March, I believe. It’s a tiny stampset but was super fun to color. I made one of them into a shaker (a tiny shaker:)).
Next, I colored the image with COPICS. I used BG000 + 0 for the bottle; Y11 +Y06 + Y13 for the lemons; Y11 +Y06 + Y13 + Y15 for the sliced lemon; YG06 + YG07 for the leaves; RV09 and Y06 + Y15 for the straw; RV10 + RV11 + RV14 for the flowers. I stamped the bubbles with Catherine Pooler Designs It’s A Boy Ink. I fussycut the image out.
I stamped the image onto a scrap of Neenah 110lb Classic Crest Cardstock with Memento Tuxedo Black Ink and set it aside to dry. I colored it with COPICS. I used Y13 + YG03 + YG01 + YG25 for the lime on the left; B0000 + 0 for the bottle; YR16 + YR18 and YG03 + YG25 for the straw; Y06 + Y18, R81 + R85, and V25 + BV17 for the flowers; and YG06 + G07 for the leaves .
Hello friends. Hope you are all safe and healthy. And if you are struggling to cope with everything going on in our world right now, hang in there because ‘this too shall pass’. Speaking of old adages, “When Life Gives You Lemons Make Lemonade” is very fitting for these times we are in as well. While it’s very easy to focus on the scary and sad stuff going on, we have to find the bright spots too — the healthcare workers saving lives, families coming together, babies being born, spending time with our pets (one of my faves right now)…
These bright and cheerful cards were made using the Catherine Pooler Designs Make Lemonade Stampset (Out of stock-maybe discontinued). It was a limited release in March, I believe. It’s a tiny stampset but was super fun to color. I made one of them into a shaker (a tiny shaker:)).
Next, I colored the image with COPICS. I used BG000 + 0 for the bottle; Y11 +Y06 + Y13 for the lemons; Y11 +Y06 + Y13 + Y15 for the sliced lemon; YG06 + YG07 for the leaves; RV09 and Y06 + Y15 for the straw; RV10 + RV11 + RV14 for the flowers. I stamped the bubbles with Catherine Pooler Designs It’s A Boy Ink. I fussycut the image out.
I added a piece of acetate behind the shaker window in the bottle, some 3M Foam Tape, and some flat clear sequins from my stash added it to the card. I finished it off by adding some Nuvo Sea Breeze Jewel Drops around the card.
On the inside of the card, I cut out a panel of Neenah 110lb Classic Crest Cardstock 8.5 X 11″ to 3-1/2″ x 4-3/4″ and a left over piece of the pattern paper to 3/4 x 3-1/2″ and adhered it to the bottom of the panel, then rounded the corners before adhereing it to the card base.
Thanks for reading this post. I hope you enjoyed and I’ve inspired you to give these cards a try for yourself. Leave comments or questions below or feel free to email.


 https://linkdeli.com/widget.js?id=f5e8378456858c916708