Christmas, Holidays 2020, Stampin' Up!, Tags

Quick Christmas Cards and Tags Using Wonder of the Season Paper by Stampin’ Up! (from the new Aug-Dec Mini Catalog)

As someone who loves to use old book pages in my junk journals, when I saw Wonder of the Season 12 x 12 Designer Series Paper in the new Stampin’ Up! Aug-Dec Mini Catalog, I knew I had to have it! It’s has pages with Christmas stories, recipes and holiday news stories, and there are pages with red foil on one side and black and white print on the other side and also gold foil pages. It can be found on page 31 of the catalog and is part of the Wonder of the Season Suite. I was able to make 2 cards and tags in a short amount of time.

I started the first card by cutting a piece of Whisper White 8-1/2″ X 11″ Thick Cardstock to 5-1/2 x 8-1/2″ and scored at 4-1/4″ to make a card base. Then cut a piece of Wonder of the Season 12 x 12 Designer Series Paper to 5 x 5-1/2″, ripped approximately 3/8″ from the top and bottom of it and adhered it on a diagonal to the card base, trimming off any excess. I cut a piece of 8-1/2″ x 11″ Vellum to 5 x 4-3/4 and ripped the top and bottom again so it is shorter than the pattern piece.

I fussycut the ornaments found on one of the red foil pages of the Wonder of the Season 12 x 12 Designer Series Paper and diecut “Merry Christmas” from Red Foil Sheets with the Word Wishes Dies. I adhered the sentiment and the ornaments to the vellum piece and adhered the vellum to the card, only adding glue behind the diecut and image and trimming off any excess from the sides. I finished it off by adding Pearls (discontinued). I colored some of them with Dark Real Red Stampin’ Blends.

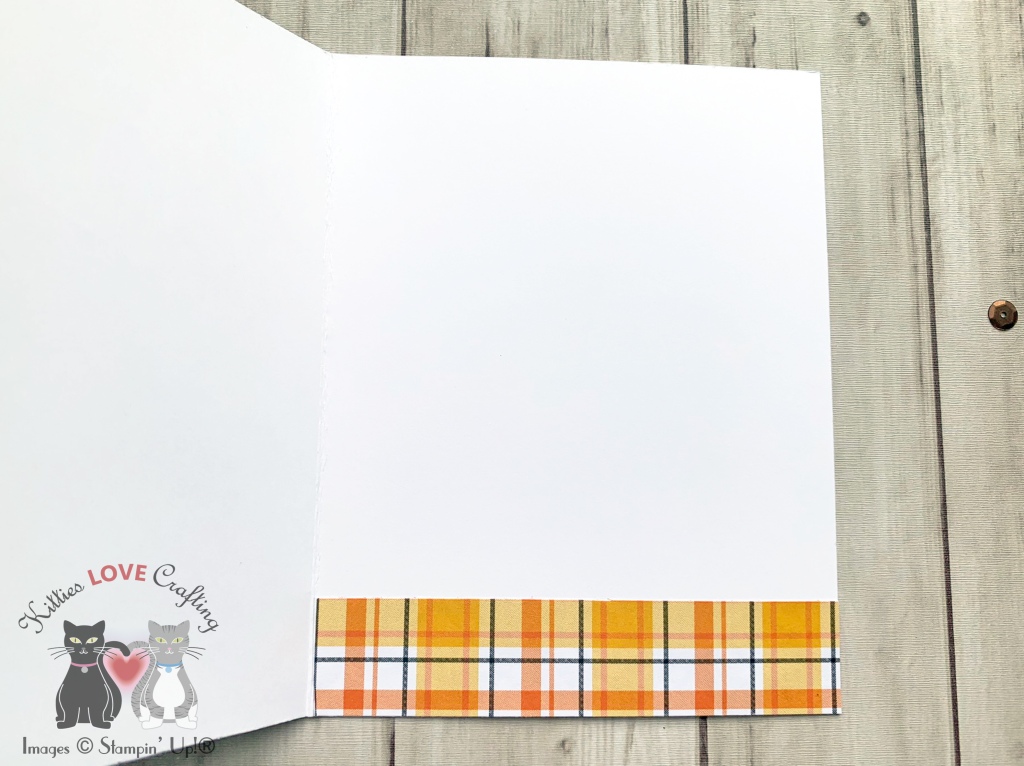
I left the inside of the card blank and just stamped a sentiment from the Tree Angle stampset with Real Red Stampin’ Ink.

Dimensions

I also made a cute tag to match this card. I cut a piece of Whisper White 8-1/2″ X 11″ Thick Cardstock to 2 x 3-5/8″ then using the Delightful Tag Topper Punch to make it into a pretty tag. Then cut a piece of Wonder of the Season 12 x 12 Designer Series Paper to 2-1/2 x 2-3/4″and a piece of 8-1/2″ x 11″ Vellum to 2-1/2 x 2-3/4 and ripped the top and bottom of both pieces and adhered the pattern piece on a diagonal to the card base, trimming off any excess. I added a piece of Red Foil Sheets, measuring 3/16 x 2-1/16″.

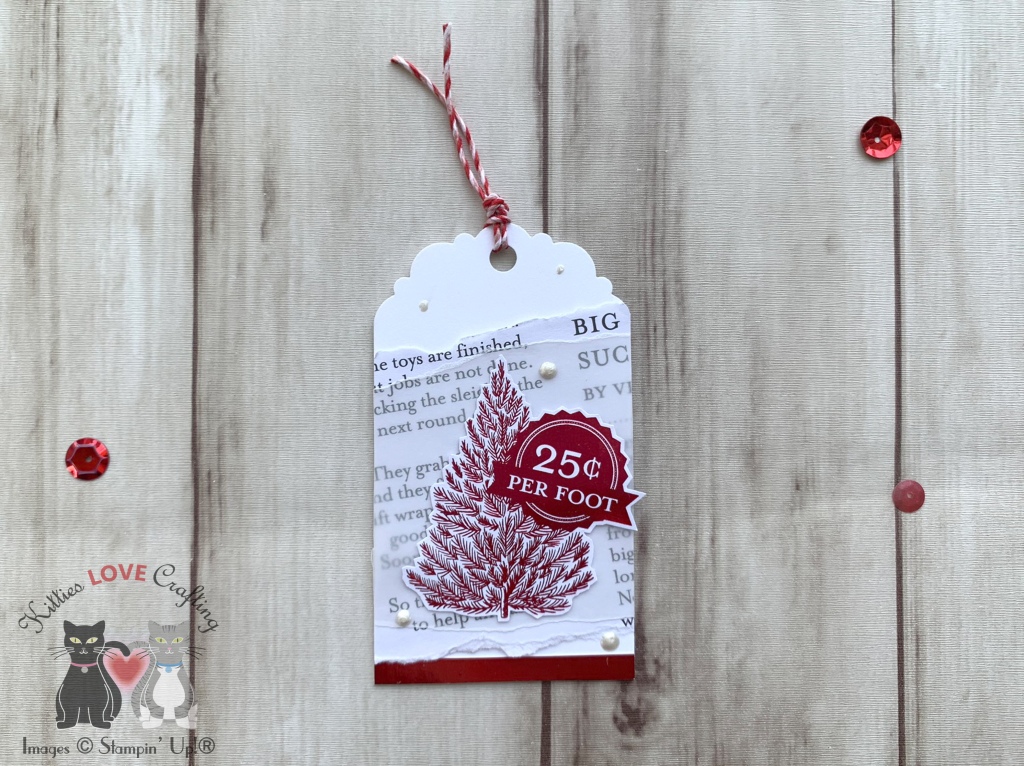
I fussycut a tree found on one of the red foil pages of the Wonder of the Season 12 x 12 Designer Series Paper and adhered it to the vellum piece and adhered the vellum to the tag, only adding glue behind the image and trimming off any excess from the sides. I finished it off by adding Pearls (discontinued) and stamping “TO” and “FROM” from the Make A Difference Stampset with Memento Black Ink. I added a piece of red and white twine as well.


Since I loved this paper so much I had to make more cards. I made one with the gold foil paper too.

I started the second card by cutting a piece of Whisper White 8-1/2″ X 11″ Thick Cardstock to 5-1/2 x 8-1/2″ and scored at 4-1/4″ to make a card base. Then cut a piece of Wonder of the Season 12 x 12 Designer Series Paper to 5 x 5-1/2″, ripped approximately 3/8″ from the top and bottom of it and adhered it on a diagonal to the card base, trimming off any excess. I cut a piece of 8-1/2″ x 11″ Vellum to 5 x 4-3/4 and ripped the top and bottom again so it is shorter than the pattern piece.

I fussycut the ornaments found on one of the red foil pages of the Wonder of the Season 12 x 12 Designer Series Paper and diecut “Merry Christmas” from Gold Foil Sheets with the Word Wishes Dies. I adhered the sentiment and the ornaments to the vellum piece and adhered the vellum to the card, only adding glue behind the diecut and image and trimming off any excess from. the sides. I finished it off by adding dots with a Tsukineko Versamark Versamarker and added Gold Stampin’ Emboss Powder and heat embossed.

I left the inside of the card blank and just stamped a sentiment from the Tree Angle stampset with Versamark Ink and added Gold Stampin’ Emboss Powder and heat embossed.

Dimensions

I also made a cute tag to for this card. I did the same exact thing except I used I added a piece of Gold Foil Sheets to the bottom, measuring 3/16 x 2-1/16″. I also I fussycut a gold tree and again made dots used the Tsukineko Versamark Versamarker and added Gold Stampin’ Emboss Powder and heat embossed and stamped “TO” and “FROM” from the Make A Difference Stampset with Memento Black Ink. I added a piece of Gold Metallic Trim as well.


Thanks for reading this post. I hope you enjoyed and I’ve inspired you to try these easy cards and tags using this beautiful paper for yourself! Leave comments or questions below or feel free to email me. If you want to share you creations with me tag me on instagram @kittieslovecrafting. If you would like a Stampin’ Up! catalog, please email me as well. All current catalogs can be found on the right side of this post and the Stampin’ Up! page. All news and fun stuff happening at Stampin’ Up! are listed there!

Autumn, Christmas, Fall, Holidays 2020, Stampin' Up!, Winter

Life Is Beautiful by Stampin’ Up! (from the new Aug-Dec Mini Catalog)

The Life Is Beautiful stampset by Stampin’ Up! at first glance looks like a very simple stampset but once you stamp the images you will notice the details in the images which give them dimension. It reminds me of another Stampin’ Up! (retired) stampset, Sheltering Tree, which I have loved for many years. Anyone else remember that stampset? I love this one sooo much more though–and I think it’s because of all the details. This lovely stampset can be found in the new Aug-Dec Mini Catalog which has a ton of awesome goodies for the holidays. I will definitely be making more cards with this stampset!

I started the first card by cutting a piece of Whisper White 8-1/2″ X 11″ Thick Cardstock to 5-1/2 x 8-1/2″ and scored at 4-1/4″ to make a card base. Then cut a piece of Plaid Tidings 6 x 6 Designer Series Paper to 4-1/4 x 5-1/2″ for the top panel, a piece of Early Espresso 8-1/2 x 11″ Cardstock to 3-7/8 x 5 1/16″, and a piece of Whisper White 8-1/2″ X 11″ Cardstock to 3-3/4 x 4-7/8″. I adhered the plaid paper to the card base and the Early Espresso 8-1/2 x 11″ Cardstock panel to the plaid paper.

I stamped the tree trunk from the Life Is Beautiful stampset to the white panel with Crumb Cake Ink, I layered the leaves by stamping them several times with Bumblebee, Pumpkin Pie and Cherry Cobbler inks, and used Early Espresso and Real Red Stampin’ Write Markers to stamp the little bird house.

For the background I used a American Crafts Heidi Swapp Stencil 6 X6 Polka Dot with Pool Party Ink then inked around the background to give it some more color. I adhered that to the Early Espresso 8-1/2 x 11″ Cardstock and then stamped a sentiment from the same stampset onto Whisper White 8-1/2″ X 11″ Cardstock with Early Espresso Ink. I cut it down to 1 x 3-3/4″, added Stampin’ Dimensionals behind it and added it to the card. I finished it off by adding a piece of 3/8″ chocolate brown satin ribbon.

I left the inside of the card blank and just added cut a piece of Plaid Tidings 6 x 6 Designer Series Paper, measuring 1 x 4-1/4″.

Dimensions


I went with a winter/Christmas theme for the second card; I just really wanted to heat emboss the snowflakes from the Life Is Beautiful stampset. This card features the Tree Angle stampset as well.

I started the second card by cutting a piece of Cherry Cobbler 8-1/2″ X 11″ Cardstock to 5-1/2 x 8-1/2″ and scored at 4-1/4″ to make a card base. Then cut a piece of Plaid Tidings 6 x 6 Designer Series Paper to 4-1/4 x 5-1/2″ for the top panel, a piece of Whisper White 8-1/2″ X 11″ Cardstock to 3-7/8 x 5 1/16″, and another piece of Whisper White 8-1/2″ X 11″ Cardstock to 3-3/4 x 4-7/8″. I adhered the plaid paper to the card base and the Whisper White 8-1/2″ X 11″ Cardstock panel to the plaid paper.

I stamped the tree trunk from the Life Is Beautiful stampset to the white panel with Basic Gray Ink, then stamped the whole image with Versamark Ink and heat embossed with Clear Stampin’ Emboss Powder. I stamped the ornaments from the Tree Angle stampset with Cherry Cobbler and Shaded Spruce inks, and Smoky Slate Stampin’ Write Markers to stamp the string on the ornaments. I used an Sponge Dauber to apply the ink to each of the ornaments since there were two coors involved. I then stamped the whole image with Versamark Ink and heat embossed with Clear Stampin’ Emboss Powder. Tip: Use a stamping platform such as the Stamparatus to do this so it’s in the same spot.

I used the snowflakes stamp from the Life Is Beautiful stampset with Versamark Ink and stamped it several times over the tree, then added White Stampin’ Emboss Powder. I did some ink blending in the background with Balmy Blue Ink, and adhered the panel to the card.

I stamped a sentiment from the Tree Angle stampset onto Whisper White 8-1/2″ X 11″ Cardstock with Cherry Cobbler Ink and cut it down to 3/4 x 4” and adhered with Stampin’ Dimensionals. To finish it off I added tiny Stampin’ Up! Pearls (retired) to the snowflakes and colored two large ones with Real Red Stampin’ Blends.

On the inside of the card, I added a piece of Plaid Tidings 6 x 6 Designer Series Paper, measuring 1 x 4-1/4″ and stamped the sentiment and ornaments from the Tree Angle stampset with Shaded Spruce Ink.

Dimensions


Supplies

https://linkdeli.com/widget.js?id=f5e8378456858c916708

Thanks for reading this post. I hope you enjoyed and I’ve inspired you to try these cards using this beautiful stampset for yourself! Leave comments or questions below or feel free to email me. If you want to share you creations with me tag me on instagram @kittieslovecrafting. If you would like a Stampin’ Up! catalog, please email me as well. All current catalogs can be found on the right side of this post and the Stampin’ Up! page. All news and fun stuff happening at Stampin’ Up! are listed there!

Fall, Fall

Fall House Card and How to Make It Into A Box featuring Honey Bee Stamps

Ok, let’s talk about how much I love the House Builder Card Base Dies from Honey Bee Stamps!!! It is sooo much fun making houses and decorating them. There are probably a million combinations you can use with these dies. The add-on dies also allow you to expand you creativity; more on those later.

For the first card, I started by diecutting the house card base 2x, chimney, and 2 gables from Simon Says Stamp Fog 8-1/2″ X 11″ Cardstock and the roof, gable roof and stairs from Simon Says Stamp Slate 8-1/2″ X 11″ Cardstock. I adhered the two houses with the pre-scored strip that comes in the dieset to create the card base. Be sure to use double-sided tape or something very strong so they don’t come apart.

I diecut all the window frames, window boxes, shutters (from the Gingerbread House add-on) and fence from Neenah Classic Crest, 80lb Solar White. I used aqua cardstock from my stash for the door and a silver cardstock for the door handle, yellows and oranges for all the bushes and dark orange, yellow, orange and aqua for the flowers in the flower pots. I backed all the windows with a light aqua cardstock and used Lawn Fawn 6×6 Perfectly Plaid Fall Petite Paper Pack to diecut curtains for the bottom windows. I created the wreath by diecutting several of the leaf vine and stacking them on top of the wreath from the Gingerbread House add-on. I also diecut a pumpkin from the Haunted House Add-on.

On the inside of the card, I stamped the “Happy” sentiment from the Honey Bee Stamps Happy Fall Y’all 4×6 Stamp Set with Catherine Pooler Black Jack Ink and diecut the “Fall” from Happy Fall Y’all Honey Cuts with orange cardstock from my stash and adhered it under the “Happy”. Love this card!


Next, I wanted to see if I could turn this card into a box easily because it could house some fun gifts for the holidays or just anytime really. And it turns out you can. I’m sure there are some other ways to do this but I chose the simplest with the least amount of cutting. The process is exactly the same as the card except, you need to decorate 2x and add the sides and bottom piece.

I started by diecutting the house card base 2x again, 2 chimneys, and 2 gables from Simon Says Stamp Fog 8-1/2″ X 11″ Cardstock and 2 roofs, 2 gable roofs and 2 stairs from Stampin’ Up! Early Espresso 8-1/2″ X 11″ Cardstock. I decorated the two houses before I adhered them to the side pieces for the box. This one was decorated much like the previous card, with the following exceptions: I used a red cardstock for the door, a different pattern for the curtains from Lawn Fawn’s 6×6 Perfectly Plaid Fall Petite Paper Pack, diecut the tree from the Haunted House Add-on with Stampin’ Up! Early Espresso 8-1/2″ X 11″ Cardstock and added several pumpkins, diecut from the same set. I did the same thing to both houses.

Ok, let’s turn these into a box! This will require just one piece of letter or A4 cardstock. First, I cut a piece of Simon Says Stamp Fog 8-1/2″ X 11″ Cardstock (same as the houses) to 3 x 9-7/8″and one to 3 x 4-1/4″. Then scored both pieces 1/2″ in from each side on the short side (holding your paper vertically) and 1-1/2″ (only scored the first section of the longer piece) and diagonal score lines from the 1-1/2″ score line to the left and right corners (see diagram below). I turned the longer (9-7/8″ long) piece 90 degrees and scored at 4-1/4″, and 9-3/8″. Folded and burnished all the scorelines and to make it easier to assemble, making sure to fold the center and diagonal score lines in both directions. This will allow the box to fold in on each side like an accordian.

I cut a little triangle 1/2″ in on the flaps where the score lines fall and the end flaps as well but only on the longer piece. I’ve included a PDF of the below diagram that you can download and print.

I used double-sided tape to adhere the sides and bottom of the box together and to the cards. I folded up all the tabs and adhered the two pieces together. You will want to adhere the second side piece to the side of the longer piece that has a 1/2″ tab (labeled bottom on diagram) then adhere your houses on either side of the box (you can see on the first of four images below how it sits against the side piece. Once the box was assembled, I used an 1/8″ punch to punch a hole in the top center of the two sides of the box and tied it with some 1/4″ red satin ribbon.

I also made a cute tag to go with it. I cut a piece of Simon Says Stamp Fog 8-1/2″ X 11″ Cardstock to 2 x 3-1/2″ and use the Stampin’ Up! Scalloped Tag Topper Punch on one end. I diecut a fence and one bush from House Builder Card Base Dies and adhered it to the tag. I stamped the “Happy” sentiment from the Honey Bee Stamps Happy Fall Y’all 4×6 Stamp Set with Catherine Pooler Black Jack Ink and diecut the “Fall” from Happy Fall Y’all Honey Cuts with red cardstock from my stash and adhered it under the “Happy”. I love how this came out!

Supplies

https://linkdeli.com/widget.js?id=f5e8378456858c916708

Thanks for reading this post. I hope you enjoyed and I’ve inspired you to try out these adorable House Builder dies and make some fun cards and gift boxes! Leave comments or questions below or feel free to email me.

Fall, Halloween, Stampin' Up!

Magic in This Night Suite by Stampin’ Up! (from the new Aug-Dec Mini Catalog)

Halloween is my favorite holiday so when I saw this suite I had to get it. It has an embossing folder, stampset, dies, gorgeous paper and beautiful shimmery ribbon. What I love most is that the colors are dark. I like my Halloween cards to be distressed and spooky where possible. I like cute happy ones too but prefer gloomy and dark cards. But you can easily pair this suite with some brighter colors like gorgeous grape, pumpkin pie and granny apple green and it would be awesome too! And can we talk about the sparkle on this black glitter cardstock?!? I will definitely be using this suite again and again this year! You can find this awesome suite in the new Aug-Dec Mini Catalog.

I started this card by cutting a piece of Blackberry Bliss 8-1/2″ X 11″ Cardstock to 5-1/2 x 8-1/2″ and scored at 4-1/4″ to make a card base and one piece to 4 x 5-1/4″ which I then embossed with the new Cobwebs Embossing Folder (part of the Magic in This Night Suite). I used Tim Holtz BLACK SOOT Distress Ink and inked all around the edges of the top panel and lightly over the top of the raised areas of the cobweb. I adhered that to the card base with Tombow Mono Multipurpose Liquid Glue.

I diecut the large label from Halloween Magic Dies from the Black Glitter Paper included in the suite and the small label from Basic Black 8-1/2″ X 11″ Cardstock. Before diecutting the small label I stamped the sentiment from the Hallows Night Magic Stampset with Versarmark Ink and added White Emboss Powder and heat embossed. Make sure to use an antistatic powder before embossing. I then adhered both labels together.

I also heat embossed the large bats from the stampset onto the Basic Black 8-1/2″ X 11″ Cardstock and then diecut them as well as the tiny bats with the coordinating dies from the Halloween Magic Dies. I cut a piece of the Pretty Peacock pattern paper from the Magic in the Night 12 x 12 Designer Series Paper to 3 x 3″. I adhered that to the card panel and diecut the border from the same dieset from another pattern paer, trimmed it down to 3″ long and adhered below the pretty peacock paper square. I adhered the labels and the bats to the card. I finished it by adding some of the Iridescent Pearls included in the suite.

On the inside of the card, I cut a piece of Whisper White 8-1/2″ X 11″ Cardstock to 4 x 5-1/4″ adn adhered it on the inside. I stamped a sentiment from the Hallows Night Magic Stampset with Blackberry Bliss Ink and added three tiny bats.

Dimensions


Supplies

https://linkdeli.com/widget.js?id=f5e8378456858c916708

Thanks for reading this post. I hope you enjoyed and I’ve inspired you to try this Halloween card using this beautiful suite for yourself! Leave comments or questions below or feel free to email me. If you want to share you creations with me tag me on instagram @kittieslovecrafting. If you would like a Stampin’ Up! catalog, please email me as well. All current catalogs can be found on the right side of this post and the Stampin’ Up! page. All news and fun stuff happening at Stampin’ Up! are listed there!

Card kits, Stampin' Up!, Stampin' Up! News

September 2020 Paper Pumpkin Kit! Hello, Pumpkin

As the autumn season approaches, prepare to celebrate with the September Paper Pumpkin Kit! There’s so much to love about fall—some love the haunts of Halloween, many love the time to give thanks, and others love the changing colors and cooler temperatures. Whatever you love most about fall, September’s kit has everything you need to celebrate the season your way! Between a multi-occasion stamp set and enough supplies to design 20 cracker box treat packages, you can create custom fall crafts to celebrate Halloween, Thanksgiving, pumpkins, and leaves. Whether you make them all the same or mix ‘n’ match your crafts, there’s something for everyone in this kit!

While this kit was designed to offer a unique treat packaging experience to subscribers, the supplies can easily be used to create cards for any autumn occasion. Don’t worry—we’ll be sure to provide plenty of project inspiration to spark your creativity! This month’s kit comes in a one-of-a-kind box which is a fun collectible for long-time subscribers and can also be used to send someone some Fall/Halloween goodies! Get yours today!

This month’s coordinating Colors: Bumblebee, Basic Black, Cajun Craze, Cinnamon Cider, Mossy Meadow, Old Olive, Pumpkin Pie, white

Subscription Information

  • Subscribe to the September 2020 Paper Pumpkin Kit from 11 August to 10 September at paperpumpkin.com.
  • Note: Supplies may be limited toward the end of each subscription period.
Autumn, Celebrations, Christmas, Fall, Just Because, Love & Friendship, Stampin' Up!, Winter

Lots to Celebrate by Stampin’ Up! (from the new Aug-Dec Mini Catalog)

I finally got to play with the new Lots to Celebrate Stampset by Stampin’ Up which is available in the new Aug-Dec Mini Catalog. I love mason jars and mason jar stamps so it only made sense to buy this one. :). It’s really cute and has stamps for different occasions. It aso coordinates with the Jar of Flowers stampset. But wait there’s more…there’s a coordinating punch. No need to fussy cut it when there’s a punch! You also save 10% when you purchase the Jar of Flowers Bundle.

I started this card by cutting a piece of Soft Suede 8-1/2″ X 11″ Cardstock to 5-1/2 x 8-1/2″ and scored at 4-1/4″ to make a card base. Then cut a piece of Crumb Cake 8-1/2″ X 11″ Cardstock to 4 x 5-1/42 x 4-1/4″” for the top panel and a piece of the Guilded Autumn Specialty Paper Pack to 2 x 4-1/4″. I stamped the background by using the leaf stamps from the Beautiful Autumn stampset and Crumb Cake Ink and adhered it to the card base. I also adhered the pattern paper strip to the card.

I stamped the mason jar from the Lots to Celebrate Stampset onto Whisper White 8-1/2″ X 11″ Cardstock with Memento Tuxedo Black Ink. I stamped the trail inside the jar with Crumb Cake Ink and the leaves with Cajun Craze Ink, Mint Macaron Ink, Soft Suede Ink and Cherry Cobbler Ink. I stamped the lid with Versamark Ink and heat embossed with Gold Emboss Powder and the doily with Soft Suede Ink. I used the Jar Punch to cut out the Mason Jar and fussycut the lid and doily and adhered them together. I added some Linen Thread and Acorn Trinket (from the Guilded Autumn Suite).

I punched a 2-1/4″ circle from Mint Macaron 8-1/2″ X 11″ Cardstock and a 2’1/2″ circle from Gold Foil and adhered them together. I stamped a sentiment from the Lots to Celebrate Stampset with Soft Suede Ink onto Whisper White 8-1/2″ X 11″ Cardstock and cut it down to 3/4 x 1-1/2″. I adhered the circles, mason jar and sentiment to the card.

On the inside of the card, I cut a piece of Whisper White 8-1/2″ X 11″ Cardstock to 4 x 5-1/4″and a strip of Guilded Autumn Specialty Paper Pack to 5/8 x 4-1/4″ and adhered them to the card. Lastly, I stamped a sentiment from the Lots to Celebrate Stampset with Mint Macaron Ink.

Dimensions


I made a second version of this card with a winter theme and simplified it a bit. I started card by cutting a piece of Night Of Navy 8-1/2″ X 11″ Cardstock to 5-1/2 x 8-1/2″ and scored at 4-1/4″ to make a card base. Then cut a piece of Plaid Tidings 6 x 6 Designer Series Paper to 2 x 5-1/4″. I stamped the background by using the the snowflakes from the Lots to Celebrate Stampset and Night Of Navy Ink. I adhered the pattern paper strip to the card.

I stamped the mason jar from the Lots to Celebrate Stampset onto Whisper White 8-1/2″ X 11″ Cardstock with Memento Tuxedo Black Ink. I stamped the trail inside the jar with Smoky Slate Ink and the snowflakes with Misty Moonlight Ink and Rich Razzleberry Ink. I stamped the lid with Versamark Ink and heat embossed with Silver Emboss Powder and the doily with Cherry Cobbler Ink. I used the Jar Punch to cut out the Mason Jar and fussycut the lid and doily and adhered them together. I added some white embroidery floss from my stash to the jar as well.

I punched a 2-1/4″ circle from Misty Moonlight 8-1/2″ X 11″ Cardstock and a 2’1/2″ circle from Silver Foil and adhered them together. I stamped a sentiment from the Lots to Celebrate Stampset with Rich Razzleberry Ink onto Whisper White 8-1/2″ X 11″ Cardstock and cut it down to 7/8 x 1-5/8. I adhered the circles, mason jar and sentiment to the card.

On the inside of the card, I cut a piece of Whisper White 8-1/2″ X 11″ Cardstock to 4 x 5-1/4″and a strip of Plaid Tidings 6 x 6 Designer Series Paper to 5/8 x 4-1/4″ and adhered them to the card.

Dimensions


Supplies

https://linkdeli.com/widget.js?id=f5e8378456858c916708

Thanks for reading this post. I hope you enjoyed and I’ve inspired you to try these cards using this adorable stampset for yourself! Leave comments or questions below or feel free to email me. If you want to share you creations with me tag me on instagram @kittieslovecrafting. If you would like a Stampin’ Up! catalog, please email me as well. All current catalogs can be found on the right side of this post and the Stampin’ Up! page. All news and fun stuff happening at Stampin’ Up! are listed there!

Stampin' Up!, Stampin' Up! News

The Stampin’ Up! August–December 2020 Mini Catalog is Now Available and the New Store Site is Open!

The new August–December 2020 Mini Catalog is now available! It is packed with awesome holidays goodies. I promise there is something in this catalog for everyone! When I saw the items in the catalog I wanted everything available (no joke) and you will too!!! Ordering is available on August 4, 2020. Check out the PDF below and start making your wishlist!

DOWNLOAD (US | CA-EN | CA-FR)

New Store Site Launch!

Stampin’ Up! will be launching their new site today as well! You can just go to the same site and you will be redirected to the new store. All your info will also be transferred over so no worries there. I’ve had a chance to preview the new site and it is stunning, easy to use and clean looking. All the product images look fantastic!

If you would like a physical copy of any Stampin’ Up! catalog, please email me. All current catalogs can be found on the right side of this post and the Stampin’ Up! page. All news and fun stuff happening at Stampin’ Up! are listed there!

Autumn, Fall, Love & Friendship, Stampin' Up!, Thank Yous

Guilded Autumn Suite by Stampin’ Up (from the new Aug-Dec Mini Catalog)

The colors in the Guilded Autumn Suite by Stampin’ Up are stunning. It has the perfect Fall colors, one of my favorites for many years being Cajun Craze. It is the primary color I envision when I think of Fall. What’s your favorite Fall color? Honestly, when I got this Suite I was stumped as to what to make with it but I was having a creative block at the time. I flipped through the catalog and decided to CASE one of the cards on page 44. I loved the colors and the wreath. I encourage you to CASE cards from the catalogs if you can’t figure out what to make. It helps get the creative juices flowing.

For this card, I started by cutting a piece of Cajun Craze 8-1/2 x 11″ Cardstock to 5-1/2 x 8-1/2″ and scored at 4-1/4″ to create a card base. I also cut a piece of pattern paper from the Guilded Autumn 12 x 12 Specialty Paper Pack to 4 x 4″ and a Very Vanilla 8-1/2 x 11″ Cardstock to 3-3/4 x 3-3/4″. I stamped the leaves from the Beautiful Autumn stampset with Cajun Craze Ink onto the card base and adhered the pattern paper to the card base with Tombow Mono Multi Liquid Glue. I diecut a circle in the center of the Very Vanilla 8-1/2 x 11″ Cardstock square with the Layering Circle Dies.

For the wreath I wanted to do something different from the original. I used the pattern paper that has copper and gold foiled leaves and acorns because when I saw this paper I fell in love. I used the Autumn Punch Pack to cut out the individual images. Having the punches made this process soooo much faster! I recommend getting this suite or the Beautiful Autumn Bundle.

I adhered the tiny images to around the circle on the very vanilla square panel. Tip: don’t add glue to the front end of your images. it makes it easier to tuck other leaves and later the sentiment strip underneath them. I stamped the sentiment from the Beautiful Autumn stampset onto a piece of Very Vanilla 8-1/2 x 11″ Cardstock with Cajun Craze Ink and trimmed it down to 3/4 x 2-7/8″, adhered it to a piece of Gold Foil paper cut to 1 x 2-7/8″ and it to the wreath, tucking ti under some of the leaves. I added Foam to the back of the Very Vanilla panel and added it to the card front.

To finish it off, I added a piece of Linen Thread. This card already has a ton of shine so it didn’t need a lot more extraness.

For the inside of the card, again I kept it simple. I cut a piece of Whisper White 8-1/2″ X 11″ Cardstock to 4 x 5-1/4″ and added a strip of the Gold Foil paper, measuring 1/2 x 4″ and two gold foiled acorns from the pattern paper to the bottom.

I also made tags for the cards to show you how you can make a whole gift set if you want. For the tag, I started by cutting a piece of Crumb Cake 8-1/2 x 11″ Cardstock to 2 x 4-3/4″ and a piece of paper paper from the Guilded Autumn 12 x 12 Specialty Paper Pack to 2 x 2 and adhered them together. Next, I punched the top of it with the Scalloped Tag Topper Punch. I cut out a piece of Cajun Craze 8-1/2 x 11″ Cardstock, measuring 2 x 2 which I tore on one end and adhered to the bottom of the tag. I rounded the bottom corners with the Crop-A-Dile – Corner Chomper Tool. I cut out a strip of the Gold Foil paper, measuring 1/4 x 2″ and added it to the bottom of the tag.

I cut a 2-1/8″ circle from Very Vanilla 8-1/2 x 11″ Cardstock using the Layering Circle Dies. and stamped a sentiment from Beautiful Autumn stampset with Cajun Craze Ink. I adhered the circel to the tag offset and cut off the excess. I used the Autumn Punch Pack to punch out several leaves from the same paper I used for the card wreath. I adhered them around the circle to create a wreath. Lastly, I added copper ribbon and Linen Thread to the top of the tag.

Dimensions


While I was making the first card, I thought ‘I wonder what it would look like if the wreath was square?’ So… I created a simpler version of the first one.

For this card, I started by cutting a piece of Cajun Craze 8-1/2 x 11″ Cardstock to 5-1/2 x 8-1/2″ and scored at 4-1/4″ to create a card base. I also cut a piece of pattern paper from the Guilded Autumn 12 x 12 Specialty Paper Pack to 3-3/4 x 5-1/2″. I cut a 2-5/8″ square on the inside of the top panel with the Layering Squares Dies.

I stamped the leaves, acorn and pinecone from the Beautiful Autumn stampset onto Whisper White 8-1/2″ X 11″ Cardstock with Cajun Craze Ink, Mint Macaron Ink, Early Espresso Ink, Crumb Cake Ink and Soft Suede Ink. To create the lighter effect for the inside of the images I stamped off once. I used the Autumn Punch Pack to punch out the images. I fussycut the pinecones.

I adhered the images around the square window of the top panel with Tombow Mono Multi Liquid Glue. I stamped the sentiment from the Beautiful Autumn stampset onto a piece of 3-1/4 x 3-1/4″ Whisper White 8-1/2″ X 11″ Cardstock with Early Espresso Ink. I added Foam to the back of the panel, adhered the sentiment pane behind it and then to the card base. I added two strips of Gold Foil paper cut to 1/8 x 5-1/2″ to the top and bottom of the front panel. I finished it off by adding Linen Thread to the wreath.

For the inside of the card, I cut a piece of Whisper White 8-1/2″ X 11″ Cardstock to 4 x 5-1/4″ and added a strip of the same Guilded Autumn 12 x 12 Specialty Paper Pack, measuring 9/16 x 4″ and a few extra stamped images to the bottom.

For the tag to match this card, I started by cutting a piece of Cajun Craze 8-1/2 x 11″ Cardstock to 2 x 4-3/4″. Next, I punched the top of it with the Scalloped Tag Topper Punch. I cut out a piece of Guilded Autumn 12 x 12 Specialty Paper Pack, measuring 1-1/2 x 2 which I tore on one end and adhered to the bottom of the tag. I cut out a strip of the Gold Foil paper, measuring 1/2 x 2″ and added it to the bottom of the tag. I rounded the bottom corners with the Crop-A-Dile – Corner Chomper Tool.

I stamped a sentiment from Beautiful Autumn stampset onto a piece of Whisper White 8-1/2″ X 11″ Cardstock with Early Espresso Ink and cut it down to 1 x 2″ and added it to the tag. I used the Autumn Punch Pack to punch out several leaves from the one of the papers in the Guilded Autumn 12 x 12 Specialty Paper Pack which has leaves and acorns and adhered them to the tag. Lastly, I added Linen Thread to the top of the tag.

Dimensions


Supplies

https://linkdeli.com/widget.js?id=f5e8378456858c916708

Thanks for reading this post. I hope you enjoyed and I’ve inspired you to try these fall cards using this beautiful suite for yourself! Leave comments or questions below or feel free to email me. If you want to share you creations with me tag me on instagram @kittieslovecrafting. If you would like a Stampin’ Up! catalog, please email me as well. All current catalogs can be found on the right side of this post and the Stampin’ Up! page. All news and fun stuff happening at Stampin’ Up! are listed there!