
Hello friends. Well November is upon us and Thanksgiving fast approaches. I don’t know about you, but I like to send out cards to friends and family for all the fall and winter holidays during September through December. These cute shaker cards were made using the Queen & Company Happy Harvest Kit and are primarily Thanksgiving cards. Their shaker dies and kits make it super easy to create adorable shaker cards in a shorter amount of time than if you have to create them from scratch.
For this first card, I cut down a piece of Lawn Fawn 100lb Paper Bag Cardstock 8.5 x 11″ to 5-1/2 x 8-1/2″ and scored at 4 1/4″ to make a card base. Then cut a piece of the pattern paper to 4 x 5-1/4″ Happy Harvest Paper Pad (may be unavailable) from the Happy Harvest Fall Kit (may be unavailable) for the top panel.
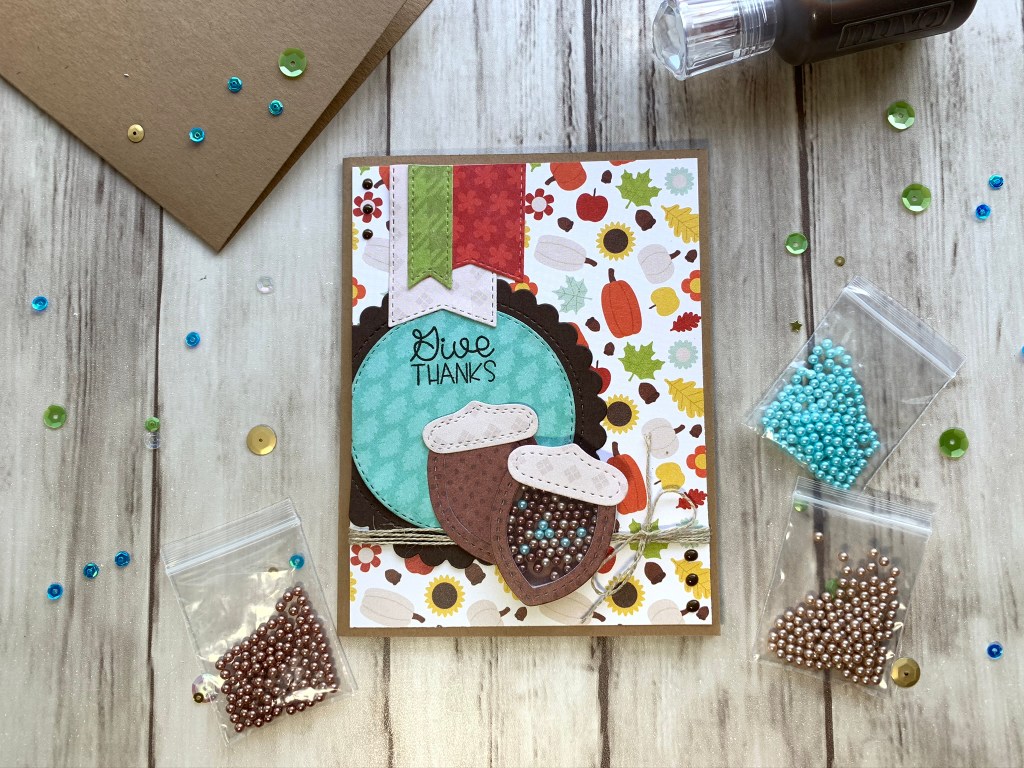
Using two of the pattern papers and dies included in the kit, I diecut the acorns and created the shaker element with the acetate, self-adhesive foam shapes and pearl toppings in 3 colors. I diecut a stitched circle from Queen & Company Foundation Dies #1 with some more of the pattern papers, a scallop circle from Stampin’ Up! Early Espresso 8-1/2″ X 11″ Cardstock, and 3 banners with the Queen & Company Foundation Dies #2.
I adhered the circles on the bottom 2/3rds of the card over to the left side of the front panel and trimmed any excess. Then adhered the banners and stamped a sentiment from the stampset (not sold seperately) included in the kit using Catherine Pooler Orange Twist Ink.

I added some Ashland™ Natural Jute Twine from my stash to the bottom of the card panel and adhered the shaker element and extra acorn image. I adhered the card panel to the card base and embellished it with some Nuvo Crystal Drops in Dark Walnut.
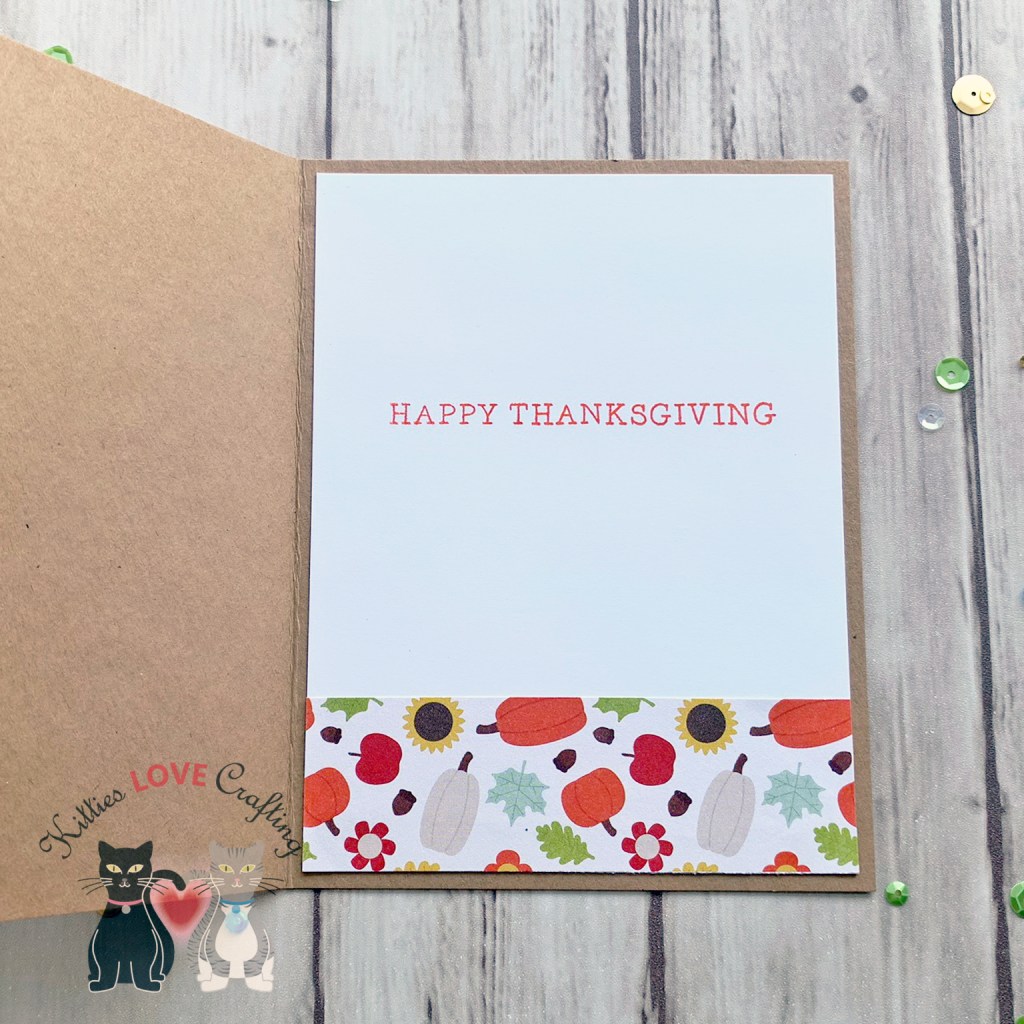
On the inside I cut a piece of Neenah 110lb Classic Crest Cardstock 8.5″X11″ to 4 x 5-1/4″ and added a piece of Happy Harvest Paper Pad from the Happy Harvest Fall Kit, measuring 1-3/8 x 4” to the bottom. I stamped a “HAPPY THANKSGIVING” sentiment from the kit with Stampin’ Up! Early Espresso Ink.
Dimensions
- Card Base = 5-1/2 x 8-1/2″ and scored at 4 1/4″ Lawn Fawn 100lb Paper Bag Cardstock 8.5 x 11″
- Top Panel = 4 x 5-1/4″ Happy Harvest Paper Pad from the Happy Harvest Fall Kit
- Inside Panel = 4 x 5-1/4″ Neenah 110lb Classic Crest Cardstock 8.5″X11″; 1-3/8 x 4“ Happy Harvest Paper Pad from the Happy Harvest Fall Kit
For the second card, I cut down a piece of Stampin’ Up! Early Espresso 8-1/2″ X 11″ to 5-1/2 x 8-1/2″ and scored at 4 1/4″ to make a card base. Then cut a piece of the pattern paper to 4 x 5-1/4″ Happy Harvest Paper Pad (may be unavailable) from the Happy Harvest Fall Kit (may be unavailable) for the top panel.

I diecut the large banner from the Queen & Company Foundation Dies #2 set in a pattern paper from the kit and backed it with a piece of Stampin’ Up! Early Espresso 8-1/2″ X 11″ and trimmed around the banner leaving an 1/8″ border. I also diecut a smaller banner from the same die set, a stitched circle from the Queen & Company Foundation Dies #1 from Neenah 110lb Classic Crest Cardstock 8.5″X11″ and a scallop circle from the same set with the green glitter paper included in the kit. I adhered the banners and the circles to the card panel and stamped a sentiment from the Happy Harvest stampset included in the kit onto the white circle with Stampin’ Up! Early Espresso Ink.
I created the turkey shaker using the dies and shaker elements included in the kit. I added some toppings in aqua light and dark browns. I finished off the card by adding some Love From Lizi Pin-stripe Peel-offs in Gold Mirror Moondust and Nuvo Crystal Drops in Ripened Pumpkin and Caribbean Ocean.


On the inside I cut a piece of Neenah 110lb Classic Crest Cardstock 8.5″X11″ to 4 x 5-1/4″ and added a piece of Happy Harvest Paper Pad from the Happy Harvest Fall Kit, measuring 1-1/4 x 4” to the bottom. I stamped a “HAPPY THANKSGIVING” sentiment from the kit with Stampin’ Up! Early Espresso Ink.
Dimensions
- Card Base = 5-1/2 x 8-1/2″ and scored at 4 1/4″ Stampin’ Up! Early Espresso 8-1/2″ X 11″
- Top Panel = 4 x 5-1/4″ Happy Harvest Paper Pad from the Happy Harvest Fall Kit
- Inside Panel = 4 x 5-1/4″ Neenah 110lb Classic Crest Cardstock 8.5″X11″; 1-1/4 x 4” Happy Harvest Paper Pad from the Happy Harvest Fall Kit
For the third card, I cut down a piece of Stampin’ Up! Crumb Cake 8-1/2″ X 11″ Cardstock to 5-1/2 x 8-1/2″ and scored at 4 1/4″ to make a card base. Then cut a piece of the pattern paper to 4 x 5-1/4″ Happy Harvest Paper Pad (may be unavailable) from the Happy Harvest Fall Kit (may be unavailable) for the top panel and adhered it to the card base.
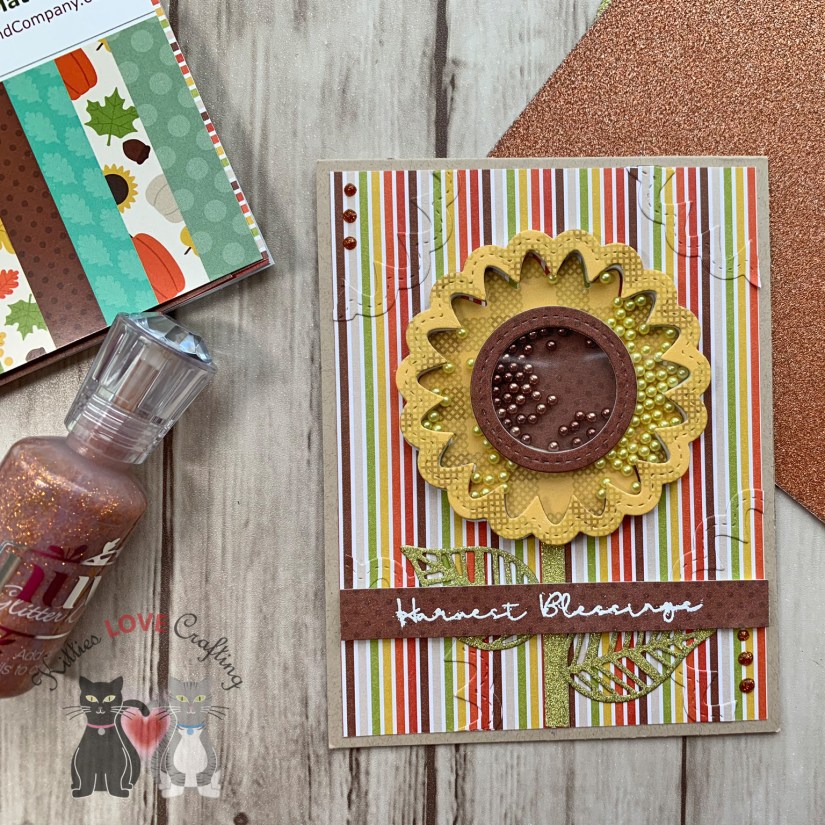
Next, I created a double shaker element using the sunflower dies and shaker pieces using some of the Happy harvest pattern paper in the kit. I added some of the toppings in brown to the center and yellow ones to the sunflower portion.
I diecut leaves from the Catherine Pooler Fallen Leaves Dies from some of the green glitter paper included. I adhered the sunflower shaker to the card panel and then I diecut several of the sunflower frame the same striped pattern paper as the background and placed them on the paper, matching the stripes so that it appears as it is embossed. I adhered the stem and leaves.
I stamped the “Harvest Blessings” onto a piece of a brown polka dot using Versamark Ink and Wow White Opaque Embossing Powder, making sure to prep the surface with anti-static powder beforehand. I popped it up onto the card with some 3M Foam Tape and finished off the card with some Nuvo Glitter Drops in Orange Soda.
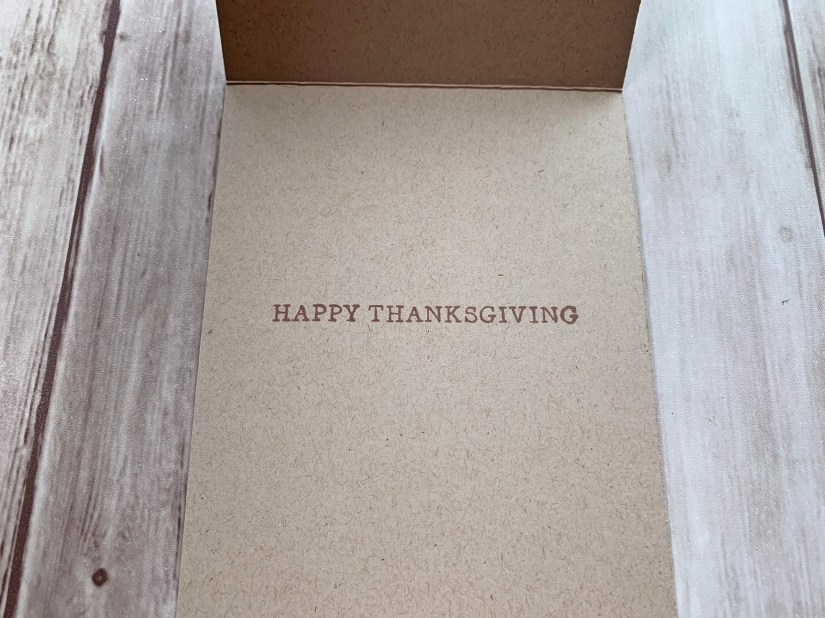
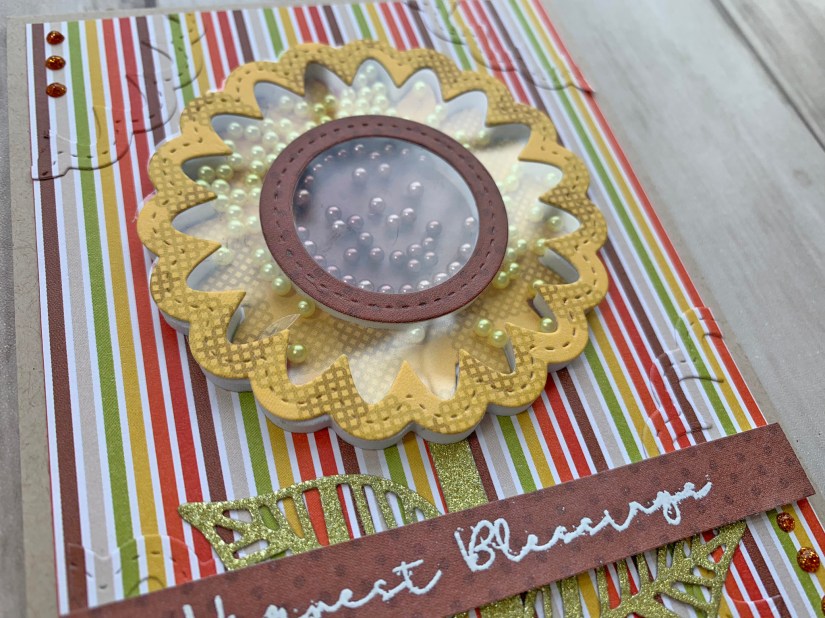
On the inside I stamped a “HAPPY THANKSGIVING” sentiment from the kit with Stampin’ Up! Crumb Cake Ink. And that completes this card.
Dimensions
- Card Base = 5-1/2 x 8-1/2″ and scored at 4 1/4″ Stampin’ Up! Crumb Cake 8-1/2″ X 11″ Cardstock
- Top Panel = 4 x 5-1/4″ Happy Harvest Paper Pad from the Happy Harvest Fall Kit
- Inside Panel = 4 x 5-1/4″ Neenah 110lb Classic Crest Cardstock 8.5″X11″; [ x “] Happy Harvest Paper Pad from the Happy Harvest Fall Kit
 https://linkdeli.com/widget.js?1559654439292
Thanks for reading stopping by and I hope I’ve inspired you to go make some cards of your own. Leave comments or questions below or feel free to email me.
