Birthdays, Distress Ink Techniques, Slimline, Summer

Zesty Slimline Birthday Card featuring Lawn Fawn

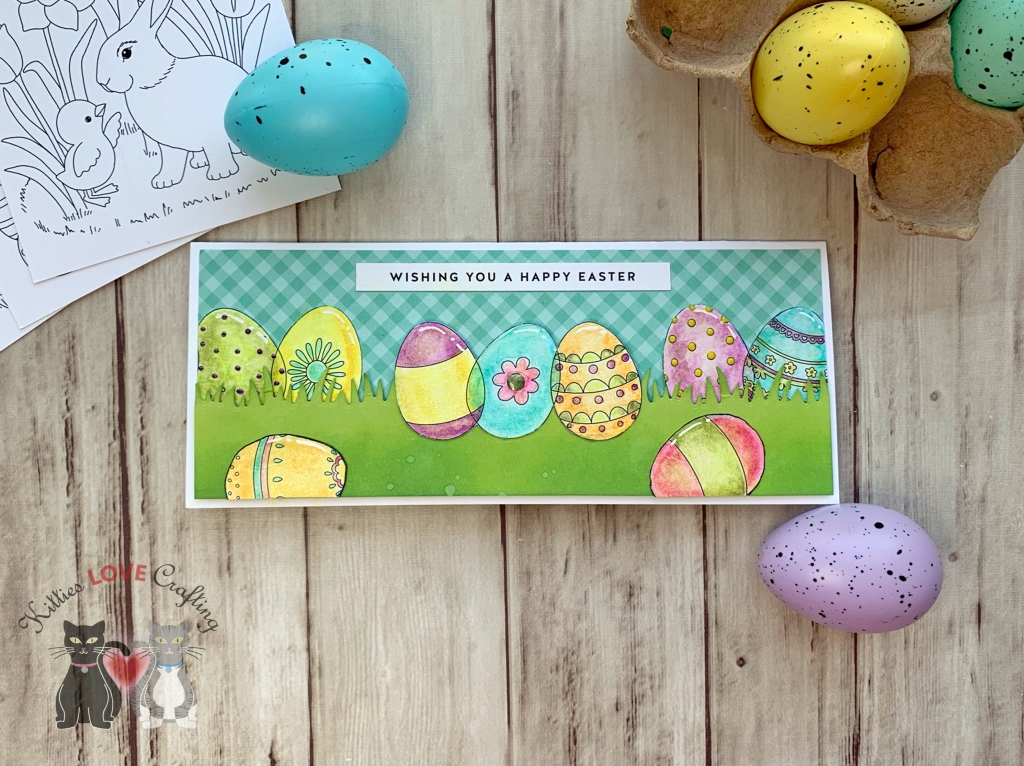
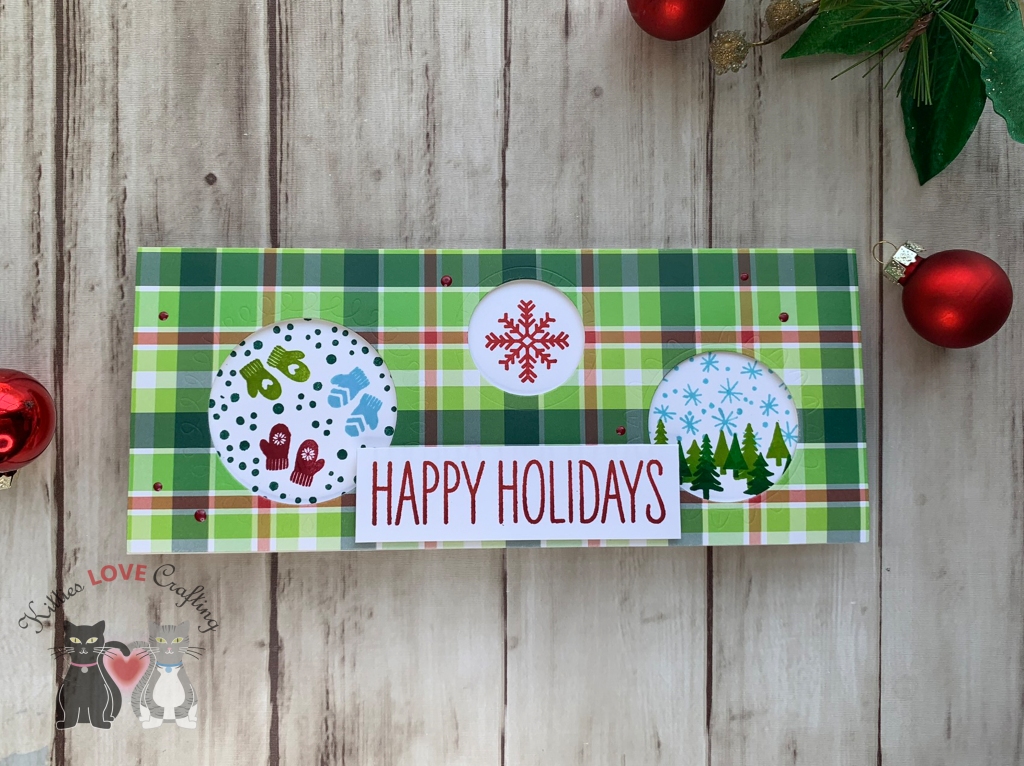
Hi friends. I couldn’t resist but CASE this card from Lawn Fawn Design Team member, Tammy Stark, featuring the cute Zesty Lemon Die. I used similar colors on the background but a different technique, changed the sentiment and a different border.

For this card, I cut a piece of Neenah 110lb Classic Crest Cardstock to 7″ x 8-1/2″ and scored at 3-1/2″ to create the card base. I diecut a piece of Neenah 110lb Classic Crest Cardstock with the stitched slimline frame from the Essentials Slimline Die. I also cut a piece measuring 3-1/8 x 6-1/8″.

I used Tim Holtz Picked Raspberry, Squeezed Lemonade, and Wild Honey Distress Inks fro the background, using the ink smoosh technique and also added some splatters. I also added white splatters with White Acrylic Paint.

I die cut the lemons and limes from Stampin’ Up! So Saffron 8-1/2″ X 11″ Cardstock and Simon Says Stamp 100# Green Apple Cardstock using the Lawn Fawn Zesty Lemon Die. The leaves I die cut from Simon Says Stamp 100# Green Leaf Cardstock, the flowers, piths, and whole lemon backs from Neenah 110lb Classic Crest Cardstock and the flower centers and cheeks from Lawn Fawn Guava 100# 8 1/2″ x 11″ Cardstock.

I colored the images with Tim Holtz Squeezed Lemonade, Mowed Lawn, and Rustic Wilderness Distress Oxide Inks.

I die cut the sentiment word ‘ZEST’ 2x from Neenah 110lb Classic Crest Cardstock using Lawn Fawn Henry’s ABCs and colored one set with Tim Holtz Picked Raspberry Distress Ink. I stamped the rest of the sentiment directly onto the card from the Lawn Fawn Happy Happy Happy Clear Stamps with Memento Tuxedo Black Ink.

I finished the card by adding white highlights with White Gel Pen.

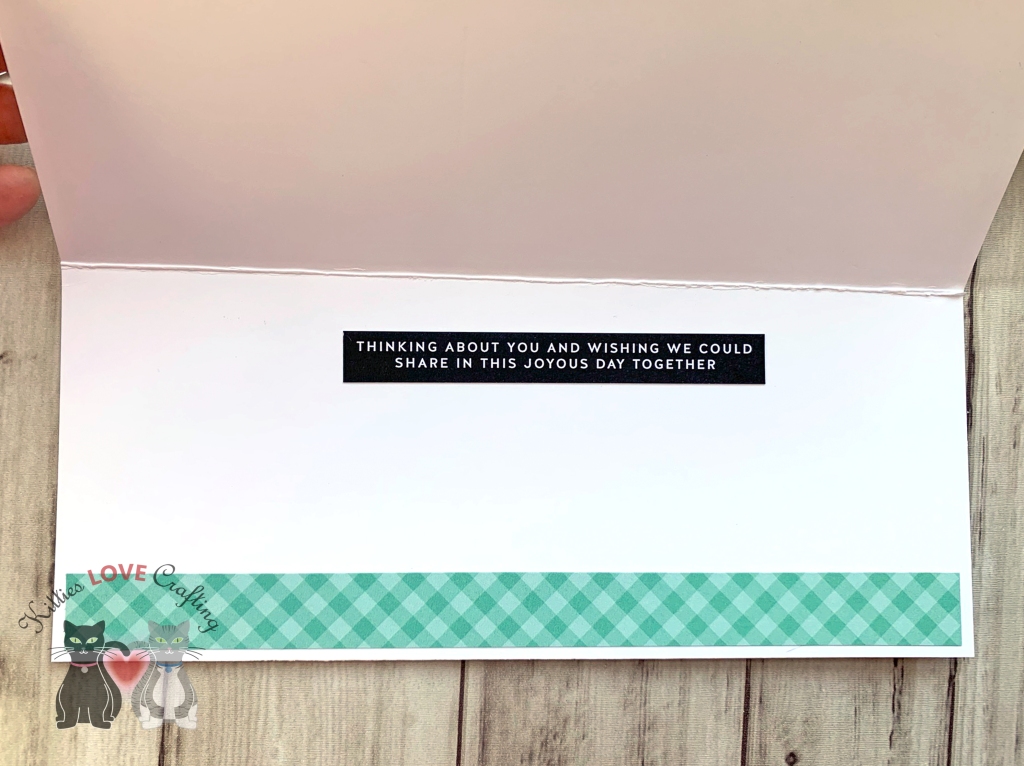
I left the inside of the card blank.

Dimensions


Supplies

Thanks for reading this post! I hope you enjoyed and I’ve inspired you to make these cute cards yourself! If you want to share you creations with me tag me on instagram @kittieslovecrafting. Leave comments or questions below or feel free to email me.

Cards, Love & Friendship, Slimline, Stenciled Background, Valentine's Day, Window Cards

Valentine’s Day Slimline Window Scene Cards

Hi friends. The Lawn Fawn Scent With Love Clear Stamps and Dies is great for scene cards so I decided to make a slimline card. But had so much fun making them I made four instead. 🙂

For these cards, I cut two pieces of Neenah 110lb Classic Crest Cardstock 8.5 X 11″, one piece of Simon Says Stamp Cardstock 100# COTTON CANDY and one of Stampin’ Up! Blushing Bride 8-1/2 x 11″ Cardstock to 7 x 8-1/2″ and scored at 3-1/2″ to create four card bases. I die cut the scallop slimline panel from two different pattern papers from my stash and two from Neenah 110lb Classic Crest Cardstock 8.5 X 11″, using the Catherine Pooler Essentials Slimline Die.

On the white panels, I stenciled hearts using the Simon Says Stamp Stencil Tumbling Hearts Stencil with Tim Holtz Distress Kitsch Flamingo Distress Oxide Ink and on the other panel, clouds using My Favorite Things Cloud Stencil and Mini Cloud Edges Mix-ables Stencil with Tim Holtz Broken China Distress Oxide Ink. I die cut out the windows using the Catherine Pooler Essentials Slimline Die. These dies make it so easy to make a 3 window slimline card.

I added a piece of Neenah 110lb Classic Crest Cardstock 8.5 X 11″ to the back of the pattern paper backgrounds and a piece of vellum behind the stenciled panels, cut to 3-1/2 x 8-1/8″. Before adhering stenciled backgrounds to the card, I added the negative pieces of the window to the card. I stenciled some tiny hearts onto the background of the white windows with Hero Arts Heart Confetti Fancy Die (I die cut acetate to create the stencil) and Catherine Pooler Be Mine Ink.

I stamped a bunch of images from the Lawn Fawn SCENT WITH LOVE Clear Stamps and Dies and the Lawn Fawn SCENT WITH LOVE ADD-ON Clear Stamps and Dies onto some Neenah 110lb Classic Crest Cardstock 8.5 X 11″ with Memento Tuxedo Black Ink.

The images were colored with Copic colors. I used R14, 27 & 46 for all the red items; R81, 83, & 85 for all the pink items; YG25 & 17 for all the greenery; C1, 5, & 7 and 0 for the skunks; and E74 & 79 for all the chocolate items. I die cut all the images with the coordinating dies.

I finished them all by adding some Tonic Fresh Snowfall Nuvo Glitter Accents.

On the inside of the pink cards, I cut a piece of Neenah 110lb Classic Crest Cardstock to 3 x 8″ and stamped a sentiment and the three hearts from the Lawn Fawn SCENT WITH LOVE ADD-ON Clear Stamps and Dies with Memento Tuxedo Black Ink. For the white cards, I just stamped the image directly inside the cards.

Dimensions


Supplies

Thanks for reading this post. I hope you enjoyed and I’ve inspired you to give these cards a try for yourself. Leave comments or questions below or feel free to email.

Cards, Easter, Easter, Slimline, Spring, Watercolor

Slimline Watercolor Easter Card Using Simon Says Stamp’s Suzy’s Easter Pals Watercolor Prints

Hi friends. The Easter bunny arrives soon and so it’s time for some cute Easter cards! I used the Simon Says Stamp’s Suzy’s Easter Pals Watercolor Prints and Simon Says Stamp EASTER WISHES Sentiment Strips to create this slimline card. These pre-printed cards are fun to watercolor and make quick cards — just add some pattern paper and embellishments and you’re done!

For this card, I started by cutting a piece of Neenah 110lb Classic Crest Cardstock to 7 x 8-1/2″ and scored at 3-1/2″ to create the card base. I also cut a piece of Lawn Fawn 6 x 6 Perfectly Plaid Paper (no longer available) to 3-1/4 x 8-1/4″ and a piece of Simon Says Stamp GREEN APPLE 8-1/2 x 11″ Card Stock to 1-3/4 x 8-1/4″ which I diecut with Lawn Fawn Grassy Border Lawn Cuts Dies for the grass and adhered them to the card. I used 3M Foam Tape to adhere the grass border.

I colored the Easter Egg Watercolor panel with Kuretake Gansai Tambi watercolor and Zig Kuretake Gansai Tambi Starry Colors and fussycut out all the images and adhered them to the card, using 3M Foam Tape for some. I added a sentiment strip from the Simon Says Stamp EASTER WISHES Sentiment Strips.

I finished it off by adding Nuvo Drops in Dandelion Yellow, Bottle Green and Violet Galaxy and some highlights with a White Gel Pen.

On the inside of the card I kept it simple and added a piece of Lawn Fawn 6 x 6 Perfectly Plaid Paper, cut to 10/16 x 8-1/4″ and added a sentiment strip from the Simon Says Stamp Sentiment Strips Reverse Easter Wishes.

Dimensions


Supplies

Thanks for reading this post. I hope you enjoyed and I’ve inspired you to make some watercolor Easter cards yourself! If you want to share you creations with me tag me on instagram @kittieslovecrafting. Leave comments or questions below or feel free to email me.

Christmas, Slimline

One Slimline Die, 2 Easy Cards featuring Catherine Pooler Designs Doodle Window Slimline Die

Hello everybody! I don’t know about you but I love slimline cards and I love window cards and if I can use a die to quickly accomplish that create both of those then I am one happy camper! This Doodle Window Slimline Die from Catherine Pooler Designs’ Jolly Holiday release is great for just that. You can add all kinds of stuff in the windows — sentiments, characters, sequins for a shaker, paper etc.

I started by cutting a piece of Neenah 110lb Classic Crest Cardstock 8.5 X 11″ to 7 x 8-1/2″ and scored at 3-1/2″ for my card base. Then diecut the panel using the Doodle Window Slimline Die. Next I diecut a piece of Simon Says Stamp Card Stock 100# GREEN APPLE with the Catherine Pooler Designs Narrow Stripe Cover Plate Die, a piece of Stampin’ Up! Garden Green 8-1/2″ X 11″ Cardstock with the Dotted Zig Zag Cover Plate Die, and a piece of Simon Says Stamp Card Stock 100# Schoolhouse Red with the Peppermint Twist Cover Plate Die.

I adhered the diecut panels behind the windows with Tombow Mono Multi Liquid Glue and then to the card base. But before adhering them to the card base I stamped a sentiment from Catherine Pooler’s Nice List Stamp Set with Catherine Pooler’s Midnight Ink.

I stamped the hats from Catherine Pooler’s Nice List Stamp Set onto another piece of Neenah 110lb Classic Crest Cardstock 8.5 X 11″ with Catherine Pooler’s Midnight Ink. I colored them with Cranberry Fizz Ink, Lime Rickey Ink, Deck the Halls Ink and Black Jack Ink and a Blender Pen. I diecut the images with the coordinating Nice List Dies, added some adhesive foam and addedd them to the card. I finished it off by adding some Bottle Green and Autumn Red Nuvo Crystal Drops and some shimmer with a Spectrum Noir Clear Overlay Sparkle Pen.

On the inside of the card, I stamped another greeting from the Lawn Fawn Merry Messages with Lime Rickey Ink and a hat from the Catherine Pooler’s Nice List Stamp Set with Cranberry Fizz Ink.

Dimensions


I started by cutting a piece of Neenah 110lb Classic Crest Cardstock 8.5 X 11″ to 7 x 8-1/2″ and scored at 3-1/3″ for my card base and then diecut the top panel using the Doodle Window Slimline Die.

I traced the three circles from the Doodle Window Slimline Die onto a piece of Neenah 110lb Classic Crest Cardstock 8.5 X 11″ and stamped the mittens from Catherine Pooler Caroling Sentiments Stampset with Cranberry Fizz Ink, Lime Rickey Ink, and It’s a Boy Ink and the dots with Deck the Halls Ink in the largest circle. Then stamped the snowflake from Catherine Pooler Caroling Sentiments Stampset with Rockin Red Ink in the smallest circle and made a scene with the trees from the Catherine Pooler Caroling Sentiments Stampset and the snowflakes from the Catherine Pooler’s Nice List Stamp Set with It’s a Boy Ink in the medium circle. I used Grass Skirt, Lime Rickey Ink, and Deck the Halls Ink for the trees and It’s a Boy Ink for the snowflakes.

I added Foam Tape to the back of the pattern paper and adhered the window panels, then adhered it to the card base. I stamped a sentiment from a very old sentiment stampset from my stash onto a piece of of Neenah 110lb Classic Crest Cardstock 8.5 X 11″ with Cranberry Fizz Ink and trimmed it down to 1 x 3-11/16”, added Foam Tape and added it to the card. I finished it off by adding Autumn Red Nuvo Crystal Drops.

On the inside of the card, I stamped another greeting from the Lawn Fawn Merry Messages with Cranberry Fizz Ink and adhered two of the leftover circles from when I diecut the front panel from Catherine Pooler Designs Under the Tree Patterned Paper.

Dimensions

Supplies

Thanks for reading this post. I hope you enjoyed and I’ve inspired you to give these fun slimline cards a try for yourself. Leave comments or questions below or feel free to email.

Cards, Christmas, Slimline

Super Easy Christmas Slimline Shaker Card featuring the Catherine Pooler Candy Cane Slimline Die

Hello everybody! I don’t know about you but I love a good shaker card and when it’s easy to make I’m all for it! I also love slimline cards so I decided to combine the two. This new Candy Cane Slimline Die from Catherine Pooler is perfect for all kinds of backgrounds You can layer it, inlay the pieces or do a tone on tone like I did here. The other die that I am loving from the Jolly Holiday release is the Peppermint Twist Cover Plate Die. You will see how I used it for this card.

I started by cutting a piece of Neenah 110lb Classic Crest Cardstock 8.5 X 11″ to 7 x 8-1/2″ and scored at 3-1/3″ for my card base. next I used the Candy Cane Slimline Die to cut the front panel and adhered it to the card base. I used the My Favorite Things Stitched Circle Scallop Frames (I think this is no longer available but you can achieve the same look with a scallop circle die or punch and a smaller circle for the inside) to cut out a frame from Neenah 110lb Classic Crest Cardstock 8.5 X 11″.

I stamped the sentiment from Catherine Pooler’s Nice List Stamp Set onto another piece of Neenah 110lb Classic Crest Cardstock 8.5 X 11″ with Catherine Pooler’s Cranberry Fizz Ink and used a 2-1/4″ punch to cut it out.

I put together my shaker element by adding acetate to the back of the frame, using a punch to cut it out, some foam tape behind that and adding some Queen and Company Topping Pastel Diamonds in red, green and clear. I adhered the circle with the sentiment and adhered the whole thing to the card.

To make it more festive, I used Catherine Pooler’s Cranberry Fizz Ink and a direct-to-paper technique to color some Neenah 110lb Classic Crest Cardstock 8.5 X 11″ then diecut it using the Peppermint Twist Cover Plate Die. I adhered several of the peppermints around the card front and added some Bottle Green and Ivory Seashell Nuvo Crystal Drops to the peppermints for some dimension.

On the inside of the card, I stamped another greeting from the Catherine Pooler’s Nice List Stamp Set with Catherine Pooler’s Eucalyptus Ink and some more peppermints. And that completes this card.

Dimensions

Supplies

Thanks for reading this post. I hope you enjoyed and I’ve inspired you to give this card a try for yourself. Leave comments or questions below or feel free to email.

Card Kits, Cards, Christmas, Slimline

Slider Slimline Card featuring Simon Says Clear Stamps ‘Gnome for the Holidays’

Happy Wednesday friends! I thought I would revisit an old Simon Says Stamp Card Kit. The ‘Gnome for the Holidays’ Card Kit was released in December 2019 and features the cute 6 x 8″ Gnome for the Holidays stampset. I thought it might be fun to make a slimline slider card with the little gnomes. It was fairly easy to make and can be even more simplified by skipping th eheat embossing and doing simple coloring on the images.

I started by cutting a piece of Neenah 110lb Classic Crest Cardstock 8.5 X 11″ to 7 x 8-1/2″ and scored at 3-1/3″ for the card base and diecut another piec with the smallest of two stitched rectangels from the Lawn Fawn Large Slimline With Sliders Die Cuts. I used Versamark Ink to stamp the snowflake from the Gnome for the Holidays stampset and heat embossed it with WOW OPAQUE BRIGHT WHITE Super Fine Embossing Powder. I used Tim Holtz SPECKLED EGG Distress Ink and Tim Holtz Broken China Distress Oxide Ink to ink blend the background.

I set that aside and stamped the gift stack and two of the gnomes from the Gnome for the Holidays stampset onto Neenah 110lb Classic Crest Cardstock 8.5 X 11″ with Memento Tuxedo Black Ink. I used a mask (stamp onto a post it note) to mask out the top bow while stamping the gifts.

I colored the image with COPIC markers. I used YG05 + G07 (body), R20 (cheeks), R14 + R27 (gloves and socks), C3 + C5 (shoes) and C1 (arms) for the tree gnome; R14 + R27 (body), YG05 + G07 (hat), C1 + 0 (beard), R00 + R01 (face), R81+ R27 (socks), R81+ R85 (hat dots and sleeves), and C1 + C3 (gloves) for the second gnome; and R14, R27, R81, R85, YG05, G07, C1, C3, and C5 for the gifts.

I fussycut the images out and decided where they would go on my card. Then diecut the slider with the Lawn Fawn Large Slimline With Sliders Die Cuts. I added Foam Tape and a penny for the slider element and adhered it to the card base.

I used Versamark Ink to stamp the sentiment from the Gnome for the Holidays stampset and heat embossed it with WOW OPAQUE BRIGHT WHITE Super Fine Embossing Powder onto a piece of Simon Says Stamp Card Stock 100lb Schoolhouse Red. And then diecut it out with the smallest rectangle from the Lawn Fawn Large Slimline With Sliders Die Cuts. I added a strip of Simon Says Stamp White Glitter Cardstock, measuring 3/8 x 2-1/2″ to the back of that piece and adhered it to the card panel.

On the inside of the card, I stamped another greeting from the Gnome for the Holidays stampset with Simon Says Stamp SCHOOLHOUSE RED Ink and added the tree gnome I colored earlier. And that completes this card.

Dimensions

Supplies

Thanks for reading this post. I hope you enjoyed and I’ve inspired you to give this card a try for yourself. Leave comments or questions below or feel free to email.