Encouragement, Faux Embossing, Just Because, Stampin' Up!, Summer, Techniques

Faux Embossed Background Using Dies

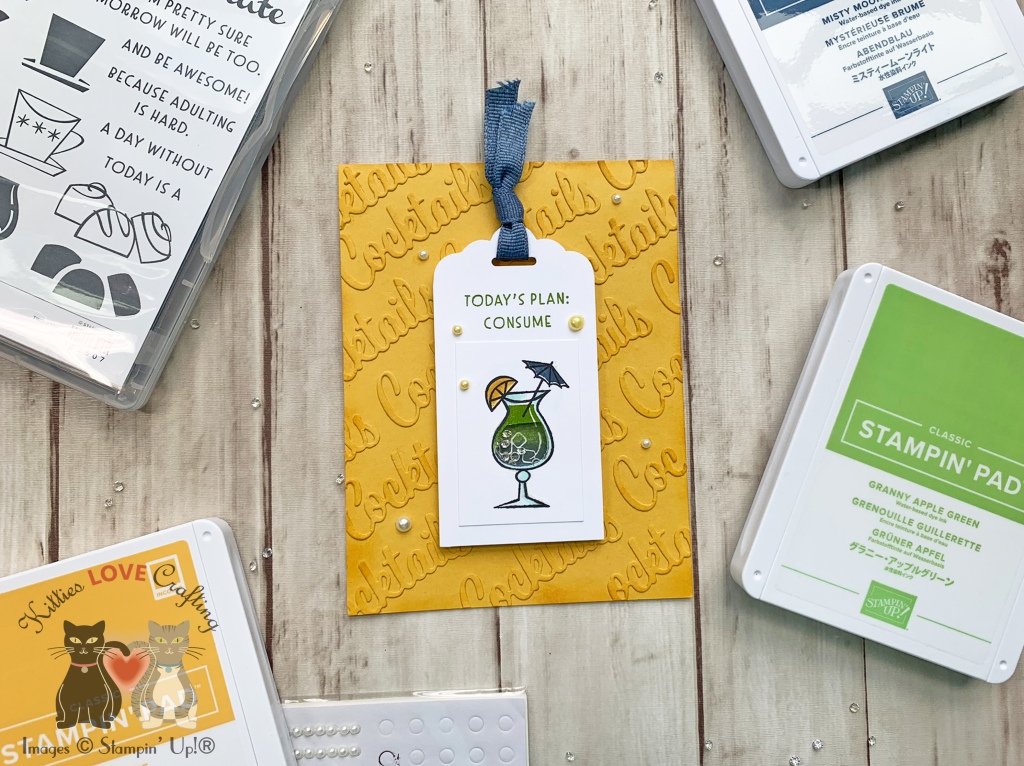
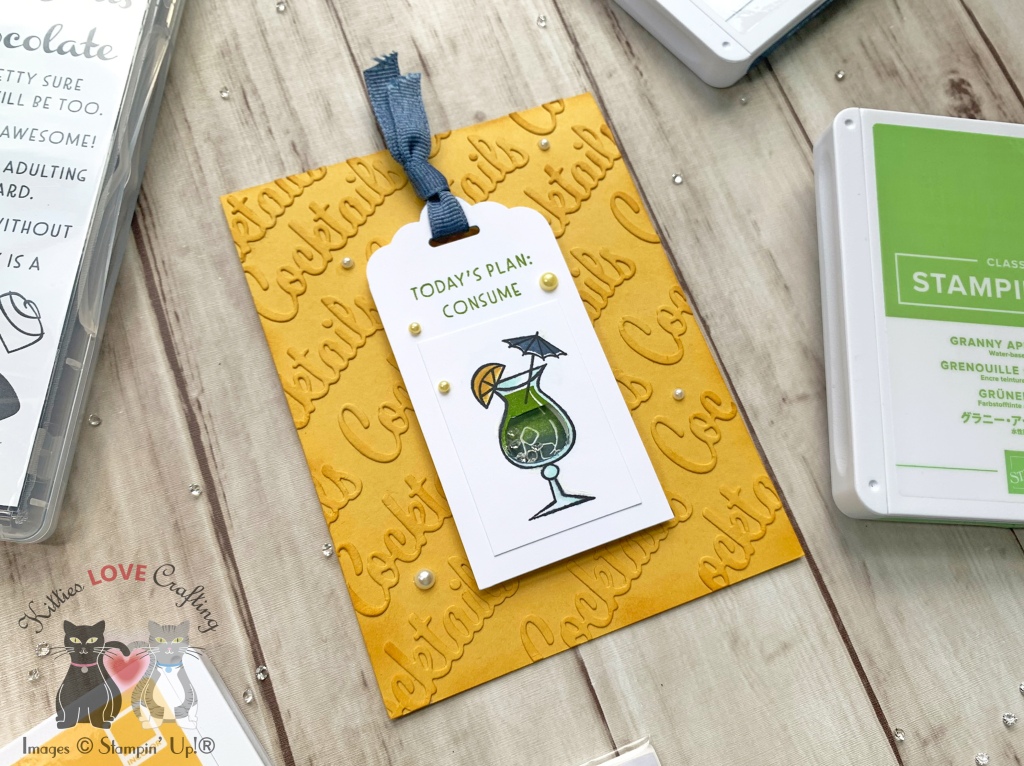
Hello friends. This faux embossed technique that I discovered a few years ago and is a great way to add dimension to your card without having to emboss. It can be done with most images and all text. I used the word dies from Nothing’s Better Than Bundle from Stampin’ Up! to create an embossed background. But to step it up I also decided to add a shaker element to the card.

I started by cutting a piece of Bumblebee 8-1/2X11 Cardstock to 5-1/2 x 8-1/2″ and scored at 4-1/4″ to create a card base. I die cut the “Cocktails” word with the Love You More Than Dies from Bumblebee 8-1/2X11 Cardstock several times. I adhered them to the card using Tombow Mono Multipurpose Liquid Glue. I added some Bumblebee Classic Stampin’ Ink to the top of the text and edges of the card base with a Sponge Dauber. Adding ink gives it more of an embossed look because it highlights the raised edges.

I stamped the outline image of the cocktail again as well as the sentiment onto a scrap piece of Whisper White 8-1/2″ X 11″ Cardstock with Tuxedo Black Memento Ink. I used the solid stamps with Granny Apple Green Stampin’ Ink and Misty Moonlight Classic Stampin’ Ink to create an ombre effect for the drink. I used a Sponge Dauber to soften the line between the two colors on the stamp before stamping. I colored the glass with Light Pool Party Stampin’ Blends and the Stampin’ Blends Color Lifter.

I stamped a second version of the solid image. I used Bumblebee Classic Stampin’ Ink for the fruit and Misty Moonlight Classic Stampin’ Ink for the umbrella. I trimmed the image to a piece, measuring 1-1/2 x 2-1/4″ and left the second solid image without diecutting. I cut another piece of Whisper White 8-1/2″ X 11″ Cardstock to 2 x 6″ and used the Scalloped Tag Topper Punch to punch one end, creating a tag. I adhered the rectangle piece with the image to the tag and then cut out the center of the drink. I stamped a sentiment from Nothing’s Better Than Stampset with Granny Apple Green Stampin’ Ink onto the tag. Then added Acetate and Foam behind the tag, some Clear Diamond Shaker Toppings, adhered the extra stamped cocktail beverage behind and adhered the tag to the card. I finished it off by adding ribbon in Misty Moonlight. Since I don’t have any Misty Moonlight Ribbon I found some white grosgrain ribbon from my stash and colored it using Misty Moonlight Classic Stampin’ Ink and added some Pearls which I colored yellow with a Light Daffodil Delight Stampin’ Blends.

On the inside of the card, I stamped another sentiment from the Nothing’s Better Than Stampset with Tuxedo Black Memento Ink and the cocktail outline image with Bumblebee Classic Stampin’ Ink.

Dimensions


Supplies

Thanks for reading this post. I hope you enjoyed and I’ve inspired you to try this fun summery card for yourself! Leave comments or questions below or feel free to email me. If you want to share you creations with me tag me on instagram @kittieslovecrafting. If you would like a Stampin’ Up! catalog, please email me as well. All current catalogs can be found on the right side of this post and the Stampin’ Up! page. All news and fun stuff happening at Stampin’ Up! are listed there!

Hello, Just Because, Love & Friendship

Four Easy Cards Featuring Stampin’ Up’s Nothing’s Better Than Stampset

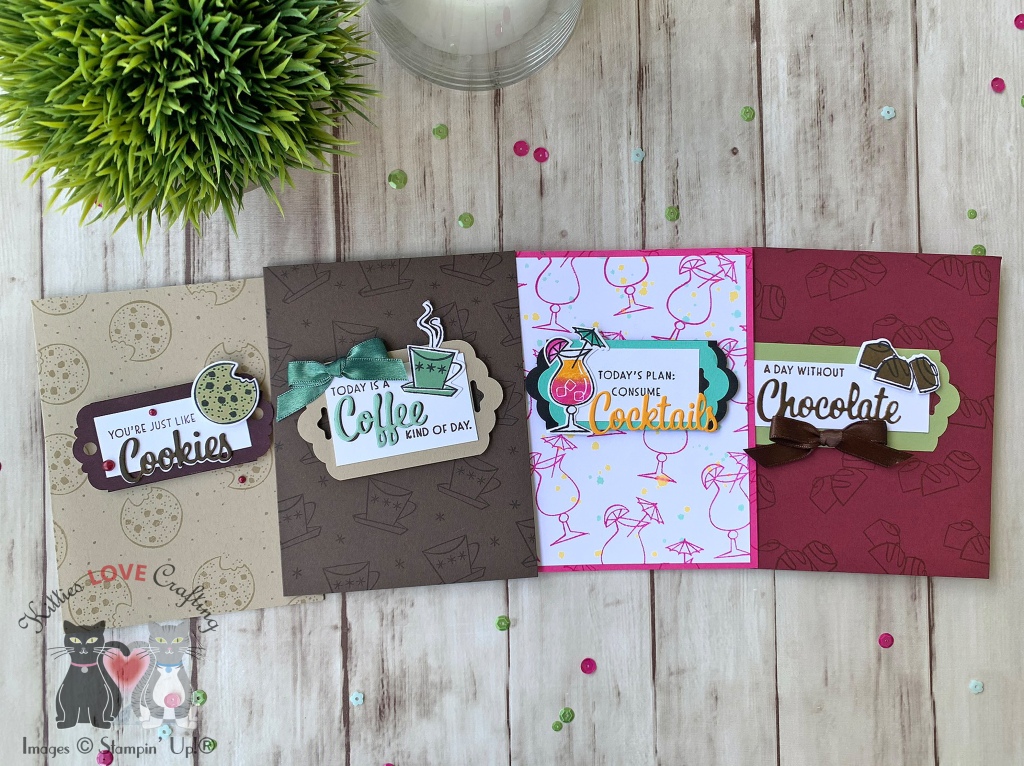
Hello Friends. Happy Monday! The Nothing’s Better Than Bundle from Stampin’ Up! is a great set to create a variety of cards for any season or occasion. It has an outline stamp as well as the solid stamp for each image so if you don’t like coloring this set will work well for you. I made four similar cards using this bundle and the Scalloped Tag Topper Punch and the Delightful Tag Topper Punch. I don’t often say this about punches but I love these tag dies. I think part of it is that I a few months ago I discovered junk journaling and have been making tags and pockets and things for it. So when I saw these punches I said (to myself) “YES PLEASE!”. LOL And now I am obsessed with making tags.

For the first card, I started by cutting a piece of Magenta Madness 8-1/2″ X 11″ Cardstock to 5-1/2 x 8-1/2″ and scored at 4-1/4″ to create a card base. I also cut a piece of Whisper White 8-1/2″ X 11″ Cardstock to 4 x 5-1/4″. I stamped the outline image of the cocktail from the Nothing’s Better Than Stampset with Magenta Madness Classic Stampin’ Ink onto the card base as well as the Whisper White panel I had previously cut. I added some ink splatters with Mango Melody Classic Stampin’ Ink and Coastal Cabana Classic Stampin’ Ink. You can also use the ink refills if you have them; I do not have them yet. I just smooshed some of the ink onto a stamp block, added some water and used a small brush to splatter it on. As an alternative, you can use a Water Painter. Once dried, I adhered the panel to the card base with Tombow Mono Multipurpose Liquid Glue.

I stamped the outline image of the cocktail again as well as the sentiment onto a scrap piece of Whisper White 8-1/2″ X 11″ Cardstock with Tuxedo Black Memento Ink. I used the solid stamps with Magenta Madness Classic Stampin’ Ink and Mango Melody Classic Stampin’ Ink to create an ombre effect for the drink. I used a Sponge Dauber to soften the line between the two colors on the stamp before stamping. I used Magenta Madness Classic Stampin’ Ink for the fruit and Coastal Cabana Classic Stampin’ Ink for the umbrella. I diecut the image using the coordinating Love You More Than Dies.

I diecut the word “Cocktails” from Mango Melody 8-1/2″ X 11″ Cardstock using the dies included in the Love You More Than Dies. Then I cut a piece of Coastal Cabana 8-1/2″ X 11″ Cardstock to 1-1/2 x 3-3/8″ and a piece of Basic Black 8-1/2″ X 11″ Cardstock to 1-1/2 x 3-3/4″ and used the Scalloped Tag Topper Punch to cut the ends of both. I stacked them on top of each other and the sentiment piece, which I cut to 1-1/4 x 2″. I adhered the cocktail image and the word “Cocktails” flat onto the sentiment piece and popped the whole piece up with Stampin’ Dimensionals.

For the inside of the card, I cut a piece of Whisper White 8-1/2″ X 11″ Cardstock to 4 x 5-1/4″ and adhered it with Tombow Mono Multipurpose Liquid Glue. I stamped another sentiment from the Nothing’s Better Than Stampset with Magenta Madness Classic Stampin’ Ink and the cocktail outline image with Mango Melody Classic Stampin’ Ink.

Dimensions


For the second card, I started by cutting a piece of Early Espresso 8-1/2″ X 11″ Cardstock to 5-1/2 x 8-1/2″ and scored at 4-1/4″ to create a card base. I stamped the outline image of the coffee cup and the little asterisk from the Nothing’s Better Than Stampset with Early Espresso Classic Stampin’ Ink onto the card base.

I stamped the outline image of the coffee cup and the steam onto a scrap piece of Whisper White 8-1/2″ X 11″ Cardstock with Tuxedo Black Memento Ink. I used the solid stamp with Mint Macaron Classic Stampin’ Ink and diecut the image using the coordinating Love You More Than Dies. I diecut the “Coffee” word from the same dieset from Mint Macaron 8-1/2″ X 11″ Cardstock and Early Espresso 8-1/2″ X 11″ Cardstock and adhered them together offset.

I stamped the sentiment onto a scrap of Whisper White 8-1/2″ X 11″ Cardstock and cut it down to 1-1/2 x 2-3/8″. I adhered it to a piece of Crumb Cake 8-1/2″ X 11″ Cardstock, measuring 2 x 3-3/4″ (I punched the sides with the Scalloped Tag Topper Punch). I adhered the coffee cup image and the “Coffee” word diecut to the sentiment piece and using Stampin’ Dimensionals added it to the card base.

To finish it off I added sparkle to the word “Coffee” with a Clear Wink Of Stella Glitter Brush and a bow made from colored white satin ribbon ( I used Mint Macaron Classic Stampin’ Ink). I just lay the ribbon down on some paper and swiped the ink pad over the ribbon. If you spray some water on the ribbon first it will help the ink sink into the ribbon better. Also, it takes a while to dry if you put a lot of ink on it. You can also use an ink refill and water to do the same.

For the inside of the card, I cut a piece of Whisper White 8-1/2″ X 11″ Cardstock to 4 x 5-1/4″ and adhered it with Tombow Mono Multipurpose Liquid Glue. I stamped another sentiment from the Nothing’s Better Than Stampset, as well as the coffee cup and steam outline images with Mint Macaron Classic Stampin’ Ink.

Dimensions


For the third card, I started by cutting a piece of Merry Merlot 8-1/2″ X 11″ Cardstock to 5-1/2 x 8-1/2″ and scored at 4-1/4″ to create a card base. I stamped the outline image of the chocolates from the Nothing’s Better Than Stampset with Merry Merlot Classic Stampin’ Ink onto the card base.

I stamped the outline image of the chocolates onto a scrap piece of Whisper White 8-1/2″ X 11″ Cardstock with Tuxedo Black Memento Ink. I used the solid stamp with Soft Suede Classic Stampin’ Ink and diecut the image using the coordinating Love You More Than Dies. I diecut the “Chocolate” word from the same dieset from Whisper White 8-1/2″ X 11″ Cardstock which I then used a direct-to-paper technique with Soft Suede Classic Stampin’ Ink to color it.

I stamped the sentiment from the Nothing’s Better Than Stampset onto a scrap of Whisper White 8-1/2″ X 11″ Cardstock with Soft Suede Classic Stampin’ Ink and cut it down to 1-1/8 x 3-1/8″. I adhered it to a piece of Pear Pizzazz 8-1/2″ X 11″ Cardstock, measuring 1-3/4 x 3-3/4″ (I punched one side with the Scalloped Tag Topper Punch). I adhered the chocolates image using Stampin’ Dimensionals and the “Chocolate” word diecut flat onto the sentiment piece and adhered it to the card base.

To finish it off I added a bow made from chocolate satin ribbon.

For the inside of the card, I cut a piece of Whisper White 8-1/2″ X 11″ Cardstock to 4 x 5-1/4″ and adhered it with Tombow Mono Multipurpose Liquid Glue. I stamped another sentiment from the Nothing’s Better Than Stampset, as well as the chocolates outline image with Mint Macaron Classic Stampin’ Ink.

Dimensions


For the last card, I started by cutting a piece of Crumb Cake 8-1/2″ X 11″ Cardstock to 5-1/2 x 8-1/2″ and scored at 4-1/4″ to create a card base. I stamped the outline image of the cookie from the Nothing’s Better Than Stampset with Crumb Cake Classic Stampin’ Ink onto the card base.

I stamped the outline image of the cookie onto a scrap piece of Whisper White 8-1/2″ X 11″ Cardstock with Tuxedo Black Memento Ink. I used the solid stamp with Crumb Cake Classic Stampin’ Ink and diecut the image using the coordinating Love You More Than Dies. I diecut the “Cookies” word from the same dieset 2x from Whisper White 8-1/2″ X 11″ Cardstock which I then used a direct-to-paper technique with Soft Suede Classic Stampin’ Ink to color one of them. I adhered them together offset (white on the bottom).

I stamped the sentiment from the Nothing’s Better Than Stampset onto a scrap of Whisper White 8-1/2″ X 11″ Cardstock with Blackberry Bliss Classic Stampin’ Ink and cut it down to 1 x 2-3/8″. I adhered it to a piece of Whisper White 8-1/2″ X 11″ Cardstock, measuring 1-1/2 x 3-3/8″, which I colored using a direct-to-paper technique with Blackberry Bliss Classic Stampin’ Ink (I don’t have the cardstock) and then punched both sides with the Delightful Tag Topper Punch. I adhered the cookie image (I used Stampin’ Dimensionals) and the “Cookies” word diecut to the sentiment piece and adhered the piece with Stampin’ Dimensionals to the card base.

To finish it off I added 3 Pearls which I colored using Blackberry Bliss Light Stampin’ Blend Marker.

For the inside of the card, I stamped another sentiment from the Nothing’s Better Than Stampset, as well as the chocolates outline image with Blackberry Bliss Classic Stampin’ Ink and the cookies with Crumb Cake Classic Stampin’ Ink.

Dimensions


Supplies

Thanks for reading this post. I hope you enjoyed and I’ve inspired you to try these easy and fun cards for yourself! Leave comments or questions below or feel free to email me. If you want to share you creations with me tag me on instagram @kittieslovecrafting. If you would like a Stampin’ Up! catalog, please email me as well. All current catalogs can be found on the right side of this post and the Stampin’ Up! page. All news and fun stuff happening at Stampin’ Up! are listed there!