Christmas, Encouragement

Fun Minty Cards featuring Lawn Fawn Dies

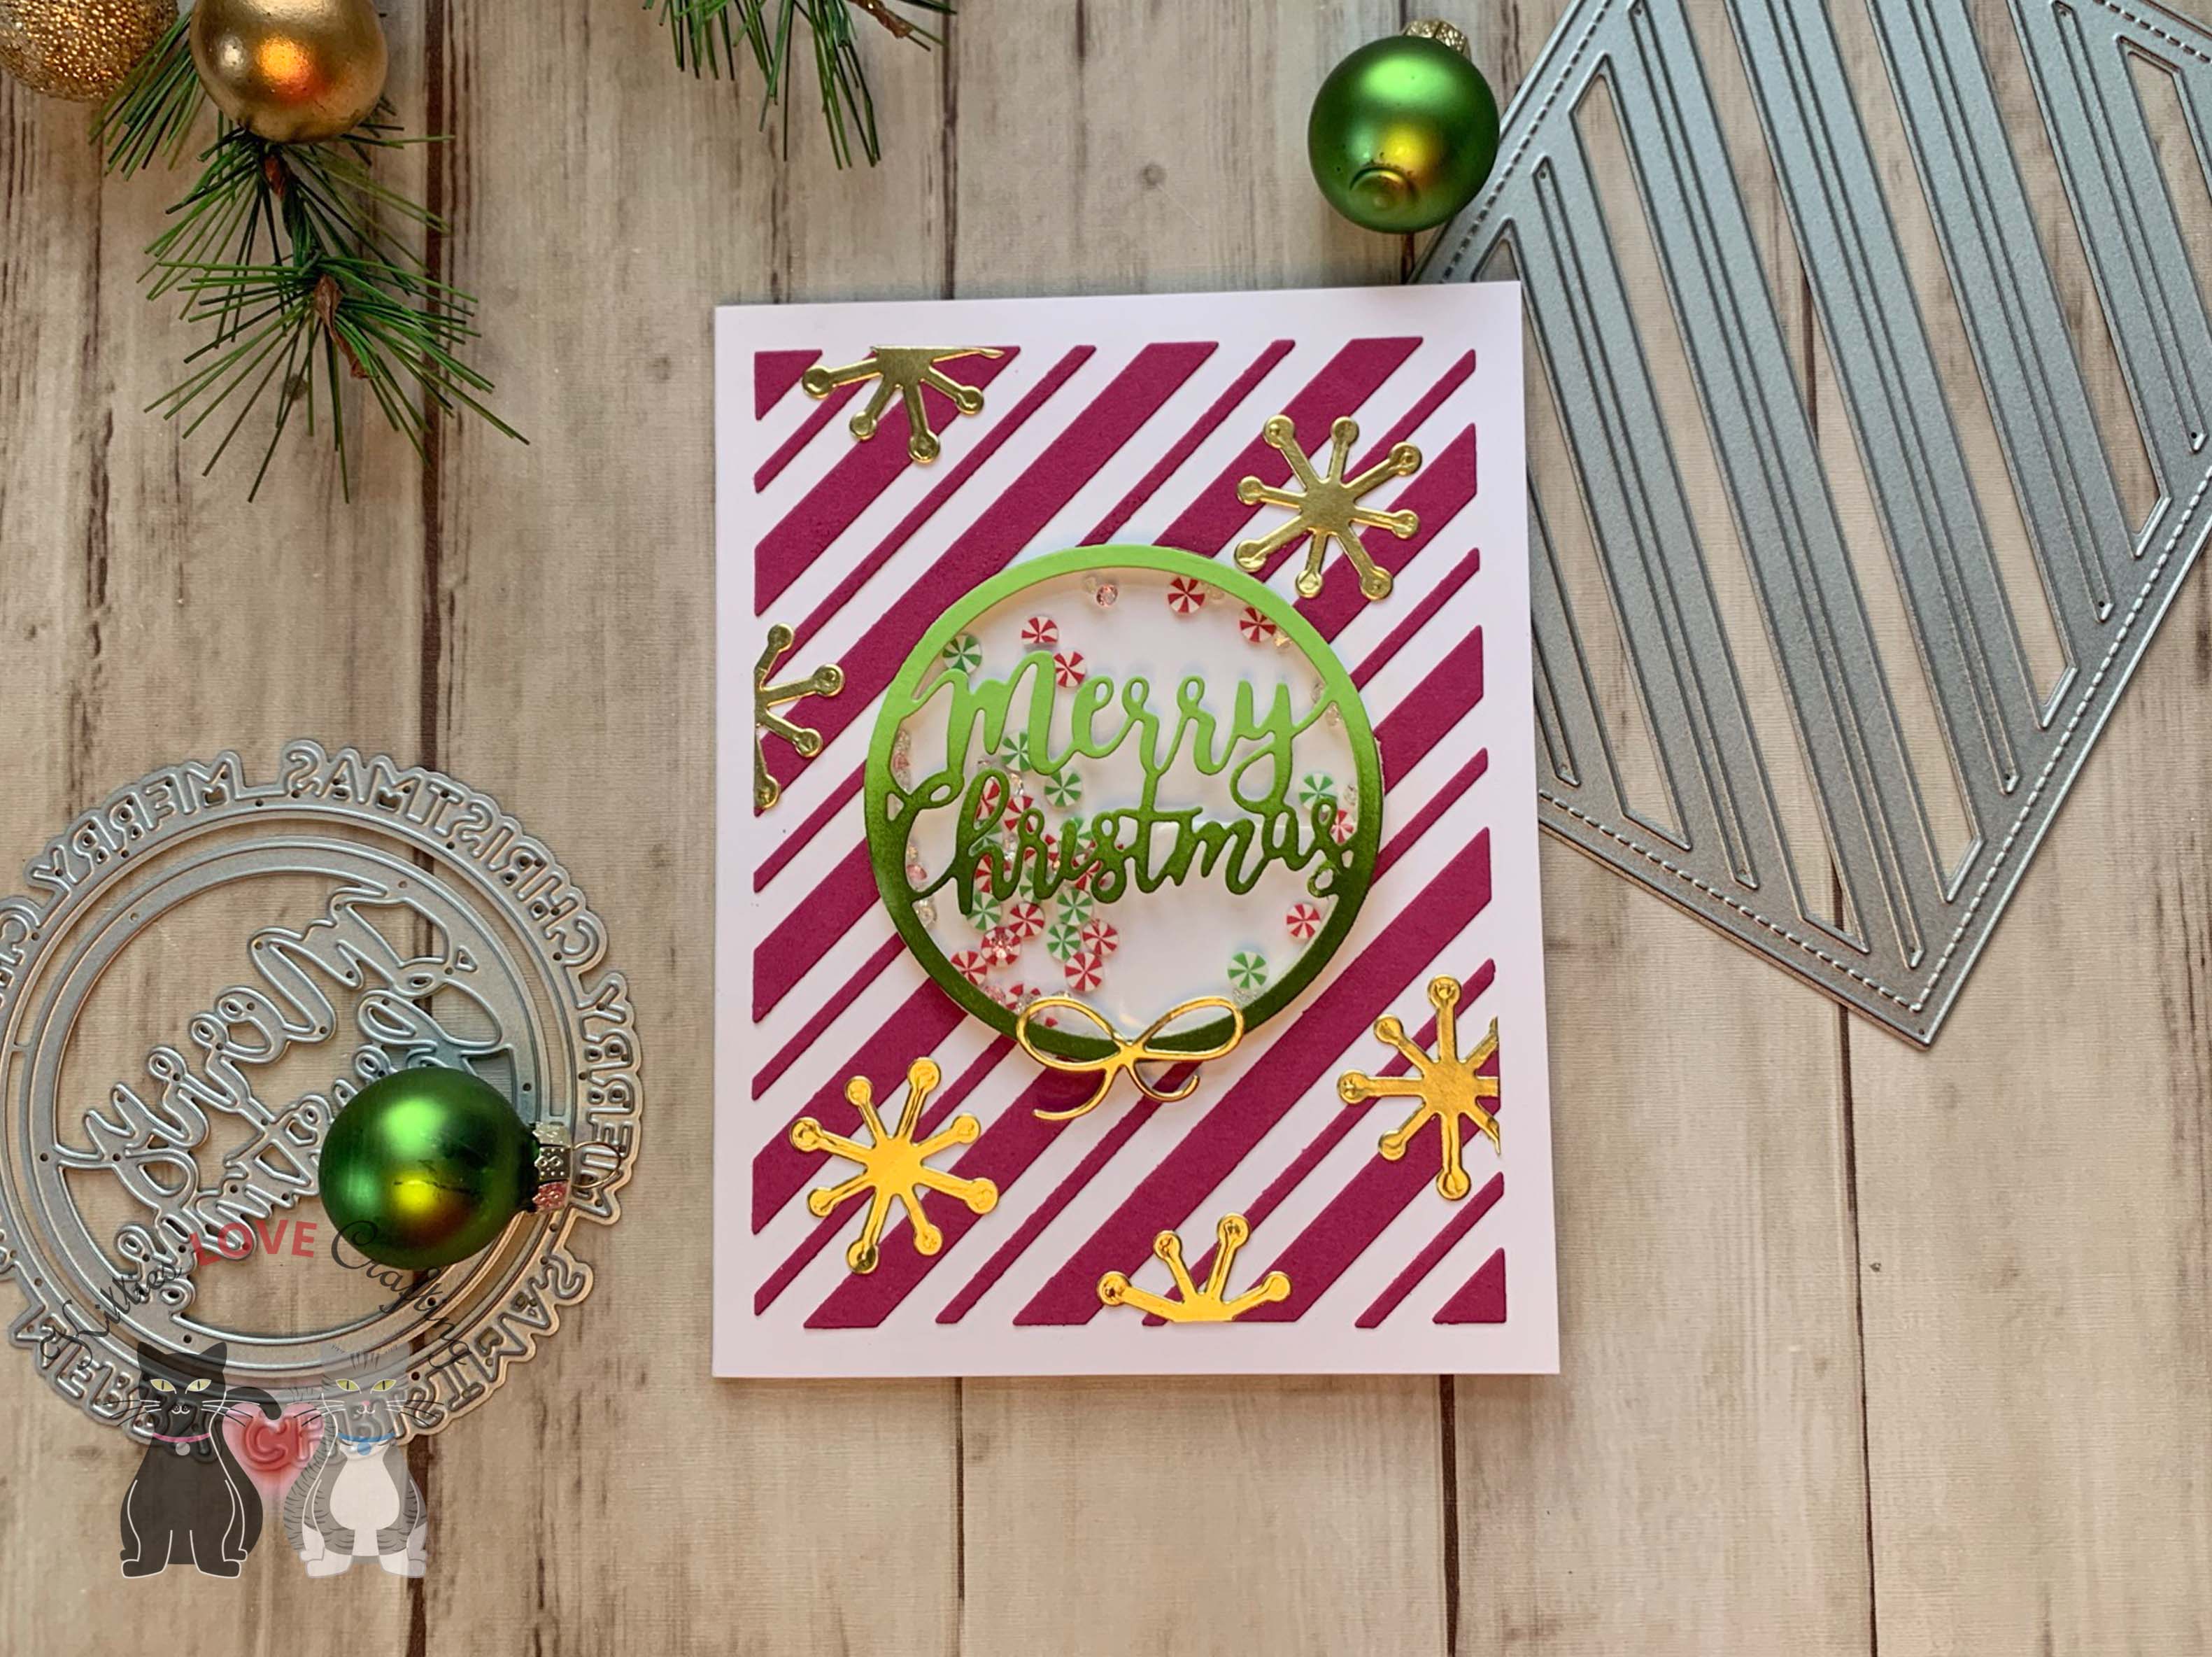
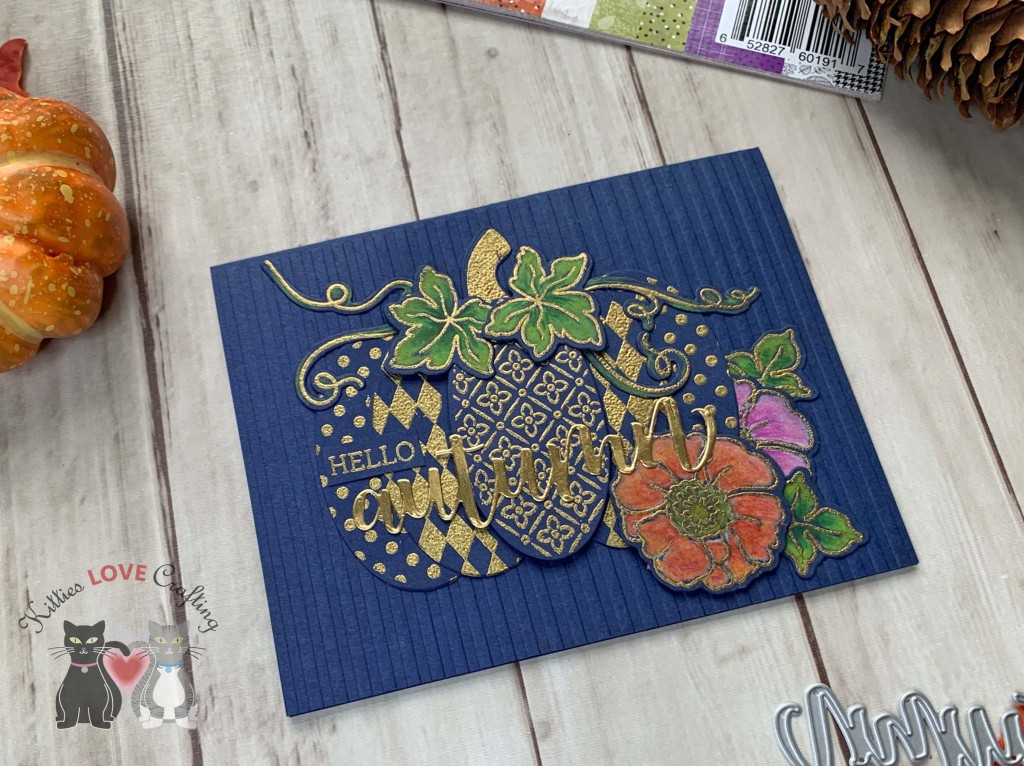
Hello friends. When Lawn Fawn came out with the How You Bean? Mint Add-on, I knew I had to get it. I love that they keep adding sets to go with the How You Bean? set. They are so much fun to play with and endless possibilities for cards. I used the same background die for both — the Lawn Fawn Peppermint Stripes Backdrop along with the same two stamp sets above to make two cards for different occasions.

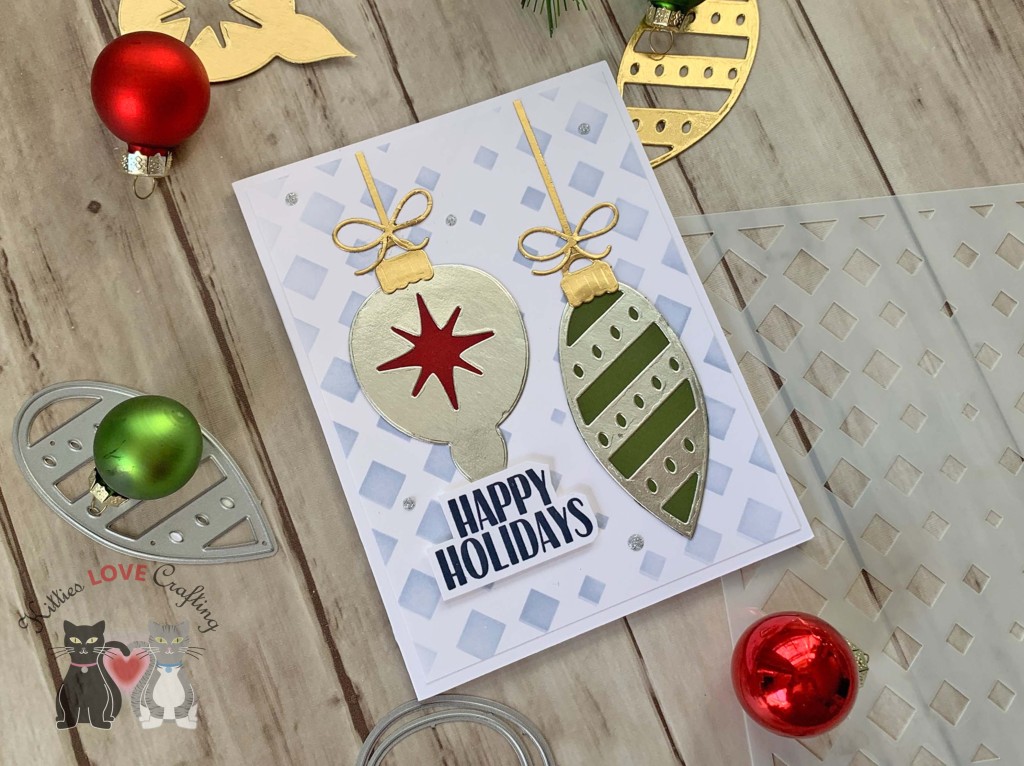
For both cards, I cut two pieces of Neenah 110lb Classic Crest Cardstock 8.5 X 11″ to 5-1/2 x 8-1/2″ and scored at 4-1/4″ to create card bases. Then I die cut Stampin’ Up! Real Red 8-1/2″ x 11″ Cardstock and Lawn Fawn Guava 8-1/2 x 11″ Cardstock with the Lawn Fawn Peppermint Stripes Backdrop and adhered each to the card base.

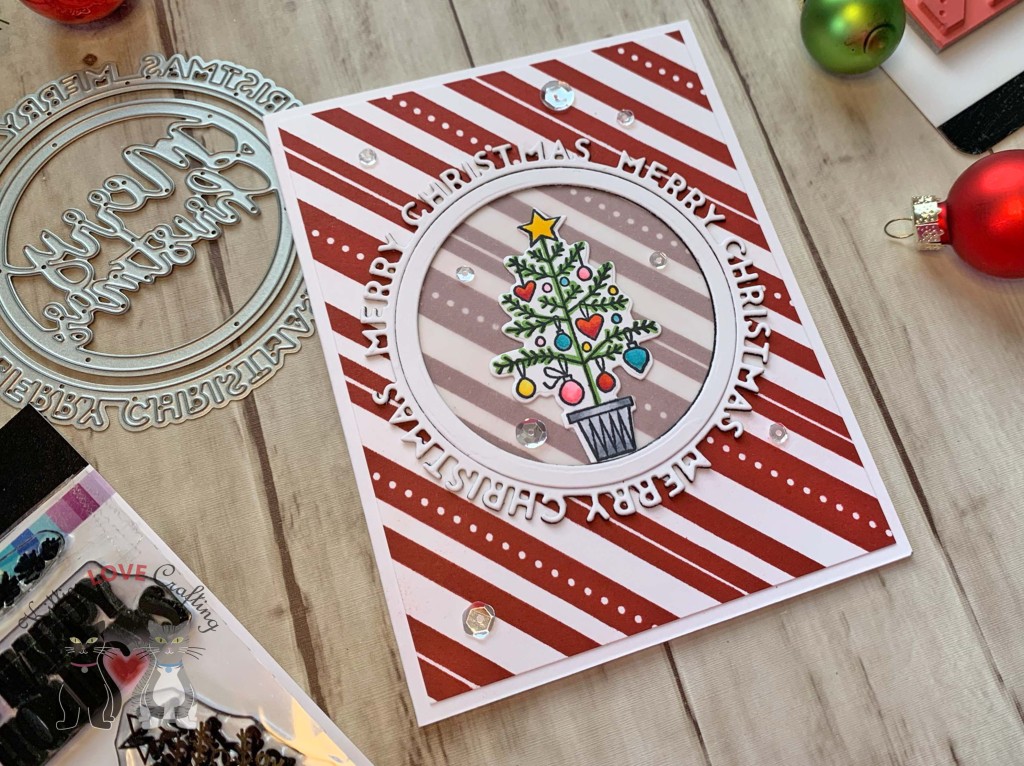
For the first card, I die cut a panel from Vellum with the Catherine Pooler Scallops and Dots Die Set and embossed it with one of the embossing folders from the the Queen and Company Embossing Folder Bundle.

I stamped the mason jar from Lawn Fawn HOW YOU BEAN? stampset with Memento Tuxedo Black Ink onto some Neenah 110lb Classic Crest Cardstock 8.5 X 11″ and the lid with Tsukineko Stazon Midi Jet Black Ink Pad onto a piece of Stampin’ Up! RED & GREEN 12″ X 12″FOIL SHEETS. Then stamped the peppermints from the Lawn Fawn Set How You Bean? Mint Add-on with Memento Tuxedo Black Ink onto some Neenah 110lb Classic Crest Cardstock 8.5 X 11″.

I used Copic Markers to color the jar and add some shading to the peppermints. I used BG000 + BG01 and C1 and C00 for the peppermints. I diecut all the images with the coordinating dies and adhered them to the card, popping up a few peppermints using Stampin’ Dimensionals.

I stamped a sentiment from Lawn Fawn’s Merry Messages Stamp Set with Stampin’ Up! Real Red Ink onto Neenah 110lb Classic Crest Cardstock 8.5 X 11″ and trimmed it before adding to the card.

I finished it by adding some Tonic FRESH SNOWFALL Nuvo Glitter Accents.

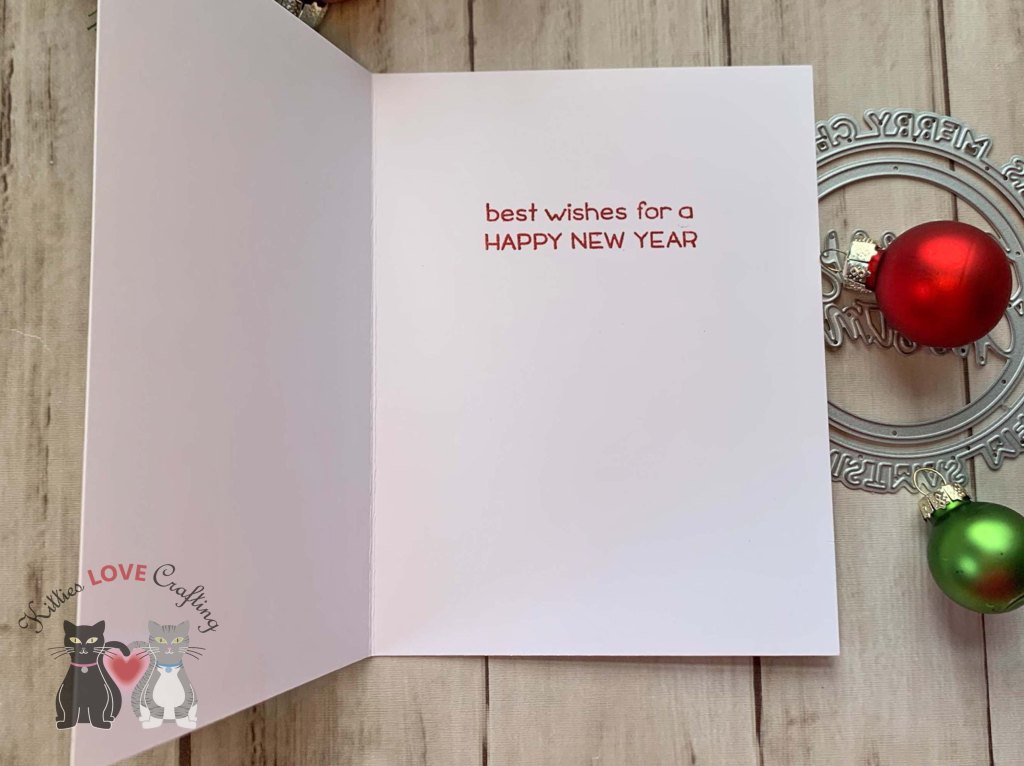
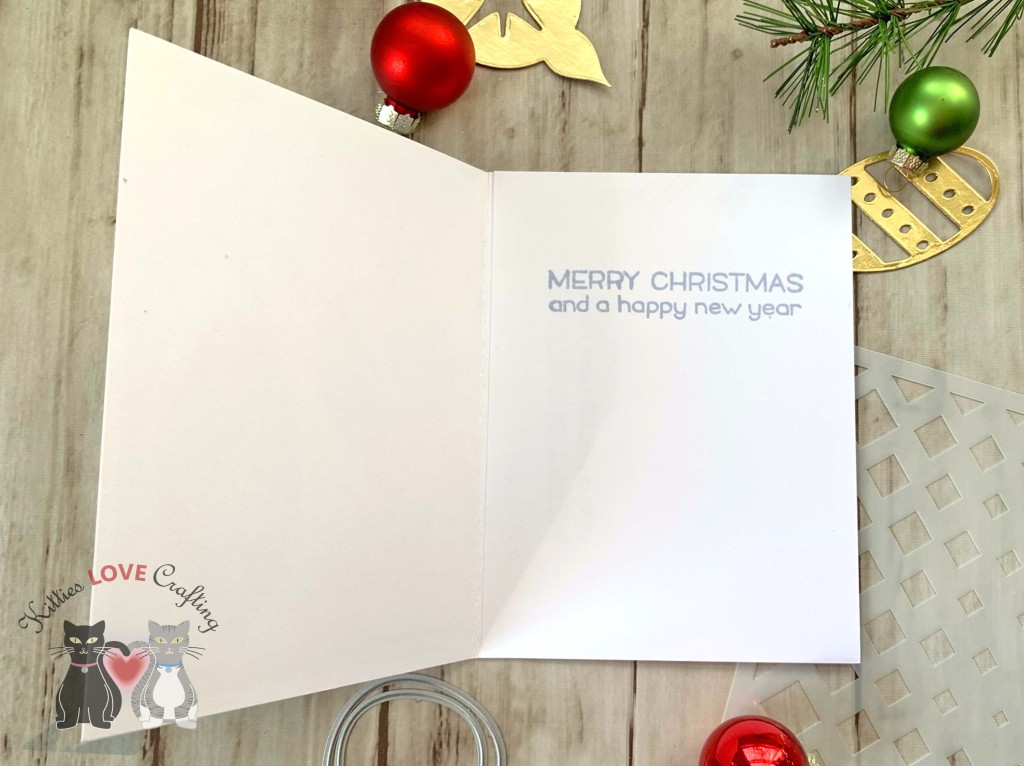
On the inside of the card, I stamped a sentiment from Lawn Fawn’s Merry Messages Stamp Set and peppermints from the Lawn Fawn Set How You Bean? Mint Add-on with Stampin’ Up! Real Red Ink.

Dimensions


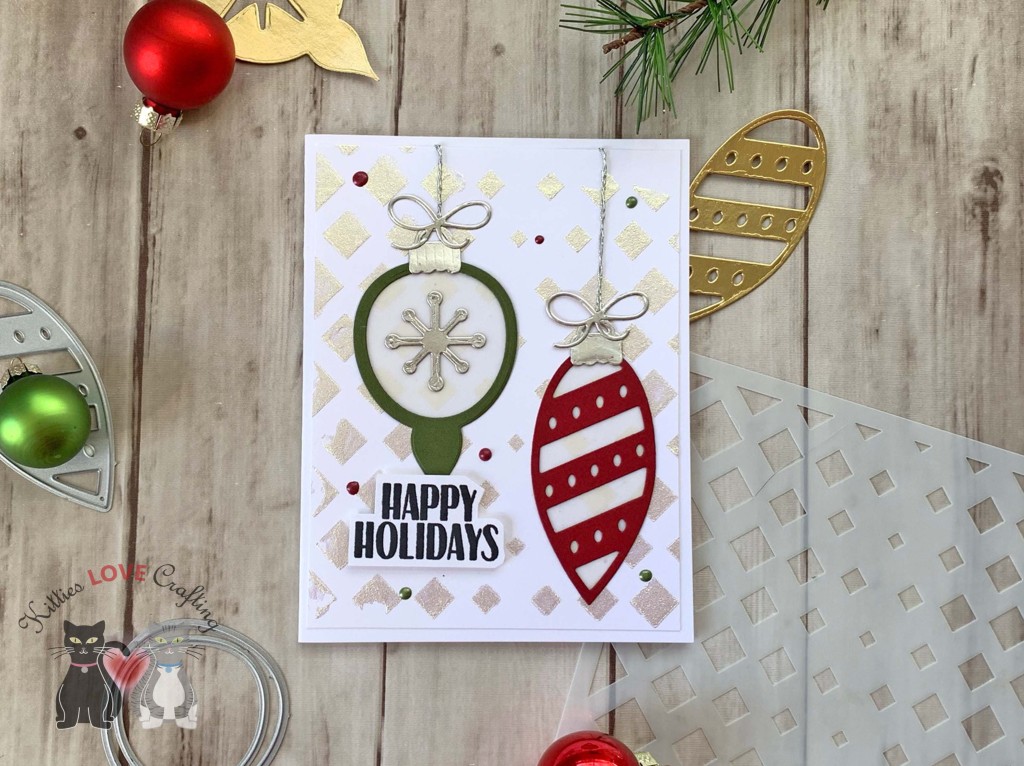
For the second card, I die cut a panel from Vellum with the Catherine Pooler Scallops and Dots Die Set. I stamped the mason jar from Lawn Fawn HOW YOU BEAN? stampset with Memento Tuxedo Black Ink onto some Neenah 110lb Classic Crest Cardstock 8.5 X 11″ and the lid with Tsukineko Stazon Midi Jet Black Ink Pad onto a piece of Tim Holtz Idea-ology 8 x 8 Paper Stash Metallic Kraft Stock. Then stamped the peppermints from the Lawn Fawn Set How You Bean? Mint Add-on with Stampin’ Up! Old Olive Ink onto some Neenah 110lb Classic Crest Cardstock 8.5 X 11″.

I used Copic Markers to color the jar and add some shading to the peppermints. I used BG000 + 0 and C1 and C00 for the peppermints. I diecut all the images with the coordinating dies and adhered them to the card.

I stamped a sentiment from Lawn Fawn Set How You Bean? Mint Add-on with Lawn Fawn Guava Ink onto Neenah 110lb Classic Crest Cardstock 8.5 X 11″ and trimmed it before adding to the card.

I finished it by adding some Metallic Bright Gold Nuvo Crystal Drops.

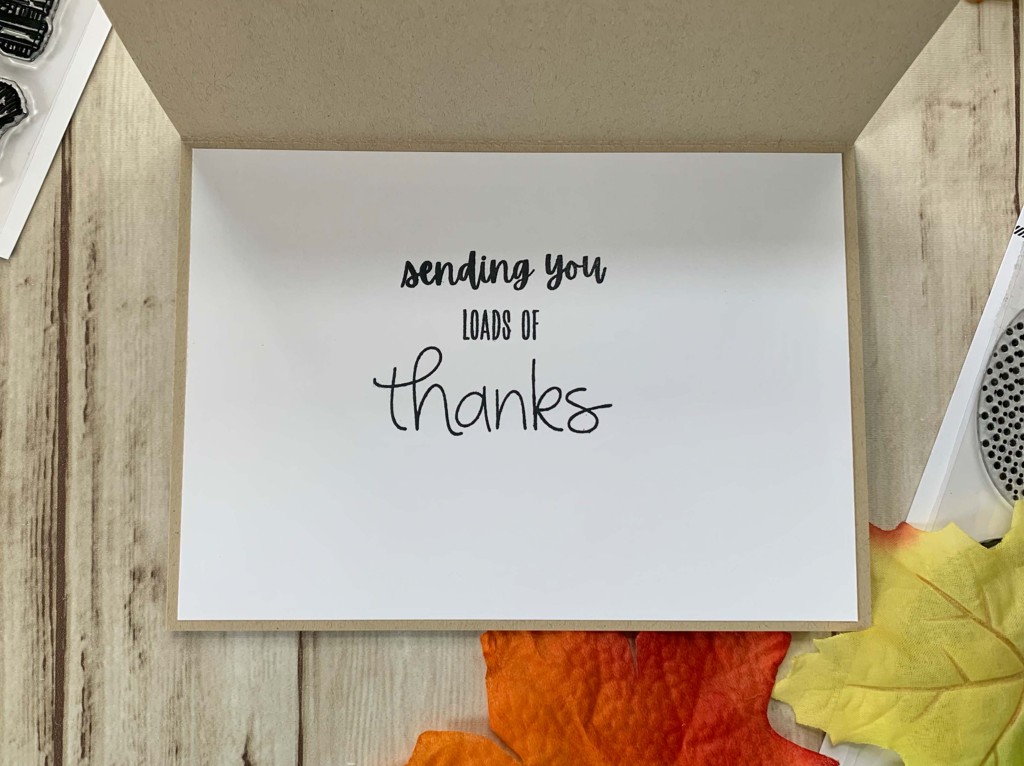
On the inside of the card, I stamped a sentiment and peppermints from the Lawn Fawn Set How You Bean? Mint Add-on with Stampin’ Up! Old Olive Ink.

Dimensions


Supplies

https://linkdeli.com/widget.js?id=f5e8378456858c916708

Thanks for reading this post. I hope you enjoyed and Iโ€™ve inspired you to give these cards a try for yourself. Leave comments or questions below or feel free to email.

Christmas, Window Cards

Quick and Easy Faux Window Card featuring Catherine Pooler Round of Merry Dies

Hello friends. Here’s a super simple Christmas card using Catherine Pooler Round of Merry Dies and the Candy Cane Background stamp.

For this card, I cut a piece of Neenah 110lb Classic Crest Cardstock 8.5 X 11″ to 5-1/2 x 8-1/2″ and scored at 4-1/4″ to create a card base and piece of Neenah 80lb Classic Crest Cardstock 8.5 X 11″ to 4-1/4 x 5-1/2โ€ for the top panel. I stamped the background with Candy Cane Background stamp and Rouge Ink, and trimmed it down to 4 x 5-1/4″.

I die cut the sentiment from both Neenah 110lb Classic Crest Cardstock 8.5 X 11″ and Stampin’ Up! Basic Black 8-1/2″ X 11″ Cardstock with the Catherine Pooler Round of Merry Dies. I left the dies connected so I got the extra circle frame piece which I also used on this card. I stacked the white and black sentiments before adhering to the card. I also added a piece of Vellum behind the sentiment piece. you can use a punch or die to cut this out or do what I did which is trace the outside edge of the inner circle and cut slightly inside that line. It doesn’t have to be perfect since no one will see this.

I stamped the little tree from the Wrapped and Ready Stamp Set with Memento Tuxedo Black Ink and colored it with Copic Markers. I used Y13 + Y18 for the star and some ornaments; RV10 + RV14, BG53 + BG57, R05 + R46 for ornaments; YG17 for the tree; and C1 + C5 for the pot. Then die cut the image with the Wrapped and Ready Dies. I finished it off by adding some clear sequins from my stash.

On the inside of the card, I stamped a sentiment from Lawn Fawn’s Merry Messages Stamp Set with Rouge Ink

Dimensions


Supplies

https://linkdeli.com/widget.js?id=f5e8378456858c916708

Thanks for reading this post. I hope you enjoyed and Iโ€™ve inspired you to give these cards a try for yourself. Leave comments or questions below or feel free to email.

Christmas

Easy Slimline Holiday Card – Using Embossing Folder to Add Texture to Focal Image

Hello friends. I’m loving this Retro Ornament Dieset from Catherine Pooler! The images are large enough to cover an A2 size card and really great on a slimline card. I went for a more traditional color but then decided to try a little less traditional color scheme.

For these cards, I cut a piece of Neenah 110lb Classic Crest Cardstock 8.5 X 11″ to 7 x 8-1/2″ and scored at 3-1/2″ to create the card bases and piece of to 3-1/4 x 8-1/4โ€ for the top panel. For the first card, I used the Catherine Pooler’s Rouge and Eucalyptus Inks to color white cardstock using direct-to-paper technique. Then diecut three rectangles using Catherine Pooler’s Scallops & Dots Dies. I adhered them offset.

I die cut the ornaments from gold cardstock from Tim Holtz Idea-ology 8 x 8 Paper Stash METALLIC KRAFT STOCK using the Retro Ornament Dieset. I embossed them with two embossing folders from Queen and Company’s Embossing Folder Bundle and backed them with Vellum before adhering them. I stamped a sentiment from the Catherine Pooler Wrapped and Ready Stampset onto Neenah 110lb Classic Crest Cardstock 8.5 X 11″ with Rouge Ink, trimmed it down and added 3M Foam Tape to adhere it to the card.

I finished it off by adding some Tonic Pale Gold Nuvo Crystal Drops.

On the inside of the card, I stamped a sentiment from the Stampin’ Up! ‘Joy to the World’ Paper Pumpkin stampset (Paper Pumpkin is a subscription box so this stampset is not available for purchase) with Eucalyptus Ink and adhered the gold star shape that I had cut out of one of the ornaments.

Dimensions


For the second card, I used the Catherine Pooler’s Suede Shoes and Cummerbund Inks to color white cardstock using direct-to-paper technique and diecut the three rectangles using Catherine Pooler’s Scallops & Dots Dies once again. I die cut the ornaments from silver cardstock instead and embossed them with the two same embossing folders from Queen and Company’s Embossing Folder Bundle and backed them with Vellum before adhering them. I stamped a sentiment from the Catherine Pooler Wrapped and Ready Stampset with Cummerbund Ink, trimmed it down and added 3M Foam Tape to adhere it to the card.

I finished it off by adding some Liquid Mercury Nuvo Crystal Drops.

On the inside of the card, I stamped a sentiment from the Stampin’ Up! ‘Joy to the World’ Paper Pumpkin stampset (Paper Pumpkin is a subscription box so this stampset is not available for purchase) with Suede Shoes ink and adhered the silver star shape that I had cut out of one of the ornaments.

Dimensions


Supplies

https://linkdeli.com/widget.js?id=f5e8378456858c916708

Thanks for reading this post. I hope you enjoyed and Iโ€™ve inspired you to give these cards a try for yourself. Leave comments or questions below or feel free to email.

Christmas

Two Backgrounds Using the Same Die and No Stamping

Hello friends. Love making holiday cards but hate stamping?!? Here are two quick and easy holiday cards that require no stamping — only dies. I used the same background die from Lawn Fawn to create both, utilizing the negative and positive pieces that were cut. This is a great way to make multiple cards without waste.

I worked on the backgrounds simultaneously because it’s easier. First, I cut two pieces of Neenah 110lb Classic Crest Cardstock 8.5 X 11″ to 5-1/2 x 8-1/2″ and scored at 4-1/4″ to create card bases. Then I die cut Stampin’ Up! Berry Burst 8-1/2″ x 11″ Cardstock (retired) with the Lawn Fawn PEPPERMINT STRIPES BACKDROP Die Cut. I adhered the negative pieces to one card base first by using the positive one as a guide to place the pieces. Then adhered the positive background piece to the other card base.

I die cut two wreaths from Neenah 110lb Classic Crest Cardstock 8.5 X 11″ with the Catherine Pooler Joy Wreath Dies. Then colored them with Garden Party and Lime Rickey Inks from Catherine Pooler using direct-to-paper technique. To help keep them together and make it easier to adhere the sentiment I added a piece of Acetate which I cut with a 2-5/8″ circle die. I used the Stampin’ Up! Layering Circle Dies (retired).

I die cut the sentiment from a piece of Neenah 110lb Classic Crest Cardstock 8.5 X 11″ and Stampin’ Up! Basic Black 8-1/2″ X 11″ Cardstock with the Catherine Pooler Round of Merry Dies. I finished it by adding some Nuvo Crystal Drops in Ivory Seashell.

On the inside of the card, I stamped a sentiment from Lawn Fawn’s Merry Messages Stamp Set with Stampin’ Up! Berry Burst Ink (retired).

Dimensions


I created a simple shaker for the second card. I die cut the sentiment from Neenah 110lb Classic Crest Cardstock 8.5 X 11″ with the Catherine Pooler Round of Merry Dies and colored it with Garden Party and Eucalyptus Inks from Catherine Pooler. I used blender brushes to create a gradient.

I die cut a piece of Acetate with a 2-1/2″ circle punch and adhered it to the back of the sentiment and added a very thin piece of 3M Foam Tape around the edges. I used Queen and Company Clear and Pink Diamond toppings (these are currently out of stock but I think will be back once Q and Co moves) and Candy Toppings to fill the shaker. I added another 2.5 inch circle behind the shaker from white cardstock.

I diecut a bow and several “snowflake” or “asterisk” images from Stampin’ Up! Gold Foil Sheets with the Catherine Pooler Retro Ornament Dies.

On the inside of the card, I stamped a sentiment from the Stampin’ Up! ‘Joy to the World’ Paper Pumpkin stampset (Paper Pumpkin is a subscription box so this stampset is not available for purchase) and Eucalyptus Ink.

Dimensions


Supplies

https://linkdeli.com/widget.js?id=f5e8378456858c916708

Thanks for reading this post. I hope you enjoyed and Iโ€™ve inspired you to give these cards a try for yourself. Leave comments or questions below or feel free to email.

Christmas

Three Quick Backgrounds Using the Catherine Pooler Gradient Diamond Stencil

Hello friends. It’s time to make some holiday cards. I’m getting a bit of a late start this year but better late than never! Starting things off with some super easy cards using Catherine Pooler’s Gradient Diamond Stencil and Retro Ornament Dies.

For this first card, I created a tone-on-tone background with a little shimmer. I cut a piece of Neenah 110lb Classic Crest Cardstock 8.5 X 11″ to 5-1/2 x 8-1/2″ and scored at 4-1/4″ to create a card base and piece of Neenah 80lb Classic Crest Cardstock 8.5 X 11″ to 4 x 5-1/4โ€ for the top panel. I used the Catherine Pooler Gradient Diamond Stencil and Cosmic Shimmer Opal Glaze Polish to create the background.

I die cut the ornaments from Stampin’ Up! Cherry Cobbler 8 1/2 x 11″ Cardstock, Stampin’ Up! Mossy Meadow 8 1/2 x 11″ Cardstock and Tim Holtz Idea-ology 8 x 8 Paper Stash Metallic Kraft Stock with the Retro Ornament Dies. I backed them with Vellum. I used some silver embroidery thread from my stash for the ornament strings and stamped a sentiment from the Catherine Pooler Wrapped and Ready Stamp Set onto piece of Neenah 110lb Classic Crest Cardstock 8.5 X 11″ with Juniper Mist Ink, trimmed around the sentiment and adhered it with 3M Foam Tape. I finished it off by adding some Red Autumn and Bottle Green Nuvo Crystal Drops.

On the inside of the card, I stamped a sentiment from Lawn Fawn’s Merry Messages Stamp Set with Stampin’ Up! Cherry Cobbler Ink.

Dimensions


For this second card, I used a traditional stenciling method with just ink. I cut a piece of Neenah 110lb Classic Crest Cardstock 8.5 X 11″ to 5-1/2 x 8-1/2″ and scored at 4-1/4″ to create a card base and piece of Neenah 80lb Classic Crest Cardstock 8.5 X 11″ to 4 x 5-1/4โ€ for the top panel. I used the Catherine Pooler Gradient Diamond Stencil with Tranquil Ink to create the background.

I die cut the ornaments from silver cardstock from the Tim Holtz Idea-ology 8 x 8 Paper Stash Metallic Kraft Stock with the Retro Ornament Dies and backed them with Stampin’ Up! Cherry Cobbler 8 1/2 x 11″ Cardstock and Stampin’ Up! Mossy Meadow 8 1/2 x 11″ Cardstock. I used gold cardstock from Tim Holtz Idea-ology 8 x 8 Paper Stash Metallic Kraft Stock for the topper, bow and string.

Then stamped a sentiment from the Catherine Pooler Wrapped and Ready Stamp Set onto piece of Neenah 110lb Classic Crest Cardstock 8.5 X 11″ with Memento Tuxedo Ink, trimmed around the sentiment and adhered it with 3M Foam Tape. I finished it off by adding some MOONDUST Nuvo Glitter Drops.

On the inside of the card, I stamped a sentiment from Lawn Fawn’s Merry Messages Stamp Set with Tranquil Ink

Dimensions


For this third card, I used a kicked it up a notch with some metallic paste. I cut a piece of Neenah 110lb Classic Crest Cardstock 8.5 X 11″ to 5-1/2 x 8-1/2″ and scored at 4-1/4″ to create a card base and piece of Neenah 80lb Classic Crest Cardstock 8.5 X 11″ to 4 x 5-1/4โ€ for the top panel. I used the Catherine Pooler Gradient Diamond Stencil with Dreamweaver Embossing Paste in Gold to create the background.

For the ornaments I used a direct-to-paper technique with Cranberry Fizz and Green Tea Inks on Neenah 110lb Classic Crest Cardstock 8.5 X 11″, then die cut with the Retro Ornament Dies and backed them with gold cardstock from Tim Holtz Idea-ology 8 x 8 Paper Stash Metallic Kraft Stock. I used the same gold cardstock for topper, bow and string again. I adhered them with 3M Foam Tape for some dimension.

I stamped a sentiment from the Catherine Pooler Wrapped and Ready Stamp Set onto piece of Neenah 110lb Classic Crest Cardstock 8.5 X 11″ with Memento Tuxedo Ink, trimmed around the sentiment before adhering it flat.

On the inside of the card, I stamped a sentiment from Lawn Fawn’s Merry Messages Stamp Set with Cranberry Fizz.

Dimensions


Supplies

https://linkdeli.com/widget.js?id=f5e8378456858c916708

Thanks for reading this post. I hope you enjoyed and Iโ€™ve inspired you to give these cards a try for yourself. Leave comments or questions below or feel free to email.

Autumn, Fall, Fall, Seasons

Loads of Fall Card featuring Honey Bee Stamps

Hi friends. Here’s another cute Fall/Autumn card using the Honey Bee Stamps Loads Of Fall stampset and dies and the Honey Bee Stamps Big Pickup Tailgate Stampset and dies. Lots of fun images in both these stampsets and lots of combinations you can use to create a variety of different cards, not just seasonal ones.

I started by stamping all the images I needed from the Honey Bee Stamps Loads Of Fall stampset and the Honey Bee Stamps Big Pickup Tailgate Stampset onto Neenah 110lb Classic Crest Cardstock 8.5 X 11″ with Memento Tuxedo Black Ink and set them aside to dry.

I cut a piece of Catherine Pooler Sand Dunes 8-1/2 x 11″ Cardstock (retired) to 10 x 7″ and scored at 5″ to make the card base. I also cut a piece of Honey Bee Stamps Halloween Harvest 6×6 Paper Pad to 4-3/4 x 6″. Since this paper pad is only 6 x 6 I had to get creative and fill in the sides with more paper. So I cut two pieces of patter paper to 1/2 x 4-3/4″ and adhered it behind the larger piece.

I colored the images with Copic Markers. I used B00, B02, and B06 for the truck; N1, N2 & N4 for the metal portions such as the mirror; N5 and N8 for the tires; BG000 & 0 for the windows; R05 & R27 for the lights; R05 & R27 for the doggy bandana, E29, E23, & E37 for the dog; YR14 & YR21 for the license plate; YG61, G94, YG99, & E15 for the jug; YR16, YR04 & Y18, Y13 & Y16, YG61, G94, & YG99, YG91 & E15 for the pumpkins; R05 & R27, E55, E57 & E29 for the apple bucket.

On the inside of the card, I cut a piece of Neenah 110lb Classic Crest Cardstock 8.5 X 11″ to 4-3/4 x 6-3/4โ€ and stamped a sentiment from the Honey Bee Stamps Big Pickup Cab Stampset and Lawn Fawn Thanks Thanks Thanks with Honey Bee Stamps Big Pickup Tailgate Stampset onto Neenah 110lb Classic Crest Cardstock 8.5 X 11″ with Memento Tuxedo Black Ink.

Dimensions


Supplies

https://linkdeli.com/widget.js?id=f5e8378456858c916708

Thanks for reading this post. I hope you enjoyed and Iโ€™ve inspired you to give this cute fall card a try for yourself. Leave comments or questions below or feel free to email me.

Emboss Resist Technique, Fall, Fall, Holidays 2021

Three Fall Cards Using the Honey Bee Stamps Patchwork Pumpkin Stampset

I love this new Patchwork Pumpkin Stampset from Honey Bee Stamps! You can create all kinds of cute pumpkins. You can also add flowers and the coordinating dies makes it easy to cut everything out. I made three cards using different color papers and coloring methods but with the same embossing powder. I wanted to see how to create different cards by just making subtle changes. Using pattern papers and embossing folders is also an easy way to add interest.

For the first card, I started by cutting a piece of Neenah 110lb Classic Crest Cardstock 8.5 X 11″ to 5-1/2 x 8-1/2″ and scored at 4-1/4″ to make the card base and cut a piece of the watercolor leaf paper from the Honey Bee Stamps Halloween Harvest 6×6 Paper Pad to 4 x 5-1/4″ and another of the purple leaf paper to 2 x 5-1/4″.

I used Versamark Ink to stamp several of the pattern pumpkins, leaves, curly vines and the stem from the Honey Bee Stamps Patchwork Pumpkin Stampset onto some Neenah 110lb Classic Crest Cardstock 8.5 X 11″ and heat embossed with Gold Embossing Powder. Then diecut all the pieces with the oval die included in the coordinating dieset. I used Tim Holtz Tumbled Glass and Broken China Distress Inks to color the pumpkin and Crushed Olive and Mowed Lawn to color the leaves and vines. I used 3M Foam Tape to pop up the center piece of the pumpkin and some of the leaves. Before adhering it to the card I added Love From Lizi Straight Peel-Off Stickers in Gold.

I stamped the sentiment from the Honey Bee Stamps Patchwork Pumpkin Stampset with Versamark Ink and heat embossed with Gold Embossing Powder onto a piece of Neenah 110lb Classic Crest Cardstock 8.5 X 11″ and diecut it with the coordinating dies. I added a little Mowed Lawn Distress Ink around the edges.

On the inside of the card, I cut a piece of the same watercolor leaf paper from the Honey Bee Stamps Halloween Harvest 6×6 Paper Pad to 1 x 5-1/4″ and stamped a sentiment from Honey Bee Stamps Autumn Stamp Set with Mowed Lawn Distress Ink.

Dimensions

For the second card, I started by cutting a piece of Catherine Pooler Sand Dunes 8-1/2 x 11″ Cardstock (discontinued-any kraft cardstock will work) to 5-1/2 x 8-1/2″ and scored at 4-1/4″ to make the card base and cut a piece of the purple paper from the Honey Bee Stamps Halloween Harvest 6×6 Paper Pad to 4 x 5-1/4″.

I used Versamark Ink to stamp several of the pattern pumpkins, leaves, curly vines and the stem from the Honey Bee Stamps Patchwork Pumpkin Stampset onto some Catherine Pooler Sand Dunes 8-1/2 x 11″ Cardstock (retired) and heat embossed with Gold Embossing Powder. Then diecut all the pieces with the oval die included in the coordinating dieset. I used Tim Holtz Mustard Seed and Carved Pumpkin Distress Inks to color the pumpkin and Crushed Olive and Mowed Lawn to color the leaves and vines. I used 3M Foam Tape to pop up the center piece of the pumpkin and some of the leaves.

I diecut the sentiment from the Honey Bee Stamps Autumn Honey Cuts and Neenah 110lb Classic Crest Cardstock 8.5 X 11″ 3x and adhered them together. I colored the bottom of the word with Mowed Lawn Distress Ink to create an ombre effect. I adhered it onto the pumpkin and stamped the rest of the sentiment from Honey Bee Stamps Autumn Stamp Set with Versamark Ink and heat embossed with Gold Embossing Powder onto a piece of the white leaf pattern paper from the Honey Bee Stamps Halloween Harvest 6×6 Paper Pad. I trimmed it down to 1/2 x 1-7/8″ before adhering to the card.

I finished it off by adding some Love From Lizi Pin Stripe Peel-Off Stickers in Gold Mirror Moondust.

On the inside of the card, I cut a piece of the same purple paper from Honey Bee Stamps Halloween Harvest 6×6 Paper Pad to 1 x 5-1/4″ and stamped a sentiment from Honey Bee Stamps Happy Fall Y’all Stamp Set with Carved Pumpkin Distress Ink.

Dimensions


For the third card, I kept thing a little simpler. I started by cutting a piece of Stampin’ Up! Night of Navy 8-1/2″ X 11″ Cardstock to 5-1/2 x 8-1/2″ and scored at 4-1/4″ to make the card base. I embossed the front to the card with one of the embossing folders from the Queen & Co’s Embossing Folder Bundle.

This time, I used Versamark Ink to stamp several of the pattern pumpkins, leaves, curly vines, flowers and the stem from the Honey Bee Stamps Patchwork Pumpkin Stampset onto some Stampin’ Up! Night of Navy 8-1/2″ X 11″ Cardstock to 5-1/2 x 8-1/2″ and heat embossed with Gold Embossing Powder. Tip: Make sure to use a good amount of anti-static powder when using embossing powder on dark cardstock or it will stick where you don’t want. Then diecut all the pieces with the oval die included in the coordinating dieset. I colored the leaves, vine sand flowers with Prismacolor Pencils.

I diecut the sentiment from the Honey Bee Stamps Autumn Honey Cuts and Tim Holtz Idea-ology 8 x 8 Paper Stash Metallic Kraft Stock. I adhered it onto the pumpkin and stamped the rest of the sentiment from Honey Bee Stamps Autumn Stamp Set with Versamark Ink and heat embossed with Gold Embossing Powder onto a piece of Stampin’ Up! Night of Navy 8-1/2″ X 11″ Cardstock. I trimmed it down to 3/8 x 7/8″ before adhering to the card.

On the inside of the card, I cut a piece of Neenah 110lb Classic Crest Cardstock 8.5 X 11″ to 4 x 5-1/4″ and left it blank.

Dimensions


Supplies

https://linkdeli.com/widget.js?id=f5e8378456858c916708

Thanks for reading this post. I hope you enjoyed and Iโ€™ve inspired you to give these cute Fall cards a try for yourself. Leave comments or questions below or feel free to email me.

Emboss Resist Technique, Halloween, Holidays 2021, Shaker

Boo Shaker Card featuring Honey Bee Stamps Buzzword Dies

Hello friends. Iโ€™ve got another cute Halloween card to share with you all. This is a very simple shaker card using the Honey Bee Stamps Boo Buzzword dies and the Honey Bee Stamps Halloween Harvest 6×6 Paper Pad. Very little stamping and absolutely no coloring involved. I love making these kinds of cards!

I started by cutting a piece of Simon Says Stamp 100lb Black 8-1/2 x 11″ Cardstock to 5-1/2 x 8-1/2″ and scored at 4-1/4″ to make the card base. I also cut a piece of the Honey Bee Stamps Halloween Harvest 6×6 Paper Pad to 4 x 5-1/4″. I diecut a window from it with the Catherine Pooler Designs Scallops & Dots Dies, added a piece of acetate with double-side tape and added some 3M Foam Tape to make the shaker element. I added sequins from the Honey Bee Stamps Halloween Harvest Sequin Mix and backed it with another piece of pattern paper from the Honey Bee Stamps Halloween Harvest 6×6 Paper Pad.

I diecut the sentiment with the Honey Bee Stamps BOO Dies from the Honey Bee Stamps Halloween Harvest 6×6 Paper Pad and Simon Says Stamp 100lb Black 8-1/2 x 11″ Cardstock (for the shadow). I stamped the rest of the sentiment from the Honey Bee Stamps BOO Stamp Set onto some more black card stock with Versamark Ink and and heat embossed with WOW Embossing Powder in Super Fine Opaque Bright White.

I diecut ghosts, bats and pumpkins from the Honey Bee Stamps Haunted House Add-On (this die works with the House Builder Card Base Dieset) from Neenah 110lb Classic Crest Cardstock 8.5 X 11″, Simon Says Stamp 100lb Black 8-1/2 x 11″ Cardstock, and orange cardstock from my scrap stash.

I finished it off by adding some Honey Bee Stamps Halloween Harvest Sequin Mix.

On the inside of the card, I cut a piece of Neenah 110lb Classic Crest Cardstock 8.5 X 11″ to 4 x 5-1/4โ€ and a piece of pattern paper from Honey Bee Stamps Halloween Harvest 6×6 Paper Pad to 1 x 5-1/4″ and stamped a sentiment from the Queen and Co Halloween Hoopla Kit with Catherine Pooler Designs Orange Twist Ink.

Dimensions


Supplies

https://linkdeli.com/widget.js?id=f5e8378456858c916708

Thanks for reading this post. I hope you enjoyed and Iโ€™ve inspired you to give this cute Halloween shaker card a try for yourself. Leave comments or questions below or feel free to email me.

Halloween, Holidays 2021, Stenciled Background, Techniques

Easy Stenciled Halloween Background featuring Pretty Pink Posh and Lawn Fawn

Background stencils are a great option to make quick backgrounds! This cute Pretty Pink Posh CANDY BACKGROUND Stencil is a fun one to use for Halloween. This card came together very quickly with minimal stamping and coloring. I combined this background stencil and a couple of background and sentiment dies to create this quick and simple card.

I started by cutting a piece of Stampin’ Up! Elegant Eggplant 8-1/2 x 11″ Cardstock (retired) to 5-1/2 x 8-1/2″ and scored at 4-1/4″ to make the card base and a piece of Neenah 110lb Classic Crest Cards cut to 4-1/4 x 5-1/2″ which I stenciled with the Pretty Pink Posh CANDY BACKGROUND Stencil and Tim Holtz Carved Pumpkin, Peeled Paint, Crushed Olive and Wilted Violet Distress Inks. Then diecut it with Catherine Pooler Designs Scallops & Dots Dies and adhered it to the card base.

I diecut a sentiment one from Stampin’ Up! Black 12″ X 12″ Glitter Paper and two fromC1 + 0 Simon Says Stamp 100lb Black 8-1/2 x 11″ Cardstock with the Lawn Fawn Giant Happy Halloween Die Cut. Using three layers of the sentiment is a great way to add dimension to an image that is not easy to add foam tape.

I stamped the images from the Pretty Pink Posh Halloween Wreath Stampset with Memento Tuxedo Black Ink and colored them with Copic Markers. I used R20, C1 + 0 blender for the ghost; C1 + 0 blender, Y02 + Y13, YR04 + YR07 for the candy corn; C7 + C9 for the bat and spider; V06 + V09, YG17 + YG25 for the witch hat; YR04 + YR07 and YG17 + YG25, YG17 + YG25 and V06 + V09 for the candy; C1 + C7, YR04 + YR07 for the lollipop. I added white highlights with my Uni-Ball UM 153 Signo Broad Point Gel Pen and die cut with the coordinating dies.

I added some Glossy Accents to the candy and some shimmer with a Spectrum Noir Clear Overlay Sparkle Pen. I also added some Ebony Black Nuvo Drops.

On the inside of the card, I cut a piece of Neenah 110lb Classic Crest Cardstock 8.5 X 11″ to 4 x 5-1/4″ and stamped a sentiment and the witch hat from the Pretty Pink Posh Halloween Wreath Stampset with Memento Tuxedo Black Ink and colored the hat with copics.

Dimensions


Supplies

https://linkdeli.com/widget.js?id=f5e8378456858c916708

Thanks for reading this post. I hope you enjoyed and Iโ€™ve inspired you to give this sweet and easy Halloween card a try for yourself. Leave comments or questions below or feel free to email me.

Emboss Resist Technique, Halloween, Halloween, Holidays 2021

Easy Halloween Wreath Card Featuring Pretty Pink Posh

Hi friends. I’m back after some unplanned time off!It’s great to be creating again. I’m cutting it close but let’s start with a cute Halloween card. This stampset from Pretty Pink Posh, Halloween Wreath is so cute! I love all the fun images. They are easy to color with markers, pencils etc or leave them uncolored. You can also make a wreath from the singular images instead of using the wreath image.

I started by cutting a piece of Simon Says Stamp 100lb Black 8-1/2 x 11″ Cardstock to 5-1/2 x 8-1/2″ and scored at 4-1/4″ to make the card base and a second piece cut to 4 x 5-1/4″ which I embossed with an embossing folders from the Queen & Co’s Embossing Folder Bundle. I added a strip of pattern paper from the Honey Bee Stamps Halloween Harvest 6×6 Paper Pad measuring 3/4 x 5-1/4″ and another measuring 1-1/4 x 5-1/4″.

I stamped the wreath and all the images as well as a sentiment in the center from the Pretty Pink Posh Halloween Wreath Stampset with Versamark Ink and heat embossed with WOW Embossing Powder in Super Fine Opaque Bright White. I colored them with Prismacolor Pencils and diecut the images with the coordinating dies. Tip: Make sure to use a good amount of anti-static powder when using embossing powder on dark cardstock or it will stick where you don’t want. I used 3M Foam Tape to pop up the wreath.

I finished it off by adding some sequins from the Honey Bee Stamps Halloween Harvest Sequin Mix.

On the inside of the card, I cut a piece of Neenah 110lb Classic Crest Cardstock 8.5 X 11″ to 4 x 5-1/4″ and the same purple paper I used on the front of the card from Honey Bee Stamps Halloween Harvest 6×6 Paper Pad to 1 x 5-1/4″ and stamped a sentiment from the Pretty Pink Posh Halloween Wreath Stampset with Catherine Pooler Designs Mandarin Spice Ink. I also added some extra images I had stamped.

Dimensions


Supplies

https://linkdeli.com/widget.js?id=f5e8378456858c916708

Thanks for reading this post. I hope you enjoyed and Iโ€™ve inspired you to give this sweet and easy Halloween card a try for yourself. Leave comments or questions below or feel free to email me.