Hello friends. Here’s another card featuring these adorable penguins from the Lawn Fawn HERE WE GO A-WADDLING stamps. I paired it with an old die set from Catherine Pooler Designs. It was featured in the Winterhaven Stamp of Approval several years ago!
For this card, I cut a piece of Neenah 100lb Classic Crest Cardstock 8.5 X 11″ to 5-1/2 x 8-1/2″ and scored at 4-1/4″ to create a card base and another piece to 4 x 5-1/4″ for the background. I used the Tim Holtz Salty Ocean, Uncharted Mariner, and Chipped Sapphire Distress Oxide Inks to color the background. Then used a snowflake embossing folder (Stampin’ Up! Winter Snow) to give it some dimension. Then I lightly ran a white pigment ink pad (Lawn Fawn Yeti Pigment Ink) over the raised areas; This enhanced the snowflakes a bit more. (TIP: Make sure to let this dry for several hours before touching the panel or use a heat tool to set it). Lastly, I added some splatters using White Acrylic paint.
Thanks for reading this post. I hope I’ve inspired you to give this cute penguin Christmas card a try for yourself. Leave comments or questions below or feel free to email.
Hello friends. For this cute holiday card, I uses a technique I had forgotten about but recently reminded of while watching a Youtube video. The technique is stenciling on pattern paper. It’s an easy way to add depth and interest to a background without adding extra bulk. This card features the Lawn Fawn Spooky Forest Backdrop die and the Lawn Fawn Winter Village Stamps.
I decided to do a radical thing on this card and have NO sentiment on the outside. What?!? Unheard of, right? LOL. Sometimes it’s ok to leave the outside of your card with just a pretty scenes. Let the recipient be surprised when they open the card.
Thanks for reading this post. I hope I’ve inspired you to give this cute penguin Christmas card a try for yourself. Leave comments or questions below or feel free to email.
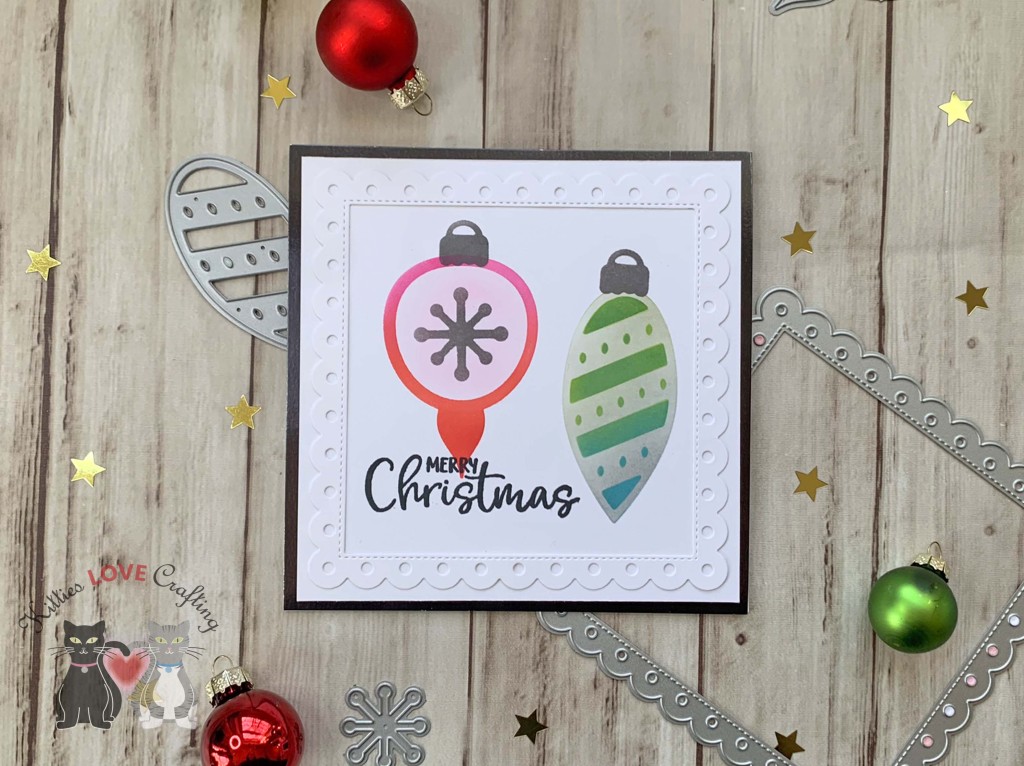
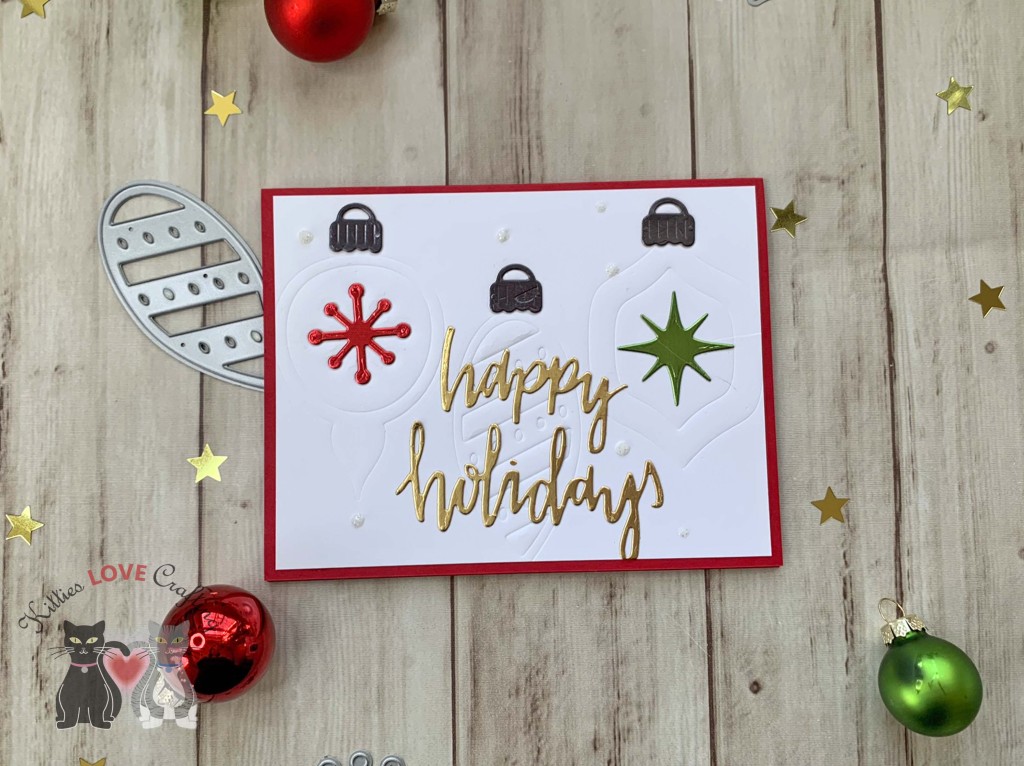
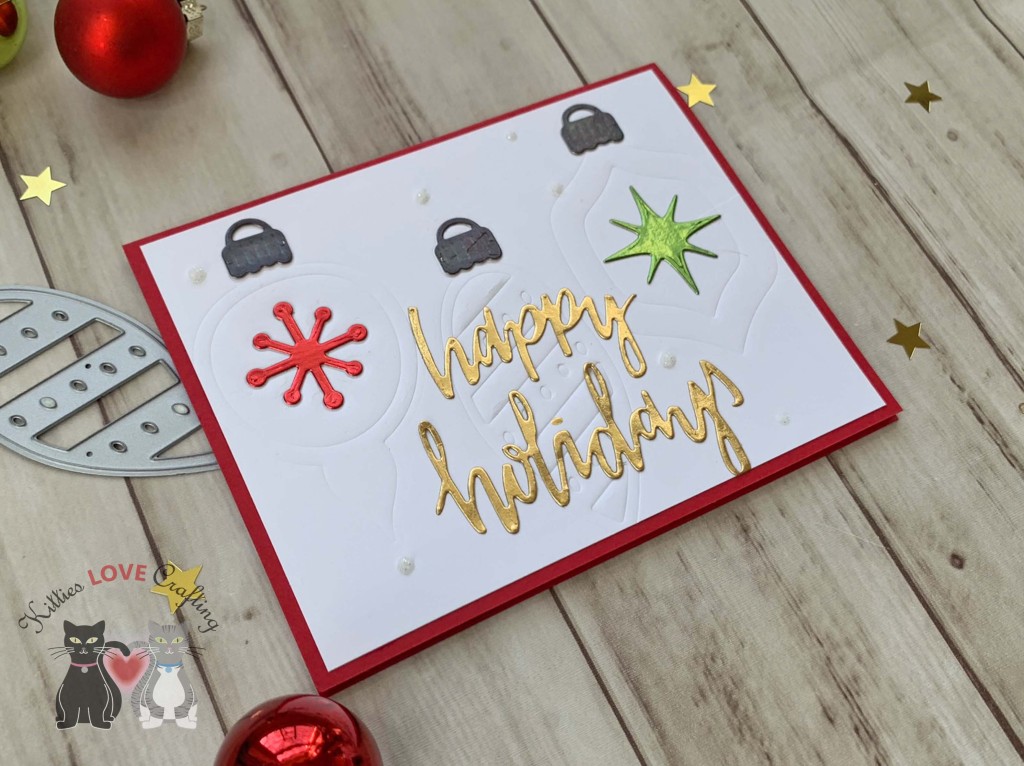
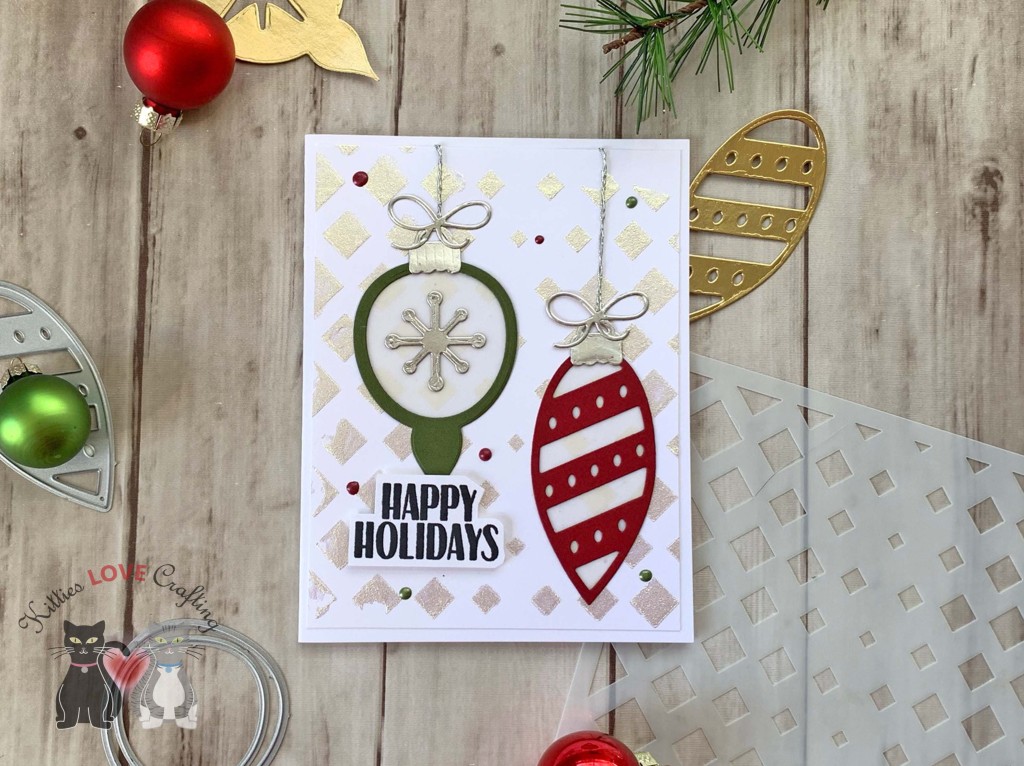
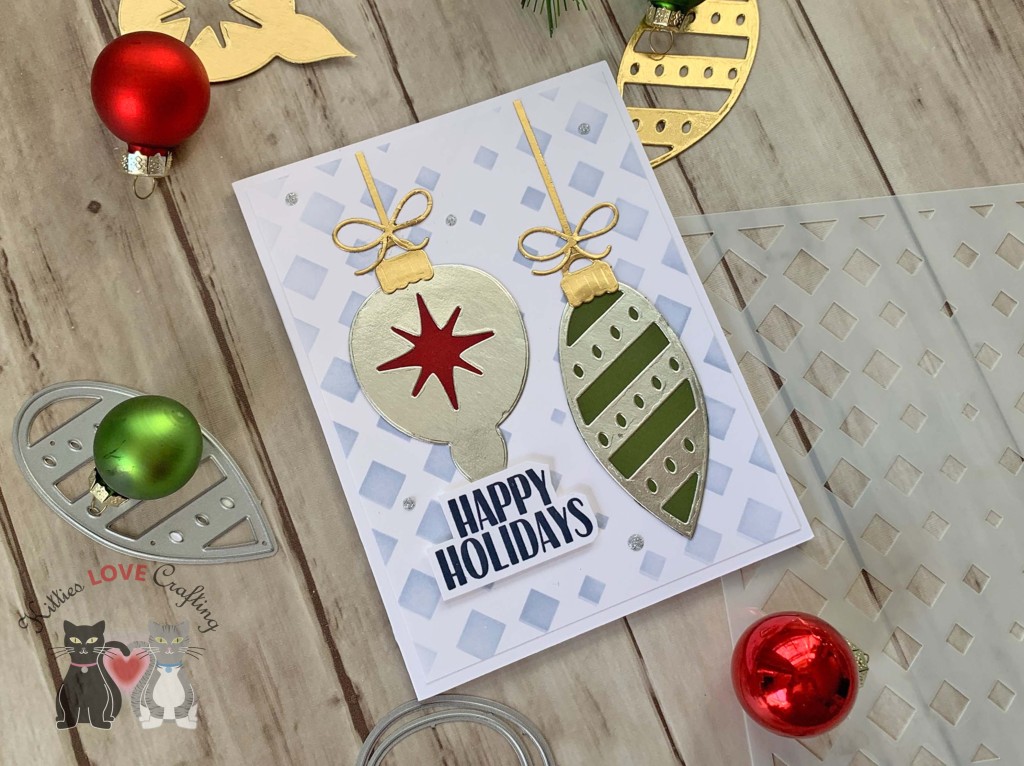
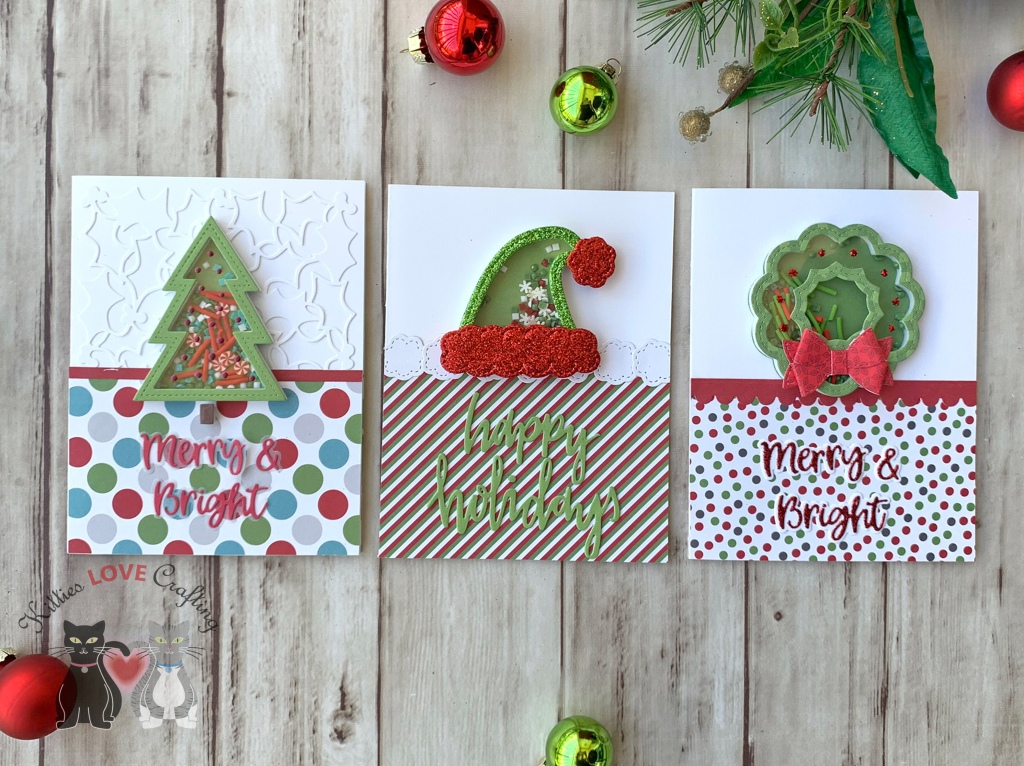
Hello friends. Have you ever tried using your dies to emboss or stencil your backgrounds?!? It’s super easy and you can make quick cards using these techniques. I created three cards demonstrating these techniques using the Catherine Pooler Retro Ornament Dies. Let me show you how easy they are to make. For more stenciled backgrounds using dies check out my previous post.
I took the ornament dies from the Catherine Pooler Designs Retro Ornament Dies and embossed the background panel. For my Sizzix Big Shot machine I used the following sandwich from the bottom up: 1.) Multipurpose Platform, 2.) Cutting Plate, 3.) Emboss mat, 4.) Paper. 5.) Die face down, and 6.) Cutting Plate. Check your machines guide for the proper snadwich. I also added additonal paper to deepen the embossing a bit.
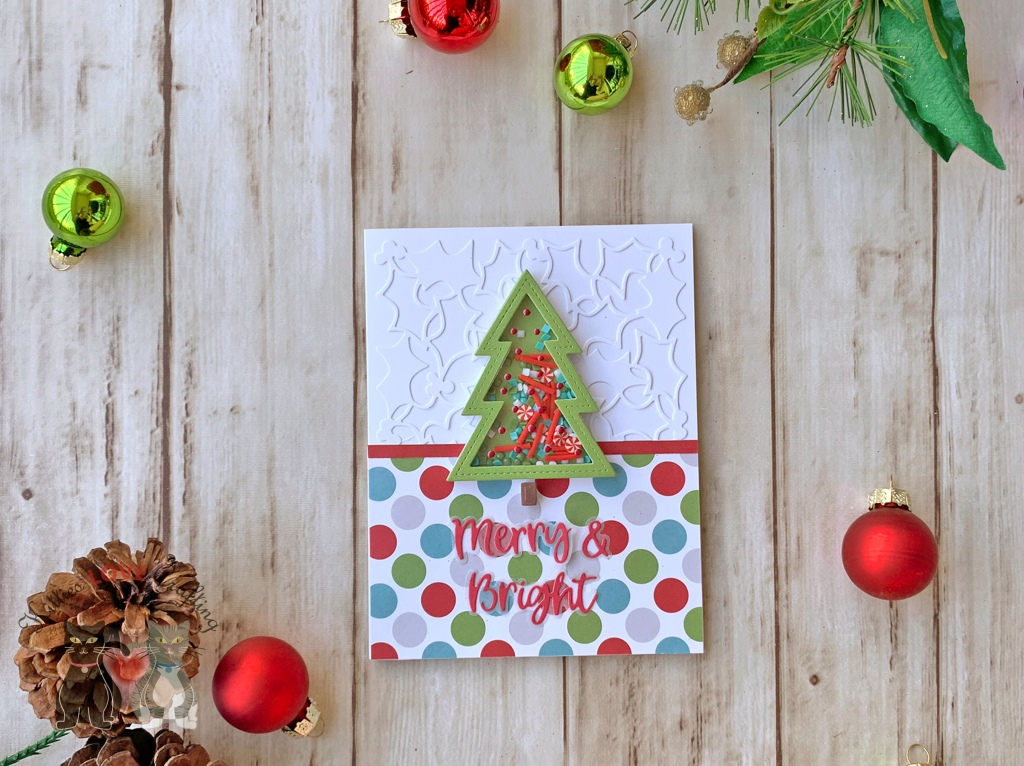
For this third card, I made a fun shaker pocket card. I cut a piece of Stampin’ Up! Melon Mambo 8-1/2 x 11″ Cardstock (retired) to 5-1/2 x 8-1/2″ and scored at 4-1/4″ to create a card base and piece of patter paper from my stash to 4-1/4 x 5-1/2” for the inside of the shaker panel.
I cut a piece Acetate slightly larger than my back panel. then used double sided tape to adhere three sides of the acetate to the back of the panel, creasing the edges. I filled the pocket with a variety of flat sequins and stars and sealed the last side of the pocket. I adhered the panel to the card and then die cut a frame from Neenah 110lb Classic Crest Cardstock 8.5 X 11″ using the Spellbinders Nestabilities A2 Card Creator Dies Matting Basics A 4-1/4 x 5-1/2″ and 4-5/8 x 4-7/8″.
Thanks for reading this post. I hope you enjoyed and I’ve inspired you to give these cards a try for yourself. Leave comments or questions below or feel free to email.
Thanks for reading this post. I hope you enjoyed and I’ve inspired you to give these cards a try for yourself. Leave comments or questions below or feel free to email.
I love most of their shaker kits, but this one by far, the North Pole Kit, is my favorite Queen and Company Card Kit. It pairs great with their Glitter Foam (I used some for the hat card). The kit Includes: 25 steel dies, 6×6 paper pad, 4×6 stamp set, 11 custom toppings and 21 foam and acetate shakers. Tons of goodies to make tons of cards and they sell refills for the paper pad, shaker foam, acetate and toppings!
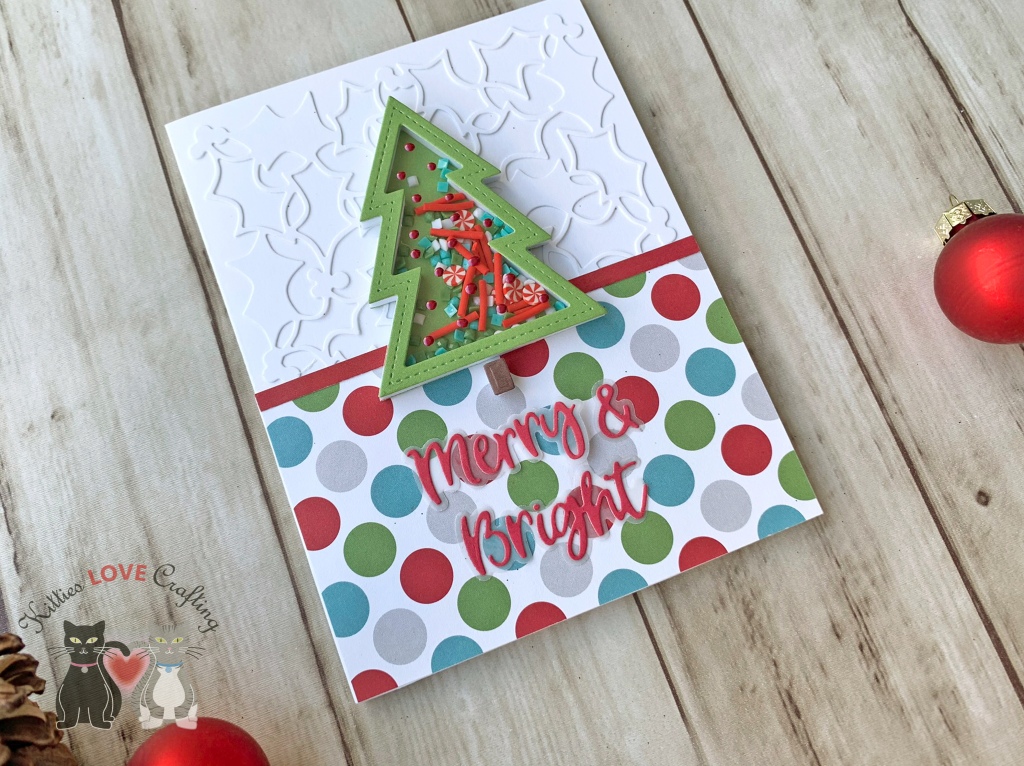
I started these cards by cutting some Neenah 110lb Classic Crest Cardstock 8.5 X 11″ to 5-1/2 x 8-1/2″ and scored at 4-1/4″. I cut three of those to create my card bases. For this first card, I diecut another piece of Neenah 110lb Classic Crest Cardstock 8.5 X 11″ with the Catherine Pooler Designs Holly and Berries Coverplate and adhered it to the card. (Tip: Save the outer border that is cut with this die to use later under the pattern paper. It will even out the papers so there’s no drooping.) I cut a piece of pattern paper from the North Pole Paper Pad (included in the kit) to 2-3/16 x 4-1/4″ and a red strip from the North Pole Solids Paper Pad to 2/16 x 4-1/4″ and adhered them to the card.
I assembled the tree shaker and added the toppings inside. I used the paper from the North Pole Solids Paper Pad for the tree and the trunk (saved the inside (solid) piece of the tree frame). I added some left over foam from the shakers to the tree trunk. I save all the extra foam from the shakers because they can be used on other cards.
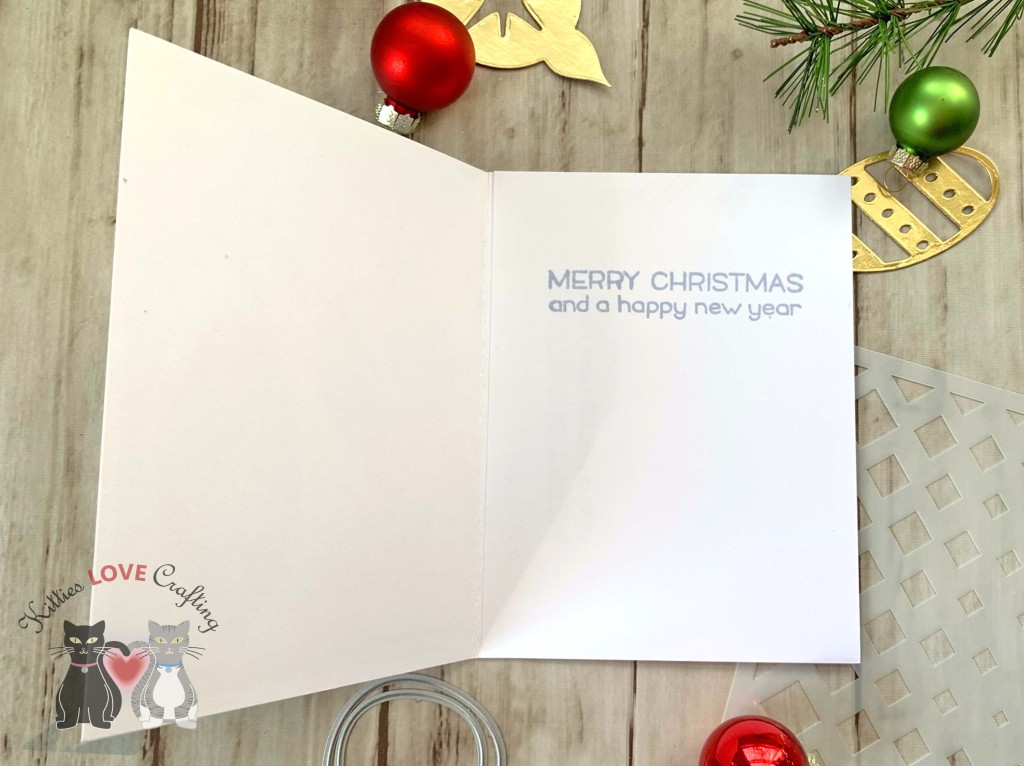
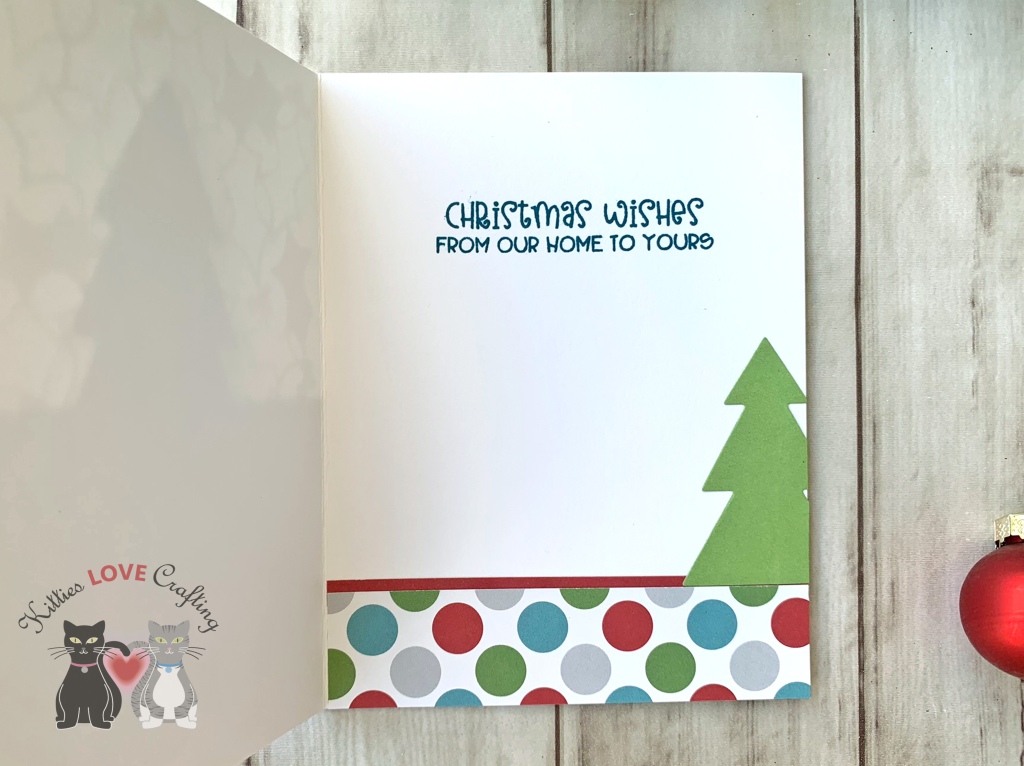
On the inside of the card, I added a red piece of North Pole Solids Paper Pad, measuring 1-1/8 x 4-1/4″and a piece of North Pole Paper Pad, measuring 1″x 4-1/4″ and stamped a sentiment from the stampset included in the kit and Catherine Pooler Daydream Ink. I added the solid inside piece of the tree frame to the bottom of the card.
For the second card, I cut a piece of pattern paper from the North Pole Paper Pad (included in the kit) to 2-7/8 x 4-1/4″ and a red strip from the North Pole Solids Paper Pad to 2/16 x 4-1/4″ and adhered them to the card base. I also used the die for the santa hat’s pom pom and diecut 7 from some Neenah 110lb Classic Crest Cardstock 8.5 X 11″ to create a cute border. I thought they looked like puffy clouds and just adds some more whimsy to the card.
I assembled the hat shaker and added the toppings inside. I used red and green glitter foam from Queen and Company’s Glitter Fun Foam – Rainbow Pack to turn this santa hat into an elf hat. I saw Kristie Marcotte do this last year and thought it was adorable so I created my own. I added some left over foam from the shakers to the pom pom and edges of the hat trim once I adhered them together. this ensures that all of the hat is the same height.
I used the Catherine Pooler Happy Holidays Die and the North Pole Solids Paper Pad to diecut a sentiment and adhered to the card. I added the cute hat to the card, and finished it by adding some shimmer to the sentiment with Spectrum Noir Clear Overlay Sparkle Pens. Look how sparkly that hat is!
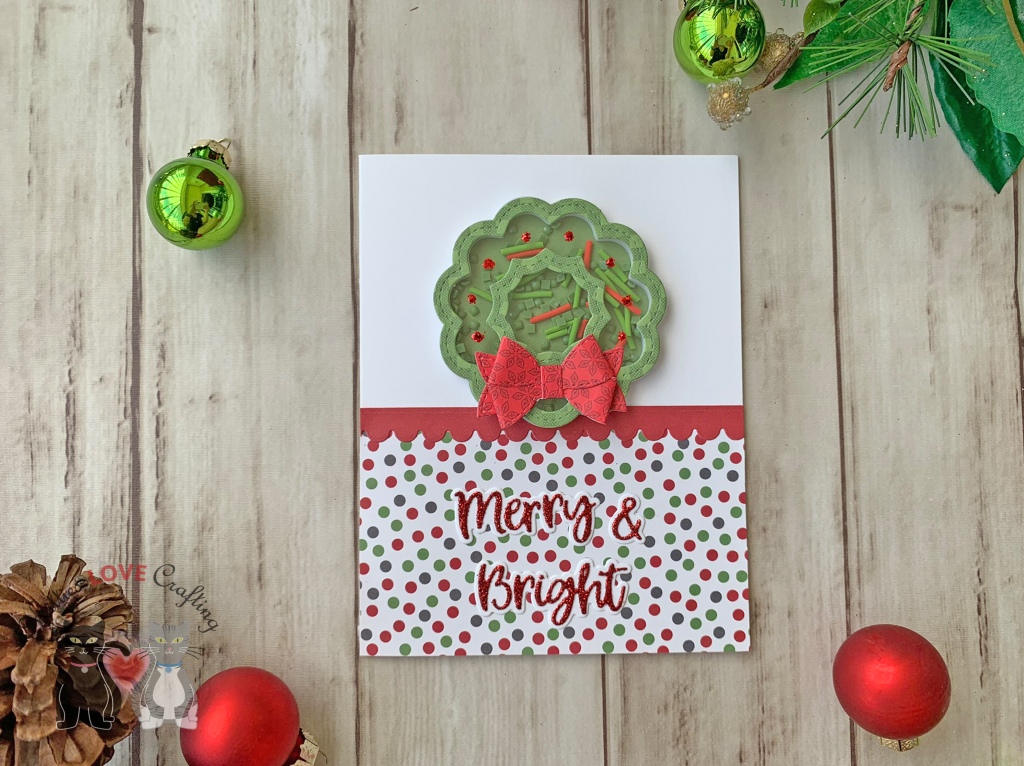
For the third card, I cut a piece of pattern paper from the North Pole Paper Pad (included in the kit) to 2-11/16 x 4-1/4″ and a red strip from the North Pole Solids Paper Pad using the scallop border die from the Honeybee Stamps Gingerbread House Add-on and adhered them to the card. This die is meant for the roof of the house but I though it made a great border!
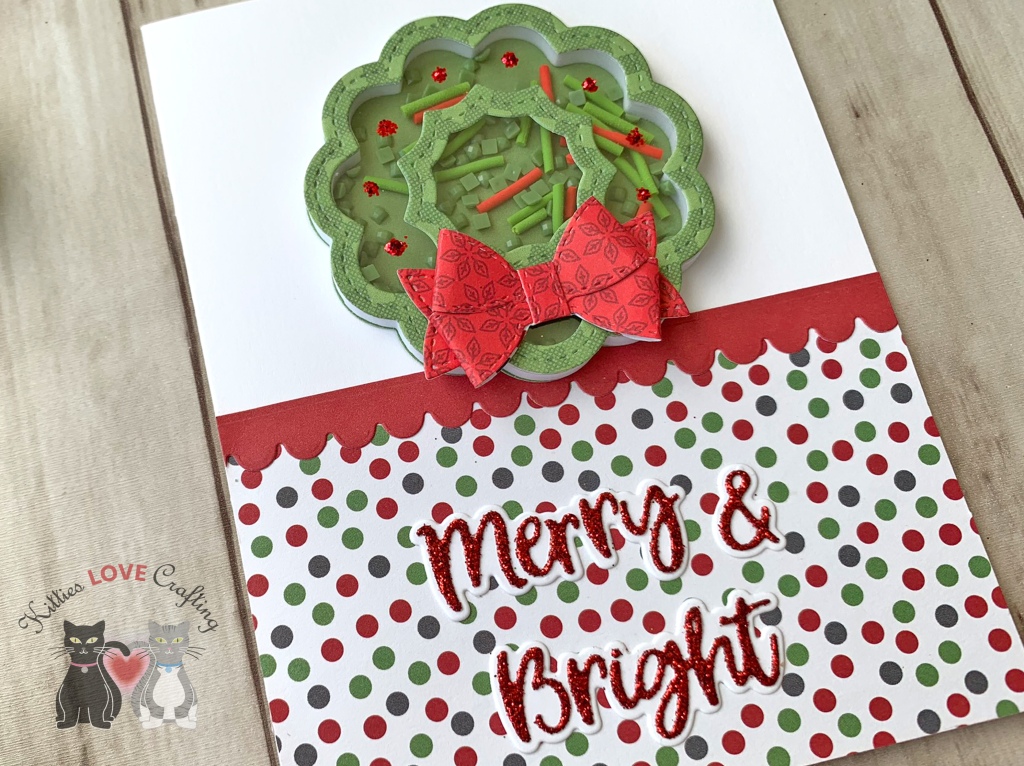
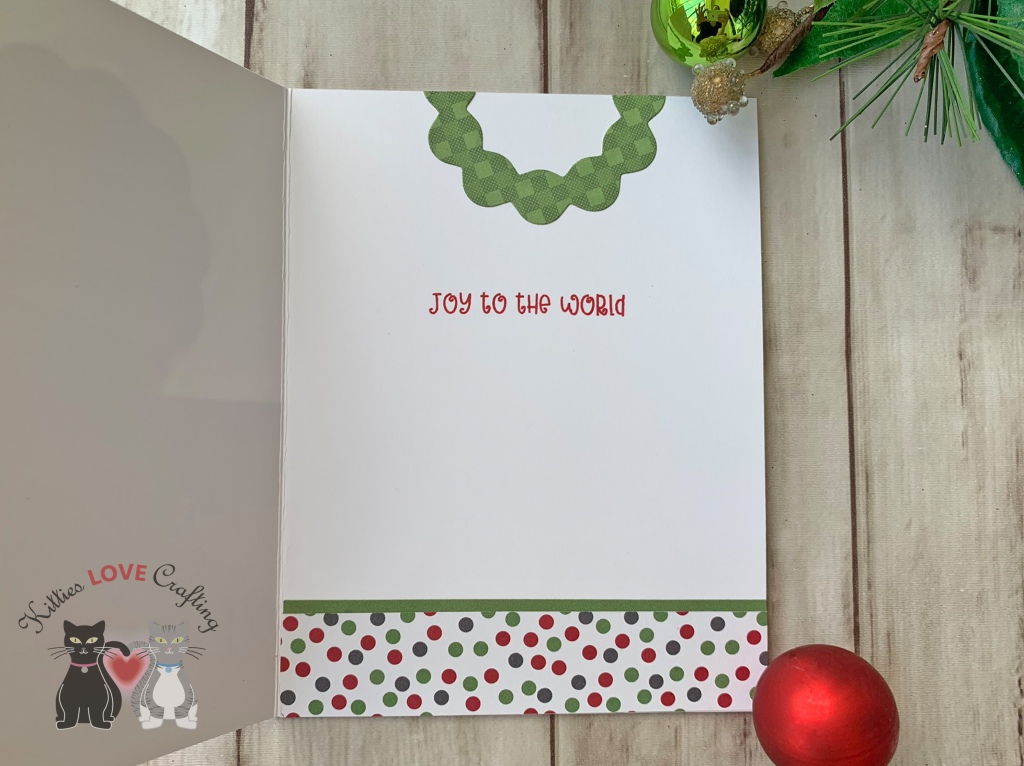
I assembled the wreath shaker and added the toppings inside (saved the inside (solid) piece of the tree frame). I used green and red pattern paper from the North Pole Paper Pad for the wreath and bow.
On the inside of the card, I added a green piece of North Pole Solids Paper Pad, measuring 1 x 4-1/4″and a piece of North Pole Paper Pad, measuring 7/8″x 4-1/4″ and stamped a sentiment from the stampset included in the kit and Catherine Pooler Rockin Red Ink. I added the solid inside piece of the wreath frame to the top of the card.
Thanks for reading this post. I hope you enjoyed and I’ve inspired you to try out these adorable House Builder dies and make some fun cards and gift boxes! Leave comments or questions below or feel free to email me.


 https://linkdeli.com/widget.js?id=f5e8378456858c916708