Card Kits, Christmas, Interactive, Shaker, Stenciled Background

Creating a Holiday Shaker Card feat. Catherine Pooler Designs Cookie Sheet Dies

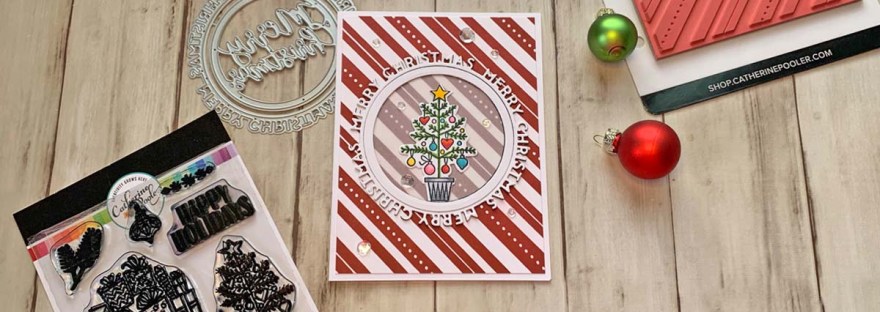
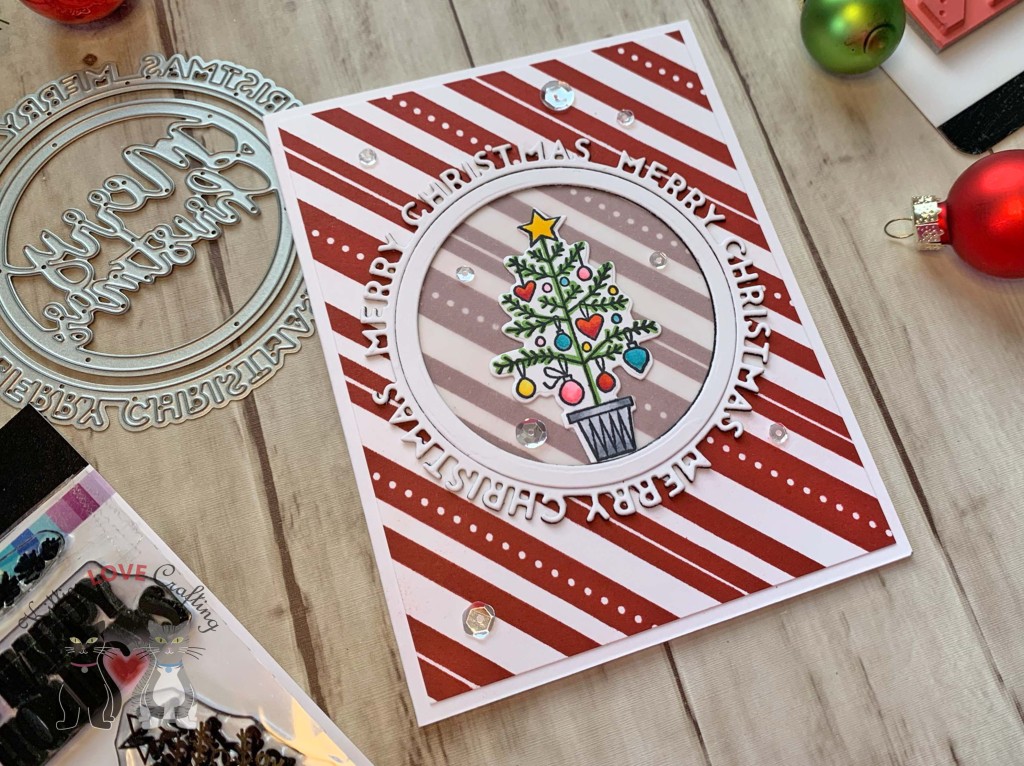
Hello friends. I recently received my Baking Spirits Bright Card Kit Box from Catherine Pooler Designs and am having so much fun making cards. If you don’t know what I’m talking about, in July she released a card kit box that is remeniscent of her old Stamp of Approval boxes that were released quarterly years ago. The theme of the box is holiday baking so it has alot of super cute images and dies. This box also came with a virtual retreat packed full of classes. For my first card I knew I needed to make a shaker card using the cute baking rack in the kit.

For the first card, I cut a piece of Neenah 100lb Classic Crest Cardstock 8.5 X 11″ to 5-1/4 x 10-1/2″ and scored at 5-1/4″ to create a card base and another piece to 5 x 5″. I stenciled the backgound using the Catherine Pooler Designs Ditsy Holly Layering Stencil (included in the Baking Spirits Bright Card Kit) along with Simon Hurley Later Gator Lunar Paste for the leaves and CP Rouge Ink mixed with Modeling Paste for the berries.

For the shaker I die cut the cookie sheet from Neenah 100lb Classic Crest Cardstock 8.5 X 11″ with the CP Cookie Sheet Dies (included in the Baking Spirits Bright Card Kit) as well as several of the baking rack (I cut off the grid part so it gave me several borders to stack). I used the direct-to-paper technique with CP Rouge Ink to color the cookie sheet.

I added a piece of acetate behind the baking rack before adding all the stacked frame pieces. I used the CP Bavaria Sequin Mix and Sparkling Sugar Sparkles Glitter by WOW for the shaker bits.

I stamped the cookies using CP Cotton Candy, Gingerbread, and Rouge inks and heat embossed the gingerbread man’s details with White Embossing Powder. For the rolling pin I used CP Grass Skirt Ink and a woodgrain paper from the From the Kitchen 6 x 6 Paper Pack (included in the Baking Spirits Bright Card Kit) with the Mix & Bake (included in the Baking Spirits Bright Card Kit) dies.

I stamped the sentiment from the CP Baking Spirits Bright Stampset (included in the Baking Spirits Bright Card Kit) onto Neenah 100lb Classic Crest Cardstock 8.5 X 11″ with CP Midnight Ink and fussycut it before adding it to the card,

I finished off the card by adding some CP Bavaria Sequin Mix.

On the inside of the card I stamped a sentiment from the CP Sweet Holiday Sentiments Stampset (included in the Baking Spirits Bright Card Kit) with CP Rouge Ink and added another gingerbread man.

Dimensions


Supplies

Thanks for reading this post. I hope I’ve inspired you to give this fun holiday shaker card a try for yourself. Leave comments or questions below or feel free to email.

Christmas, Window Cards

Quick and Easy Faux Window Card featuring Catherine Pooler Round of Merry Dies

Hello friends. Here’s a super simple Christmas card using Catherine Pooler Round of Merry Dies and the Candy Cane Background stamp.

For this card, I cut a piece of Neenah 110lb Classic Crest Cardstock 8.5 X 11″ to 5-1/2 x 8-1/2″ and scored at 4-1/4″ to create a card base and piece of Neenah 80lb Classic Crest Cardstock 8.5 X 11″ to 4-1/4 x 5-1/2” for the top panel. I stamped the background with Candy Cane Background stamp and Rouge Ink, and trimmed it down to 4 x 5-1/4″.

I die cut the sentiment from both Neenah 110lb Classic Crest Cardstock 8.5 X 11″ and Stampin’ Up! Basic Black 8-1/2″ X 11″ Cardstock with the Catherine Pooler Round of Merry Dies. I left the dies connected so I got the extra circle frame piece which I also used on this card. I stacked the white and black sentiments before adhering to the card. I also added a piece of Vellum behind the sentiment piece. you can use a punch or die to cut this out or do what I did which is trace the outside edge of the inner circle and cut slightly inside that line. It doesn’t have to be perfect since no one will see this.

I stamped the little tree from the Wrapped and Ready Stamp Set with Memento Tuxedo Black Ink and colored it with Copic Markers. I used Y13 + Y18 for the star and some ornaments; RV10 + RV14, BG53 + BG57, R05 + R46 for ornaments; YG17 for the tree; and C1 + C5 for the pot. Then die cut the image with the Wrapped and Ready Dies. I finished it off by adding some clear sequins from my stash.

On the inside of the card, I stamped a sentiment from Lawn Fawn’s Merry Messages Stamp Set with Rouge Ink

Dimensions


Supplies

Thanks for reading this post. I hope you enjoyed and I’ve inspired you to give these cards a try for yourself. Leave comments or questions below or feel free to email.

Christmas

Easy Slimline Holiday Card – Using Embossing Folder to Add Texture to Focal Image

Hello friends. I’m loving this Retro Ornament Dieset from Catherine Pooler! The images are large enough to cover an A2 size card and really great on a slimline card. I went for a more traditional color but then decided to try a little less traditional color scheme.

For these cards, I cut a piece of Neenah 110lb Classic Crest Cardstock 8.5 X 11″ to 7 x 8-1/2″ and scored at 3-1/2″ to create the card bases and piece of to 3-1/4 x 8-1/4” for the top panel. For the first card, I used the Catherine Pooler’s Rouge and Eucalyptus Inks to color white cardstock using direct-to-paper technique. Then diecut three rectangles using Catherine Pooler’s Scallops & Dots Dies. I adhered them offset.

I die cut the ornaments from gold cardstock from Tim Holtz Idea-ology 8 x 8 Paper Stash METALLIC KRAFT STOCK using the Retro Ornament Dieset. I embossed them with two embossing folders from Queen and Company’s Embossing Folder Bundle and backed them with Vellum before adhering them. I stamped a sentiment from the Catherine Pooler Wrapped and Ready Stampset onto Neenah 110lb Classic Crest Cardstock 8.5 X 11″ with Rouge Ink, trimmed it down and added 3M Foam Tape to adhere it to the card.

I finished it off by adding some Tonic Pale Gold Nuvo Crystal Drops.

On the inside of the card, I stamped a sentiment from the Stampin’ Up! ‘Joy to the World’ Paper Pumpkin stampset (Paper Pumpkin is a subscription box so this stampset is not available for purchase) with Eucalyptus Ink and adhered the gold star shape that I had cut out of one of the ornaments.

Dimensions


For the second card, I used the Catherine Pooler’s Suede Shoes and Cummerbund Inks to color white cardstock using direct-to-paper technique and diecut the three rectangles using Catherine Pooler’s Scallops & Dots Dies once again. I die cut the ornaments from silver cardstock instead and embossed them with the two same embossing folders from Queen and Company’s Embossing Folder Bundle and backed them with Vellum before adhering them. I stamped a sentiment from the Catherine Pooler Wrapped and Ready Stampset with Cummerbund Ink, trimmed it down and added 3M Foam Tape to adhere it to the card.

I finished it off by adding some Liquid Mercury Nuvo Crystal Drops.

On the inside of the card, I stamped a sentiment from the Stampin’ Up! ‘Joy to the World’ Paper Pumpkin stampset (Paper Pumpkin is a subscription box so this stampset is not available for purchase) with Suede Shoes ink and adhered the silver star shape that I had cut out of one of the ornaments.

Dimensions


Supplies

Thanks for reading this post. I hope you enjoyed and I’ve inspired you to give these cards a try for yourself. Leave comments or questions below or feel free to email.

Card Kits, Holidays 2021, Interactive, Love & Friendship, Slimline, Valentine's Day

Peekaboo Window Slimline Card Using Simon Says Stamp’s February 2021 Card Kit

Hi friends. Here’s a fun interactive peekaboo window with hidden messages for Valentine’s, Galentine’s or any day you want to share love. I pulled out an oldy but goody interactive die from Lawn Fawn and combined it with the Simon Says Stamp February 2021 Card Kit Love You Beary Much. I love the Tumbling Hearts 6 x 6 stencil included in this kit! It is so easy to make a pretty background with it. I will show you how I was able to use it on a slimline card.

The Kit includes:

I started by cutting a piece of Neenah 110lb Classic Crest Cardstock 8.5 X 11″ to 7 x 8-1/2″ and scored a at 3-1/2″ to create the card base and another piece to 3-1/4 x 7-1/4″. I used Catherine Pooler Designs It’s a Girl Ink to create a gradient background then used the Simon Says Stamp Exclusive Tumbling Hearts 6 x 6 stencil and Catherine Pooler Designs Rouge Ink to create gradient of hearts over the pink.

Next, I used the Lawn Fawn Lift the Flap Dies to cut out three windows on the top panel. I backed the top and bottom windows with a piece of paper from the Simple Stories Sweet Talk 6 x 8 paper pad and stamped a sentiment from the Simon Says Stamp Love You Beary Much Exclusive 6 x 8 stamp set with Memento Tuxedo Black Ink onto a piece of Neenah 110lb Classic Crest Cardstock 8.5 X 11″ to place behind the center window. And adhered that panel to the card base.

I stamped all of the images from the Simon Says Stamp Sweet Truffles Exclusive 3 x 4 stamp set with Memento Tuxedo Black Ink onto a piece of Neenah 110lb Classic Crest Cardstock 8.5 X 11″ and some conversation hearts from the Simon Says Stamp Love You Beary Much Exclusive 6 x 8 stamp set.

I colored all the images with Copic Markers. I used E23, E25, E29 & E49 (for chocolate truffles); R81, R83 & R85 (for the truffle wrappers, sprinkles and decor, hearts); R05, R17 & R29 (for hearts); BG000, BG01 & BG02 (for sprinkles and decor, hearts). I fussycut all the images and adhered some to the inside of the card and some on the outside.

To finish it off, I added some White Gloss Nuvo Drops.

On the inside of the card I kept it simple, and just stamped the sentiment from the Simon Says Stamp Love You Beary Much Exclusive 6 x 8 stamp set with Catherine Pooler Designs Rouge Ink onto Neenah 110lb Classic Crest Cardstock 8.5 X 11″, fussycut and adhered it to the card. I also added nother truffle image.

Dimensions


Supplies

Thanks for reading this post. I hope you enjoyed and I’ve inspired you to make this slimline card using this kit yourself! If you want to share you creations with me tag me on instagram @kittieslovecrafting. Leave comments or questions below or feel free to email me.