Celebrations, Fall, Just Because

Donut Cards

Happy Monday everyone! Coming to you today with some fun and delicious cards. I love coffee and donuts but since I am trying to be good (yeah, right!) and not eat too much sugar, I will make them into cards instead.

This die from Honey Bee Stamps really makes them super quick and easy to make. There are also so many ways to embellish this cute donut card. It can be for birthdays, holidays, seasons, or just because.

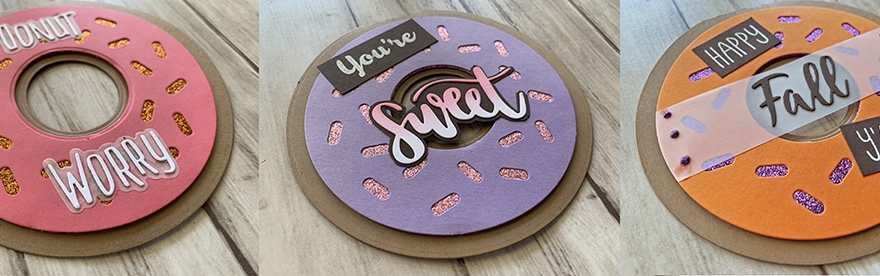
All the cards bases were created using Lawn Fawn Paper Bag 8. 1/2 x 11โ€ Cardstock along with the Honey Bee Stamps Donut Card Die. On this first card I used Lawn Fawn Guava 8 1/2 x 11โ€ Cardstock and the Honey Bee Stamps Donut Card Die to create the frosting and added a layer of orange Queen & Co Rainbow Glitter Fun Foam to highlight the sprinkles. In retrospect I shouldโ€™ve made the sprinkles 3D, but oh well.

I diecut the sentiment from Neenah Solar White 8 1/2 x 11โ€ 110lb Cardstock using the Honey Bee Stamps Donut Worry Dies for the inside and the outside of the card. I used Stampinโ€™ Up! Vellum for the sentiment shadow. I glued all of it with Tombow Mono Multi Liquid Glue.

The second card uses SU! Highland Heather 8 1/2 x 11 Cardstock for the frosting and a layer of light pink Queen & Co Rainbow Glitter Fun Foam to highlight the sprinkles.

I diecut the word โ€˜Sweetโ€™ from Neenah Solar White 8 1/2 x 11โ€ 110lb Cardstock using the Catherine Pooler Celebrate Friends Stamp of Approval Collection Sweet Die. I then ink blended Catherine Pooler Itโ€™s A Girl ink to create an ombrรฉ effect on the word. I glued that down onto a scrap of Stampin’ Up! 8 1/2 x 11 Early Espresso 8 1/2 x 11โ€ cardstock and fussycut around it to create a shadow. I stamped the word โ€˜Youโ€™reโ€™ from Stampinโ€™ Up!โ€™s Cool Treats (retired) with Versamark clear embossing ink onto a piece of Stampin’ Up! 8 1/2 x 11 Early Espresso 8 1/2 x 11โ€ cardstock and heat embossed it with Wow white embossing powder. I adhered those two pieces to the front of the card with Tombow Mono Multi Liquid Glue.

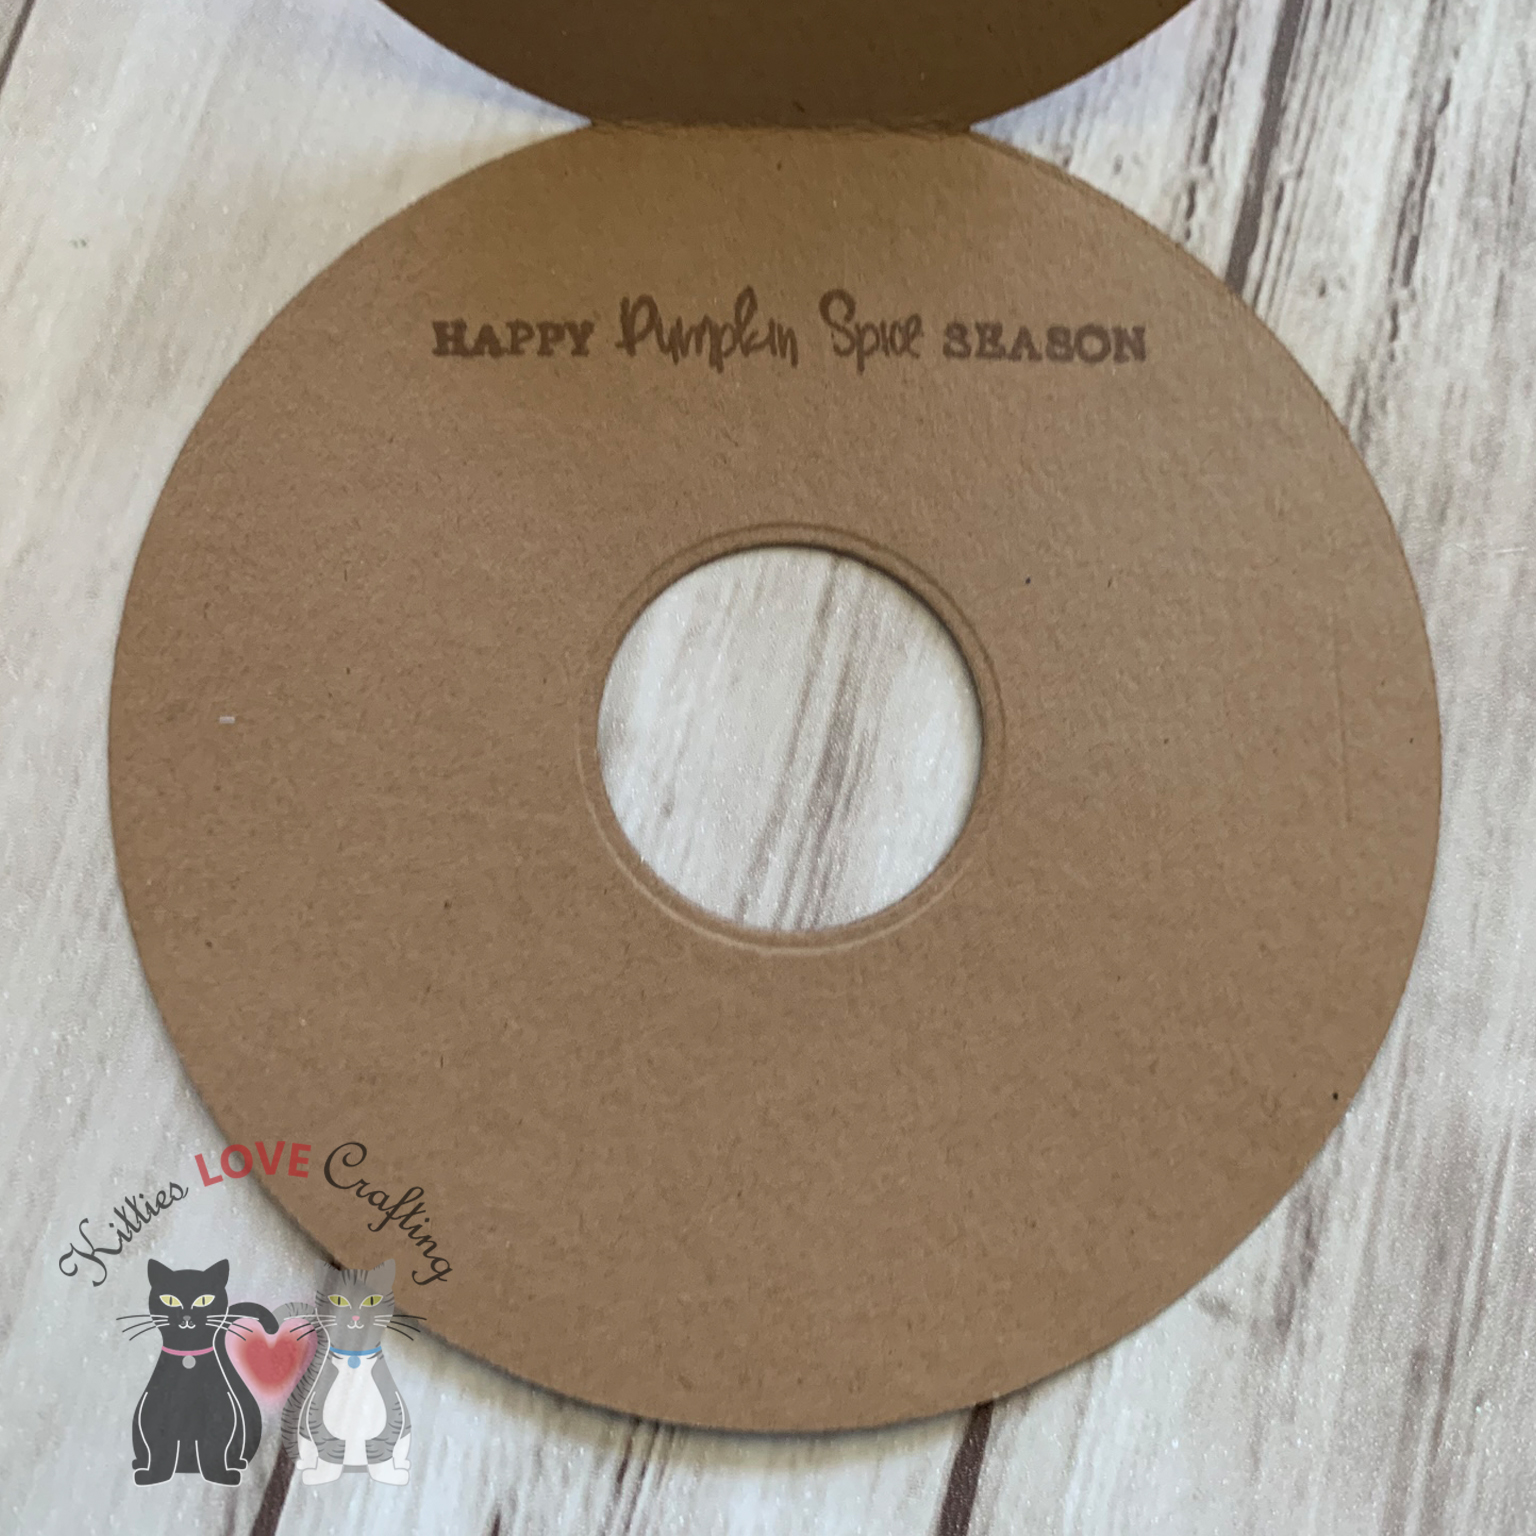
On the inside I diecut out a donut shape using the Honey Bee Stamps Donut Card Die circle die from Neenah Solar White 8 1/2 x 11โ€ 110lb Cardstock and stamped a sentiment from Stampinโ€™ Up!โ€™s Cool Treats (retired) in Catherine Pooler Designs Over Coffee Ink and glued the piece inside the card.

For the last card I had to make it a Fall card, not only because I love Fall but also because I love pumpkin spiced everything and donuts are no exception. Canโ€™t wait for Fall people!

Anyways I used SU! Pumpkin Pie 8 1/2 x 11 Cardstock for the yummy orange frosting and layered purple Queen & Co Rainbow Glitter Fun Foam (ok itโ€™s a little bit more Halloween than Fall but thatโ€™s ok โ€˜cuz I live Halloween too).

For the sentiment, I stamped part of it using the Honey Bee Stamps Happy Fall Yโ€™all stampset, Versamark clear embossing ink and heat embossed it with Wow white embossing powder onto a piece of Stampin’ Up! 8 1/2 x 11 Early Espresso 8 1/2 x 11โ€ cardstock. Then diecut the โ€˜Fallโ€™ word from Stampin’ Up! 8 1/2 x 11 Early Espresso 8 1/2 x 11โ€ cardstock with the Fall die from the same stampset.

To make the word appear to float over the donut hole, I used a strip of Stampinโ€™ Up! Vellum and adheredit over the hole. I used the circle die in the Donut Card dieset to trim the sides. I then adhered the rest of the sentiment pieces above and below. I used Nuvo Crystal Drops in Violet Galaxy to add some embellishment.

Lastly I stamped a sentiment from the Queen & Co Happy Harvest Kit with Catherine Pooler Designs Over Coffee Ink and this card is complete.

Before I go I just want to say that if you want to make these cards and you donโ€™t have all the supplies I used and donโ€™t want to purchase them, just look through your stash of stamps, dies, and papers and make them your own. Itโ€™s fun to play with different looks. The possibilities are really endless. Have FUN with it!!!

Dimensions

Supplies

Thanks for stopping by and I hope Iโ€™ve inspired you to give the Honey Bee Donut Card Die a try and make some donut cards of your own. Leave comments or questions below or feel free to email me.

Birthdays, Celebrations

Today is Your Day

Hello friends. This card features stamps from Catherine Pooler Designs. These stamps are from the Celebrate Friends Stamp of Approval Collection but are also sold separately. I wanted to make a cheerful, fun but gender neutral card. This can be for a birthday or other celebration. This card is available for sale in my Etsy shop if you prefer not to make it yourself.

Ok letโ€™s make this card. First I cut a piece of Neenah Solar White 110lb Cardstock to 8 1/2 x 5 1/2โ€ for the card base and scored it at 4 1/4โ€, another piece to 4 x 5 1/4โ€ for the back panel and a third to 1 1/8 x 5 1/2โ€ for the vertical strip. Time to do some stamping.

I stamped the back panel first using the mod circles from Catherine Pooler Designs Punctuated Party Stamp Set and Catherine Pooler Fiesta Blue Ink and Catherine Pooler Garden Party Ink. Next I stamped the mod streamers from the same stampset using Catherine Pooler Fiesta Blue Ink and Catherine Pooler Over Coffee Ink. I stamped 3 next to each other. Then I stamped the sentiment onto a piece of with Neenah Solar White 110lb Cardstock using Catherine Pooler Over Coffee Ink and the Catherine Pooler Designs Punctuated Party Stamp Set. I quickly (gotta be quick or the ink will dry) sprinkled some WOW Clear Embossing Powder and heat set it using my heat gun.

I diecut the sentiment with the Simon Says Stamp STITCHED SQUARES Wafer Dies. Then I fussycut the streamers out. Time to start putting this card together. I adhered the back panel to the card base and then I went to adhere the streamers to that and realized it was not going to hold up against the background. So I cut out a piece of Stampinโ€™ Up! Vellum to 4 x 5 1/4โ€ and adhered it on top of the card panel. Now I can adhere the streamer strip over that. I added the sentiment piece with some 3M foam tape to the card.

Something is missing but what… Itโ€™s not festive enough. Whatโ€™s a birthday car without cake and a party hat?!? So I stamped the cake from Catherine Pooler Designs WooHoo Stamp Set in Catherine Pooler Fiesta Blue Ink and the party hat in Catherine Pooler Garden Party Ink and Catherine Pooler Over Coffee Ink and diecut them with their coordinating dies. I added some Stampin’ Dimensionals to each image and added it to the card. Finished it off with some Tonic Nuvo Jewel Drops in Key Lime and Sea Breeze and I added some shimmer to the cake with my Spectrum Noir Clear Overlay Sparkle Brush Pen. All supplies and dimensions listed below.

Dimensions

Supplies

Thanks for stopping by and I hope Iโ€™ve inspired you to make some birthday cards of your own. Leave comments or questions below or feel free to email me.

Art Journal

Imagine the Possibilities Art Journal Page

Hello friends. Today’s post is a little different. Coming to you with a with an art journal layout. I havenโ€™t done one of these in quite a while but itโ€™s time to start it up again. An art journal is just a fun place to play with your products and experiment. Sometimes it comes out great and sometimes not so much but itโ€™s about having fun. If you havenโ€™t tried art journaling yet I highly recommend it. You donโ€™t need a ton of supplies to do this either. I like to keep some printed tissue papers and some Acrylic paints on hand. I use stamps and pattern papers from my stash. God knows I have plenty of those!!! LOL I recently purchased the Stamperia paper after seeing Umut Radios use them in her videos. They are beautiful papers. Check out her videos for more inspiration. She inspired me to get started; she makes beautiful layouts using printed napkins!

Ok so let take you through my process. First I gathered some supplies.

Supplies

I stamped the Tim Holtz Rubber Stamp BOOKS SKETCH Stampers Anonymous several times onto scraps of Neenah Solar White 110lb Cardstock with Ranger Black Archival Jet Black Ink. At this point I only had a slight idea of what I was doing on these pages but I kind of knew I wanted stacks of books. I will continue while those dry.

I added Canvas Tissuestock Printed French Script, 12-Inch by 12-Inch, Ivory, 10-Pack to the pages. I used Matte gel medium to adhere. I added some to the back and then some over top once down on the page. This seals it and allows you to add other mediums on top without saturating the paper. Next I tore up some of the pattern paper from the Stamperia Scrapbooking Paper – Clockwise collection and randomly adhered them onto the pages. No need for perfection here because I want it to look organic. I sealed everything with Matte gel medium. And now I wait…and wait…and wait for it to dry. A couple of hours later….

Step 1 – Adding Paper

Time to add ink some. I spritzed the pages with water and again very randomly sprayed distress sprays in Tumbled Glass and Walnut Stain. I spread it around with a brush and used my heat tool to dry it some but I still had to wait for it to dry a few hours before continuing with other colors. Once it dried, I added some Broken China Distress Stain, Ground Espresso Distress Stain, and Tarnished Brass Distress Stain and kept layering color until I was happy with the results.

Step 2 – Adding Ink

While that dried, I cut out and colored all my images. i distressed the tag edges and added distress ink at the edges. I added Walnut Stain Distress Stain and Ground Espresso Distress Stain around the edges of all the cut outs, except the books. Set those aside to dry and got my Stencils out. I used some brown and aqua acrylic paint with the Catherine Pooler Harleen Creative Screenings to some texture. The pattern is similar to the one on the paper I added in the background. Then I used the Tim Holtz Layering Stencil BURLAP with gold acrylic paint and added some small areas of gold.

Final page

Next I laid out the images on my spread and adhered them down with Matte gel medium. Let that dry and completely and added shading with my Faber Castell Stamper’s Big Brush Pens and highlights with a Uni-Ball Signo Broad Point White Gel Pen. Lastly I added splatters with gold and white acrylic paint.

Here are some closeups.

Supplies

Thanks for stopping by and I hope Iโ€™ve inspired you to make some adorable critter cards of your own. Leave comments or questions below or feel free to email me.

Celebrations, Encouragement, Just Because, Motherโ€™s Day

Stampinโ€™ Up! So Hoppy Together Stampset

Hello friends, Iโ€™m coming at you today with this cute and simple froggy card using Stampin’ Up!โ€™s SO HOPPY TOGETHER Stamp Set. Iโ€™ve had this stampset for awhile and just got around to making some cards. It was part of the Stampinโ€™ Up! Sale-a-bration 2019 catalog so unfortunately is no longer available but I still wanted to present some inspiration for those of you who have this stampset. And if you donโ€™t have the stampset you can easily substitute another critter for the frogs. And if you want to own any of these cards they are both available for sale in my Etsy shop.

Celebrate Your Awesomeness Card

For this card I kept things simple. I cut a card base to 8 1/2 x 5 1/2โ€ from Neenah Solar White 110lb Cardstock and scored it at 4 1/4โ€. Then cut and adhered a panel measuring 4 1/4 x 5 1/2โ€ and a Strip to 1 3/4 x 5 1/2โ€ from Queen and Company Flirty Florals Paper Pad to the card base. Using a paper pad is a great way to ensure that all your pattern papers coordinate. No guessing necessary.

I stamped the frog images onto Neenah Solar White 110lb Cardstock using Tuxedo Black Memento Ink and colored them with Daffodil Delight Stampin’ Blends Markers, Granny Apple Green Stampin’ Blends Markers, Highland Heather Stampin’ Blends Markers, Pool Party Stampin’ Blends Markers and Rich Razzleberry Stampin’ Blends Markers.

I fussycut all the images out then diecut the circles with the Queen and Company Foundation Dies #1. Using the Company Sentiment Stacker Dies, I diecut the โ€˜Celebrateโ€™ word from Simon Says Stamp Black Card stock and the shadow from Stampinโ€™ Up! Vellum. I adhered those two pieces together then proceeded to stamp and heat emboss the sentiment strip onto black cardstock using Versamark clear embossing ink and Wow white embossing powder. That was then cut out using the Company Foundation Dies #2.

I figured out the placement of all the images and sentiments on the card and adhered. Finished it off with some Nuvo drops in Key Lime, Purple Rain and Sea Breeze. I also stamped the froggy image on a white envelope.

Dimensions

Supplies

Hoppy For You

This card is my favorite of the two. Also quite easy to make. This time the pattern paper is just an accent or enhancement.

I cut a card base to 8 1/2 x 5 1/2โ€ and a panel to 4 x 5 1/4โ€ from Neenah Solar White 110lb Cardstock. Then cut a strip of Catherine Pooler Black Tie Gala Patterned Paper to 1 3/16 x 5 1/4โ€ and Simon Says Stamp Black Card stock to 1 3/8 x 5 1/4″. I adhered those two pieces together and then to the card panel. Then adhered the white card panel to the card base.

I had already stamped and colored the images prior to starting this card. If I know I’m making multiple cards using the same stamp set, I like to stamp and color all the images I need (or just a bunch of I’m not sure what I want to use) before I create my cards. I will fussycut them just before I begin the cardmaking process. Onto the next step then…

I used some Neenah Solar White 110lb Cardstock and used the direct-to-paper method to color with Catherine Pooler Fiesta Blue Ink. This method is a great way to match your cardstock to your project. If you want to see this technique in action check out this video from Catherine Pooler.

Next I diecut the word “HOPPY” with the Honey Bee Bee Bold Alphabet Dies. I also cut two additional sets of the word from Neenah Solar White 110lb Cardstock. I stacked the two white sets together and adhered, followed by the colored set of letters on top of those.

I stamped the sentiment with the Lawn Fawn Happy Happy Happy Sentiments using Versamark clear embossing ink onto Simon Says Stamp Black Card stock and heat embossed with Wow white embossing powder. I cut it down to a strip measuring 1/2 x 1 3/4โ€. Time to adhere the sentiments and the little froggy on his unicycle as well as his fluttering friends. He’s just so cute, don’t you think?!? Finished it off with some Nuvo drops in Key Lime, Sea Breeze, and Rosewater. Lastly I stamped a little frog on a white envelope in Catherine Pooler Fiesta Blue Ink.

Dimensions

Supplies

Thanks for stopping by and I hope Iโ€™ve inspired you to make some adorable critter cards of your own. Leave comments or questions below or feel free to email me.

Mother's Day, Motherโ€™s Day

Easy Motherโ€™s Day Card

Hello friends. Coming to you today with a quick and easy Mother’s Day card. If you haven’t found the perfect card for mom yet, you will want to give this one a try. Only one type of paper is required. And the addition of a stencil, ink and a die makes it super easy to create a card with texture. It can also be for any other occasion–just change out the sentiment.

Supplies

I started by cutting down a piece of Neenah Solar White 110lb Cardstock to 4 x 5-1/4″. Then created a pattern in the background using Catherine Pooler Designs Rose Petals and Catherine Pooler Designs Pattern of Rings Creative Screening.

I set that aside to dry and stamped the teapot in Catherine Pooler Designs Polished and Catherine Pooler Designs Green Tea with Catherine Pooler Designs Cuppa Tea Stamp Set. I stamped the teacup and plate in Catherine Pooler Designs Green Tea and Catherine Pooler Designs Icing-on-the-Cake and the little embellishment in Catherine Pooler Designs Polished. Lastly I stamped the flower for the teapot in both Catherine Pooler Designs Green Tea and Catherine Pooler Designs Rose Petals. I diecut all the images with the coordinating dies, Cuppa Tea Dies.


Catherine Pooler Designs Cuppa Tea Stamp Set

I added a sentiment from the Lawn Fawn HAPPY HAPPY HAPPY Clear Stamps. I stamped the HAPPY in Catherine Pooler Designs Green Tea onto the card panel at the top left and the MOTHER’S DAY in Catherine Pooler Designs Polished on a scrap of Neenah Solar White 110lb Cardstock. I diecut that sentiment using the banner from Queen and Company Foundation Dies #2.

I glued that banner down to a piece of Neenah Solar White 110lb Cardstock after using the direct-to-paper method to color it with Catherine Pooler Designs Polished. I added 3M foam tape to the back of the teacup, plate and teapot and adhered it to the card.

Motherโ€™s Day Card

I cut down a piece of Neenah Solar White 110lb Cardstock to 5 1/2 x 8 1/2″, scored at 4 1/4″ to create a card base. I then cut a piece Neenah Solar White 110lb Cardstock to 4 1/4 x 5 1/2″ and again used the direct-to-paper method to color it with Catherine Pooler Designs Green Tea. I adhered that Green Tea panel to the card base and the completed card panel with images onto that piece.

I finished off the card by adding some Tonic Nuvo drops in Carnation Pink and Tonic Nuvo Jewel Drops in Rosewater.

Supplies

Thanks for stopping by. Hope you enjoyed this process post. Leave comments or questions below or feel free to email me.

Birthdays, Spring

Cute Interactive Pop Up Cards

Hello friends. I’m back with two adorable pop up cards created using the Lawn Fawn STITCHED HILLSIDE POP UP Lawn Cuts Dies. Currently this is in the lead for my favorite interactive die! I seriously just want to make everything a pop up card now!!! LOL it can be a little fiddly if you don’t adhere the inside tabs properly but it’s still tons of fun to create with this die.

Oh Gnomes! Happy Birthday

I created a little scene using the Lawn Fawn LEAFY TREE BACKDROP LANDSCAPE Lawn Cuts Dies, Lawn Fawn Mushroom House Die Cuts , Lawn Fawn Mushroom Border Die,
and the little girl gnome from Lawn Fawn’s Set Oh Gnome!. I’m loving all the mushroom dies, especially that mushroom house. I mean, look how cute it is. Adorable! Using mostly dies to create this card also made it come together a lot faster than expected. I cut off the border on the Leafy Tree Backdrop Die so the tree appears much taller than the little gnome. I also took apart the mushroom border and used the individual mushrooms scattered around both scenes. You don’t have to use the border dies as is. Don’t be afraid to cut apart your border die-cuts or any die-cuts (not the dies themselves however) for that matter. I used the My Favorite Things CLOUD Mix-ables Stencil to create the sky with Distress Oxide Tumbled Glass.


Oh Gnomes! Happy Birthday Card_Front

I continued the scene on the inside of the card using the same dies and stamps again. I used the Lawn Fawn STITCHED HILLSIDE POP UP Lawn Cuts Dies to create the pop-up mechanism. For the forest in the background I used the whole tree die but cut them down to look larger than the gnomes again. And I repeated the same technique I used on the front of the card for the inside sky.

Oh Gnomes! Happy Birthday Card_Inside
Oh Gnomes! Happy Birthday Card_Inside Greeting

The greeting was from the Lawn Fawn HAPPY HAPPY HAPPY Clear Stamps. I finished off the card with some white accents using my Uni-Ball Signo Broad Point White Gel Pen and added some sparkle to the windows on both the front and inside of the card using my Spectrum Noir Sparkle Fine Glitter Brush Pen .

Supplies

Enjoy the Little Things Pop Up Card

And because I can’t get enough of the Lawn Fawn STITCHED HILLSIDE POP UP Lawn Cuts Dies, I used it again to create a second card. Again using Lawn Fawn products (cuz I’m addicted and I ain’t afraid to admit it. LOL), I made a scene on the front of the card. This time I combined Lawn Fawn VILLAGE SHOPS, and Lawn Fawn HAPPY VILLAGE stampsets.

Enjoy the Little Things Pop Up Card_Front

The first scene features images from the Lawn Fawn HAPPY VILLAGE stampset and a greeting from the Lawn Fawn VILLAGE SHOPS. I used the Lawn Fawn Perfectly Plaid Spring 6×6 inch Petite Paper Pack for the sky and the Lawn Fawn Perfectly Plaid Rainbow 6×6 inch Petite Paper Pack for the grass. I cut out the grass using the Lawn Fawn Grassy Hillside Borders Die and ink blended some Tim Holtz Distress Oxide in Mowed Lawn to the mute the grass.

Using pattern paper is a great way to build a scene. It makes for a quick and easy background but it doesn’t have to look flat. You can add depth to it by simply using ink or alcohol markers to add some color to it. One note however, if you choose to use markers make sure they are blendable or it will look streaky. So water-based markers will probably not work because they don’t move on the paper.

Enjoy the Little Things Pop Up Card_Front

On the inside I again used the Lawn Fawn STITCHED HILLSIDE POP UP Lawn Cuts Dies with the same pattern papers as the front, again applying some Tim Holtz Distress Oxide in Mowed Lawn to darken the bottoms edges of the hillsides and give them dimension.

The inside scene features images from the Lawn Fawn VILLAGE SHOPS Clear Stamps as well as a greeting from the same stampset.

Before I glued the images to the inside of the card, I added highlights with my Uni-Ball Signo Broad Point White Gel Pen. I also added the rest of the sentiment inside the cards.

Supplies

Thanks for stopping by and I hope Iโ€™ve inspired you to make some adorable cards of your own. Leave comments or questions below or feel free to email me.

Just a quick side note: I have no affiliation or do I profit from promoting Lawn Fawn products. I promote any product that I love and I LOVE their products.

DIY Projects, Easter, Wreaths

Quick and Easy Easter Wreath

Easter is around the corner and I finally got around to making my Easter Wreath. Yay! I made this wreath using mostly Dollar Tree supplies. My store didn’t have much so I ordered from their online store and had it shipped to my house. They offer a ship-to-store option too.

A word of caution…if you order flowers online they can arrive crushed as mine did. I ordered 6 stems and only got 5 usable flower heads out of it and those were not that great as you will see in the photos. Keep that in mind.

Anyways,  it was super easy and quick to make. I started off with a 10-inch straw wreath form. I got mine from Hobby Lobby, but they are readily available at other craft stores and online. Check Amazon, Michaels, Joann Fabrics, Walmart and Dollar Tree. My local store did not carry it but I’m guessing others might. I carefully removed the clear plastic wrap around it as it tends to shed. Nor,ally I would normally leave the plastic wrap on it but since I wanted this to look natural and .organic, I removed it.

After cleaning the straw debris from my desk, i wrapped some 5/8 inch wide lavender satin ribbon around the wreath, creating a stripe pattern. I get most of my ribbon from the Ribbon Retreat. This color is called purple haze. A tiny dab of hot glue on each of the ribbon ends secure it to the wreath.

I added the moss next. I used Green Spanish Moss I hot glued it onto the bottom half of the wreath. Once I had enough of the area covered, I wrapped Green Floral Wire, 22 Gauge around the moss to secure it further. Ok the hard part is done. Time to decorate.

I added 5 Green Gerbera Daisies. 6 Speckled Easter Eggs, and 3 3 inch Salisbury Butterflies.To finish it off , i added 3 Pearl Corsage Pins to each ribbon stripe. Thatโ€™s it. Add a ribbon to hang it and your wreath is complete. Easy peasy. Quickest wreath Iโ€™ve ever made.IMG_0526_watermarked

Supplies:

Thanks for stopping by and I hope Iโ€™ve inspired you to make your own wreath. Leave comments or questions below or feel free to email me.

Easter, Easter, Watercolor techniques

Easy Watercolor Backgrounds Using Distress Inks

Today’s topic is watercolor backgrounds. Whenever I want a quick and easy background for a card, I go with a watercolor background. You don’t need to know how to watercolor like a pro, you just need some good watercolor paper. The paper makes the difference in the results you get. I used Canson XL Series Watercolor Paper Pad (140 Pound, 9 x 12 Inch). The great thing is, that this technique can be achieved with dye inks, stains, sprays, or watercolors (high end or inexpensive). I used Distress Ink Stains for my backgrounds. I originally pulled out my Distress Ink Pads but then decided that my Distress Ink Stains haven’t been getting enough love so I decided to use those instead. These can be dabbed on or sprayed. These now are sold in spray bottles but if you’re like me and have the original bottles, Ranger sells a spray bottle lid. I used mine straight out of the bottle like watercolor though.

Watercolor Background Supplies

Ok, so let’s get started. First, I taped down my watercolor paper piece (4 1/4 x 5 1/2″) with some ScotchBlue Painters Tape to a hard surface. Protect your surface before you begin because this will be messy. With a clean brush, add some water to your surface, covering the whole area. Then dispense some of ink onto a clear block, craft mat, etc. (I used my glass mat) and then dab/pounce it your paper. If the surface is too dry, add some more water. You can add more ink to certain areas to get darker areas. Alternatively, you can add more water and blot certain areas to subtract color. Stick to one color if you are not comfortable mixing multiple colors together. Keep playing with adding color until you are satisfied.

Let your piece dry in between layers. This will yield a better result, in the end. You can let it air dry or use a heat tool (if you are not patient like me. :)) Once the piece was almost dry I added some splashes using the same ink color for each. I usually do this inside a box since I don’t want my desk and surrounding areas to stained. Let it dry completely before moving onto the next step. And if you want to stop here, you totally can; they look great as is. I wanted to enhance mine by adding another level of texture.

Watercolor Panels

I added texture to only two of the panels by embossing them. On the first panel (blue one), I stamped the Easter eggs from the Newton’s Nook Designs Newton’s Easter Basket Stamp (no longer available) with Versamark clear embossing ink and added Wow white embossing powder. On the third panel (yellow one), I used a the Tim Holtz MINI STENCIL SET 27 MST027 with Ranger Texture Paste Transparent Gloss to add texture. I used only portions of the stencil around the page. Then before it dried, I sprinkled on some Dazzling Diamonds Stampin’ Glitter. Any white glitter will do however. These are now ready to become cards!

Watercolor Panels With Embossing

I made Easter cards with these backgrounds. I used Newton’s Nook Designs Newton’s Easter Basket Stamp on all 3 cards for the images.

I used Simon Says Stamp Some Bunny for the sentiment on the first card and the Lawn Fawn Straight Flower Border Die Cut to build the scene. And finished it with Nuvo drops in different colors. The second card features the Pretty Pink Posh Happy Easter Script Die cut out of 4 layers of cardstock (3 black and one white), stacked up to create the sentiment. The third card showcases the Easter egg kitty by putting him in ovals diecut using Stampin’ Up! Layering Ovals Framelits Dies. I added a sentiment from Newton’s Nook Designs Newton’s Easter Basket Stamp. I created card bases from Stampin’ Up! Tempting Turquoise (retired), Stampin’ Up! Elegant Eggplant (retired), and Stampin’ Up! Crushed Curry 8-1/2″ X 11″ Cardstock, respectively. And finally, on the inside I added a piece of white 80lb cardstock so I can later write a message inside my cards.

Supplies

Thanks for stopping by. I hope this was helpful and I’ve inspired you to create some fun watercolor backgrounds of your own. Feel free to email me with questions or leave a comments below.

Easter, Easter, Holidays 2019, Mother's Day, Motherโ€™s Day, Spring, Thank Yous

Spring Cards 2

3 Cards using SSS Blooming Circle and Blooming Wave Wafer Dies

Hi friends. Continuing on with some Spring inspired cards, I pulled out the Simon Says Stamp Blooming Circle Wafer Dies and Simon Says Stamp Blooming Wave Wafer Die to create 3 different cards. It was a little time-consuming to inlay all the flowers and leaves but the results are well worth it

This Easter card combines the Simon Says Stamp Some Bunny stamps and Newtonโ€™s Nook Designs Newtonโ€™s Easter Basket stamps with the Simon Says Stamp Blooming Circle Wafer Dies. I added patterned paper from both the Doodlebug 6 x 6 Double-sided Paper Pad-Easter Express (discontinued), and Queen & Co Flirty Florals 6 x 6 Mat Stack. Images were colored with Copic markers and fussycut. I inlaid the flowers after diecutting several pieces of scrap rainbow color cardstock. Finished it off by adding some Nuvo Crystal Drops in White Gloss.

Card 2 turned into a Motherโ€™s Day Card. When I started working on these cards I had no idea what the theme would be so I didnโ€™t pick sentiments. But after adding the daisy pattern paper (from Doodlebug 6 x 6 Double-sided Paper Pad-Easter Express (discontinued)), I decided to make into a Motherโ€™s Day card. I used the Simon Says Stamp Blooming Wave Wafer, to create a border then inlaid the flowers after diecutting several pieces of scrap yellow and green cardstock. I used Lawn Fawn Happy Happy Happy Sentiments and the Lawn Cuts Happy Happy Happy to creqte this dimensional sentiment. Finished it off by adding Nuvo Crystal Drops in Ivory Seashell.

And for this 3rd card, I wanted to make it look like rings so I diecut the Simon Says Stamp Blooming Circle Wafer Dies and diecut 3 flower circles, centering one of them. Once again I ran the die through with several color cardstock in rainbow colors. I added a sentiment to the center wreath using Catherine Pooler Designs Good Stuff Inside.Finished it off by adding Nuvo Crystal Drops in White Blizzard Glitter Drops.

Supplies:

Hope you’ve enjoyed this process post and I hope I’ve inspired you to create some cards of your own. Thanks for stopping by and once again please leave questions in the comments or feel free to email me if you prefer.

Birthdays, Just Because

Fruit Frenzy Reveal Wheel Card

Well, it’s Monday again friends and that means back to work. Ugh!! But I got to play this weekend with the Lawn Fawn Reveal Wheel dies and Semicircle add-on. Can you tell I’m loving the reveal wheel dies?!? Its just so much fun to make these! And I wanted to show that a lot of non-Lawn Fawn stampsets also work with this die. Now don’t get me wrong I love everything Lawn Fawn makes, but I want to maximize the use of my stamps as well. This card is available for purchase in my Etsy shop.

All the paper and ink for this card are Stampin’ Up! products. Most are still available for purchase. Full list below. There’s very little measuring with this card. Dies and punches do all the work for you.

As with my previous reveal wheel cards, I began by cutting out all the Reveal Wheel pieces with the Lawn Fawn Reveal Wheel dies and Semicircle add-on from Neenah Solar White 110lb Cardstock.  You need to cut out two panels (one with the cutout window and one without – this will be your back piece). To create the complete circle on the front piece, I turned the semicircle 180 degrees and lined up under the open semicircle. Butt it up against the edge of the bottom 2 cut lines and it will have the perfect space between both. Its a good idea to cut out the tiny arrow from Stampin’ Up! Garden Green 8 1/2 x 11โ€ Cardstock at this time.


TIP: Use heavy cardstock for the reveal wheel to give it more stability. It won’t work well if it’s flimsy. Ask me how I know. LOL


Next I cut a 1 1/2 x 3 3/4โ€ piece and 3/4 x 3 3/4โ€ piece of the Stampin’ Up! Tutti Frutti DSP. I used one 6 x 6 piece and just used both sides since they match perfectly. I adhered the two pieces together, leaving the bolder pattern on top and a little of the smaller pattern peeking out from behind on one end. I adhered these to the front panel at the bottom edge.

Ok, time to stamp all the things. ๐Ÿ™‚ I heat embossed the bowl onto a piece of Stampin’ Up! Garden Green 8 1/2 x 11โ€ Cardstock with Versamark clear embossing ink and Wow white embossing powder and diecut it with the coordinating dies. Then I punched out several fruits from Neenah Solar White 110lb Cardstock using Stampin Up! Itty Bitty Fruit Punch Pack . Then stamped all the fruits with Stampin’ Up! Fruit Basket stampset. I Found it’s easier if you punch them out first.

I used Stampin’ Up! Crushed Curry and Stampin’ Up! Granny Apple Green for the lemon and the pear, Stampin’ Up! Granny Apple Green and Stampin’ Up! Garden Green for the lime, Stampin’ Up! Garden Green and Stampin’ Up! Real Red ink for the strawberry and the watermelon.

Next, I stamped the sentiment (from the same stampset) onto some Stampin’ Up! Crushed Curry 8 1/2 x 11โ€ Cardstock using Tuxedo Black Memento Ink. Cut it down to 1/2 x 2 1/4โ€ and cut the ends into a banner.

Time to assemble the card. I attached the little wheel to the larger one with a tiny brad, added 3 Stampin’ Dimensionals behind the tiny wheel, making sure not to cover the brad and it to the back card panel. Added some 3M foam tape  to the back of the front panel, making sure not to get too close to the wheel, and  attached it to the back panel. Glued that to a 4 1/4 x  5 1/2โ€ card base (Neenah Solar White 110lb Cardstock). Next I glued the bowl to the bottom edge of the circle, glued the fruit inside the wheel and the sentiment strip to the top half. Then scattered some more fruit around the card. And the card is complete!

Dimensions:

Continue reading “Fruit Frenzy Reveal Wheel Card”