
Well, it’s Monday again friends and that means back to work. Ugh!! But I got to play this weekend with the Lawn Fawn Reveal Wheel dies and Semicircle add-on. Can you tell I’m loving the reveal wheel dies?!? Its just so much fun to make these! And I wanted to show that a lot of non-Lawn Fawn stampsets also work with this die. Now don’t get me wrong I love everything Lawn Fawn makes, but I want to maximize the use of my stamps as well. This card is available for purchase in my Etsy shop.
All the paper and ink for this card are Stampin’ Up! products. Most are still available for purchase. Full list below. There’s very little measuring with this card. Dies and punches do all the work for you.
As with my previous reveal wheel cards, I began by cutting out all the Reveal Wheel pieces with the Lawn Fawn Reveal Wheel dies and Semicircle add-on from Neenah Solar White 110lb Cardstock. You need to cut out two panels (one with the cutout window and one without – this will be your back piece). To create the complete circle on the front piece, I turned the semicircle 180 degrees and lined up under the open semicircle. Butt it up against the edge of the bottom 2 cut lines and it will have the perfect space between both. Its a good idea to cut out the tiny arrow from Stampin’ Up! Garden Green 8 1/2 x 11” Cardstock at this time.
TIP: Use heavy cardstock for the reveal wheel to give it more stability. It won’t work well if it’s flimsy. Ask me how I know. LOL
Next I cut a 1 1/2 x 3 3/4” piece and 3/4 x 3 3/4” piece of the Stampin’ Up! Tutti Frutti DSP. I used one 6 x 6 piece and just used both sides since they match perfectly. I adhered the two pieces together, leaving the bolder pattern on top and a little of the smaller pattern peeking out from behind on one end. I adhered these to the front panel at the bottom edge.
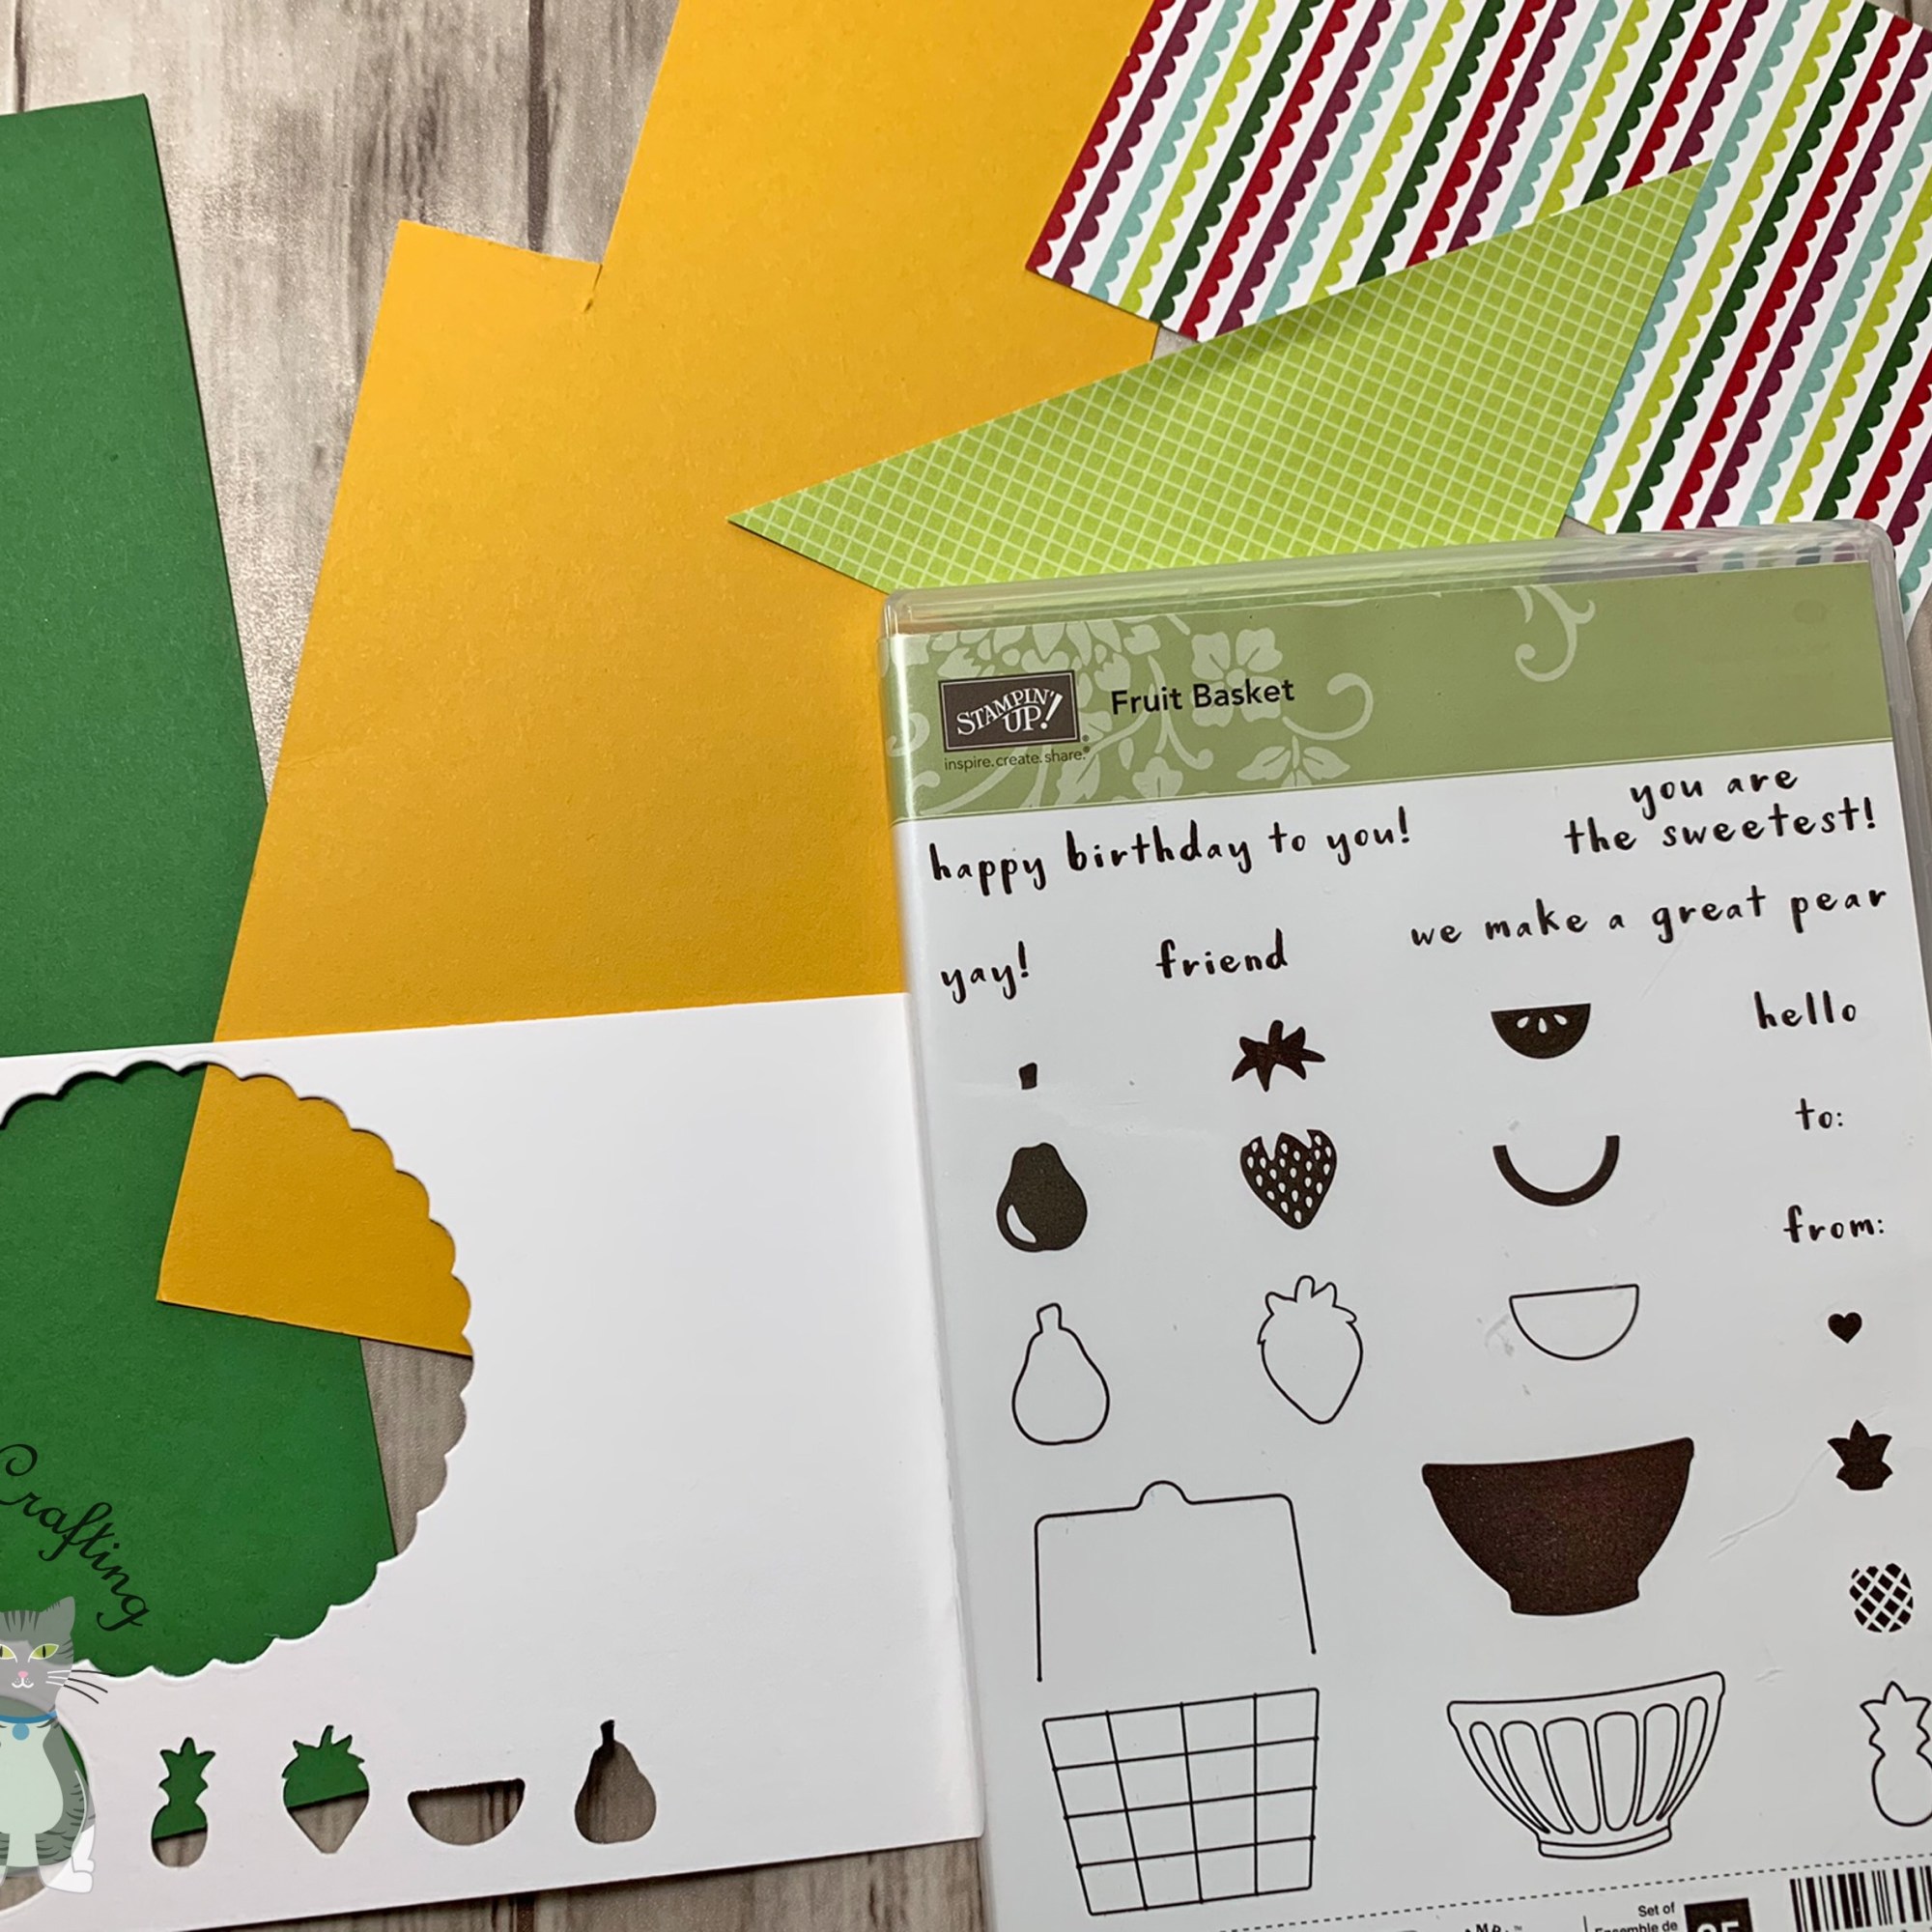

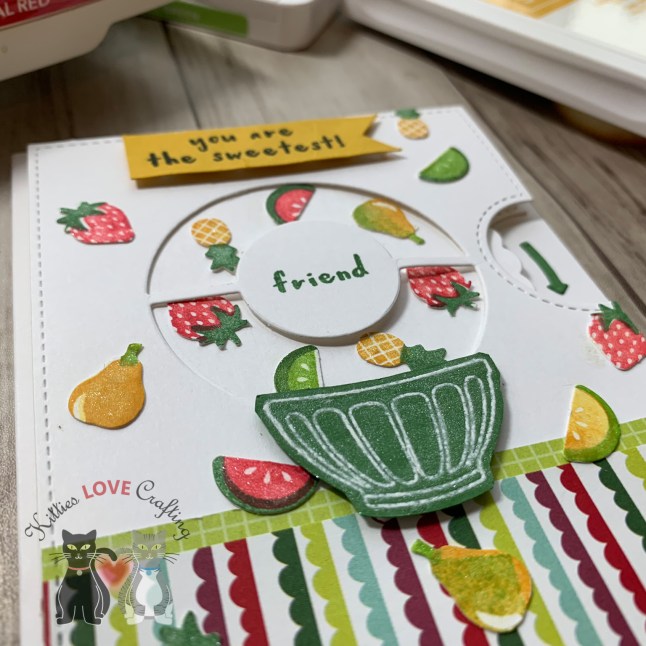
Ok, time to stamp all the things. 🙂 I heat embossed the bowl onto a piece of Stampin’ Up! Garden Green 8 1/2 x 11” Cardstock with Versamark clear embossing ink and Wow white embossing powder and diecut it with the coordinating dies. Then I punched out several fruits from Neenah Solar White 110lb Cardstock using Stampin Up! Itty Bitty Fruit Punch Pack . Then stamped all the fruits with Stampin’ Up! Fruit Basket stampset. I Found it’s easier if you punch them out first.
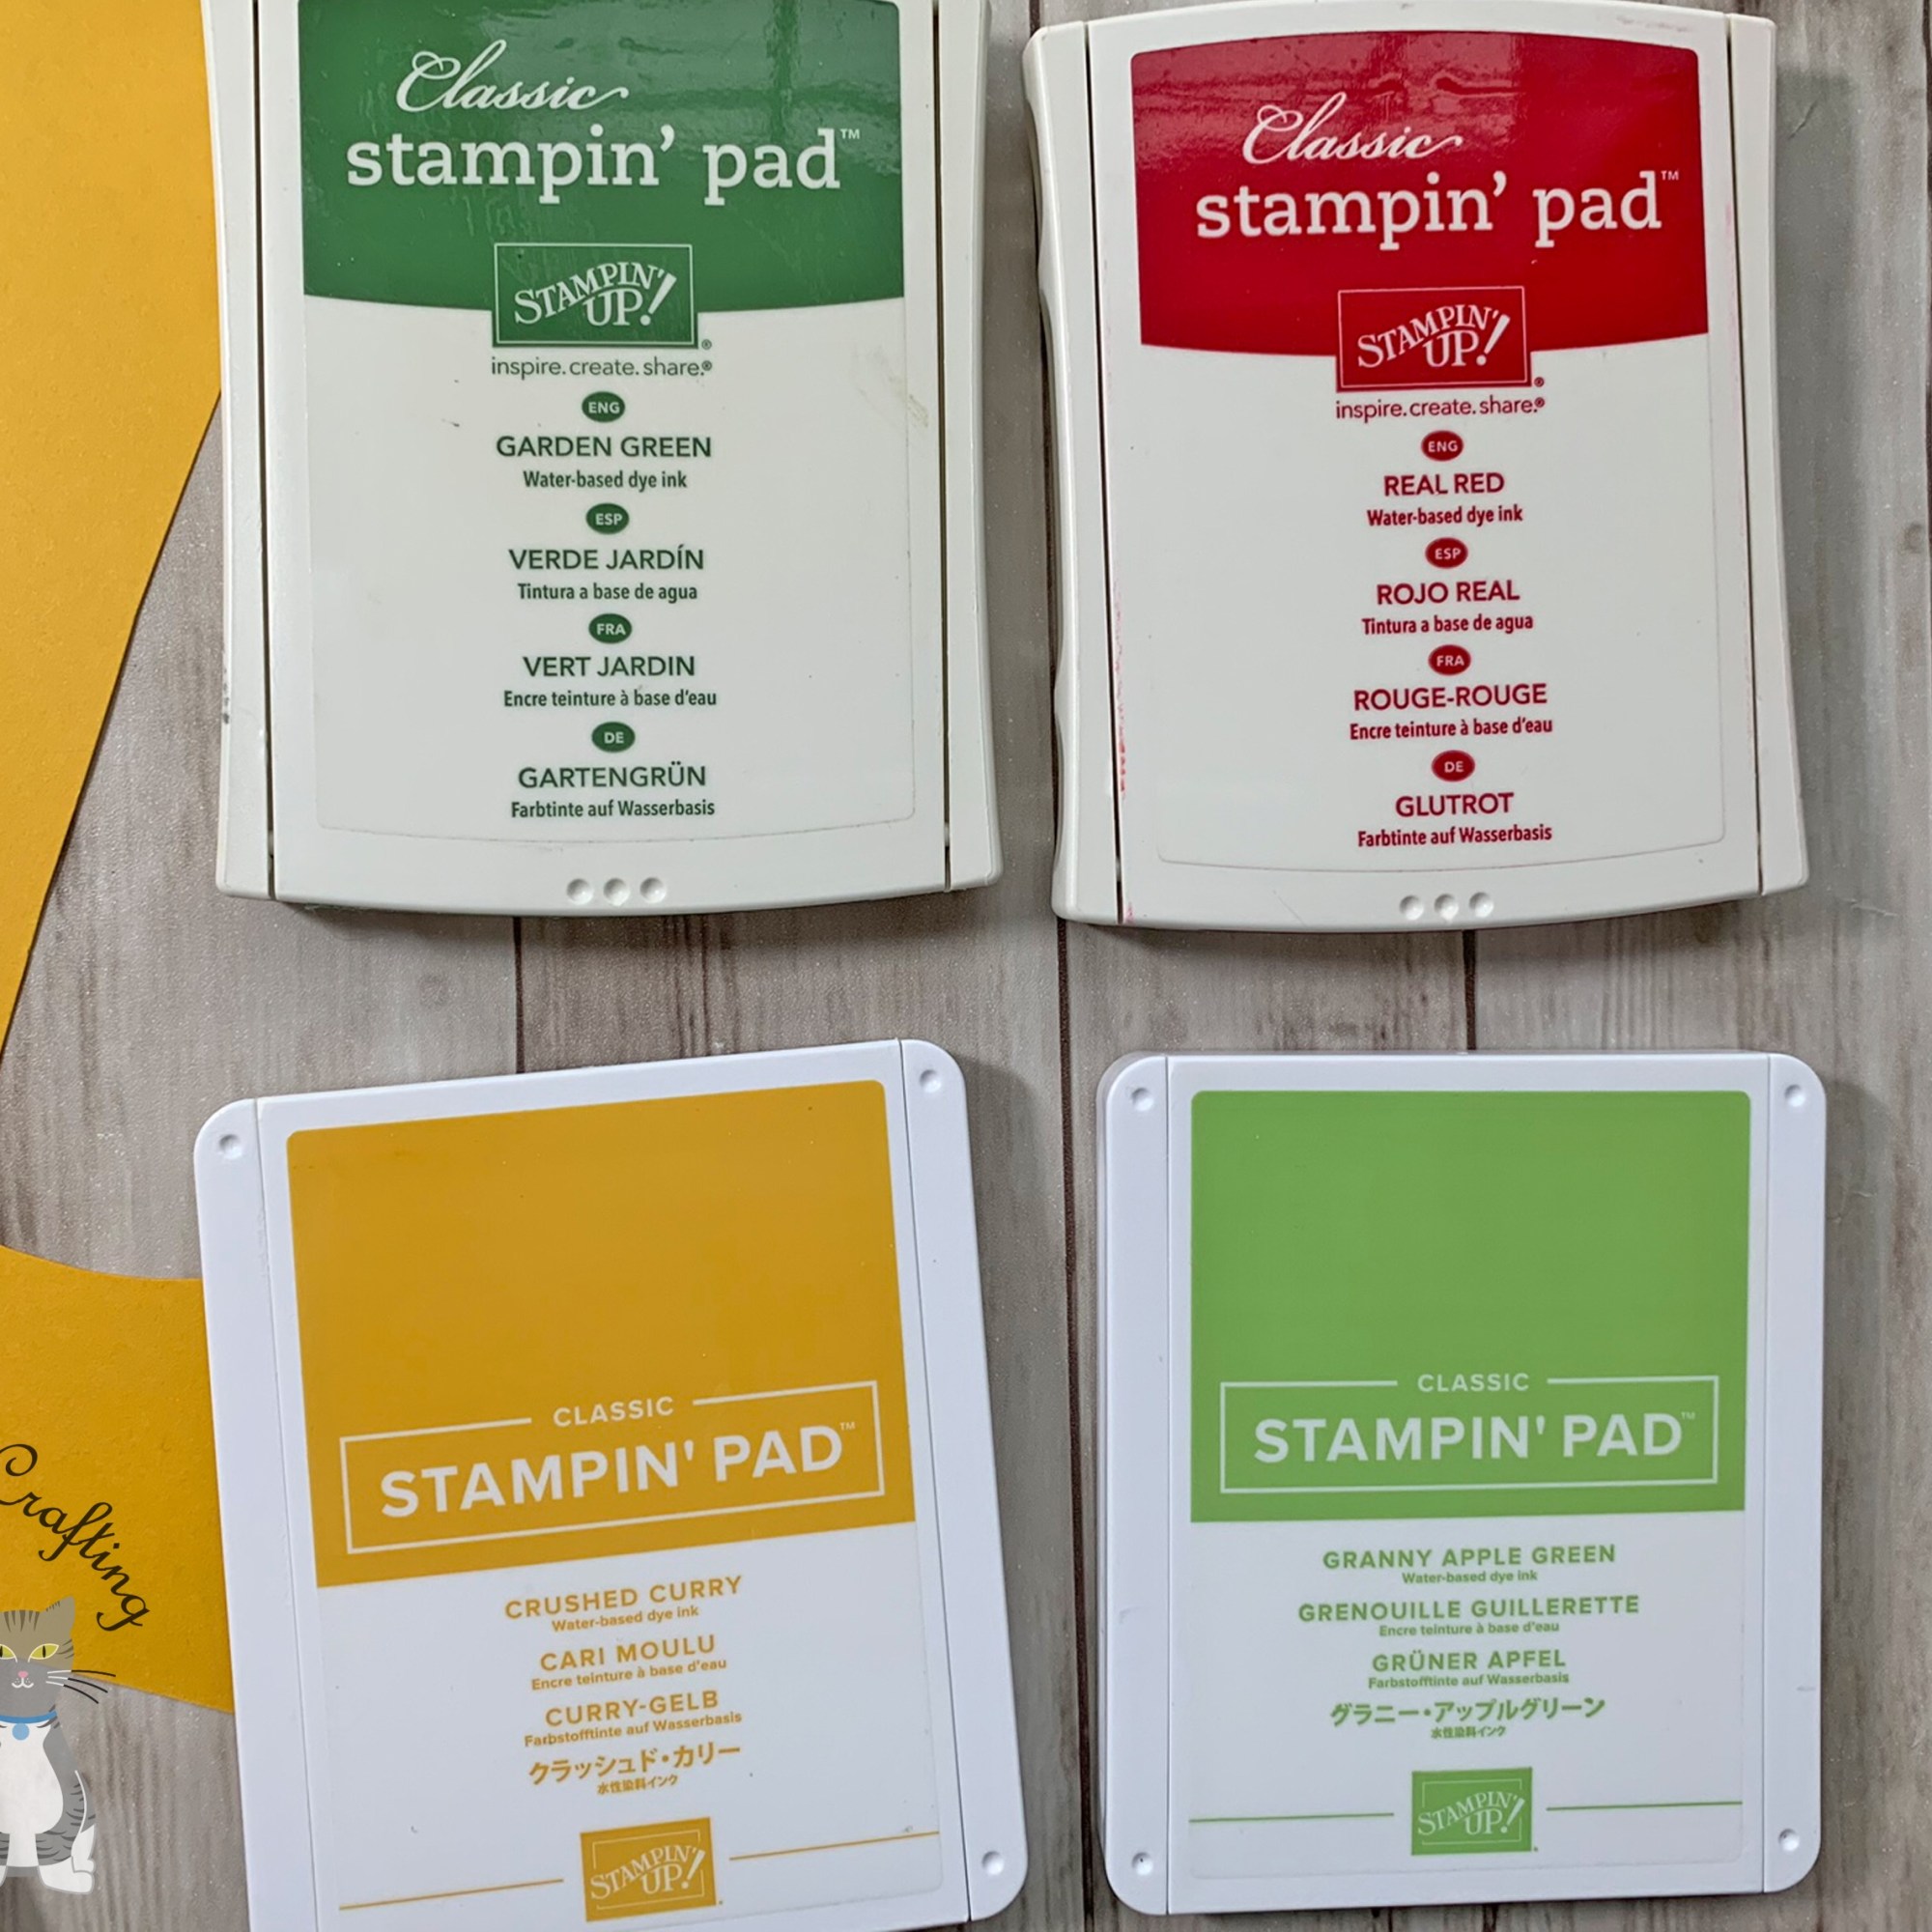
I used Stampin’ Up! Crushed Curry and Stampin’ Up! Granny Apple Green for the lemon and the pear, Stampin’ Up! Granny Apple Green and Stampin’ Up! Garden Green for the lime, Stampin’ Up! Garden Green and Stampin’ Up! Real Red ink for the strawberry and the watermelon.
Next, I stamped the sentiment (from the same stampset) onto some Stampin’ Up! Crushed Curry 8 1/2 x 11” Cardstock using Tuxedo Black Memento Ink. Cut it down to 1/2 x 2 1/4” and cut the ends into a banner.
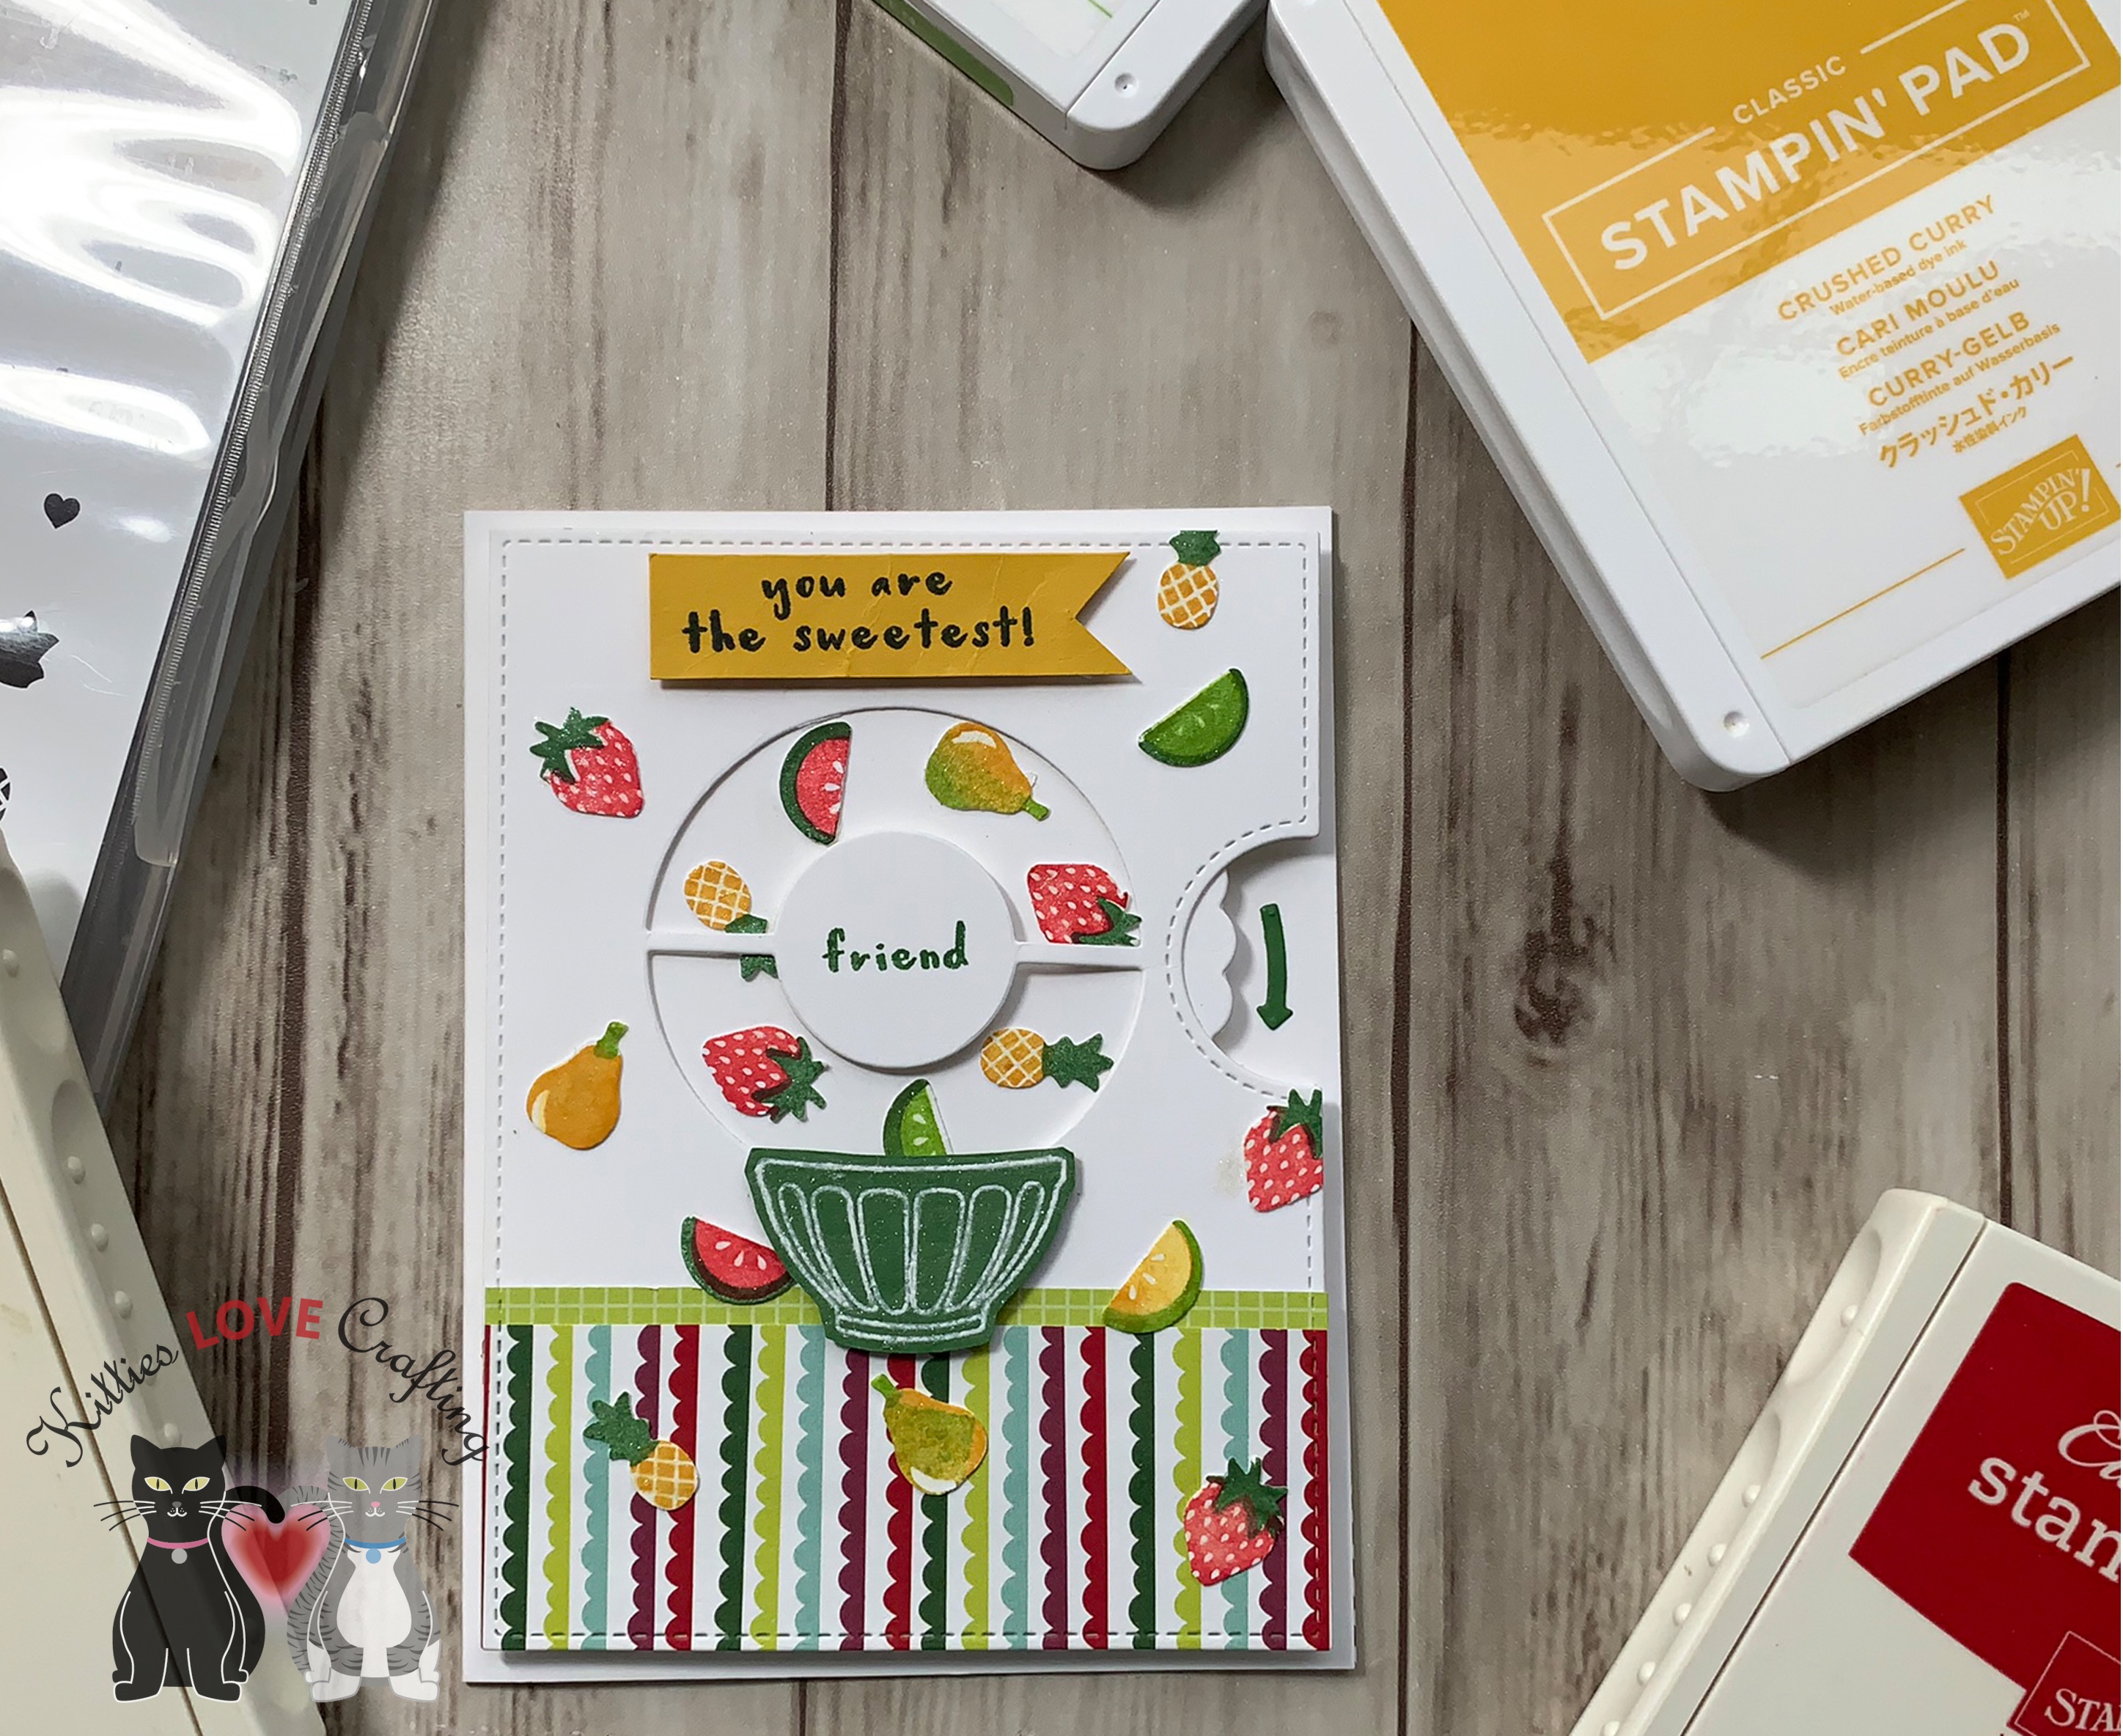
Time to assemble the card. I attached the little wheel to the larger one with a tiny brad, added 3 Stampin’ Dimensionals behind the tiny wheel, making sure not to cover the brad and it to the back card panel. Added some 3M foam tape to the back of the front panel, making sure not to get too close to the wheel, and attached it to the back panel. Glued that to a 4 1/4 x 5 1/2” card base (Neenah Solar White 110lb Cardstock). Next I glued the bowl to the bottom edge of the circle, glued the fruit inside the wheel and the sentiment strip to the top half. Then scattered some more fruit around the card. And the card is complete!
Dimensions:
- Card Base = 4 1/4 x 5 1/2″ Neenah Solar White 110lb Cardstock
- DSP Panels = 1 1/2 x 3 3/4” and 3/4 x 3 3/4” Stampin’ Up! Tutti Frutti 6 x 6 DSP (retired)
- Sentiment banner = 1/2 x 2 1/4″ Stampin’ Up! Crushed Curry 8 1/2 x 11” Cardstock
Supplies:
- Paper – Neenah Solar White 110lb Cardstock , Stampin’ Up! Crushed Curry 8 1/2 x 11” Cardstock, Stampin’ Up! Garden Green 8 1/2 x 11” Cardstock, Stampin’ Up! Tutti Frutti 6 x 6 DSP (retired)
- Inks – Tuxedo Black Memento Ink, Stampin’ Up! Crushed Curry, Stampin’ Up! Garden Green, Stampin’ Up! Granny Apple Green, Stampin’ Up! Real Red ink, Versamark clear embossing ink, Wow white embossing powder
- Stamps – Stampin’ Up! Fruit Basket (retired)
- Dies – Lawn Fawn Reveal Wheel, Reveal Wheel Semicircle add-on
- Punches – Stampin Up! Itty Bitty Fruit Punch Pack
- Embellishments – Spectrum Noir Clear Overlay Sparkle Brush Pen
- Adhesives – Tombow Mono Multi Liquid Glue, 3M foam tape, Stampin’ Dimensionals
Thanks for reading this process post and I hope I’ve inspired you to create some cards of your own. Please leave questions in the comments or feel free to email me if you prefer.
