This month I decided to challenge myself to NOT buy any new craft supplies (with the exception of necessary supplies like white cardstock and adhesive). Like many of you, I realized that I have been spending a ton of money on cleaning supplies, hygiene and groceries since I have had to order online more than usual so it was time to cut some corners. I also thought this would help people who are struggling financially but who still want to craft.
I went through my stamps, dies, stencils and picked out some that I know I have not used very often and combined with the other things I already own. I alos thought it was a good time to go through my already made card stash and see what categories I was low on –birthdays is one such category so I started there.
Thanks for reading this post. I hope you enjoyed and I’ve inspired you to Shop Your Stash and see what fun ideas you come up with and maybe rediscover supplies you forgot you had! Leave comments or questions below or feel free to email me.
Going back to the 80s for this post. Some of you may too young to have experienced the fun of the 80s, but these composition notebook stamps and dies from Catherine Pooler remind us all of our schooldays as youngsters. And while the fashion of the 80s was pretty horrible (in my opinion), there was nothing like a new composition notebook to start a new year of school.
These cards would be fun to make with kids who are currently stuck at home. You can make the notebooks any color and tons of different items in the shaker (maybe some glitter?).
Thanks for reading this post. I hope you enjoyed and I’ve inspired you to give these cards a try for yourself. Leave comments or questions below or feel free to email.
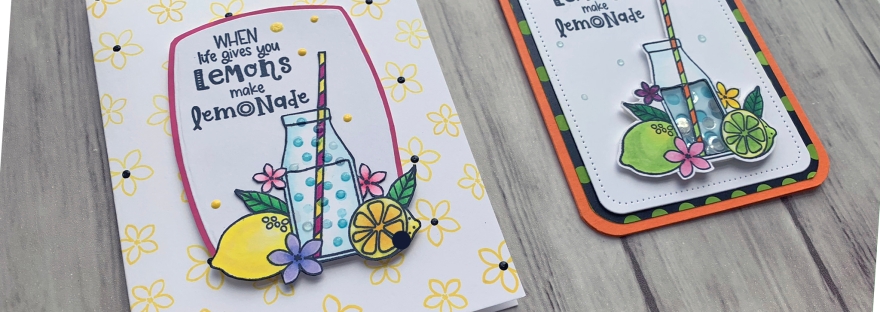
Hello friends. Hope you are all safe and healthy. And if you are struggling to cope with everything going on in our world right now, hang in there because ‘this too shall pass’. Speaking of old adages, “When Life Gives You Lemons Make Lemonade” is very fitting for these times we are in as well. While it’s very easy to focus on the scary and sad stuff going on, we have to find the bright spots too — the healthcare workers saving lives, families coming together, babies being born, spending time with our pets (one of my faves right now)…
These bright and cheerful cards were made using the Catherine Pooler Designs Make Lemonade Stampset (Out of stock-maybe discontinued). It was a limited release in March, I believe. It’s a tiny stampset but was super fun to color. I made one of them into a shaker (a tiny shaker:)).
Next, I colored the image with COPICS. I used BG000 + 0 for the bottle; Y11 +Y06 + Y13 for the lemons; Y11 +Y06 + Y13 + Y15 for the sliced lemon; YG06 + YG07 for the leaves; RV09 and Y06 + Y15 for the straw; RV10 + RV11 + RV14 for the flowers. I stamped the bubbles with Catherine Pooler Designs It’s A Boy Ink. I fussycut the image out.
I stamped the image onto a scrap of Neenah 110lb Classic Crest Cardstock with Memento Tuxedo Black Ink and set it aside to dry. I colored it with COPICS. I used Y13 + YG03 + YG01 + YG25 for the lime on the left; B0000 + 0 for the bottle; YR16 + YR18 and YG03 + YG25 for the straw; Y06 + Y18, R81 + R85, and V25 + BV17 for the flowers; and YG06 + G07 for the leaves .
Hello friends. Hope you are all safe and healthy. And if you are struggling to cope with everything going on in our world right now, hang in there because ‘this too shall pass’. Speaking of old adages, “When Life Gives You Lemons Make Lemonade” is very fitting for these times we are in as well. While it’s very easy to focus on the scary and sad stuff going on, we have to find the bright spots too — the healthcare workers saving lives, families coming together, babies being born, spending time with our pets (one of my faves right now)…
These bright and cheerful cards were made using the Catherine Pooler Designs Make Lemonade Stampset (Out of stock-maybe discontinued). It was a limited release in March, I believe. It’s a tiny stampset but was super fun to color. I made one of them into a shaker (a tiny shaker:)).
Next, I colored the image with COPICS. I used BG000 + 0 for the bottle; Y11 +Y06 + Y13 for the lemons; Y11 +Y06 + Y13 + Y15 for the sliced lemon; YG06 + YG07 for the leaves; RV09 and Y06 + Y15 for the straw; RV10 + RV11 + RV14 for the flowers. I stamped the bubbles with Catherine Pooler Designs It’s A Boy Ink. I fussycut the image out.
I added a piece of acetate behind the shaker window in the bottle, some 3M Foam Tape, and some flat clear sequins from my stash added it to the card. I finished it off by adding some Nuvo Sea Breeze Jewel Drops around the card.
On the inside of the card, I cut out a panel of Neenah 110lb Classic Crest Cardstock 8.5 X 11″ to 3-1/2″ x 4-3/4″ and a left over piece of the pattern paper to 3/4 x 3-1/2″ and adhered it to the bottom of the panel, then rounded the corners before adhereing it to the card base.
Thanks for reading this post. I hope you enjoyed and I’ve inspired you to give these cards a try for yourself. Leave comments or questions below or feel free to email.
Happy Saturday friends! Hope you are all doing well and are safe. To go along with the cards in my previous post using the Hello Easter stampset from Simon Says Stamp, I decided to make some multimedia tags. I also dug up some items from my stash that I forgot I had (yeah that’s how old they are. LOL, Anyone else have this problem?) to use on the tags.
I colored them with COPICS. I used C000, C1, and 0 for the bunny and R81 and R85 for its ears; Y06, Y13 and Y18 for the bunny’s bow; YG06, YG07, and YG09, YR07 and YR16 for the egg the bunny holds; YR07, YR16 and R29 for one tulip; BG01, BG02, and BG05 for the second tulip; Y06, Y13 and Y18 for the daffodils and YG06, YG07, and YG09 for the stems; and Y00, Y06, and Y21 for the basket, V04, V06 and V09, YR07, YR16 and R29, BG01, BG02, and BG05 for the eggs inside the basket, R29 and R32 for the basket bow. Once I finished coloring the images, I fussycut them all out.
I colored them with COPICS. I used Y06, Y13 and Y18 for the ducky body, YR07 and YR16 for the feet and beak and R81 for the cheeks, V04, V06 and V09 for the bow; R32, R37 and R29 for the umbrella and V04, V06 and V09 for the umbrella bow; Y06, Y13 and Y18, YR07 and YR16 for the medallion; R81 and R85, BG000, BG01 and BG02 for the large egg, and YR07, YR16 and R29 for the egg’s bow. Once I finished coloring the images, I fussycut them all out.
Thanks for reading this post. I hope you enjoyed and I’ve inspired you to give these tags a try for yourself. Have a great Easter! Leave comments or questions below or feel free to email.
Happy Friday friends! Hope you are all doing well and are safe. With Easter right around the corner, I’m sharing some more super easy cards. These were made easy using the Simon Says Stamp’s Faberge Egg Dies.
For the first card, I started by cutting a piece of Simon Says Stamp Cotton Candy 8.5 x 11” Cardstock and Simon Says Stamp Mint 8.5×11 cardstock to 5-1/2 x 8-1/2″ and scored at 4-1/4″ To make a card base. Then to make the egg-shaped card, I used the outline egg and just positioned slightly off the folded edge of the card. this will produce a shaped card.
I diecut out the Faberge Egg Dies from Stampin’ Up! Shimmer Paper in Mint Macaron and Sweet Sugarplum (these are no longer available but Simon Says Stamp has tons of glitter papers). Next, I diecut two pieces of Simon Says Stamp VELLUM using the outer Faberge Egg die. This will go behind the front decorative egg. I also diecut two different pattern papers with the same die. I chose one from My Favorite Things Plaid Patterns Merry & Bright Paper Pad and one front an older Lawn Fawn Perfectly Plaid Rainbow 6 x 6 Paper Pad (no longer available I think).
For the second card, I wanted to make a shaker card. Unlike most shaker cards this one did not take long at all. 😀 I started by cutting a piece of Daffodil Delight 8-1/2″ X 11″ Cardstock to 5-1/2 x 8-1/2″ and scored at 4-1/4″ to create a card base and a piece of Lawn Fawn Perfectly Plaid Rainbow 6 x 6 Paper Pad (no longer available I think) to 4-1/4 x 5-1/2”. I diecut an egg window into the pattern paper using the outline die from the Simon Says Stamp’s Faberge Egg Dies. Then I added a piece of Acetate behind it with some Scor-Tape. I diecut the Faberge Egg from Simon Says Stamp’s ASSORTMENT GLITTER Cardstock 6×6 Pack and carefully adhered it to the acetate with some Tombow Mono Multi Liquid Glue.
I then added some 3M Foam Tape behind it, creating a well around the window. I added some pink sequins from my stash as well as Queen and Company Pastel Diamonds in pink, yellow and orange and Queen and Company Pops Toppings in pink, yellow and orange. I adhered a piece of the Daffodil Delight Cardstock behind the shaker as well. Instead of trying to adhere it directly to the card, adding a piece of paper behind it is much easier. I adhered the shaker element to the card base and thought it looked a little plain. Even with the sparkle of the glitter Cardstock, it was missing something so I added a strip of Stampin’ Up! Melon Mambo 8-1/2″ X 11″ Cardstock, measuring 1/4 x 5-1/2”. To finish it off, I added some Nuvo Drops in White Blizzard.
On the inside of the card, I cut down a piece of Neenah 110lb Classic Crest Cardstock 8.5 X 11″ to 4-1/ x 5-1/2” and adhered it to the inside of the card base and added a strip of the same plaid pattern paper, measuring 3/4 x 4” to the bottom of the white panel.
Thanks for reading this post. I hope you enjoyed and I’ve inspired you to give these cards a try for yourself. They are super quick and fun to make! Have a great Easter! Leave comments or questions below or feel free to email.
Happy Monday friends! Easter is fast approaching and even though we may not gather with all our families this year, we can still share happy sentiments with our loved ones by sending cards and gifts. We are going to have to get creative this year folks! Maybe instead of a community Easter Egg Hunt, try one in your back yard or inside your house. Decorate some cookies with your kids. For thedr two cards I used the very cute Hello Easter stampset from Simon Says Stamp. I like that the images are nice and big so they are easy to color and fill up more space on a card.
I stamped the ducky, large Easter egg, and the chickadee with 3 eggs from all the images I needed from Hello Easter stampset from Simon Says Stamp and the two eggs from SSS Some Bunny (not available anymore I believe) with Memento Tuxedo Black Ink onto Neenah 110lb Classic Crest Cardstock 8.5 X 11″. Once dried, I colored the images with COPIC markers. I used BG000 + 0 Blender for mini eggs and YG05 + YG07 for the grass; Y06 and Y18 for the both chicks; RV000 + RV11 for the chick’s bow; YR12 + YR16 for the chock beaks and feet; V06 + V09 for the umbrella top and BV08 + V09 for the umbrella underside, YR12 +YR07 + YR16 for the umbrella bow; Y06 + Y18 for the umbrella medallion; RV09 + RV14 + RV19 for the large egg, BG000 + BG01 + BG02 for the egg’s stripes and Y06 + Y18 for the egg’s bow; YR12 + YR16 and V06 + V09 for the small polka egg; and RV000 + RV11 and BG000 + BG01 for the small stripe egg. I fussycut the images out and adhered them to the card. I added 3M Foam Tape behind the images that hung over the edge of the grass.
Then I stamped the bunny, 2 tulip bundles and 1 daffodil from the Hello Easter stampset from Simon Says Stamp and the eggs from the SSS Some Bunny (not available anymore I believe) with Memento Tuxedo Black Ink onto Neenah 110lb Classic Crest Cardstock 8.5 X 11″. I colored the images with COPIC markers. I used N1 + N2 + N5 for the bunny, R20 + R32 for the bunny ears, cheeks and nose, R05 + R08 + R59 for the bunny’s bow; R20 + R32 and R32 + R37 for the tulips; and R08 + R59 and Y06 + Y18 for the daffodil. I fussycut all the images.
Thanks for reading this post. I hope you enjoyed and I’ve inspired you to give these cards a try for yourself. Have a great Easter! Leave comments or questions below or feel free to email.
Now more than ever we all need to stick together to get through these tough times. And this card kit from Simon Says Stamp embodies that. This is the perfect time to send someone a card to let them know you are thinking of them. I decided to make a tag as well as a card that can be paired together. I’ve been neglectful in my tag making and it’s high time I got back to it!
Multimedia Tag Featuring Simon Says Stamp’s March Card Kit
When I was thinking about creating the tag I knew that I wanted to have different textures and coloring mediums. That’s the fun of multimedia – no commitment to one medium. LOL I mixed papers from the card kit, ink, watercolors and embossing to do this.
I adhered the watercolor panel to the card base and the frame to the watercolor card with Tombow Mono Multi Liquid Glue. I finished it off by adding some self adhesive purple and clear gems from my stash. These are so old that I have no idea who made them or where I purchased them. Sorry.
Thanks for reading this post. I hope you enjoyed and I’ve inspired you to give this card a try for yourself. Leave comments or questions below or feel free to email.
Thanks for reading this post. I hope you enjoyed and gave you some ideas on how to use this kit for more than just cards. Leave comments or questions below or feel free to email.
Happy Sunday friends! Hope you are safe and having a good weekend. Today I am bringing you this card featuring the very cute gnomes from Simon Says Stamp Lil Gnome Wafer Dies. This die was included in the December 2019 card kit and but is great for Spring, Easter or any occassion cards! I paired them with some cute Lawn Fawn border dies to create a fun little Spring cards. This card is mostly ink blending and diecutting so if you don’t like stamping or coloring, this card is for you!
I assembled the two gnomes and moved on to assembling the card. I adhered the sky background to the card base and the added the back grassy border to the card with glue and the front grassy border with 3M Foam Tape. I added the gnomes to the card, adhering one with glue and one with Stampin’ Dimensionals.
On the inside of the card, I stamped another greeting from the Lawn Fawn Oh Gnome! stampset in Memento Tuxedo Black Ink and added some tulips that were left over from the front of the card. And that completes this card.
Thanks for reading this post. I hope you enjoyed and I’ve inspired you to give this card a try for yourself. Leave comments or questions below or feel free to email.
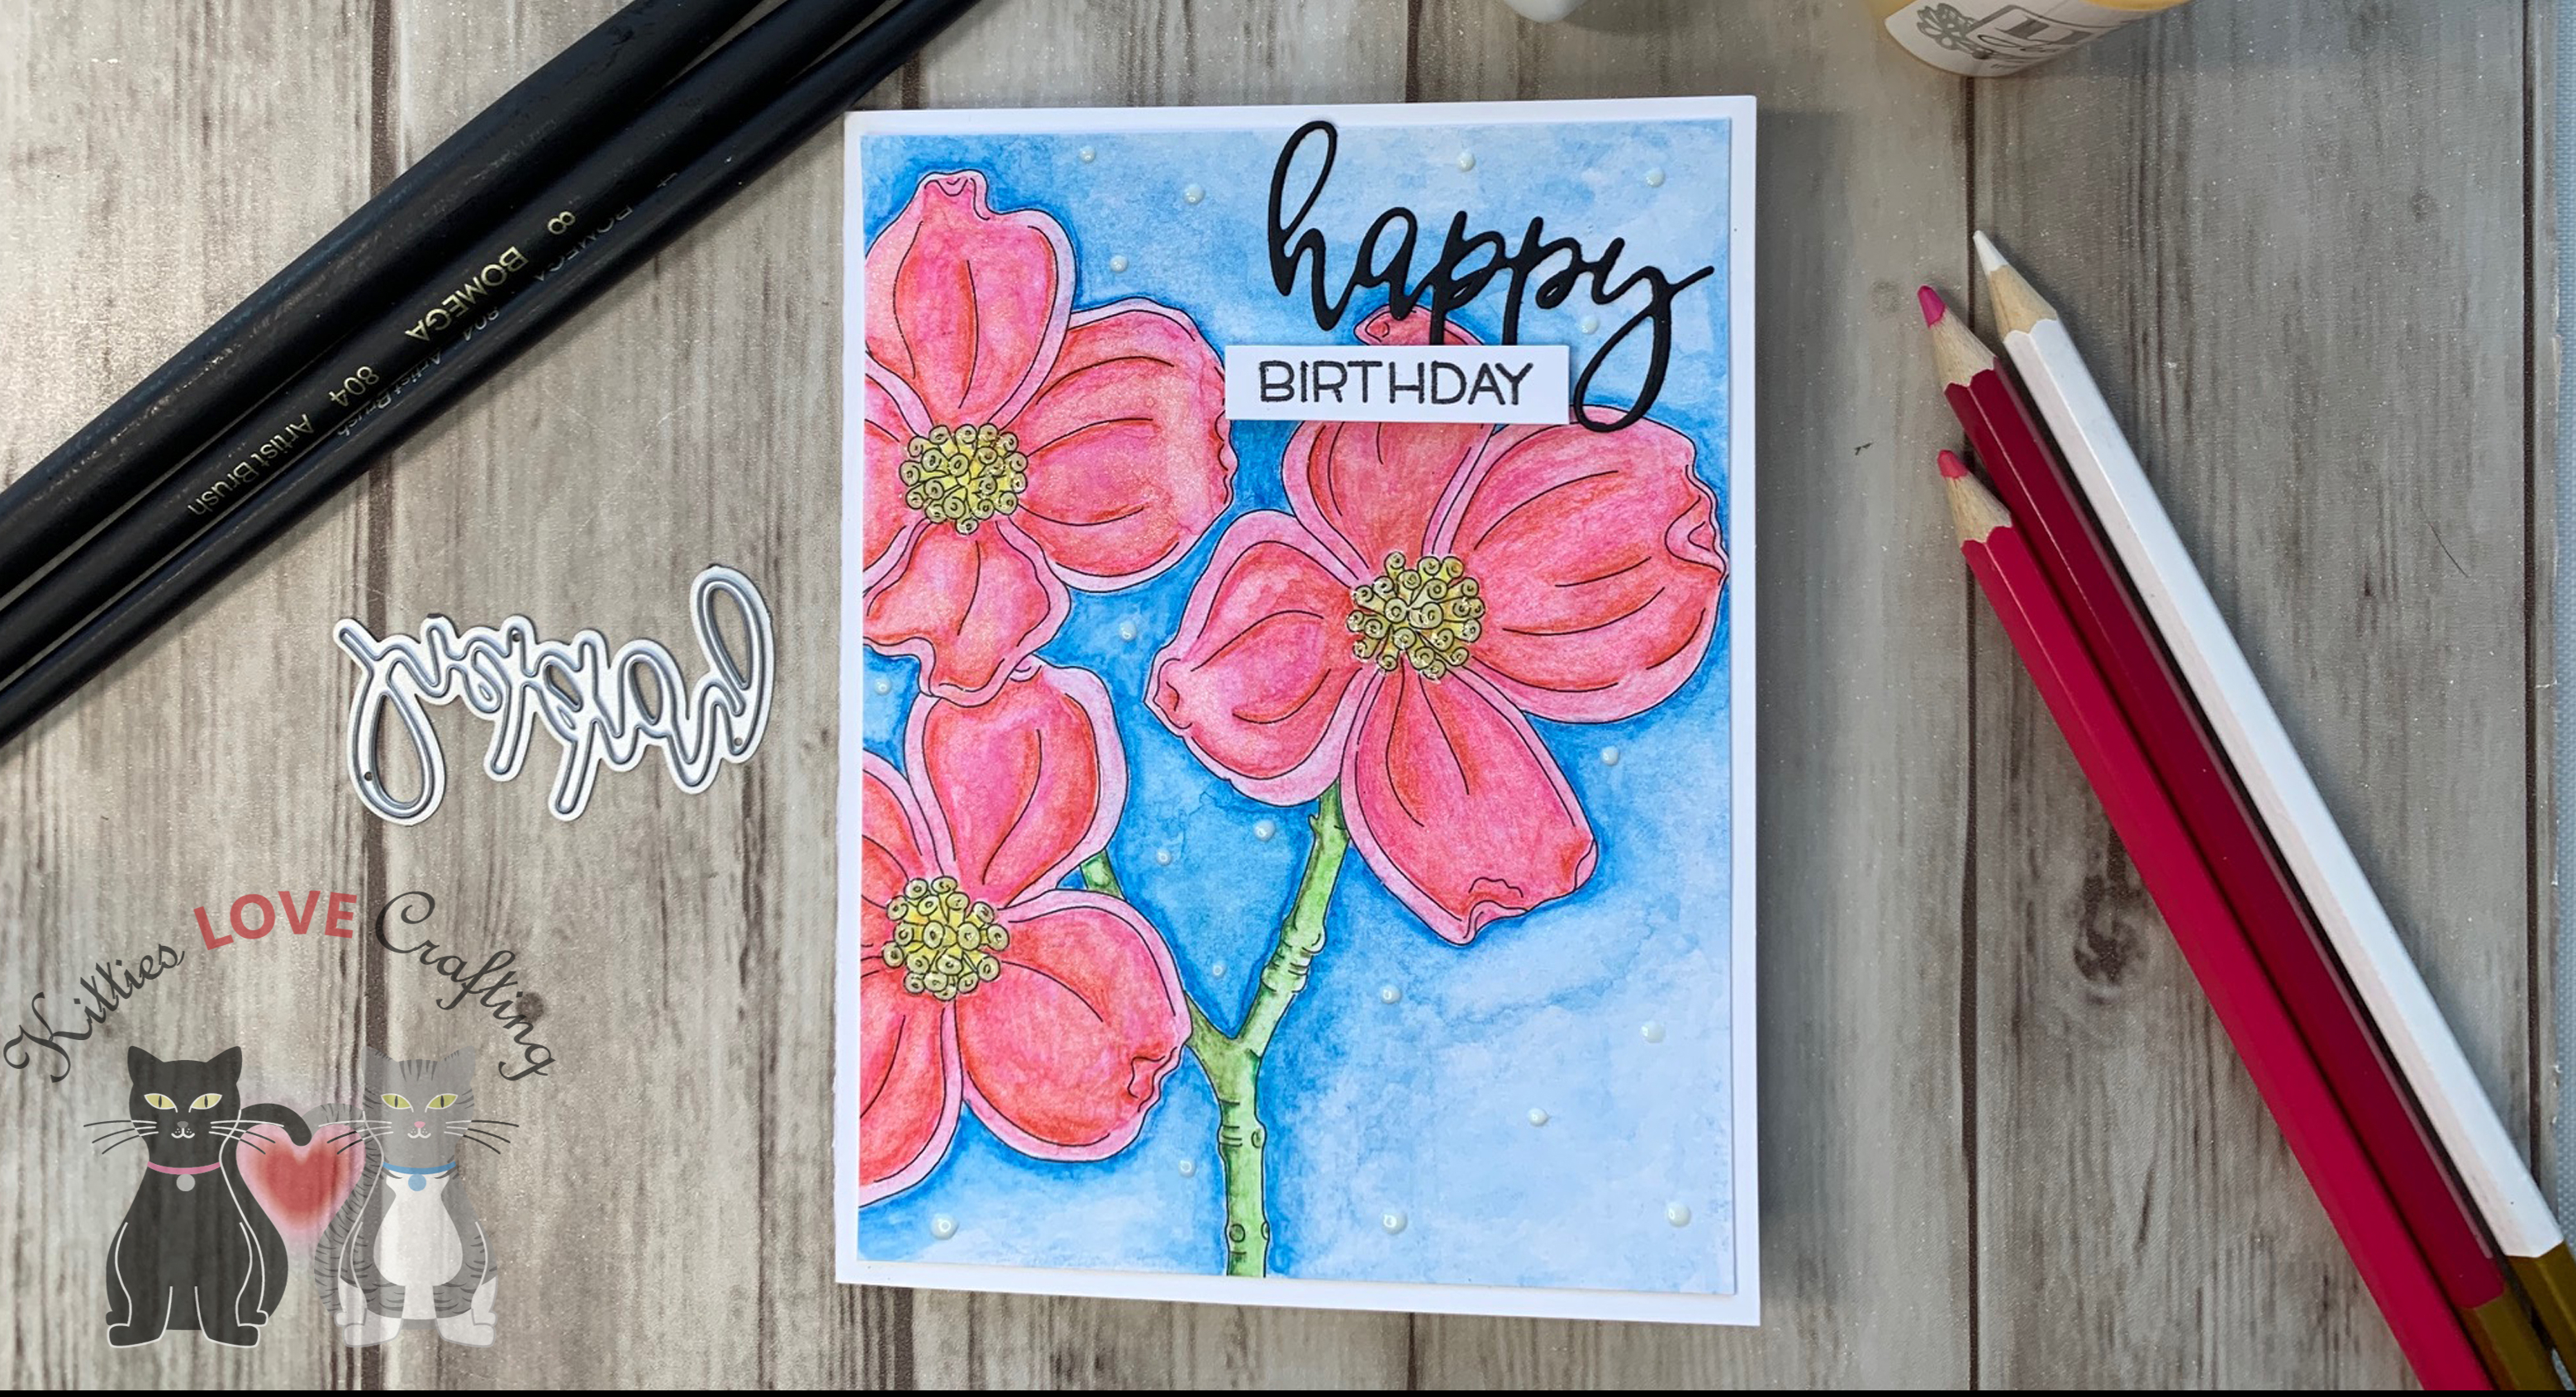
Happy Hump Day friends! Here’s another quick card using the Simon Says Stamp’s Stronger Together March Card Kit. I’ve been having fun watercoloring with the pencils included in the kit. The quality of the pencils is not bad. You have more control with pencils than you do with traditional watercolors so it’s definitely a great option for folks (like me) who are not great at watercoloring. My colors tend to run into each other. Anyone else have this issue??
Thanks for reading this post. I hope you enjoyed and I’ve inspired you to give this card a try for yourself. Leave comments or questions below or feel free to email.
Spring is officially here friends! And when I think of Spring, I think of beautiful flowers in bloom and soft pastel colors. And this Card Kit from Simon Says Stamp is perfect for spring cards, as well as Easter cards and even Mother’s Day cards! And can we talk about the purple glitter paper included in this kit?!? OMG, just gorgeous.
Thanks for reading this post. I hope you enjoyed and I’ve inspired you to give this card a try for yourself. Leave comments or questions below or feel free to email.


 https://linkdeli.com/widget.js?id=f5e8378456858c916708