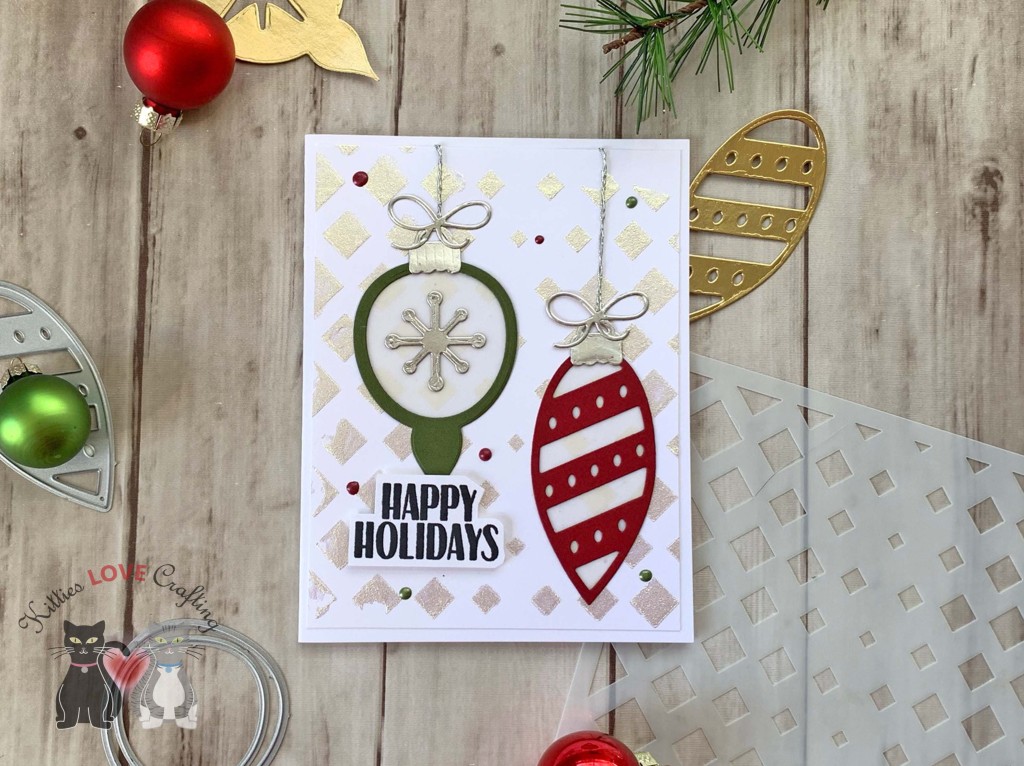
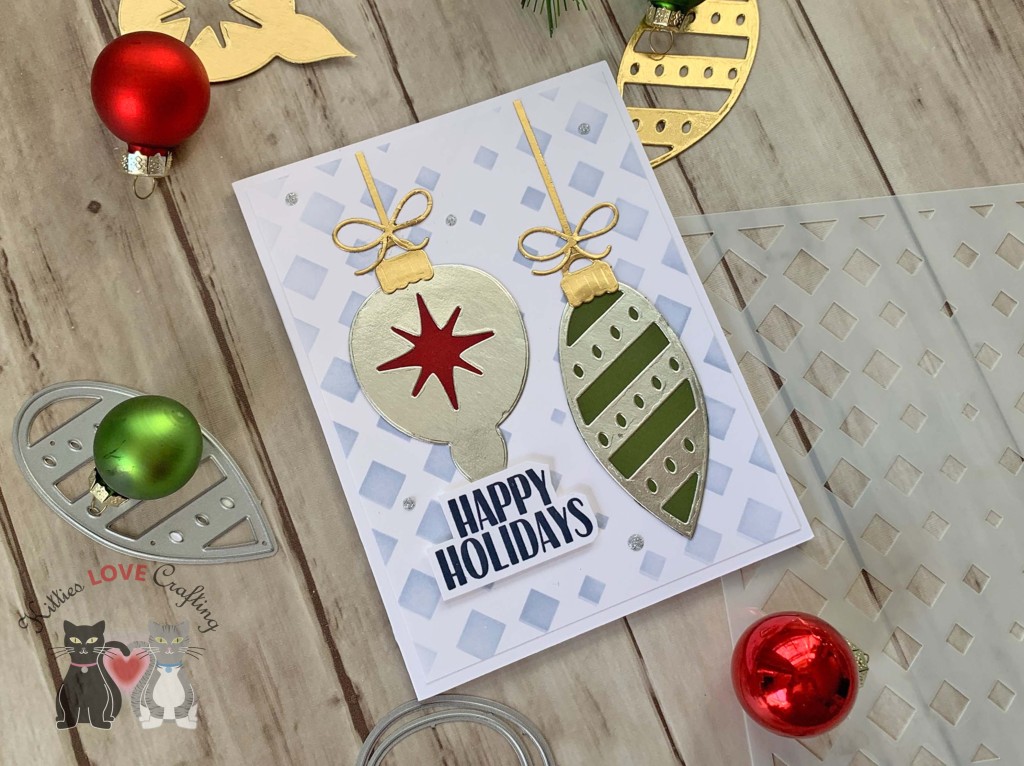
Hello friends. I’m loving this Retro Ornament Dieset from Catherine Pooler! The images are large enough to cover an A2 size card and really great on a slimline card. I went for a more traditional color but then decided to try a little less traditional color scheme.
For these cards, I cut a piece of Neenah 110lb Classic Crest Cardstock 8.5 X 11″ to 7 x 8-1/2″ and scored at 3-1/2″ to create the card bases and piece of to 3-1/4 x 8-1/4” for the top panel. For the first card,I used the Catherine Pooler’s Rouge and Eucalyptus Inks to color white cardstock using direct-to-paper technique. Then diecut three rectangles using Catherine Pooler’s Scallops & Dots Dies. I adhered them offset.
On the inside of the card, I stamped a sentiment from the Stampin’ Up! ‘Joy to the World’ Paper Pumpkin stampset (Paper Pumpkin is a subscription box so this stampset is not available for purchase) with Eucalyptus Ink and adhered the gold star shape that I had cut out of one of the ornaments.
On the inside of the card, I stamped a sentiment from the Stampin’ Up! ‘Joy to the World’ Paper Pumpkin stampset (Paper Pumpkin is a subscription box so this stampset is not available for purchase) with Suede Shoes ink and adhered the silver star shape that I had cut out of one of the ornaments.
Thanks for reading this post. I hope you enjoyed and I’ve inspired you to give these cards a try for yourself. Leave comments or questions below or feel free to email.
Hello friends. Love making holiday cards but hate stamping?!? Here are two quick and easy holiday cards that require no stamping — only dies. I used the same background die from Lawn Fawn to create both, utilizing the negative and positive pieces that were cut. This is a great way to make multiple cards without waste.
I worked on the backgrounds simultaneously because it’s easier. First, I cut two pieces of Neenah 110lb Classic Crest Cardstock 8.5 X 11″ to 5-1/2 x 8-1/2″ and scored at 4-1/4″ to create card bases. Then I die cut Stampin’ Up! Berry Burst 8-1/2″ x 11″ Cardstock (retired) with the Lawn Fawn PEPPERMINT STRIPES BACKDROP Die Cut. I adhered the negative pieces to one card base first by using the positive one as a guide to place the pieces. Then adhered the positive background piece to the other card base.
I die cut a piece of Acetate with a 2-1/2″ circle punch and adhered it to the back of the sentiment and added a very thin piece of 3M Foam Tape around the edges. I used Queen and Company Clear and Pink Diamond toppings (these are currently out of stock but I think will be back once Q and Co moves) and Candy Toppings to fill the shaker. I added another 2.5 inch circle behind the shaker from white cardstock.
On the inside of the card, I stamped a sentiment from the Stampin’ Up! ‘Joy to the World’ Paper Pumpkin stampset (Paper Pumpkin is a subscription box so this stampset is not available for purchase) and Eucalyptus Ink.
Thanks for reading this post. I hope you enjoyed and I’ve inspired you to give these cards a try for yourself. Leave comments or questions below or feel free to email.
Thanks for reading this post. I hope you enjoyed and I’ve inspired you to give these cards a try for yourself. Leave comments or questions below or feel free to email.
Hi friends. When I saw Jennifer McGuire’s video featuring the Slimline Bird House Pop Up Card Dies and add-on dies from Scrappy Tails, I knew I had to have them. They remind me of the Honey Bee Stamps House Card Dies and Add-ons which as you may have figured out I love so much! These dies are just as versatile and allow you to make tons of different types of cards for all occasions.
I cut out the two windows using the circle from the birdhouse die set. I adhered the scallop bosrders on the window as well as the roof. Then diecut some grass using the Lawn Fawn Grassy Border from Stampin’ Up! Granny Apple Green 8-1/2 x 11″ Cardstock, trimmed it down to size and adhered it to the bottom of the card. I added the white base on top of the grass.
I colored the images with COPIC Markers. I c olored the peppermints and candy canes with R27, R46 and C1, YG17 and YG25 for the trees, E34, E37, R20, C1 and 0 for the gingerbread people, and R81 and R85 for the gumdrops.
Thanks for reading this post. I hope you enjoyed and I’ve inspired you to give these cute cards a try for yourself. Leave comments or questions below or feel free to email me.
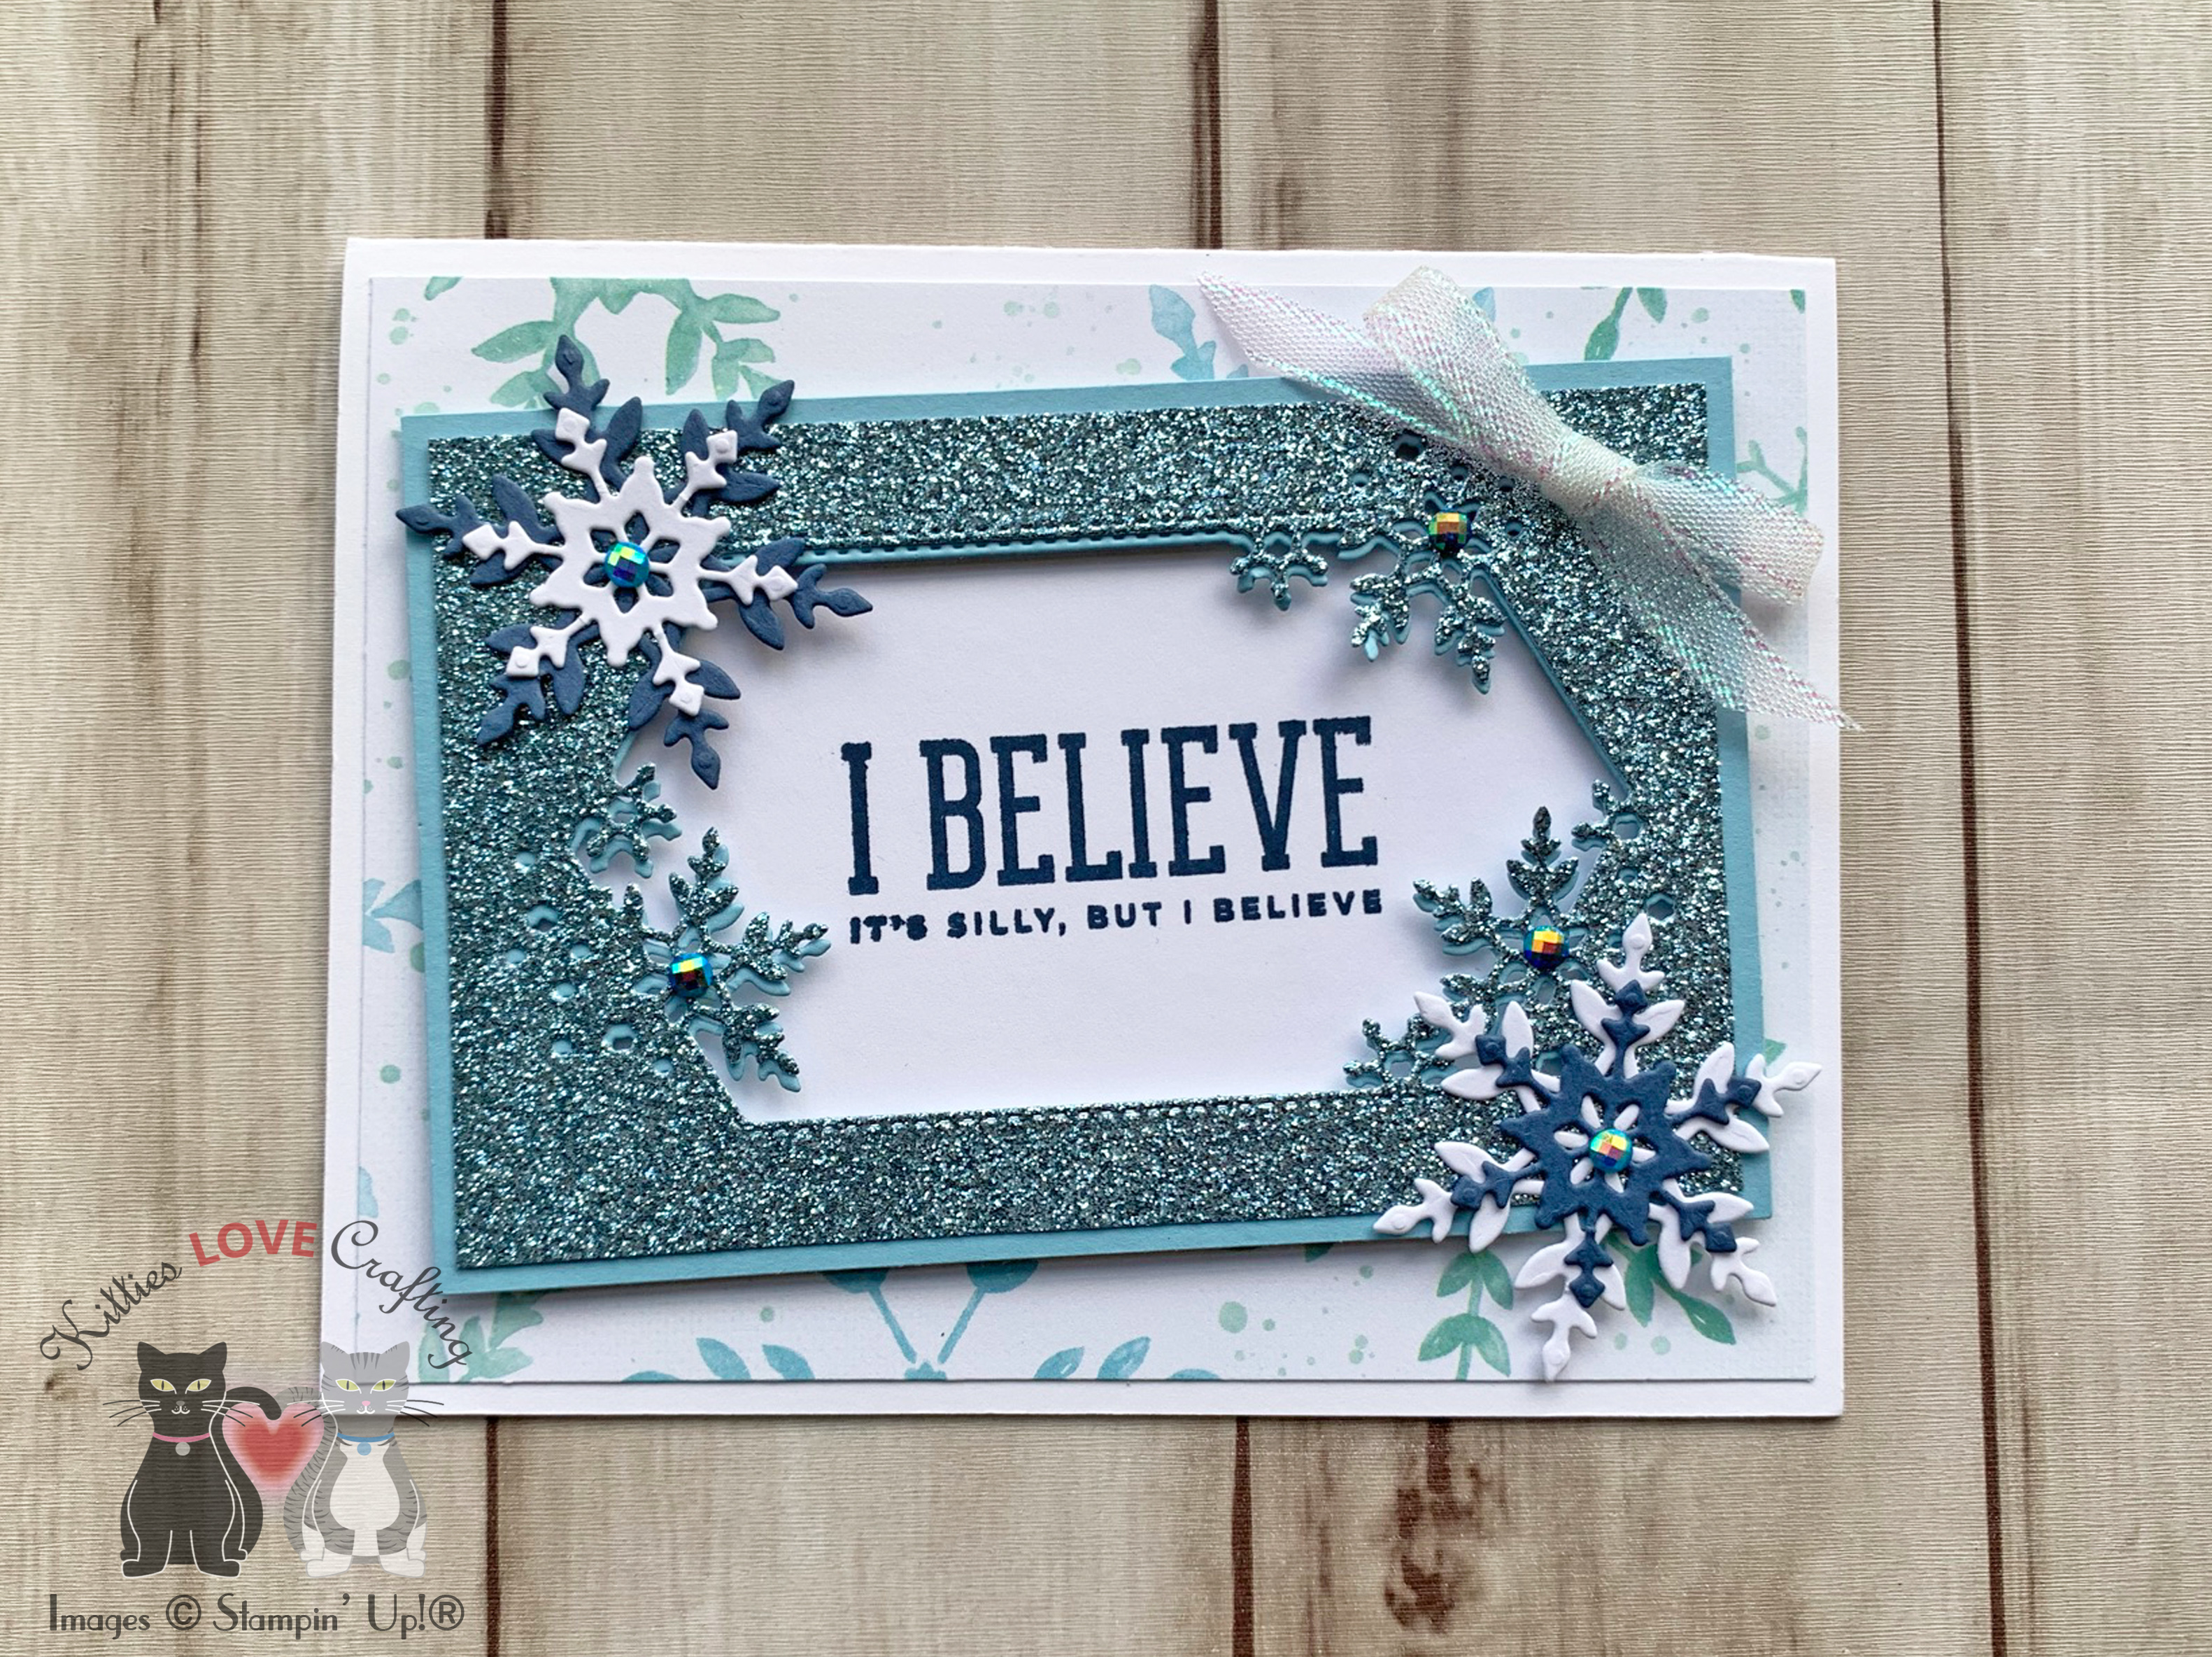
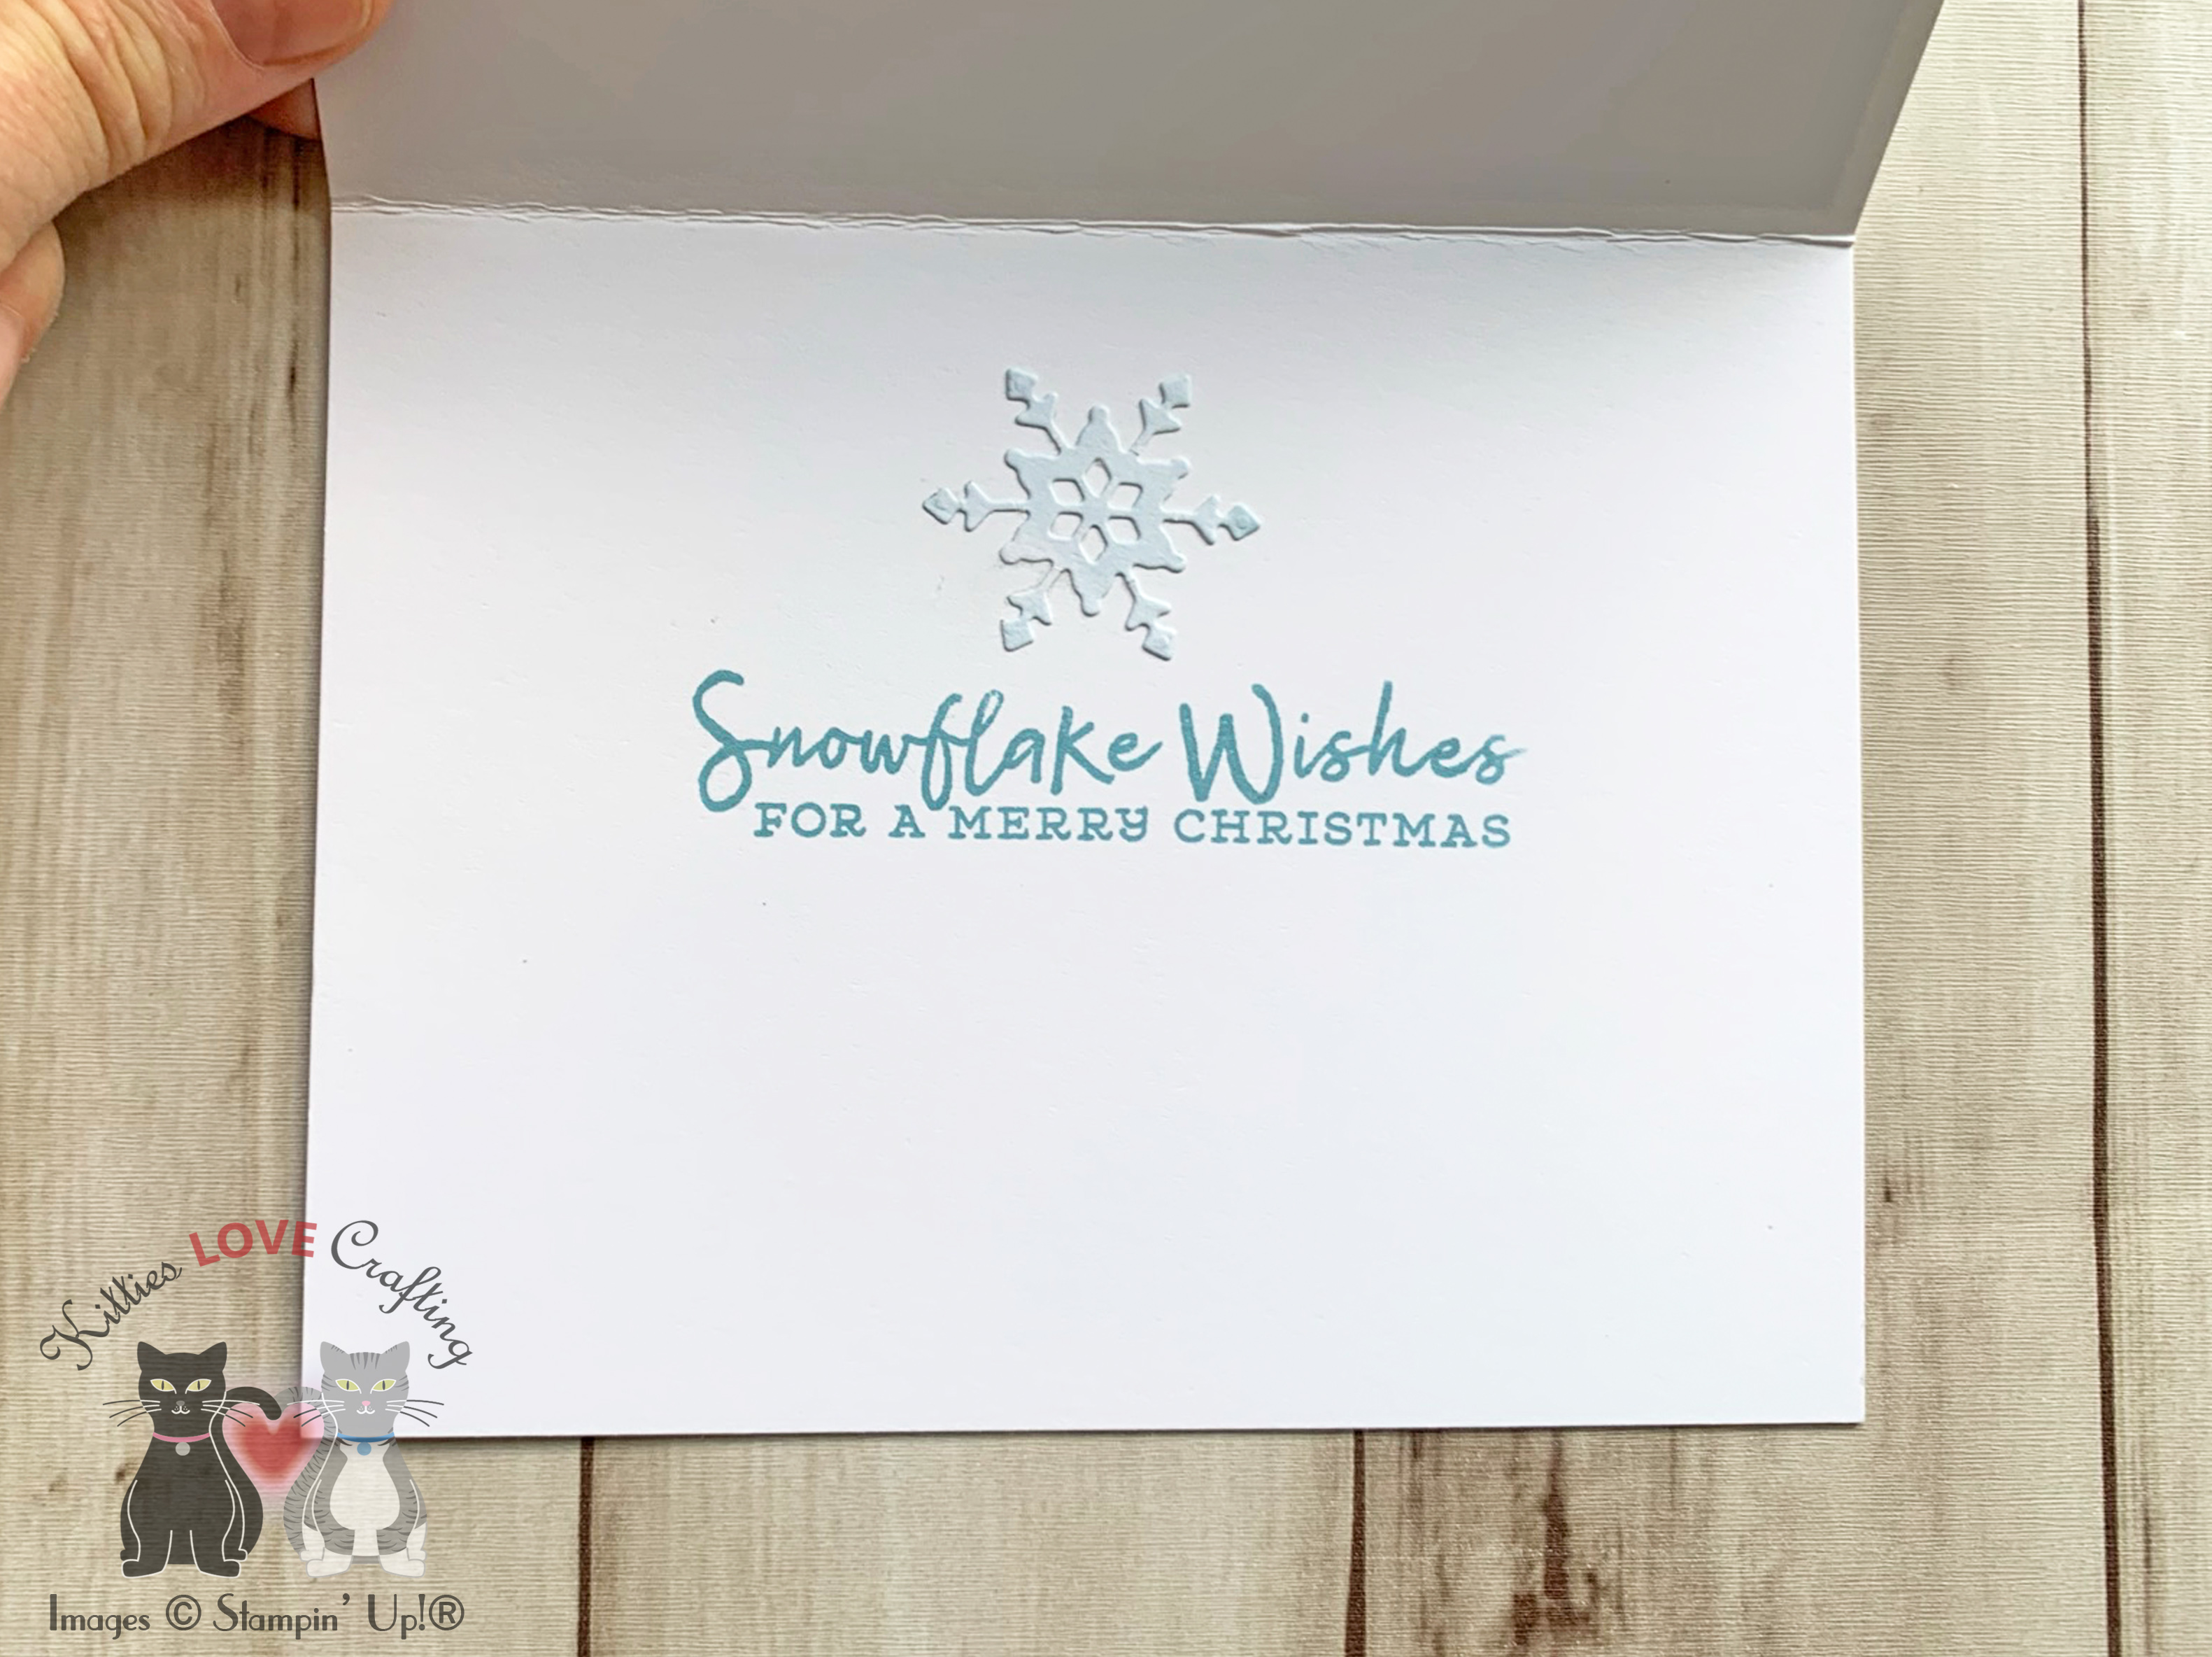
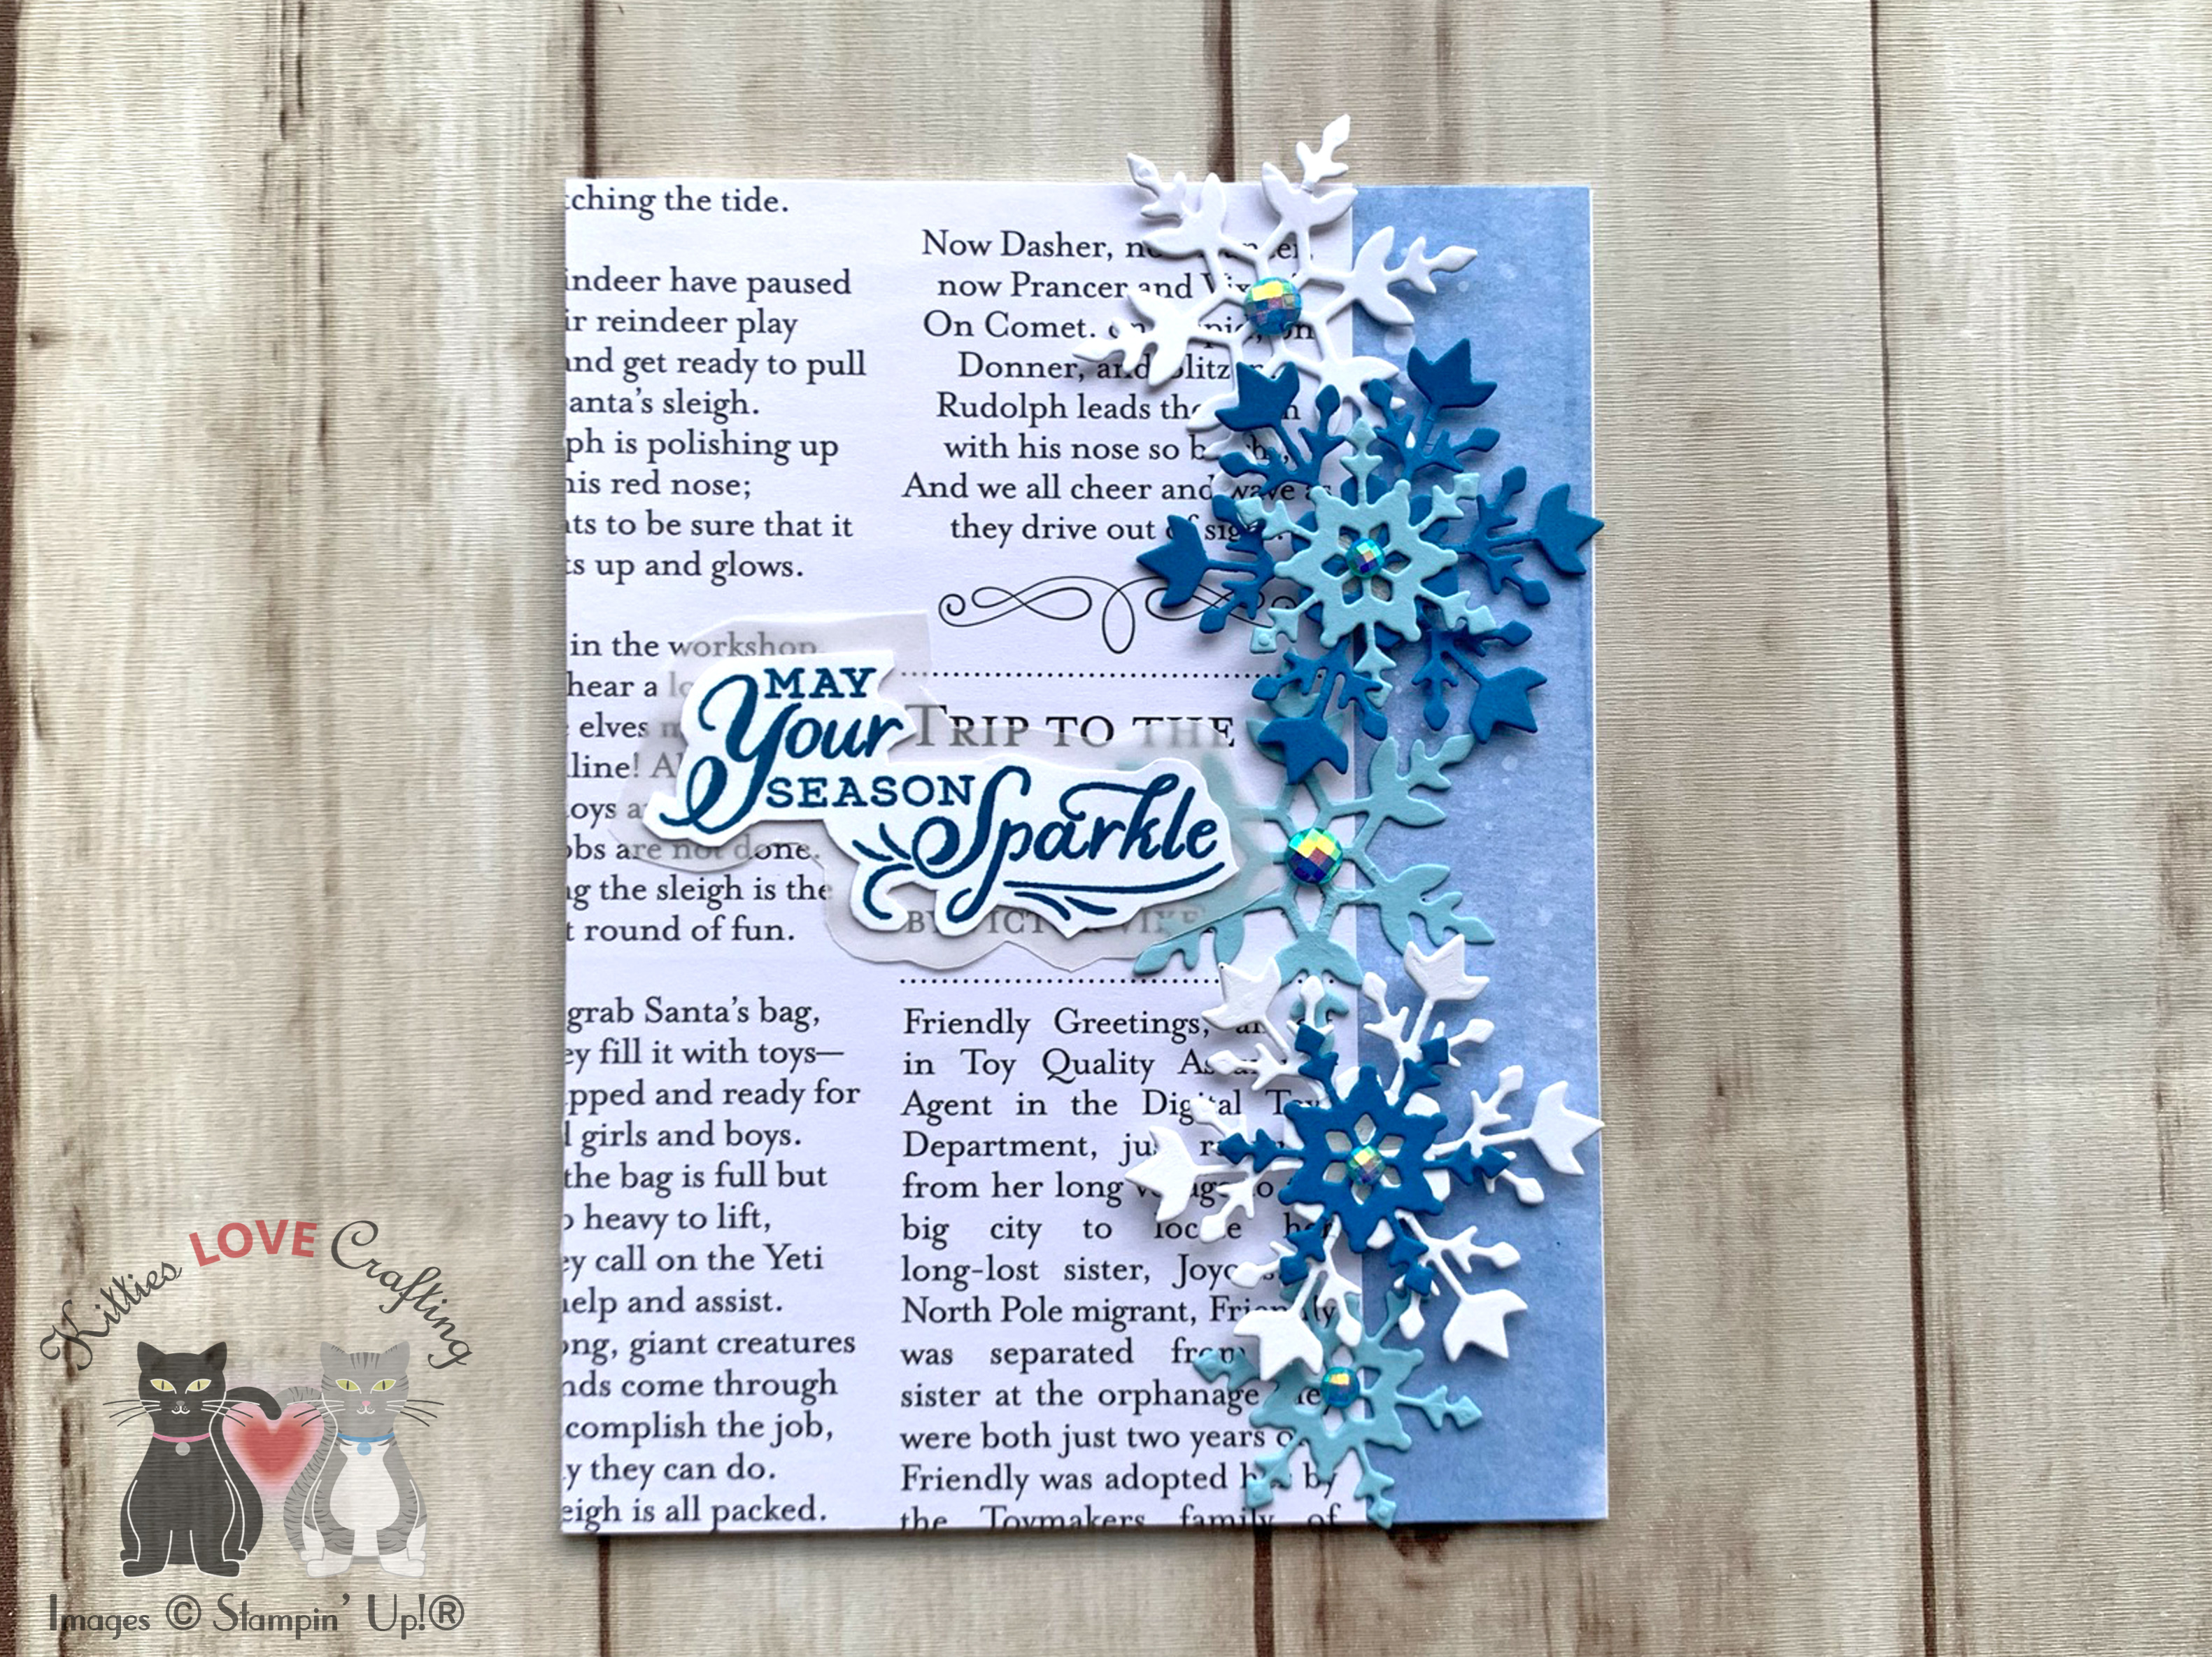
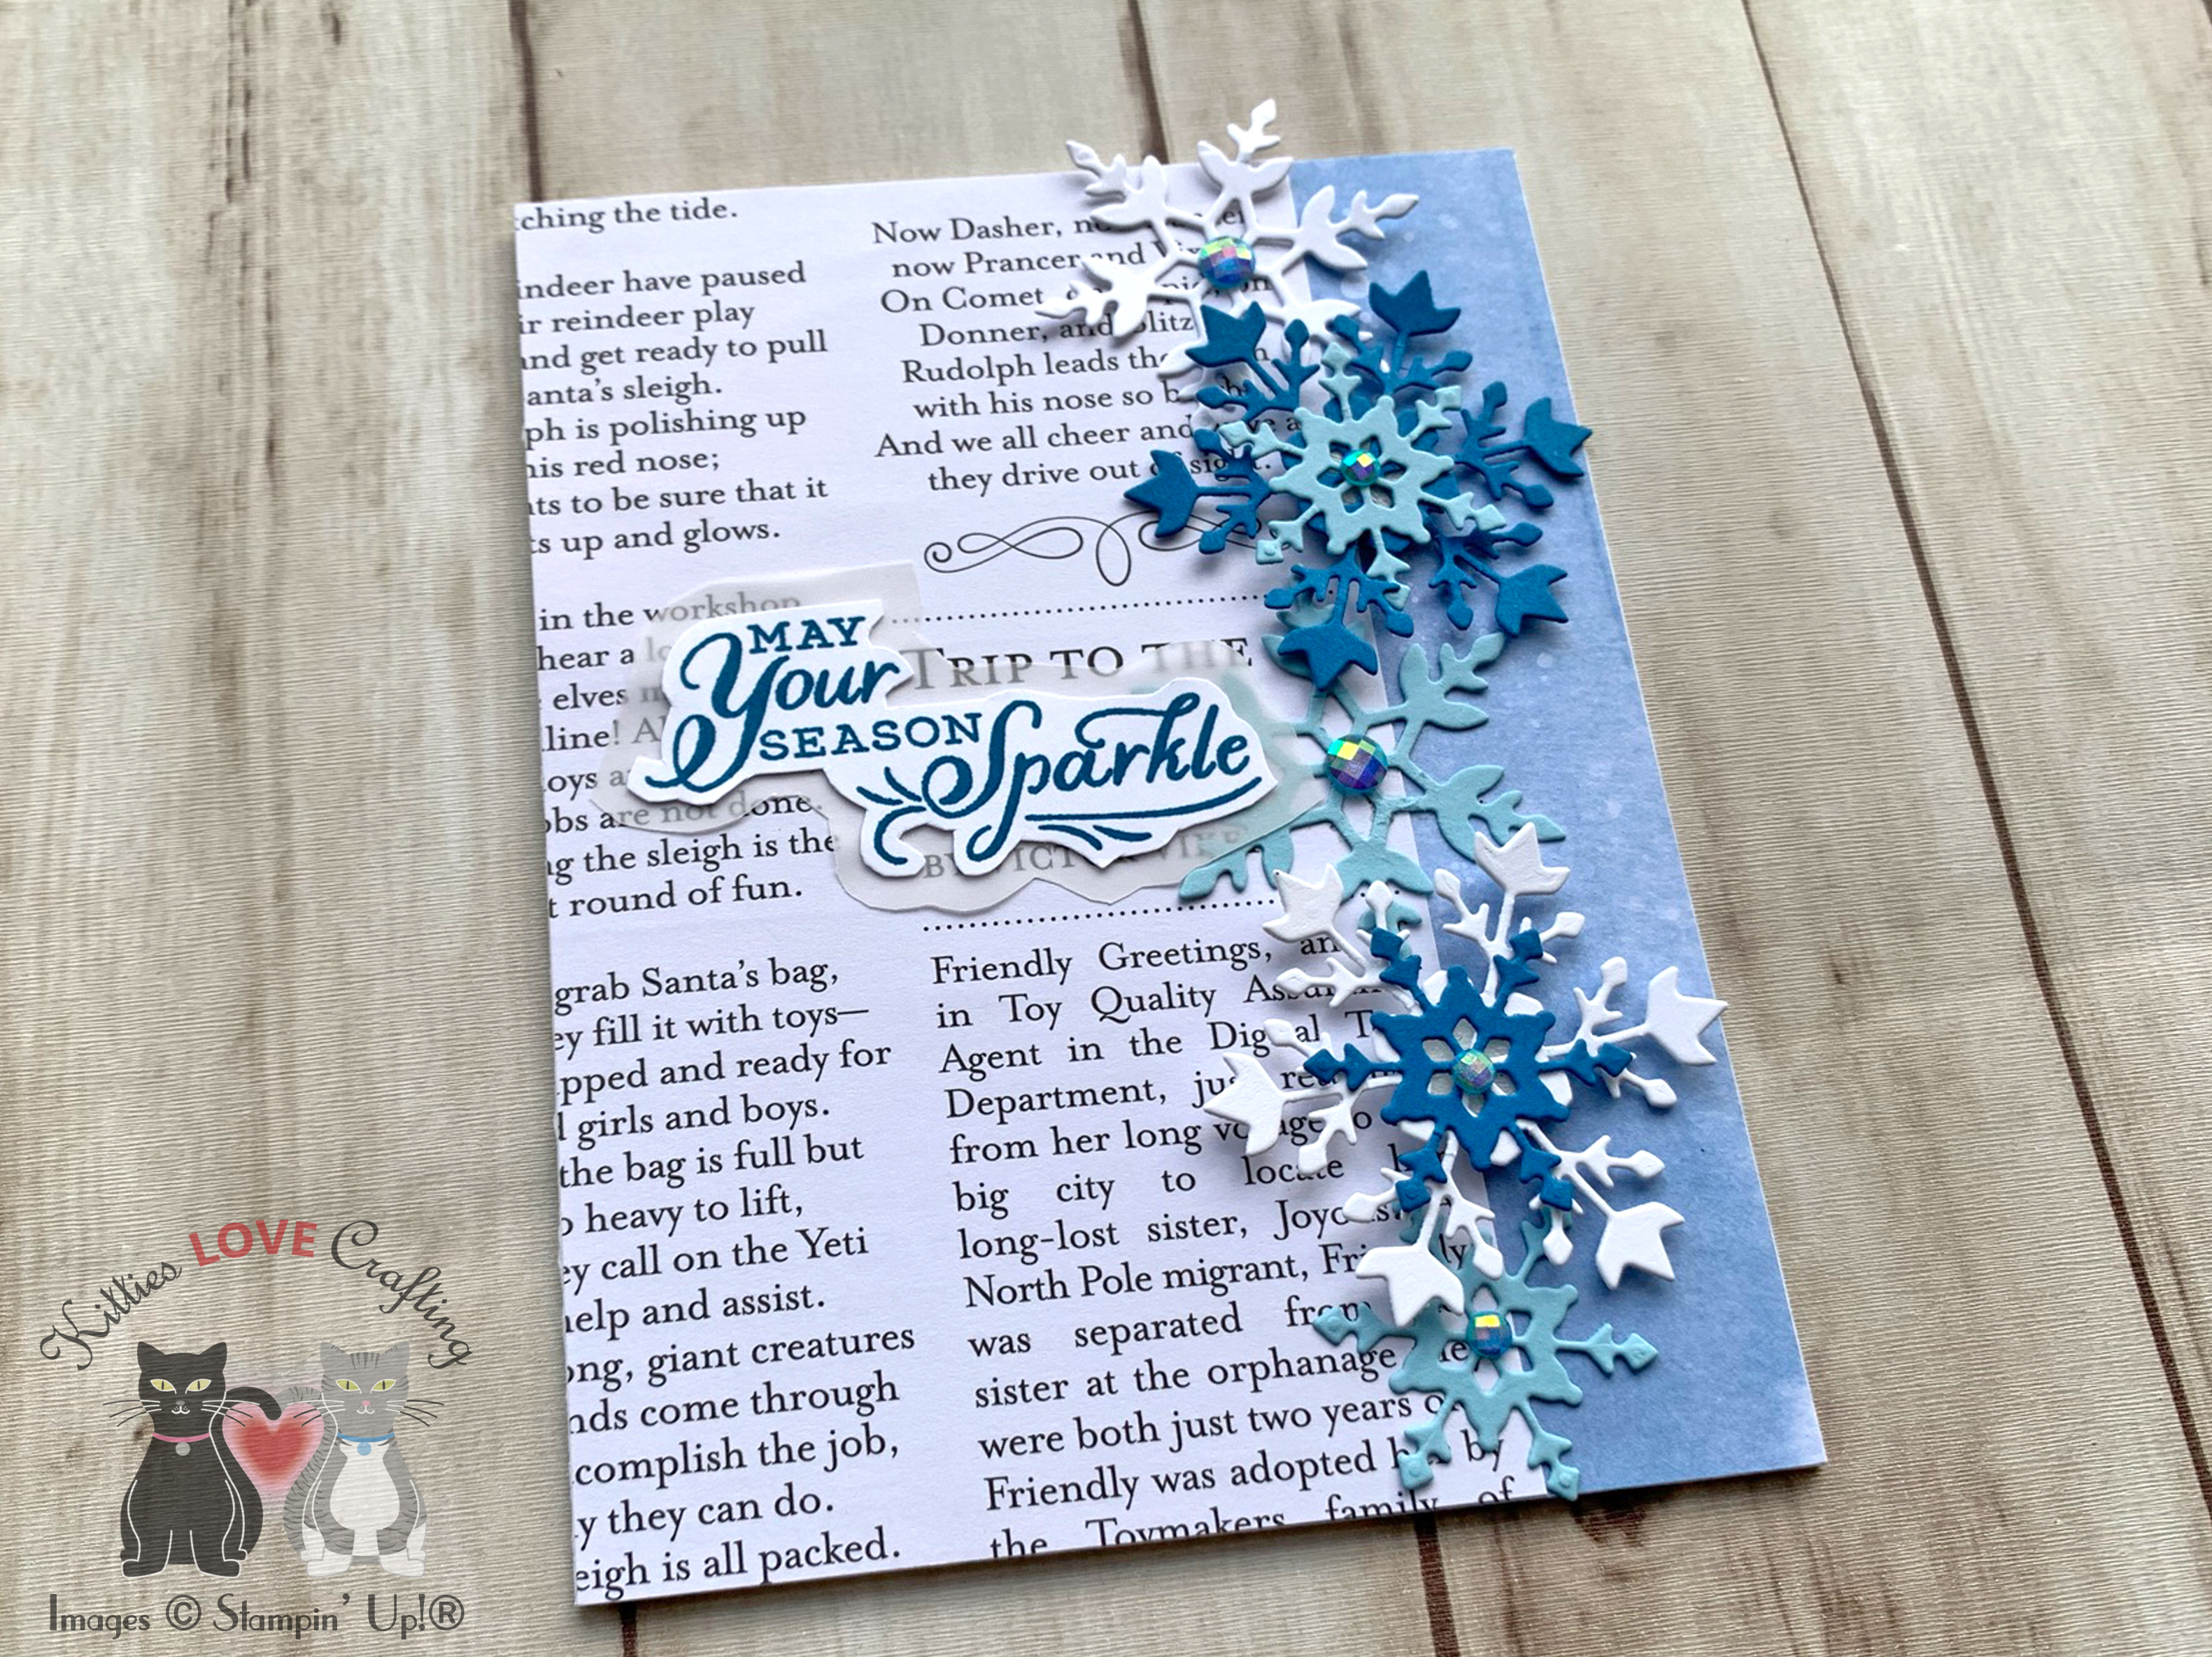
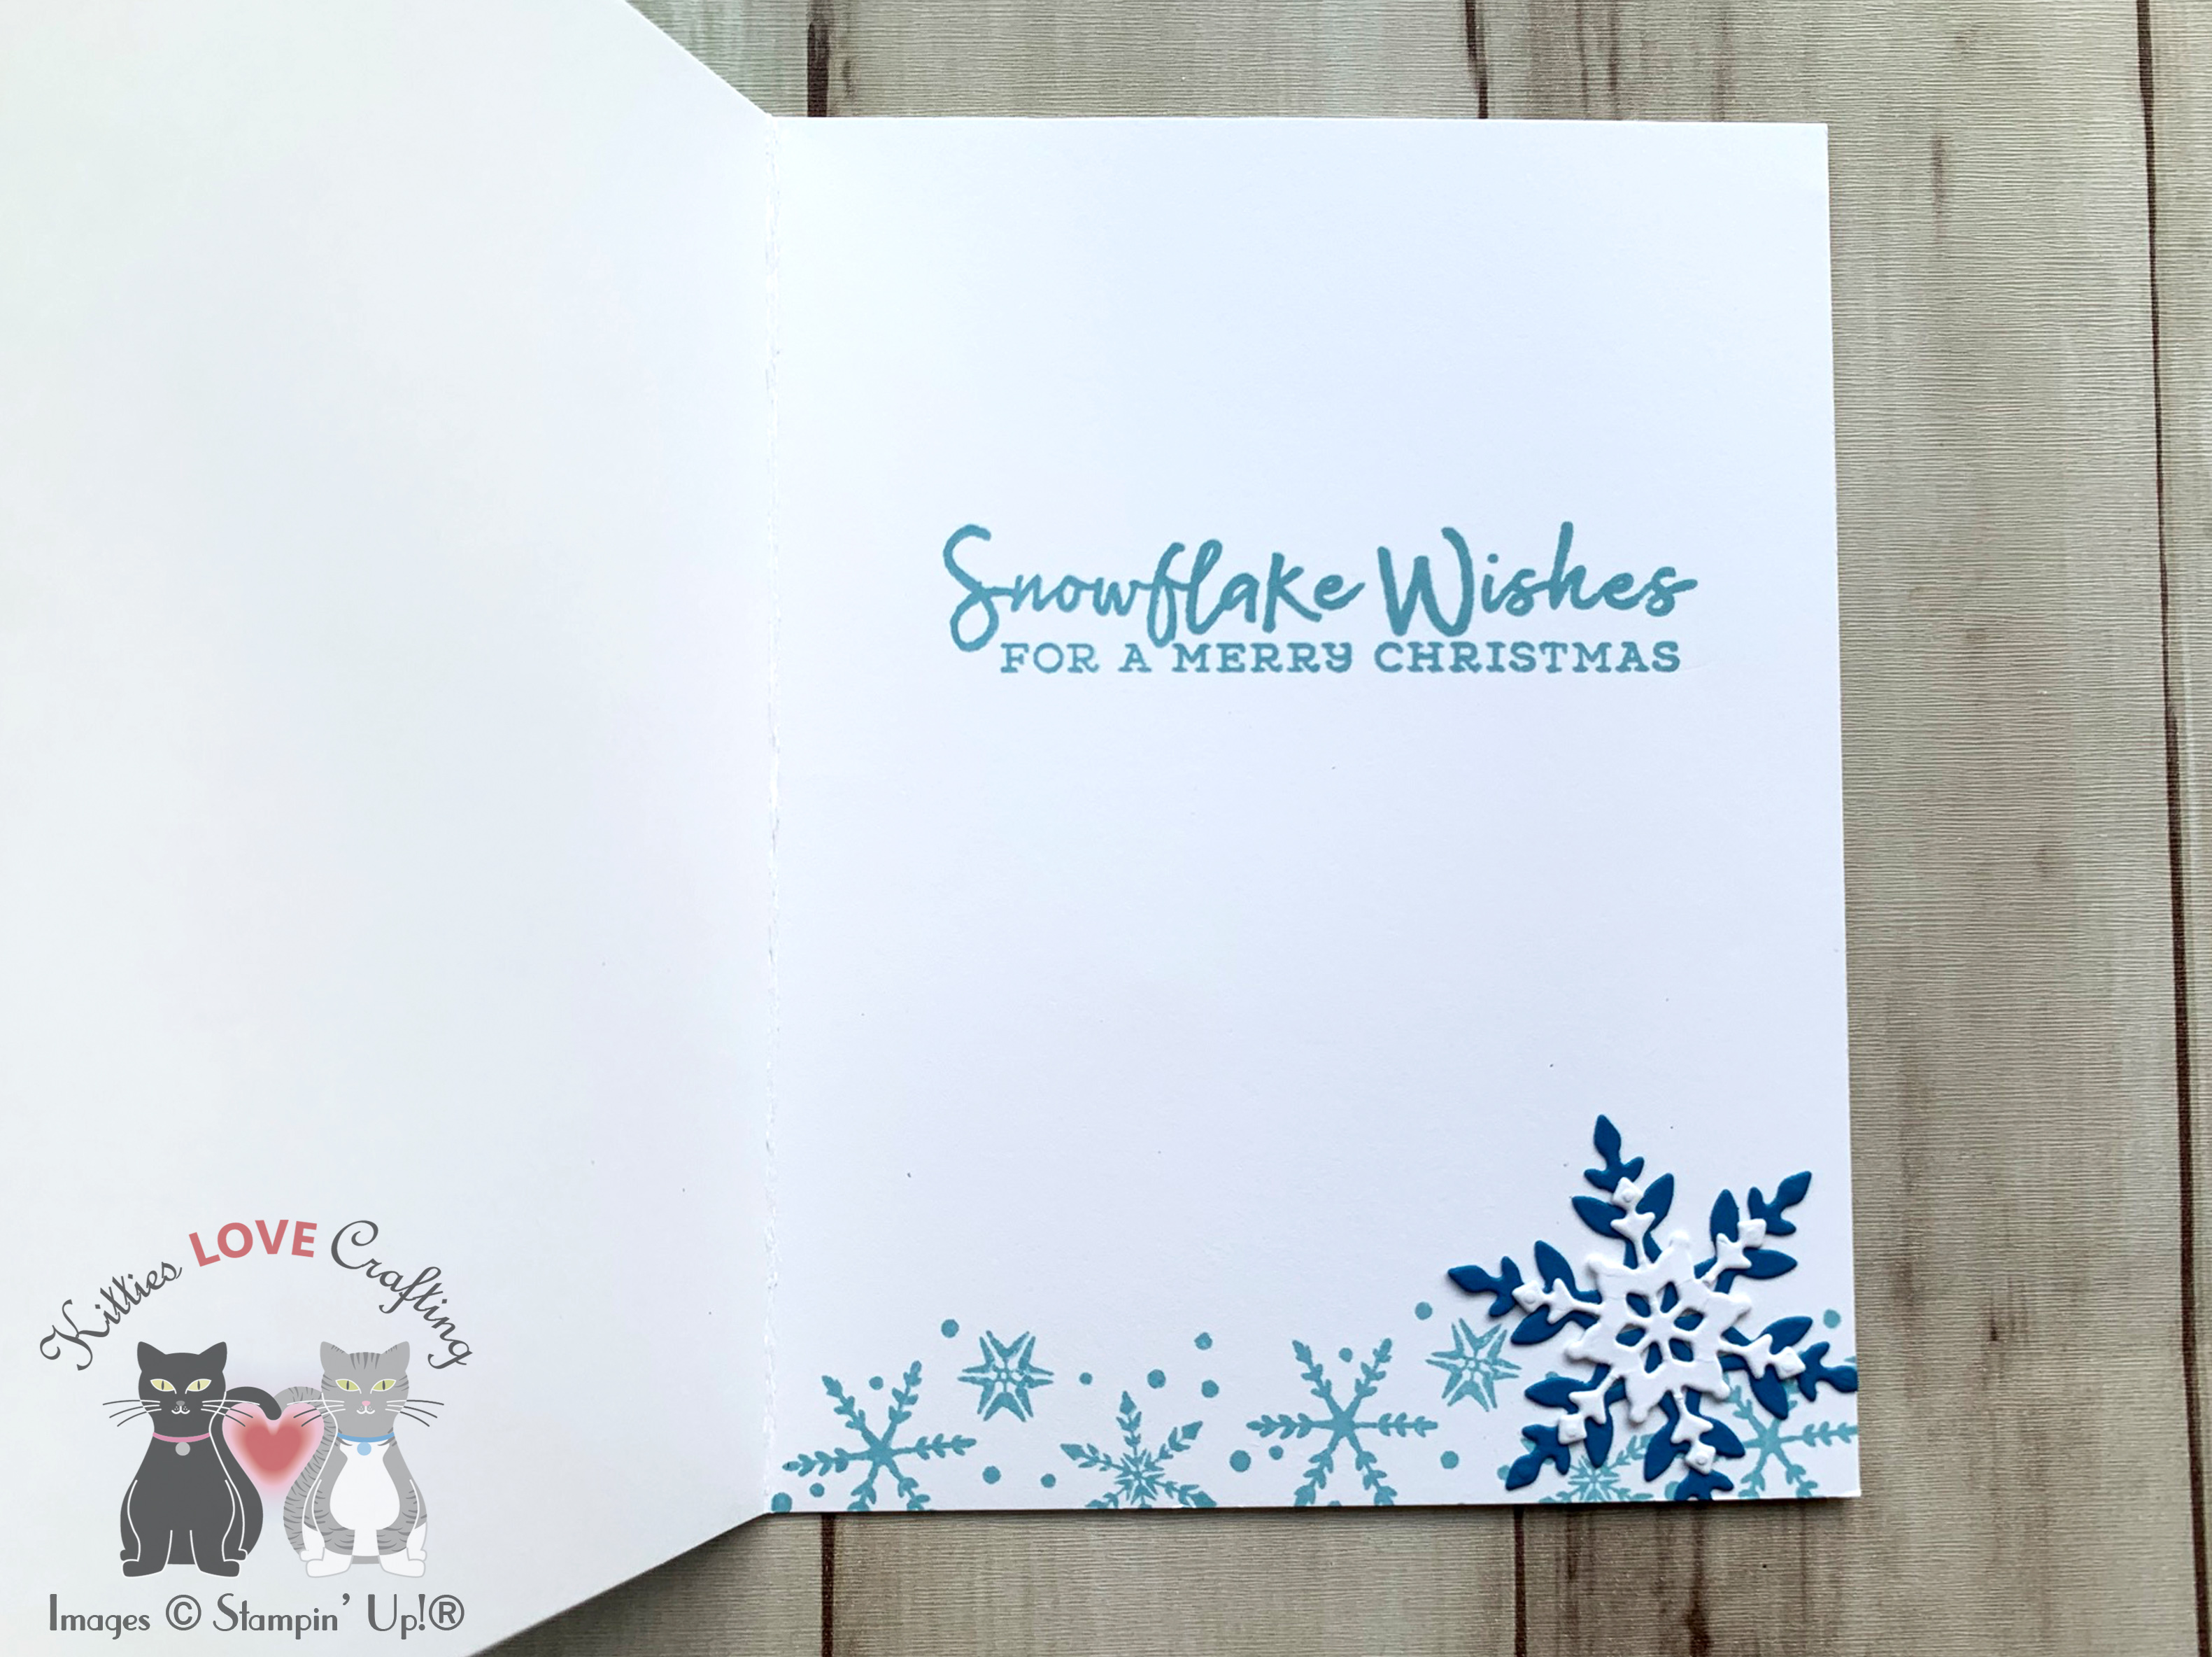
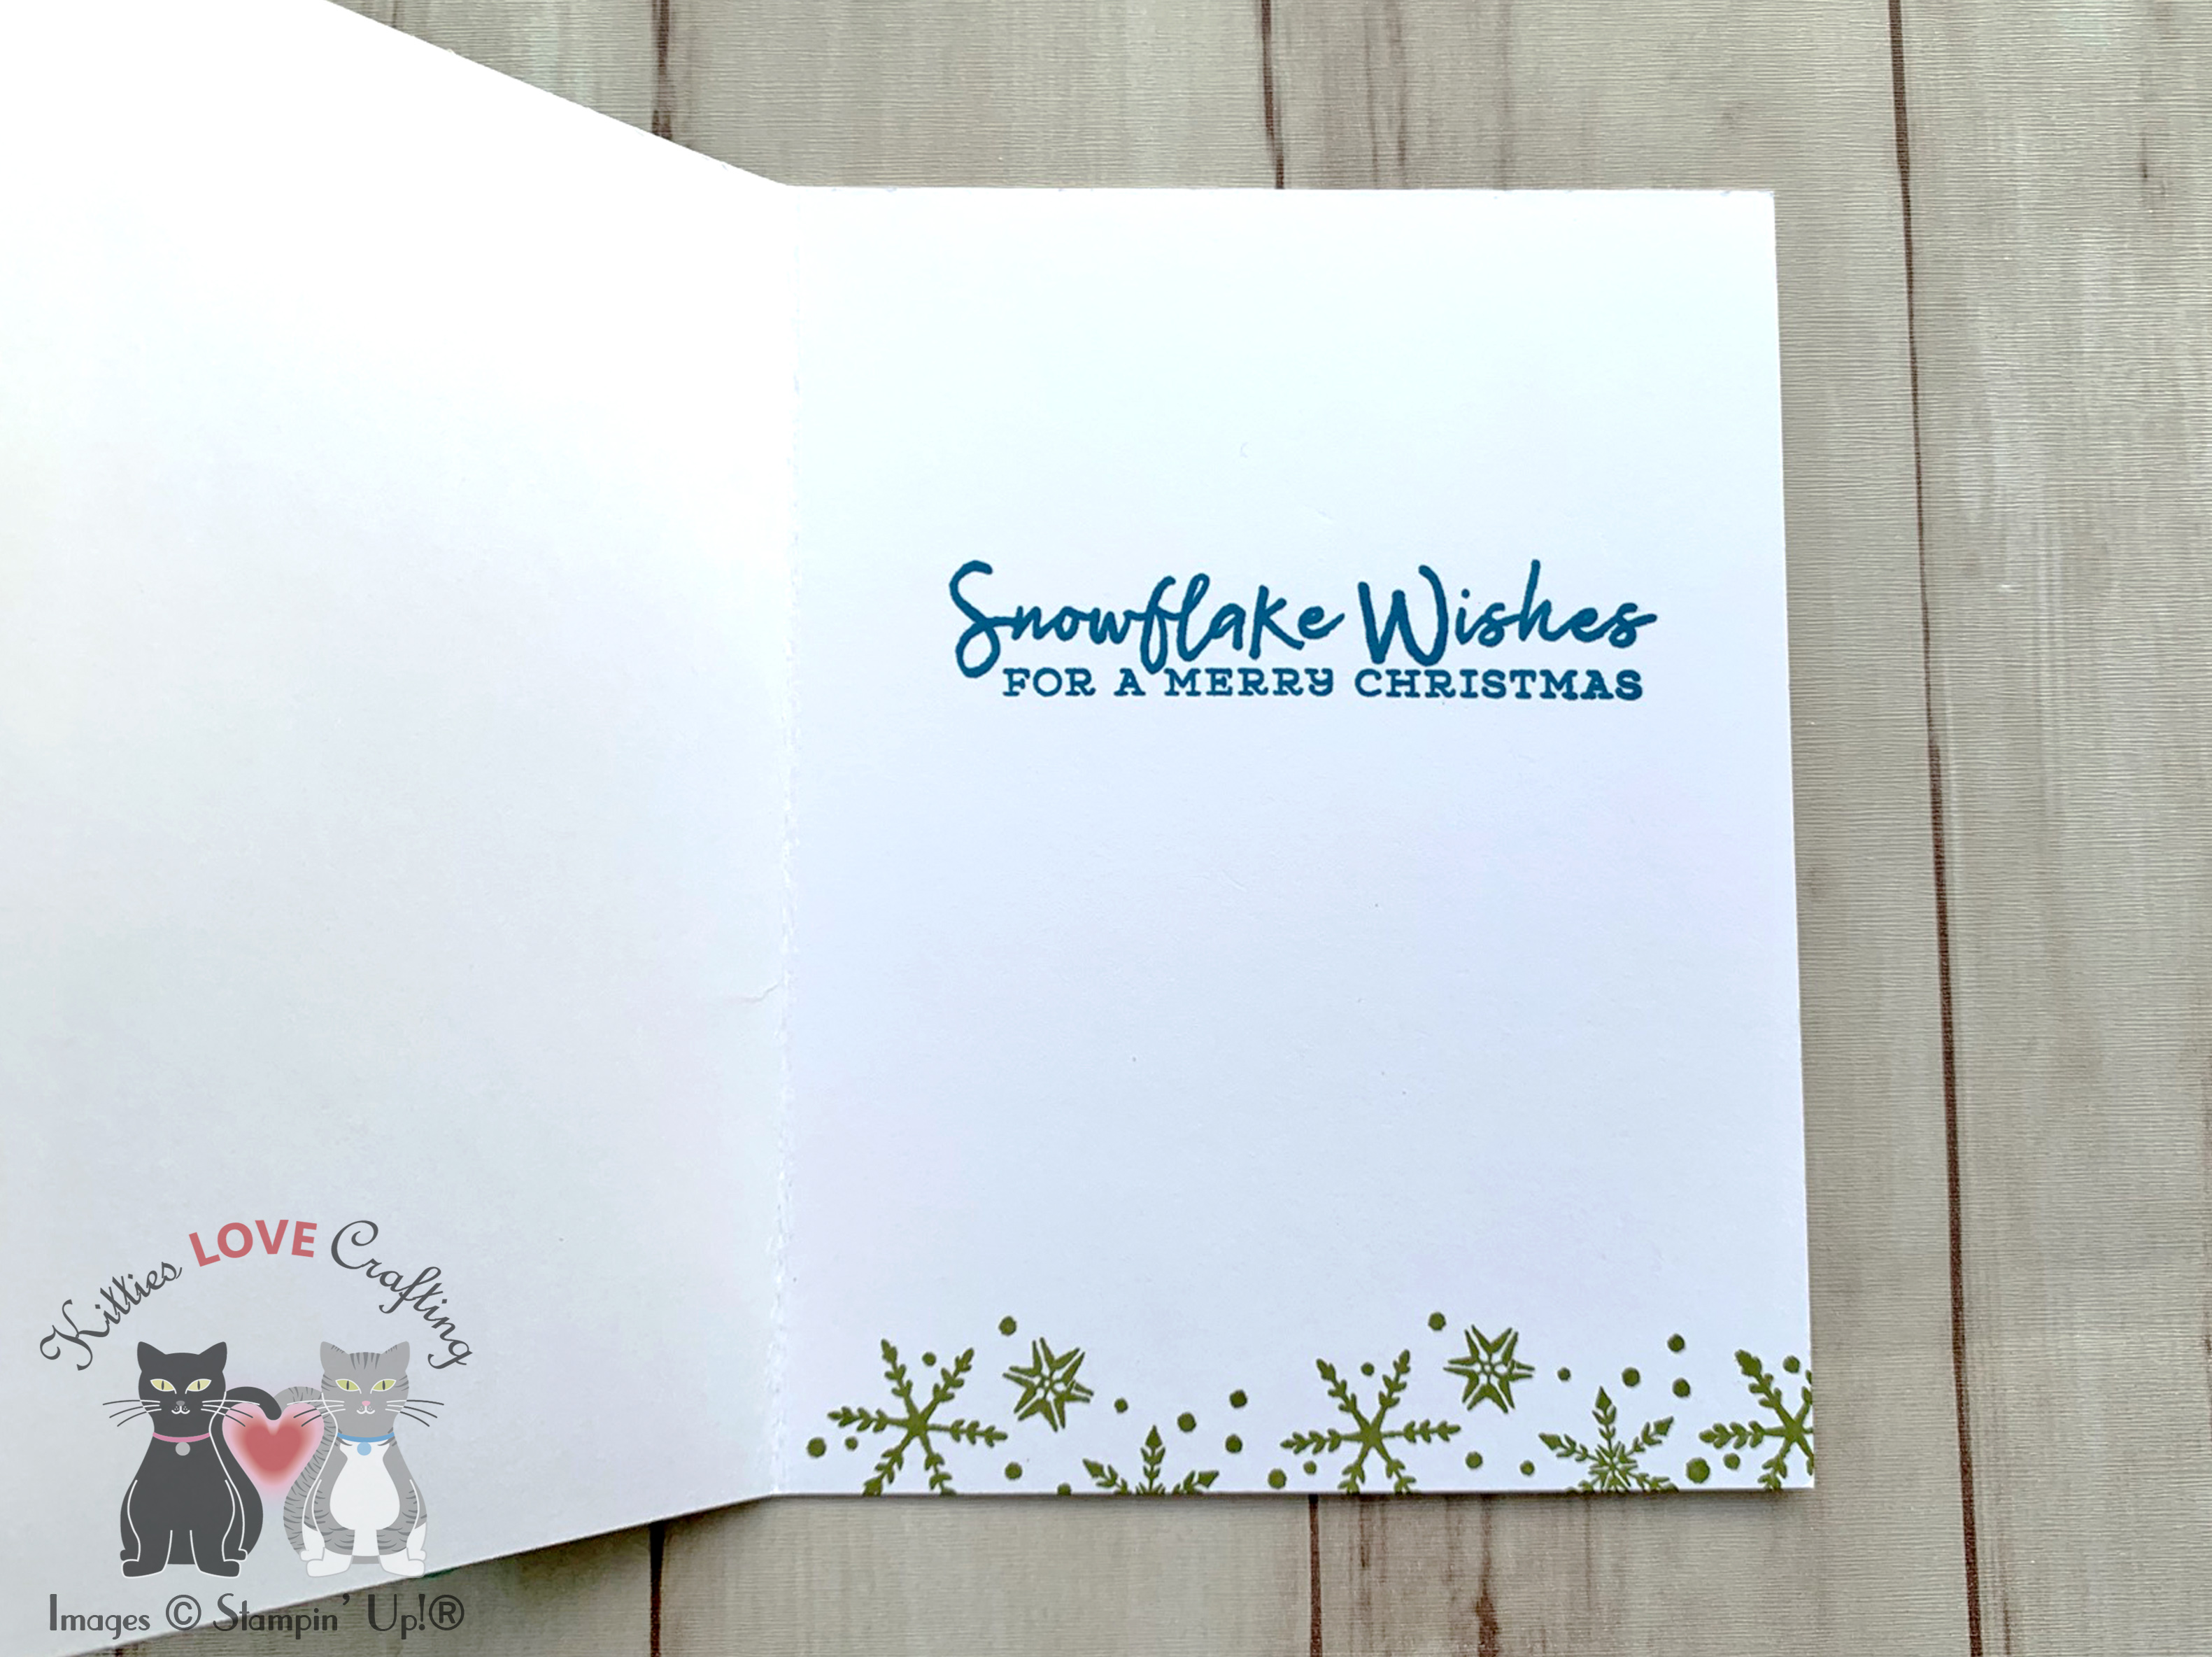
Need some quick last minute cards??? These pretty snowflake cards were all created using the Snowflake Splendor Suite from Stampin’ Up! and came together quickly. This suite can be found on page 37 of the new Aug-Dec Mini Catalog; it features lots of beautiful papers in shades of blues, aquas and purples.
Thanks for reading this post. I hope you enjoyed and I’ve inspired you to try these easy holiday cards using this stampset for yourself! Leave comments or questions below or feel free to email me. If you want to share you creations with me tag me on instagram @kittieslovecrafting. If you would like a Stampin’ Up! catalog, please email me as well. All current catalogs can be found on the right side of this post and the Stampin’ Up! page. All news and fun stuff happening at Stampin’ Up! are listed there!
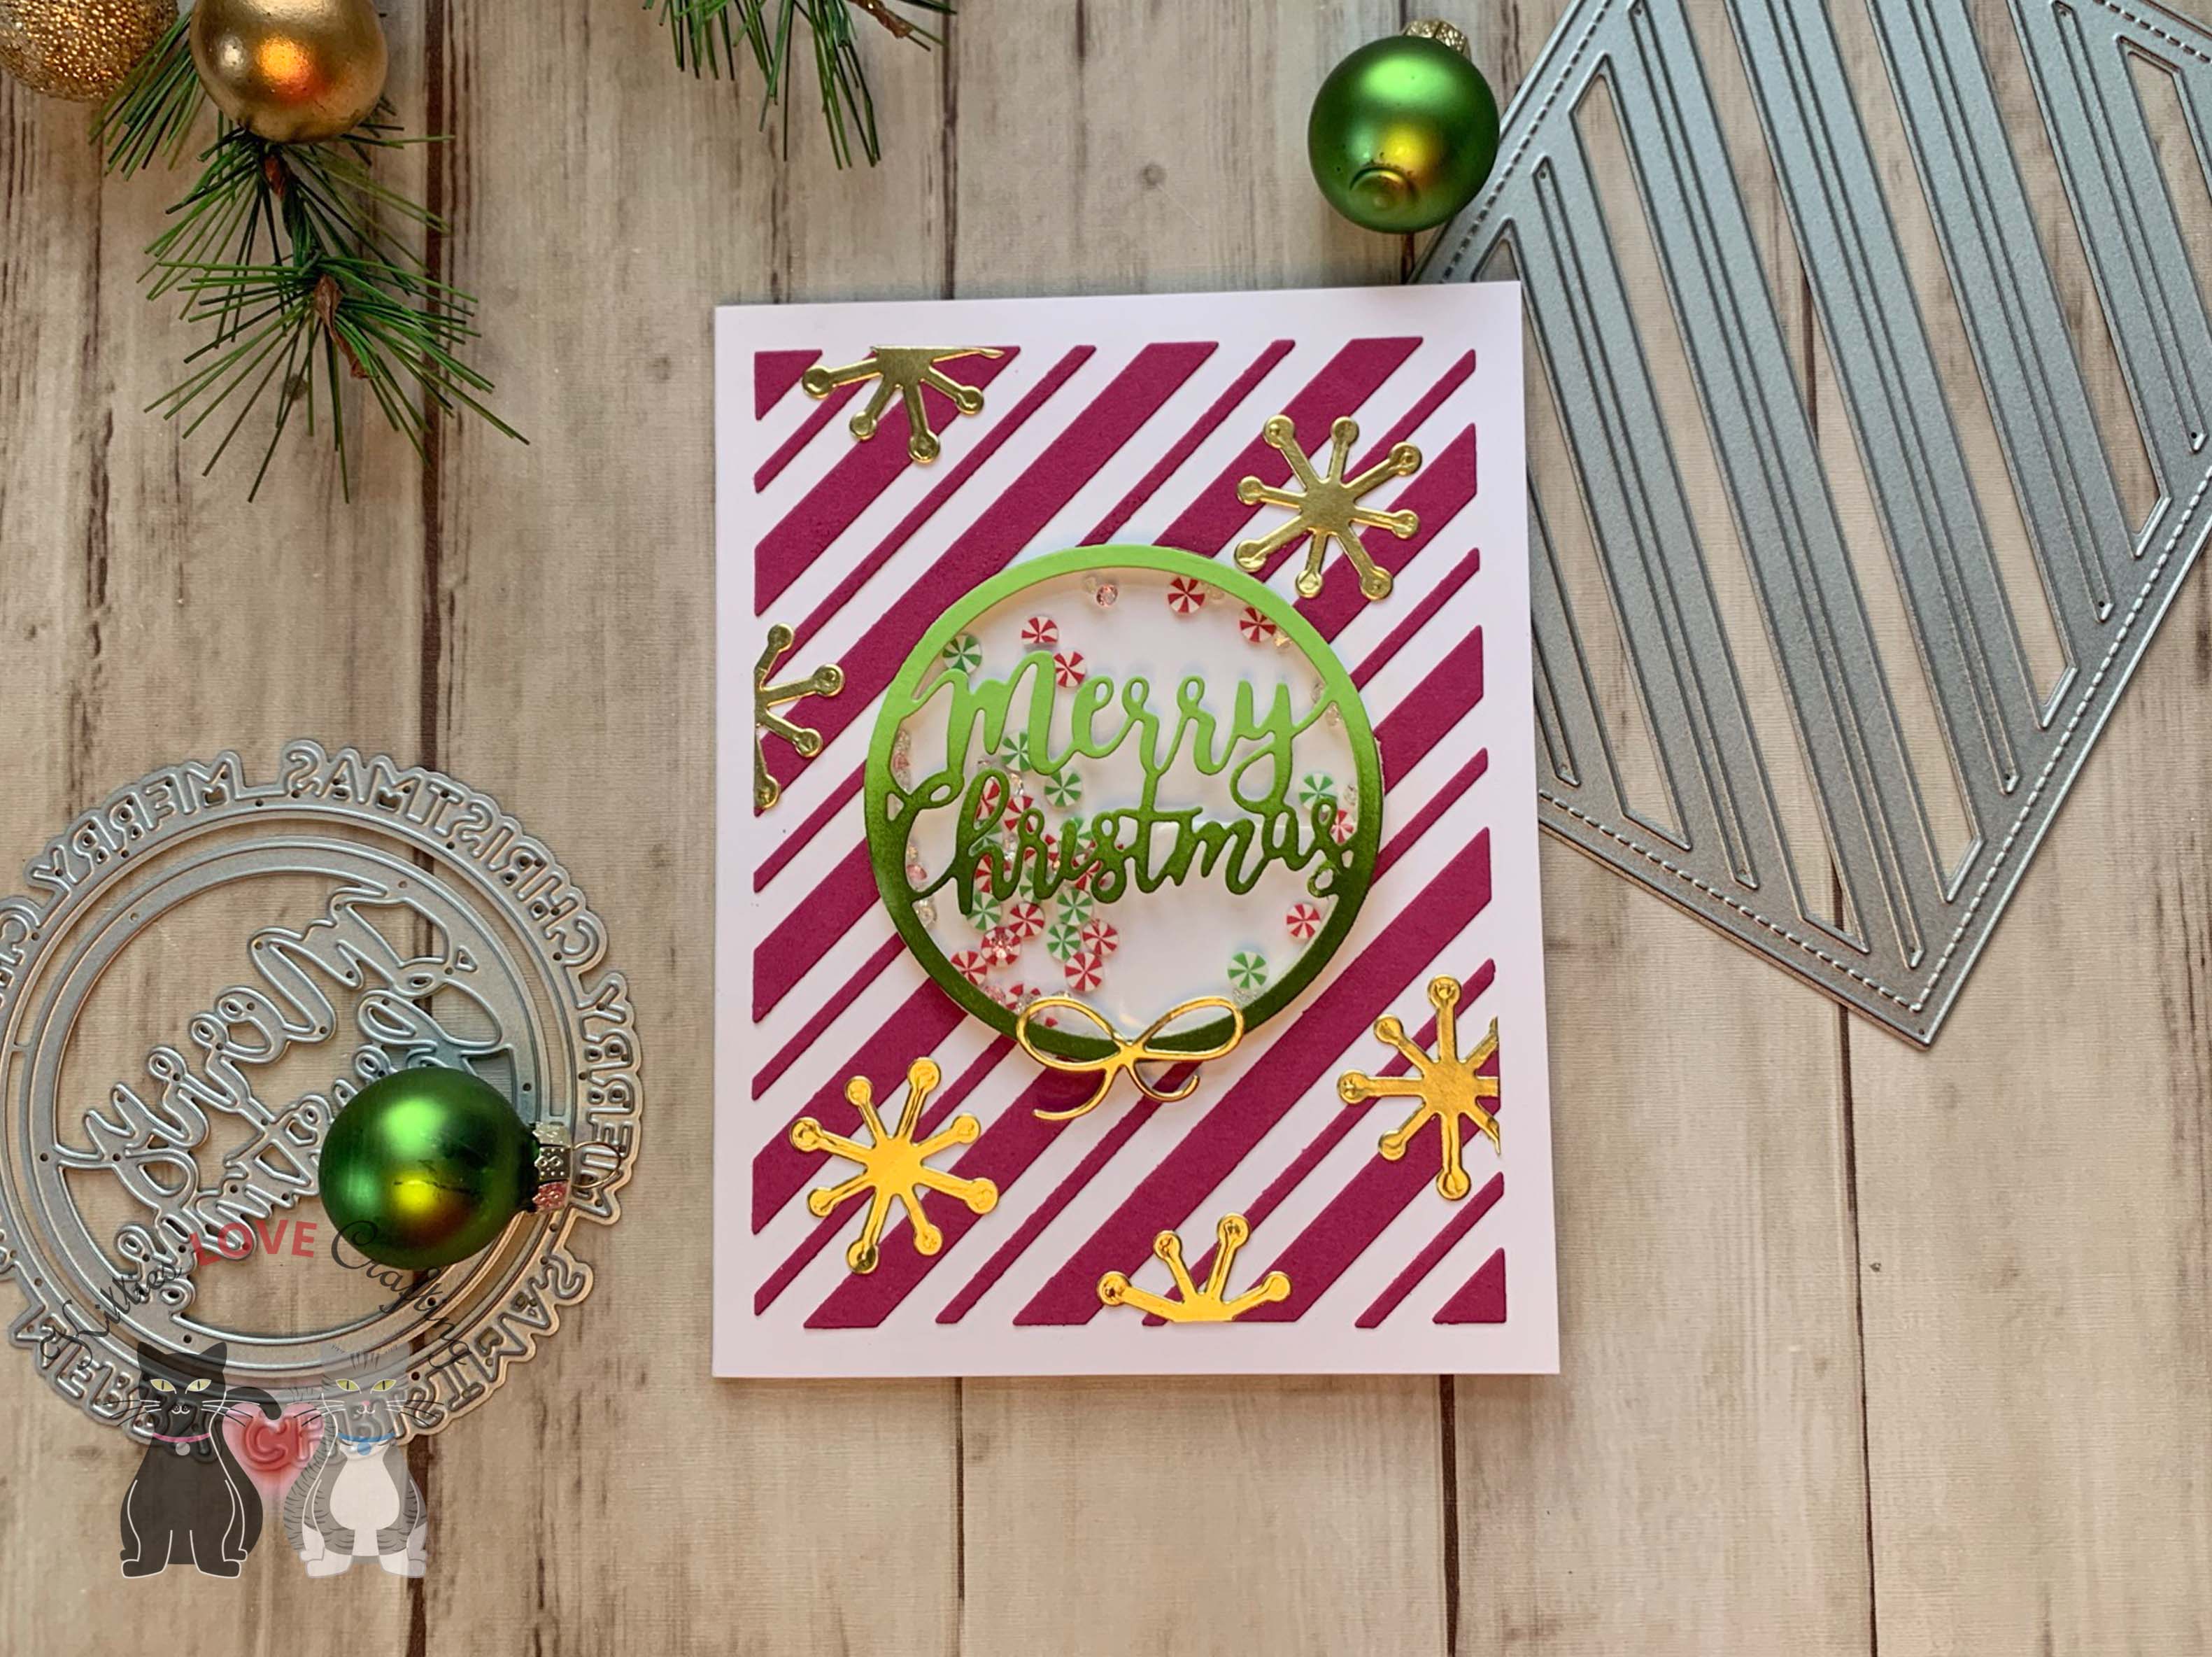
Hello everybody! I don’t know about you but I love slimline cards and I love window cards and if I can use a die to quickly accomplish that create both of those then I am one happy camper! This Doodle Window Slimline Die from Catherine Pooler Designs’ Jolly Holiday release is great for just that. You can add all kinds of stuff in the windows — sentiments, characters, sequins for a shaker, paper etc.
Thanks for reading this post. I hope you enjoyed and I’ve inspired you to give these fun slimline cards a try for yourself. Leave comments or questions below or feel free to email.
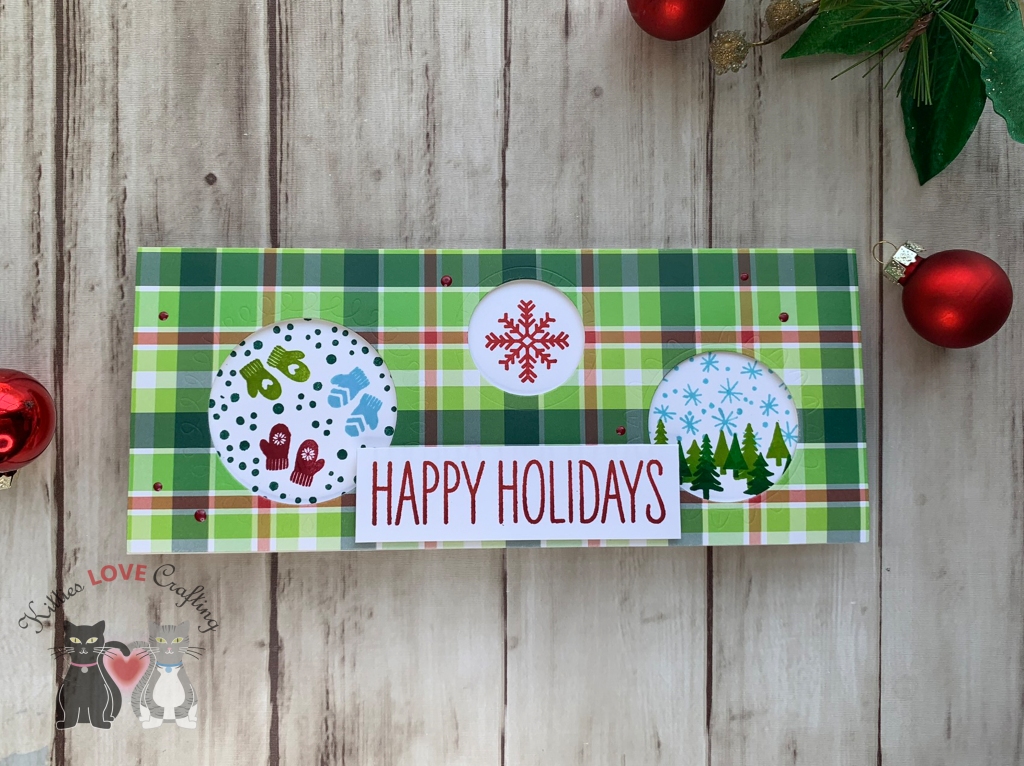
Hello everybody! I don’t know about you but I love a good shaker card and when it’s easy to make I’m all for it! I also love slimline cards so I decided to combine the two. This new Candy Cane Slimline Die from Catherine Pooler is perfect for all kinds of backgrounds You can layer it, inlay the pieces or do a tone on tone like I did here. The other die that I am loving from the Jolly Holiday release is the Peppermint Twist Cover Plate Die. You will see how I used it for this card.
I started by cutting a piece of Neenah 110lb Classic Crest Cardstock 8.5 X 11″ to 7 x 8-1/2″ and scored at 3-1/3″ for my card base. next I used the Candy Cane Slimline Die to cut the front panel and adhered it to the card base. I used the My Favorite Things Stitched Circle Scallop Frames (I think this is no longer available but you can achieve the same look with a scallop circle die or punch and a smaller circle for the inside) to cut out a frame from Neenah 110lb Classic Crest Cardstock 8.5 X 11″.
I put together my shaker element by adding acetate to the back of the frame, using a punch to cut it out, some foam tape behind that and adding some Queen and Company Topping Pastel Diamonds in red, green and clear. I adhered the circle with the sentiment and adhered the whole thing to the card.
Thanks for reading this post. I hope you enjoyed and I’ve inspired you to give this card a try for yourself. Leave comments or questions below or feel free to email.
Happy Monday friends! Hope you are safe and had a good weekend. Today I am bringing you this card featuring a faux shaker. I saw this technique used by Jennifer McGuire and I decided to try it. I made it simpler by using pattern paper and some stamped snowflakes.
I started by cutting a piece of Simon Says Stamp Audrey Blue 100lb Card Stock to 5-1/2 x 8-1/2″ and scored at 4-1/4″, to create a card base. I cut out a strip from the front of the card base, measuring 1-1/4” in height and then two strips of the stories from the Carta Bella Santa’s Workshop 6 x 6 Designer Papers (discontinued), each measuring 1-1/2 x 5-1/2”.
I took some sequins and added them inside a laminating pouch and ran that through a lamination machine. I trimmed it down to approximately 3 x 5-1/2” and adhered it between the card base pieces and the pattern pieces using 1/4” double sided tape.
On the inside of the card, I adhered two strips of another pattern paper from the Carta Bella Santa’s Workshop 6 x 6 Designer Papers (discontinued), each measuring 1-1/2 x 5-1/2”, to the back of the front panel. Then I stamped another greeting from the Simon Says Stamp CHRISTMAS CHEER Stamps with Tim Holtz Festive Berries Distress Oxide Ink.
Thanks for reading this post. I hope you enjoyed and I’ve inspired you to give this technique a try for yourself. Leave comments or questions below or feel free to email.
Stickers are a great way to create quick cards and who doesn’t like quick cards for the holidays, right?!? I had some leftover stickers from the Carta Bella Paper – Santa’s Workshop Collection, Christmas, 12 x 12 Cardstock Stickers featured in the Says Stamp December 2018 Card Kit, Holiday Cheer (sold out) so I decided to use them on a slimline card. The larger sticker like the Santa and reindeer one are great fro slimline cards!
Thanks for reading this post. I hope you enjoyed and I’ve inspired you to give this card a try for yourself. Leave comments or questions below or feel free to email.
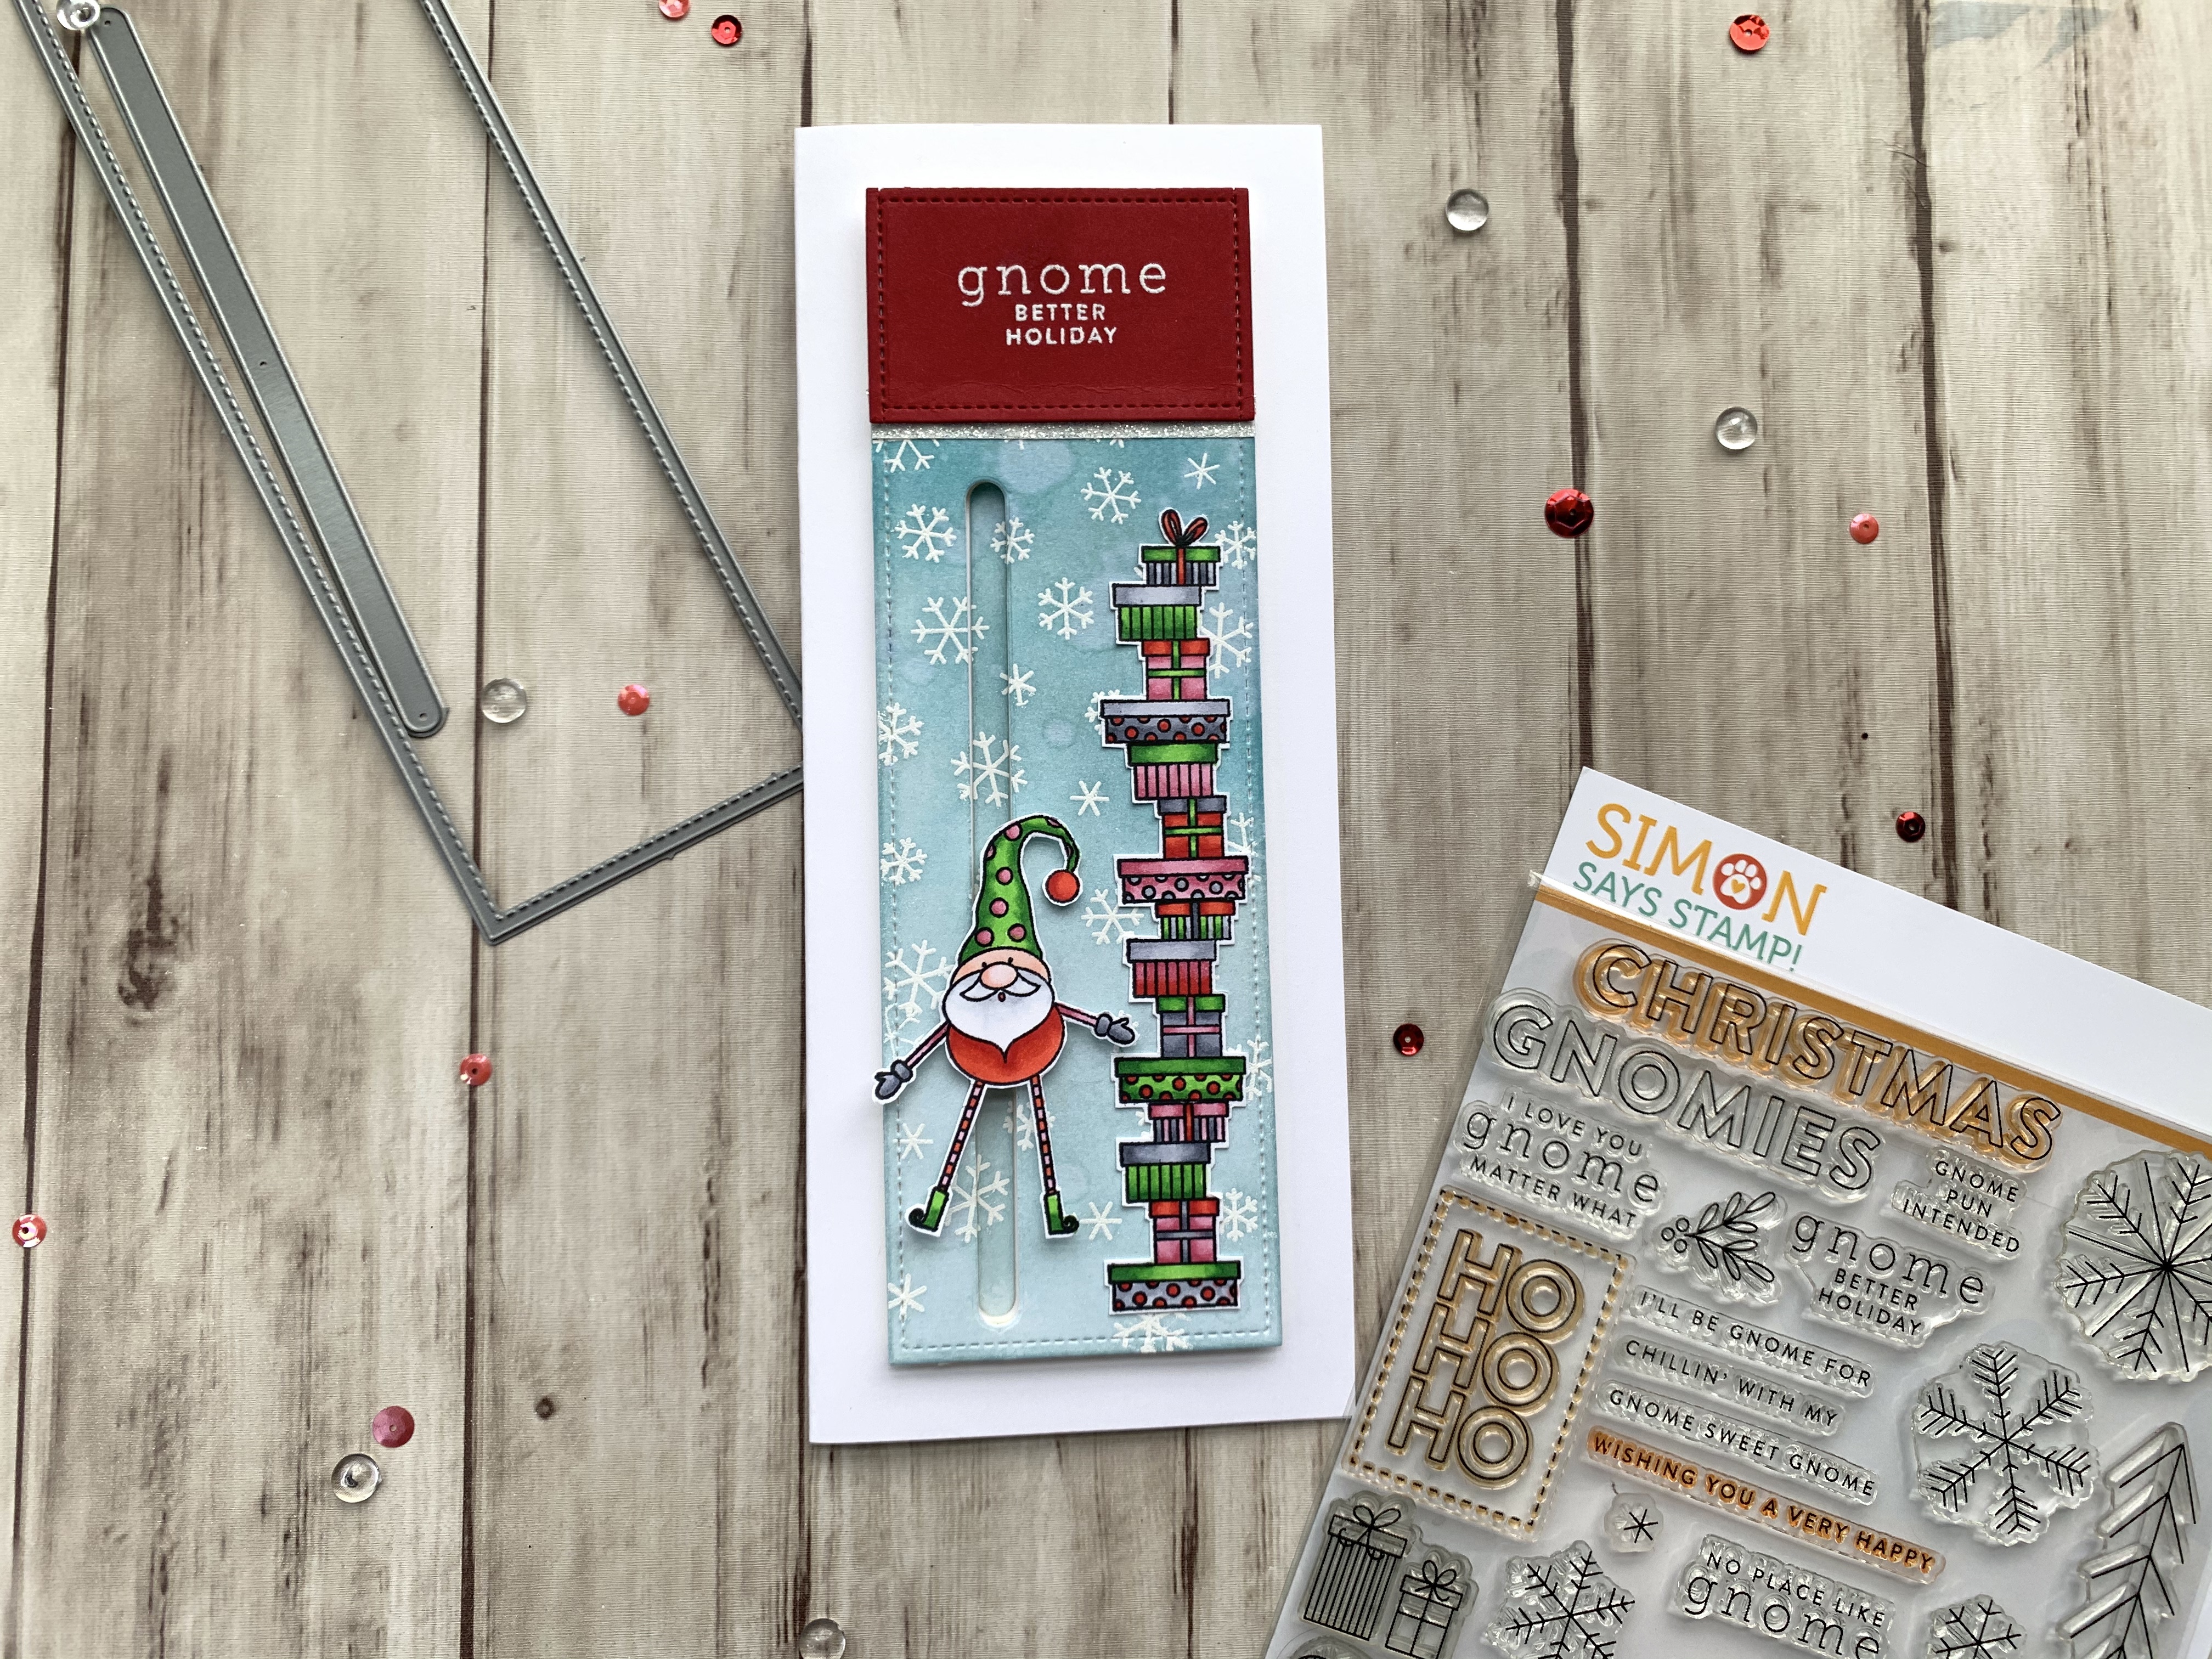
Happy Wednesday friends! I thought I would revisit an old Simon Says Stamp Card Kit. The ‘Gnome for the Holidays’ Card Kit was released in December 2019 and features the cute 6 x 8″ Gnome for the Holidays stampset. I thought it might be fun to make a slimline slider card with the little gnomes. It was fairly easy to make and can be even more simplified by skipping th eheat embossing and doing simple coloring on the images.
I colored the image with COPIC markers. I used YG05 + G07 (body), R20 (cheeks), R14 + R27 (gloves and socks), C3 + C5 (shoes) and C1 (arms) for the tree gnome; R14 + R27 (body), YG05 + G07 (hat), C1 + 0 (beard), R00 + R01 (face), R81+ R27 (socks), R81+ R85 (hat dots and sleeves), and C1 + C3 (gloves) for the second gnome; and R14, R27, R81, R85, YG05, G07, C1, C3, and C5 for the gifts.
I fussycut the images out and decided where they would go on my card. Then diecut the slider with the Lawn Fawn Large Slimline With Sliders Die Cuts. I added Foam Tape and a penny for the slider element and adhered it to the card base.
Thanks for reading this post. I hope you enjoyed and I’ve inspired you to give this card a try for yourself. Leave comments or questions below or feel free to email.


 https://linkdeli.com/widget.js?id=f5e8378456858c916708