Christmas, Distress Ink Techniques, Stenciled Background, Winter

Cute Penguin Christmas Scene Card featuring Lawn Fawn and Catherine Pooler Designs

Hello friends. Here’s another card featuring these adorable penguins from the Lawn Fawn HERE WE GO A-WADDLING stamps. I paired it with an old die set from Catherine Pooler Designs. It was featured in the Winterhaven Stamp of Approval several years ago!

For this card, I cut a piece of Neenah 100lb Classic Crest Cardstock 8.5 X 11″ to 5-1/2 x 8-1/2″ and scored at 4-1/4″ to create a card base and another piece to 4 x 5-1/4″ for the background. I used the Tim Holtz Salty Ocean, Uncharted Mariner, and Chipped Sapphire Distress Oxide Inks to color the background. Then used a snowflake embossing folder (Stampin’ Up! Winter Snow) to give it some dimension. Then I lightly ran a white pigment ink pad (Lawn Fawn Yeti Pigment Ink) over the raised areas; This enhanced the snowflakes a bit more. (TIP: Make sure to let this dry for several hours before touching the panel or use a heat tool to set it). Lastly, I added some splatters using White Acrylic paint.

Next I die cut the the snowy hills from Neenah 100lb Classic Crest Cardstock 8.5 X 11″ with the Lawn Fawn Stitched Hillside Borders and inked it with Tumbled Glass Distress Oxide Ink. I also added some Nuvo Fresh Snowfall Glitter Drops to the snowy hills. I used 3M Foam Tape to adhere the front hillside.

I stamped the images from the Lawn Fawn HERE WE GO A-WADDLING stamps onto Neenah 100lb Classic Crest Cardstock 8.5 X 11″ with Memento Tuxedo Black Ink and colored them with Copic Markers. I used R17, R27 & R59, BG10, BG11 & BG32, R20, N1 & 0, N4, N5 & N8, YR04 & YR07 for the penguins; Y13, Y15 & Y17 for the bell and lantern.

I stamped sentiment from the Lawn Fawn HERE WE GO A-WADDLING stamps onto Neenah 100lb Classic Crest Cardstock 8.5 X 11″ with Memento Tuxedo Black Ink and then cut them down to strips.

On the inside of the card, I stamped a sentiment from the Lawn Fawn Simply Winter Sentiments with Catherine Pooler Designs Rockin’ Red Ink and added a penguin.

Dimensions


Supplies

https://linkdeli.com/widget.js?id=f5e8378456858c916708

Thanks for reading this post. I hope Iโ€™ve inspired you to give this cute penguin Christmas card a try for yourself. Leave comments or questions below or feel free to email.

Christmas, Distress Ink Techniques, Stenciled Background, Winter

Winter Village Christmas Scene Card featuring a Stenciled Pattern Paper Background

Hello friends. For this cute holiday card, I uses a technique I had forgotten about but recently reminded of while watching a Youtube video. The technique is stenciling on pattern paper. It’s an easy way to add depth and interest to a background without adding extra bulk. This card features the Lawn Fawn Spooky Forest Backdrop die and the Lawn Fawn Winter Village Stamps.

For this card, I cut a piece of Neenah 100lb Classic Crest Cardstock 8.5 X 11″ to 5-1/2 x 8-1/2″ and scored at 4-1/4″ to create a card base and a piece of Lawn Fawn Spiffier Speckles 6×6 Paper to ~4 x 5-1/4″ for the background. I used the Tim Holtz Stormy Sky and Faded Jeans Distress Ink along with the Honey Bee Stamps Birch A2 Cover Plate to give some dimension to the background.

Next I die cut the forest from Neenah 100lb Classic Crest Cardstock 8.5 X 11″ with the Lawn Fawn Spooky Forest Backdrop, the snowy hills from more Neenah 100lb Classic Crest Cardstock 8.5 X 11″ with the Lawn Fawn Stitched Hillside Borders and inked it with Tumbled Glass Distress Ink. I also added some Nuvo Fresh Snowfall Glitter Drops to the snowy hills. I used 3M Foam Tape to adhere the forest panel as well as some behind the snowy hills for more dimension.

I stamped the images from the Lawn Fawn Winter Village Stamps onto Neenah 100lb Classic Crest Cardstock 8.5 X 11″ with Memento Tuxedo Black Ink and colored them with Copic Markers. I used Y13 & Y18 for the lantern, windows and star; R81, R83, & R85, YG25, YG17 & YG67, C0, C1, C3 & C5 for the houses; YG25, YG17 & YG67 and E25 & E29 for the trees; BG000 and 0 for the snow.

I decided to do a radical thing on this card and have NO sentiment on the outside. What?!? Unheard of, right? LOL. Sometimes it’s ok to leave the outside of your card with just a pretty scenes. Let the recipient be surprised when they open the card.

On the inside of the card, I cut a piece of Lawn Fawn Spiffier Speckles 6×6 Paper to 1 x 4-1/4″ and stamped a sentiment from the Lawn Fawn Winter Village Stamps with Catherine Pooler Rose Petals Ink.

Dimensions


Supplies

https://linkdeli.com/widget.js?id=f5e8378456858c916708

Thanks for reading this post. I hope Iโ€™ve inspired you to give this cute penguin Christmas card a try for yourself. Leave comments or questions below or feel free to email.

Autumn, Embossed Background, Fall, Inlay diecutting technique, Thank Yous

Fall Card Series #8: Inlay Diecut Thank You Card feat. Catherine Pooler and Honey Bee Stamps

Hello friends. Here is one last card to close out my Fall series! This one is an easy inlay technique — and oldy but goody! lol

For the first card, I cut a piece of Neenah 100lb Classic Crest Cardstock 8.5 X 11″ to 5-1/2 x 8-1/2″ and scored at 4-1/4″ to create a card base and a piece of Catherine Pooler Designs Sunflower Fields Forever Patterned Paper to 4-1/4 x 5-1/2″. I also die cut a piece of Neenah 100lb with the Catherine Pooler Woven Cover Plate Die.

I cut another piece Neenah 100lb Classic Crest Cardstock 8.5 X 11″ to 3-1/2 x 4-3/4″ which I colored with Catherine Pooler Designs Spiced Ink using the direct-to-paper technique. Then die cut another piece using the second largest die (3-1/2 x 4-1/2″) from the Lawn Fawn Large Stitched Rectangle Stackables Lawn Cuts Dies.

I die cut a window from the white top panel using the shadow from the Honey Bee Stamps Large Thanks Dies (retired) as well as one from Catherine Pooler Designs Sunflower Fields Forever Patterned Paper which I then inlay into the window area. I stamped the rest of the sentiment from Lawn Fawn Thanks Thanks Thanks Stampset using Catherine Pooler Green Tea Ink.

I die cut 2 pumpkins from some Neenah 100lb Classic Crest Cardstock 8.5 X 11″ using the Catherine Pooler Fall Frames. I colored them using ink. I used Catherine Pooler Sauna and Orange Peel and Green Tea Inks and popped one up with Stampin’ Up! Stampinโ€™ Dimensionals.

I finished off the card by adding some Nuvo Drops in Metallic Bright Gold and Bottle Green.

I stamped a sentiment from the Lawn Fawn Thanks Thanks Thanks Stampset with Catherine Pooler Green Tea Ink on the inside of the card and added a piece of Catherine Pooler Designs Sunflower Fields Forever Patterned Paper measuring 1 x 5-1/2″ and 1-1/8 x 5-1/2″.

Dimensions


Supplies

https://linkdeli.com/widget.js?id=f5e8378456858c916708

Thanks for reading this post. I hope Iโ€™ve inspired you to give this easy Thank You card a try for yourself. Leave comments or questions below or feel free to email.

Autumn, Fall, Faux Embossing, Thank Yous

Fall Card Series #7: Creating a Faux Embossed Background Using Word Dies

Hello friends. There are still a few more weeks left of Fall and even though I’ve been knee deep in Christmas card making, I wanted to make some more Fall cards. I brought out some Honey Bee Stamps stamps and dies for this one. An easy way to make a dimensional background without having to emboss is to use diecuts.

For this card, I cut a piece of Neenah 100lb Classic Crest Cardstock 8.5 X 11″ to 5-1/2 x 8-1/2″ and scored at 4-1/4″ to create a card base, another piece to 4 x 5-1/4″, and a piece of Catherine Pooler Designs Sunflower Fields Forever 6 x 6 Paper to 4-1/4 x 5-1/2″.

I die cut a bunch of die cut words from Neenah 100lb Classic Crest Cardstock 8.5 X 11″ using the Honey Bee Stamps Honey Cuts Autumn Die (retiring soon) which I glued to the white panel.

I stamped some images from the Honey Bee Stamps Happy Fall Y’all 4×6 Stamp Set onto Neenah 100lb Classic Crest Cardstock 8.5 X 11″ with Memento Tuxedo Black Ink. I colored them with Copic Markers. I used Y13, Y18, & Y18, E25 & E29, and YG25 for the sunflower; YG03, YG25 & YG67 for the stems and leaves; Y13, Y18, & Y18, C5 & C9, R20, BG10 & 0 (blender) for the bees. I use the coordinating dies to cut out the images. I popped up the bee with Stampin’ Up! Stampinโ€™ Dimensionals.

I stamped the sentiment from Honey Bee Stamps Autumn Stampset (recently retired) onto Neenah 100lb Classic Crest Cardstock 8.5 X 11″ with Memento Tuxedo Black Ink.

On the inside of the card I stamped a sentiment from the Lawn Fawn THANKS THANKS THANKS Stamps with Memento Tuxedo Black Ink and added a strip of pattern paper from Catherine Pooler Designs Sunflower Fields Forever 6 x 6 Paper measuring 1 x 4-1/4″ as well as a sunflower and bee.

Dimensions


Supplies

https://linkdeli.com/widget.js?id=f5e8378456858c916708

Thanks for reading this post. I hope Iโ€™ve inspired you to give this cute Fall card a try for yourself. Leave comments or questions below or feel free to email.

Autumn, Embossed Background, Fall, Love & Friendship, Window Cards

Fall Card Series #5: Window Card feat. Catherine Pooler Appley Ever After

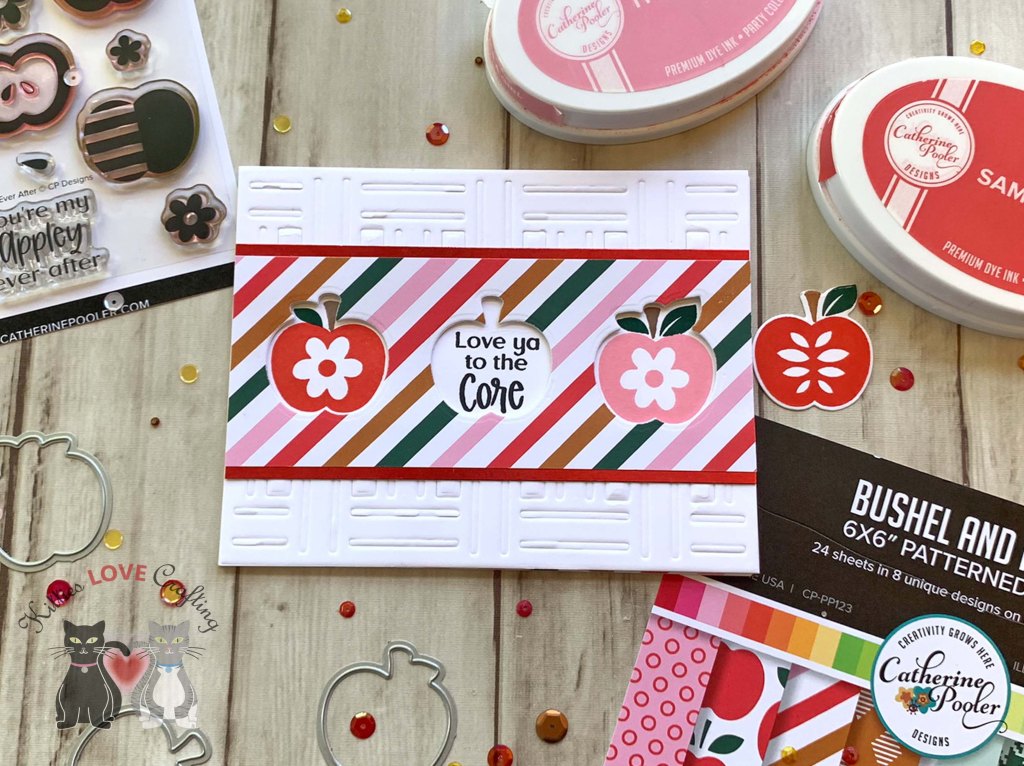
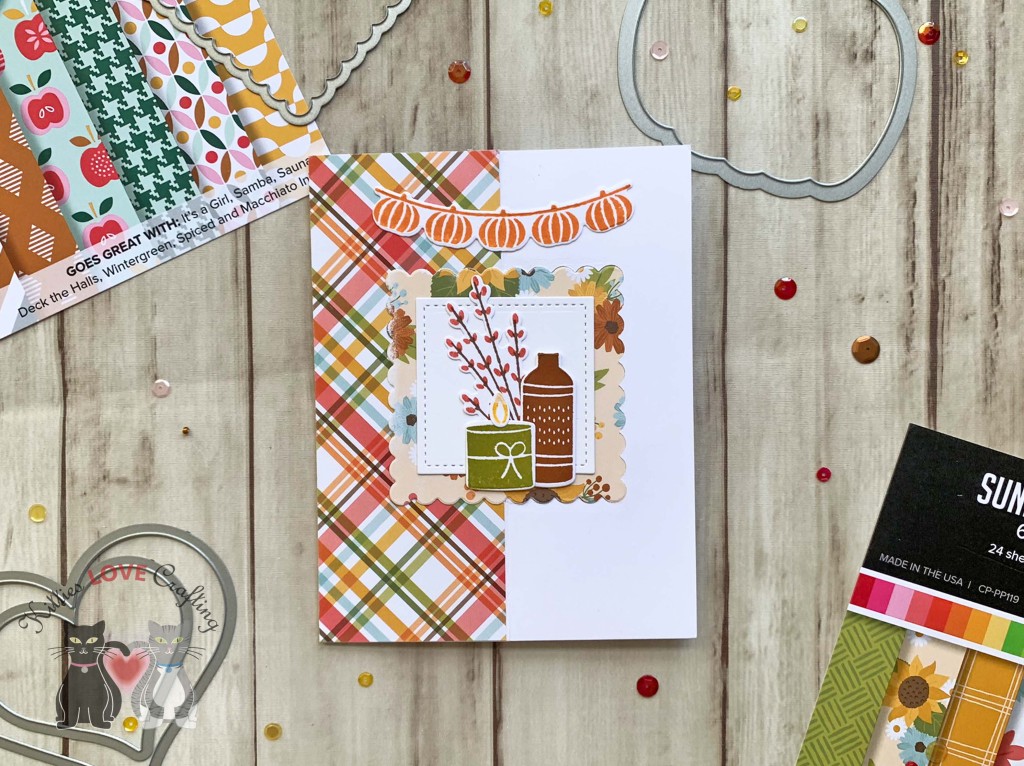
Hello friends. The next post in my Fall card series features a window card using the coordinating dies from the Catherine Poolerโ€™s Appley Ever After stampset. This was a very easy card to make. To add texture to the background I added an embossed panel behind it (more on this later in the post).

For the first card, I cut a piece of Neenah 100lb Classic Crest Cardstock 8.5 X 11″ to 5-1/2 x 8-1/2″ and scored at 4-1/4″ to create a card base and another piece 4-1/4 x 5-1/2″ which I embossed using the Catherine Pooler Designs Woven Coverplate (see your embossing machines instructions for proper sandwich).

I cut a piece of pattern paper from the Catherine Pooler Bushel and a Peck 6 x 6 Patterned Paper to 2-1/4 x 5-1/2″ and cut out three apple windows using the dies from the Appley Ever After Dies. I cut 2 pieces of red metallic cardstock from Tim Holtz Idea-ology 8 x 8 Paper Stash Metallic Jewels Kraft Stock to 3/4 x 5-1/2″.

Then stamped a sentiment and two apples onto Neenah 100lb Classic Crest Cardstock 8.5 X 11″ from the Catherine Pooler Designs Appley Ever After Stamp Set with Midnight, Samba, It’s a Girl, Over Coffee, and Deck the Halls Inks. I added Foam Tape behind the top panel and adhered the apples and sentiment behind it before adhereing to the card base.

On the inside of the card I stamped a sentiment from the CP Joyful Thanks Sentiments Stamp Set with Samba Ink and added a strip of pattern paper measuring 1 x 5-1/2″.

Dimensions


Supplies

https://linkdeli.com/widget.js?id=f5e8378456858c916708

Thanks for reading this post. I hope Iโ€™ve inspired you to give this cute Fall card a try for yourself. Leave comments or questions below or feel free to email.

Autumn, Fall, Fancy Folds, Halloween, Love & Friendship, Thank Yous

Fall Card Series #6: It’s All About the Fancy Folds!

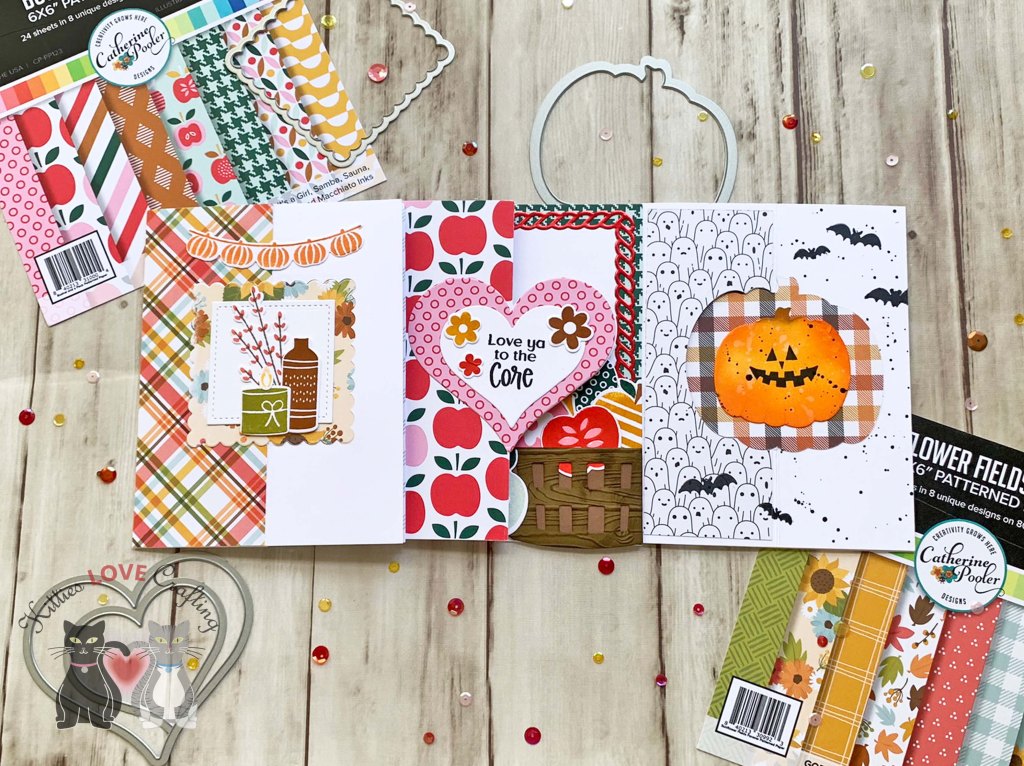
Hello friends. This post is all about adding fancy folds to your cards. I used different shaped dies and papers as well as a variety of stamps to create different themes. These were inspired by Catherine Pooler’s video on fancy folds over on Stampnation. Check it out here>>.

For the first card, I cut a piece of Neenah 100lb Classic Crest Cardstock 8.5 X 11″ to 5-1/2 x 8-1/2″ and scored at 4-1/4″ to create a card base and then I scored the front of the card at 2-1/8″. At this point you need to decide what shape you wll be die cutting out and which side you will be folding your panel. You will see that on my second and third cards the folds are in the opposite direction.

I chose a scallop square die from the Sizzix Framelits Squares Scallop Die Set. The way to achieve the flip window is to only die cut one half of the panel. To do this you just need to align your cutting plates along the score line covering only the side you will cut out.

I cut 2 pieces of pattern paper from the Catherine Pooler Sunflower Fields Forever Patterned Paper to 2-1/8 x 5-1/2″ and one to 4-1/4 x 5-1/2″. I also die cut 2 scallop squares from the same paper. Then die cut a stitched square from Neenah 100lb Classic Crest Cardstock 8.5 X 11″ using the Lawn Fawn Dies – Small Stitched Square Stackables, a scallop square measuring 2 x 2″ and another measuring 3-3/8 x 3-3/8″.

I stamped images from the Catherine Pooler Bless this House Stamp Set onto Neenah 100lb Classic Crest Cardstock 8.5 X 11″ with CP Green Tea, Polished, Over Coffee, Buttercream, Sauna, Orange Peel, and Spiced inks.

Then stamped the sentiment onto the white scallop piece from the Catherine Pooler Bless this House Stamp Set with Spiced ink.

On the inside of the card I adhered the larger scallop square (3-3/8 x 3-3/8″) and added a pumpkin.

Dimensions


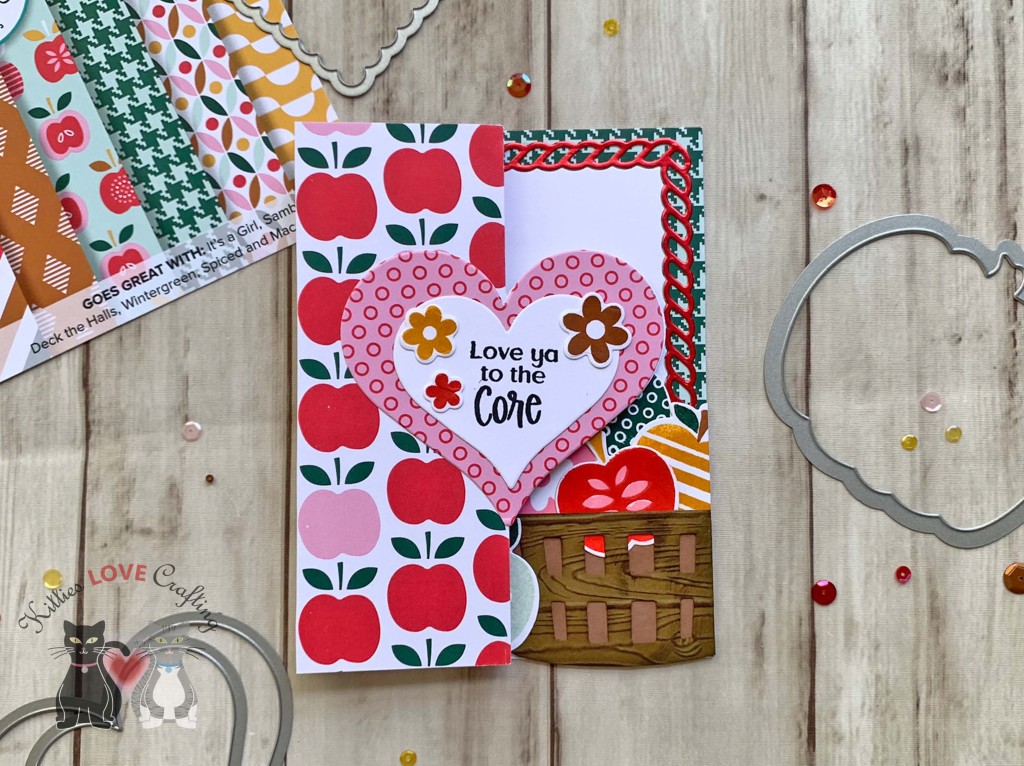
For the second card, I cut a piece of Neenah 100lb Classic Crest Cardstock 8.5 X 11″ to 5-1/2 x 8-1/2″ and scored at 4-1/4″ to create a card base and then I scored the front of the card at 2-1/8″.

For this card, I chose a heart die from the Stampin’ Up! Sweet and Sassy Die Set (retired). Same step as before for cutting the flip window.

Next, I cut 3 pieces of pattern paper from the Catherine Pooler Bushel and a Peck 6 x 6 Patterned Paper to 2-1/8 x 5-1/2″ and one to 4-1/4 x 5-1/2″. I also die cut 2 hearts (of the same size) from the same paper. Then die cut a smaller heart from Neenah 100lb Classic Crest Cardstock 8.5 X 11″ using the same dies. I stamped the sentiment from Catherine Pooler’s Appley Ever After Stamp Set onto it with Midnight ink.

I stamped images from the Catherine Pooler’s Appley Ever After Stamp Set onto Neenah 100lb Classic Crest Cardstock 8.5 X 11″ with CP It’s A Girl, Samba, Wintergreen, Deck the Halls, Sauna, and Spiced inks. I die cut the apple basket from Stampin’ Up! Soft Suede 8-1/2 x 11″ Cardstock (retired) with the Catherine Pooler Bushel Basket Die and inked it with Stampin’ Up! Soft Suede ink (retired).

On the inside of the card I die cut a frame from Tim Holtz Idea-ology 8 x 8 METALLIC JEWELS Kraft Stock with the Catherine Pooler Fall Frames dies. I also die cut another frame from Neenah 100lb Classic Crest Cardstock 8.5 X 11″ and used the negative piece.

Dimensions


For the third card, I cut a piece of Neenah 100lb Classic Crest Cardstock 8.5 X 11″ to 5-1/2 x 8-1/2″ and scored at 4-1/4″ to create a card base and then I scored the front of the card at 2-1/8″.

For this card, I chose a pumpkin die from the Sizzix Pumpkin Framelits (no longer available). Follow the same steps as in the previous two cards for cutting the flip window.

Next, I cut 3 pieces of pattern paper from the Honey Bee Stamps Halloween Harvest 6 x 6 Patterned Paper (discontinued) to 2 x 5-1/4″ and one to 4 x 5-1/4. I also die cut 2 pumpkins (of the same size) from the same paper. Then die cut a smaller pumpkin from Neenah 100lb Classic Crest Cardstock 8.5 X 11″ using the same dies. I inked it with Tim Holtz Spiced Marmalade, Carved Pumpkin, and Peeled Paint Distress Inks. I stamped a Jack-O-Lantern face from the Papertrey Ink Pumpkin Expressions Mini Stamp Set with Midnight Ink. I also added splatters to it and the right side of the card front with Black Acrylic Paint and stamped bats from the Lawn Fawn Happy Haunting stampset.

I stamped 3 ghosts and more bats from the Lawn Fawn Happy Haunting and the sentiment from the Papertrey Ink Pumpkin Expressions Mini Stamp Sets onto Neenah 100lb Classic Crest Cardstock 8.5 X 11″ with Midnight Ink.

On the inside of the card I die cut a spider from Simon Says Stamp 100# BLACK Cardstock with the We R Memory Keepers 2-inch Spider die and the sentiment from some Honey Bee Stamps Halloween Harvest 6 x 6 Patterned Paper (discontinued) using the Pretty Pink Posh Happy Halloween Script Die.

Dimensions

  • Card Base = 5-1/2 x 8-1/2″ and scored at 4-1/4″ and 2-1/8″ Neenah 100lb Classic Crest Cardstock 8.5 X 11″
  • Front Panels = 2 x 5-1/4″ (3) and 4 x 5-1/4″ (1) Honey Bee Stamps Halloween Harvest 6 x 6 Patterned Paper (discontinued)
  • Inside Panel = 4 x 5-1/4″ Honey Bee Stamps Halloween Harvest 6 x 6 Patterned Paper (discontinued) Honey Bee Stamps Halloween Harvest 6 x 6 Patterned Paper (discontinued)

Supplies

https://linkdeli.com/widget.js?id=f5e8378456858c916708

Thanks for reading this post. I hope Iโ€™ve inspired you to give these fun fancy fold cards a try for yourself. Leave comments or questions below or feel free to email.

Autumn, Fall, Shaker, Window Cards

Fall Card Series #1: Catherine Pooler Woven Cover Plate

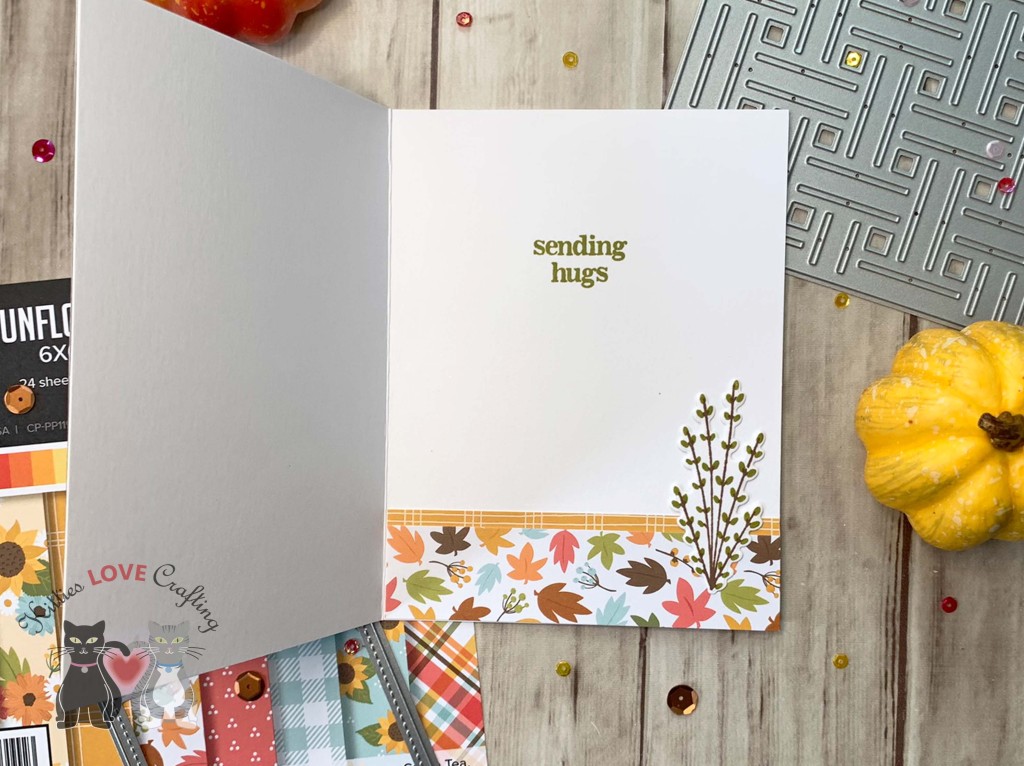
Hello friends. I am starting my Fall series with a card featuring the new release from Catherine Pooler Designs. More cards using these products will be coming soon. For this one I featured the Woven Cover Plate. This cover plate adds lots of texture to your cards without to much work. That’s a win win!

For this card, I cut a piece of Neenah 100lb Classic Crest Cardstock 8.5 X 11″ to 5-1/2 x 8-1/2″ and scored at 4-1/4″ to create a card base. I die cut two pieces of pattern paper from the Catherine Pooler Sunflower Fields Forever 6 x 6 Patterned Paper with the CP Woven Cover Plate Die, cut them each in half and adhered them together. I then added a strip of gold metallic cardstock from Tim Holtz Idea-ology 8 x 8 METALLIC KRAFT STOCK, measuring 1 x 5-1/2″. I backed the panel with some Stampin’ Up! Early Espresso 8-1/2 x 1 1″ Cardstock.

I die cut a panel from Neenah 100lb Classic Crest Cardstock 8.5 X 11″ using Lawn Fawn Small Stitched Square Stackables. For the images, I die cut a pumpkin from Neenah 100lb Classic Crest Cardstock 8.5 X 11″ with the CP Fall Frames Dies and colored them with Orange Peel, Spiced, Green Tea, Eucalyptus inks. I also stamped images onto Neenah 100lb Classic Crest Cardstock 8.5 X 11″ with the CP Bless this House Stamp Set using Buttercream, Sauna, Green Tea & Eucalyptus for the candle and Over Coffee & Polished for the sprig.

The sentiment was stamped from the CP Joyful Thanks Sentiments onto Neenah 100lb Classic Crest Cardstock 8.5 X 11″ with Versamark Emboss Ink and heat set with Gold Embossing Powder and die cut with the coordinating dies.

On the inside of the card I added a piece of pattern paper measuring 1 x 4-1/4″ and another measuring 1-1/8 x 4-1/4″. I stamped a sentiment from the CP Joyful Thanks Sentiments with Eucalyptus ink and added another sprig.

Dimensions


Supplies

https://linkdeli.com/widget.js?id=f5e8378456858c916708

Thanks for reading this post. I hope Iโ€™ve inspired you to give this Fall card a try for yourself. Leave comments or questions below or feel free to email.

Celebrations, Summer

Summer Cocktails Card feat. Lawn Fawn Build-A-Drink Cocktail Add-on and Scripty Enjoy

Hello friends. The Lawn Fawn Build-A-Drink Dies and Lawn Fawn Build-A-Drink Cocktail Add-On Dies are a great addition to my summer card line-up. There are so many beverages you can make with these diesets. I’m starting off with a cute pink daiquiri card. I love to combine pink and green and ths card was a great opportunity to do just that! Look for more cards to come using these dies.

For this card, I cut a piece of Neenah 100lb Classic Crest Cardstock 8.5 X 11″ to 5-1/2 x 8-1/2″ and scored at 4-1/4″ to create a card base and a piece of pattern paper from the Lawn Fawn Fruit Salad 6×6 Inch Petite Paper Pack to 4 x 5-1/4″ which I die cut a window from using the Lawn Fawn Secret Garden Window Dies and another piece cut to 3-3/4 x 5″.

I die cut the cocktail glass, drink strawberries, umbrella, leaves, straw and flowers from Neenah 100lb Classic Crest Cardstock 8.5 X 11″ using the Lawn Fawn Build-A-Drink, Lawn Fawn Build-A-Drink Cocktail Add-On and Lawn Fawn Zesty Lemon Dies. I die cut the ice cubes from Vellum and the umbrella top from retired Stampin’ Up! Designer Series Papers.

I inked all the images with Catherine Pooler Design inks. I used It’s a Girl for the drink, It’s a Girl and Rouge for the strawberries, Lime Rickey and Grass Skirt for the leaves, Lime Rickey for the flower, and Black Jack for the straw and umbrella base.

I die cut the sentiment from Neenah 100lb Classic Crest Cardstock 8.5 X 11″ using the Lawn Fawn Scripty Enjoy Die. I cut it 3x and stacked them. But before adhering them I used Black Jack Ink to color the top sentiment.

I finished off the card by adding shimmer to the drink portion with a Spectrum Noir Clear Sparkle Pen.

On the inside of the card, I add pattern paper cut to 1 x 4-1/4″ and 1-3/16 x 4-1/4″ and stamped a sentiment from Lawn Fawn How You Bean Strawberries Add-on with Memento Tuxedo Black Ink.

These cards fold flat to fit into a regular A2 envelope. My balloons go outside the box top so I made a custom envelope to fit it better.


Supplies

https://linkdeli.com/widget.js?id=f5e8378456858c916708

Thanks for reading this post. I hope Iโ€™ve inspired you to give this fun summer cocktail card a try for yourself. Leave comments or questions below or feel free to email.

Birthdays, Masculine, Shaker

Flat Shaker Masculine Birthday Card feat. Lawn Fawn

Hello friends. Here’s a fun flat shaker card that could be for anyone but in keeping with my masculine card series, I think this one would work well for that theme. This is my first flat shaker but it turns out they are actually easier to make than a regular shaker. It’s win win in my book!

For this card, I cut a piece of Lawn Fawn 100lb Black Licorice Cardstock to 5-1/2 x 8-1/2″ and scored at 4-1/4″ to create a card base and a piece of Catherine Pooler Designs Arnold’s Drive-In Patterned Paper which I die cut with Lawn Fawn LARGE STITCHED RECTANGLE STACKABLES and inked with Catherine Pooler Oh Boy! Ink to tone it down a bit.

I took a clear bag in A2 size (I used the same ones I use for my finished cards) and slid the panel inside it. I taped the excess plastic on the sides to create a tight fit around the card panel. Next I added a bunch of different sequins and sprinkle shaker bits and sealed the top with more double sided tape.

I die cut the large sentiment from Neenah 100lb Classic Crest Cardstock 8.5 X 11″ as well as Lawn Fawn 100lb Black Licorice Cardstock using the Lawn Fawn Giant Happy Birthday Die. I stamped the rest of the sentiment from the Queen and Company Sentiment Stackers #1 Stampset onto Lawn Fawn 100lb Black Licorice Cardstock with Versamark Ink and White Embossing Powder.

I stamped the balloons from Lawn Fawn Set Elephant Parade Add-On Stampset with Memento Tuxedo Black Ink onto Neenah 100lb Classic Crest Cardstock 8.5 X 11″. I colored them with Copic Markers. I used Y02, Y13 & Y17, BV00, BV13 & BV17, and YG01, YG25, and YG17.

On the inside of the card, I cut a piece of Neenah 100lb Classic Crest Cardstock 8.5 X 11″ to 3-3/4 x 5″ using the Lawn Fawn Small Stitched Rectangle Stackables. I also added a strip of the pattern paper measuring 1 x 3-3/4″ and another balloon.

Dimensions


Supplies

https://linkdeli.com/widget.js?id=f5e8378456858c916708

Thanks for reading this post. I hope Iโ€™ve inspired you to give this birthday shaker card a try for yourself. Leave comments or questions below or feel free to email.

Father's Day, Masculine

Quick and Fun Fatherโ€™s Day Card feat. Feelinโ€™ Fizzy

Hello friends. I’m bringing you another Father’s Day card using the Catherine Pooler Designs Feelin’ Fizzy stampset. It’s a really cute and fun set. Also having two step stamps for the bottles is a time saver!

For this card, I cut a piece of Neenah 100lb Classic Crest Cardstock 8.5 X 11″ to 10 x 7″ and scored at 5″ to create a card base, a piece of Simon Says Stamp 100# Black Cardstock to 4-3/4 x 6-3/4, another piece of Neenah 100lb Classic Crest Cardstock 8.5 X 11″ to 4-1/2 x 6-1/2″, and a piece of Catherine Pooler Designs Arnold’s Drive-In Patterned Paper to 1-3/4 x 6-1/2″.

For the background panel, I stamped the bubbles from Catherine Pooler Designs Feelin’ Fizzy stampset with Cummerbund Ink and the sparkles with Tiara Ink. For the bottles I used Catherine Pooler Designs Midnight Ink for the outlines and Rockin Red/It’s a Girl and Limoncello/Tiara Inks for the liquid.

I die cut the sentiment from Simon Says Stamp 100# Black Cardstock using the Lawn Fawn Father’s Day Line Border and stamped the sentiment and bottle cap from the CPD Feelin’ Fizzy stampset with Midnight Ink.

I finished off the card by adding some Milwaukee Sequin Mix.

On the inside of the card, I cut a piece of Simon Says Stamp 100# Black Cardstock to 1 x 6-3/4″ as well as a piece of the same pattern paper to 1 x 6″.

Dimensions


Supplies

https://linkdeli.com/widget.js?id=f5e8378456858c916708

Thanks for reading this post. I hope Iโ€™ve inspired you to give this Father’s Day card a try for yourself. Leave comments or questions below or feel free to email.