Autumn, Embossed Background, Fall, Love & Friendship, Window Cards

Fall Card Series #5: Window Card feat. Catherine Pooler Appley Ever After

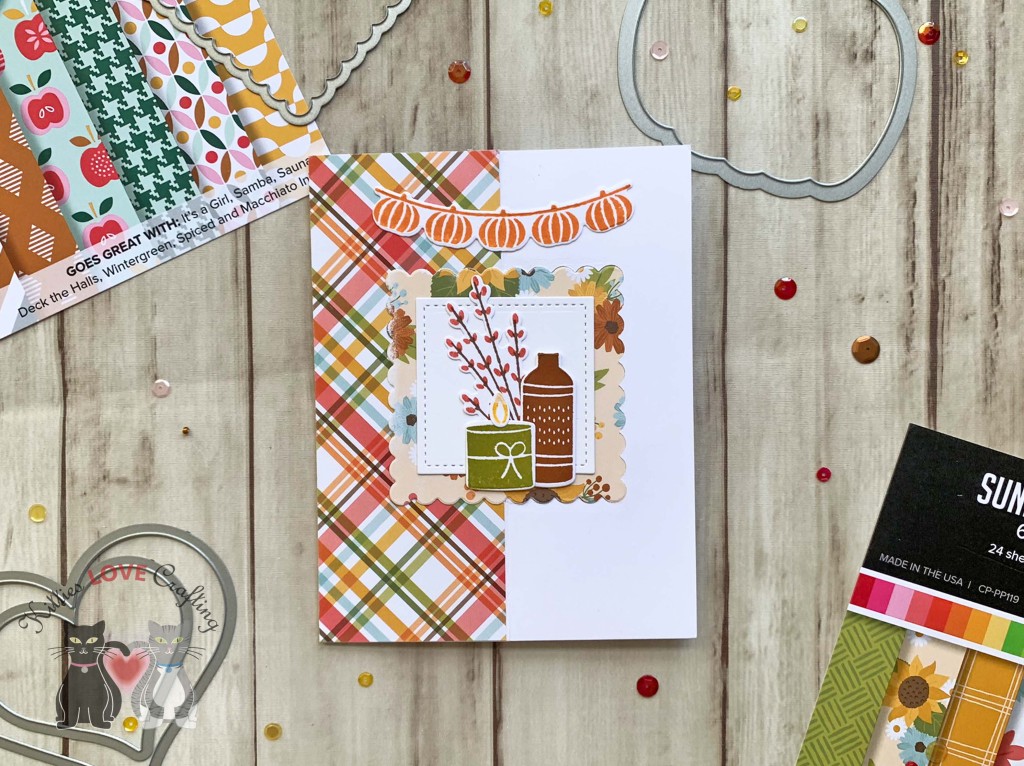
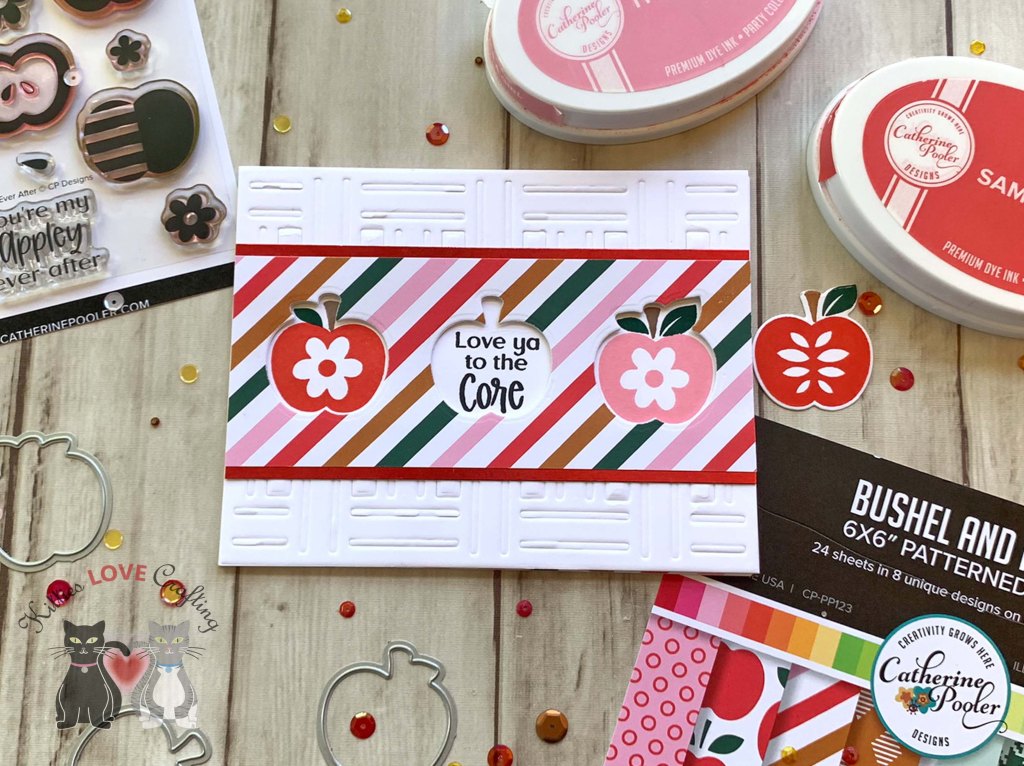
Hello friends. The next post in my Fall card series features a window card using the coordinating dies from the Catherine Pooler’s Appley Ever After stampset. This was a very easy card to make. To add texture to the background I added an embossed panel behind it (more on this later in the post).

For the first card, I cut a piece of Neenah 100lb Classic Crest Cardstock 8.5 X 11″ to 5-1/2 x 8-1/2″ and scored at 4-1/4″ to create a card base and another piece 4-1/4 x 5-1/2″ which I embossed using the Catherine Pooler Designs Woven Coverplate (see your embossing machines instructions for proper sandwich).

I cut a piece of pattern paper from the Catherine Pooler Bushel and a Peck 6 x 6 Patterned Paper to 2-1/4 x 5-1/2″ and cut out three apple windows using the dies from the Appley Ever After Dies. I cut 2 pieces of red metallic cardstock from Tim Holtz Idea-ology 8 x 8 Paper Stash Metallic Jewels Kraft Stock to 3/4 x 5-1/2″.

Then stamped a sentiment and two apples onto Neenah 100lb Classic Crest Cardstock 8.5 X 11″ from the Catherine Pooler Designs Appley Ever After Stamp Set with Midnight, Samba, It’s a Girl, Over Coffee, and Deck the Halls Inks. I added Foam Tape behind the top panel and adhered the apples and sentiment behind it before adhereing to the card base.

On the inside of the card I stamped a sentiment from the CP Joyful Thanks Sentiments Stamp Set with Samba Ink and added a strip of pattern paper measuring 1 x 5-1/2″.

Dimensions


Supplies

Thanks for reading this post. I hope I’ve inspired you to give this cute Fall card a try for yourself. Leave comments or questions below or feel free to email.

Autumn, Fall, Fancy Folds, Halloween, Love & Friendship, Thank Yous

Fall Card Series #6: It’s All About the Fancy Folds!

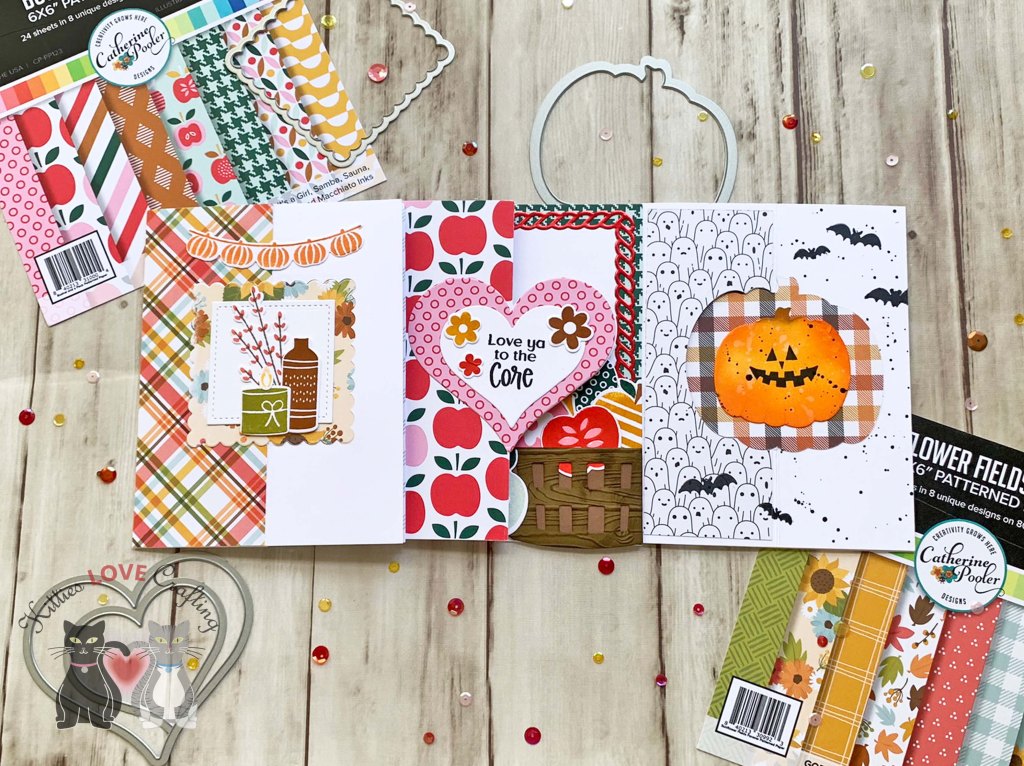
Hello friends. This post is all about adding fancy folds to your cards. I used different shaped dies and papers as well as a variety of stamps to create different themes. These were inspired by Catherine Pooler’s video on fancy folds over on Stampnation. Check it out here>>.

For the first card, I cut a piece of Neenah 100lb Classic Crest Cardstock 8.5 X 11″ to 5-1/2 x 8-1/2″ and scored at 4-1/4″ to create a card base and then I scored the front of the card at 2-1/8″. At this point you need to decide what shape you wll be die cutting out and which side you will be folding your panel. You will see that on my second and third cards the folds are in the opposite direction.

I chose a scallop square die from the Sizzix Framelits Squares Scallop Die Set. The way to achieve the flip window is to only die cut one half of the panel. To do this you just need to align your cutting plates along the score line covering only the side you will cut out.

I cut 2 pieces of pattern paper from the Catherine Pooler Sunflower Fields Forever Patterned Paper to 2-1/8 x 5-1/2″ and one to 4-1/4 x 5-1/2″. I also die cut 2 scallop squares from the same paper. Then die cut a stitched square from Neenah 100lb Classic Crest Cardstock 8.5 X 11″ using the Lawn Fawn Dies – Small Stitched Square Stackables, a scallop square measuring 2 x 2″ and another measuring 3-3/8 x 3-3/8″.

I stamped images from the Catherine Pooler Bless this House Stamp Set onto Neenah 100lb Classic Crest Cardstock 8.5 X 11″ with CP Green Tea, Polished, Over Coffee, Buttercream, Sauna, Orange Peel, and Spiced inks.

Then stamped the sentiment onto the white scallop piece from the Catherine Pooler Bless this House Stamp Set with Spiced ink.

On the inside of the card I adhered the larger scallop square (3-3/8 x 3-3/8″) and added a pumpkin.

Dimensions


For the second card, I cut a piece of Neenah 100lb Classic Crest Cardstock 8.5 X 11″ to 5-1/2 x 8-1/2″ and scored at 4-1/4″ to create a card base and then I scored the front of the card at 2-1/8″.

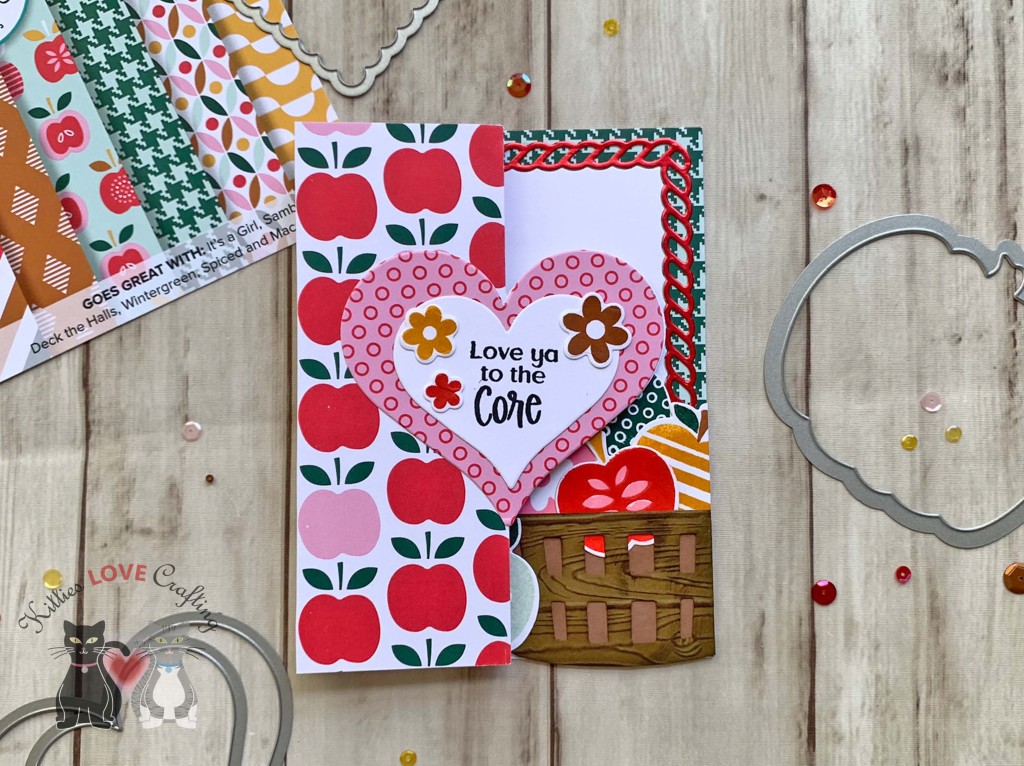
For this card, I chose a heart die from the Stampin’ Up! Sweet and Sassy Die Set (retired). Same step as before for cutting the flip window.

Next, I cut 3 pieces of pattern paper from the Catherine Pooler Bushel and a Peck 6 x 6 Patterned Paper to 2-1/8 x 5-1/2″ and one to 4-1/4 x 5-1/2″. I also die cut 2 hearts (of the same size) from the same paper. Then die cut a smaller heart from Neenah 100lb Classic Crest Cardstock 8.5 X 11″ using the same dies. I stamped the sentiment from Catherine Pooler’s Appley Ever After Stamp Set onto it with Midnight ink.

I stamped images from the Catherine Pooler’s Appley Ever After Stamp Set onto Neenah 100lb Classic Crest Cardstock 8.5 X 11″ with CP It’s A Girl, Samba, Wintergreen, Deck the Halls, Sauna, and Spiced inks. I die cut the apple basket from Stampin’ Up! Soft Suede 8-1/2 x 11″ Cardstock (retired) with the Catherine Pooler Bushel Basket Die and inked it with Stampin’ Up! Soft Suede ink (retired).

On the inside of the card I die cut a frame from Tim Holtz Idea-ology 8 x 8 METALLIC JEWELS Kraft Stock with the Catherine Pooler Fall Frames dies. I also die cut another frame from Neenah 100lb Classic Crest Cardstock 8.5 X 11″ and used the negative piece.

Dimensions


For the third card, I cut a piece of Neenah 100lb Classic Crest Cardstock 8.5 X 11″ to 5-1/2 x 8-1/2″ and scored at 4-1/4″ to create a card base and then I scored the front of the card at 2-1/8″.

For this card, I chose a pumpkin die from the Sizzix Pumpkin Framelits (no longer available). Follow the same steps as in the previous two cards for cutting the flip window.

Next, I cut 3 pieces of pattern paper from the Honey Bee Stamps Halloween Harvest 6 x 6 Patterned Paper (discontinued) to 2 x 5-1/4″ and one to 4 x 5-1/4. I also die cut 2 pumpkins (of the same size) from the same paper. Then die cut a smaller pumpkin from Neenah 100lb Classic Crest Cardstock 8.5 X 11″ using the same dies. I inked it with Tim Holtz Spiced Marmalade, Carved Pumpkin, and Peeled Paint Distress Inks. I stamped a Jack-O-Lantern face from the Papertrey Ink Pumpkin Expressions Mini Stamp Set with Midnight Ink. I also added splatters to it and the right side of the card front with Black Acrylic Paint and stamped bats from the Lawn Fawn Happy Haunting stampset.

I stamped 3 ghosts and more bats from the Lawn Fawn Happy Haunting and the sentiment from the Papertrey Ink Pumpkin Expressions Mini Stamp Sets onto Neenah 100lb Classic Crest Cardstock 8.5 X 11″ with Midnight Ink.

On the inside of the card I die cut a spider from Simon Says Stamp 100# BLACK Cardstock with the We R Memory Keepers 2-inch Spider die and the sentiment from some Honey Bee Stamps Halloween Harvest 6 x 6 Patterned Paper (discontinued) using the Pretty Pink Posh Happy Halloween Script Die.

Dimensions

  • Card Base = 5-1/2 x 8-1/2″ and scored at 4-1/4″ and 2-1/8″ Neenah 100lb Classic Crest Cardstock 8.5 X 11″
  • Front Panels = 2 x 5-1/4″ (3) and 4 x 5-1/4″ (1) Honey Bee Stamps Halloween Harvest 6 x 6 Patterned Paper (discontinued)
  • Inside Panel = 4 x 5-1/4″ Honey Bee Stamps Halloween Harvest 6 x 6 Patterned Paper (discontinued) Honey Bee Stamps Halloween Harvest 6 x 6 Patterned Paper (discontinued)

Supplies

Thanks for reading this post. I hope I’ve inspired you to give these fun fancy fold cards a try for yourself. Leave comments or questions below or feel free to email.

Autumn, Fall

Fall Card Series #3: Catherine Pooler Joyful Thanks

Hello friends. The third card in my series features the Catherine Pooler Designs Joyful Thanks Sentiments Stamp Set combined with the Appley Ever After Stamp Set and the Woven Cover Plate Die. I like that the Joyful Thanks Sentiments are large and bold sentiments so they make a nice impact on your card.

For this card, I cut a piece of Neenah 100lb Classic Crest Cardstock 8.5 X 11″ to 5-1/2 x 8-1/2″ and scored at 4-1/4″ to create a card base and another piece to 4-1/4 x 5-1/2″. I stamped the background with Samba, Cotton Candy, Lime Rickey, and Over Coffee inks using the Appley Ever After Stamp Set.

Then I die cut a piece of Vellum with the Lawn Fawn Small Stitched Rectangles to cover the top panel. I also cie cut a piece of Neenah 100lb Classic Crest Cardstock 8.5 X 11″ with the Woven Cover Plate Die and then cut it down to 1-1/2″ in width.

I stamped the sentiment from the Catherine Pooler Designs Joyful Thanks Sentiments Stamp Set onto Neenah 100lb Classic Crest Cardstock 8.5 X 11″ with Over Coffee Ink. Then used the coordinating dies to cut them out.

I finished off the card by adding some Appolonia Sequin Mix.

I left the inside of the card of the card blank and stamped an apple.

Dimensions


Supplies

Thanks for reading this post. I hope I’ve inspired you to give this cute Fall card a try for yourself. Leave comments or questions below or feel free to email.

Autumn, Fall

Fall Card Series #2: Catherine Pooler Appley Ever After

Hello friends. The second card in my series is a really cute but simple card using the Catherine Pooler Designs Appley Ever After Stamp Set. There is no coloring required with these images so creating cards is a breeze!

For this card, I cut a piece of Neenah 100lb Classic Crest Cardstock 8.5 X 11″ to 5-1/2 x 8-1/2″ and scored at 4-1/4″ to create a card base and a piece of Catherine Pooler Bushel and a Peck 6 x 6 Patterned Paper to 4 x 5-1/4″.

I die cut the frame from Tim Holtz Idea-ology 8 x 8 Paper Stash Metallic Jewels Kraft Stock using the Catherine Pooler Fall Frames Dies. I also die cut the inside piece from the frames from Neenah 100lb Classic Crest Cardstock 8.5 X 11″.

For the images, I die cut the basket from Stampin! Up! Early Espresso 8-1/2 x 11″ Cardstock using the CP Bushel Basket Die, embossed it with the Stampin’ Up! Pinewood Planks 3D Embossing Folder (retired) and inked it with Stampin! Up! Early Espresso Ink. I used a piece of Lawn Fawn Paper Bag 100lb Cardstock to back the basket.

I stamped several of the apples from the Catherine Pooler Designs Appley Ever After Stamp Set onto Neenah 100lb Classic Crest Cardstock 8.5 X 11″ with It’s a Girl, Samba, SaunaWintergreen, and Deck the Halls

I finished off the card by adding some Orange Marmalade Nuvo Jewel Drops.

On the inside of the card I added a piece of the same pattern paper measuring 1 x 5-1/2″ and added an apple.

Dimensions


Supplies

Thanks for reading this post. I hope I’ve inspired you to give this cute Fall card a try for yourself. Leave comments or questions below or feel free to email.