Distress Ink Techniques, Halloween, Techniques

Halloween Scene Card featuring Lawn Fawn’s Pumpkin House

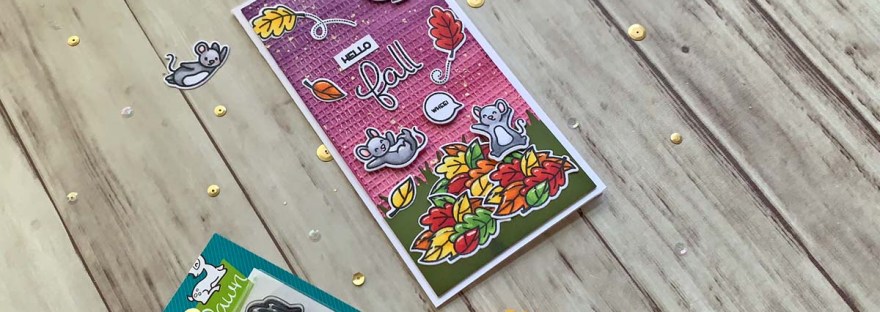
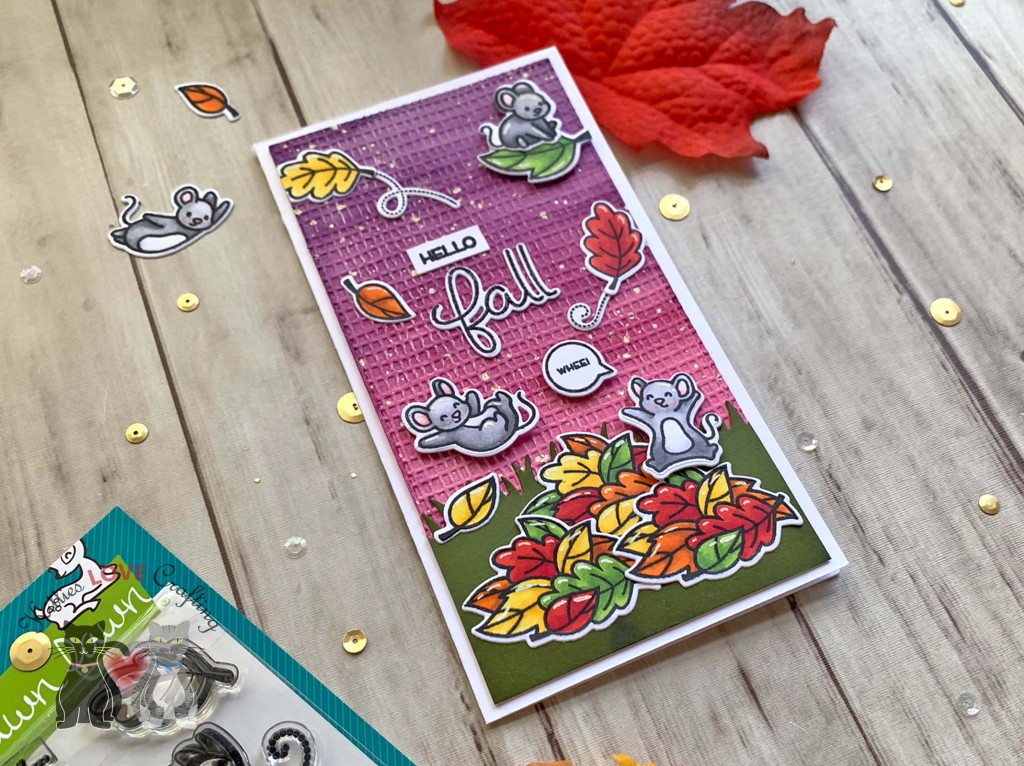
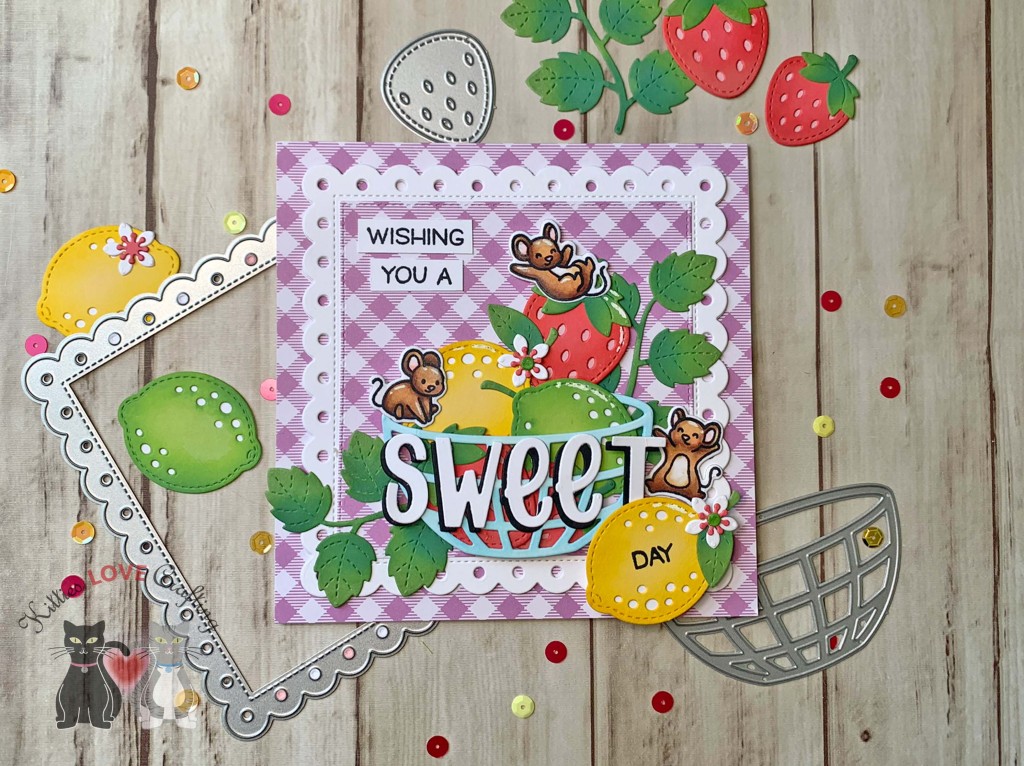
Hi friends. Here’s another adorable scene card using the Pumpkin House Die from Lawn Fawn. Itโ€™s such a fun die set. There are so many occasions for which it can be used, Maybe a winter pumpkin?? Christmas??

For this card, I cut a piece of Simon Says Stamp 100lb Black 8-1/2 x 11″ Cardstock to 8-1/2 x 5-1/2″ and scored at 4-1/4″ to create the card base. Then cut a piece of Neenah 110lb Classic Crest Cardstock measuring 4 x 5-1/4″. I used Distress Oxide Inks to create the background on this panel.

I masked off the moon by punching out a 1-1/4″ circle from post it paper. I used Tim Holtz Seedless Preserves, Villainous Potion, and Chipped Sapphire Distress Oxide Inks. Then removed the mask and added Scattered Straw Distress Oxide Ink around the moon which blended with the sky colors and created a cool spooky effect. This was totally unplanned but worked out in my favor. I also sprayed water on the panel to further distress it.

I die cut all the necessary images from the Lawn Fawn Pumpkin House Die from various cardstocks and colored them with ink to add dimension. I used Stampin’ Up! Pumpkin Pie 8-1/2 x 11″ 80lb Cardstock for the pumpkin house, cut two so I can pop up the center portion, added a spiderweb pattern using Tim Holtz Cling Mount Stamps: Trick or Treat, Versamark Ink and White Embossing Powder. Then added StampinI used Stampin’ Up! Pumpkin Pie Ink to color the pumpkin. I used Stampin’ Up! Old Olive 8-1/2 x 11″ 80lb Cardstock which I colored with Stampin’ Up! Old Olive 8-1/2 x 11″ 80lb Cardstock for the leaves; a pattern paper from the Honey Bee HALLOWEEN HARVEST 6 x 6 Paper Pad for the door which I colored with Catherine Pooler Designs Grape

Ink; Simon Says Stamp Cardstock 100# SLATE Gray Cardstock for the window frames, fence shadow, and chimney shadow. I used Catherine Pooler Designs Black Jack Ink to color the wndow frames then backed the windows and door with a piece of Neenah 110lb Classic Crest Cardstock which I colored with Catherine Pooler Designs Limoncello Ink. I die cut the wood slats, ghosts, bats and spider using Lawn Fawn Build-A-House Halloween Add-on. I used Stampin’ Up! Soft Suede 8-1/2″ X 11″ Cardstock for the windows and colored them with Stampin’ Up! Soft Suede Ink; Neenah 110lb Classic Crest Cardstock for the ghosts; and Simon Says Stamp 100lb Black 8-1/2 x 11″ Cardstock for the bats and spider. The fence is from Lawn Fawn’s Spooky Fence Border and was cut from Simon Says Stamp 100lb Black 8-1/2 x 11″ Cardstock.

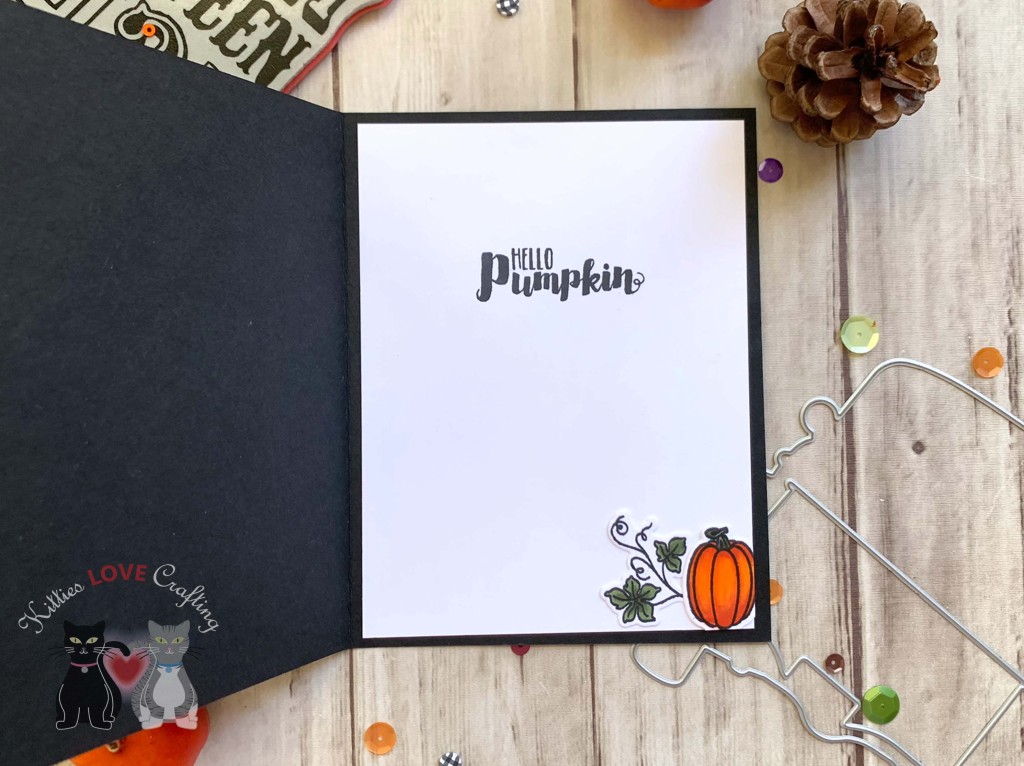
I stamped the sentiment from Queen and Company Halloween Hoopla! stampset (included in the kit) onto Neenah 110lb Classic Crest Cardstock with Catherine Pooler Designs Midnight Ink and fussycut it.

I finished the card by adding some white to the background with a White Signo Gel Pen and shimmer to the fence with a Spectrum Noir Clear Overlay Sparkle Pen.

On the inside of the card, I cut a piece of Neenah 110lb Classic Crest Cardstock to 4 x 5-1/4″ and a piece of Honey Bee HALLOWEEN HARVEST 6 x 6 Paper Pad to 1 x 4″. I stamped a sentiment from Queen and Company Halloween Hoopla! stampset (included in the kit) with Catherine Pooler Designs Midnight Ink and added a ghost and spiderweb.

Dimensions


Supplies

https://linkdeli.com/widget.js?id=f5e8378456858c916708

Thanks for reading this post! I hope you enjoyed and Iโ€™ve inspired you to make this Halloween scene card yourself! If you want to share you creations with me tag me on instagram @kittieslovecrafting. Leave comments or questions below or feel free to email me.

Emboss Resist Technique, Halloween, Halloween, Techniques

Emboss Resist Technique: Making a Spooky Background

Hi friends. Using the emboss resist technique to create a background is super easy and creates a very high contrast, impactful visual. Let me show you how easy this was to create.

For this card, I cut a piece of Simon Says Stamp 100# Black Cardstock to 8-1/2 x 5-1/2″ and scored at 4-1/4″ to create the card base. Then cut a piece of Neenah 110lb Classic Crest measuring 4 x 5-1/4″ and embossed it with Tim Holtz Cling Mount Stamps: Halloween Silhouettes. I used Versamark Ink to stamp the background, added WOW Opaque Bright White Super Fine Embossing Powder and heat set with my heat gun. Then colored it with Tim Holtz Peeled Paint and Black Soot Distress Oxide Inks. Remember to wipe off any excess ink with apaper towel or cloth to clean off the white embossed areas.

I stamped the truck and pumpkins from Honey Bee Stamps Big Pickup Tailgate 6×6 Stamp Set and Honey Bee Loads of Fall Stamp Set onto Neenah 110lb Classic Crest Cardstock with Memento Tuxedo Black Ink and colored with Copic markers.

I used YR16, YR18, & YR09, N2, N6 & N8 for the pumpkins; G94 & G99 for the leaves; BV11, BV08, V25 & V28 for the truck bed; Y13 & Y17 for the truck head lights; C1, C3, C5, C7, & C9 for the metal on the truck; YG05, YG17 & YG67 for the license plate; and BG000 & 0 for the truck windows.

I stamped the sentiment from Papertrey ink Pumpkin Expressions Stamp Set (retired) onto Neenah 110lb Classic Crest with Catherine Pooler Midnight Ink. I fussycut the sentiments since I don’t have dies for this stampset.

On the inside of the card, I cut a piece of Neenah 110lb Classic Crest to 4 x 5-1/4″ and stamped a sentiment from Queen and Company Halloween Hoopla! Stampset with Memento Tuxedo Black Ink and added additional pumpkin and leaf vine.

Dimensions


Supplies

https://linkdeli.com/widget.js?id=f5e8378456858c916708

Thanks for reading this post! I hope you enjoyed and Iโ€™ve inspired you to make this cute Halloween card yourself! If you want to share you creations with me tag me on instagram @kittieslovecrafting. Leave comments or questions below or feel free to email me.

Embossed Background, Halloween, Halloween

Creating a Dimensional Halloween Card featuring Honey Bee Stamps

Hi friends. A quick way to create a dimensional background with little effort is to use an embossing folder. We all have a bunch of embossing folders we bought when it was all the rage to emboss everything and now they sit in a drawer or craft room shelf collecting dust. Am I right?!? Come on, you know it’s true??? LOL Well thankfully they are coming back in fashion and there are so many techniques you can do with them. Today we are keeping it simple — just some ink and a blender. No fancy tools needed either.

For this card, I cut a piece of Neenah 110lb Classic Crest Cardstock to 8-1/2 x 5-1/2″ and scored at 4-1/4″ to create the card base. Then cut a piece measuring 4 x 5-1/4″ and embossed with the Stampin’ Up! Cobwebs 3D Embossing Folder (retired); any spiderweb embossing folder will work here.

I used mostly Seedless Preserves and Villainous Poison Distress Oxide Inks to color the background. Then lightly went over the raised cobwebs with some Chipped Sapphire Distress Oxide Ink. I sprayed some water on the background to distress it further.

I stamped the all the images from the Honey Bee Stamps Pumpkin Patch Stampset onto Neenah 110lb Classic Crest Cardstock with Midnight Ink and heat set with Clear Embossing Powder. Then colored the pumpkin with Spiced Marmalade and Wild Honey Distress Oxide Inks. I colored the leaves with Twisted Citron, Rustic Wilderness, and Peeled Paint Distress Oxide Inks. I used Picked Raspberry Distress Oxide Ink for the flowers.

I stamped the ghost and bat images from Lawn Fawn Happy Haunting stampset and colored them with Copic Markers. I used C00, 0 and R20 for the ghosts. And then diecut them with the coordinating dies.

I stamped the sentiment from Honey Bee Stamps Boo 3×4 Stamp Set onto Neenah 110lb Classic Crest Cardstock with Midnight Ink and die cut the ‘boo’ from Simon Says Stamp Cardstock 100# Black 8-1/2 x 11″ Cardstock 3x with the Honey Bee Boo Dies. I finished it off by adding some glitter with a Spectrum Noir Clear Overlay Sparkle Pen.

On the inside of the card, I stamped a sentiment from Queen and Company Halloween Hoopla Kit with with Midnight Ink and added an extra ghost.

Dimensions


Supplies

https://linkdeli.com/widget.js?id=f5e8378456858c916708

Thanks for reading this post! I hope you enjoyed and Iโ€™ve inspired you to make this cute Halloween card yourself! If you want to share you creations with me tag me on instagram @kittieslovecrafting. Leave comments or questions below or feel free to email me.

Autumn, Embossed Background, Fall, Fall, Mini Slimline, Techniques, Watercolor techniques

Fall Mini Slimline Card featuring Lawn Fawn’s You Autumn Know

Hi friends. The little mice in the Lawn Fawn You Autumn Know Stampset are so stinking cute that I just had to make this mini slimline card and added some texture to the background by using an older Crafters Companion Embossing Folder.

For this card, I cut a piece of Neenah 110lb Classic Crest Cardstock to 7 x 6-1/2″ and scored at 3-1/4″ to create the card base. I also diecut a piece of Neenah white cardstock with the Queen and Company Foundation 17 dies.

Then I used my Kuretake Gansai Tambi 36 colors Watercolor Paint Set to color the background. I used a red, blue and purple color. Then created some splashes with the Zig Kuretake Gansai Tambi Starry Colors Set. I created some texture by using the Crafters Companion Textures Artist Collection Hessian Embossing Folder (retired).

I die cut the grass from Stampin’ Up! Old Olive 8-1/2″ X 11″ Cardstock with the Lawn Fawn Simple Grassy Hillsides and added some Stampin’ Up! Old Olive Ink.

I stamped the images from Lawn Fawn You Autumn Know Stampset onto Neenah 110lb Classic Crest Cardstock with Memento Tuxedo Black Ink and colored them with Copic Markers. I used Y13 & Y18, YR16 & YR27, R17 & R29, YG03 & YG25 for the leaves; and R20, N1, N2, N4 & copic blender for the mice and die cut with the coordinating dies.

I stamped the sentiment from Lawn Fawn Scripty Autumn Sentiments onto Neenah 110lb Classic Crest Cardstock with Memento Tuxedo Ink and then Versamark Ink and embossed it using Ranger Clear Embossing Powder and die cut with the coordinating die set.

I finished the card by adding some highlights with a White Signo Gel Pen.

On the inside of the card, I stamped a sentiment from Lawn Fawn Scripty Autumn Sentiments with Memento Tuxedo Ink and and added an extra leaf.

Dimensions


Supplies

https://linkdeli.com/widget.js?id=f5e8378456858c916708

Thanks for reading this post! I hope you enjoyed and Iโ€™ve inspired you to make this cute mini slimline card yourself! If you want to share you creations with me tag me on instagram @kittieslovecrafting. Leave comments or questions below or feel free to email me.

Birthdays, Embossed Background, Summer

Sweet Square Birthday Card featuring Lawn Fawn Henry’s ABCs

Hi friends. I had to make another summer card with the Lawn Fawn Zesty Lemon and Lawn Fawn Strawberry Patch die sets! This time I paired it with the cute mice from Lawn Fawn You Autumn Know Stampset. I will definitely be using these critters on other cards for sure.

For this card, I cut a piece of Neenah 110lb Classic Crest Cardstock to 5-1/2 x 11″ and scored at 5-1/2″ to create the card base. I diecut a piece of Neenah 110lb Classic Crest Cardstock with the 5 x 5″ scallop stitched square from the Queen & Company Foundation 16 dies. I also die cut a top panel (measuring from 4-1/16 x 4-1/16″) from Lawn Fawn Gotta Have Gingham Rainbow 12×12 Pack with the Queen & Company Foundation 16 dies and hand cut a back panel to 5-1/2 x 5-1/2″,

Next, I die cut the fruit from Stampin’ Up! So Saffron 8-1/2 x 11″, Simon Says Stamp 100# Green Apple Cardstock, Simon Says Stamp 100# Leaf Green Cardstock, Lawn Fawn 100# Guava Cardstock using the Lawn Fawn Zesty Lemon and Lawn Fawn Strawberry Patch Die, and Lawn Fawn Fruit Basket.

I colored them with Distress Oxide Inks. I used Tim Holtz Mustard Seed and Mowed Lawn for the lemons and limes, Festive Berries for the strawberries, Rustic Wilderness for the leaves, and Tumbled Glass for the fruit basket.

I stamped the mice from Lawn Fawn You Autumn Know Stampset onto Neenah 110lb Classic Crest Cardstock with Memento Tuxedo Ink and colored them with Copic Markers. I used E53, E23, E27, R20, 0 and die cut with the coordinating dies.

I stamped the sentiment from Lawn Fawn Happy Happy Happy onto Neenah 110lb Classic Crest Cardstock with Memento Tuxedo Ink. I stamped part of it into the lemon at the bottom right. I also die cut the word ‘SWEET’ from Neenah 110lb Classic Crest Cardstock and Simon Says Stamp #100 Cardstock with the Lawn Fawn Henry’s ABCs.

I finished the card by adding sime highlights with a White Signo Gel Pen.

On the inside of the card, I cut a piece of Lawn Fawn Gotta Have Gingham Rainbow 12×12 Pack to 1 x 5-1/2″ and stamped a sentiment from Stampin’ Up!’s Sweet Ice Cream Stampset (retired) with Festive Berries Distress Oxide Ink.

Dimensions


Supplies

https://linkdeli.com/widget.js?id=f5e8378456858c916708

Thanks for reading this post! I hope you enjoyed and Iโ€™ve inspired you to make this sweet card yourself! If you want to share you creations with me tag me on instagram @kittieslovecrafting. Leave comments or questions below or feel free to email me.

Birthdays, Distress Ink Techniques, Slimline, Summer

Zesty Slimline Birthday Card featuring Lawn Fawn

Hi friends. I couldn’t resist but CASE this card from Lawn Fawn Design Team member, Tammy Stark, featuring the cute Zesty Lemon Die. I used similar colors on the background but a different technique, changed the sentiment and a different border.

For this card, I cut a piece of Neenah 110lb Classic Crest Cardstock to 7โ€ณ x 8-1/2โ€ณ and scored at 3-1/2โ€ณ to create the card base. I diecut a piece of Neenah 110lb Classic Crest Cardstock with the stitched slimline frame from the Essentials Slimline Die. I also cut a piece measuring 3-1/8 x 6-1/8″.

I used Tim Holtz Picked Raspberry, Squeezed Lemonade, and Wild Honey Distress Inks fro the background, using the ink smoosh technique and also added some splatters. I also added white splatters with White Acrylic Paint.

I die cut the lemons and limes from Stampin’ Up! So Saffron 8-1/2″ X 11″ Cardstock and Simon Says Stamp 100# Green Apple Cardstock using the Lawn Fawn Zesty Lemon Die. The leaves I die cut from Simon Says Stamp 100# Green Leaf Cardstock, the flowers, piths, and whole lemon backs from Neenah 110lb Classic Crest Cardstock and the flower centers and cheeks from Lawn Fawn Guava 100# 8 1/2″ x 11″ Cardstock.

I colored the images with Tim Holtz Squeezed Lemonade, Mowed Lawn, and Rustic Wilderness Distress Oxide Inks.

I die cut the sentiment word ‘ZEST’ 2x from Neenah 110lb Classic Crest Cardstock using Lawn Fawn Henry’s ABCs and colored one set with Tim Holtz Picked Raspberry Distress Ink. I stamped the rest of the sentiment directly onto the card from the Lawn Fawn Happy Happy Happy Clear Stamps with Memento Tuxedo Black Ink.

I finished the card by adding white highlights with White Gel Pen.

I left the inside of the card blank.

Dimensions


Supplies

https://linkdeli.com/widget.js?id=f5e8378456858c916708

Thanks for reading this post! I hope you enjoyed and Iโ€™ve inspired you to make these cute cards yourself! If you want to share you creations with me tag me on instagram @kittieslovecrafting. Leave comments or questions below or feel free to email me.

Distress Ink Techniques, Embossed Background, Hello, Love & Friendship, Summer

Two Mini Slimline Cards featuring Lawn Fawn Zesty Lemon

Hi friends. I couldn’t resist getting the cute Zesty Lemon Die set from Lawn Fawn when I saw it! For my first cards I decided to make some embossed backgrounds and my distress sprays. These will also be available in my Etsy Shop.

For the both cards, I cut a piece of Neenah 110lb Classic Crest Cardstock to 7โ€ณ x 6โ€ณ and scored at 3-1/2โ€ณ to create the card bases. I diecut a piece of Neenah 110lb Classic Crest Cardstock with the stitched frame 3x to stack them and the scallop rectangle from the Queen & Company Foundation 17 dies. I also die cut one of the stitched smaller rectangles from the same set as well as a piece measuring 3 x 5-3/4″.

I embossed the two rectangles with the Darice 5 x 7 Plaid Embossing Folder then colored them using Distress Sprays. I used Broken China and Salty Ocean for the first card and Picked Raspberry and Carved Pumpkin for the second. In retrospect, I would water down the colors on the pink/orange background a bit more. Once all was dry, I added some splashed with White Acrylic Paint.

For the lemons and leaves, I die cut them from Neenah 110lb Classic Crest Cardstock with the Lawn Fawn Zesty Lemon set. I used Distress Oxide Inks to color them. I used Squeezed Lemonade for the lemons, Mowed Lawn and Rustic Wilderness for the leaves and Picked Raspberry for the flower centers and the cheeks.

For the sentiments, on the first card I used the Honey Bee Tailgate Alphabet Dies to spell out “ZEST” which I die cut from Neenah 110lb Classic Crest Cardstock (which I colored with Picked Raspberry Distress Oxide Ink) and Simon Says Stamp 100lb Black Card Stock. The rest of the sentiment came from the Lawn Fawn Sweet Friends Stampset and was stamped with Memento Tuxedo Black Ink onto the same white cardstock.

On the second card, I diecut the “hello” from Neenah 110lb Classic Crest Cardstock (which I colored with Picked Raspberry Distress Oxide Ink) and Simon Says Stamp 100lb Black Card Stock using the Simon Says stamp Bold Hello Die. I added some shimmer with a Spectrum Noir Clear Overlay Sparkle Pen.

I left the insides of the cards blank.

Dimensions


Supplies

https://linkdeli.com/widget.js?id=f5e8378456858c916708

Thanks for reading this post! I hope you enjoyed and Iโ€™ve inspired you to make these cute cards yourself! If you want to share you creations with me tag me on instagram @kittieslovecrafting. Leave comments or questions below or feel free to email me.

Fourth of July, Stenciled Background, Summer

A Clean and Simple Card Elevated By Stencils feat. Scrapbook.com

Hi friends. While I am not one to make a clean and simple card very often (I like to complicate my life. LOL), I decided to make one using the Fireworks Stencil from Scrapbook.com. This card can easily be made for any occasion — just change the background stencil and sentiment!

I cut a piece of Neenah 110lb Classic Crest Cardstock to 5-1/2 x 8-1/2″ and scored at 4-1/4″ to create the card base. I also die cut another piece using the largest dot die from Catherine Pooler Designs Scallops & Dots which measures 4-1/2″ x 3-1/4″. Then using the Scrapbook.com Fireworks 6×8 Stencil combined with Tim Holtz Chipped Sapphire and Candied Apple Distress Oxides Ink I stenciled the background.

I die cut a strip of Neenah 110lb Classic Crest Cardstock using the Queen and Company Foundations 17 dies. I used the rectangle that measures 1 x 6-1/4″. It has stitched edges which adds a nice element to the card. I adhered that to my card base and added some Love from Lizi Pin Stripe Peel-offs in Red Mirror and Blue Mirror along the edge of that strip.

I added some 3M Foam Tape behind the front panel and adhered it. I die cut the sentiment from Simon Says Stamp Red Glitter Cardstock as well as Stampin’ Up! Night of Navy 8-1/2 x 11″ Cardstock (for the shadow)

I finished off the card by adding red, white, and blue sequins. I don’t think the mix I used is still available but I have linked to a simliar one. But if you have the three colors separately that will do just fine as well here.

On the inside of the card, I stamped “Happy 4th of July” from and old sentiment stamp I have. I will try to link it below if I find it.s

Dimensions


Supplies

https://linkdeli.com/widget.js?id=f5e8378456858c916708

Thanks for reading this post! I hope you enjoyed and Iโ€™ve inspired you to make this cute card yourself! If you want to share you creations with me tag me on instagram @kittieslovecrafting. Leave comments or questions below or feel free to email me.

Fourth of July, Stenciled Background, Summer

Creating a Very Dimensional, But Quick and Easy Background feat. Scrapbook.com and Lawn Fawn

Hi friends. Here’s another cute card for Independence Day. This one is a little more involved than my previous card but was lots of fun to make. I haven’t used this Lawn Fawn Build-A-House Die in a while and it was time!

For this card, I cut a piece of Neenah 110lb Classic Crest Cardstock to 5-1/2 x 8-1/2″ and scored at 4-1/4″ to create the card base. I also cut another piece to 4-1/4 x 5-1/2″ for the background.

I used Tim Holtz Salty Ocean, Faded Jeans, and Chipped Sapphire Distress Oxides Inks to create a gradient background. Then used a mixture of Modelling Paste and Nuvo Glimmer Paste Moonstone with Scrapbook.com Fireworks 6×8 Stencil.

While that dried, I cut a piece of Neenah 110lb Classic Crest Cardstock to 2 x 5-1/4″ and diecut it with Lawn Fawn Grassy Border and colored it with Copic Markers. I used YG25, and G07. I die cut all the pieces for the house from Neenah 110lb Classic Crest Cardstock bwith the Lawn Fawn Build-A-House, Build-A-House Christmas Add-on Dies as well as the fence from the Honey Bee Stamps House Builder Card Base.

I colored all the pieces with Copic Markers as well. I used C00 for the house; C5, C7 & C9 for the roof; C3 & C5, Y13 & Y18 for the windows; R14, R17 & R29 for the door; C5, C7 & C9 for the stairs; B34, B37 & B39 for the awning; R29, Y18 & B37 for the window box flowers; C3 & 0 for the window box; R29 & B37 for the wreath and bow; and C00 & 0 for the fence.

I stamped the sentiment onto Neenah 110lb Classic Crest Cardstock with Catherine Pooler Designs Midnight Ink, added some Clear Embossing Powder and heat set it. I fussycut it and added it to the card with Stampinโ€™ Dimensionals.

I finished off the card by adding Tonic Fresh Snowfall Nuvo Glitter Drops to the door knob and the wreath bow.

I left the inside of the card blank.

Dimensions


Supplies

https://linkdeli.com/widget.js?id=f5e8378456858c916708

Thanks for reading this post! I hope you enjoyed and Iโ€™ve inspired you to make this cute card yourself! If you want to share you creations with me tag me on instagram @kittieslovecrafting. Leave comments or questions below or feel free to email me.

Fourth of July, Fourth of July, Stenciled Background, Summer

Partial Stenciling Technique: Patriotic Card

Hi friends. Independence Day is approaching and if you like making cards to send to friends and family like I do, here’s a simple one to get started. I saw a video from Gina K Designs on partial stenciling so I decided to give it a try.

For this card, I cut a piece of Neenah 110lb Classic Crest Cardstock to 7 x 10″ and scored at 5″ to create the card base. I taped off the area I wanted to stencil with Low Tack Tape and made sure to cover the rest of the areas so as not to add unwanted ink in those areas. I used Tim Holtz Candied Apple and Chipped Sapphire Distress Oxide Inks to create a gradient.

For the sentiment I diecut the letters for “fourth” from Tim Holtz Idea-ology 8 x 8 Paper Stash Metallic Kraft Stock and two from Simon Says Stamp Cardstock 100# Slate Gray using Honey Bee Tailgate Alphabet Dies. I also die cut silver stars using Queen & Company Foundation Dies #2.

I didn’t have any suitable stamps for the “Happy” and “of July” part of the sentiment so I printed some out from my computer. YOu can use a program like Microsoft Powerpoint or Word or Adobe Illustrator or any other program that allows you to create text and print it.

I left the inside of the card blank.

Dimensions


Supplies

https://linkdeli.com/widget.js?id=f5e8378456858c916708

Thanks for reading this post! I hope you enjoyed and Iโ€™ve inspired you to make this cute card yourself! If you want to share you creations with me tag me on instagram @kittieslovecrafting. Leave comments or questions below or feel free to email me.