Card kits, Encouragement, Just Because, Love & Friendship, Slimline

5 Cards 1 Kit: Rainbow Is My Favorite Color (Simon Says Stamp June 2021 Card Kit)

Hi everyone. This card kit just makes me happy. It’s all about rainbows and what’s not to like about that?!? The Simon Says Stamp Rainbow Is My Favorite Color 6×8 inch clear stamp set has a ton of rainbow images and cute sentiments to go along with them. Lots of options with this one. You can also use the straight stripe in non rainbow cards or make no traditional rainbows. I was definitely inspired my several of the design team cards I’ve been seeing posted on instagram @ #sssck.

The Kit includes:

For the first card, I started by cutting a piece of Neenah 110lb Solar White 8.5 x 11″ Cardstock to 5-1/2 x 8-1/2″ and scored at 4-1/4″ to make a card base. Then cut a piece of the aqua tiny cloud pattern paper from the Doodlebug Custom Rainbow 2021 6×6 inch paper to 4 x 5-1/4″ and a strip of the rainbow striped paper (also from the same paper pack) to 5/8 x 5-1/4″ and adhered them all to the card base. I added White Love from Lizi Pin Stripe Peel-Off Stickers on each side of the striped strip.

I diecut 1 rainbow from Neenah 110lb Solar White 8.5 Neenah 110lb Solar White 8.5 x 11″ Cardstock with the Simon Says Stamp Hello Rainbow die and used the Simon Says Stamp 1 inch cube ink pads in Jellybean, Sunshine, Hot Lips, and Audrey Blue and Mini Sponge Daubers to create a rainbow. I stamped and fussycut two clouds from the Simon Says Stamp Rainbow Is My Favorite Color 6×8 inch clear stamp set onto a piece of Neenah 110lb Solar White 8.5 x 11″ Cardstock with Memento Tuxedo Black Ink. I used Copic Marker BG000 + 0 (Blender) to color the clouds. I adhered them to the card using Stampin’ Dimensionals.

I stamped a sentiment from the Simon Says Stamp Rainbow Is My Favorite Color 6×8 inch clear stamp set onto a piece of Neenah 110lb Solar White 8.5 x 11″ Cardstock with Memento Tuxedo Black Ink, which I cut down to 1-1/16 x 2″.

To finish it off, I added a tiny pink heart from the Doodlebug Chasing Rainbows Shape Sprinkles and lots of the Memory Box Fairy Jewels.

On the inside of the card, I added a strip of the same paper Doodlebug Custom Rainbow 2021 6×6 inch paper I used on the front cut to 3/4 x 5-1/2″.

Dimensions


For the second card, I started by cutting a piece of Neenah 110lb Solar White 8.5 x 11″ Cardstock to 7 x 8-1/2″ and scored at 3-1/2″ to make a card base. Then cut another piece to 3-1/4 x 8-1/4″.

I used the Simon Says Stamp Build A Rainbow 6×9 inch stencil with the Simon Says Stamp 1 inch cube ink pads in Jellybean, Sunshine, Hot Lips, and Audrey Blue and Broken China Distress Ink to create my scene. I stenciled the clouds first with Broken China Distress Ink, the rainbows next with the 4 colors included in the kit and lastly the sun. I traced the outer rainbow onto piece of post-it note paper to use as a mask before adding the sun. I adhered the panel to the card base and stamped a sentiment from the Simon Says Stamp Rainbow Is My Favorite Color 6×8 inch clear stamp set onto a piece of Neenah 110lb Solar White 8.5 x 11″ Cardstock with Memento Tuxedo Black Ink, which I fussy cut and added to the card.

I added some yellow jewels from the Memory Box Fairy Jewels to the sun and some clear ones to the card.

On the inside of the card I stenciled some clouds at the bottom edge of the card with the Simon Says Stamp Build A Rainbow 6×9 inch stencil and Broken China Distress Ink.

Dimensions


For the third card, I started by cutting a piece of Neenah 110lb Solar White 8.5 x 11″ Cardstock to 7 x 8-1/2″ and scored at 3-1/2″ to make a card base. Then cut another piece to 3-1/4 x 8-1/4″.

I kept this card pretty simple and the rainbows didn’t take as long to stamp as I thought they might. Using my MISTI made the process faster. I stamped three rainbows from the Simon Says Stamp Rainbow Is My Favorite Color 6×8 inch clear stamp set onto Neenah 110lb Solar White 8.5 x 11″ Cardstock using the Simon Says Stamp 1 inch cube ink pads in Jellybean, Sunshine, Hot Lips, and Audrey Blue inks and fussy cut them. I stamped the clouds from the same stamp set with Memento Tuxedo Black Ink onto more Neenah card stock and fussycut those out as well.

I cut a piece of the pattern paper from the Doodlebug Custom Rainbow 2021 6×6 inch paper to 1-1/2 x 3-1/2โ€ and stamped a sentiment from the same stamp set with Memento Tuxedo Black Ink onto it.

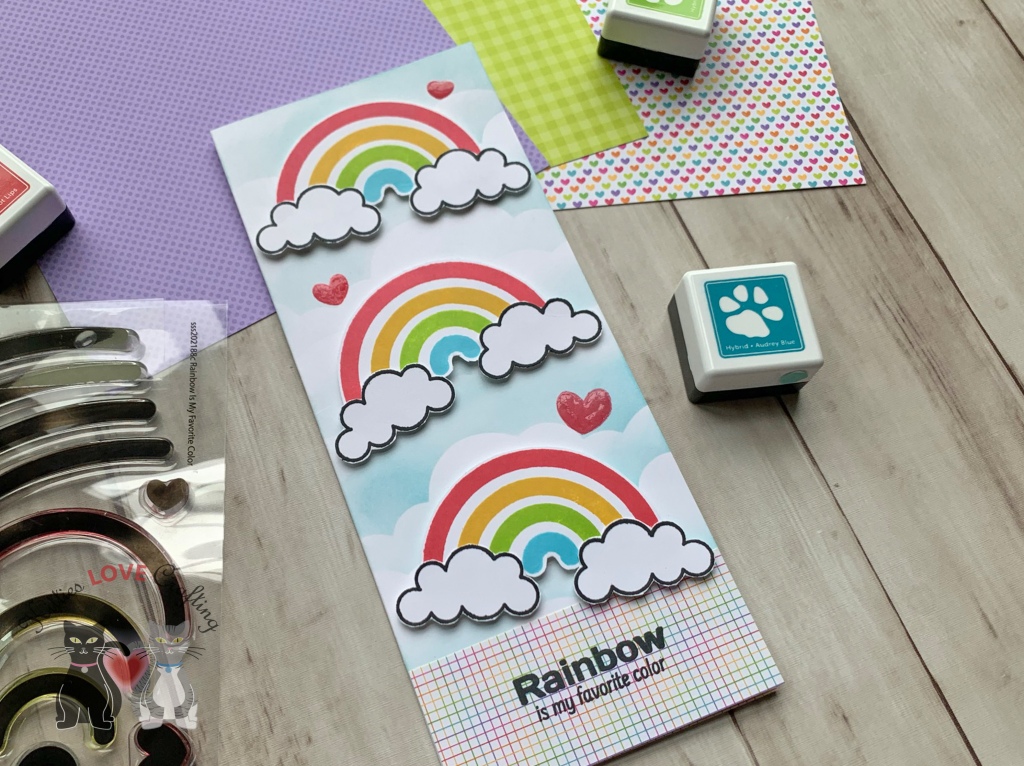
I adhered the pattern paper to the card and used 3M Foam Tape to adhere the rainbows and clouds to the card. I stamped the three hearts from the stamp set with Hot Lips Ink and added Glossy Accents over them.

On the inside of the card I cut a piece of the same pattern paper as the front of the card to 1-1/4 x 3-1/2″.

Dimensions


For the fourth card, I started by cutting a piece of Neenah 110lb Solar White 8.5 x 11″ Cardstock to 7 x 8-1/2″ and scored at 3-1/2″ to create a card base. And a second piece of Neenah Cardstock which I diecut using the large die from the Lawn Fawn Large Slimline with Sliders Die. I Inked it with Audrey Blue Ink to create an ombre effect.

I diecut four rainbows from the 8.5 x 11 inch sheet of Simon Says Stamp Holographic Rainbow cardstock with the Simon Says Stamp Hello Rainbow die. And stamped several clouds from the Simon Says Stamp Rainbow Is My Favorite Color 6×8 inch clear stamp set onto Neenah 110lb Solar White 8.5 x 11″ Cardstock with Memento Tuxedo Black Ink, colored them with C1 and 0 Copic Markers and fussycut them out.

I adhered the clouds and rainbows to the card. Then stamped the sentiment from the Simon Says Stamp Rainbow Is My Favorite Color 6×8 inch clear stamp set onto the card with Memento Tuxedo Black Ink.I finsihed it off by adding puffy clouds and hearts from the Doodlebug Chasing Rainbows Shape Sprinkles. I also added some clear Memory Box Fairy Jewels.

On the inside of the card I adhered another rainbow diecut from the 8.5 x 11 inch sheet of Simon Says Stamp Holographic Rainbow cardstock.

Dimensions


For the fifth card, I started by cutting a piece of Neenah 110lb Solar White 8.5 x 11″ Cardstock to 5-1/2 x 8-1/2″ and scored at 4-1/4″ to make a card base and another piece to 4 x 5-1/4″. I stenciled the sune and clouds using the Simon Says Stamp Build A Rainbow 6×9 inch stencil and Sunshine and Audrey Blue Inks.

I also stenciled the cloud border on another piece of Neenah 110lb Solar White 8.5 x 11″ Cardstock which I cut to 1-3/4 x 4″, then fussycut the top edge of the clouds. I stamped a sentiment from the Simon Says Stamp Rainbow Is My Favorite Color 6×8 inch clear stamp set with Memento Tuxedo Black Ink onto the cloud border.

Next, I used Deco Foil – Transfer Gel, a palette knife and the Simon Says Stamp Build A Rainbow 6×9 inch stencil to add a rainbow onto the card. Once it dried, I added Therm O Web RAINBOW SHATTERED Deco Foil Transfer Sheets and ran it through my lamination machine.

I adhered the cloud border to the bottom of the card panel with 3M Foam Tape. I finished it off by adding some Memory Box Fairy Jewels.

I left the inside of the card blank .

Dimensions


Supplies

https://linkdeli.com/widget.js?id=f5e8378456858c916708

Thanks for reading this post. I hope you enjoyed and Iโ€™ve inspired you to make some cards using this kit yourself! If you want to share you creations with me tag me on instagram @kittieslovecrafting. Leave comments or questions below or feel free to email me.

Birthdays, Celebrations, Slimline, Stampin' Up!, Summer

A Sweet Summer Slimline Birthday Card featuring Stampinโ€™ Up!’s Sweet Ice Cream

Hi friends! Love the look of watercolor but not so great at it like me?!? This Sweet Ice Cream Stampset from Stampinโ€™ Up! is a great option. You can make quick cards with little effort but they look like you spent lots of time watercoloring the images. ๐Ÿ™‚ And they look so cute when complete!

I started by cutting a piece of Neenah 110lb Classic Crest Cardstock 8.5 X 11″ to 7 x 8-1/2″ and scored a at 3-1/2″ to create the card base and another piece to 3-1/4 x 8-1/4″. I used Stampin’ Up! Pool Party Ink and the sprinkle dots from the Sweet Ice Cream Stampset to create the background.

I stamped 3 popsicles and 2 ice cream cones onto Neenah 110lb Classic Crest Cardstock 8.5 X 11″ with Sahara Sand and Soft Suede (cone, popsicle sticks and one ice cream scoop and sprinkles) Inks, Mango Melody, Gorgeous Grape and Melon Mambo (popsicles). I used second generation stamping to get the different shades on the popsicles as well as for the pink ice cream scoop.

I stamped a sentiment from the Sweet Ice Cream Stampset onto a piece of Neenah 110lb Classic Crest Cardstock 8.5 X 11″ with Gorgeous Grape and fussycut it. I also stamped the rest of my sentiment directly on the card with Memento Tuxedo Black Ink. After adhereing all the images and esntiment to teh card I finished it off ny adding some Doodlebug Sprinkles Self Adhesive Enamel Dots in Bumblebee, Lilac, Swimming Pool, and Cupcake.

On the inside, I stamped the sprinkle dots from the Sweet Ice Cream Stampset with Stampin’ Up! Pool Party Ink.

Dimensions


Supplies

https://linkdeli.com/widget.js?id=f5e8378456858c916708

Thanks for reading this post. I hope you enjoyed and Iโ€™ve inspired you to try this cute summer slimline ice cream card using this stampset for yourself! Leave comments or questions below or feel free to email me. If you want to share you creations with me tag me on instagram @kittieslovecrafting.

Easter, Easter, Slimline, Spring, Watercolor techniques

Slimline Watercolor Easter Card Using Simon Says Stampโ€™s Suzy’s Easter Pals Watercolor Prints

Hi friends. The Easter bunny arrives soon and so it’s time for some cute Easter cards! I used the Simon Says Stampโ€™s Suzy’s Easter Pals Watercolor Prints and Simon Says Stamp EASTER WISHES Sentiment Strips to create this slimline card. These pre-printed cards are fun to watercolor and make quick cards — just add some pattern paper and embellishments and you’re done!

For this card, I started by cutting a piece of Neenah 110lb Classic Crest Cardstock to 7 x 8-1/2″ and scored at 3-1/2″ to create the card base. I also cut a piece of Lawn Fawn 6 x 6 Perfectly Plaid Paper (no longer available) to 3-1/4 x 8-1/4″ and a piece of Simon Says Stamp GREEN APPLE 8-1/2 x 11″ Card Stock to 1-3/4 x 8-1/4″ which I diecut with Lawn Fawn Grassy Border Lawn Cuts Dies for the grass and adhered them to the card. I used 3M Foam Tape to adhere the grass border.

I colored the Easter Egg Watercolor panel with Kuretake Gansai Tambi watercolor and Zig Kuretake Gansai Tambi Starry Colors and fussycut out all the images and adhered them to the card, using 3M Foam Tape for some. I added a sentiment strip from the Simon Says Stamp EASTER WISHES Sentiment Strips.

I finished it off by adding Nuvo Drops in Dandelion Yellow, Bottle Green and Violet Galaxy and some highlights with a White Gel Pen.

On the inside of the card I kept it simple and added a piece of Lawn Fawn 6 x 6 Perfectly Plaid Paper, cut to 10/16 x 8-1/4″ and added a sentiment strip from the Simon Says Stamp Sentiment Strips Reverse Easter Wishes.

Dimensions


Supplies

https://linkdeli.com/widget.js?id=f5e8378456858c916708

Thanks for reading this post. I hope you enjoyed and Iโ€™ve inspired you to make some watercolor Easter cards yourself! If you want to share you creations with me tag me on instagram @kittieslovecrafting. Leave comments or questions below or feel free to email me.

Card kits, Holidays 2021, interactive, Love & Friendship, Slimline, Valentine's Day

Peekaboo Window Slimline Card Using Simon Says Stampโ€™s February 2021 Card Kit

Hi friends. Here’s a fun interactive peekaboo window with hidden messages for Valentine’s, Galentine’s or any day you want to share love. I pulled out an oldy but goody interactive die from Lawn Fawn and combined it with the Simon Says Stamp February 2021 Card Kit Love You Beary Much. I love the Tumbling Hearts 6 x 6 stencil included in this kit! It is so easy to make a pretty background with it. I will show you how I was able to use it on a slimline card.

The Kit includes:

I started by cutting a piece of Neenah 110lb Classic Crest Cardstock 8.5 X 11″ to 7 x 8-1/2″ and scored a at 3-1/2″ to create the card base and another piece to 3-1/4 x 7-1/4″. I used Catherine Pooler Designs It’s a Girl Ink to create a gradient background then used the Simon Says Stamp Exclusive Tumbling Hearts 6 x 6 stencil and Catherine Pooler Designs Rouge Ink to create gradient of hearts over the pink.

Next, I used the Lawn Fawn Lift the Flap Dies to cut out three windows on the top panel. I backed the top and bottom windows with a piece of paper from the Simple Stories Sweet Talk 6 x 8 paper pad and stamped a sentiment from the Simon Says Stamp Love You Beary Much Exclusive 6 x 8 stamp set with Memento Tuxedo Black Ink onto a piece of Neenah 110lb Classic Crest Cardstock 8.5 X 11″ to place behind the center window. And adhered that panel to the card base.

I stamped all of the images from the Simon Says Stamp Sweet Truffles Exclusive 3 x 4 stamp set with Memento Tuxedo Black Ink onto a piece of Neenah 110lb Classic Crest Cardstock 8.5 X 11″ and some conversation hearts from the Simon Says Stamp Love You Beary Much Exclusive 6 x 8 stamp set.

I colored all the images with Copic Markers. I used E23, E25, E29 & E49 (for chocolate truffles); R81, R83 & R85 (for the truffle wrappers, sprinkles and decor, hearts); R05, R17 & R29 (for hearts); BG000, BG01 & BG02 (for sprinkles and decor, hearts). I fussycut all the images and adhered some to the inside of the card and some on the outside.

To finish it off, I added some White Gloss Nuvo Drops.

On the inside of the card I kept it simple, and just stamped the sentiment from the Simon Says Stamp Love You Beary Much Exclusive 6 x 8 stamp set with Catherine Pooler Designs Rouge Ink onto Neenah 110lb Classic Crest Cardstock 8.5 X 11″, fussycut and adhered it to the card. I also added nother truffle image.

Dimensions


Supplies

https://linkdeli.com/widget.js?id=f5e8378456858c916708

Thanks for reading this post. I hope you enjoyed and Iโ€™ve inspired you to make this slimline card using this kit yourself! If you want to share you creations with me tag me on instagram @kittieslovecrafting. Leave comments or questions below or feel free to email me.

Love & Friendship, Slimline

Using Only Dies to Make A Slimline Valentine’s Day Card

Hi friends. Need a quick and easy card for Valentine’s Day??? This card uses only dies and paper and came together very quickly. Here’s how it came together.

I started by cutting a piece of Neenah 110lb Classic Crest Cardstock 8.5 X 11″ to 7 x 8-1/2″ and scored a at 3-1/2″. I used the Honey Bee Stamps Slimline Thin Frames Dies and Stampin’ Up!’s Poppy Parade 8-1/2 x 11″ Cardstock and a pink cardstock from Hunkydory Matt-tastic Adorable Scorable Core Colourways Collection to cut out the frames. This die is cool because it cuts all 14 frames at the same time so I just had to run it through two times. I adhered used the five largest frames to the card base, alternating colors. I cut a piece of the Neenah 110lb Classic Crest Cardstock 8.5 X 11″ to 2-1/4 x 7-1/4 and embossed it with the Craftwell Delicate Dots 8.5 X 11″ Embossing Folder, and adhered to the front of the card.

For my sentiment I diecut the word ‘LOVE’ from Simon Says Stamp 6 x 6 Red Glitter Cardstock using the Honey Bee Bee Bold Alphabet Dies as well as from Neenah 110lb Classic Crest Cardstock 8.5 X 11″ two times and adhered those stacked to the card. To finish it off, I added two small hearts which I cut out using a heart punch from Stampin’ Up!’s Poppy Parade 8-1/2 x 11″ Cardstock.

On the inside of the card, I stamped a sentiment from Lawn Fawn Happy Happy Happy Add-On Stampset with Stampin’ Up! Poppy Parade Ink and added another punched heart.

Dimensions


Supplies

https://linkdeli.com/widget.js?id=f5e8378456858c916708

Thanks for reading this post. I hope you enjoyed and Iโ€™ve inspired you to give this card a try for yourself. Leave comments or questions below or feel free to email me.

Christmas, Slimline

One Slimline Die, 2 Easy Cards featuring Catherine Pooler Designs Doodle Window Slimline Die

Hello everybody! I don’t know about you but I love slimline cards and I love window cards and if I can use a die to quickly accomplish that create both of those then I am one happy camper! This Doodle Window Slimline Die from Catherine Pooler Designs’ Jolly Holiday release is great for just that. You can add all kinds of stuff in the windows — sentiments, characters, sequins for a shaker, paper etc.

I started by cutting a piece of Neenah 110lb Classic Crest Cardstock 8.5 X 11″ to 7 x 8-1/2″ and scored at 3-1/2″ for my card base. Then diecut the panel using the Doodle Window Slimline Die. Next I diecut a piece of Simon Says Stamp Card Stock 100# GREEN APPLE with the Catherine Pooler Designs Narrow Stripe Cover Plate Die, a piece of Stampin’ Up! Garden Green 8-1/2″ X 11″ Cardstock with the Dotted Zig Zag Cover Plate Die, and a piece of Simon Says Stamp Card Stock 100# Schoolhouse Red with the Peppermint Twist Cover Plate Die.

I adhered the diecut panels behind the windows with Tombow Mono Multi Liquid Glue and then to the card base. But before adhering them to the card base I stamped a sentiment from Catherine Pooler’s Nice List Stamp Set with Catherine Pooler’s Midnight Ink.

I stamped the hats from Catherine Pooler’s Nice List Stamp Set onto another piece of Neenah 110lb Classic Crest Cardstock 8.5 X 11″ with Catherine Pooler’s Midnight Ink. I colored them with Cranberry Fizz Ink, Lime Rickey Ink, Deck the Halls Ink and Black Jack Ink and a Blender Pen. I diecut the images with the coordinating Nice List Dies, added some adhesive foam and addedd them to the card. I finished it off by adding some Bottle Green and Autumn Red Nuvo Crystal Drops and some shimmer with a Spectrum Noir Clear Overlay Sparkle Pen.

On the inside of the card, I stamped another greeting from the Lawn Fawn Merry Messages with Lime Rickey Ink and a hat from the Catherine Pooler’s Nice List Stamp Set with Cranberry Fizz Ink.

Dimensions


I started by cutting a piece of Neenah 110lb Classic Crest Cardstock 8.5 X 11″ to 7 x 8-1/2″ and scored at 3-1/3″ for my card base and then diecut the top panel using the Doodle Window Slimline Die.

I traced the three circles from the Doodle Window Slimline Die onto a piece of Neenah 110lb Classic Crest Cardstock 8.5 X 11″ and stamped the mittens from Catherine Pooler Caroling Sentiments Stampset with Cranberry Fizz Ink, Lime Rickey Ink, and It’s a Boy Ink and the dots with Deck the Halls Ink in the largest circle. Then stamped the snowflake from Catherine Pooler Caroling Sentiments Stampset with Rockin Red Ink in the smallest circle and made a scene with the trees from the Catherine Pooler Caroling Sentiments Stampset and the snowflakes from the Catherine Pooler’s Nice List Stamp Set with It’s a Boy Ink in the medium circle. I used Grass Skirt, Lime Rickey Ink, and Deck the Halls Ink for the trees and It’s a Boy Ink for the snowflakes.

I added Foam Tape to the back of the pattern paper and adhered the window panels, then adhered it to the card base. I stamped a sentiment from a very old sentiment stampset from my stash onto a piece of of Neenah 110lb Classic Crest Cardstock 8.5 X 11″ with Cranberry Fizz Ink and trimmed it down to 1 x 3-11/16โ€, added Foam Tape and added it to the card. I finished it off by adding Autumn Red Nuvo Crystal Drops.

On the inside of the card, I stamped another greeting from the Lawn Fawn Merry Messages with Cranberry Fizz Ink and adhered two of the leftover circles from when I diecut the front panel from Catherine Pooler Designs Under the Tree Patterned Paper.

Dimensions

Supplies

https://linkdeli.com/widget.js?id=f5e8378456858c916708

Thanks for reading this post. I hope you enjoyed and Iโ€™ve inspired you to give these fun slimline cards a try for yourself. Leave comments or questions below or feel free to email.

Christmas, Slimline

Super Easy Christmas Slimline Shaker Card featuring the Catherine Pooler Candy Cane Slimline Die

Hello everybody! I don’t know about you but I love a good shaker card and when it’s easy to make I’m all for it! I also love slimline cards so I decided to combine the two. This new Candy Cane Slimline Die from Catherine Pooler is perfect for all kinds of backgrounds You can layer it, inlay the pieces or do a tone on tone like I did here. The other die that I am loving from the Jolly Holiday release is the Peppermint Twist Cover Plate Die. You will see how I used it for this card.

I started by cutting a piece of Neenah 110lb Classic Crest Cardstock 8.5 X 11″ to 7 x 8-1/2″ and scored at 3-1/3″ for my card base. next I used the Candy Cane Slimline Die to cut the front panel and adhered it to the card base. I used the My Favorite Things Stitched Circle Scallop Frames (I think this is no longer available but you can achieve the same look with a scallop circle die or punch and a smaller circle for the inside) to cut out a frame from Neenah 110lb Classic Crest Cardstock 8.5 X 11″.

I stamped the sentiment from Catherine Pooler’s Nice List Stamp Set onto another piece of Neenah 110lb Classic Crest Cardstock 8.5 X 11″ with Catherine Pooler’s Cranberry Fizz Ink and used a 2-1/4″ punch to cut it out.

I put together my shaker element by adding acetate to the back of the frame, using a punch to cut it out, some foam tape behind that and adding some Queen and Company Topping Pastel Diamonds in red, green and clear. I adhered the circle with the sentiment and adhered the whole thing to the card.

To make it more festive, I used Catherine Pooler’s Cranberry Fizz Ink and a direct-to-paper technique to color some Neenah 110lb Classic Crest Cardstock 8.5 X 11″ then diecut it using the Peppermint Twist Cover Plate Die. I adhered several of the peppermints around the card front and added some Bottle Green and Ivory Seashell Nuvo Crystal Drops to the peppermints for some dimension.

On the inside of the card, I stamped another greeting from the Catherine Pooler’s Nice List Stamp Set with Catherine Pooler’s Eucalyptus Ink and some more peppermints. And that completes this card.

Dimensions

Supplies

https://linkdeli.com/widget.js?id=f5e8378456858c916708

Thanks for reading this post. I hope you enjoyed and Iโ€™ve inspired you to give this card a try for yourself. Leave comments or questions below or feel free to email.

Card kits, Christmas, Slimline

Using Stickers to Create a Slimline Christmas Card

Stickers are a great way to create quick cards and who doesnโ€™t like quick cards for the holidays, right?!? I had some leftover stickers from the Carta Bella Paper – Santa’s Workshop Collection, Christmas, 12 x 12 Cardstock Stickers featured in the Says Stamp December 2018 Card Kit, Holiday Cheer (sold out) so I decided to use them on a slimline card. The larger sticker like the Santa and reindeer one are great fro slimline cards!

I started by cutting a piece of Says Stamp Green Leaf Card Stock 100# 8.5 x 11″ to 7 x 8-1/2″ and scored at 3-1/2″ to create a slimline card base and a piece of Neenah 110lb Classic Crest Cardstock 8.5 X 11″ to 3-1/4 x 8-1/4โ€ for the top panel. I also cut another piece of Neenah 110lb Classic Crest Cardstock 8.5 X 11″ to 1-1/2 x 8-1/2โ€ and used the Lawn Fawn Slimline Stitched Hillside Borders Die Cuts to diecut a snowy hillside.

I used Versamark Ink to stamp the snowflake pattern from the Simon Says Stamp CHRISTMAS CHEER Stampset all over the background and heat embossed it with WOW OPAQUE BRIGHT WHITE Super Fine Embossing Powder. I used Tim Holtz Tumbled Glass Distress Ink and Tim Holtz Salty Ocean Oxide Ink to ink blend the background and adhered it to the card base. I adhered the snowy hillside to the card as well, leaving the top edge without glue. I adhered the Christmas tree from Carta Bella Paper – Santa’s Workshop Collection, Christmas, 12 x 12 Cardstock Stickers behind the hillside and the Santa on his sleigh on top of the hillside.

I stamped a sentiment from Simon Says Clear CHRISTMAS CHEER Stampset onto a piece of Neenah 110lb Classic Crest Cardstock 8.5 X 11″ with Stampinโ€™ Up! Real Red Ink, cut it to 1-3/16 x 2-1/8 and adhered it to the card. I finished it off by adding Tonic White Blizzard Nuvo Glitter Drops.

On the inside of the card, I stamped another greeting from the Simon Says Clear CHRISTMAS CHEER Stampset with Stampinโ€™ Up! Real Red Ink and added a reindeer from the Carta Bella Paper – Santa’s Workshop Collection, Christmas, 12 x 12 Cardstock Stickers.

Dimensions

Supplies

https://linkdeli.com/widget.js?id=f5e8378456858c916708

Thanks for reading this post. I hope you enjoyed and Iโ€™ve inspired you to give this card a try for yourself. Leave comments or questions below or feel free to email.

Card kits, Christmas, Slimline

Slider Slimline Card featuring Simon Says Clear Stamps โ€˜Gnome for the Holidaysโ€™

Happy Wednesday friends! I thought I would revisit an old Simon Says Stamp Card Kit. The โ€˜Gnome for the Holidaysโ€™ Card Kit was released in December 2019 and features the cute 6 x 8″ Gnome for the Holidays stampset. I thought it might be fun to make a slimline slider card with the little gnomes. It was fairly easy to make and can be even more simplified by skipping th eheat embossing and doing simple coloring on the images.

I started by cutting a piece of Neenah 110lb Classic Crest Cardstock 8.5 X 11″ to 7 x 8-1/2″ and scored at 3-1/3″ for the card base and diecut another piec with the smallest of two stitched rectangels from the Lawn Fawn Large Slimline With Sliders Die Cuts. I used Versamark Ink to stamp the snowflake from the Gnome for the Holidays stampset and heat embossed it with WOW OPAQUE BRIGHT WHITE Super Fine Embossing Powder. I used Tim Holtz SPECKLED EGG Distress Ink and Tim Holtz Broken China Distress Oxide Ink to ink blend the background.

I set that aside and stamped the gift stack and two of the gnomes from the Gnome for the Holidays stampset onto Neenah 110lb Classic Crest Cardstock 8.5 X 11″ with Memento Tuxedo Black Ink. I used a mask (stamp onto a post it note) to mask out the top bow while stamping the gifts.

I colored the image with COPIC markers. I used YG05 + G07 (body), R20 (cheeks), R14 + R27 (gloves and socks), C3 + C5 (shoes) and C1 (arms) for the tree gnome; R14 + R27 (body), YG05 + G07 (hat), C1 + 0 (beard), R00 + R01 (face), R81+ R27 (socks), R81+ R85 (hat dots and sleeves), and C1 + C3 (gloves) for the second gnome; and R14, R27, R81, R85, YG05, G07, C1, C3, and C5 for the gifts.

I fussycut the images out and decided where they would go on my card. Then diecut the slider with the Lawn Fawn Large Slimline With Sliders Die Cuts. I added Foam Tape and a penny for the slider element and adhered it to the card base.

I used Versamark Ink to stamp the sentiment from the Gnome for the Holidays stampset and heat embossed it with WOW OPAQUE BRIGHT WHITE Super Fine Embossing Powder onto a piece of Simon Says Stamp Card Stock 100lb Schoolhouse Red. And then diecut it out with the smallest rectangle from the Lawn Fawn Large Slimline With Sliders Die Cuts. I added a strip of Simon Says Stamp White Glitter Cardstock, measuring 3/8 x 2-1/2″ to the back of that piece and adhered it to the card panel.

On the inside of the card, I stamped another greeting from the Gnome for the Holidays stampset with Simon Says Stamp SCHOOLHOUSE RED Ink and added the tree gnome I colored earlier. And that completes this card.

Dimensions

Supplies

https://linkdeli.com/widget.js?id=f5e8378456858c916708

Thanks for reading this post. I hope you enjoyed and Iโ€™ve inspired you to give this card a try for yourself. Leave comments or questions below or feel free to email.

Card kits, Just Because, Love & Friendship, Slimline

5 Cards 1 Kit (Simon Says Stamp July 2020 Card Kit)

Well this post is a little late but….better late than never I guess. This kit is very appropriate for the time we are currently in. What I really liked about the included stamp set, Simon Says Stamp Home Sweet Home 6×8 Stamp Set, is that the image of the houses fits across a landscape A2 card or a slimline card.

The Kit includes:

For the first card, I started by cutting a piece of Neenah 110lb Classic Crest Cardstock to 5-1/2 x 8-1/2″ and scored at 4-1/4″ to make a card base. Then cut a piece of the dark cloud paper from Waffle Flower Special Delivery Paper to 5-1/2 x 8-1/2″ and inked around the edges with the Tim Holtz Ranger Speckled Egg Mini Distress Ink included in the kit and adhered it to the card base.

I diecut 1 large and 2 medium postage pieces from Neenah Solar White 80lb Cardstock with the Simon Says Stamp CZ Design Postage Dies. I stamped the houses from Simon Says Stamp’s Home Sweet Home 6×8 Stamp Set onto those diecuts with Memento Tuxedo Black Ink. I also stamped additional images (the plane and banner with sentiment, paper plane, sun and wifi symbol) onto the same Neenah Solar White 80lb Cardstock.

I colored all the images with COPICS. I used R81 & R85, W1 & W3, Y13 & Y18, G07 & G28 for the first house (top); BG11 & BG53, W1, W3 & W7, G07 & G28, Y13 & Y18, R29 & R56 for the second house; R29 & R56, W3 & W7, Y13 & Y18 for the third house; R29 & R56, BG11 & BG53, W3 & W7 for the Airplane and banner; Y13 & Y18 for the sun and R81 & R85 for the paper plane. I fussycut all the images and adhered them to the card. I used 3M Foam Tape to pop up some of the images for added dimension.

To finish it off, I added a dashed line behind the paper plane with my Faber-Castell PITT Artist Pen Superfine Fineliner – Black (199) and some Nuvo Glitter Drops in Fresh Snowfall.

On the inside of the card I kept it simple, and just stamped the sentiment and the row of houses from Simon Says Stamp’s Home Sweet Home 6×8 Stamp Set with Tim Holtz’s Ranger Speckled Egg Mini Distress Ink.

Dimensions


For the second card, I started by cutting a piece of Neenah 110lb Classic Crest Cardstock to 7 x 8-1/2″ and scored at 3-1/2″ to make a card base. Then cut a piece of the light cloud paper from Waffle Flower Special Delivery Paper to 3-1/2 x 8-1/2″ using the Lawn Fawn Large Slimline with Sliders Die Cuts and adhered it to the card base.

I stamped the houses, the plane and banner with sentiment, the sun and some clouds from Simon Says Stamp’s Home Sweet Home 6×8 Stamp Set onto a piece of Neenah Solar White 80lb Cardstock with Memento Tuxedo Black Ink.

I colored all the images with COPICS. I used R14 & R27, N2 & N5 for the first house; G07 & G14 for the trees; B37 & B24, N5 & N7 for the second house, R81 & R85, N2 & N5 for the third house; R14, R81 & R85, N2 & N5 for the fourth house; and BG000 for the clouds. I stamped a sentiment from Simon Says Stamp’s Home Sweet Home 6×8 Stamp Set onto the card front with Memento Tuxedo Black Ink. Then I restamped it with Versamark Emboss Ink and added Clear Embossing Powder. I made sure to use an anti static powder tool before using the embossing ink.

I fussycut all the images and adhered them to the card. I used 3M Foam Tape to pop up the plane and banner for added dimension.

On the inside of the card I kept it simple, I added a leftover strip of the same cloud paper (about 1 x 8-1/2โ€ and just stamped a sentiment and stars Simon Says Stamp’s Home Sweet Home 6×8 Stamp Set with Stampinโ€™ Up!โ€™s Night of Navy Ink.

Dimensions


For the third card, I started by cutting a piece of Simon Says Stamp Soft Navy Cardstock to 4-1/4 x 5-1/2″ and scored at 4-1/4″ to create the card base and another piece to 4 x 5-1/4″.

For this card I wanted to try using my prismacolors on the navy cardstock to see if it wouls work. To be honest it is a techinique I have never tried before but have seen Jennifer McGuire and others do it successfully so I figured why not. I also saw Kristina Werner white heat emboss onto the navy cardstock with this kit and looked stunning so I combined the two ideas and came up with this card.

I picked out a sentiment from Simon Says Stamp’s Home Sweet Home 6×8 Stamp Set and all the images I wanted to use (note: the stars had to be stamped multiple times). I used an anti static powder tool and coated the paper well (I still got strays-tell you later how I fixed it) and stamped the images with Versamark Emboss Ink, added Wow Opaque Bright White Super Fine Embossing Powder and heat set it. I used my Prismacolor Pencils to color the images. Tip: Color with white pencil first so that your colors will appear brighter and truer over dark cardstock.

Ok, so how did I fix the stray embossing powder. Well, I tried using a sand eraser and an exacto knife to gently scrape it off but it was starting to pill the paper so I decided to embrace it instead and add white dots (for stars) with my Uni-Ball Signo Broad Point Gel Pen.

I adhered the panel to the card base and then finished it off by adding a wonky stitched line around the edge.

On the inside of the card I adhered a piece of Neenah Solar White 80lb Cardstock, measuring 4 x 5-1/4″ and just stamped a sentiment from Simon Says Stamp’s Home Sweet Home 6×8 Stamp Set with Stampinโ€™ Up!โ€™s Night of Navy Ink and stars with Stampin’ Up!’s Daffodil Delight Ink.

Dimensions


For the fourth card, I started by cutting a piece of Simon Says Stamp Smoke Cardstock to 4-1/4 x 5-1/2″ and scored at 4-1/4″ to create a card base and cut down one of the papers from the Waffle Flower Special Delivery Paper to 4 x 5-1/4″. I used an exacto knife to cut out two of the postage stamp images. I took the large one I cut out and mounted it on a piece of Neenah Solar White 80lb Cardstock, measuring 2 x 2-1/2. I mounted both those pieces onto a piece of pattern paper from the Waffle Flower Special Delivery Paper included in the kit, measuring 2-1/2 x 3-7/16. I will add that inside a Simon Says Stamp Mini White Envelope.

I stamped houses and the paper airplane from Simon Says Stamp’s Home Sweet Home 6×8 Stamp Set onto Neenah Solar White 80lb Cardstock with Memento Tuxedo Black Ink. I colored them with COPIC markers. I used B000 & B01, W1 & W3 (roof), BG0000 & 0 (windows) for the first house; RV10, RV11 & RV14, W1 & W3 (roof), BG0000 & 0 (windows) for the second house; YG09 & YG25 for the trees; W1 & W3, Y06 & Y13 for the lamp post; B24 & B37 for the sky; Y06 & Y13 for the stars and B01 & B24 for the paper airplane and RV10 & RV11 for the background.

I added 3M Foam Tape to the top panel, adhered the images behind the panel and adhered it to the card base. I finished it off by adding three dots of Nuvo Gloss Drops in Midnight Blue at the top and bottom of the card.

On the inside of the card I adhered Simon Says Stamp Mini White Envelope with the card inside to the inside of the card and just stamped a sentiment and a row of houses from Simon Says Stamp’s Home Sweet Home 6×8 Stamp Set with Stampinโ€™ Up!โ€™s Night of Navy Ink.

Dimensions


For the fifth card, I was inspired by Cindy Norberg and Heather Ruwe‘s cards. I think this is my favorite card! It’s so bright and shiny!

I started by cutting a piece of Neenah 110lb Classic Crest Cardstock 8.5 X 11″ to 4-1/4 x 5-1/2″ and scored at 4-1/4″ to create the card base and cut down a piece of Simon Says Stamp Slate Gray Cardstock to 4-1/4 x 5-1/2″ and adhered it to the card base. I also cut a piece of Neenah Solar White 80lb Cardstock to 4 x 5-1/2″ and adhered it to the card base.

I used three pieces of Montval Acid-Free Cold Press 140 lb Watercolor Paper along with my Kuretake Gansai Tambi Watercolors and Watercolor Brushes to create three rainbow backgrounds. I used red, orange and yellow for the first piece. yellow, green and aqua for the second piece, and aqua, dark blue and purple for the third piece. I let those dry WELL (cannot stress this enough) and then I stamped the houses on each panel with Versamark Emboss Ink, added Silver Embossing Powder and heat set it with a heat gun. Also, it is very important to use an anti static powder tool before embossing.

I fussycut the images out and adhered them to the card front. I heat embossed a sentiment and some clouds to the top of the card with the same Silver Embossing Powder. To finish it off I added some splashes with Silver Acrylic Paint.

I left the inside of the card blank and just added a strip of the leftover watercolor, measuring 1 x 4-1/4″.

Dimensions


Supplies

https://linkdeli.com/widget.js?id=f5e8378456858c916708

Thanks for reading this post. I hope you enjoyed and Iโ€™ve inspired you to make some cards using this kit yourself! If you want to share you creations with me tag me on instagram @kittieslovecrafting. Leave comments or questions below or feel free to email me.