Cards, Love & Friendship, Valentine's Day

Cute Pickup Truck Valentine’s Day Card featuring Honey Bee Stamps

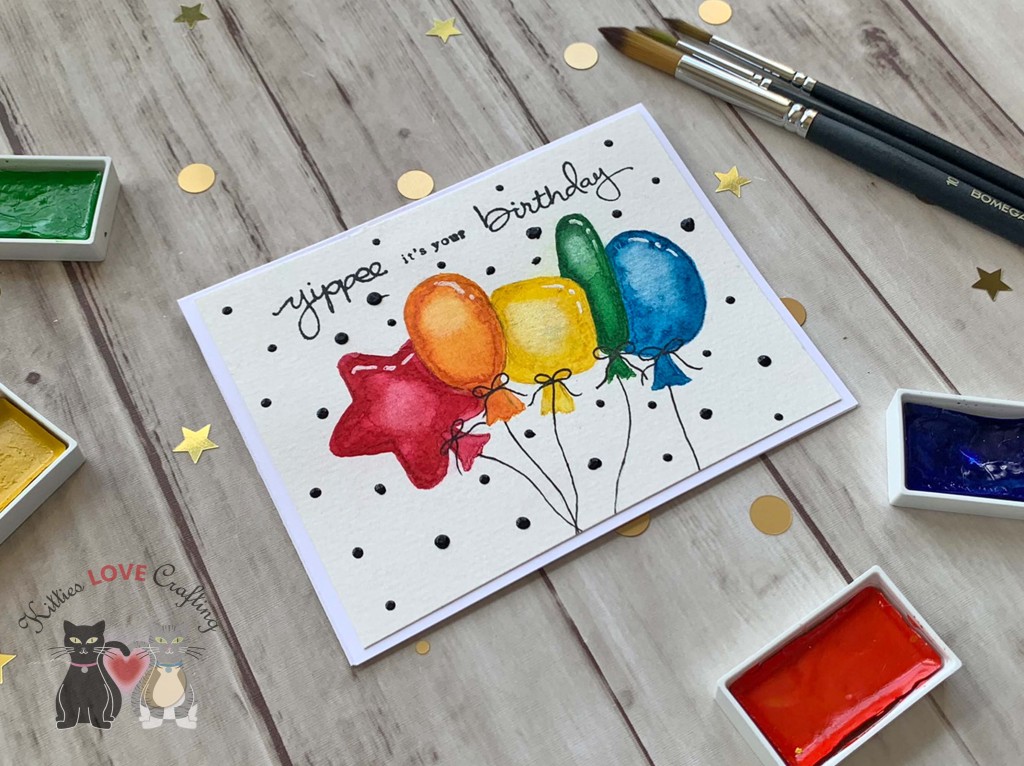
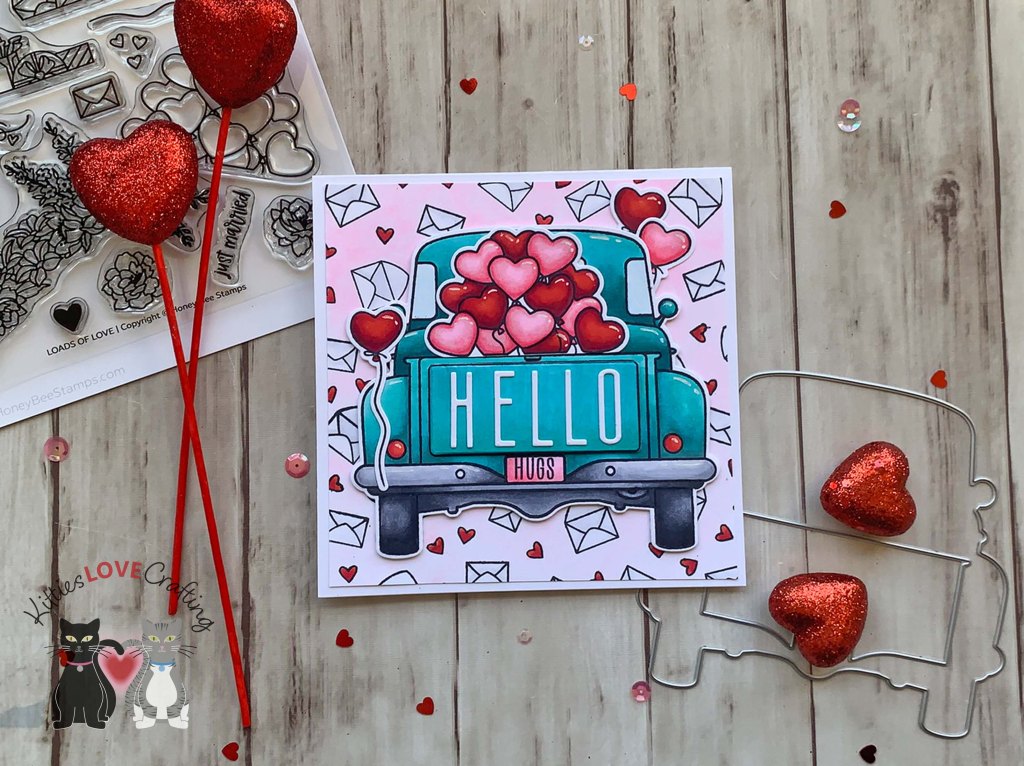
Hello friends. Here’s a cute Valentine’s Day Card that can be masculine or feminine, depending on you’re definition. This card features an oldy but goody from my Honey Bee Stamps, the Big Pickup Tailgate and the Loads of Love Add-on. I’ve had this add-on in my cart for a year now and I’m glad I finally bought it. So very cute and lots of options.

For this card, I cut a piece of Neenah 100lb Classic Crest Cardstock 8.5 X 11″ to 5-1/2 x 11″ and scored at 5-1/2″ to create a square card base. Then cut a piece of Neenah 100lb Classic Crest Cardstock 8.5 X 11″ to 5-1/4 x 5-1/4″ background panel.

I stamped the little envelopes and hearts from the Loads of Love Add-on stampset onto the back panel with Memento Tuxedo Black Ink. Then colored the images with Copics. I used C0, C1, and 0 (blender) for the envelopes, R17 & R29 for hearts, and RV0000, RV000 & RV10 for the background.

Next, I stamped the truck image from the Honey Bee Stamps Big Pickup Tailgate stamp set and the heart stack and balloons from the HBS Loads of Love Add-on onto Neenah 100lb Classic Crest Cardstock 8.5 X 11″ with Memento Tuxedo Black Ink. I also colored them with Copic Markers. I used BG15, BG09, BG45, & BG18 for the truck; R17 & R29 for the back lights; C5, C7 & C9 for the tires; C1, C3, C5, & C7 for the bumper; B00 & 0 (blender) for the windows; and R17, R29, & R39, RV10, RV11 & RV14 for the hearts and the license plate. I stamped and colored a second truck bed which I die cut out with the coordinating dies and popped up with foam tape.

I die cut the sentiment ‘Hello’ from the HBS Tailgate Alphabet from Neenah 100lb Classic Crest Cardstock 8.5 X 11″. I also stamped the ‘HUGS’ from the Big Pickup Tailgate stamp set onto the license plate.

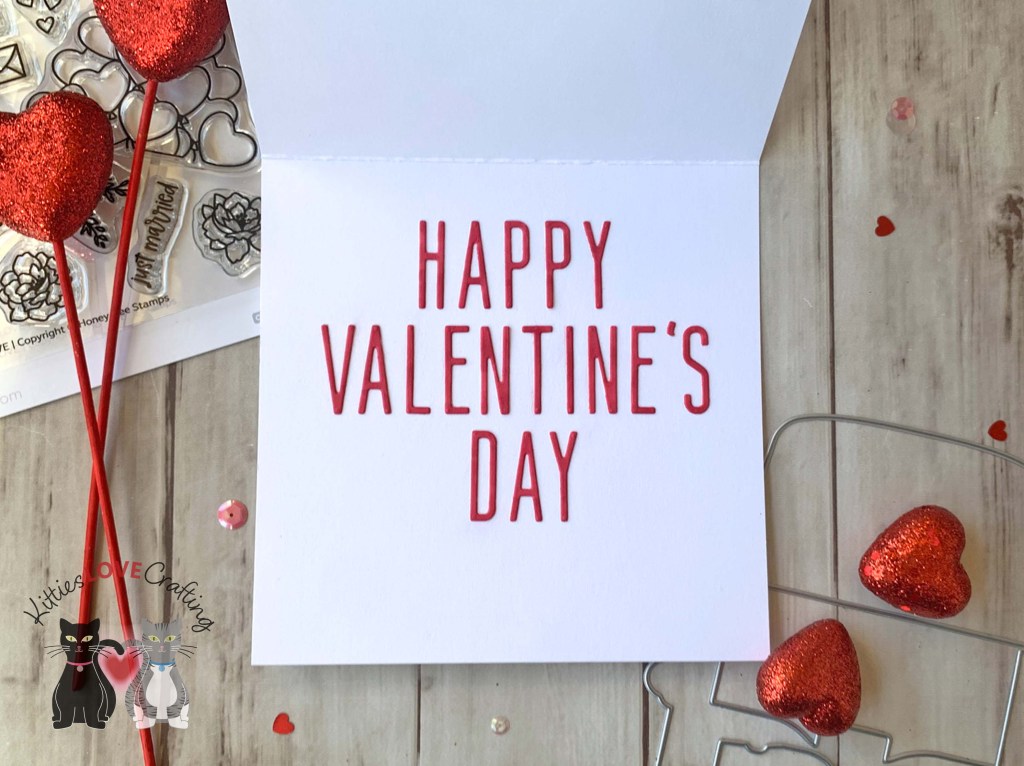
On the inside of the card, I die cut the sentiment from Neenah 100lb Classic Crest Cardstock 8.5 X 11″ using the HBS Tailgate Alphabet and colored the letters using the same red Copics.

Dimensions


Supplies

https://linkdeli.com/widget.js?id=f5e8378456858c916708

Thanks for reading this post. I hope Iโ€™ve inspired you to give this cute pickup truck Valentine’s Day card a try for yourself. Leave comments or questions below or feel free to email.

Cards, Christmas

Quick and Easy Mini Slimline Holiday Card Using Minimal Supplies

Hello friends. Need a quick holiday card that packs a punch?!? Today I’m showing how to make this mini slimline card that uses minimal supplies. See how easy this was to create!

For this card, I cut a piece of Neenah 100lb Classic Crest Cardstock 8.5 X 11″ to 7 x 6 and scored at 3-1/2″ to create a mini slimline card base, as well as a piece which I cut to 3-1/2 x 6″. Then embossed it using the Craftwell Delicate Dots Embossing Folder. I also cut a strip of patterned paper from Catherine Pooler Under the Tree Slimline Patterned Paper (discontinued) to 1 x 6″.

I die cut the candy canes and bow from Tim Holtz idea-ology 8 x 8 Paper Stash Metallic Jewels Kraft using the Catherine Pooler Designs Candy Cane Christmas Dies.

I stamped the sentiment from Holiday Joy Sentiments Stamp Set onto Neenah 100lb Classic Crest Cardstock 8.5 X 11″ with Catherine Pooler Designs Rockin’ Red Ink.

On the inside, I added a strip of the same patterned paper measuring 1 x 3-1/2″. I stamped a sentiment from Lawn Fawn Henry’s Build-A-Sentiment – Winter with Catherine Pooler Designs Rockin’ Red Ink.

Dimensions


Supplies

https://linkdeli.com/widget.js?id=f5e8378456858c916708

Thanks for reading this post. I hope Iโ€™ve inspired you to make this easy mini slimline holiday card! Leave comments or questions below or feel free to email.

Cards, Christmas

Combining Different Brands to Create a Holiday Card Using Only Dies

Hello friends. Here’s a quick and simple Holiday card that was created entirely from dies. No stamping required! This card combines Catherine Pooler Designs, Lawn Fawn and Queen & Company products.

For this card, I cut a piece of Neenah 100lb Classic Crest Cardstock 8.5 X 11″ to 5-1/2 x 8-1/2″ and scored at 4-1/4″ to create an A2 card base. I die cut another piece of Neenah 100lb Classic Crest Cardstock 8.5 X 11″ using the Lawn Fawn Peppermint Stripes Backdrop, which I adhered to the front of the card base.

I die cut the holly leaves from green cardstock from the DCWV Single-Sided Brights Mat Stack 4.5″ x 6.5″ and the berries from red metallic cardstock from Tim Holtz idea-ology Metallic Jewels 8 x 8 Paper Stash Kraft Stock using the Catherine Pooler Designs Candy Cane Christmas Dies. I colored the leaves with Stampin’ Up! Old Olive Ink to give them some added dimension.

I die cut the sentiment from red metallic cardstock from Tim Holtz idea-ology Metallic Jewels 8 x 8 Paper Stash Kraft Stock using Lawn Fawn Henry’s ABCs Dies and the Queen & Company Sentiment Stacker Dies.

On the inside of the card, I stamped another sentiment from Lawn Fawn Henry’s Build-A-Sentiment: Winter Stamps with Stampin’ Up! Old Olive Ink. I also added another set of holly leaves and a bow.

Dimensions


Supplies

https://linkdeli.com/widget.js?id=f5e8378456858c916708

Thanks for reading this post. I hope Iโ€™ve inspired you to make this quick and easy holiday card! Leave comments or questions below or feel free to email.

Cards, Christmas, interactive, Shaker

Two Slimline Holiday Cards Using One Die, Two Ways feat. Catherine Pooler Designs

Hello friends. Here’s a fun way to use the same dies to get two different looks. My cards feature the Catherine Pooler Designs Candy Cane Christmas and Festive Joy Word Dies.
One card uses the Candy Cane Christmas dies as a background for a large dimensional sentiment and the other uses the same dies as the focal image which are shakers.

For the first card, I cut a piece of Neenah 100lb Classic Crest Cardstock 8.5 X 11″ to 7 x 8-1/2″ and scored at 3-1/2″ to create a slimline card base as well as a piece which I die cut with the Lawn Fawn Large Slimline with Sliders. This piece measures 3-1/2 x 8-1/2″.

I die cut the candy canes from the back panel using the base candy cane dies from the Catherine Pooler Designs Candy Cane Christmas Dies. Then added pattern paper behind them from CP Bring on the Figgy Pudding Patterned Paper and Under the Tree Slimline Patterned Paper (discontinued).

I die cut the JOY from both Neenah 100lb Classic Crest Cardstock 8.5 X 11″ and Lawn Fawn Black Licorice Cardstock. I colored the white letters using the CP Be Mine Ink and offset the black letters behind. I added some glitter with a Spectrum Noir Clear Overlay Sparkle Pen.

I finished it off by adding some Stampin’ Up! Snowflake Splendor 1/4″ (6.4 mm) Ribbon (retired). I left the inside of the card blank.

Dimensions


For the second card, I cut a piece of Neenah 100lb Classic Crest Cardstock 8.5 X 11″ to 7 x 8-1/2″ and scored at 3-1/2″ to create a slimline card base as well as a piece which I die cut with the Lawn Fawn Large Slimline with Sliders. This piece measures 3-1/2 x 8-1/2″.

Again, I die cut the candy canes from the back panel using the base candy cane dies from the Catherine Pooler Designs Candy Cane Christmas Dies. I stamped the holly leaves from the Catherine Pooler Holiday Joy Sentiments Stamp Set with CP Rose Petals Ink. I added some acetate behind it to make a shaker.

I die cut the two candy canes from Stampin’ Up! Sweet Sugarplum 12 x 12 Glimmer Paper (retired) and Titanite from Altenew Forest Canopy Glitter Gradient Cardstock using CP Candy Cane Christmas Dies. The bows were die cut from Neenah 100lb Classic Crest Cardstock 8.5 X 11″ and colored them CP inks. I used Rouge and Green Tea inks. I inlayed the candy canes and adhered them to the acetate. This makes them look like they are floating and creates a fun shaker.

I stamped the sentiment from Catherine Pooler Holiday Joy Sentiments Stamp Set onto Neenah 100lb Classic Crest Cardstock 8.5 X 11″ with Tsukineko Memento Tuxedo Black Ink.

Dimensions


Supplies

https://linkdeli.com/widget.js?id=f5e8378456858c916708

Thanks for reading this post. I hope Iโ€™ve inspired you to make these slimline holiday cards! Leave comments or questions below or feel free to email.

Cards, Christmas, interactive, Shaker

Create a Shaker Card Using Word Dies! feat. Catherine Pooler Designs

Hello friends. Here’s an easy way to make a shaker card. Just use word dies to cut out the shaker window! This one was created using Catherine Pooler Designs Festive Joy Word Die.

For this card, I cut a piece of Neenah 100lb Classic Crest Cardstock 8.5 X 11″ to 5-1/2 x 8-1/2″ and scored at 4-1/4″ as well as a piece of watercolor paper to 4-1/4 x 5-1/2″ for the background.

For the back panel I used Color Burst Powder (Brights) to add watercolor. Then die cut it using the CP Dots & Scallops Dies. I stamped swirl from the CP It’s Magic Background Stamp with CP Midnight Ink.

I die cut the shaker window using the CP Festive Joy Word Die, added some acetate behind it as well as some foam tape. I added sequins in pinks, reds, greens and white iridescent to the shaker. And backed it with a piece of Simon Says Stamp Cardstock 100lb Black Cardstock.

I stamped a sentiment from the Catherine Pooler Holiday Joy Sentiments Stamp Set onto Neenah 100lb Classic Crest Cardstock 8.5 X 11″ with CP Midnight Ink and fuzzycut it. I also stamped the holly from the same set and colored using Copic markers. I used R59 & R27, YG17 & YG25.

On the inside of the card, I added the positive of the word joy I previously cut out and added another holly. And for the sentiment, I stamped a sentiment from the Catherine Pooler Holiday Joy Sentiments Stamp Set onto Neenah 100lb Classic Crest Cardstock 8.5 X 11″ with CP Midnight Ink and fuzzycut it.

Dimensions


Supplies

https://linkdeli.com/widget.js?id=f5e8378456858c916708

Thanks for reading this post. I hope Iโ€™ve inspired you to make this fun shaker using your own word dies! Leave comments or questions below or feel free to email.

Cards, Easter, Spring

Shaped Easter Gnome Card featuring Trinity Stamps

Hello friends. This cute egg shaped card features the Trinity Stamps Springtime Gnome Die Set. This little gnome is very easy to put together and the can be used for many occasions. Let’s put this card together…

For this card, I die cut a piece of Neenah 100lb Classic Crest Cardstock 8.5 X 11″, folded in half using the Sizzix Framelits Die Set 10PK – Egg (discontinued) to create the card base. to accomplish this I simply left one side of the die off the edge of the folded card base before die cutting. This card base measures 3-3/4 x 5-1/4″ I also cut a smaller egg shape for the front panel.

I colored the sky with Tim Holtz Uncharted Mariner and Chipped Sapphire Distress Oxide Inks. Then die cut the grass from Simon Says Stamp 100lb Green Apple Cardstock with the Lawn Fawn Simple Grassy Hillsides and also used the Egg framelits to shape it.

I die cut the gnome’s hat, hands and bunny ear insides from Echo Park 12 x 12 I Love Easter Cardstock Pack (discontinued I believe) using the Trinity Stamps Springtime Gnome Die Set. The bunny ears, nose, face and beard were die cut from Neenah 100lb Classic Crest Cardstock 8.5 X 11″ and colored with Copic Markers. I used E000 for the nose, E000, E00, R20 & 0 for the face; and C0 & 0 for the ears. His shoes, hat band and all the eggs were die cut from Doodlebug 6 x 6 Dot Grid Daisy Stripe Pack (discontinued I think).

I added a sentiment using the Simon Says Stamp Sentiment Strips REVERSE EASTER WISHES. I finished off the card by adding some highlights with a White Gel Pen.

I left the inside of the card blank.


Supplies

https://linkdeli.com/widget.js?id=f5e8378456858c916708

Thanks for reading this post. I hope Iโ€™ve inspired you to give this cute gnome Easter card a try for yourself. Leave comments or questions below or feel free to email.

Cards, Easter, Watercolor techniques

Turning Simon Says Stamp Suzy’s Watercolor Prints Into Scene Cards

Hello friends. I made these two cute Easter cards using the Simon Says Stamp Suzy’s Watercolor Prints. The prints I used are from an older set but I will link to the newer one that was released this year. I created cute scene cards by using them in a non traditional way.I love to just sit and watercolor these prints! It’s very relaxing and fun to me. If watercolor isn’t your thing you can probably use color pencils to color the images.

For the first card, I cut a piece of Neenah 100lb Classic Crest Cardstock 8.5 X 11″ to 5-1/2 x 8-1/2″ and scored at 4-1/4″ to create a card base.

I used my Kuretake GANSAI TAMBI Watercolor Paint Set (I love this set!) to color the images. Then cut all the background white areas out and used one of the Egg framelits from Sizzix Framelits Die Set 10PK – Egg (discontinued) to cut out the watercolor print, making sure to not cut his ears. I die cut a piece of Lawn Fawn Stripes ‘n Sprinkles 6×6 Paper with the same framelit for the background.

I die cut grass from Simon Says Stamp Cardstock 100lb Green Apple Cardstock using the Lawn Fawn Simple Grassy Hillsides. I die cut two pieces of varying heights but 4-1/4″ in width and popped up the front one with 3M Foam Tape.

For the sentiment I used the Simon Says Stamp EASTER WISHES Sentiment Strips.

I left the inside of the card blank.

Dimensions


For the second card, I cut a piece of Neenah 100lb Classic Crest Cardstock 8.5 X 11″ to 5-1/2 x 8-1/2″ and scored at 4-1/4″ to create a card base and a piece of Echo Park I Love Easter 12 x 12 Pattern Paper (discontinued) to 4 x 5-1/4″. I die cut a window from the panel using the Egg framelits from Sizzix Framelits Die Set 10PK – Egg (discontinued). I also used 2 of them to cut out a frame from Neenah 100lb Classic Crest Cardstock 8.5 X 11″.

Once again, I used my Kuretake GANSAI TAMBI Watercolor Paint Set to color the images. I then placed the panel behind the window panel.

I stamped a sentiment from the Lawn Fawn Eggstraordinary Easter onto the panel with Catherine Pooler Midnight Ink.

I finished off the card by adding some highlights with a Uni-ball Signo White Broad Point Gel Pen and some Tonic IVORY SEASHELL Nuvo Crystal Drops.

On the inside of the card, I cut two strips of the pattern paper from Echo Park I Love Easter 12 x 12 Pattern Paper (discontinued), measuring 1 x 4-1/4″ and 1-1/4 x 4-1/4″.

Dimensions

  • Card Base = 5-1/2 x 8-1/2″ and scored at 4-1/4″ Neenah 100lb Classic Crest Cardstock 8.5 X 11″
  • Top Panel = 4 x 5-1/4″ Echo Park I Love Easter 12 x 12 Pattern Paper (discontinued)
  • Inside Strips = 1 x 4-1/4″ and 1-1/4 x 4-1/4″ Echo Park I Love Easter 12 x 12 Pattern Paper (discontinued)

Supplies

https://linkdeli.com/widget.js?id=f5e8378456858c916708

Thanks for reading this post. I hope Iโ€™ve inspired you to give these cute Easter cards a try for yourself. Leave comments or questions below or feel free to email.

Birthdays, Cards, Easter, St. Patrick's Day, Watercolor techniques

3 Easy Watercolor Cards

Hello friends. Here are some easy watercolor cards anyone can make! While I am an artist I am not super comfortable doing freehand watercolor paintings. But these 3 cards were very easy to make. If you cannot draw either use a stencil, die or printable to trace a simple drawing. I used this technique for one of my cards. More on this later…

For the first card, I cut a piece of Neenah 100lb Classic Crest Cardstock 8.5 X 11″ to 5-1/2 x 8-1/2″ and scored at 4-1/4″ to create a card base and a piece to Watercolor Paper to 3-3/4 x 5″. I also cut a piece of Doodlebug Dot Stripe Rainbow Petite Prints 6×6 Paper to 4-1/4 x 5-1/2″.

I did a quick sketch for the egg (I actually used an egg shaped framelit die to trace the outside). I used my Kuretake GANSAI TAMBI Watercolor Paint Set (I love this set!) to color the egg. I kept the coloring simple – one color and white. You can be as elaborate with your painting as you like though. Once the egg and grass were colored and dry, I added some splatters with some Zig Kuretake Gansai Tambi STARRY COLORS. Then I added some sketchy lines around the egg with a 0.5 Sakura Pigma Micron Fineliner Pen.

I used the Simon Says Stamp Foil Transfer Cards Fancy Happy Easter Splendor with Therm O Web Gina K Designs GLIMMERING GOLD Fancy Foil Deco Foil for the sentiment and fussycut it out. And then also used a sentiment from the Simon Says Stamp REVERSE EASTER WISHES Sentiment Strips.

On the inside of the card, I cut a strip of pattern a paper from Doodlebug Dot Stripe Rainbow Petite Prints 6×6 Paper to 1 x 4-1/4″. And added another sentiment from the Simon Says Stamp REVERSE EASTER WISHES Sentiment Strips.

Dimensions


For the second card, I cut a piece of Neenah 100lb Classic Crest Cardstock 8.5 X 11″ to 5-1/2 x 8-1/2″ and scored at 4-1/4″ to create a card base and a piece of Watercolor Paper to 4 x 5-1/4″.

While I do not have a picture of the sketch to show you, I just drew very basic shapes for the balloons. They don’t have to be perfect. If you feel like you cannot draw them, get an image from the internet etc and trace it or use stencils or dies. Again very simple painting here. This time I used one color plus a White Gold watercolor from the Zig Kuretake Gansai Tambi STARRY COLORS.

I added the balloon strings using my 0.5 Sakura Pigma Micron Fineliner Pen.

I stamped a sentiment from the Stampin’ Up! Endless Birthday Wishes Stampset (retired) and Catherine Pooler Designs Midnight Ink. I finished off the card by adding some highlights to the balloons with a Uni-ball Signo White Broad Point Gel Pen and some Tonic Ebony Black Nuvo Drops.

On the inside of the card, I stamped a sentiment from Stampinโ€™ Up! Biggest Wish (retired) with Catherine Pooler Designs Midnight Ink.

Dimensions


For the third card, I cut a piece of Neenah 100lb Classic Crest Cardstock 8.5 X 11″ to 5-1/2 x 8-1/2″ and scored at 4-1/4″ to create a card base, a piece to Watercolor Paper to 4 x 5-1/4″ and a piece of Tim Holtz Idea-ology 8 X 8 Paper Stash Metallic Kraft Stock. to 4-1/4 x 5-1/2″.

The sketch for this card was super simple. I drew 3 hearts and a stem. I used my Kuretake GANSAI TAMBI Watercolor Paint Set again. And finished the background by adding some splatters with White and Gold Acrylic paint.

I die cut the sentiment word from Tim Holtz Idea-ology 8 X 8 Paper Stash Metallic Kraft Stock using the Simon Says Stamp Fancy Lucky Wafer Dies. And added a sentiment strip from the Simon Says Stamp Reverse Lucky Sentiment Strips.

On the inside of the card, I added a strip of metallic paper cut to 1 x 4-1/4″ and stamped a sentiment from Happy Happy Happy Add-on with Catherine Pooler Designs Lime Rickey Ink.

Dimensions


Supplies

https://linkdeli.com/widget.js?id=f5e8378456858c916708

Thanks for reading this post. I hope Iโ€™ve inspired you to give these easy watercolor cards a try for yourself. Leave comments or questions below or feel free to email.

Christmas, Distress Ink Techniques, Stenciled Background, Winter

Cute Penguin Christmas Scene Card featuring Lawn Fawn and Catherine Pooler Designs

Hello friends. Here’s another card featuring these adorable penguins from the Lawn Fawn HERE WE GO A-WADDLING stamps. I paired it with an old die set from Catherine Pooler Designs. It was featured in the Winterhaven Stamp of Approval several years ago!

For this card, I cut a piece of Neenah 100lb Classic Crest Cardstock 8.5 X 11″ to 5-1/2 x 8-1/2″ and scored at 4-1/4″ to create a card base and another piece to 4 x 5-1/4″ for the background. I used the Tim Holtz Salty Ocean, Uncharted Mariner, and Chipped Sapphire Distress Oxide Inks to color the background. Then used a snowflake embossing folder (Stampin’ Up! Winter Snow) to give it some dimension. Then I lightly ran a white pigment ink pad (Lawn Fawn Yeti Pigment Ink) over the raised areas; This enhanced the snowflakes a bit more. (TIP: Make sure to let this dry for several hours before touching the panel or use a heat tool to set it). Lastly, I added some splatters using White Acrylic paint.

Next I die cut the the snowy hills from Neenah 100lb Classic Crest Cardstock 8.5 X 11″ with the Lawn Fawn Stitched Hillside Borders and inked it with Tumbled Glass Distress Oxide Ink. I also added some Nuvo Fresh Snowfall Glitter Drops to the snowy hills. I used 3M Foam Tape to adhere the front hillside.

I stamped the images from the Lawn Fawn HERE WE GO A-WADDLING stamps onto Neenah 100lb Classic Crest Cardstock 8.5 X 11″ with Memento Tuxedo Black Ink and colored them with Copic Markers. I used R17, R27 & R59, BG10, BG11 & BG32, R20, N1 & 0, N4, N5 & N8, YR04 & YR07 for the penguins; Y13, Y15 & Y17 for the bell and lantern.

I stamped sentiment from the Lawn Fawn HERE WE GO A-WADDLING stamps onto Neenah 100lb Classic Crest Cardstock 8.5 X 11″ with Memento Tuxedo Black Ink and then cut them down to strips.

On the inside of the card, I stamped a sentiment from the Lawn Fawn Simply Winter Sentiments with Catherine Pooler Designs Rockin’ Red Ink and added a penguin.

Dimensions


Supplies

https://linkdeli.com/widget.js?id=f5e8378456858c916708

Thanks for reading this post. I hope Iโ€™ve inspired you to give this cute penguin Christmas card a try for yourself. Leave comments or questions below or feel free to email.

Christmas, Distress Ink Techniques, Stenciled Background, Winter

Winter Village Christmas Scene Card featuring a Stenciled Pattern Paper Background

Hello friends. For this cute holiday card, I uses a technique I had forgotten about but recently reminded of while watching a Youtube video. The technique is stenciling on pattern paper. It’s an easy way to add depth and interest to a background without adding extra bulk. This card features the Lawn Fawn Spooky Forest Backdrop die and the Lawn Fawn Winter Village Stamps.

For this card, I cut a piece of Neenah 100lb Classic Crest Cardstock 8.5 X 11″ to 5-1/2 x 8-1/2″ and scored at 4-1/4″ to create a card base and a piece of Lawn Fawn Spiffier Speckles 6×6 Paper to ~4 x 5-1/4″ for the background. I used the Tim Holtz Stormy Sky and Faded Jeans Distress Ink along with the Honey Bee Stamps Birch A2 Cover Plate to give some dimension to the background.

Next I die cut the forest from Neenah 100lb Classic Crest Cardstock 8.5 X 11″ with the Lawn Fawn Spooky Forest Backdrop, the snowy hills from more Neenah 100lb Classic Crest Cardstock 8.5 X 11″ with the Lawn Fawn Stitched Hillside Borders and inked it with Tumbled Glass Distress Ink. I also added some Nuvo Fresh Snowfall Glitter Drops to the snowy hills. I used 3M Foam Tape to adhere the forest panel as well as some behind the snowy hills for more dimension.

I stamped the images from the Lawn Fawn Winter Village Stamps onto Neenah 100lb Classic Crest Cardstock 8.5 X 11″ with Memento Tuxedo Black Ink and colored them with Copic Markers. I used Y13 & Y18 for the lantern, windows and star; R81, R83, & R85, YG25, YG17 & YG67, C0, C1, C3 & C5 for the houses; YG25, YG17 & YG67 and E25 & E29 for the trees; BG000 and 0 for the snow.

I decided to do a radical thing on this card and have NO sentiment on the outside. What?!? Unheard of, right? LOL. Sometimes it’s ok to leave the outside of your card with just a pretty scenes. Let the recipient be surprised when they open the card.

On the inside of the card, I cut a piece of Lawn Fawn Spiffier Speckles 6×6 Paper to 1 x 4-1/4″ and stamped a sentiment from the Lawn Fawn Winter Village Stamps with Catherine Pooler Rose Petals Ink.

Dimensions


Supplies

https://linkdeli.com/widget.js?id=f5e8378456858c916708

Thanks for reading this post. I hope Iโ€™ve inspired you to give this cute penguin Christmas card a try for yourself. Leave comments or questions below or feel free to email.