Then I diecut the panel using the second largest die from the Sizzix Framelits Die Set 6/PK – Squares, Scallop (4-1/8 x 4-1/8″). I cut a piece of Vellum with the next smaller scallop square (3-3/8 x 3-3/8″) as well. I stamped a background with the raindrop from Lawn Fawn’s Here For You Bear stampset with Ranger Archival Manganese Blue onto the vellum piece.
I used Y02, Y13 & Y18, E33, E37 & E29, E00 & E33 (nose) for the bear; R14 & R27, Y13 & Y18, B02 & B06 for the rainbow; BG000 & 0 for the clouds and the puddles. I fussycut the images and trimmed the sentiment strips to 7/16 x 2-1/2 and 7/16 x 1-3/4 and added some Stampin’ Dimensionals to the rainbows to pop them up.
Thanks for reading this post! I hope you enjoyed and I’ve inspired you to make this cute shaker card yourself! If you want to share you creations with me tag me on instagram @kittieslovecrafting. Leave comments or questions below or feel free to email me.
Thanks for reading this post! I hope you enjoyed and I’ve inspired you to make this cute shaker card yourself! If you want to share you creations with me tag me on instagram @kittieslovecrafting. Leave comments or questions below or feel free to email me.
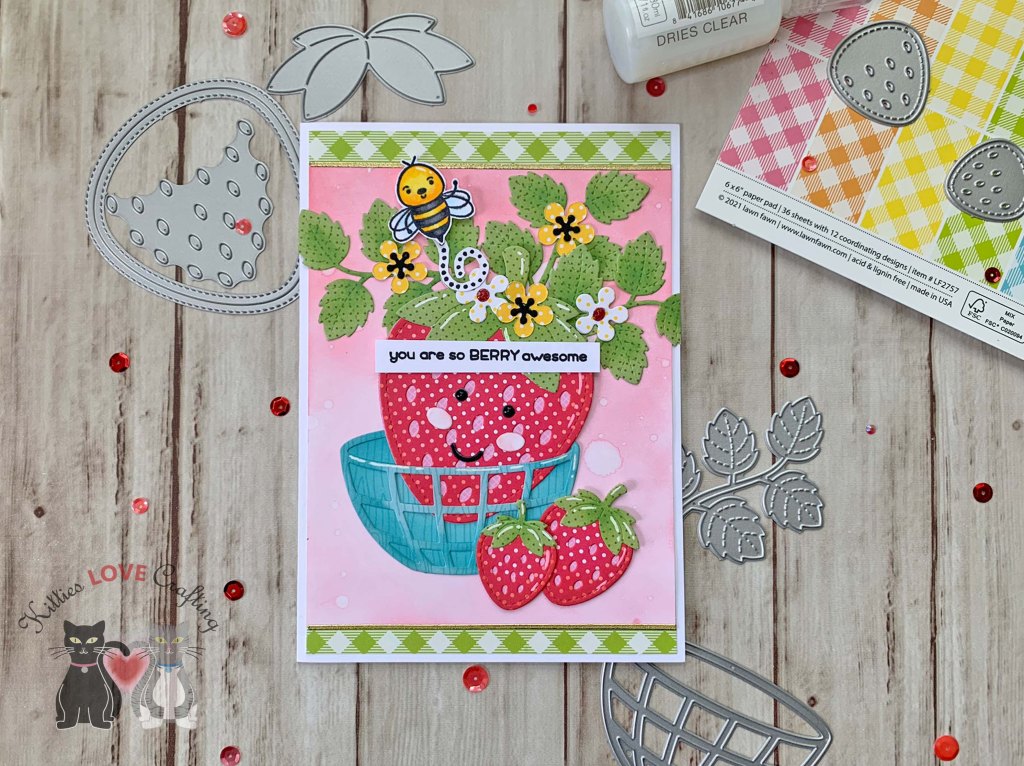
Hi friends. I saw a video by Nicol Spohr comparing these two techniques with Easter Cards and I thought it would be cute to try it with the strawberry dies from Lawn Fawn.
I finished it off by adding some highlights to the strawberries with a White Gel Pen and Tonic Ruby Slipper Nuvo Glitter Drops to the white flowers and Morning Dew Nuvo Crystal Drops to the eyes.
Thanks for reading this post! I hope you enjoyed and I’ve inspired you to make these cute cards yourself! If you want to share you creations with me tag me on instagram @kittieslovecrafting. Leave comments or questions below or feel free to email me.
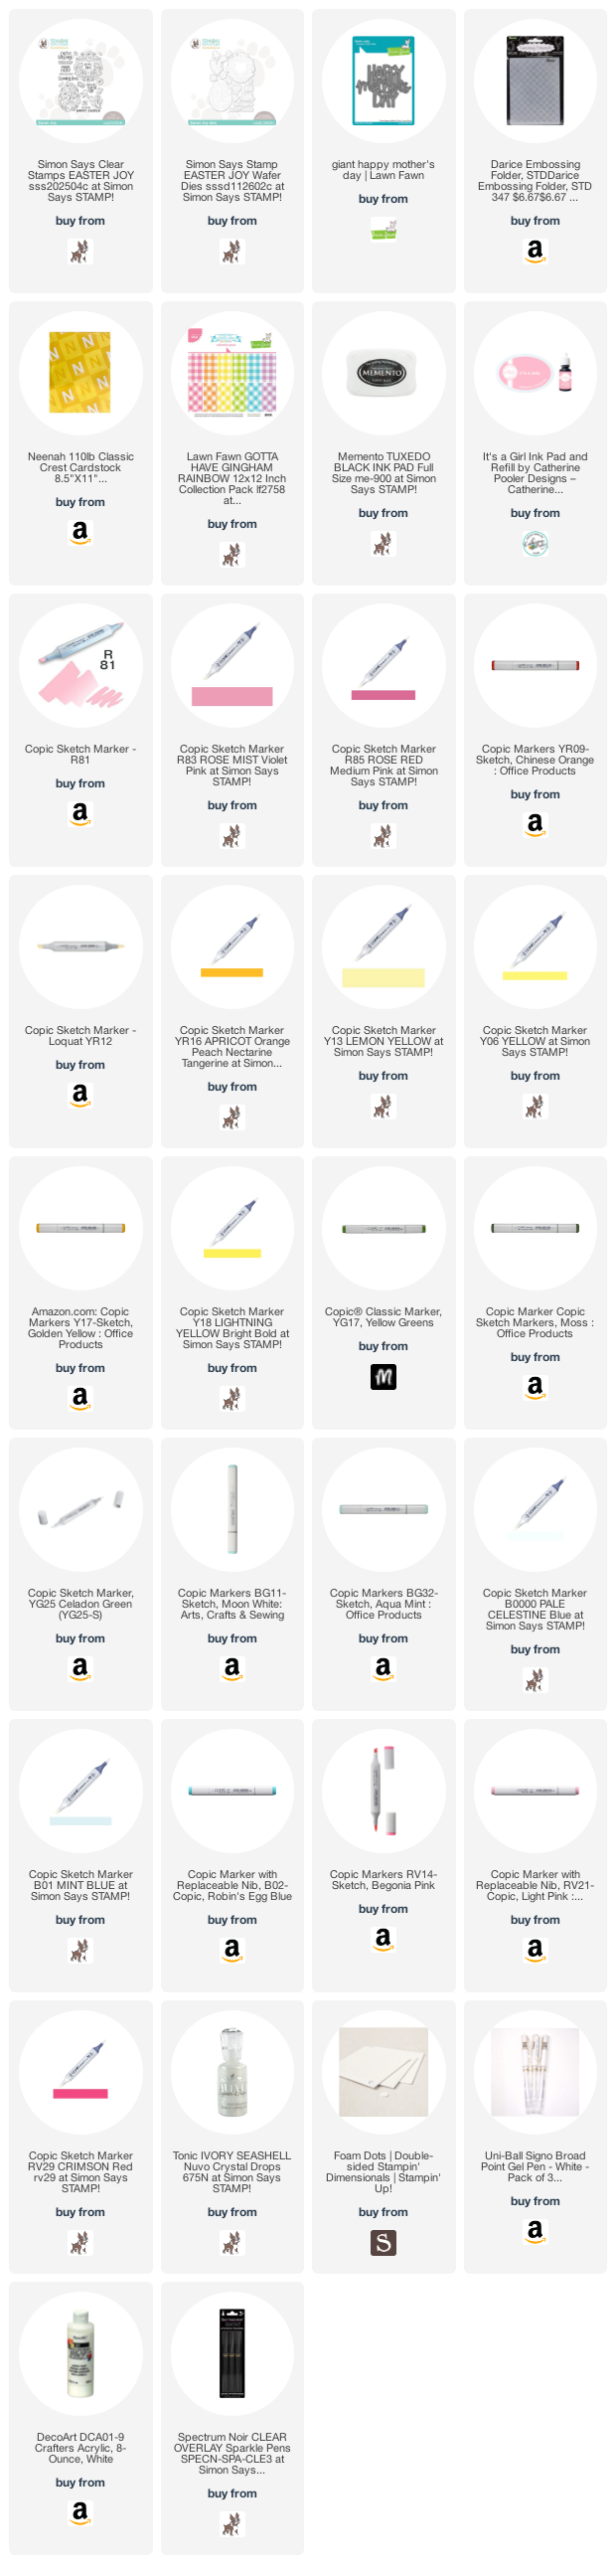
Mother’s Day Cards featuring the Simon Says Stamp Easter Joy Stampset and Lawn Fawn Giant Sentiments
Hi friends. If you want to combine a large sentiment like the Lawn Fawn Giant Happy Mother’s Day Die and a stamped image like floral wreath from the Simon Says Stamp Easter Joy stampset but they don’t necessarily fit on the card together? Well, you can make a larger card right?!? Yes, but if you don’t want to do that you can also cut apart your stamped images. What? OMG No! If this sounds horrifying to you, you’re not alone. But I really like this wreath and obsessed with the Lawn Fawn Giant sentiment dies lately and wanted to combine them. The only solution is to cut the wreath apart. And I’m glad I did.
I stamped the wreath from Simon Says Stamp Easter Joy stampset onto Neenah 110lb Classic Crest Cardstock with Memento Tuxedo Black Ink. I colored the images with Copic Markers. I used YG17, YG25 and YG67 for the leaves and stems; R81, R83, & R85, Y17, Y18,BG11 & BG32, YR12, YR16, & YR09 for the flowers. I diecut it using the coordinating dies. Then cut the wreath in half and eventually further cut it apart.
I stamped the wreath from Simon Says Stamp Easter Joy stampset onto Neenah 110lb Classic Crest Cardstock with Memento Tuxedo Black Ink. I colored the images with Copic Markers. I used YG17, YG25 and YG67 for the leaves and stems; R81, R83, & R85, Y17, Y18,BG11 & BG32, YR12, YR16, & YR09 for the flowers. I diecut it using the coordinating dies. Then cut the wreath in half and eventually further cut it apart.
I adhered the parts of the wreath around the sentiment using some Stampin Dimensionals to pop some of it up. I finished off the card by adding some Nuvo Drops in Ivory Shell.
Thanks for reading this post and Happy Easter! I hope you enjoyed and I’ve inspired you to make some cards using this kit yourself! If you want to share you creations with me tag me on instagram @kittieslovecrafting. Leave comments or questions below or feel free to email me.
Hi friends. Mother’s Day is fast approaching and if you need a card and don’t love to stamp and color images, this one is for you! I only used dies and inks to create this card.
Thanks for reading this post! I hope you enjoyed and I’ve inspired you to make this Mother’s Day Card yourself! If you want to share you creations with me tag me on instagram @kittieslovecrafting. Leave comments or questions below or feel free to email me.
On the inside of the card, I cut a piece of Neenah 110lb Classic Crest Cardstock to 4 x 5-1/4″ and strip of the pattern paper from the front, cut to 7/8 x 4″.
Thanks for reading this post. I hope you enjoyed and I’ve inspired you to make some cards using this kit yourself! If you want to share you creations with me tag me on instagram @kittieslovecrafting. Leave comments or questions below or feel free to email me.
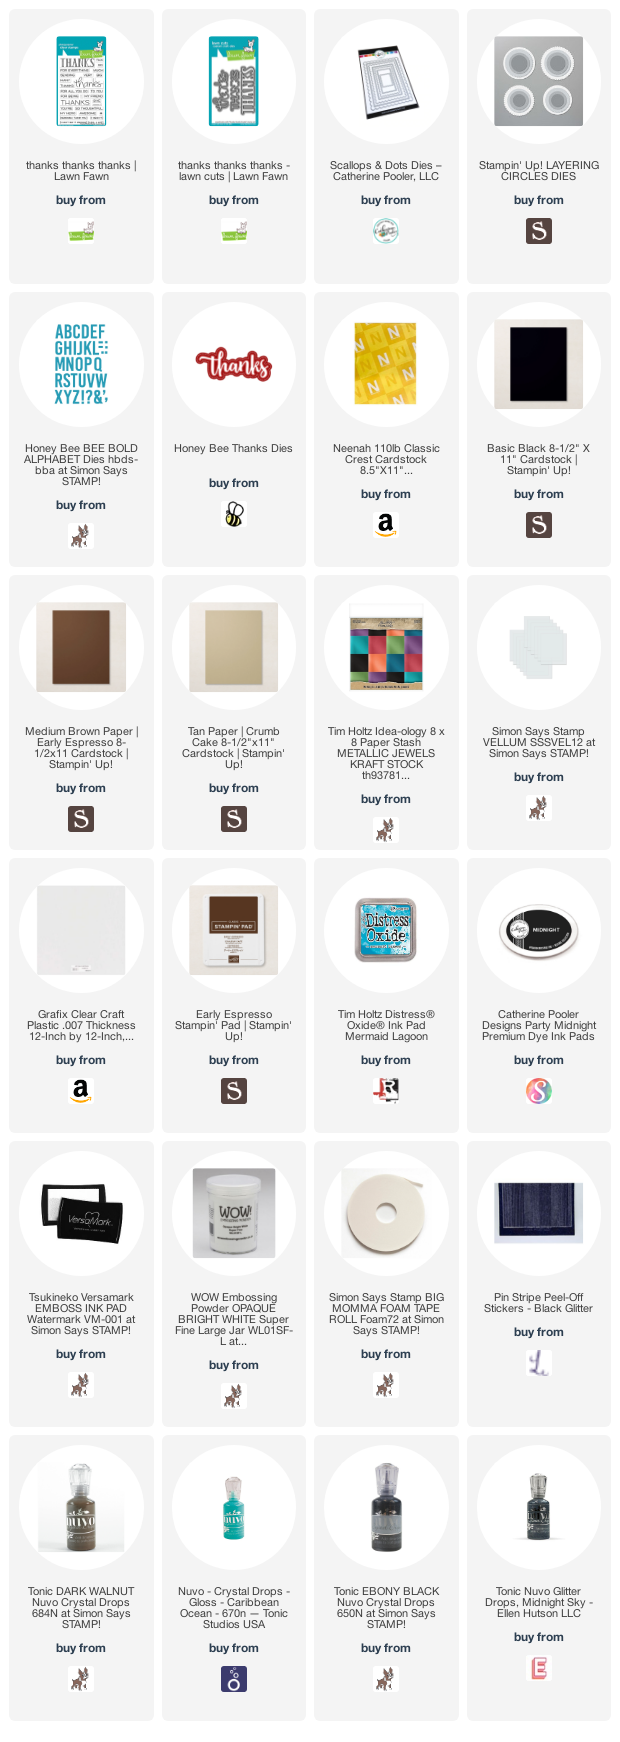
Hello friends. In part 1 of this post I showed how I created six backgrounds using distress inks, markers, and crayons. It’s time to make some cards with these. I kept them pretty simple to show that you don’t need to always make complicated cards (even though I tend to).
For the first set of backgrounds, I started the cutting a piece of Stampin’ Up! Crumb Cake 8-1/2″ X 11″ Cardstock and a piece of Simon Says Stamp 100# Black Cardstock to 5-1/2 x 8-1/2″ and scored at 4-1/4″ to create the two card bases. I cut the watercolor paper panel down to 4 x 5-1/4″ and left the Strathmore Bristol Smooth Paper one 4-1/4 x 5-1/2″.
Watercolor Paper Panel
For this card I decided to make a shaker card. I diecut a stitched rectangle from the center with the Catherine Pooler Scallops & Dots Dies. Then added a piece of acetate and 3M Foam Tape behind it, added some pink, black and white sequins from my stash (I tried to pick flat ones) and adhered the panel to the card. I diecut the sentiment from Neenah 110lb Classic Crest Cardstock 8.5 X 11″ and the shadow from Simon Says Stamp 100# Black Cardstock using the Honey Bee Stamps Thanks Die (this is an older die and I don’t think it’s been retired). I finished it off by adding some additional black sequins.
For the third set of backgrounds, I started the cutting two pieces of Stampin’ Up! Early Espresso 8-1/2″ X 11″ Cardstocktock 5-1/2 x 8-1/2″ and scored at 4-1/4″ to create the two card bases. I cut both panels down to 4 x 5-1/4″.
Watercolor Paper Panel
I diecut a scalloped circle (measuring 2-1/2″) from the center with the Stampin’ Up! Layering Circles Dies. (Just a note about these layering circles as well as the other layering dies from SU!. I never thought I would get so much use out of them but I actually have so they kinda paid for themselves by now, And that’s crafty win in my book!).
Thanks for reading this post. I hope you enjoyed and I’ve inspired you to give these easy cards a try for yourself. Leave comments or questions below or feel free to email.
For the sky on the outside of the card, I cut a piece of some random Lawn Fawn Paper Paper I had in my stash (it either came in a Simon Says Stamp kit or sent with a Lawn Fawn order) to 4-1/4 x 5-1/2″. For the inside, I used Lawn Fawn 6×6 Perfectly Plaid Spring Petite Paper Pack cut to the same size. If you need a tutorial on how to assemble the Pop Up Card mechanism, please watch this Lawn Fawn video.
I diecut the mushroom house from Neenah 110lb Classic Crest Cardstock 8.5 X 11″ using the Lawn Cuts Custom Craft Die-mushroom House and colored it with Copic Markers. I used RV000 & 0 and R81 & R83 for the roof; E25, E27 & E49 for the house; YG25, YG17 & G07 for the door and window; N4 & N7 for the chimney; Y13 & Y06 for the keyhole and window backs; and V01 & V04 for the butterflies. I also added some embellishments with a black marker and a white gel pen.
I used YG17 & G07 for the shamrocks; E57 & E29, R81, R83, & R85, RV00, RV10 & RV11 for the mushrooms; N4, N5 & N7 for the cart. For the gnomes I used E00, E01 & R20 for the faces; C00, C1 & 0 for mustaches and beards; R14 & R27, R81 & R83, Y06 (belt buckle), and N4 & N7 (shoes and belt) for the red gnome; YR04 &YR09, YR12 & YR04, E23 & E25 (hair), and N1 & 0 (apron) for the orange gnome; Y13 & Y18, Y11 & Y02, Y06 (belt buckle), and N4 & N7 (shoes and belt) for the yellow gnome; G07 & G09, YG25 & YG17, E23 & E25 (hair), C1& 0 (apron), and N7 (shoes) for the green gnome; BG01 & BG05, BG10, BG15 & BG32, Y13 (belt buckle), and N4 & N7 (shoes an00 & BVd belt) for the aqua gnome; B24 & B26, B12 & B14, Y13 (belt buckle), and N4 & N7 (shoes and belt) for the blue gnome; YG25 & YG17, Y18 for the tiny daisy patch; YG25 & YG17, Y13 & Y18, C5 & C7 for the large daisy; and YG25 & YG17, V01 & V04 for the tulip and bud.
Thanks for reading this post. I hope you enjoyed and I’ve inspired you to give this card a try for yourself. Leave comments or questions below or feel free to email.
Hello friends. Here’s a quick but very cute St. Patrick’s Day card featuring Simon Says Stamp’s Wooly Lucky Stampset (this came out last year I believe). It’s a very simple card with a subtle stenciled background. I love using stencils for backgrounds because it makes it so quick. And who’s got time to make complicated backgrounds these days?!? Not me.
I colored the images with Copic colors. I used W0, W1 & 0, R20, & C7 for the llama; G07 & G09, C7 & C9, Y15 & Y17 for the hat and bow; YG03 for the shamrocks; YG03, YG17, G07, Y15 & Y17 for the blanket; R17 & R27, YR04 & YR07, YG17 & G07, B02 & B04, BV08 & BV17 for the rainbow; and BG000 & 0 for the clouds. I fussy cut all the images.
Thanks for reading this post. I hope you enjoyed and I’ve inspired you to give this card a try for yourself. Leave comments or questions below or feel free to email.
Hi friends. I used the House Builder Card Base Diesfrom Honey Bee Stamps along with the Treat Shop Add-On Dies and Stamps to make this cute Valentine’s Day Card. I couldn’t pass up the opportunity to make another card with these dies. They are still one of my faves!
I colored them with Copic Markers. I used BG000 and Copic Blender 0 for all glass elements (cake dome, candy dome and gumball machine); R81 & R83, C1, C3, & C5 for the chairs and table; R14 & R27, R81 & R83 for the umbrella. E25 & E29, R81, R83 & R85, C1 & 0 for the cupcakes; R14 & R27, C00 & 0, BG000, G94 and E25 for the gumball machine; E25 & E29 for the chocolates; R81, R83 & R85 for the present; and G94 & G99, R81 & R83, E25 & E29, R14 & R27 for the candies.
Thanks for reading this post. I hope you enjoyed and I’ve inspired you to give this cute Valentine’s Day card a try for yourself. Leave comments or questions below or feel free to email me.


 https://linkdeli.com/widget.js?id=f5e8378456858c916708


