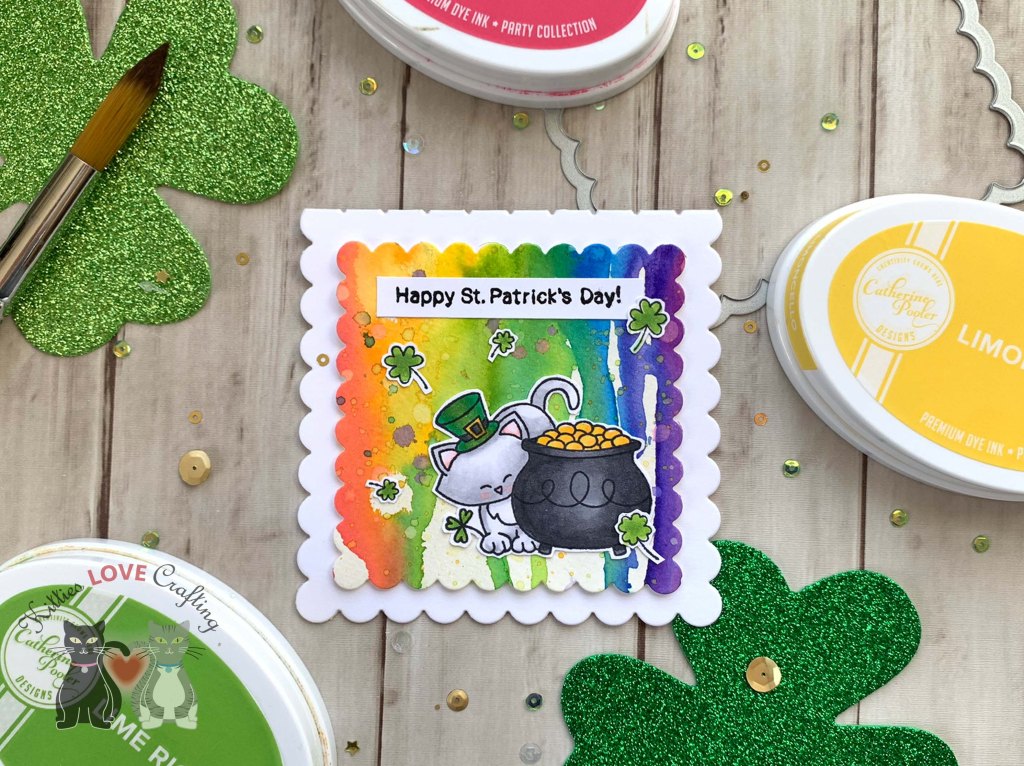
Hello friends. Need a quick card for St. Patrick’s Day?!? The watercolor background on this card is super quick to make and there’s no for perfection (which I love) necessary because it should look like paint was dropped on the paper.
I colored the images with Copic colors. I used N5 & N8 and Y15 & Y17 for the pot of gold; YG17, G07 & G09, N5 & N8 and Y15 & Y17 for Newton’s hat; N1, N2, 0 & R20 for Newton; and YG17, G07 & G09 for the shamrocks.
Thanks for reading this post. I hope you enjoyed and I’ve inspired you to give this card a try for yourself. Leave comments or questions below or feel free to email.
Hello friends. I had some fun playing with my distress inks and other products and created several backgrounds. Sometimes it’s nice just to play with mediums and not think too much. I love distress inks because they create cool effects when water or other mediums are combined with them. I ended up with 6 backgrounds I will later turn into cards. Stay tuned for that post…
For these backgrounds I decided to test out the reaction Distress Oxides and Distress Crayons had with water and also salt plus white vinegar. I also tested Cold Press Watercolor Paper and Strathmore Bristol Smooth Multimedia Paper. I was actually surprised at the reaction of the watercolor paper to the salt and vinegar.
I then used Abandoned Coral, Carved Pumpkin, and Worn Lipstick Distress Crayons and smeared them with my finger (Tip: Wet your finger a little to smooth). Then sprayed more water again.
Left = Strathmore Bristol Smooth Paper; Right = Watercolor Paper
Observations: One thing I noticed is that the distress crayons are much harder to move and blend out on the watercolor paper. They require a lot more water then on the Strathmore Bristol Smooth Multimedia Paper. But the colors look more saturated and vibrant on the watercolor paper.
Strathmore Bristol Smooth PaperWatercolor Paper
Once all the ink was dry, I mixed some Perfect Copper Perfect Pearls by Ranger with water and randomly added splashed and went around the edges of one of the panels.
I then used Salty Ocean, Blueprint Sketch, Mustard Seed, and Vintage Photo Distress Crayons and smeared them with my finger (Tip: Wet your finger a little to smooth). I reinked the panels with Mermaid Lagoon and Mowed Lawn Distress Oxide Inks to brighten them up a bit. Then, added more salt and water to see if it would react again.
Left = Strathmore Bristol Smooth Paper; Right = Watercolor Paper
Observations: I didn’t see much of a reaction to the salt on either papers. Not sure if I didn’t leave it on a sufficient amount of time or if only the regular distress inks react to the salt. Again, the distress crayons are much harder to move and blend out on the watercolor paper and the colors are more vibrant on the watercolor paper.
Left = Strathmore Bristol Smooth Paper; Right = Watercolor Paper
Then I did some ink smooshing with a few of the colors above, added water, white vinegar and salt again and let it sit for a few minutes.
Observations: Again very little reaction to the salt on either papers, But when rubbing off the salt from the watercolor paper panel, some of the areas of the paper pilled and rubbed off. Not a big deal; it just adds to the texture.
Thanks for reading this post. I hope you enjoyed and I’ve inspired you to give these backgrounds a try for yourself. They are lots of fun to make! Leave comments or questions below or feel free to email.
I colored the images with Copic colors. I used R14, 27 & 46 for the red heart balloon and tiny heart trio; C1 & 0, C5 & C7, and R20 for the skunks; RV11 & RV55, R14 & R46, E25 & E29 for the cupcakes; C1 & 0 for the scent trails; C00 & 0, R14 for the envelope; R14, 27 & 46, RV10, RV11 & RV55, E27 & E29 for the heart boxes; R14 & R46 for the tulip and YG25 & 17 for all the stem. I die cut all the images with the coordinating dies.
I nestled some of the images between the two layers of trees before adding to the card.
Thanks for reading this post. I hope you enjoyed and I’ve inspired you to give this card a try for yourself. Leave comments or questions below or feel free to email.
Hi friends. I used the House Builder Card Base Diesfrom Honey Bee Stamps along with the Treat Shop Add-On Dies and Stamps to make this cute Valentine’s Day Card. I couldn’t pass up the opportunity to make another card with these dies. They are still one of my faves!
I colored them with Copic Markers. I used BG000 and Copic Blender 0 for all glass elements (cake dome, candy dome and gumball machine); R81 & R83, C1, C3, & C5 for the chairs and table; R14 & R27, R81 & R83 for the umbrella. E25 & E29, R81, R83 & R85, C1 & 0 for the cupcakes; R14 & R27, C00 & 0, BG000, G94 and E25 for the gumball machine; E25 & E29 for the chocolates; R81, R83 & R85 for the present; and G94 & G99, R81 & R83, E25 & E29, R14 & R27 for the candies.
Thanks for reading this post. I hope you enjoyed and I’ve inspired you to give this cute Valentine’s Day card a try for yourself. Leave comments or questions below or feel free to email me.
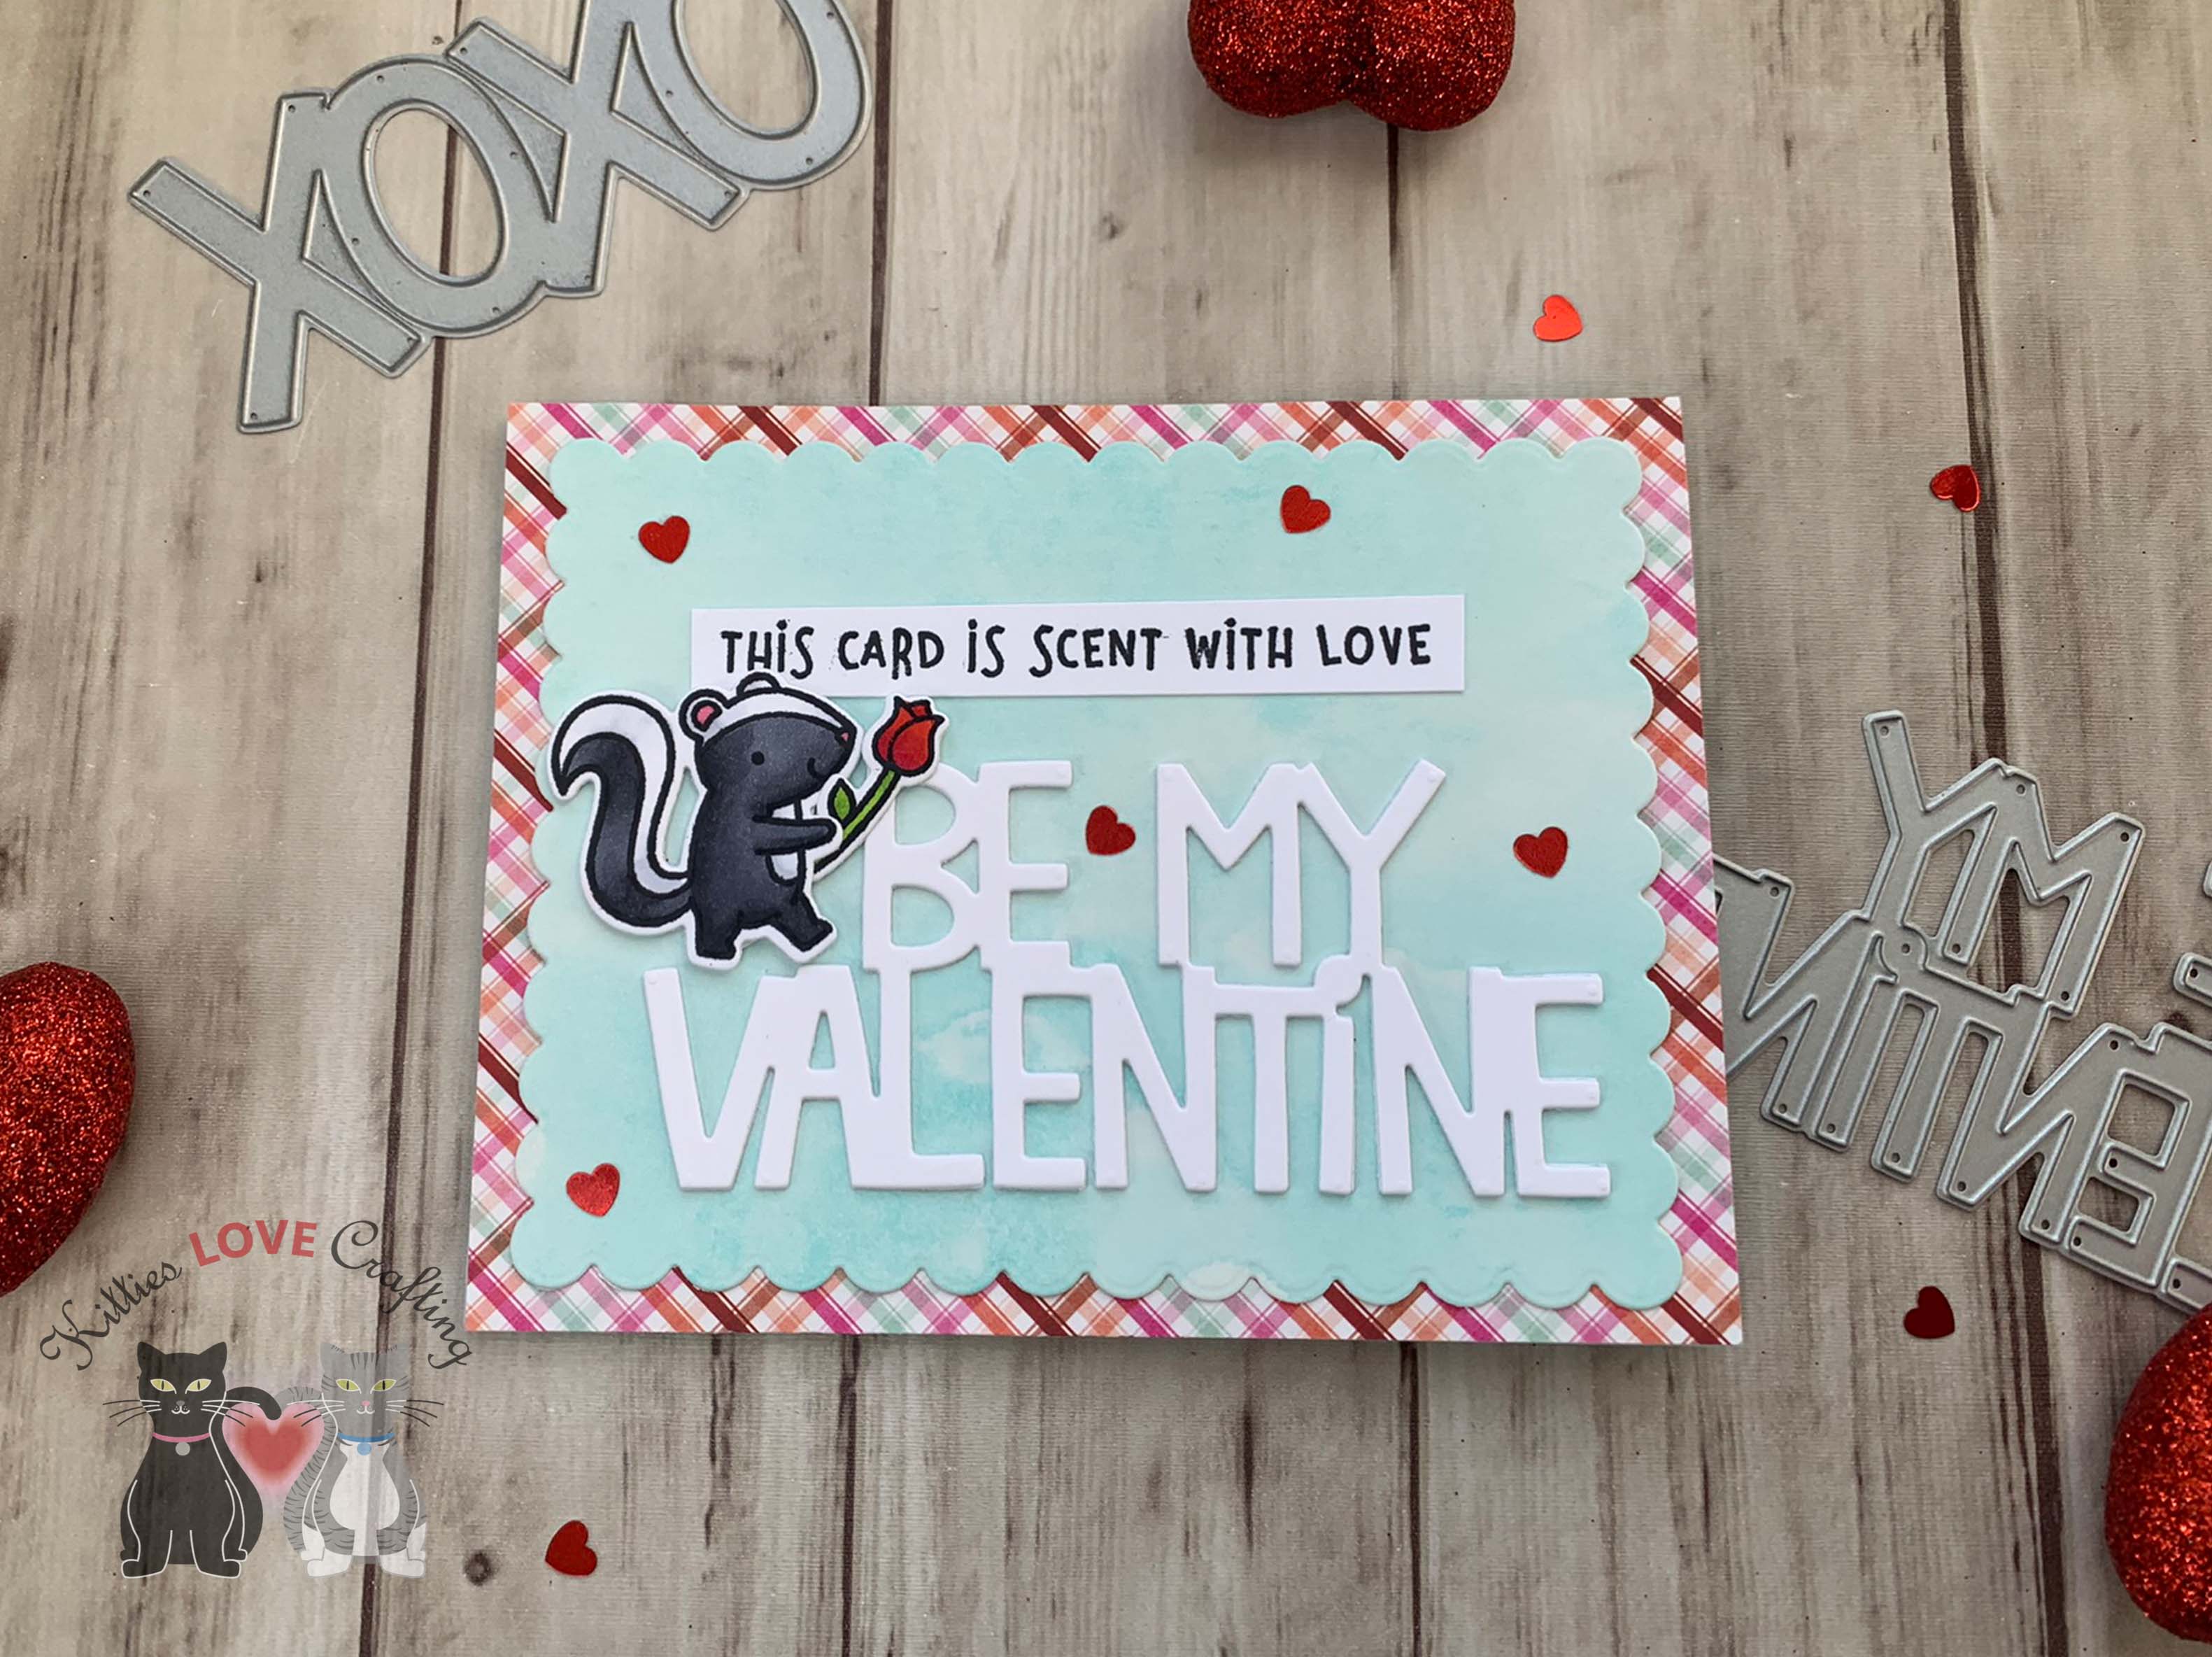
Hello friends. I came across these two birthday gift stampsets I have from Lawn Fawn while organizing and thought they would be cute on some Valentine’s Day card. These stamp sets are meant for birthdays but why not try to make Valentine’s Day cards instead. It’s time to challenge myself.
I used the Lawn Fawn, Party Pig, which I received as my birthday gift from Lawn Fawn in 2021 but also decide to use the Party Panda stamp set I received in 2020 as well. I combined them with the Giant Be My Valentine sentiment die to create a lovely focal image. Combining this die and some pattern papers helped me create two very quick cards!
I colored them with Copic markers. Then I used C1 & 0 to add shading to the panda; R81, 83, & 85 for the cupcake, E23 & E29 for the cupcake wrapper, and R17 for the cherry on top of the cupcake. I die cut all the images with the coordinating dies and added some Stampin Dimensionals to the panda before adhering to the card. And added some Pretty Pink Posh Sparkling Clear Mix Cupped Sequins to finish it.
I diecut a piece of Vellum Cardstock with the Lawn Fawn Lacy Heart Stackables which I embossed it using the Crafters Companion Embossalicious Grand Dots Embossing Folder (retired but I linked a similar one).
I stamped the pig and gift images from the Lawn Fawn Party Pig mini stampset (2021 birthday gift with purchase) onto Neenah 110lb Classic Crest Cardstock 8.5 X 11″ with Memento Tuxedo Black Ink and colored them with Copic markers. I used RV52, RV55, RV66, C1, C3, C7 & 0 to for the pig; R17 & R27, E29 & E27 for the gift. I die cut all the images with the coordinating dies.
Thanks for reading this post. I hope you enjoyed and I’ve inspired you to give these cards a try for yourself. Leave comments or questions below or feel free to email.
I added a piece of Neenah 110lb Classic Crest Cardstock 8.5 X 11″ to the back of the pattern paper backgrounds and a piece of vellum behind the stenciled panels, cut to 3-1/2 x 8-1/8″. Before adhering stenciled backgrounds to the card, I added the negative pieces of the window to the card. I stenciled some tiny hearts onto the background of the white windows with Hero Arts Heart Confetti Fancy Die (I die cut acetate to create the stencil) and Catherine Pooler Be Mine Ink.
The images were colored with Copic colors. I used R14, 27 & 46 for all the red items; R81, 83, & 85 for all the pink items; YG25 & 17 for all the greenery; C1, 5, & 7 and 0 for the skunks; and E74 & 79 for all the chocolate items. I die cut all the images with the coordinating dies.
Thanks for reading this post. I hope you enjoyed and I’ve inspired you to give these cards a try for yourself. Leave comments or questions below or feel free to email.
Thanks for reading this post. I hope you enjoyed and I’ve inspired you to give these cards a try for yourself. Leave comments or questions below or feel free to email.
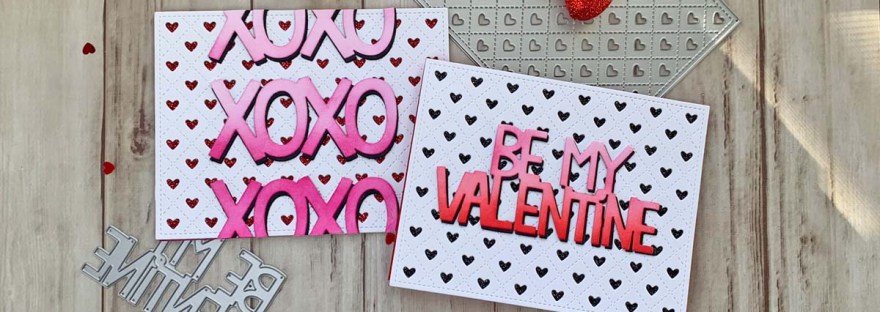
Happy New Year friends. Hope you all had some quality safe time with family and friends and are ready for a new and hopefully better year!
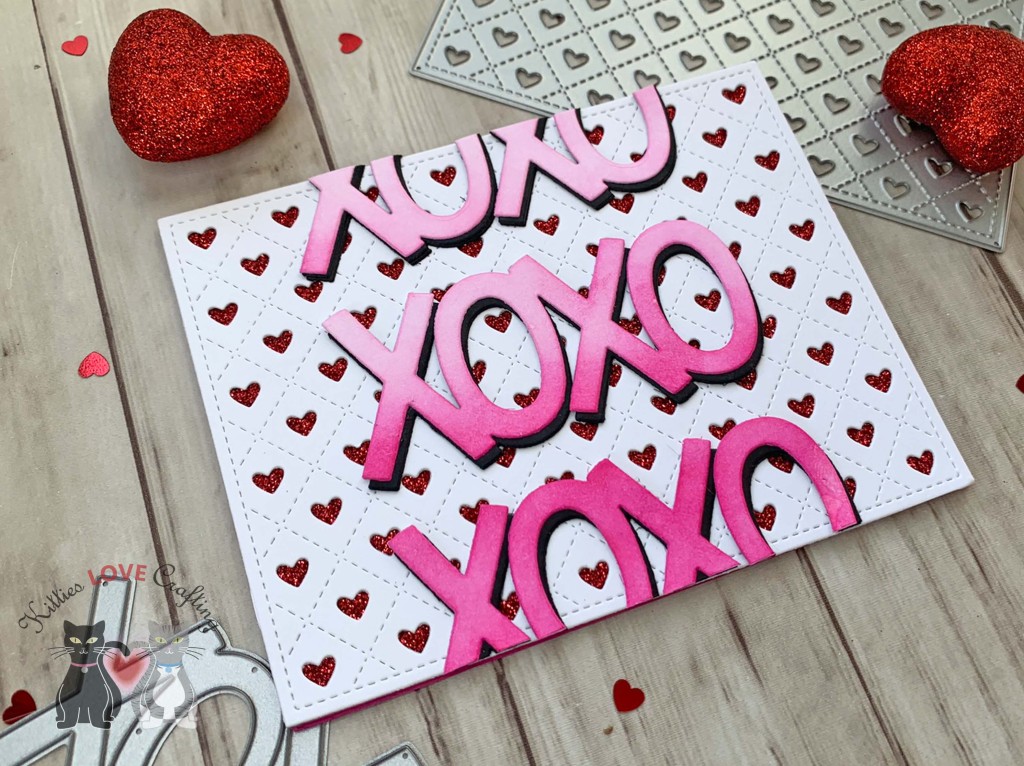
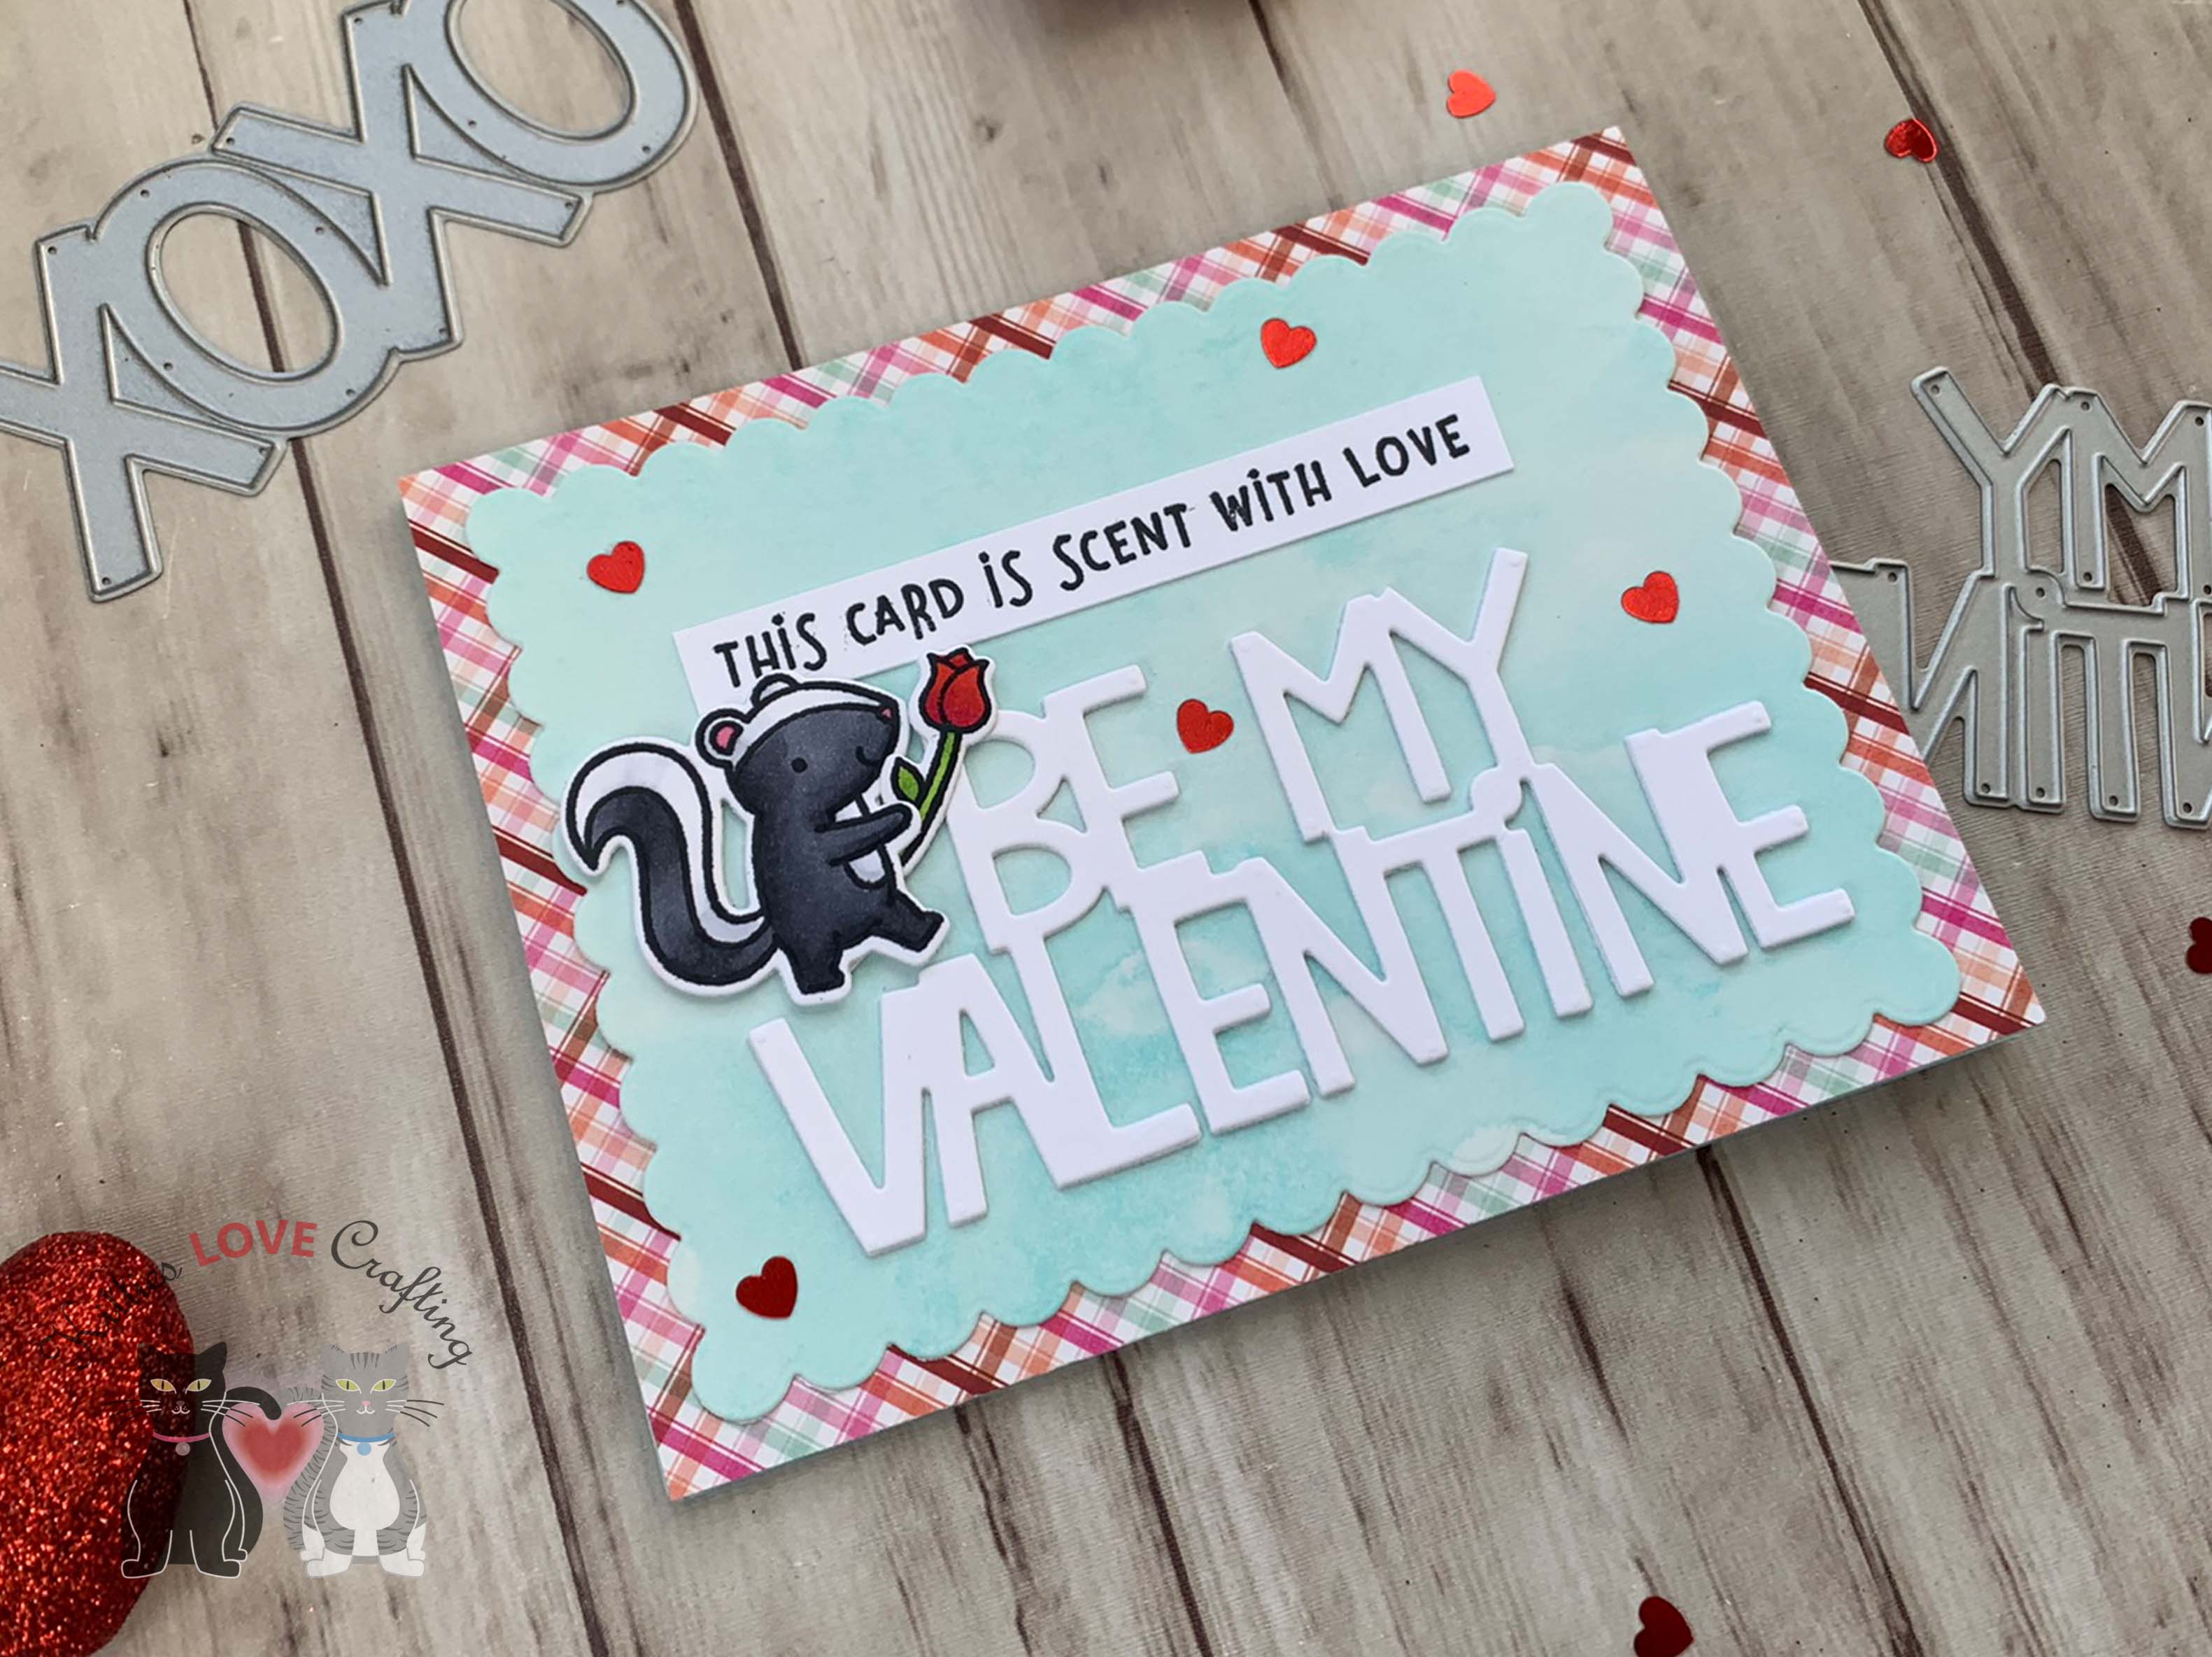
For my first cards of the new year I am making some cute Valentine’s cards using Lawn Fawn SCENT WITH LOVE Clear Stamps and Dies and Giant XOXO and Giant Be My Valentine combined with some simple watercolor/smooshed backgrounds. I haven’t done any watercoloring techniques in a while and wanted to play with this technique again. It’s great for quick backgrounds!
I took a piece of Strathmore 300 Series Bristol Smooth Paper, measuring 4-1/4 x 5-1/2″ and Catherine Pooler Cummerbund Ink to create the background. I used the smoosh technique (you put ink on an acrylic block or glass surface, add ink and lots of water and press your paper doen onto it) which is super easy and fun. Then I had to wait for it to dry….(always hard for me since I’m super impatient. LOL). Once dry, I used the Catherine Pooler Scallops & Dots Dies (I used the largest scallop) to cut it out. Always make sure the paper is completely dry before die cutting or it will tear the paper!
I colored the images with Copic colors. I used R17, 27 & 46 for all the red items; R81, 83, & 85 for all the pink items; YG25 & 17 for all the greenery; C1, 3, 5, & 7 for the skunks; and E74 & 79 for all the chocolate items. I die cut all the images with the coordinating dies.
Thanks for reading this post. I hope you enjoyed and I’ve inspired you to give these cards a try for yourself. Leave comments or questions below or feel free to email.
Hello friends. This festive holiday card features several of the Scrappy Tails Crafts add-on dies for the Slimline Bird House Pop Up Card Metal Die. These are tons of fun to play with and quickly becoming another favorite house builder set. These standalone dies are especially great for those of you who dislike or struggle with stamping.
Thanks for reading this post. I hope you enjoyed and I’ve inspired you to give this card a try for yourself. Leave comments or questions below or feel free to email.
Hello friends. This little car from Catherine Pooler Wrapped and Ready Stampset is so cute! I also love how large it is so it covers a good portion of an A2 card or a mini slimline card as well. In a previous post I created a mini slimline card using this stampset.
I colored the car with Copic Markers. I used R05, R17 & R46; Y02 and Y18; and C1, C3, C5, C7 & C9 for the car. R05, R17 & R46; Y02 and Y18; C1, C3, C5, C7; YG01, YG25, YG17; BV11 & BV08; YR14 & YR16; B00 & B02; and R81 & R85 for the gifts; and R05, R17 & R46; YG01, YG25, YG17; and C1, C3, C5 for the ornaments. I used a White Uni-Ball Gel Pen to add highlights to the car.
Thanks for reading this post. I hope you enjoyed and I’ve inspired you to give these cards a try for yourself. Leave comments or questions below or feel free to email.


 https://linkdeli.com/widget.js?id=f5e8378456858c916708