Holidays 2022, St. Patrick's Day, Watercolor

Easy Rainbow Watercolor Background Square Card

St. Patrick’s Day Cards

Hello friends. Need a quick card for St. Patrick’s Day?!? The watercolor background on this card is super quick to make and there’s no for perfection (which I love) necessary because it should look like paint was dropped on the paper.

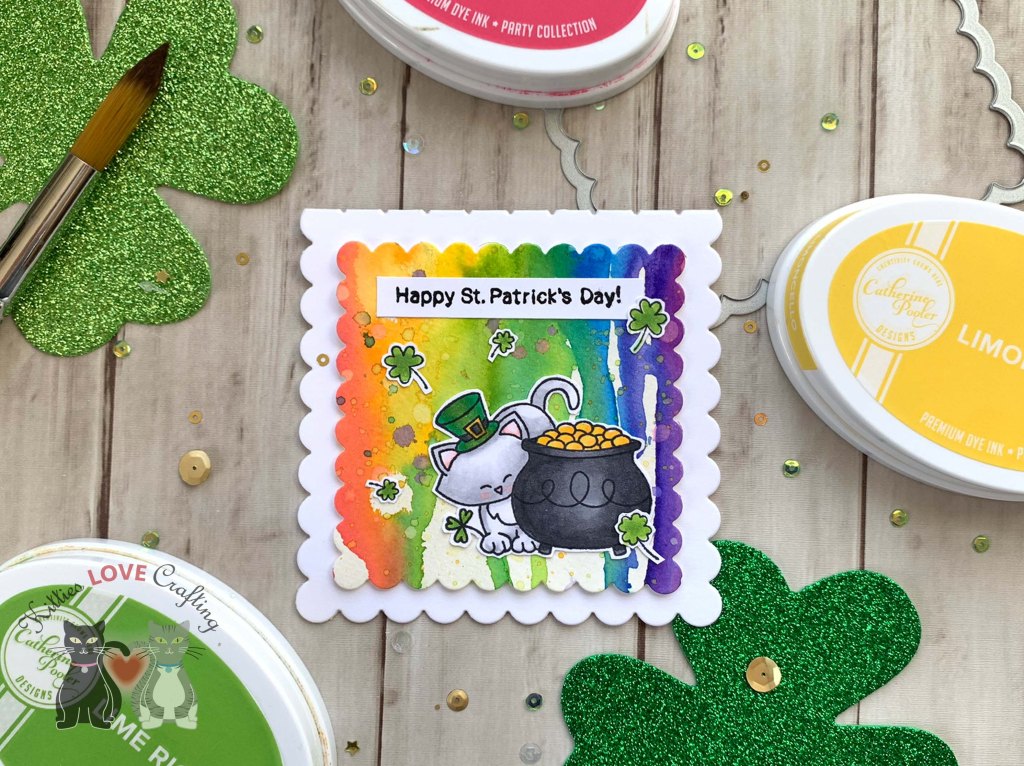
For this card, I cut a piece of Neenah 110lb Classic Crest Cardstock 8.5 X 11″ to 4-1/4 x 8-1/2″ and scored at 4-1/4″ to create the card base. Then, using the largest of the scallop squares (4 x 4″) from the Sizzix Framelits Die Set 6/PK – Squares, Scallop, I diecut the card base. I left the die about an 1/8″ off the card so that it would leave the top connected.

I cut a piece of Montval Acid-Free Cold Press Watercolor Paper, 140 lb, 18 X 24 in, Natural White to about 4 x 4″ and used the Catherine Pooler ink refills in Party Dress, Tiki Torch, Limoncello, Lime Rickey, Something Borrowed, and Grape Crush to create drips on the panel. I just squirted a dot of the ink onto the very top of the panel then using a brush dripped water onto it and let it run down the page. I added some splashes with a few of the same inks.

Then I diecut the panel using the second largest die from the Sizzix s Die Set 6/PK – Squares, Scallop (3-3/8 x 3-3/8″). I stamped the cat from Newton’s Nook Designs Newton’s Pot of Gold and the shamrocks from Simon Says Stamps WOOLY-LUCKY stampset onto some Neenah 110lb Classic Crest Cardstock 8.5 X 11″ with Memento Tuxedo Black Ink.

I colored the images with Copic colors. I used N5 & N8 and Y15 & Y17 for the pot of gold; YG17, G07 & G09, N5 & N8 and Y15 & Y17 for Newton’s hat; N1, N2, 0 & R20 for Newton; and YG17, G07 & G09 for the shamrocks.

I stamped the sentiment from the from Newton’s Nook Designs Newton’s Pot of Gold onto some Neenah 110lb Classic Crest Cardstock 8.5 X 11″ with Memento Tuxedo Black Ink, then using my MISTI stamped over it with Versamark Ink, heat embossed it with Ranger CLEAR Embossing Powder and cut it to 3/8 x 2-1/2″.

I adhered all the images and sentiment onto the panel and to the card base using 3M Foam Tape.

I left the inside of the card blank.

Dimensions


Supplies

Thanks for reading this post. I hope you enjoyed and I’ve inspired you to give this card a try for yourself. Leave comments or questions below or feel free to email.

Birthdays, Celebrations

Rainbow Birthday Card featuring Simon Says Stamp Trio Window Die

Hi friends. This fun and colorful card was made using the Simon Says Stamp Exclusive Trio Window Wafer Die and Simon Says Stamp Exclusive 6×8 Inch Window Frames clear stamp set included in the Simon Says Stamp February 2020 Card Kit. All the items from the kit are sold seperately so no need to fret if you don’t have the kit.

I started by cutting a piece of Neenah 110lb Classic Crest Cardstock 8.5 X 11″ to 5-1/2 x 8-1/2″ and scored at 4-1/4″ to create a card base. Then I cut another piece of Neenah 110lb Classic Crest Cardstock 8.5 X 11″ to 4 x 5-1/4” to create top panel.

I diecut the trio window using the Simon Says Stamp Exclusive Trio Window Wafer Die from the top panel, offsetting it from the center slightly.

I stamped the balloon border from the Simon Says Stamp Exclusive 6×8 Inch Window Frames clear stamp set around the windows and also some extra balloons with the additional balloon and string stamp included in the stampset using Memento Tuxedo Black Ink. To stamp balloons that look like they are behind the balloons around the windows, I stamped the balloon border on to Masking Paper, fussycut it out, and placed it over the balloon border image before stamping additional balloons. I stamped some of the confetti pieces around the card to fill up the white space. I wanted this card to look like a party on paper!

I also stamped some balloons in the inside of the windows so it looks like balloons continue on the inside. To do this, I just lined up the stamp on the card panel using my Tim Holtz Tonic Craft Travel Stamp Platform, removed the top panel, and stamped in the card base. I also stamped additional balloons onto scraps of Neenah 110lb Classic Crest Cardstock 8.5 X 11″, which I will pop up later with foam squares.

Before I started coloring all the images, I stamped some of the tiny sentiments in between the windows using the same Memento Tuxedo Black Ink (COPIC-friendly ink). I used COPICS in R17 and R27, R81 and R85, YR12 and YR16, Y06 and Y18, G07 and G14, BG000 and BG01, B95 and B37, and V06 and V09. Not gonna lie, this took a long time to color but I usually just watch a movie or Youtube videos while doing it so it makes it more fun. Once colored I all the images, I adhered the panel to the card base with 3M Foam Tape and used Stampin’ Dimensionals to adhered some of the additional balloons.

Closeup

Lastly, I stamped the “happy birthday” sentiment from the Simon Says Stamp Exclusive 6×8 Inch Window Frames clear stamp set onto a scrap of Neenah 110lb Classic Crest Cardstock 8.5 X 11″ and fussycut it out, separating the two words. I also used white alphabet stickers from my stash for the “50”. Since they were white I colored them with a black marker and addded them to the card in the middle window. If you have black Alphabet stickers that you like and fit inside the window, you can use those. I finished off the card by adding some highlights with my White Uni-Ball UM 153 Signo Broad Point Gel Pen and some splatters with Craft Smart Acrylic Paint in Black. And of course, no card is complete without some Nuvo Drops. I used Tonic Nuvo Crystal Drops in Ebony Black. It’s now a fun and colorful rainbow card. Doesn’t it just scream “HAPPY BIRTHDAY!?!”

Dimensions

Supplies

Thanks for reading this post. I hope you enjoyed and I’ve inspired you to give this card a try for yourself. Leave comments or questions below or feel free to email.

Uncategorized

Sweet Ice Cream Birthday Wishes

Hello friends. To celebrate the new Lawn Fawn’s Reveal Wheel add-on products, I made this little interactive birthday card. I love the Reveal Wheel dies. They are awesome! They make it super easy to make cute and fun cards and Lawn Fawn keeps making new dies and stampsets to go along with it.

Ok let’s get to the card making! After all that’s why you are all here. I began by cutting out all the Reveal Wheel pieces (including the ice cream cone frame with the LF Reveal Wheel Sweetest Flavor Add-on) out of Neenah Solar White 110lb Cardstock. It’s a good idea to use heavy cardstock; it gives the wheel more stability. The last thing you want is the wheel to bend while the recipient is playing with their card. Ugh! You need to cut out two panels (one with the cutout window and one without – this will be your back piece).

Next I stamped sprinkles from the Lawn Fawn Sweet Friends  stampset all over the top panel in the following colors, Stampin’ Up! Pumpkin Pie, Stampin’ Up! Granny Apple Green, Stampin’ Up! Highland Heather, Stampin’ Up! Pool Party, Catherine Pooler Designs Be Mine, and Catherine Pooler Designs Shea Butter. Then I cut the rainbow paper about 1 1/2” x 4, just large enough so you can trim with the Reveal Wheel main die. Glue that panel onto the front panel (the one with the window) and rerun it through your diecut machine using the die for the main panel. This will give you a stitched border on the rainbow paper. At this point, I added a piece of gold glitter washi tape (~1/8” wide) onto the panel.

I put this aside for now and got to stamping and coloring my images. I stamped the ice cream cone image from Lawn Fawn Sweetest Flavor 3 times and the cherry in Catherine Pooler Designs Midnight ink on Neenah Solar White 110lb Cardstock. I will be coloring these with my new Prismacolor Pencils, Blending Stumps and Gamsol.

TIP: Make sure to use a water- based ink if using alcohol markers and an archival ink for water-based mediums such as pencils (if using gamsol), water-based markers or watercolors.

I let the ink dry and colored the images as well as colored the ice cream cone frame. Then diecut the stamped images using the coordinating dies. I also fussy cut the cone off of one of the ice cream cones and the ice cream cone frame. While those dried, I stamped the sentiment onto Stampin’ Up! Vellum and cut it down to 11/16 x 3 3/4”.

Time to work on the Wheel itself. I colored the Wheel the same color as the middle ice cream scoop using my Prismacolor pencils and Gamsol. I stamped the faces from both Lawn Fawn Sweetest Flavor and Lawn Fawn Sweet Friends around the wheel. Ok. All that’s left to do is assemble this little card. Attached the little Wheel to the larger one with a tiny brad, added 3 Stampin’ Dimensionals behind the tiny wheel and it to the back card panel. Added the black one, behind that and glued it all to the card base. Next I added the ice cream, sentiment strip and little tiny arrow to the card. Embellished with some Nuvodrops in a few different colors and it’s all done. And always make sure your card is fully functional by playing with it. LOL.

Supplies:

Hope you’ve enjoyed this process post and I hope I’ve inspired you to create some cards of your own. Thanks for stopping by and once again please leave questions in the comments or feel free to email me if you prefer.