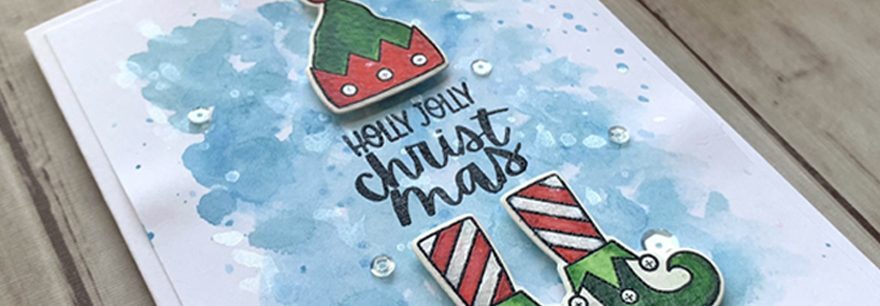
Hello friends. This cute little elf card was created using Catherine Pooler’s Nice List Stamp Set. It features cute elf hats and legs and feet. The sentiments were meant to be the body of the elf as in this card. I used a quick watercolored background with a heat embossed sentiment.
While that dried, I watercolored the background onto the card panel and also added some splatters wih the same color. I made sure not to add too much water to my watercolors since I was working on Neenah Cardstock and not watercolor paper. While that dried, I diecut the elf parts with the coordinating Nice List Dies. Once the background was dry, I stamped the sentiment from Catherine Pooler’s Nice List Stamp Set with Versamark Ink and heat embossed it with Clear Embossing Powder. I adhered the panel to the card base and the hat and shoes with Stampin’ Dimensionals. I finished it off by adding some clear sequins.
Thanks for reading this post. I hope you enjoyed and I’ve inspired you to give this cute and easy card a try for yourself. Leave comments or questions below or feel free to email.
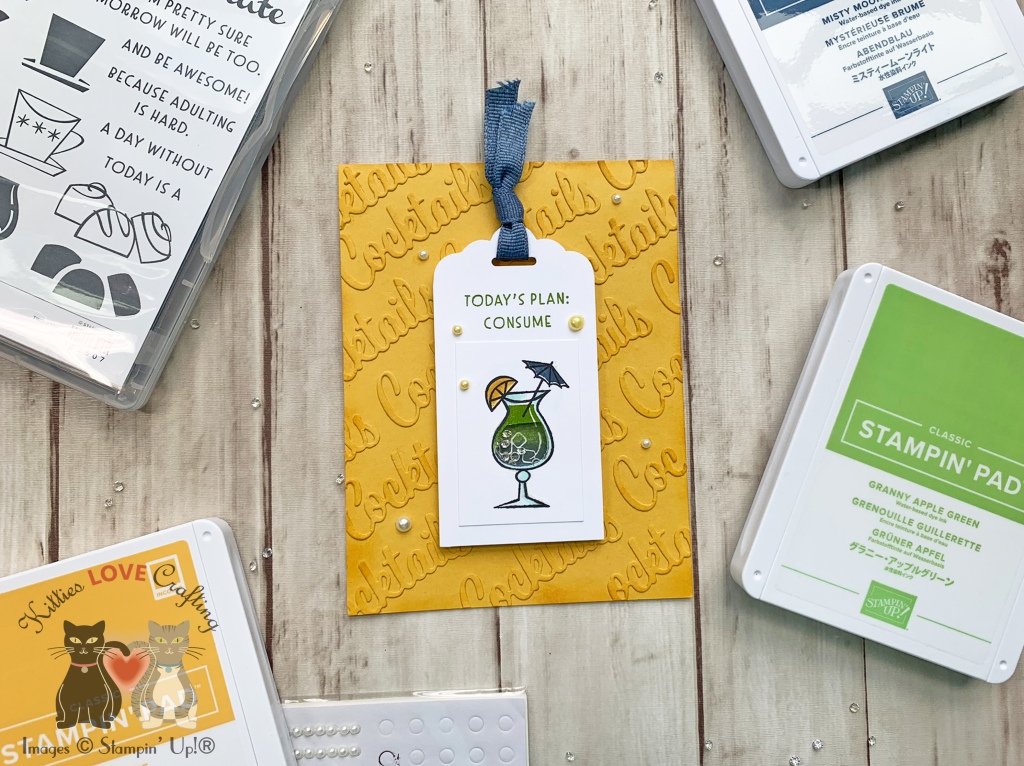
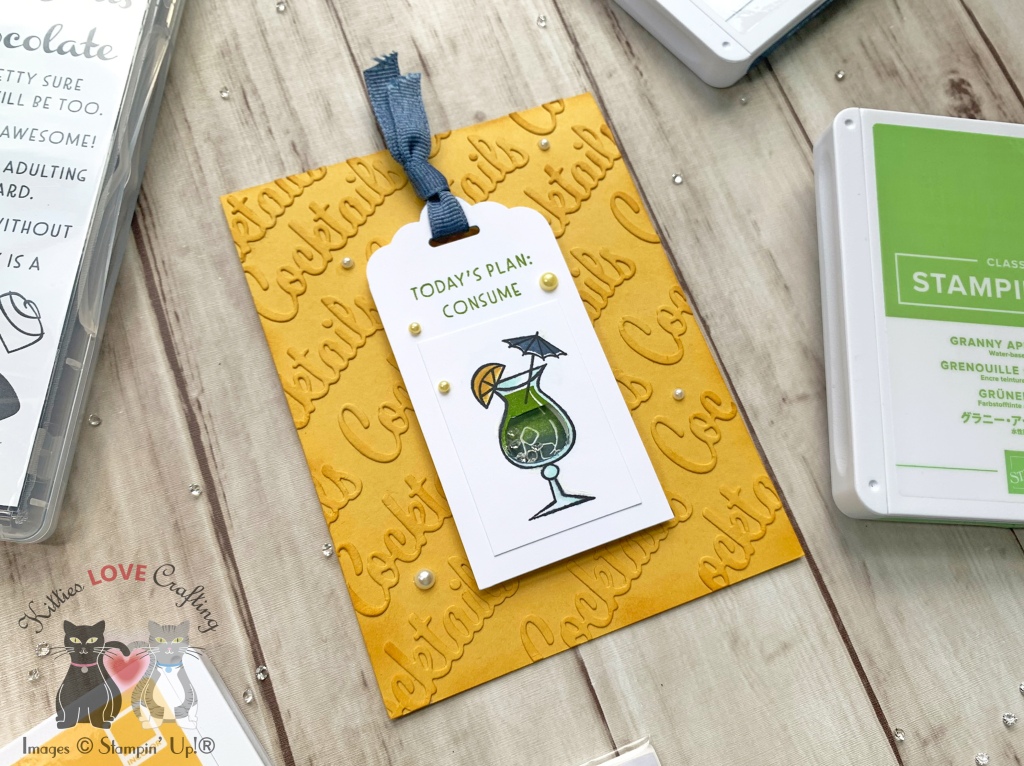
Hello friends. This faux embossed technique that I discovered a few years ago and is a great way to add dimension to your card without having to emboss. It can be done with most images and all text. I used the word dies from Nothing’s Better Than Bundle from Stampin’ Up! to create an embossed background. But to step it up I also decided to add a shaker element to the card.
Thanks for reading this post. I hope you enjoyed and I’ve inspired you to try this fun summery card for yourself! Leave comments or questions below or feel free to email me. If you want to share you creations with me tag me on instagram @kittieslovecrafting. If you would like a Stampin’ Up! catalog, please email me as well. All current catalogs can be found on the right side of this post and the Stampin’ Up! page. All news and fun stuff happening at Stampin’ Up! are listed there!
Happy Saturday friends! Hope you are all doing well and are safe. To go along with the cards in my previous post using the Hello Easter stampset from Simon Says Stamp, I decided to make some multimedia tags. I also dug up some items from my stash that I forgot I had (yeah that’s how old they are. LOL, Anyone else have this problem?) to use on the tags.
I colored them with COPICS. I used C000, C1, and 0 for the bunny and R81 and R85 for its ears; Y06, Y13 and Y18 for the bunny’s bow; YG06, YG07, and YG09, YR07 and YR16 for the egg the bunny holds; YR07, YR16 and R29 for one tulip; BG01, BG02, and BG05 for the second tulip; Y06, Y13 and Y18 for the daffodils and YG06, YG07, and YG09 for the stems; and Y00, Y06, and Y21 for the basket, V04, V06 and V09, YR07, YR16 and R29, BG01, BG02, and BG05 for the eggs inside the basket, R29 and R32 for the basket bow. Once I finished coloring the images, I fussycut them all out.
I colored them with COPICS. I used Y06, Y13 and Y18 for the ducky body, YR07 and YR16 for the feet and beak and R81 for the cheeks, V04, V06 and V09 for the bow; R32, R37 and R29 for the umbrella and V04, V06 and V09 for the umbrella bow; Y06, Y13 and Y18, YR07 and YR16 for the medallion; R81 and R85, BG000, BG01 and BG02 for the large egg, and YR07, YR16 and R29 for the egg’s bow. Once I finished coloring the images, I fussycut them all out.
Thanks for reading this post. I hope you enjoyed and I’ve inspired you to give these tags a try for yourself. Have a great Easter! Leave comments or questions below or feel free to email.
Now more than ever we all need to stick together to get through these tough times. And this card kit from Simon Says Stamp embodies that. This is the perfect time to send someone a card to let them know you are thinking of them. I decided to make a tag as well as a card that can be paired together. I’ve been neglectful in my tag making and it’s high time I got back to it!
Multimedia Tag Featuring Simon Says Stamp’s March Card Kit
When I was thinking about creating the tag I knew that I wanted to have different textures and coloring mediums. That’s the fun of multimedia – no commitment to one medium. LOL I mixed papers from the card kit, ink, watercolors and embossing to do this.
I adhered the watercolor panel to the card base and the frame to the watercolor card with Tombow Mono Multi Liquid Glue. I finished it off by adding some self adhesive purple and clear gems from my stash. These are so old that I have no idea who made them or where I purchased them. Sorry.
Thanks for reading this post. I hope you enjoyed and I’ve inspired you to give this card a try for yourself. Leave comments or questions below or feel free to email.
Thanks for reading this post. I hope you enjoyed and gave you some ideas on how to use this kit for more than just cards. Leave comments or questions below or feel free to email.
It’s always fun to find new ways to use your dies and this is one of my favorite techniques to stretch my dies. It’s a faux embossing technique; no embossing folder needed.
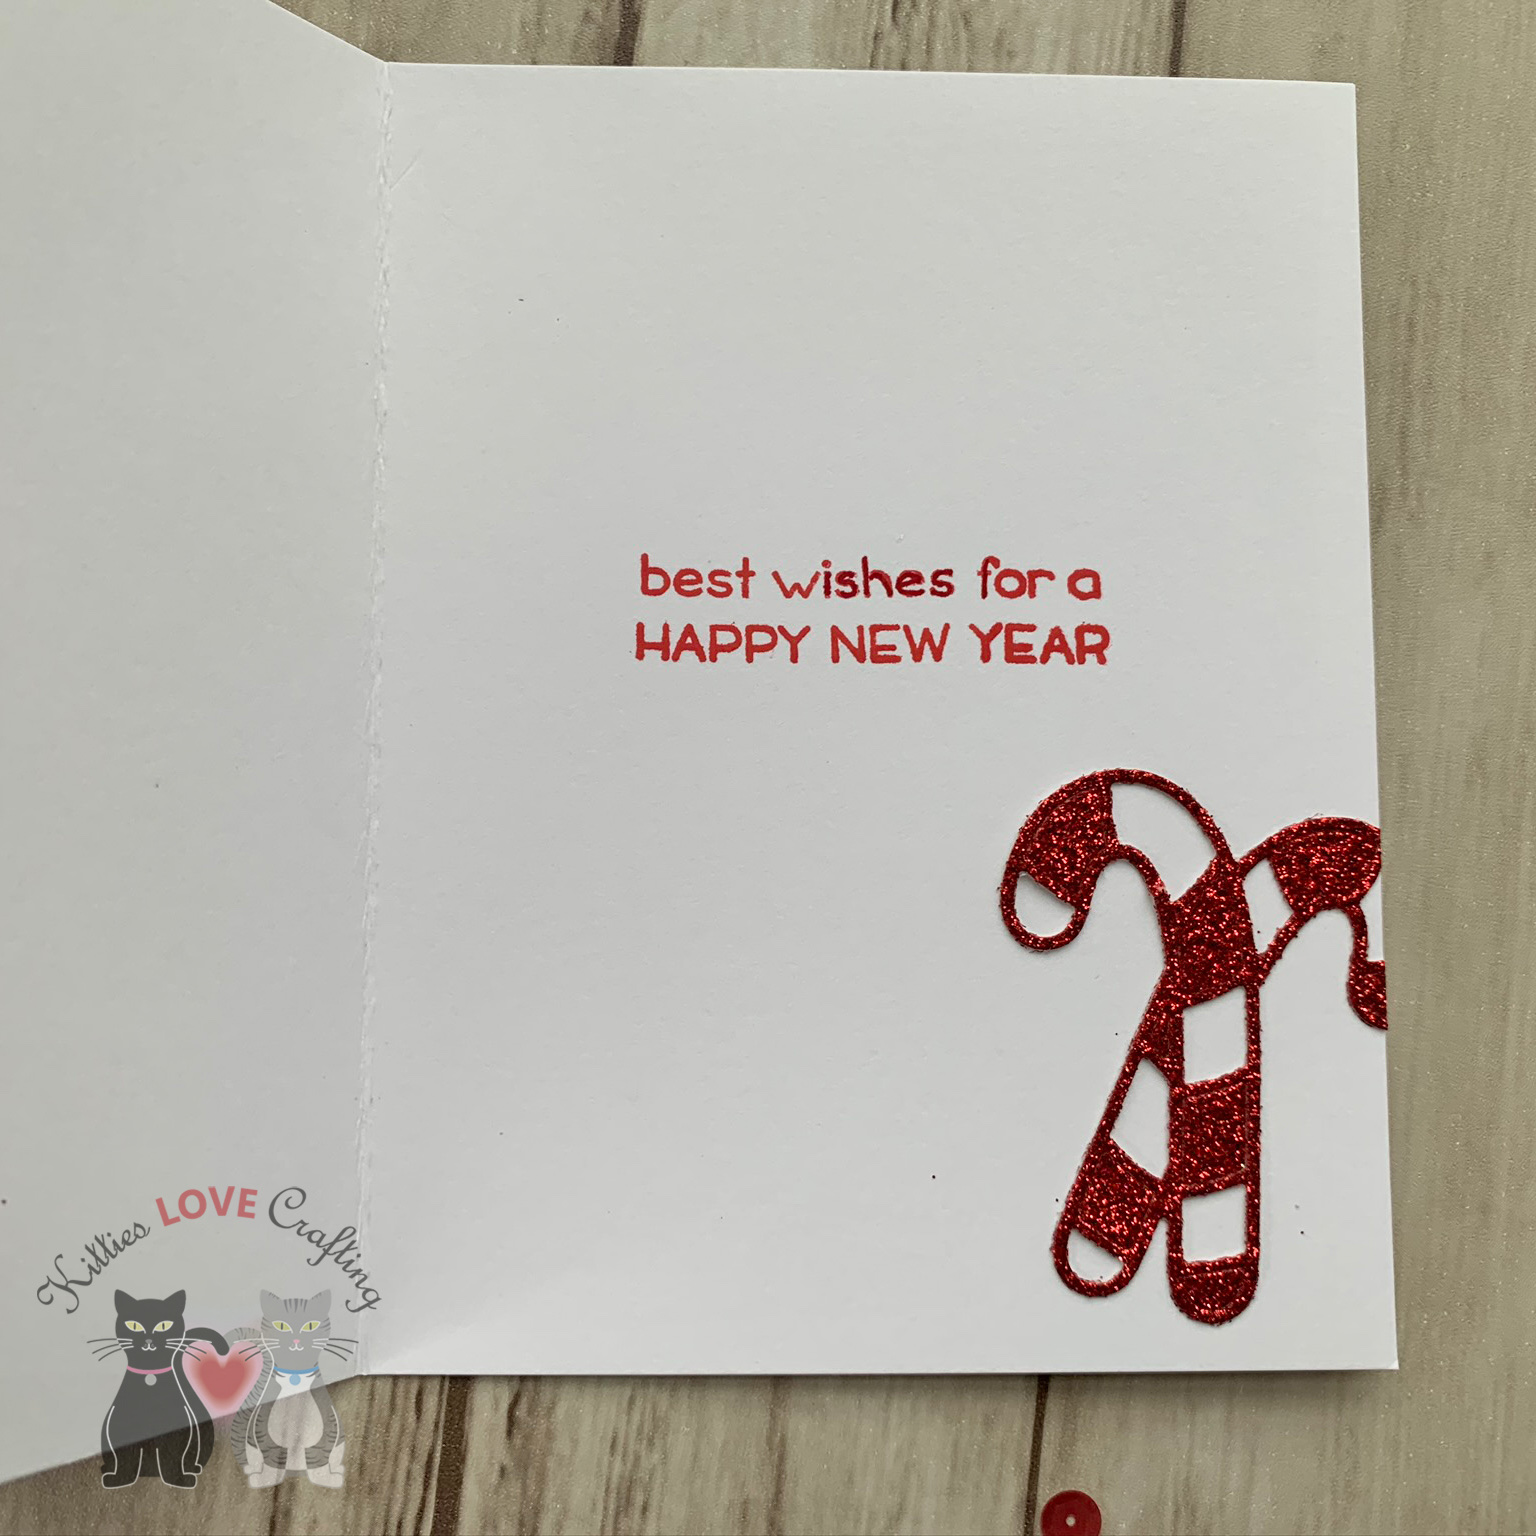
I adhered the white candy cane diecuts randomly around the card, creating a pattern and a faux embossed look. This is a quick way to add dimension to your backgrounds. I made one of the candy canes the focal point by inlaying the red and white glitter paper pieces inside the candy cane outlines. Then added the bow from the same die. Don’t get rid of the leftover glitter diecut candy cane pieces, you can use them on the inside of the card.
On the inside of the card,I stamped another sentiment from the Merry Messages Stampset by Lawn Fawn with Festive Berries Distress Oxide and adhered the leftover red glitter candy cane diecut and Inlayed some of the interior stripe pieces. And that completes this card. Pretty easy and quick to make.
Thanks for reading this post and I hope I’ve inspired you to give this card a try on your own. Leave comments or questions below or feel free to email me.
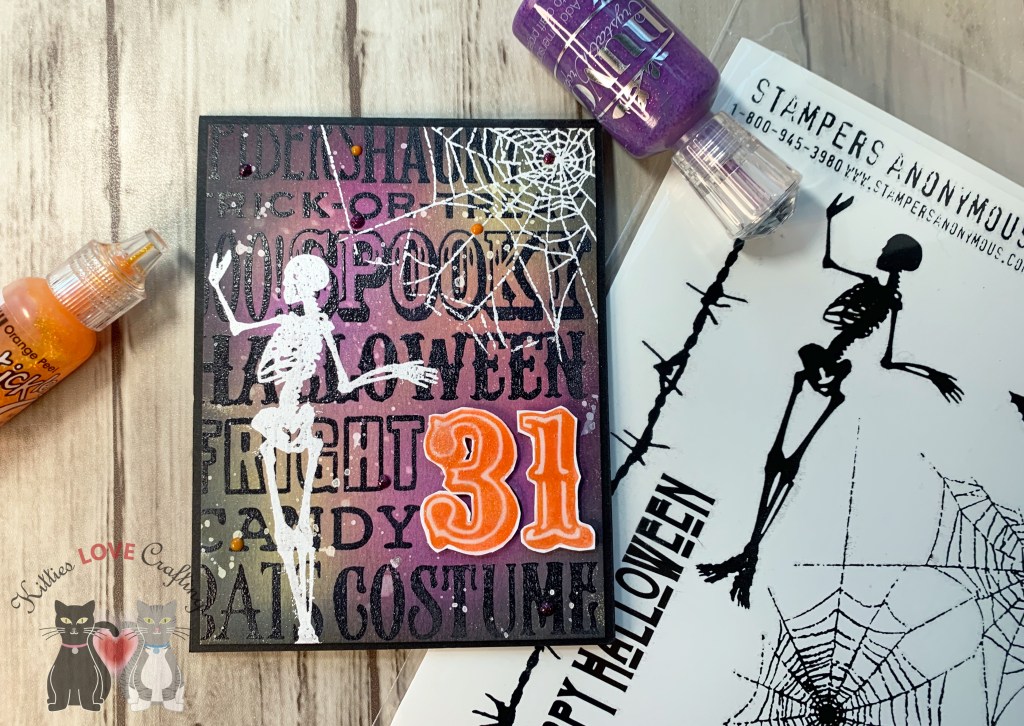
Thanks for reading this post and I hope I’ve inspired you to make this fun spooky Halloween card. Leave comments or questions below or feel free to email me.
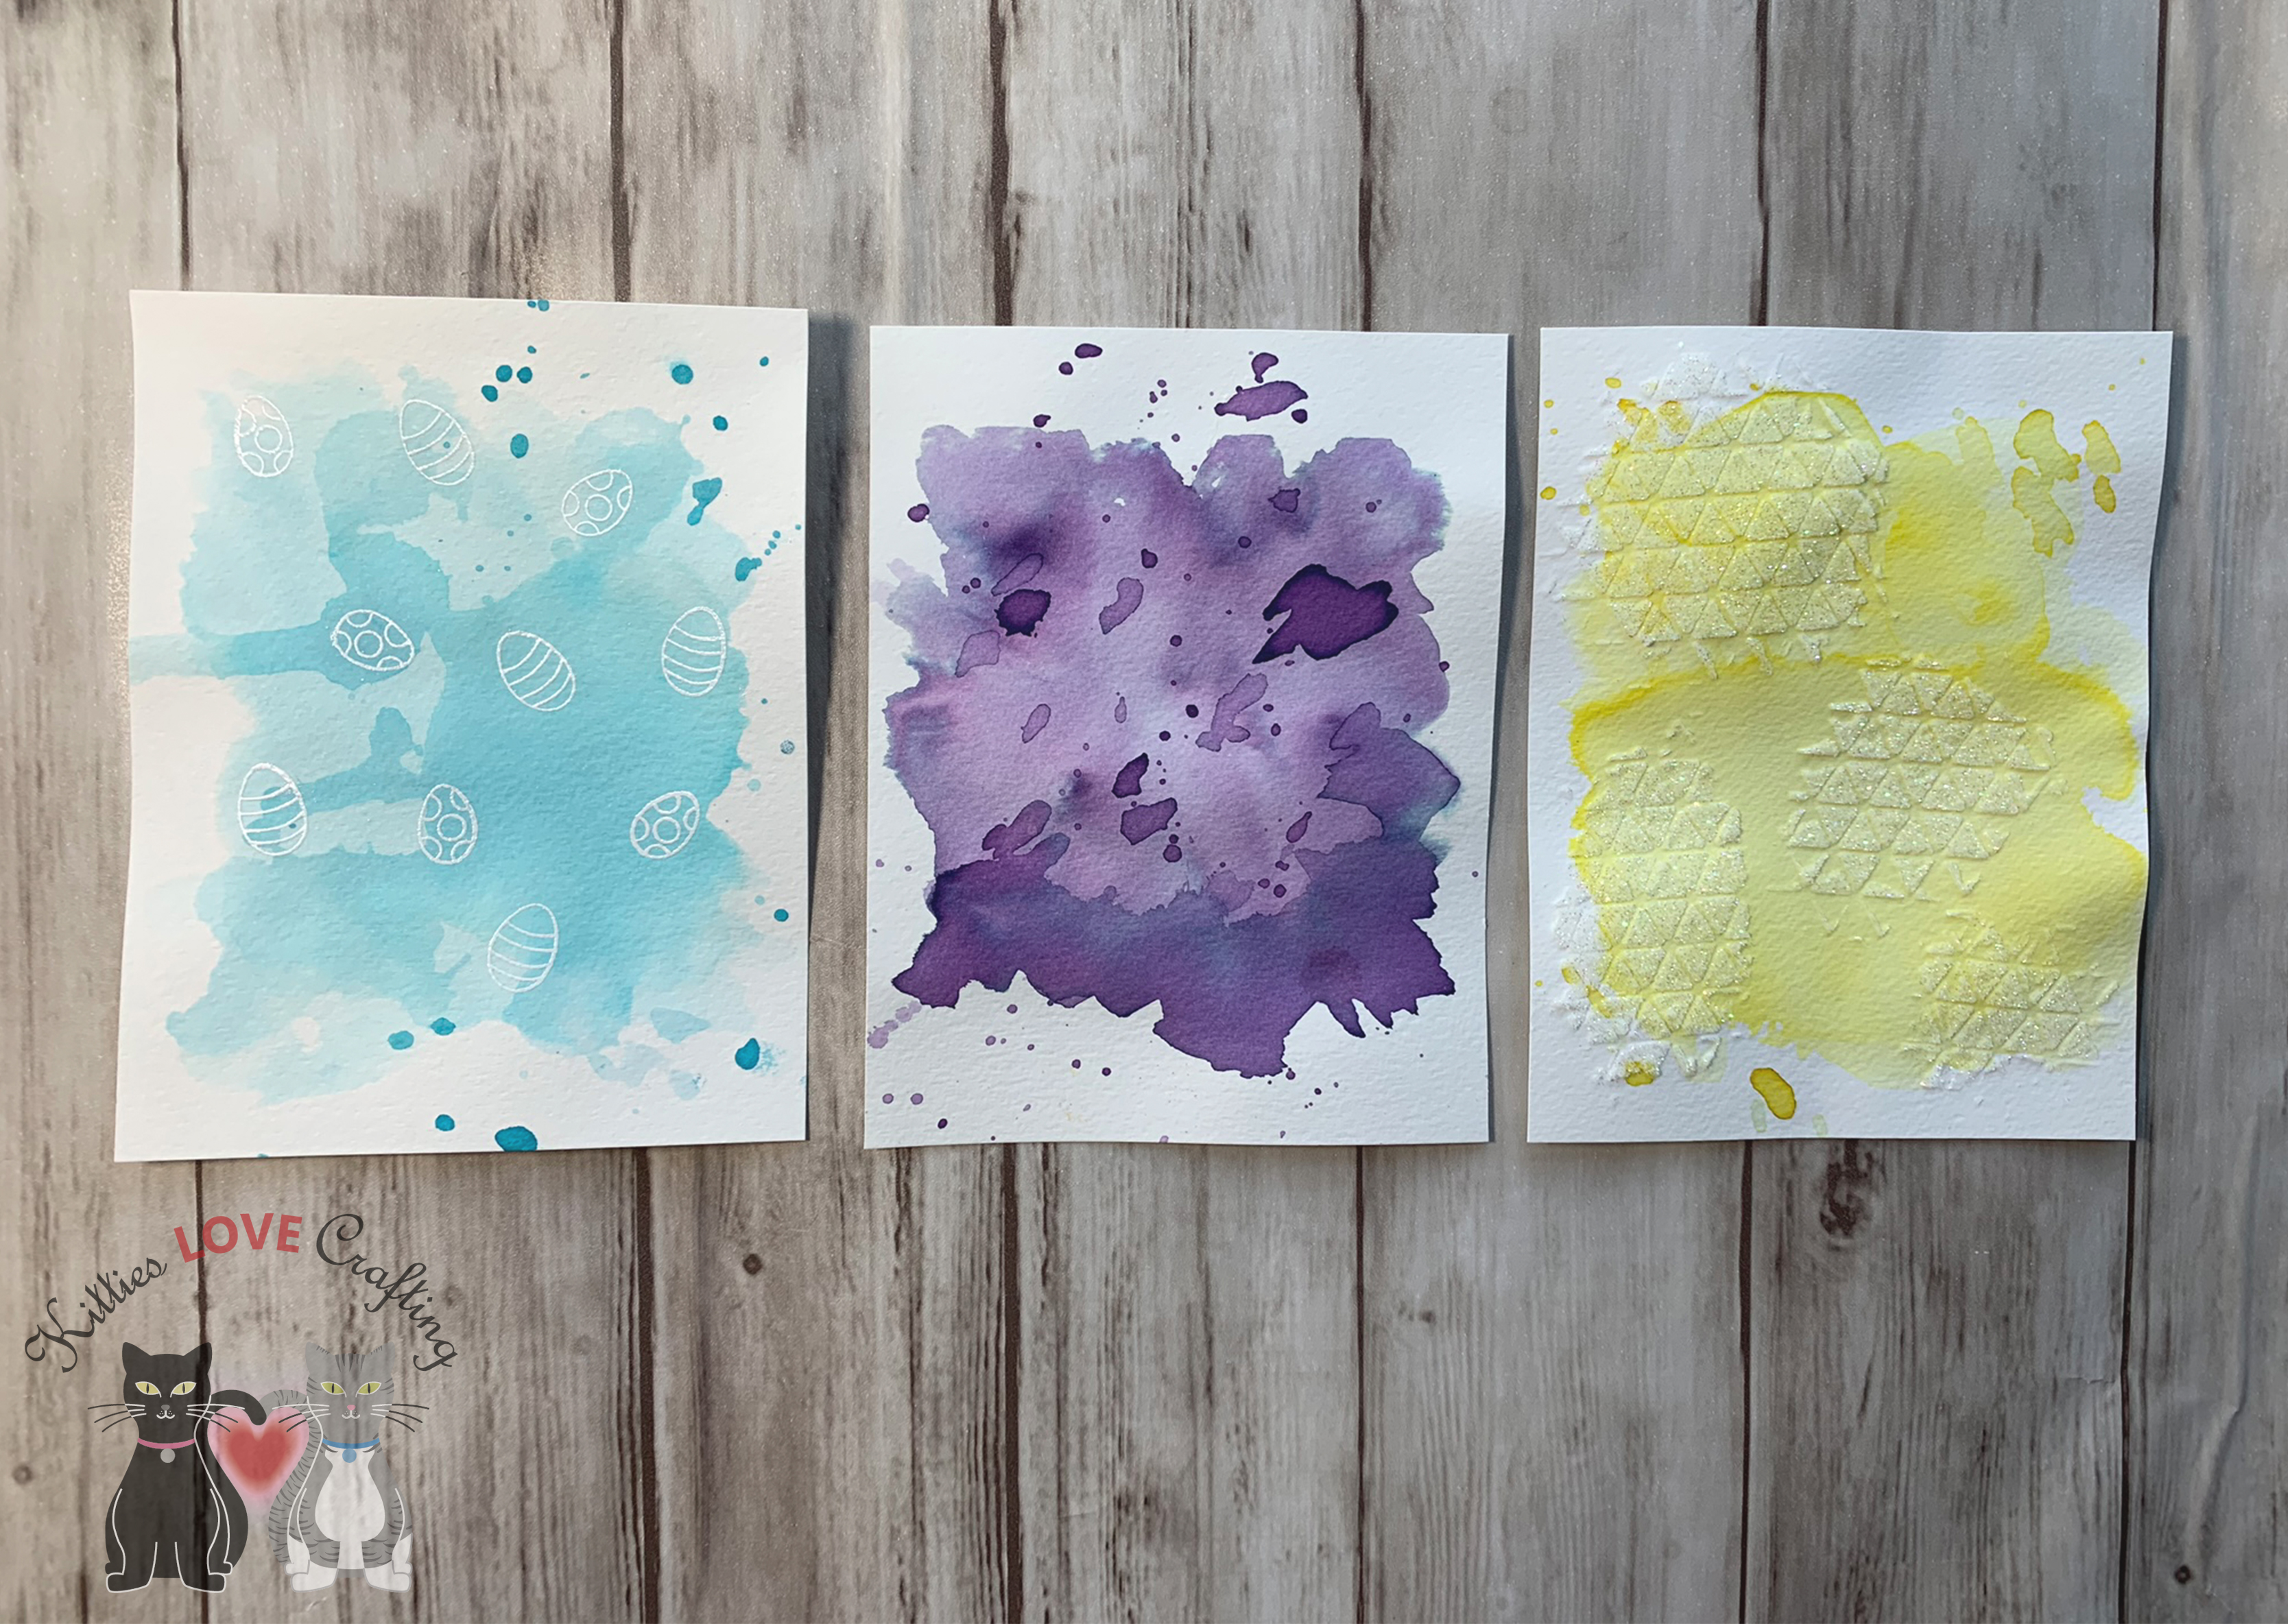
Today’s topic is watercolor backgrounds. Whenever I want a quick and easy background for a card, I go with a watercolor background. You don’t need to know how to watercolor like a pro, you just need some good watercolor paper. The paper makes the difference in the results you get. I used Canson XL Series Watercolor Paper Pad (140 Pound, 9 x 12 Inch). The great thing is, that this technique can be achieved with dye inks, stains, sprays, or watercolors (high end or inexpensive). I used Distress Ink Stains for my backgrounds. I originally pulled out my Distress Ink Pads but then decided that my Distress Ink Stains haven’t been getting enough love so I decided to use those instead. These can be dabbed on or sprayed. These now are sold in spray bottles but if you’re like me and have the original bottles, Ranger sells a spray bottle lid. I used mine straight out of the bottle like watercolor though.
Watercolor Background Supplies
Ok, so let’s get started. First, I taped down my watercolor paper piece (4 1/4 x 5 1/2″) with some ScotchBlue Painters Tape to a hard surface. Protect your surface before you begin because this will be messy. With a clean brush, add some water to your surface, covering the whole area. Then dispense some of ink onto a clear block, craft mat, etc. (I used my glass mat) and then dab/pounce it your paper. If the surface is too dry, add some more water. You can add more ink to certain areas to get darker areas. Alternatively, you can add more water and blot certain areas to subtract color. Stick to one color if you are not comfortable mixing multiple colors together. Keep playing with adding color until you are satisfied.
Let your piece dry in between layers. This will yield a better result, in the end. You can let it air dry or use a heat tool (if you are not patient like me. :)) Once the piece was almost dry I added some splashes using the same ink color for each. I usually do this inside a box since I don’t want my desk and surrounding areas to stained. Let it dry completely before moving onto the next step. And if you want to stop here, you totally can; they look great as is. I wanted to enhance mine by adding another level of texture.
I made Easter cards with these backgrounds. I used Newton’s Nook Designs Newton’s Easter Basket Stamp on all 3 cards for the images.
I used Simon Says Stamp Some Bunny for the sentiment on the first card and the Lawn Fawn Straight Flower Border Die Cut to build the scene. And finished it with Nuvo drops in different colors. The second card features the Pretty Pink Posh Happy Easter Script Die cut out of 4 layers of cardstock (3 black and one white), stacked up to create the sentiment. The third card showcases the Easter egg kitty by putting him in ovals diecut using Stampin’ Up! Layering Ovals Framelits Dies. I added a sentiment from Newton’s Nook Designs Newton’s Easter Basket Stamp. I created card bases from Stampin’ Up! Tempting Turquoise (retired), Stampin’ Up! Elegant Eggplant (retired), and Stampin’ Up! Crushed Curry 8-1/2″ X 11″ Cardstock, respectively. And finally, on the inside I added a piece of white 80lb cardstock so I can later write a message inside my cards.
Thanks for stopping by. I hope this was helpful and I’ve inspired you to create some fun watercolor backgrounds of your own. Feel free to email me with questions or leave a comments below.


 https://linkdeli.com/widget.js?id=f5e8378456858c916708