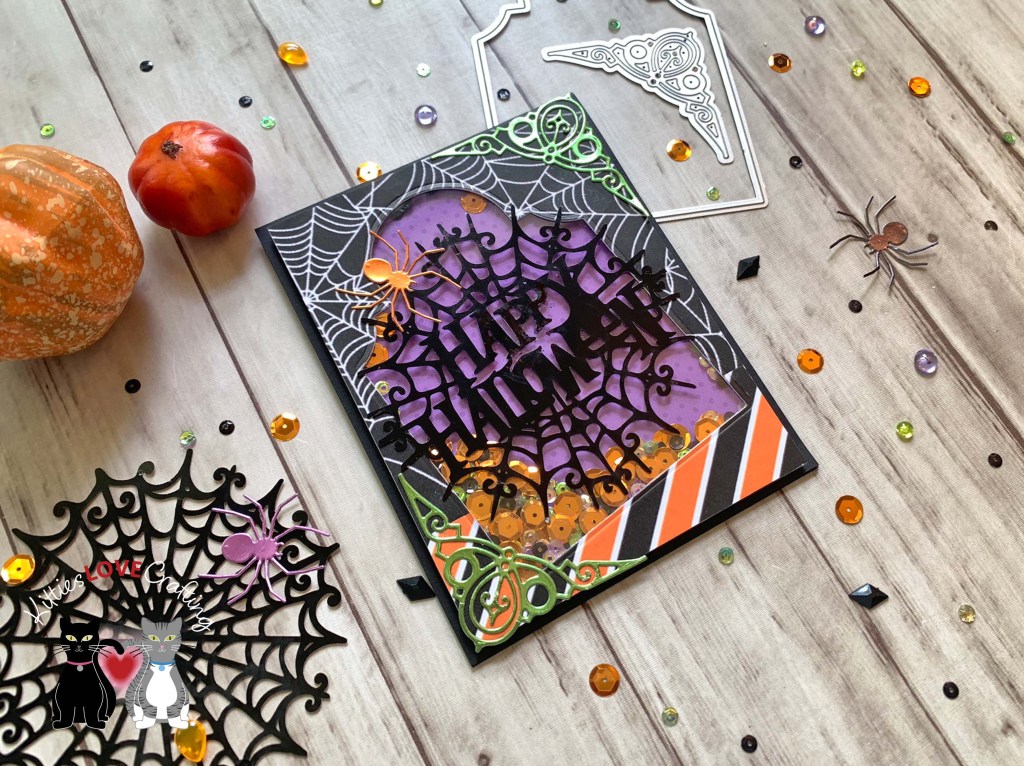
Cards, Halloween, interactive, Shaker

Tombstone Shaker Halloween Card feat. Simply Made Crafts

Hello friends. Hereโ€™s a quick Halloween shaker card featuring Simply Made Crafts Happy Haunting collection products. In case you are not familiar with this company, it is the creation of Helen Griffin from the UK. Go check out her blog. She has lots of cool dies and stamps.

For this card, I cut a piece of Lawn Fawn Black Licorice Cardstock to 5-1/2 x 8-1/2″ and scored at 4-1/4″ to create an A2 card base, a piece of pattern paper from the Simply Made Crafts Happy Haunting Digital Papers to 4 x 5-1/4 and another to 1-1/4 x 4″.

I glued those two pieces of pattern paper together and die cut a window using the largest tombstone in the Simply Made Crafts Happy Haunting Spell Book Elements Die Set. I backed it with a piece of acetate scut to a litlle bit smaller than 4 x 5-1/4. Then added foam tape to the back. I used a variety of green, purple, black and orange sequins from my stash. And backed it with a piece of Doodlebug Happy Haunting 12 x 12 Petite Print Paper (discontinued).

To the front panel, I added some decorations by die cutting the ornate corner embellishments from the Simply Made Crafts Happy Haunting Spell Book Elements Die Set from green metallic cardstock from the Tim Holtz idea-ology 8 x 8 Paper Stash Metallic Jewels Kraft Stock and an orange spider using the same carstock pack. For the sentiment I used one of the large spider web sentiments from the Simply Made Crafts A5 Ephemera Pack Spooky Specials Halloween Spooky Webs. I love these sentiment diescuts because they really create a great focal point.

On the inside of the card, I cut a piece of Neenah 100lb Classic Crest Cardstock 8.5 X 11″ to 4 x 5-1/4″, added a strip of Doodlebug Happy Haunting 12 x 12 Petite Print Paper (discontinued) to 1-1/4 x 4″ and a piece of Simply Made Crafts Happy Haunting Digital Papers to 1 x 4-1/4″. I added a white web and black metallic spider die cut from the Simply Made Crafts Happy Haunting Spell Book Elements Die Set.

Dimensions


Supplies

https://linkdeli.com/widget.js?id=f5e8378456858c916708

Thanks for reading this post. I hope Iโ€™ve inspired you to give this cute shaker card a try for yourself! Leave comments or questions below or feel free to email.

Cards, Halloween

Halloween Cards: Using Tiny Images to Create a Background feat. Catherine Pooler Designs

Hello friends. Here’s a fun way to stretch your stamps to create a background — use those tiny images included in your stampsets! This card features the Catherine Pooler Designs Fright Night and Halloween Mug Shots Stampsets which came in the Boo Box released last month. I love how this card turned out!

For this card, I cut a piece of Lawn Fawn Black Licorice 8-1/2 x 11″ Cardstock to to 5-1/2 x 8-1/2″ and scored at 4-1/4″ to create an A2 card base, and a piece of Neenah 100lb Classic Crest Cardstock 8.5 X 11″ to 4 x 5-1/4″.

For the background, I stamped the most of the tiny images from the Catherine Pooler Designs Fright Night and Halloween Mug Shots Stampsets (both included in the Boo Box) using CP Midnight, Orange Twist, Catching Rays, Melon Ice, Martini, Black Jack, Royal Treatment and Pixie Dust inks.

I stamped the images from the Catherine Pooler Designs Halloween Mug Shots Stampset onto Strathmore 300 Series Smooth Bristol Paper with Catherine Pooler Midnight Ink and colored it with a blender pen and more inks. I used Melon Ice, Martini and Black Jack for the mug, Pixie Dust and Catching Rays for the inside of the mug and tiny circles and stars on the mug, and Pebble, Black Jack, Catching Rays and Spice inks for foam and broom.

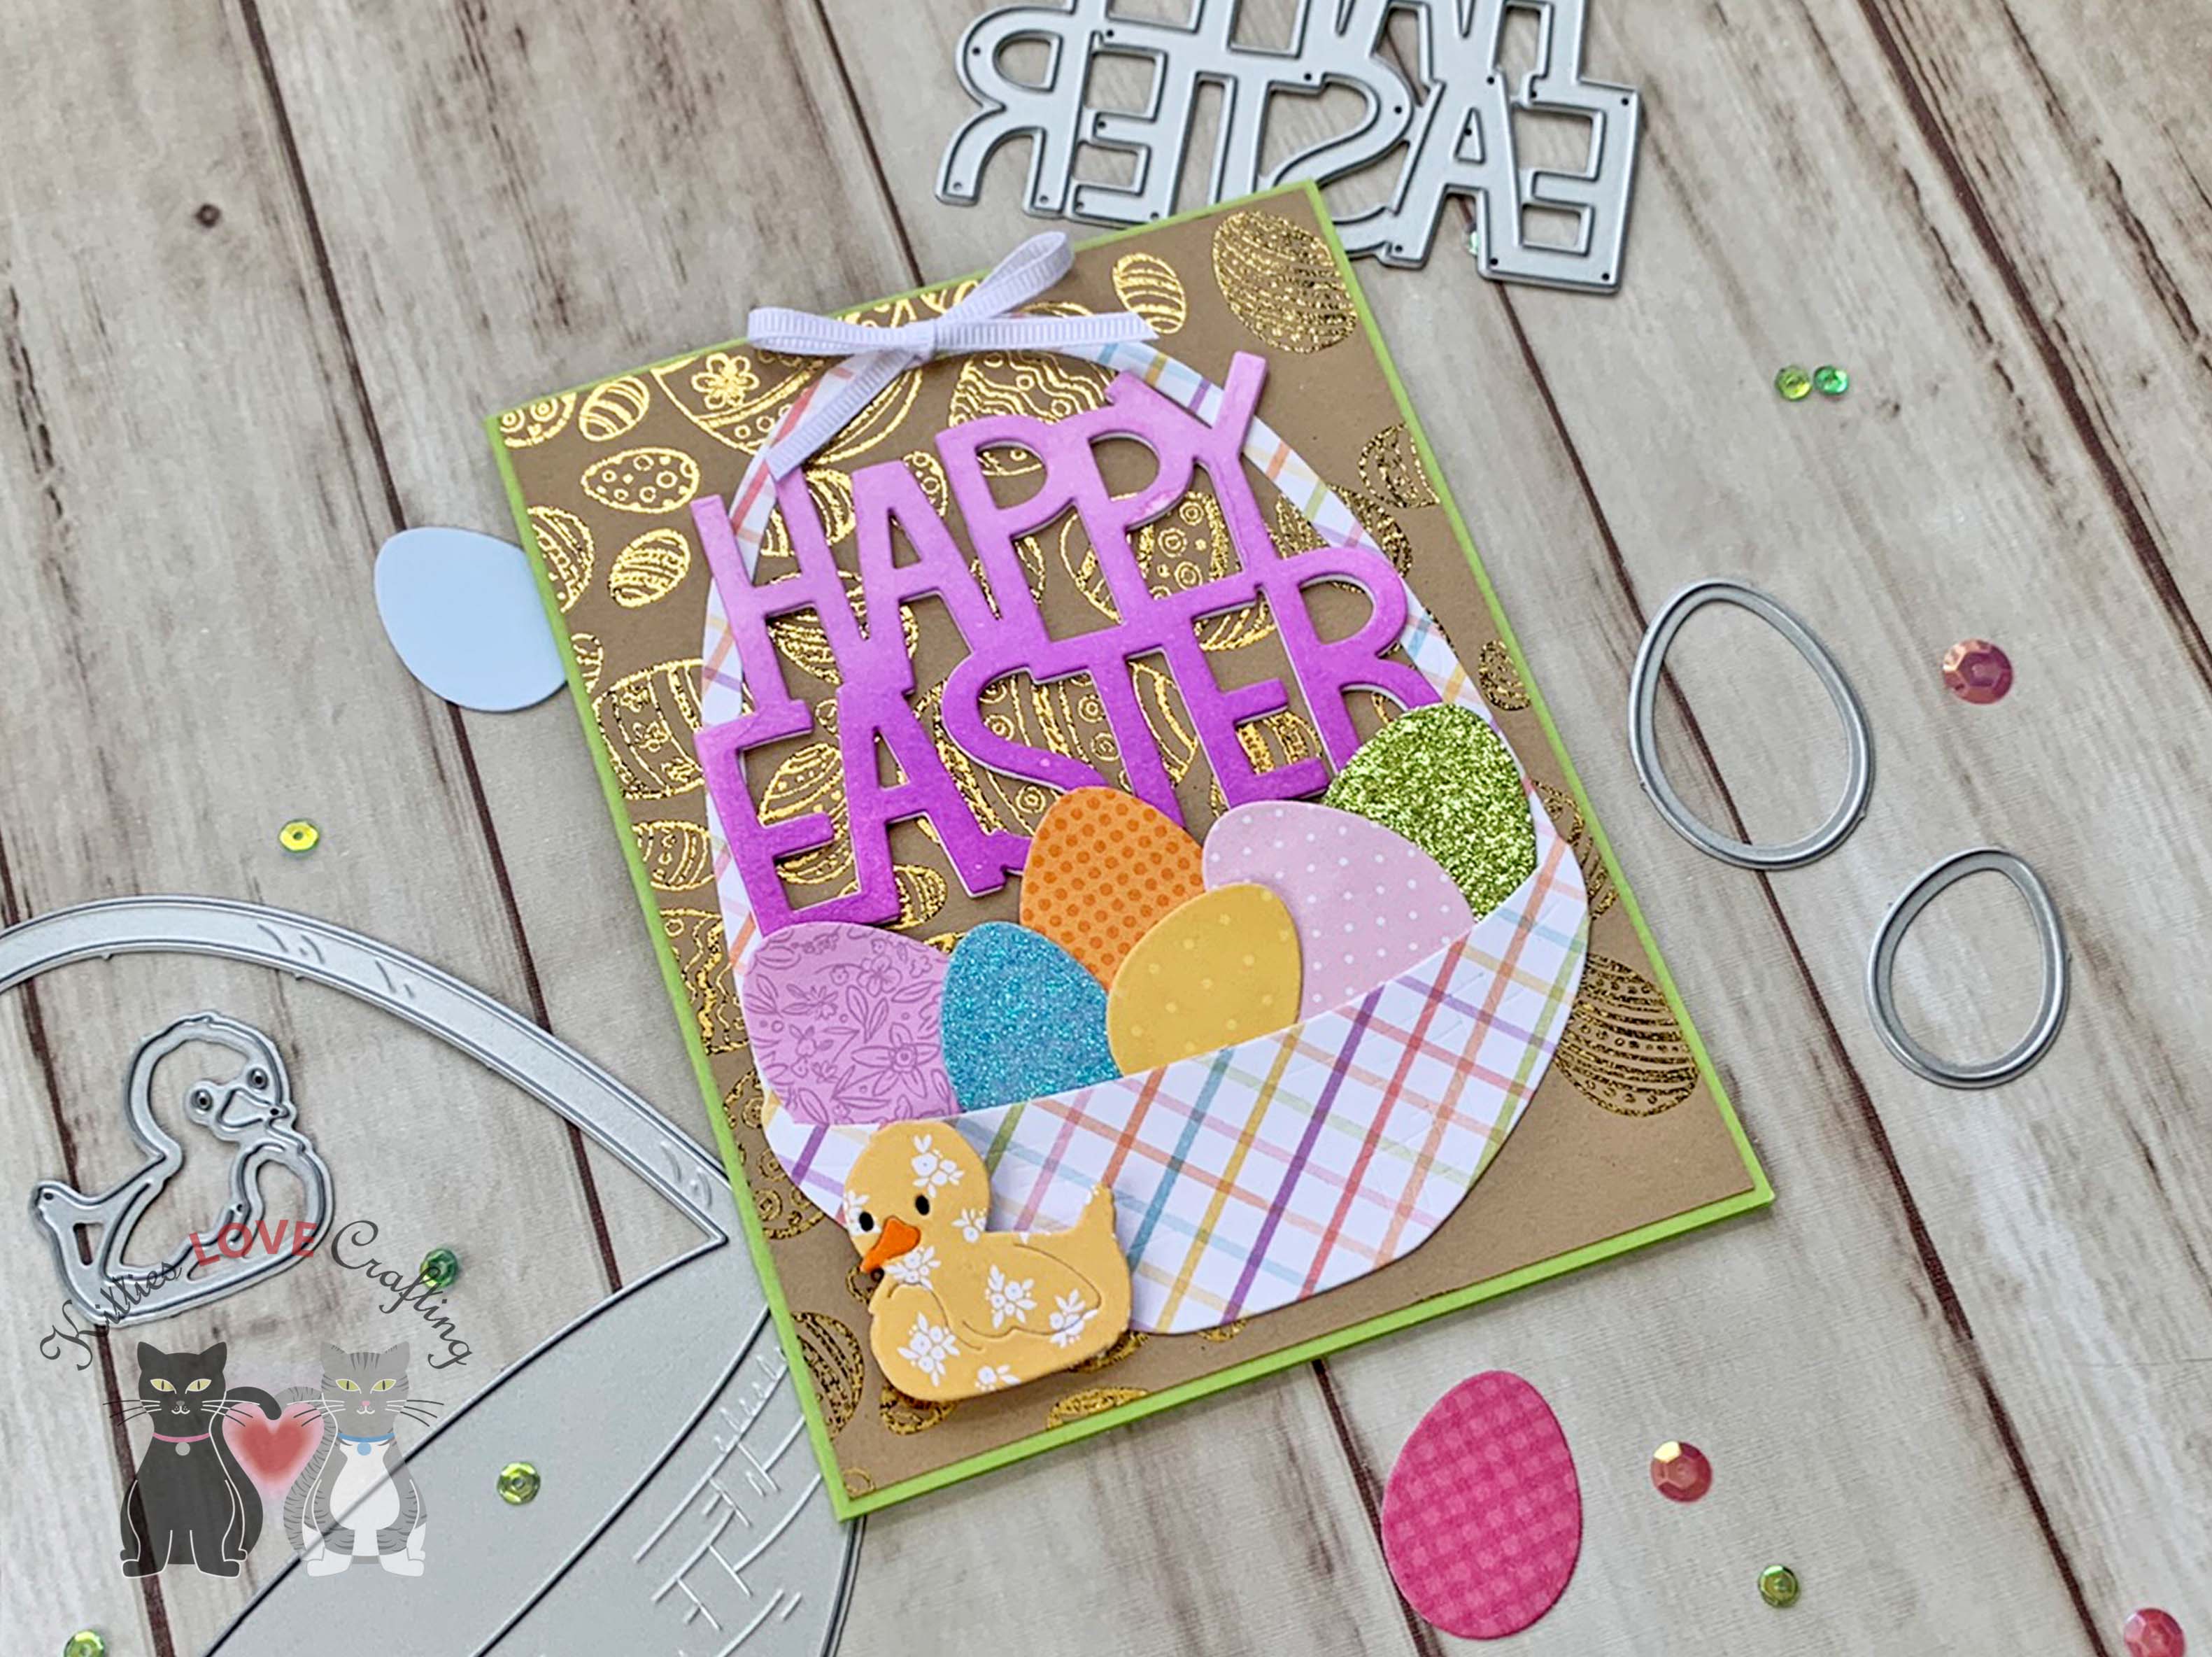
I die cut two tags from the CP Haunted Tags & Charms die set (included in the Boo Box) from Catherine Pooler Designs Eerie-sistible 6 x 6 Paper (included in the Boo Box) and Lawn Fawn Black Licorice 8-1/2 x 11″ Cardstock and added some Doodlebug Beetle Black Doodle Twine. The bats, spider and the spiderweb are from the same tag die set. I cut the bats from both white and black cardstock and used Pixie Dust Ink to color them.

I stamped the sentiment from Catherine Pooler Designs Fright Night Stampset (included in the Boo Box) with CP Midnight Ink and fussycut it.

On the inside of the card, I cut a piece of Neenah 100lb Classic Crest Cardstock 8.5 X 11″ to 4 x 5-1/4″ as well as a piece of Catherine Pooler Designs Eerie-sistible 6 x 6 Paper (included in the Boo Box) cut to 1 x 5-1/4″. I stamped the sentiment from the Catherine Pooler Designs Boo Day Stampset (included in the Boo Box) with CP Midnight Ink and added a spiderweb die cut from white cardstock snd colored with Pixie Dust Ink.
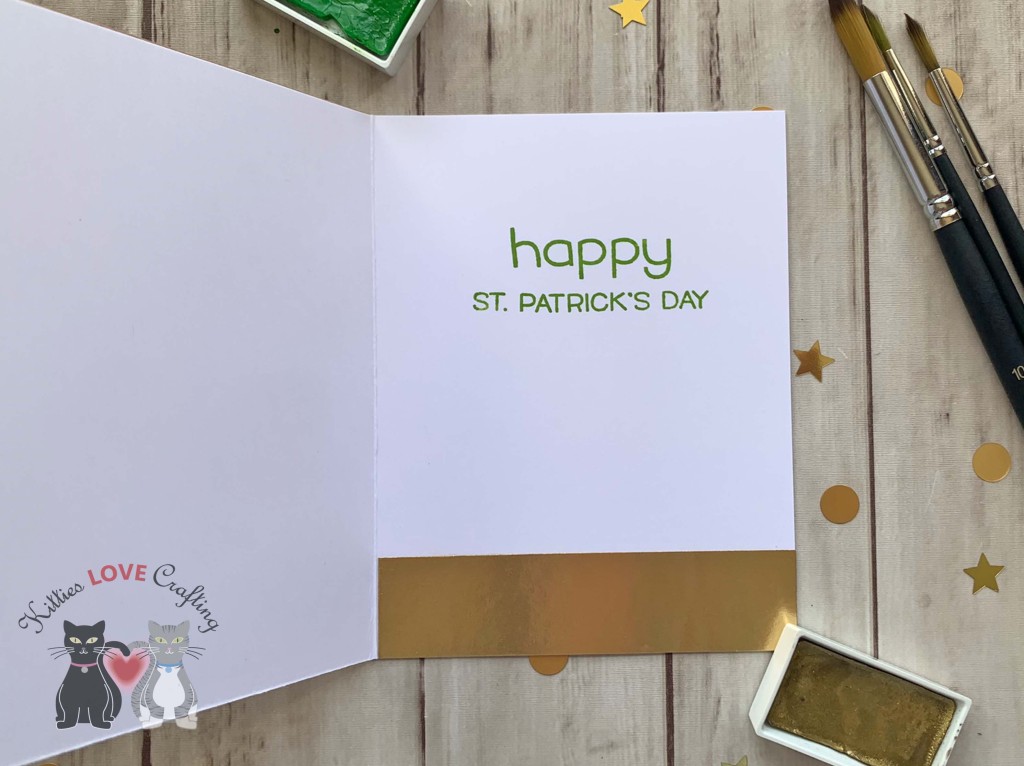
Dimensions


Supplies

https://linkdeli.com/widget.js?id=f5e8378456858c916708

Thanks for reading this post. I hope Iโ€™ve inspired you to give this technique a try! Leave comments or questions below or feel free to email.

Cards, Spring, St. Patrick's Day, Stenciled Background

Slimline St. Patrick’s Day Gnome Card featuring Trinity Stamps

Hello friends. I am loving the new Springtime Gnome Die Set from Trinity Stamps! You can make so many cute gnomes and they are a nice size too!

For this card, I cut a piece of Neenah 100lb Classic Crest Cardstock 8.5 X 11″ to 7 x 8-1/2″ and scored at 3-1/2″ to create a slimline card base, and another piece 3-1/4 x 8-1/4″.

For the background I used the Simon Says Stamp BUILD A RAINBOW Stencil with Catherine Pooler Designs Samba, Limoncello, Lime Rickey, and Something Borrowed Inks to create rainbows. I used same stencil with Catherine Pooler Designs Oh Boy! Ink to create the sky.

I die cut the gnomes from the Springtime Gnome Die Set with Doodlebug Essentials 12 x 12 Lots o’ Luck Paper (I think the paper pack is discontinued), Stampin’ Up! Petal Pink 8-1/2″ X 11″ Cardstock, Simon Says Stamp 100lb Black Cardstock, Simon Says Stamp 100lb Green Apple Cardstock, Stampin’ Up! Cajun Craze 8-1/2″ X 11″ Cardstock, Tim Holtz Idea-ology 8 x 8 METALLIC KRAFT STOCK Paper Stash, Tim Holtz Idea-ology 8 x 8 METALLIC JEWELS KRAFT STOCK Paper Stash, and DCWV Single-Sided 4.5″ x 6.5″ Brights Mat Stack. And the pot of gold was die cut using Trinity Stamps Leprechaun Loot Die Set from Simon Says Stamp 100lb Black Cardstock and Tim Holtz Idea-ology 8 x 8 METALLIC KRAFT STOCK Paper Stash. And the clover in the leprechaun’s hands is from the Lawn Fawn Lucky Clovers.

I added a sentiment from the Simon Says Stamp Sentiment Strips Lucky which I die cut from the DCWV Single-Sided 4.5″ x 6.5″ Brights Mat Stack.

On the inside of the card, I added a strip of pattern paper from Doodlebug Essentials 12 x 12 Lots o’ Luck Paper (same as on the gnome) measuring 1 x 3-1/2″ and stamped a sentiment from Lawn Fawn Happy Happy Happy Add-on with Catherine Pooler Designs Lime Rickey Ink.

Dimensions


Supplies

https://linkdeli.com/widget.js?id=f5e8378456858c916708

Thanks for reading this post. I hope Iโ€™ve inspired you to give this cute slimline St. Patrick’s Day card a try for yourself. Leave comments or questions below or feel free to email.

Birthdays, Cards, Easter, St. Patrick's Day, Watercolor techniques

3 Easy Watercolor Cards

Hello friends. Here are some easy watercolor cards anyone can make! While I am an artist I am not super comfortable doing freehand watercolor paintings. But these 3 cards were very easy to make. If you cannot draw either use a stencil, die or printable to trace a simple drawing. I used this technique for one of my cards. More on this later…

For the first card, I cut a piece of Neenah 100lb Classic Crest Cardstock 8.5 X 11″ to 5-1/2 x 8-1/2″ and scored at 4-1/4″ to create a card base and a piece to Watercolor Paper to 3-3/4 x 5″. I also cut a piece of Doodlebug Dot Stripe Rainbow Petite Prints 6×6 Paper to 4-1/4 x 5-1/2″.

I did a quick sketch for the egg (I actually used an egg shaped framelit die to trace the outside). I used my Kuretake GANSAI TAMBI Watercolor Paint Set (I love this set!) to color the egg. I kept the coloring simple – one color and white. You can be as elaborate with your painting as you like though. Once the egg and grass were colored and dry, I added some splatters with some Zig Kuretake Gansai Tambi STARRY COLORS. Then I added some sketchy lines around the egg with a 0.5 Sakura Pigma Micron Fineliner Pen.

I used the Simon Says Stamp Foil Transfer Cards Fancy Happy Easter Splendor with Therm O Web Gina K Designs GLIMMERING GOLD Fancy Foil Deco Foil for the sentiment and fussycut it out. And then also used a sentiment from the Simon Says Stamp REVERSE EASTER WISHES Sentiment Strips.

On the inside of the card, I cut a strip of pattern a paper from Doodlebug Dot Stripe Rainbow Petite Prints 6×6 Paper to 1 x 4-1/4″. And added another sentiment from the Simon Says Stamp REVERSE EASTER WISHES Sentiment Strips.

Dimensions


For the second card, I cut a piece of Neenah 100lb Classic Crest Cardstock 8.5 X 11″ to 5-1/2 x 8-1/2″ and scored at 4-1/4″ to create a card base and a piece of Watercolor Paper to 4 x 5-1/4″.

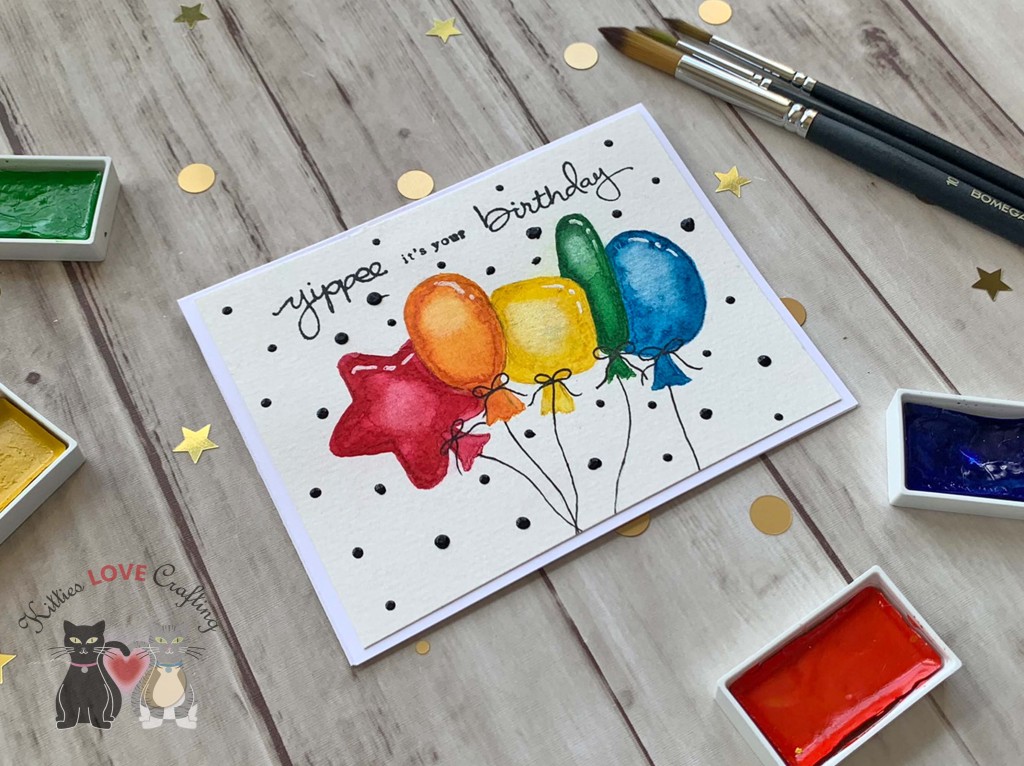
While I do not have a picture of the sketch to show you, I just drew very basic shapes for the balloons. They don’t have to be perfect. If you feel like you cannot draw them, get an image from the internet etc and trace it or use stencils or dies. Again very simple painting here. This time I used one color plus a White Gold watercolor from the Zig Kuretake Gansai Tambi STARRY COLORS.

I added the balloon strings using my 0.5 Sakura Pigma Micron Fineliner Pen.

I stamped a sentiment from the Stampin’ Up! Endless Birthday Wishes Stampset (retired) and Catherine Pooler Designs Midnight Ink. I finished off the card by adding some highlights to the balloons with a Uni-ball Signo White Broad Point Gel Pen and some Tonic Ebony Black Nuvo Drops.

On the inside of the card, I stamped a sentiment from Stampinโ€™ Up! Biggest Wish (retired) with Catherine Pooler Designs Midnight Ink.

Dimensions


For the third card, I cut a piece of Neenah 100lb Classic Crest Cardstock 8.5 X 11″ to 5-1/2 x 8-1/2″ and scored at 4-1/4″ to create a card base, a piece to Watercolor Paper to 4 x 5-1/4″ and a piece of Tim Holtz Idea-ology 8 X 8 Paper Stash Metallic Kraft Stock. to 4-1/4 x 5-1/2″.

The sketch for this card was super simple. I drew 3 hearts and a stem. I used my Kuretake GANSAI TAMBI Watercolor Paint Set again. And finished the background by adding some splatters with White and Gold Acrylic paint.

I die cut the sentiment word from Tim Holtz Idea-ology 8 X 8 Paper Stash Metallic Kraft Stock using the Simon Says Stamp Fancy Lucky Wafer Dies. And added a sentiment strip from the Simon Says Stamp Reverse Lucky Sentiment Strips.

On the inside of the card, I added a strip of metallic paper cut to 1 x 4-1/4″ and stamped a sentiment from Happy Happy Happy Add-on with Catherine Pooler Designs Lime Rickey Ink.

Dimensions


Supplies

https://linkdeli.com/widget.js?id=f5e8378456858c916708

Thanks for reading this post. I hope Iโ€™ve inspired you to give these easy watercolor cards a try for yourself. Leave comments or questions below or feel free to email.

Birthdays, Cards, Celebrations, Distress Ink Techniques, interactive, Slimline, Stenciled Background

Slimline Interactive Birthday Card featuring Lawn Fawn

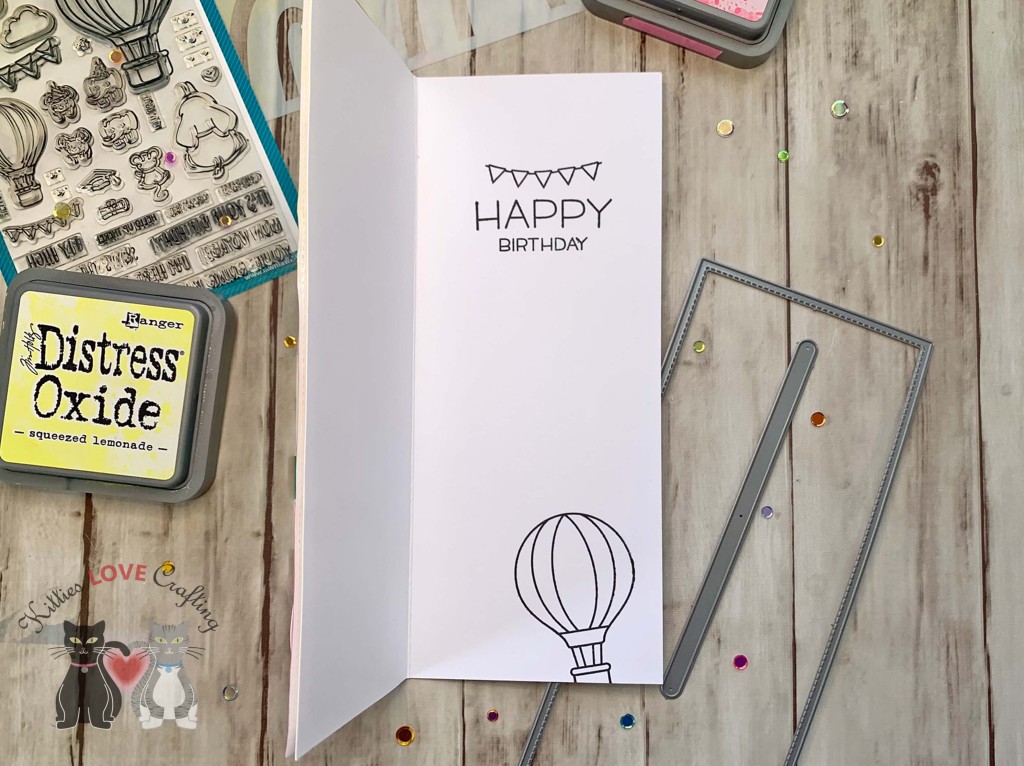
Hello friends. This card features the Lawn Fawn Fly High stampset. This is an example on how to create an interactive slimline card with this stampset. The hot air balloons can be used in a variety of ways. Check out the mini slimline Valentine’s Day card I made with it to see more ideas in my previous post.

For this card, I cut a piece of Neenah 110lb Classic Crest Cardstock to 7โ€ณ x 8-1/2โ€ณ and scored at 3-1/2โ€ณ to create the card base. I diecut a piece of Neenah 110lb Classic Crest Cardstock with the largest stitched slimline frame from the Lawn Fawn Large Slimline with Sliders, which measures 3-1/2 x 8-1/2″.

I used the Simon Says Stamp Stencil BUILD A RAINBOW with Tim Holtz Squeezed Lemonade, Scattered Straw, and Picked Raspberry Distress Oxide Inks to color the background. I splashed some water onto it and dried it off.

I stamped the images from the Lawn Fawn Fly High stampset onto Neenah 100lb Classic Crest Cardstock 8.5 X 11″ with Memento Tuxedo Black Ink. I paper pieced the hot air balloins using the Lawn Fawn Stripes ‘n Sprinkles 6×6 Petite Pack and Doodlebug Dot Stripe Rainbow Petite Prints 6×6 Inch Paper. Then colored the rest of theb images including the balloon’s bucket with Copic Markers. I used E13, E25, & E27 for the balloon bucket; RV52 & RV55, Y13 & Y17, YG03 & YG45, B24 & 28, and BV11 & BV17 for the banners; BG000 & 0 for the clouds; C0, C1 & C3, R20, Y13 & Y17, BV11 & BV17, RV52 & RV55, and B24 for the elephants; C1, C3 & C5, YG03 & YG45, and Y13 & Y17.

Before adhereing my images. I die cut the slider mechanism using the Lawn Fawn Large Slimline with Sliders. Then, I stamped a sentiment using Lawn Fawn Fly High stampset onto Neenah 100lb Classic Crest Cardstock 8.5 X 11″ with Memento Tuxedo Black Ink and then cut them down.

On the inside of the card, I stamped a sentiment from the Lawn Fawn Happy Happy Happy-on with Memento Tuxedo Black Ink.

Dimensions


Supplies

https://linkdeli.com/widget.js?id=f5e8378456858c916708

Thanks for reading this post. I hope Iโ€™ve inspired you to give this cute slimline birthday card a try for yourself. Leave comments or questions below or feel free to email.

Card kits, Easter, Holidays 2022, Love & Friendship, Slimline

5 Cards 1 Kit (Simon Says Stamp Limited Edition Easter Joy 2022 Card Kit)

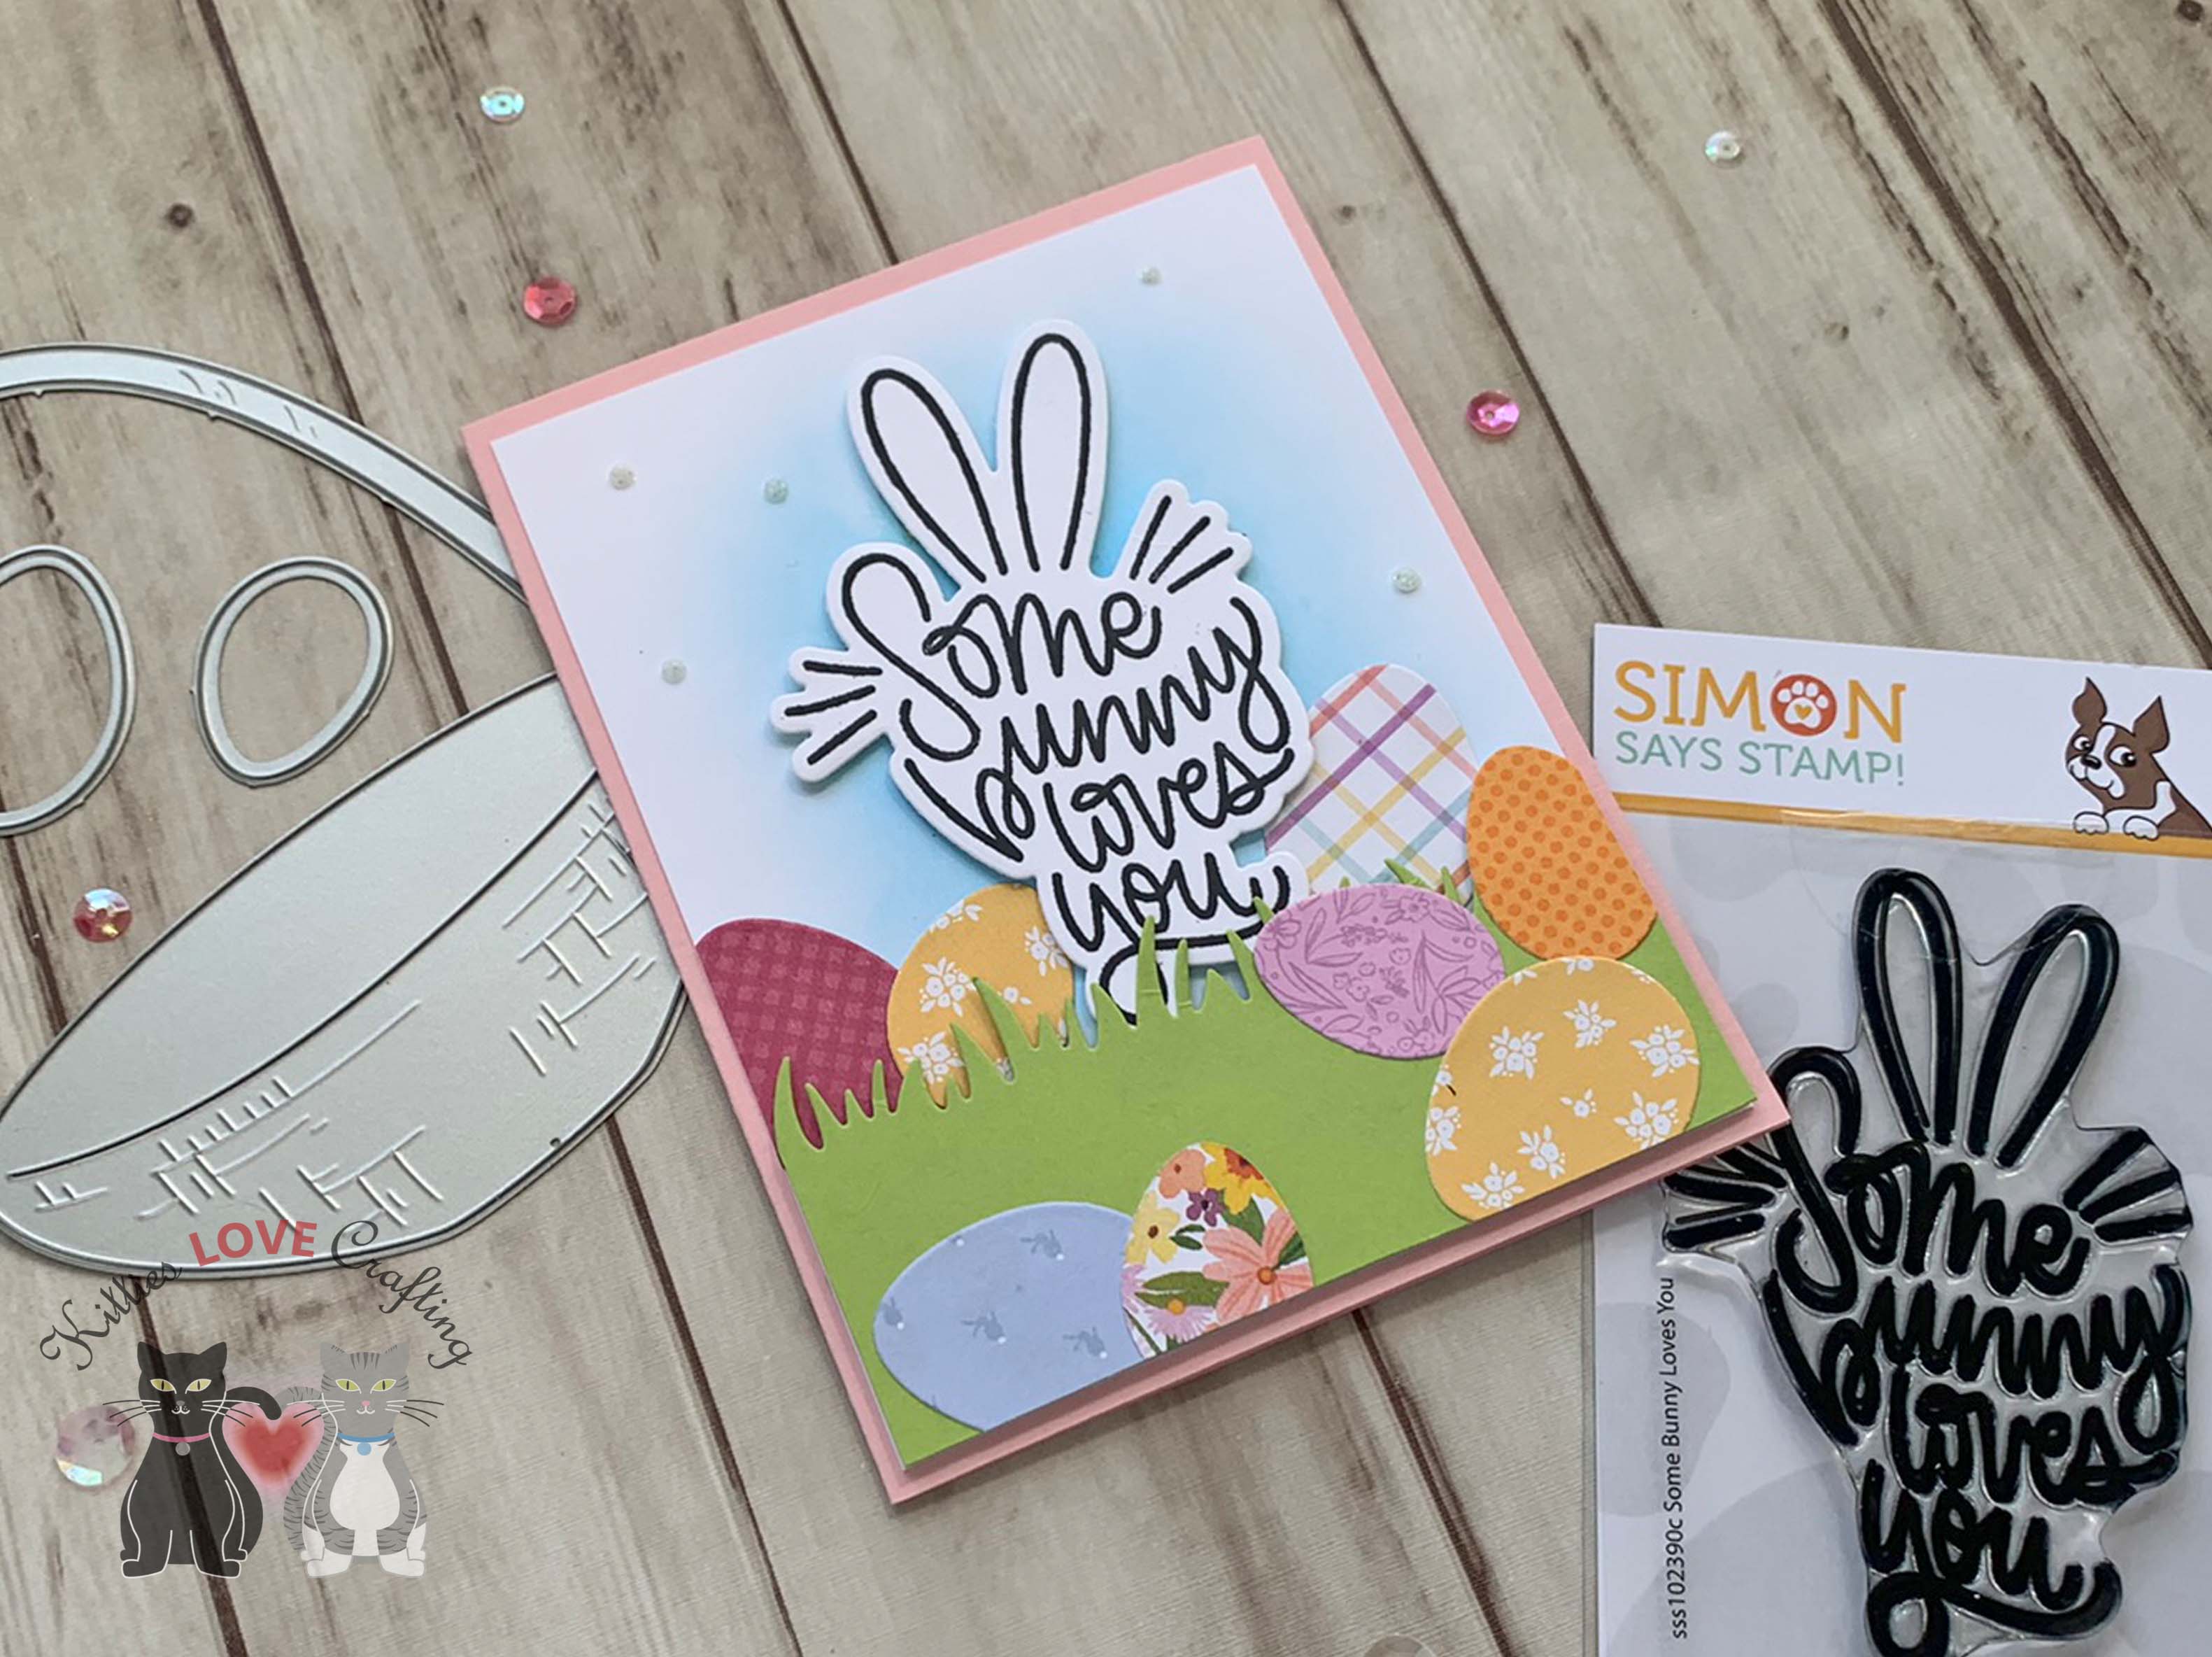
The Limited Edition Simon Says Stamp EASTER JOY 2022 Card Kit is full of tons of goodies to make cute Easter cards as well as for other occasions. I will be posting some Mother’s Day cards using some items from the kit in April. Stay tuned for that! While the kit is now sold out, you can buy most of the items in the kit seperately. The list below has all the links.

The Kit includes:

For the first card, I started by cutting a piece the piece of 1 sheet Simon Says Stamp 8.5 x 11 inch cardstock in Green Apple in half (5-1/2 x 8-1/2″) and scored at 4-1/4″ to make a two card bases. I’ll set one aside for now. I foiled the Deco Foil Kraft Toner Card Fronts – Basket of Fun with the 6×6 inch Therm O Web Gold Foil, using my laminator and trimmed it down to 4-1/8 x 5-3/8″.

I diecut the easter basket, eggs and chick from the Echo Park My Favorite Easter 6×6 inch paper using the Simon Says Stamp Large Easter Basket die set. I also cut one egg from Simon Says Stamp Aqua Glitter 6×6 Cardstock (not included in the kit) and one from Altenew – Glitter Gradient Cardstock Set – Forest Canopy (not included in the kit) . I added some black cardstock behind the chick and colored his beak with a Copic marker.

I die cut the sentiment 3x from Neenah 110lb Classic Crest Cardstock using the Lawn Fawn Giant Happy Easter Die Cut (not included in the kit) and created an ombre effect on one of them with Catherine Pooler Designs Sweet Sixteen and Pixie Dust Inks. I finished it off by adding some white grosgrain ribbon to the basket.

On the inside of the card, I cut a piece of Neenah 110lb Classic Crest Cardstock to 4 x 5-1/4″ and stamped a sentiment from the Simon Says Stamp Easter Joy 6×8 inch clear stamp set with Pixie Dust Ink.

Dimensions


For the second card, I started by cutting a piece of Neenah 110lb Classic Crest Cardstock to 7 x 8-1/2″ and scored at 3-1/2″ to make a card base. I foiled the Deco Foil Slimline Toner Card Fronts – Basket of Fun included in the kit with Therm O Web RAINBOW SHATTERED Deco Foil Transfer Sheets using my laminator. I trimmed it down to 3-1/4 x 8-1/4″.

I used the Simon Says Stamp Set of 2 Layering Eggs 4×9 inch stencils to ink all the eggs onto Neenah 110lb Classic Crest Cardstock in a rainbow pattern. I used the base stencil with Tim Holtz Kitsch Flamingo, Spiced Marmalade, Squeezed Lemonade, Mowed Lawn, Salty Ocean and Seedless Preserves Distress Oxide Ink. I added some of the Ranger Icicle Mini Crackle Paste over the eggs and let it dry. Then I used the pattern stencil with Modeling Paste over the eggs to add some texture. I should mention that because I used distress inks to color my eggs the modeling paste will absorb some of that ink and not remain pure white.

I fussycut the eggs but before adding them to the card, I cut a piece of from the sheet of 8.5 x 11 inch Simple Foundations translucent Vellum Paper which I cut to 2-7/8 x 8-1/4″. For the sentiment I cut out strips from the Simon Says Stamp Sentiment Strips REVERSE EASTER WISHES.

On the inside of the card I kept it simple, I added a sentiment from the Simon Says Stamp Sentiment Strips EASTER WISHES with Catherine Pooler Designs Midnight Ink and some leftover eggs.

Dimensions


For the third card, I started by cutting a piece the piece of 1 sheet Simon Says Stamp 8.5 x 11 inch cardstock in Cotton Candy in half (5-1/2 x 8-1/2″) and scored at 4-1/4″ to make a two card bases. I’ll set one aside for now. I also cut a piece of Neenah 110lb Classic Crest Cardstock to 4 x 5-1/4โ€ which I inked with Salty Ocean Distress Oxide Ink.

I stamped the Some Bunny Loves You sentiment from the from the Simon Says Stamp Somebunny Loves You 3×4 inch clear stamp onto some Neenah 110lb Classic Crest Cardstock with Catherine Pooler Designs Midnight Ink and die cut it with the Simon Says Stamp Somebunny Loves You coordinating die set.

I die cut the grass from Simon Says Stamp 8.5 x 11 inch cardstock in Green Apple with the Lawn Fawn Hillside Grassy Border and the eggs from the Echo Park My Favorite Easter 6×6 inch paper using the Simon Says Stamp Large Easter Basket die set.

I popped up the sentiment and the grass with 3M Foam Tape and finished it off by adding some Nuvo Fresh Snowfall Glitter Drops.

On the inside of the card I adhered a piece of Neenah Solar White 80lb Cardstock, measuring 4 x 5-1/4″ and just added a sentiment strip from Simon Says Stamp Sentiment Strips Easter Wishes and some extra die cut eggs.

Dimensions


For the fourth Neenah 110lb Classic Crest Cardstock to 4-1/4 x 5-1/2″ and scored at 4-1/4″ to create a card base. I die cut a panel from one of the pattern papers in the Echo Park My Favorite Easter 6×6 inch paper using the the Catherine Pooler Scallops and Dots Dies and cut out a window with the egg die from the Simon Says Stamp Easter Joy 6×8 inch clear stamp set.

I added another piece of pattern paper from the Echo Park My Favorite Easter 6×6 inch paper using behind the window. I stamped a sentiment from the Simon Says Stamp Easter Joy 6×8 inch clear stamp set onto some Neenah 110lb Classic Crest Cardstock with Catherine Pooler Designs Midnight Ink and cut it with the coordinating dies (not included in the kit). I added a bunny and some carrots from the Doodlebug Mini Icons Easter Express Stickers. I finished it off by adding ribbon from Tim Holtz Velvet Ribbons.

On the inside of the card I added a sentiment strip from Simon Says Stamp Sentiment Strips Easter Wishes, a 1 inch strip of pattern paper of which I die cut the edge with Catherine Pooler Scallops and Dots Dies and some stickers from the Doodlebug Mini Icons Easter Express Stickers.

Dimensions


For the fifth card, I decided to do two versions of this just to see the different results I would achieve using acetate versus vellum with Copic Markers.

I used the other half of the Simon Says Stamp 8.5 x 11 inch cardstock in Green Apple and Cotton Candy which I had cut to 4-1/4 x 5-1/2″ and scored at 4-1/4″ to create the card bases. Then I cut a piece of Neenah 8.5 x 11 inch cardstock in Desert Storm to 4-1/4 x 5-1/2″ and another to 4 x 5-1/4″.

I stamped the flowers from the Simon Says Stamp Easter Joy 6×8 inch clear stamp set all over the backgrounds, using Versamark Ink on one and Frayed Burlap Distress Ink on the other panel. Then die cut a window from the center of both using the egg included in the Simon Says Stamp Easter Joy Wafer Dies.

I stamped the egg flower image from the Simon Says Stamp Easter Joy 6×8 inch clear stamp set onto a piece Acetate and a piece of the 8.5 x 11 inch Simple Foundations translucent Vellum Paper larger than my window with Tsukineko Stazon Midi Jet Black Ink. I colored both with Copic Markers.

For the acetate piece, I used YG25 + G09 for the greenery; BV08 + V17 and RV19 + RV55 for the tulips; BG02 + BG05, YR04 + YR09 and Y17 for the flowers; BG02 + BG05 and RV19, BV08 + V17 and Y17 for the eggs.

For the vellum piece, I used YG25 + YG67 for the greenery; R32+ R37 for the tulips; BG02 + BG15, Y13 + Y18, BG01 + BG02 for the flowers; Y13 + Y18, R32+ R37, YR14 + YR16, BG01 + BG02 for the eggs.

I stamped two different sentiments from the Simon Says Stamp Easter Joy 6×8 inch clear stamp set onto Stampin’ Up! Basic Black 8-1/2″ X 11″ Cardstock with Versamark Ink and used WOW OPAQUE BRIGHT WHITE Super Fine Embossing Powder and popped them up with 3M Foam Tape.

I finished off the cards by adding some Nuvo Drops in Bottle Green, Duck Egg Blue and Rosewater to one and Crushed Grape Gloss and Orange Marmalade to the other.

On the insides of the cards I adhered a piece of Neenah Solar White 80lb Cardstock, measuring 4 x 5-1/4″ and stamped a sentiment and a flower from Simon Says Stamp Easter Joy 6×8 inch clear stamp set with Catherine Pooler Designs Midnight Ink.

Dimensions


Supplies

https://linkdeli.com/widget.js?id=f5e8378456858c916708

Thanks for reading this post. I hope you enjoyed and Iโ€™ve inspired you to make some cards using this kit yourself! If you want to share you creations with me tag me on instagram @kittieslovecrafting. Leave comments or questions below or feel free to email me.

Card kits, Encouragement, Just Because, Love & Friendship, Slimline

5 Cards 1 Kit: Rainbow Is My Favorite Color (Simon Says Stamp June 2021 Card Kit)

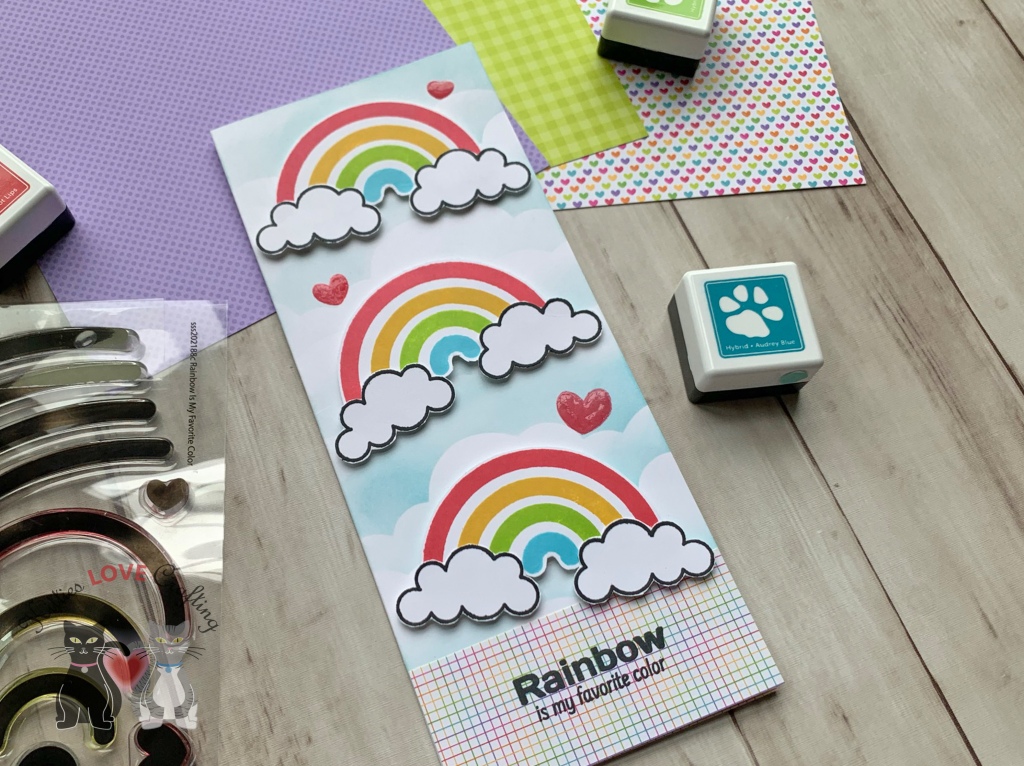
Hi everyone. This card kit just makes me happy. It’s all about rainbows and what’s not to like about that?!? The Simon Says Stamp Rainbow Is My Favorite Color 6×8 inch clear stamp set has a ton of rainbow images and cute sentiments to go along with them. Lots of options with this one. You can also use the straight stripe in non rainbow cards or make no traditional rainbows. I was definitely inspired my several of the design team cards I’ve been seeing posted on instagram @ #sssck.

The Kit includes:

For the first card, I started by cutting a piece of Neenah 110lb Solar White 8.5 x 11″ Cardstock to 5-1/2 x 8-1/2″ and scored at 4-1/4″ to make a card base. Then cut a piece of the aqua tiny cloud pattern paper from the Doodlebug Custom Rainbow 2021 6×6 inch paper to 4 x 5-1/4″ and a strip of the rainbow striped paper (also from the same paper pack) to 5/8 x 5-1/4″ and adhered them all to the card base. I added White Love from Lizi Pin Stripe Peel-Off Stickers on each side of the striped strip.

I diecut 1 rainbow from Neenah 110lb Solar White 8.5 Neenah 110lb Solar White 8.5 x 11″ Cardstock with the Simon Says Stamp Hello Rainbow die and used the Simon Says Stamp 1 inch cube ink pads in Jellybean, Sunshine, Hot Lips, and Audrey Blue and Mini Sponge Daubers to create a rainbow. I stamped and fussycut two clouds from the Simon Says Stamp Rainbow Is My Favorite Color 6×8 inch clear stamp set onto a piece of Neenah 110lb Solar White 8.5 x 11″ Cardstock with Memento Tuxedo Black Ink. I used Copic Marker BG000 + 0 (Blender) to color the clouds. I adhered them to the card using Stampin’ Dimensionals.

I stamped a sentiment from the Simon Says Stamp Rainbow Is My Favorite Color 6×8 inch clear stamp set onto a piece of Neenah 110lb Solar White 8.5 x 11″ Cardstock with Memento Tuxedo Black Ink, which I cut down to 1-1/16 x 2″.

To finish it off, I added a tiny pink heart from the Doodlebug Chasing Rainbows Shape Sprinkles and lots of the Memory Box Fairy Jewels.

On the inside of the card, I added a strip of the same paper Doodlebug Custom Rainbow 2021 6×6 inch paper I used on the front cut to 3/4 x 5-1/2″.

Dimensions


For the second card, I started by cutting a piece of Neenah 110lb Solar White 8.5 x 11″ Cardstock to 7 x 8-1/2″ and scored at 3-1/2″ to make a card base. Then cut another piece to 3-1/4 x 8-1/4″.

I used the Simon Says Stamp Build A Rainbow 6×9 inch stencil with the Simon Says Stamp 1 inch cube ink pads in Jellybean, Sunshine, Hot Lips, and Audrey Blue and Broken China Distress Ink to create my scene. I stenciled the clouds first with Broken China Distress Ink, the rainbows next with the 4 colors included in the kit and lastly the sun. I traced the outer rainbow onto piece of post-it note paper to use as a mask before adding the sun. I adhered the panel to the card base and stamped a sentiment from the Simon Says Stamp Rainbow Is My Favorite Color 6×8 inch clear stamp set onto a piece of Neenah 110lb Solar White 8.5 x 11″ Cardstock with Memento Tuxedo Black Ink, which I fussy cut and added to the card.

I added some yellow jewels from the Memory Box Fairy Jewels to the sun and some clear ones to the card.

On the inside of the card I stenciled some clouds at the bottom edge of the card with the Simon Says Stamp Build A Rainbow 6×9 inch stencil and Broken China Distress Ink.

Dimensions


For the third card, I started by cutting a piece of Neenah 110lb Solar White 8.5 x 11″ Cardstock to 7 x 8-1/2″ and scored at 3-1/2″ to make a card base. Then cut another piece to 3-1/4 x 8-1/4″.

I kept this card pretty simple and the rainbows didn’t take as long to stamp as I thought they might. Using my MISTI made the process faster. I stamped three rainbows from the Simon Says Stamp Rainbow Is My Favorite Color 6×8 inch clear stamp set onto Neenah 110lb Solar White 8.5 x 11″ Cardstock using the Simon Says Stamp 1 inch cube ink pads in Jellybean, Sunshine, Hot Lips, and Audrey Blue inks and fussy cut them. I stamped the clouds from the same stamp set with Memento Tuxedo Black Ink onto more Neenah card stock and fussycut those out as well.

I cut a piece of the pattern paper from the Doodlebug Custom Rainbow 2021 6×6 inch paper to 1-1/2 x 3-1/2โ€ and stamped a sentiment from the same stamp set with Memento Tuxedo Black Ink onto it.

I adhered the pattern paper to the card and used 3M Foam Tape to adhere the rainbows and clouds to the card. I stamped the three hearts from the stamp set with Hot Lips Ink and added Glossy Accents over them.

On the inside of the card I cut a piece of the same pattern paper as the front of the card to 1-1/4 x 3-1/2″.

Dimensions


For the fourth card, I started by cutting a piece of Neenah 110lb Solar White 8.5 x 11″ Cardstock to 7 x 8-1/2″ and scored at 3-1/2″ to create a card base. And a second piece of Neenah Cardstock which I diecut using the large die from the Lawn Fawn Large Slimline with Sliders Die. I Inked it with Audrey Blue Ink to create an ombre effect.

I diecut four rainbows from the 8.5 x 11 inch sheet of Simon Says Stamp Holographic Rainbow cardstock with the Simon Says Stamp Hello Rainbow die. And stamped several clouds from the Simon Says Stamp Rainbow Is My Favorite Color 6×8 inch clear stamp set onto Neenah 110lb Solar White 8.5 x 11″ Cardstock with Memento Tuxedo Black Ink, colored them with C1 and 0 Copic Markers and fussycut them out.

I adhered the clouds and rainbows to the card. Then stamped the sentiment from the Simon Says Stamp Rainbow Is My Favorite Color 6×8 inch clear stamp set onto the card with Memento Tuxedo Black Ink.I finsihed it off by adding puffy clouds and hearts from the Doodlebug Chasing Rainbows Shape Sprinkles. I also added some clear Memory Box Fairy Jewels.

On the inside of the card I adhered another rainbow diecut from the 8.5 x 11 inch sheet of Simon Says Stamp Holographic Rainbow cardstock.

Dimensions


For the fifth card, I started by cutting a piece of Neenah 110lb Solar White 8.5 x 11″ Cardstock to 5-1/2 x 8-1/2″ and scored at 4-1/4″ to make a card base and another piece to 4 x 5-1/4″. I stenciled the sune and clouds using the Simon Says Stamp Build A Rainbow 6×9 inch stencil and Sunshine and Audrey Blue Inks.

I also stenciled the cloud border on another piece of Neenah 110lb Solar White 8.5 x 11″ Cardstock which I cut to 1-3/4 x 4″, then fussycut the top edge of the clouds. I stamped a sentiment from the Simon Says Stamp Rainbow Is My Favorite Color 6×8 inch clear stamp set with Memento Tuxedo Black Ink onto the cloud border.

Next, I used Deco Foil – Transfer Gel, a palette knife and the Simon Says Stamp Build A Rainbow 6×9 inch stencil to add a rainbow onto the card. Once it dried, I added Therm O Web RAINBOW SHATTERED Deco Foil Transfer Sheets and ran it through my lamination machine.

I adhered the cloud border to the bottom of the card panel with 3M Foam Tape. I finished it off by adding some Memory Box Fairy Jewels.

I left the inside of the card blank .

Dimensions


Supplies

https://linkdeli.com/widget.js?id=f5e8378456858c916708

Thanks for reading this post. I hope you enjoyed and Iโ€™ve inspired you to make some cards using this kit yourself! If you want to share you creations with me tag me on instagram @kittieslovecrafting. Leave comments or questions below or feel free to email me.