I love stackable geometric dies, especially with stitched details. They are so versatile because you can create a whole card using only the shapes, or add a shape behind a sentiment or focal point to emphasize it. For this card I decided to keep it simple and bright. I combined a rainbow of Stampin’ Up!’s cardstocks, Stitched Triangles Dies and a simple sentiment. It is a very simple card to make and can easily be mass produced. This die set is available in the new 2020-2021 Annual Catalog! There is also a coordinating stamp set.
Then I cut several triangles from each panel using the Stampin’ Up! Stitched Triangles Dies. I laid all my triangles out on the card base and puzzle pieced them together basically. Once I was happy with the placement, I adhered them down with Tombow Mono Multi Glue.
Thanks for reading this post. I hope you enjoyed and I’ve inspired you to try these fun and quick cards for yourself! Leave comments or questions below or feel free to email me. Also if you would like a Stampin’ Up! catalog, please email me as well. All current catalogs can be found on the right side of this post and the Stampin’ Up! page. All news and fun stuff happening at Stampin’ Up! are listed there!
Hello friends. I would like to talk to you all about pattern paper and cardstock today. Most of us have a ton of it, some of us use it and some of us hoard it (Guilty as charged. LOL) Sometimes we have pattern papers that have images on them but no coordinating stamps (either you didn’t purchase them or the manufacturer didn’t create a coordinating stampset). These two paper packs from Brutus Monroe were part of their June release. Very fruity and summery but there is no coordinating stamps. I have several fruity stamp sets that will work with this paper but I know that many other people may not.
So I decided to challenge myself to make cards with just the paper and some sentiments from my stash. Since it’s still summer I decided to use fruity paper. Fruit is a delicious summer treat!
Ok, time to work on the background. I chose 4 pattern papers from the pack, cut one to 1/2 x 2-1/4″, one to 2 x 3-1/4″, one to 2 x 3-7/16″ and the last one to 2 x 2″. I adhered them on the white card base as per the below sketch. If you want a gap between your rectangles cut them down to 1/16th smaller on each side. I added a strip of the thicker width Pin Stripe Peel-Off Stickers – Apple Green by Love From Lizi vertically in the center, then the narrowest width strips to the outer edges and in between the panels horizontally.
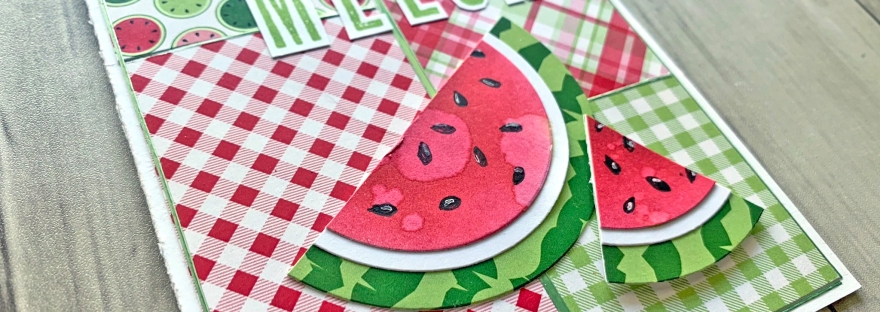
I laid out my sentiments and watermelon pieces onto my card to figure out placement. Once I was happy with it, I adhered all the pieces down, popping up one watermelon slice with Stampin’ Dimensionals by Stampin’ Up! . To finish this card, i added some Tonic Nuvo Drops in BOTTLE GREEN.
I had so much fun playing with these papers from Brutus Monroe that I decided to make another card.
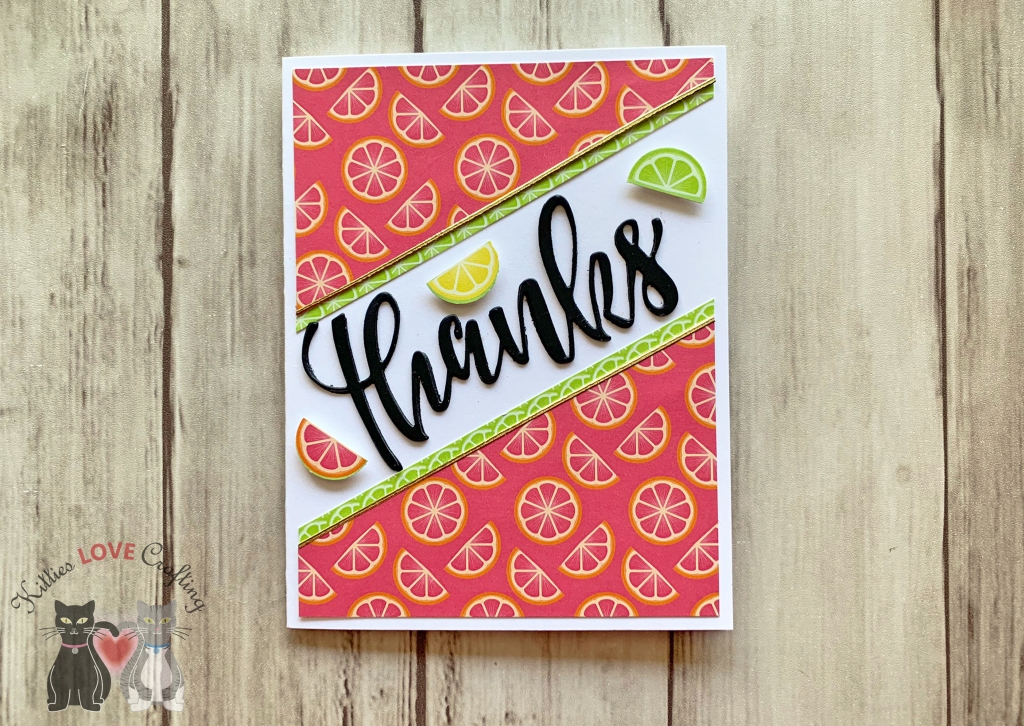
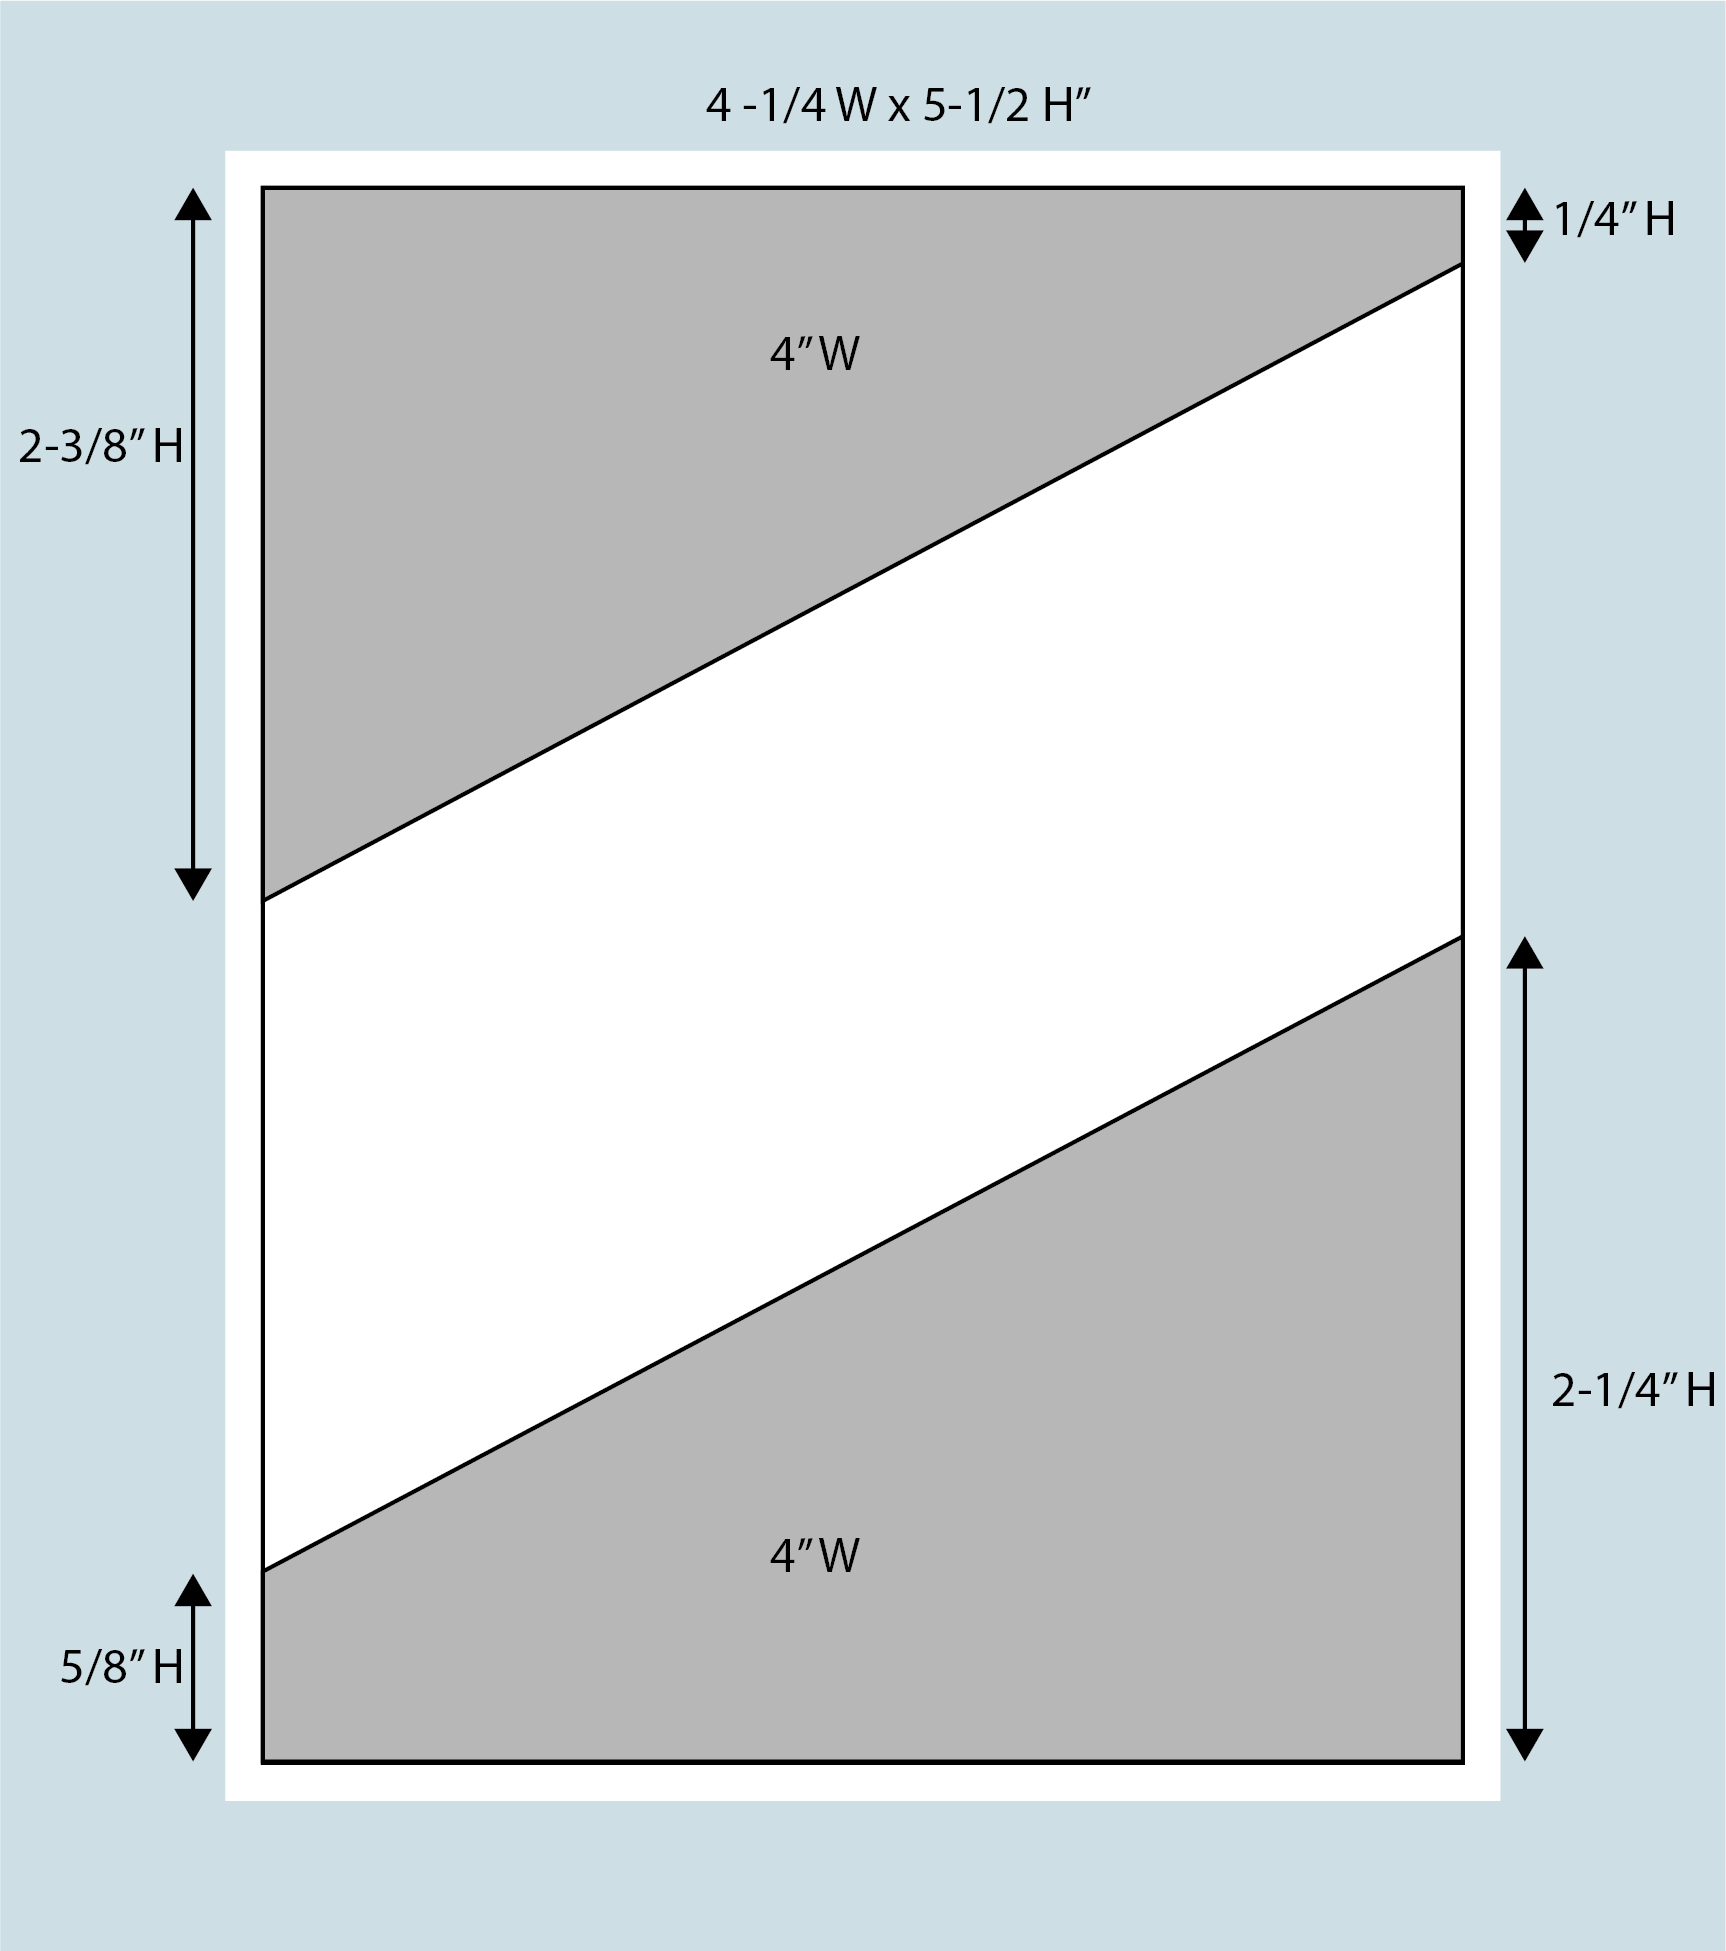
The second card came together quickly. I started with a white card base measuring 5-1/2 x 8-1/2″, scoring it at 4 1/2″. This was made from Neenah 110lb Classic Crest Cardstock 8.5″X11″. Next, I cut some of the pattern paper down to 4 x 5-1/4″ and cut that down diagonally as per the below sketch. I did the same thing to a second pattern paper (green one) and adhered that behind the top layer, offsetting it a bit to create a border. I added a strip of the thinner width Love From Lizi Pin Stripe Peel-Off Stickers in Gold Glitter between the two pattern papers and adhered them to my card base, leaving a 1/8 border around the edge.
Thanks Card Sketch
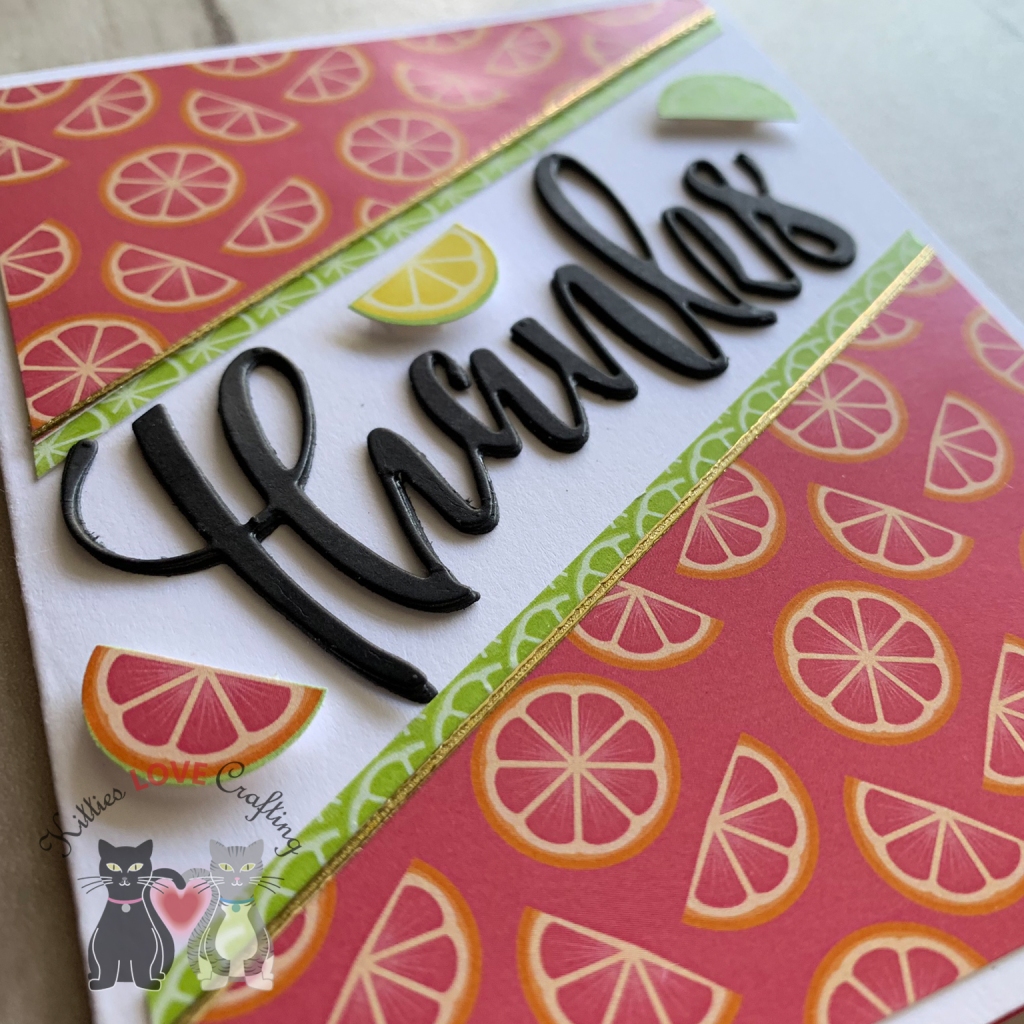
For the sentiment, I kept thing simple. I used the Large Thanks Die from Honey Bee Stamps and diecut the word 3 times from Simon Says Stamp Card Stock 100# BLACK Cardstock. I layered those 3 together and adhered them, creating a nice thick 3D sentiment. I adhered those to the card in the center of the white space. I felt like something was missing though. I took another pattern paper that had small lemons, limes and oranges (maybe grapefruit? not sure) and using a 1/2 punch I cut 3 of them out and adhered them on my page. That completed the front of this card! Like I said, this one was a quick one.
But just because I hate an empty card inside, I adhered some of the same pattern paper I used on the front diagonally to the inside bottom right corner. And now its complete!
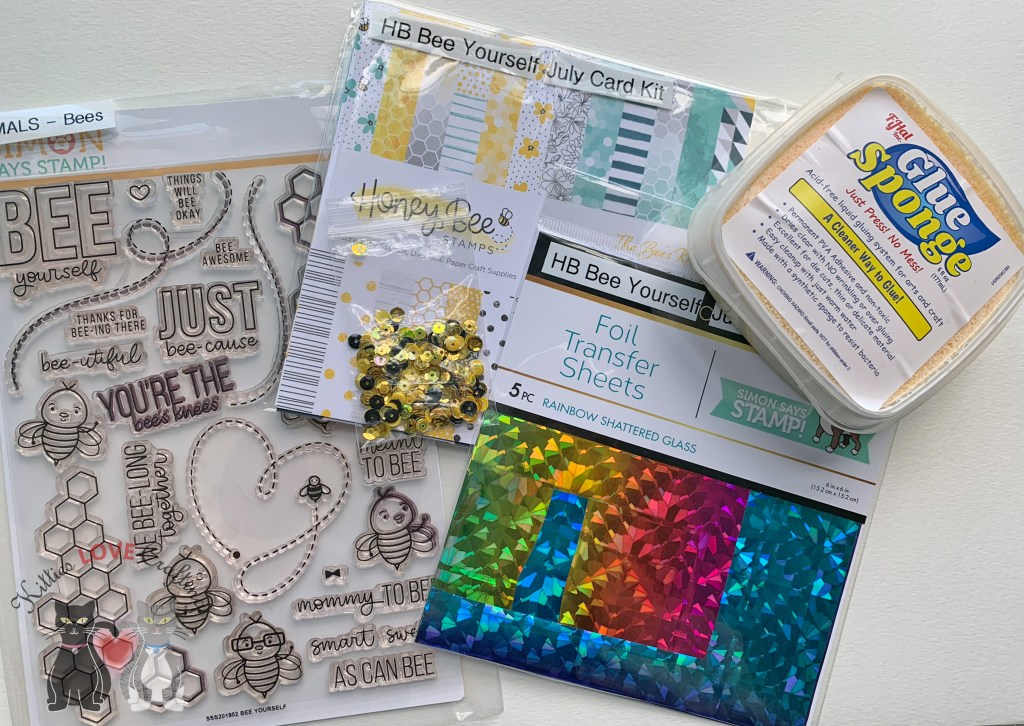
Hello friends. I finally got to play with this adorable bee-themed card kit from Simon Says Stamps. It’s the July Card Kit called Bee Yourself. Lots of fun products to play with and I just adore the stampset. Unfortunately the kit is no longer available but I will link all the available individual products. I almost strictly used only the card kit contents. I did bring in a few of my own products and I will link those below as well.
Card Kit Supplies
When I first saw the reveal video for this kit, I fell for the paper pad from Honeybee Stamps immediately. I knew I had to use the aqua watercolor pattern first. I kept it simple. I wanted to see if I could foil using a stamp and the glue pad and a stamp (didn’t have transfer gel. I do NOW though 🙂 ).
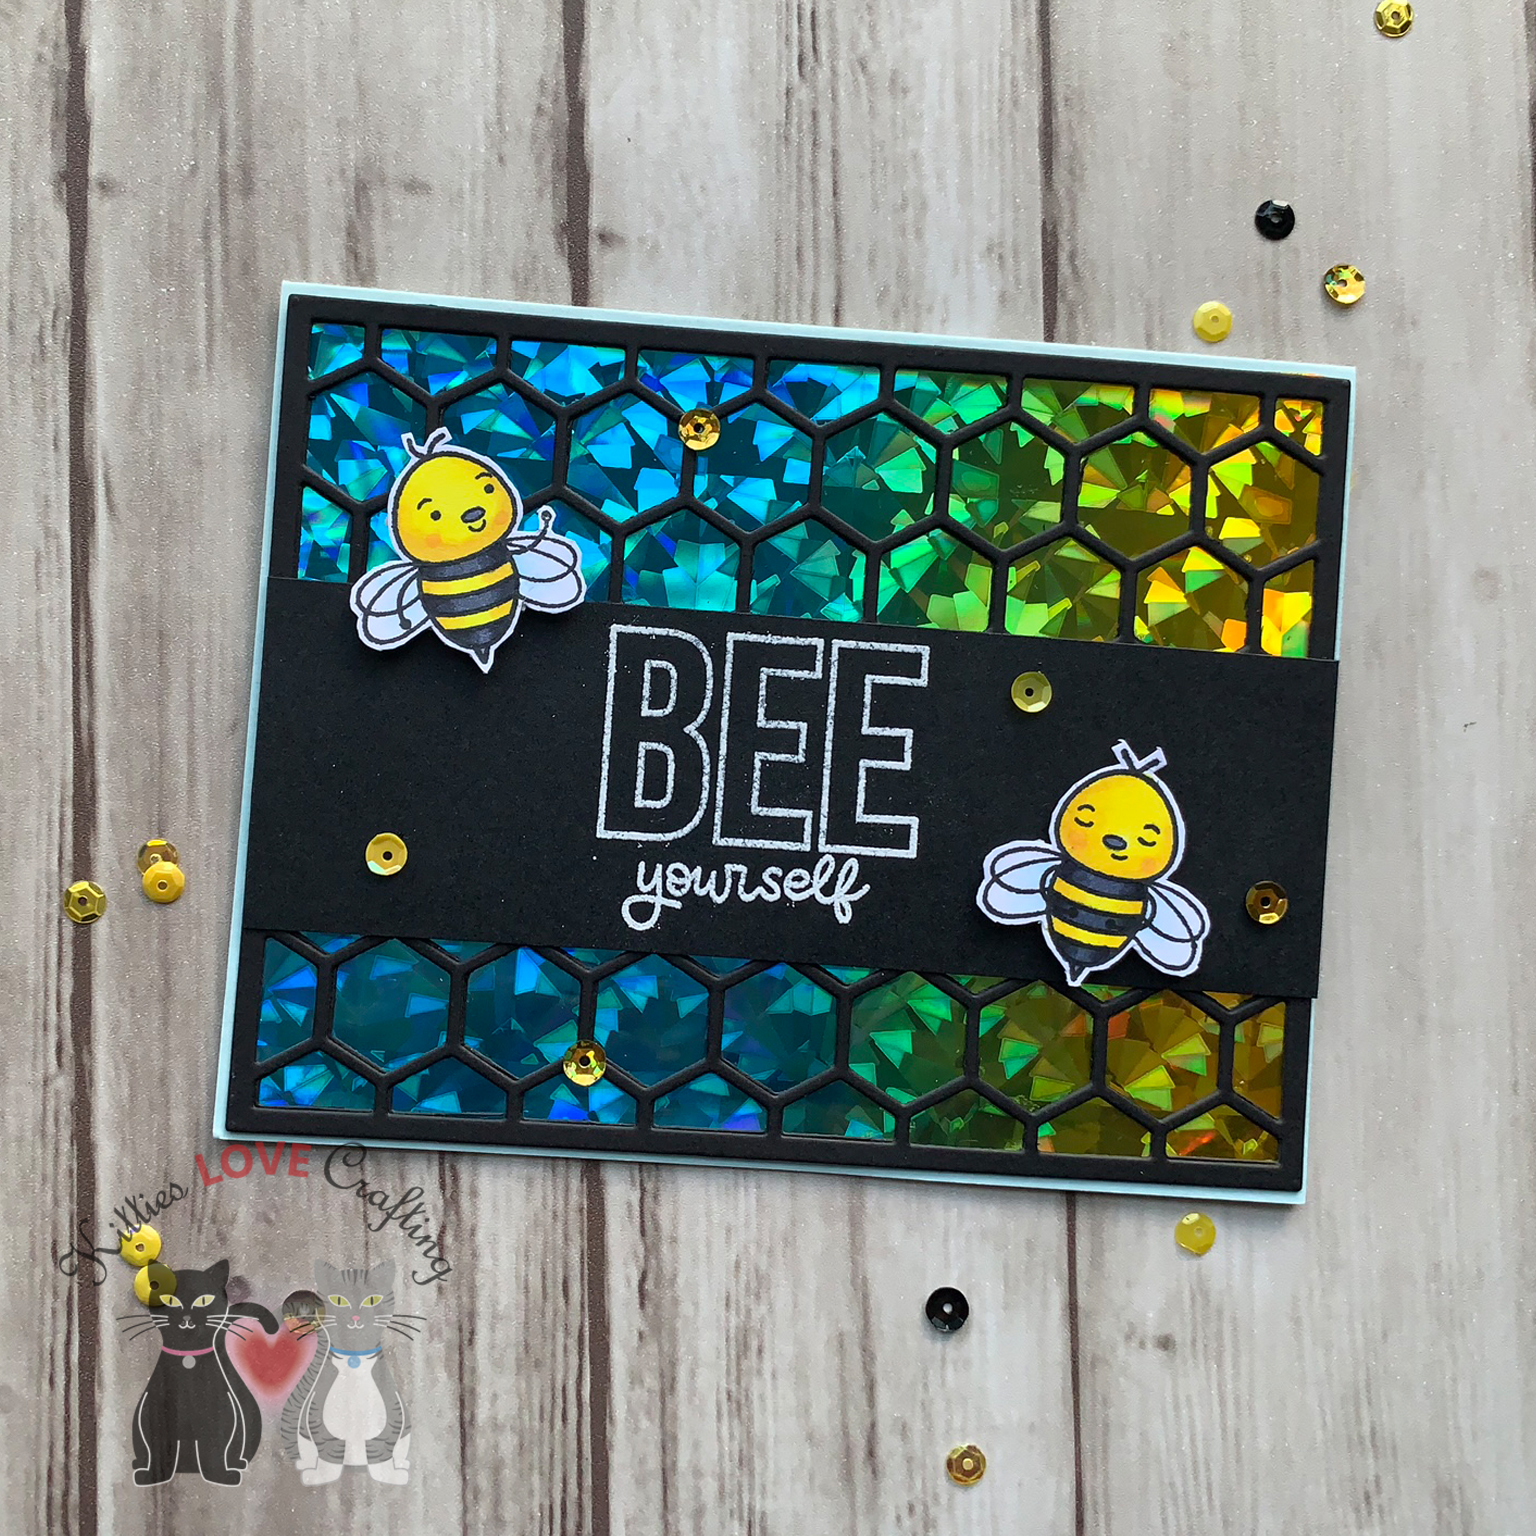
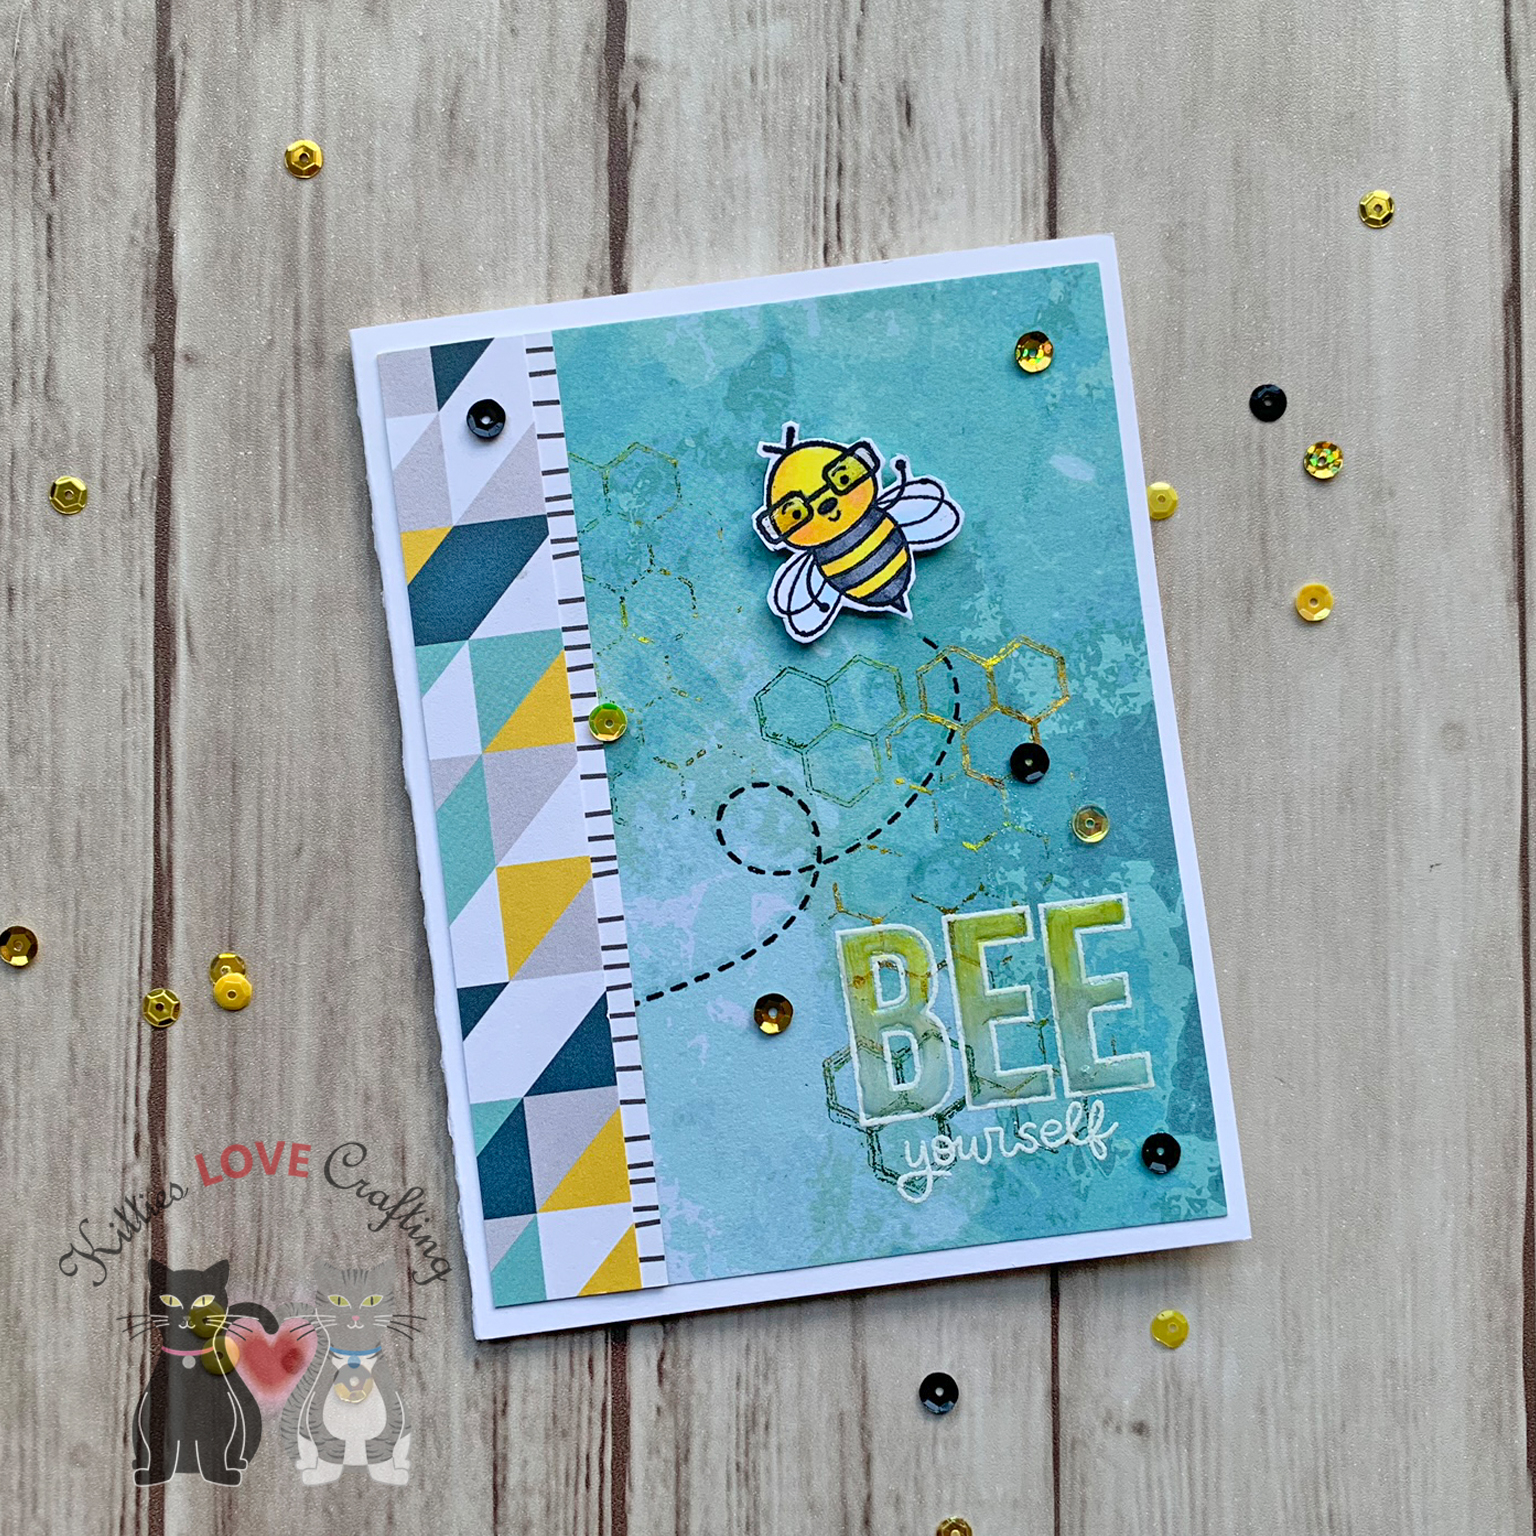
I diecut a few hexagons from Simon Says Stamp Black cardstock using the Simon Says Stamp Small Hexagon Cluster wafer thin die and a few from some black glitter paper. I added the black hexagon cluster to the card and then inlayed 3 glitter hexagons back into the clusters. I added a black mat behind the sentiment. Then I adhered the flower onto the right side of the card and the sentiment toward the bottom. I adhered the little bees and added some sequins to finish off the card.
Another paper that I really like for this collection was the black and white wonky (technical term :)) striped one. Another thing I wanted to use was the foilable cards. And the rainbow one of course calls for rainbow foil (duh). I only foiled the rainbow itself and the little bees so that they would stand out. I fussycut around the images and words, leaving a white border around them. I chose the yellow polka dotted pattern paper from the paper pad as my background. I cut a piece to 3 1/4 x 5 1/2”. I adhered a strip of the black and white wonky stripe paper onto and A2 sized card base (Simon Says Stamp Sunshine cardstock), leaving a 1/4 inch on each side, and adhered the yellow polka dot one in the center over that piece. I added some thin Love From Lizi Pin Stripe Black Glitter Peel Offs to separate the patterns a bit. I love the peel offs from Love From Lizi! They add interest to your card with little effort and she sells soooo many colors (glitter, metallic, transparent). Super fun.
Anyways back to my card…
I adhered the images down onto the card and added some sequins from the included pack. To finish off the inside I cut a piece of Simon Says Stamp White 120# cardstock to 4 x 5 1/4” and adhered inside the card. I added a 1 x 5 1/4” strip of the yellow polka dotted paper and a 1/2 x 5 1/4” strip of the black and white wonky striped paper to the right side of that panel. And stamped the “JUST bee-cause” sentiment in Ranger Black Archival Jet Black. And this completes card #4.
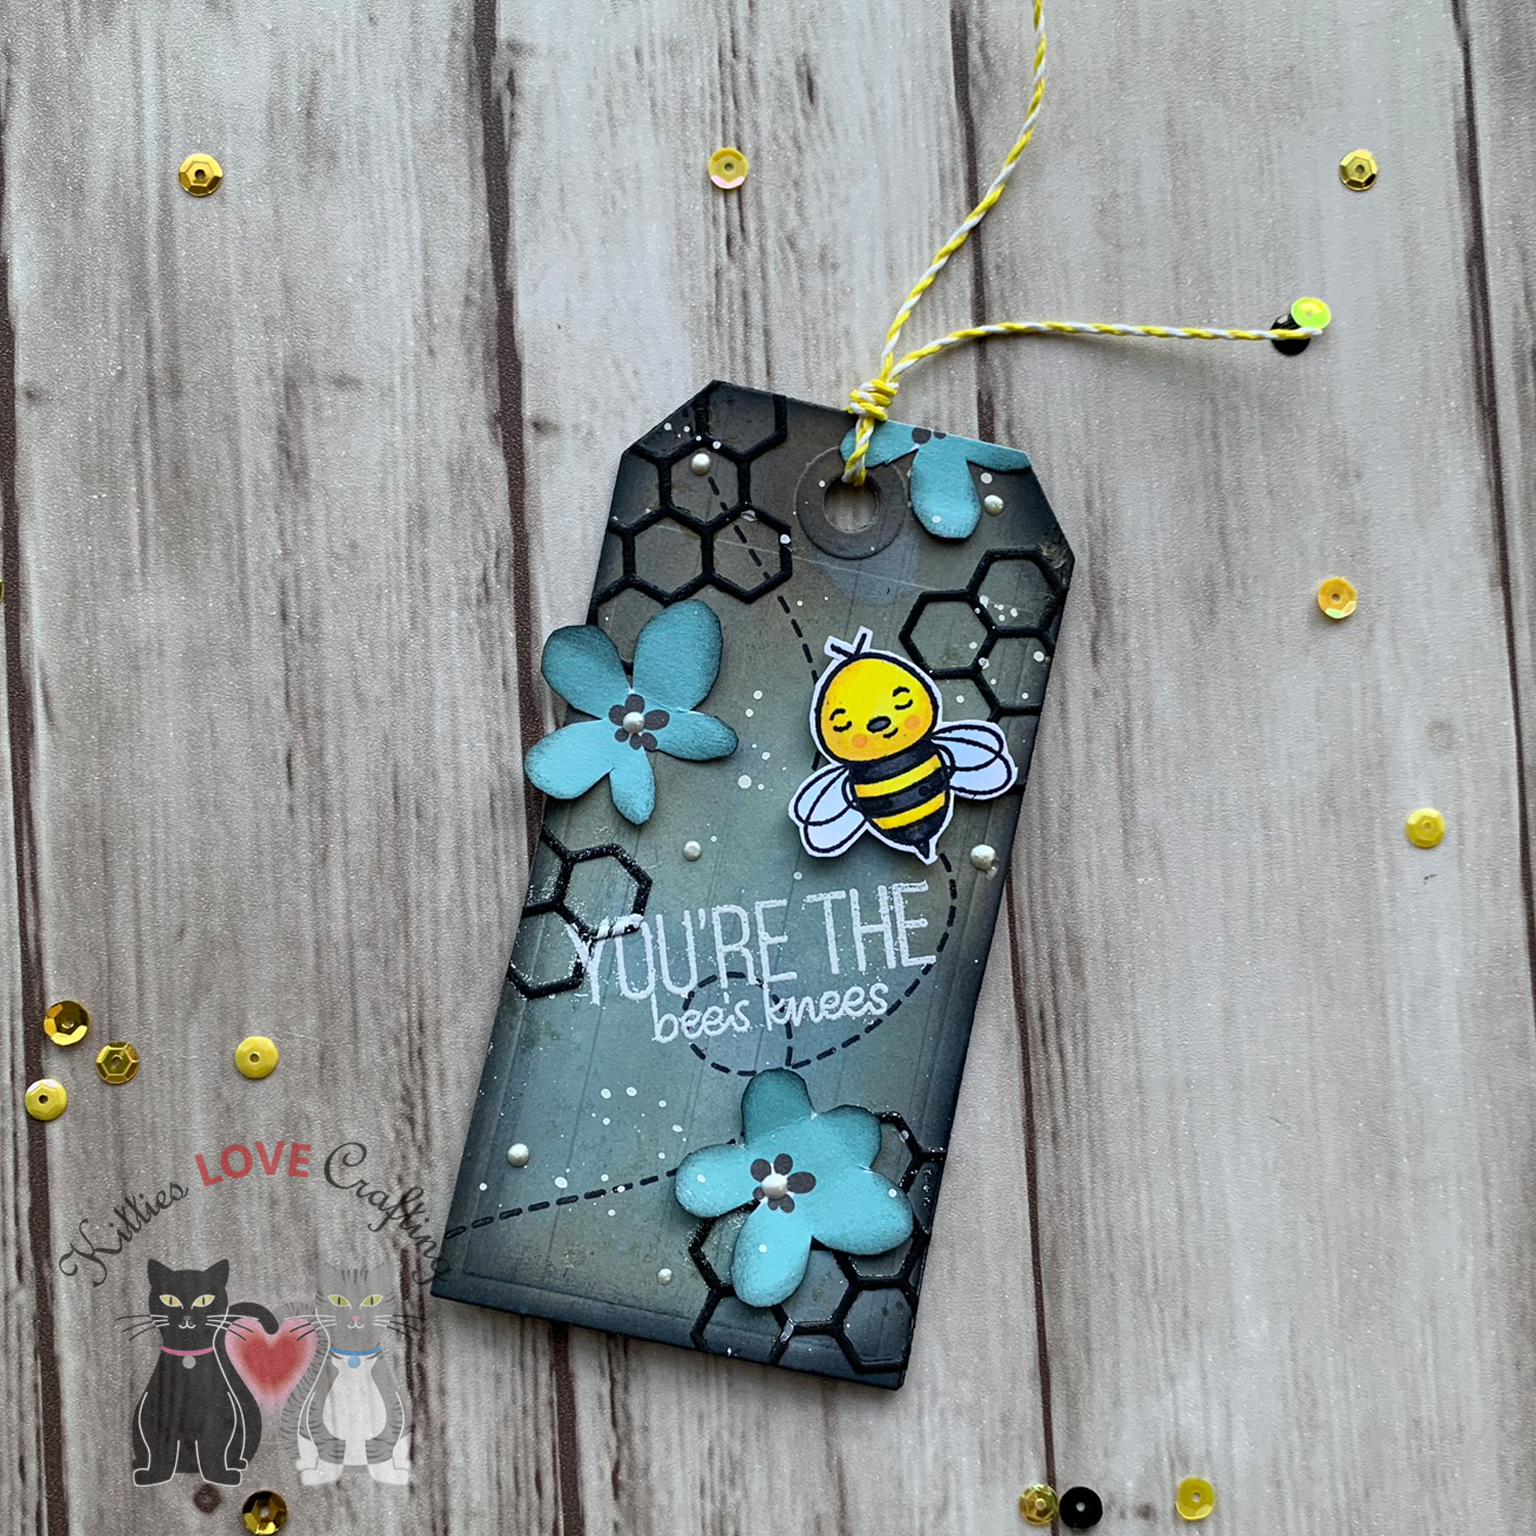
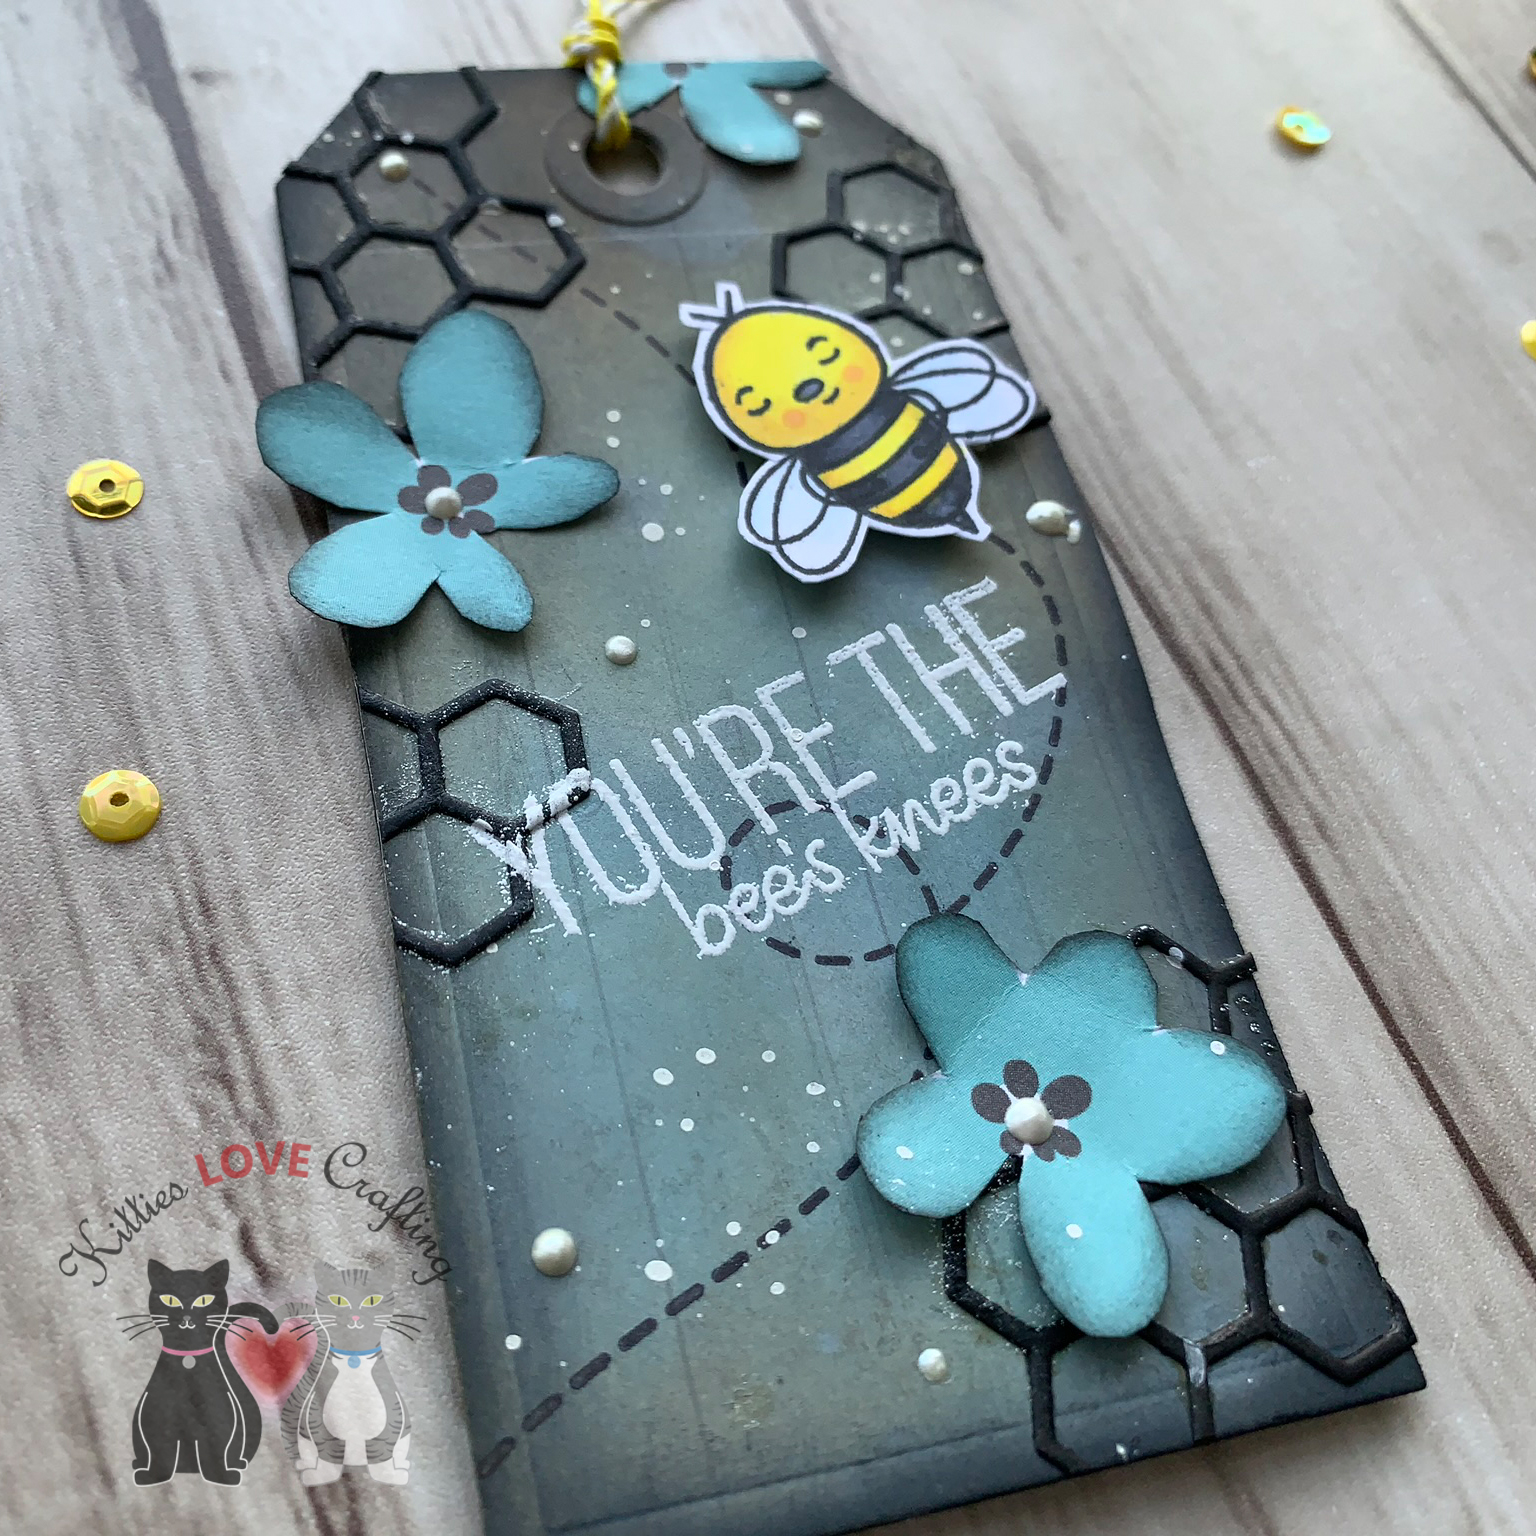
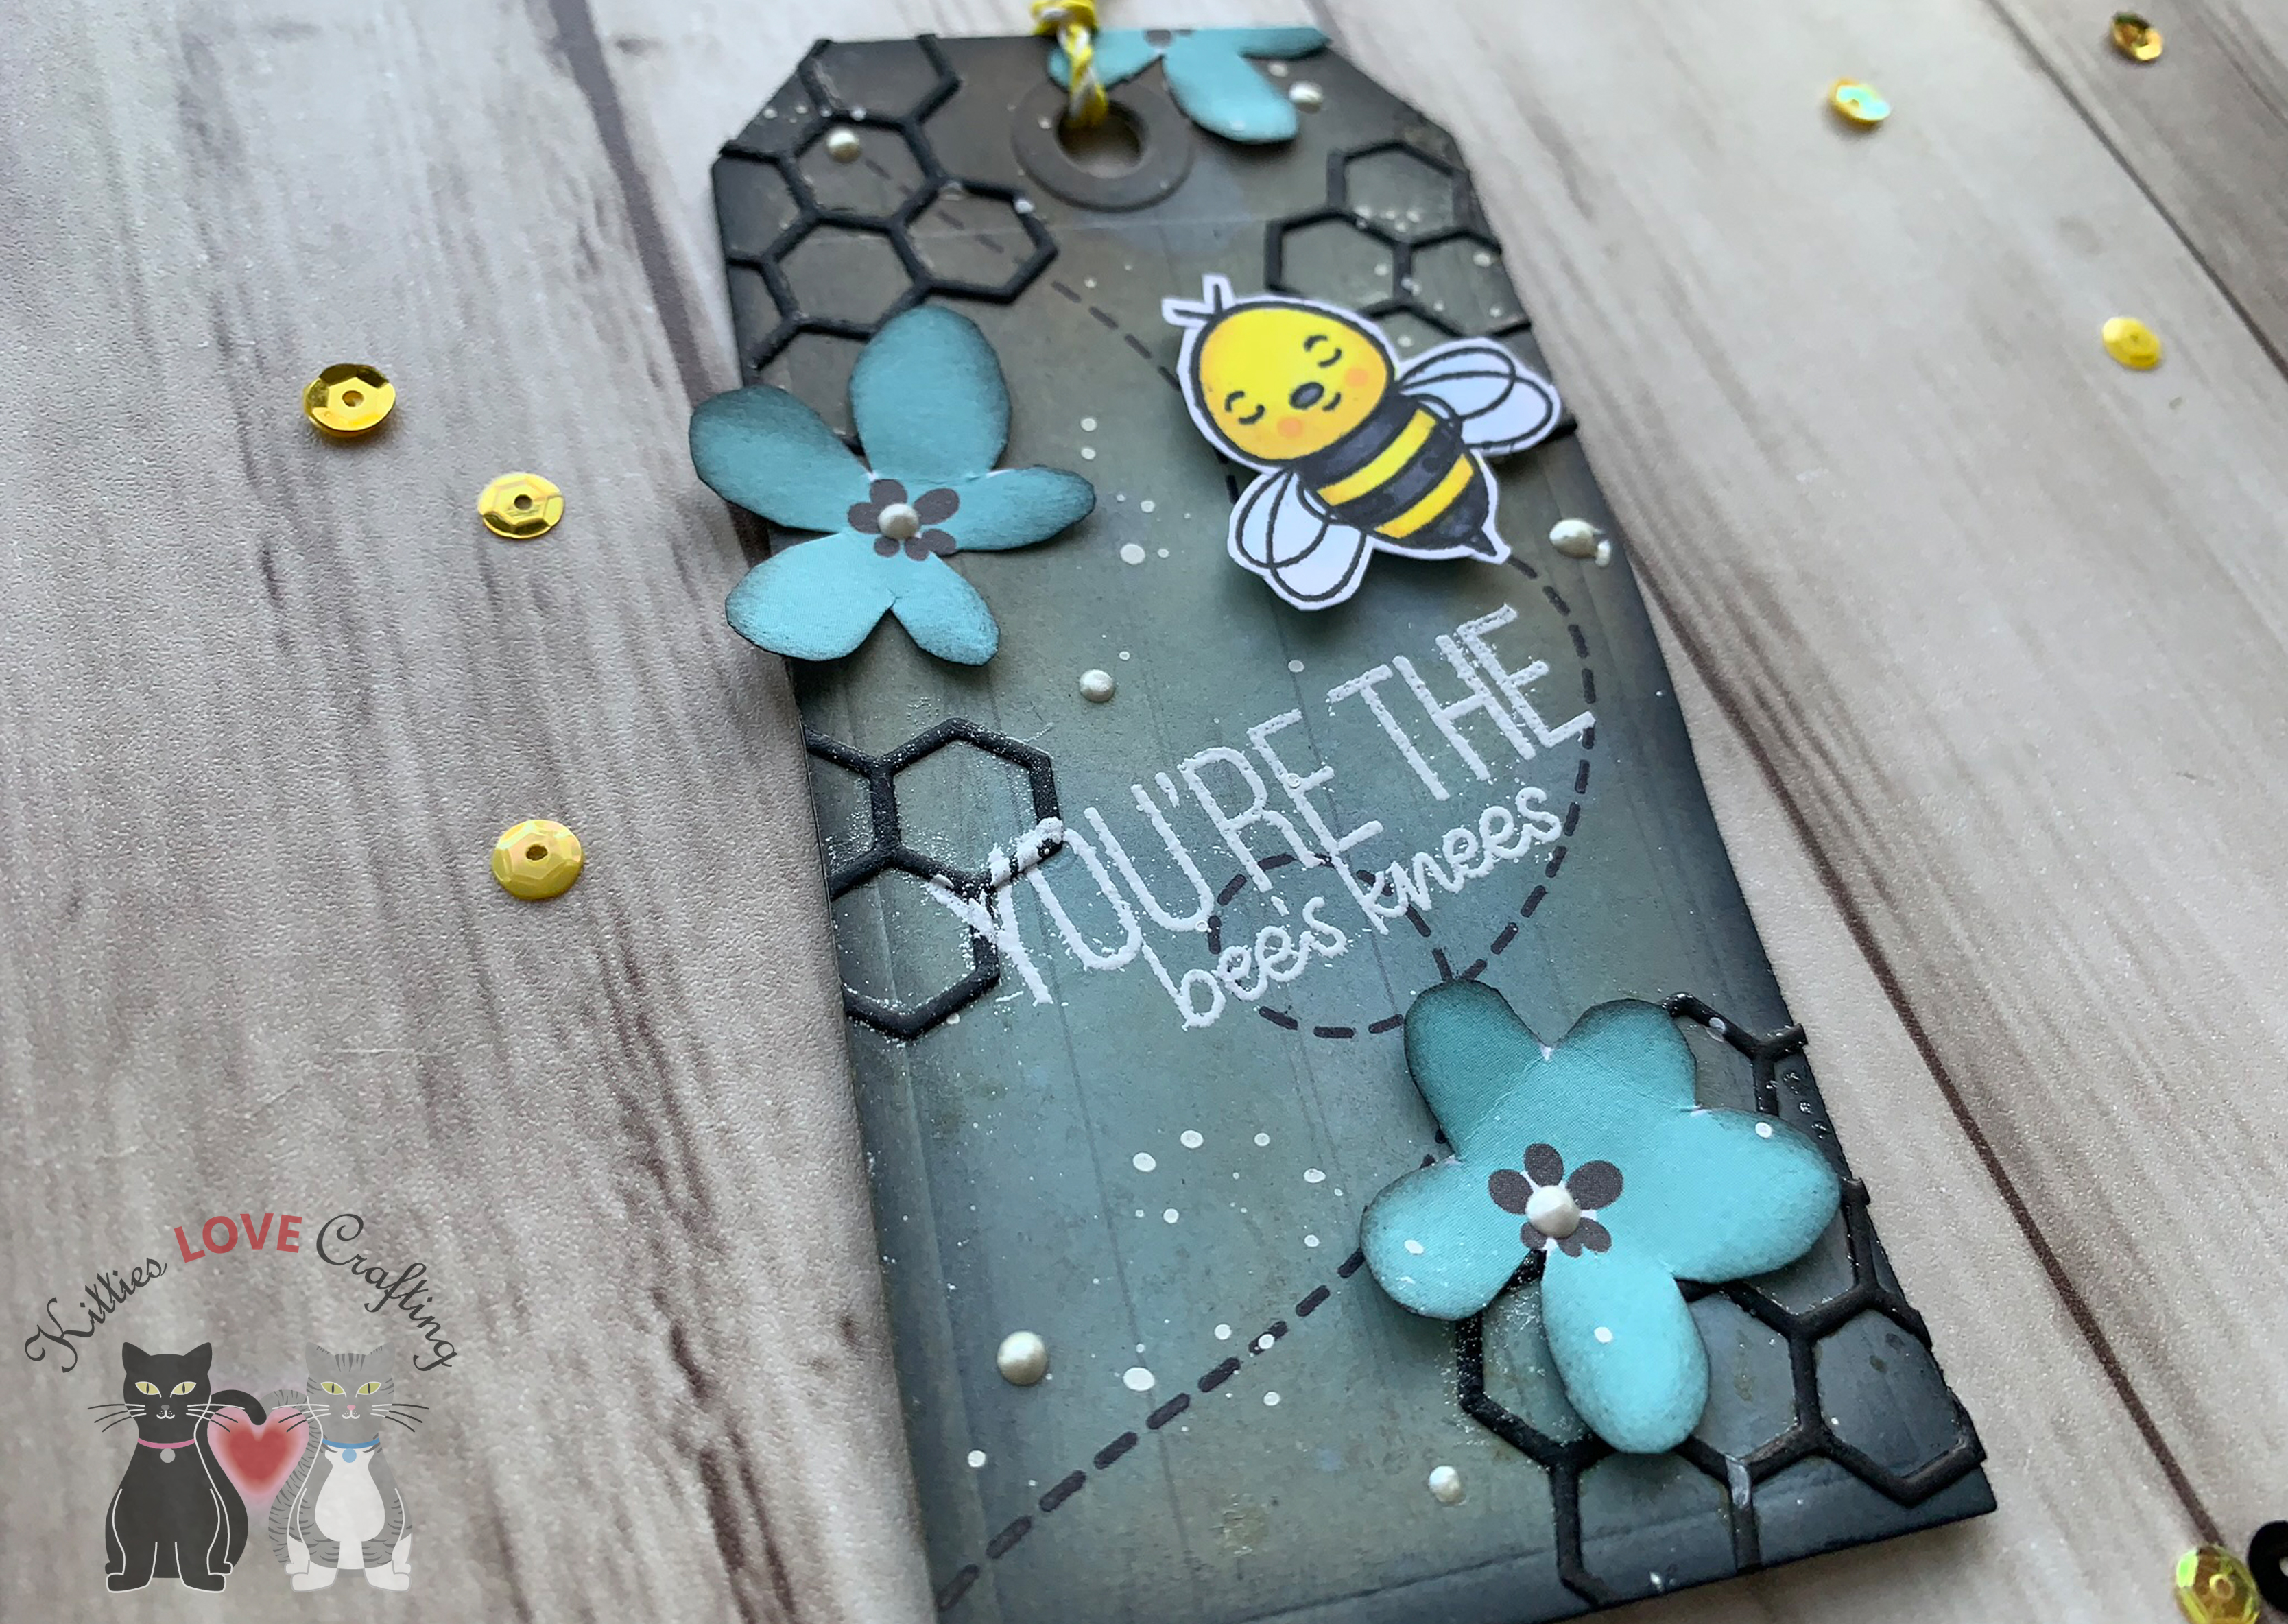
While I was making these cards, I had a thought…how cute would the bees look on a tag??? So I got out my trusty tag die from Tim Holtz (Sizzix Framelit Dies – Tag Collection by Tim Holtz) and diecut 2 tags using the second to largest die from Simon Says Stamp Black cardstock. I chose two pattern papers for my backgrounds, the light wood grain and the black and aqua hexagons, diecut 2 of each of those and glued them onto the front and back of the tag. Then I got to distressing.
I don’t want to leave this tag just as is though. I thought it might look cute as a card instead. So I cut a piece of the yellow hexagon paper to 1-1/4 x 5 1/2” and a piece of the yellow polka dot paper to -1 x 5 1/2” and adhere it to the.back of the hexagon paper and adhered both to an A2 sized card base (Simon Says Stamp Black cardstock).
I adhered the tag to the card base on a slight angle, placing it over the edges.i trimmed off the excess and proceeded to diecut some more hexagon clusters with black cardstock and adhered them to the card. I added one on the black. paper so it looks like it’s embossed. I added three little bees and some sequins to complete this card.
Supplies
Card Kit Includes:
Other Supplies Used:
Hope you’ve enjoyed this post. Thanks for reading to the end; I know it was a long one. I hope I’ve inspired you to make some adorable bee cards of your own. Whether you have the kit or not you can make these cards. Leave comments or questions below or feel free toemailme.
Hello friends. I finally got to play with this adorable bee-themed card kit from Simon Says Stamps. It’s the July Card Kit called Bee Yourself. Lots of fun products to play with and I just adore the stampset. Unfortunately the kit is no longer available but I will link all the available individual products. I almost strictly used only the card kit contents. I did bring in a few of my own products and I will link those below as well.
Card Kit Supplies
When I first saw the reveal video for this kit, I fell for the paper pad from Honeybee Stamps immediately. I knew I had to use the aqua watercolor pattern first. I kept it simple. I wanted to see if I could foil using a stamp and the glue pad and a stamp (didn’t have transfer gel. I do NOW though 🙂 ).
I diecut a few hexagons from Simon Says Stamp Black cardstock using the Simon Says Stamp Small Hexagon Cluster wafer thin die and a few from some black glitter paper. I added the black hexagon cluster to the card and then inlayed 3 glitter hexagons back into the clusters. I added a black mat behind the sentiment. Then I adhered the flower onto the right side of the card and the sentiment toward the bottom. I adhered the little bees and added some sequins to finish off the card.
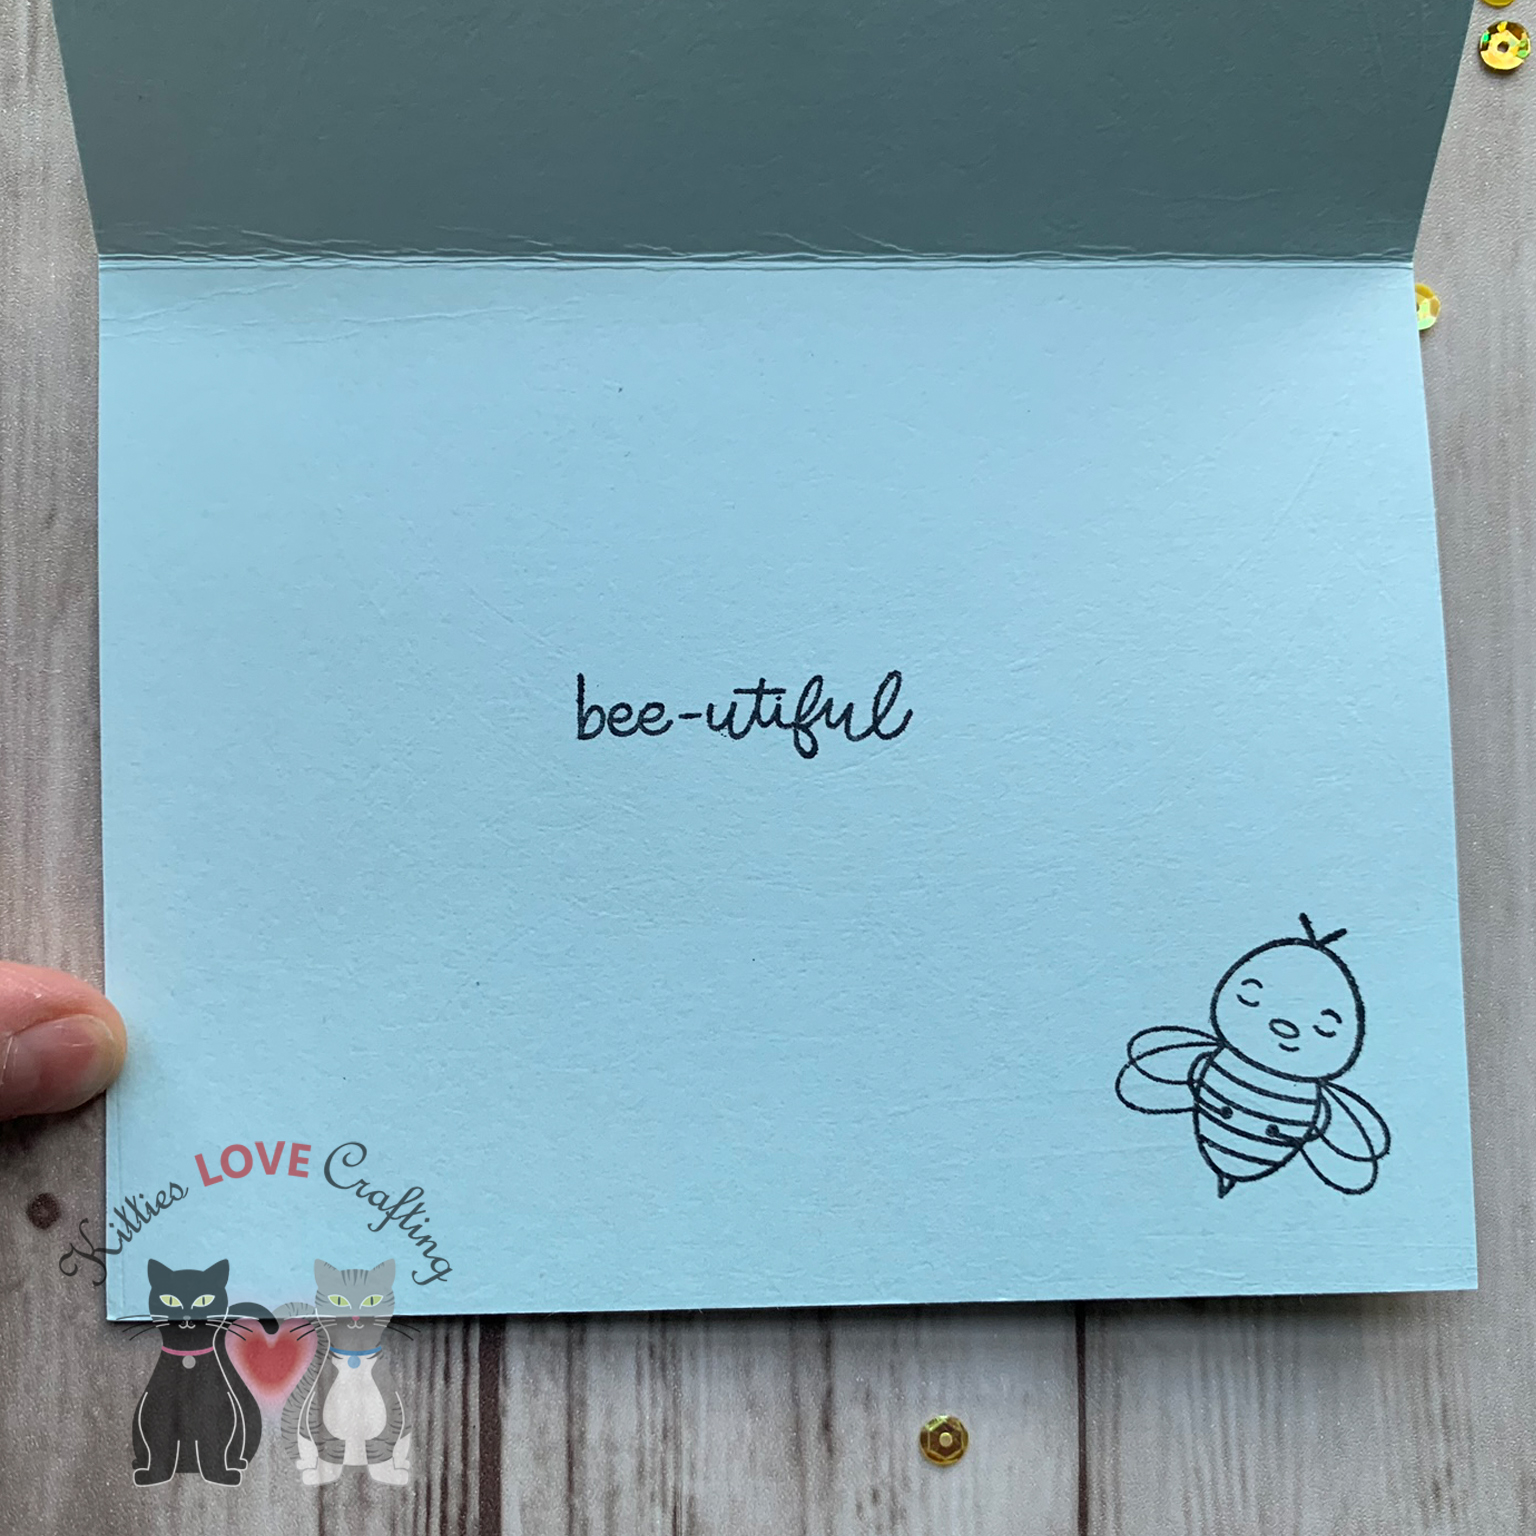
I stamped the “bee-utiful” sentiment and a little bee with Ranger Black Archival Jet Black on the inside of the card. And now this card is done!
3 cards done, 2 to go…
Another paper that I really like for this collection was the black and white wonky (technical term :)) striped one. Another thing I wanted to use was the foilable cards. And the rainbow one of course calls for rainbow foil (duh). I only foiled the rainbow itself and the little bees so that they would stand out. I fussycut around the images and words, leaving a white border around them. I chose the yellow polka dotted pattern paper from the paper pad as my background. I cut a piece to 3 1/4 x 5 1/2”. I adhered a strip of the black and white wonky stripe paper onto and A2 sized card base (Simon Says Stamp Sunshine cardstock), leaving a 1/4 inch on each side, and adhered the yellow polka dot one in the center over that piece. I added some thin Love From Lizi Pin Stripe Black Glitter Peel Offs to separate the patterns a bit. I love the peel offs from Love From Lizi! They add interest to your card with little effort and she sells soooo many colors (glitter, metallic, transparent). Super fun.
I adhered the images down onto the card and added some sequins from the included pack. To finish off the inside I cut a piece of Simon Says Stamp White 120# cardstock to 4 x 5 1/4” and adhered inside the card. I added a 1 x 5 1/4” strip of the yellow polka dotted paper and a 1/2 x 5 1/4” strip of the black and white wonky striped paper to the right side of that panel. And stamped the “JUST bee-cause” sentiment in Ranger Black Archival Jet Black. And this completes card #4.
While I was making these cards, I had a thought…how cute would the bees look on a tag??? So I got out my trusty tag die from Tim Holtz (Sizzix Framelit Dies – Tag Collection by Tim Holtz) and diecut 2 tags using the second to largest die from Simon Says Stamp Black cardstock. I chose two pattern papers for my backgrounds, the light wood grain and the black and aqua hexagons, diecut 2 of each of those and glued them onto the front and back of the tag. Then I got to distressing.
I don’t want to leave this tag just as is though. I thought it might look cute as a card instead. So I cut a piece of the yellow hexagon paper to 1-1/4 x 5 1/2” and a piece of the yellow polka dot paper to -1 x 5 1/2” and adhere it to the.back of the hexagon paper and adhered both to an A2 sized card base (Simon Says Stamp Black cardstock).
I adhered the tag to the card base on a slight angle, placing it over the edges. I trimmed off the excess and proceeded to diecut some more hexagon clusters with black cardstock and adhered them to the card. I added one on the black paper so it looks like it’s embossed. I added three little bees and some sequins to complete this card.
Supplies
Card Kit Includes:
Other Supplies Used:
Hope you’ve enjoyed this post. Thanks for reading to the end; I know it was a long one. I hope I’ve inspired you to make some adorable bee cards of your own. Whether you have the kit or not you can make these cards. Leave comments or questions below or feel free toemailme.
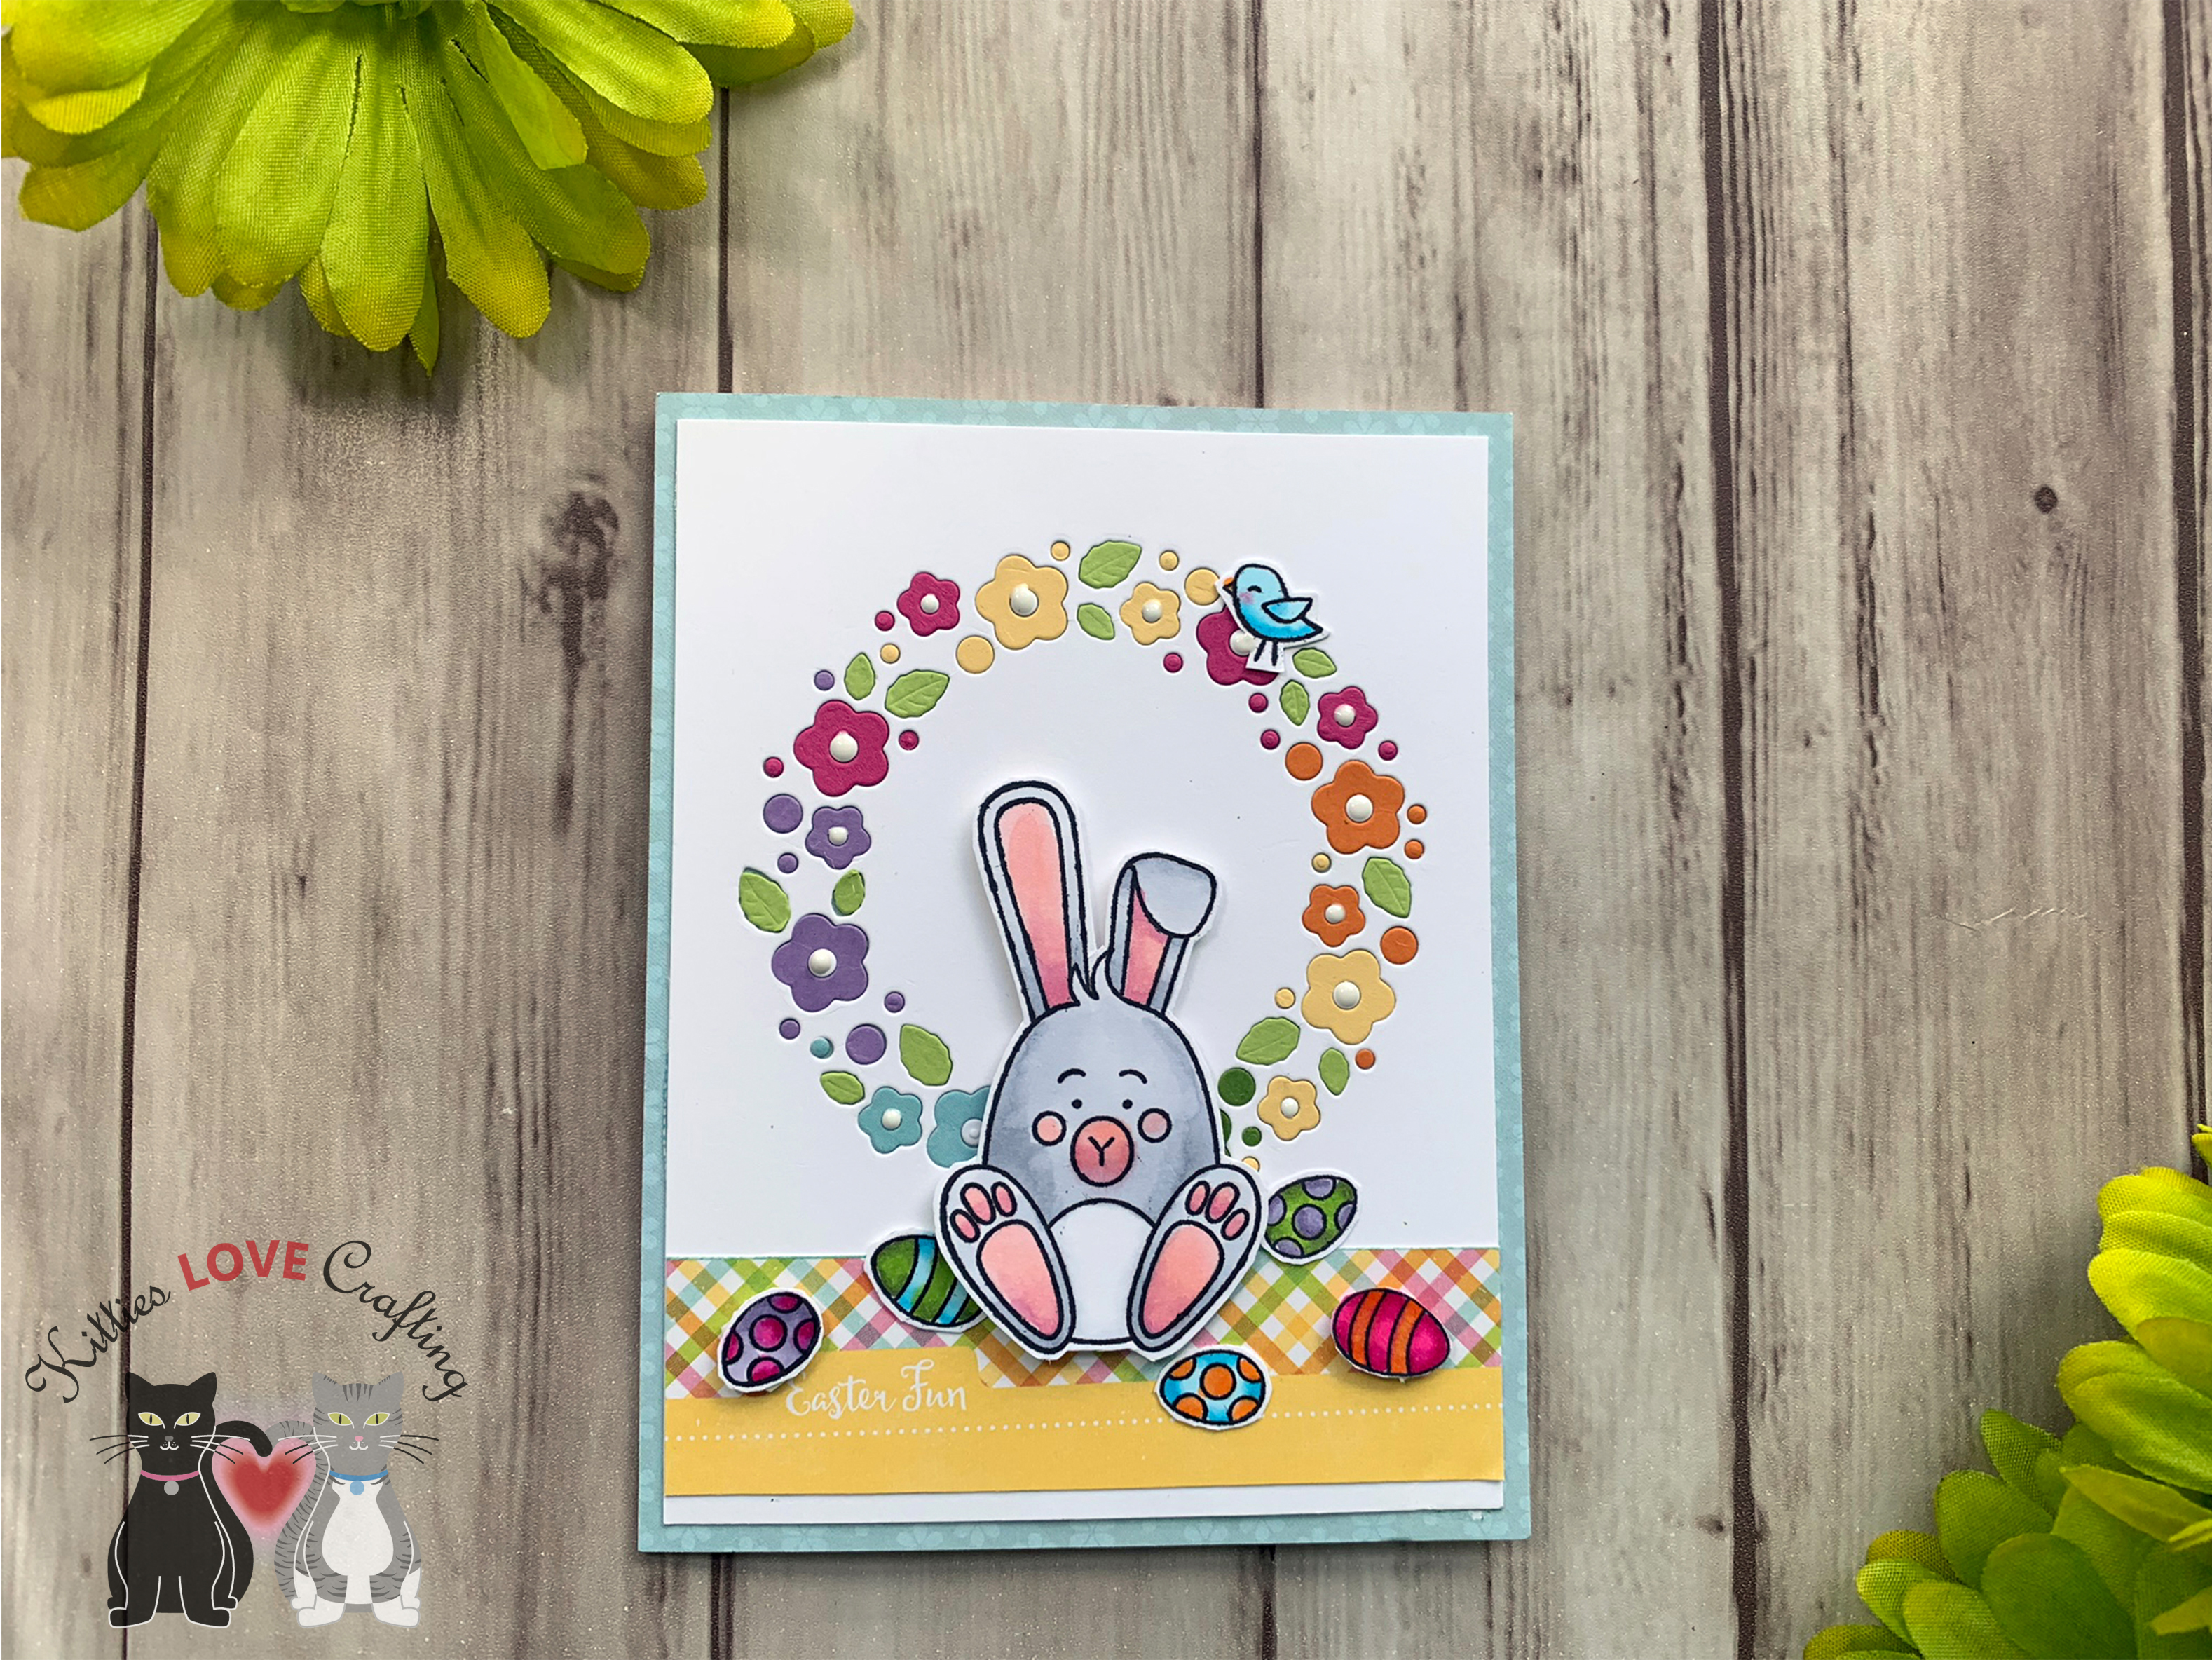
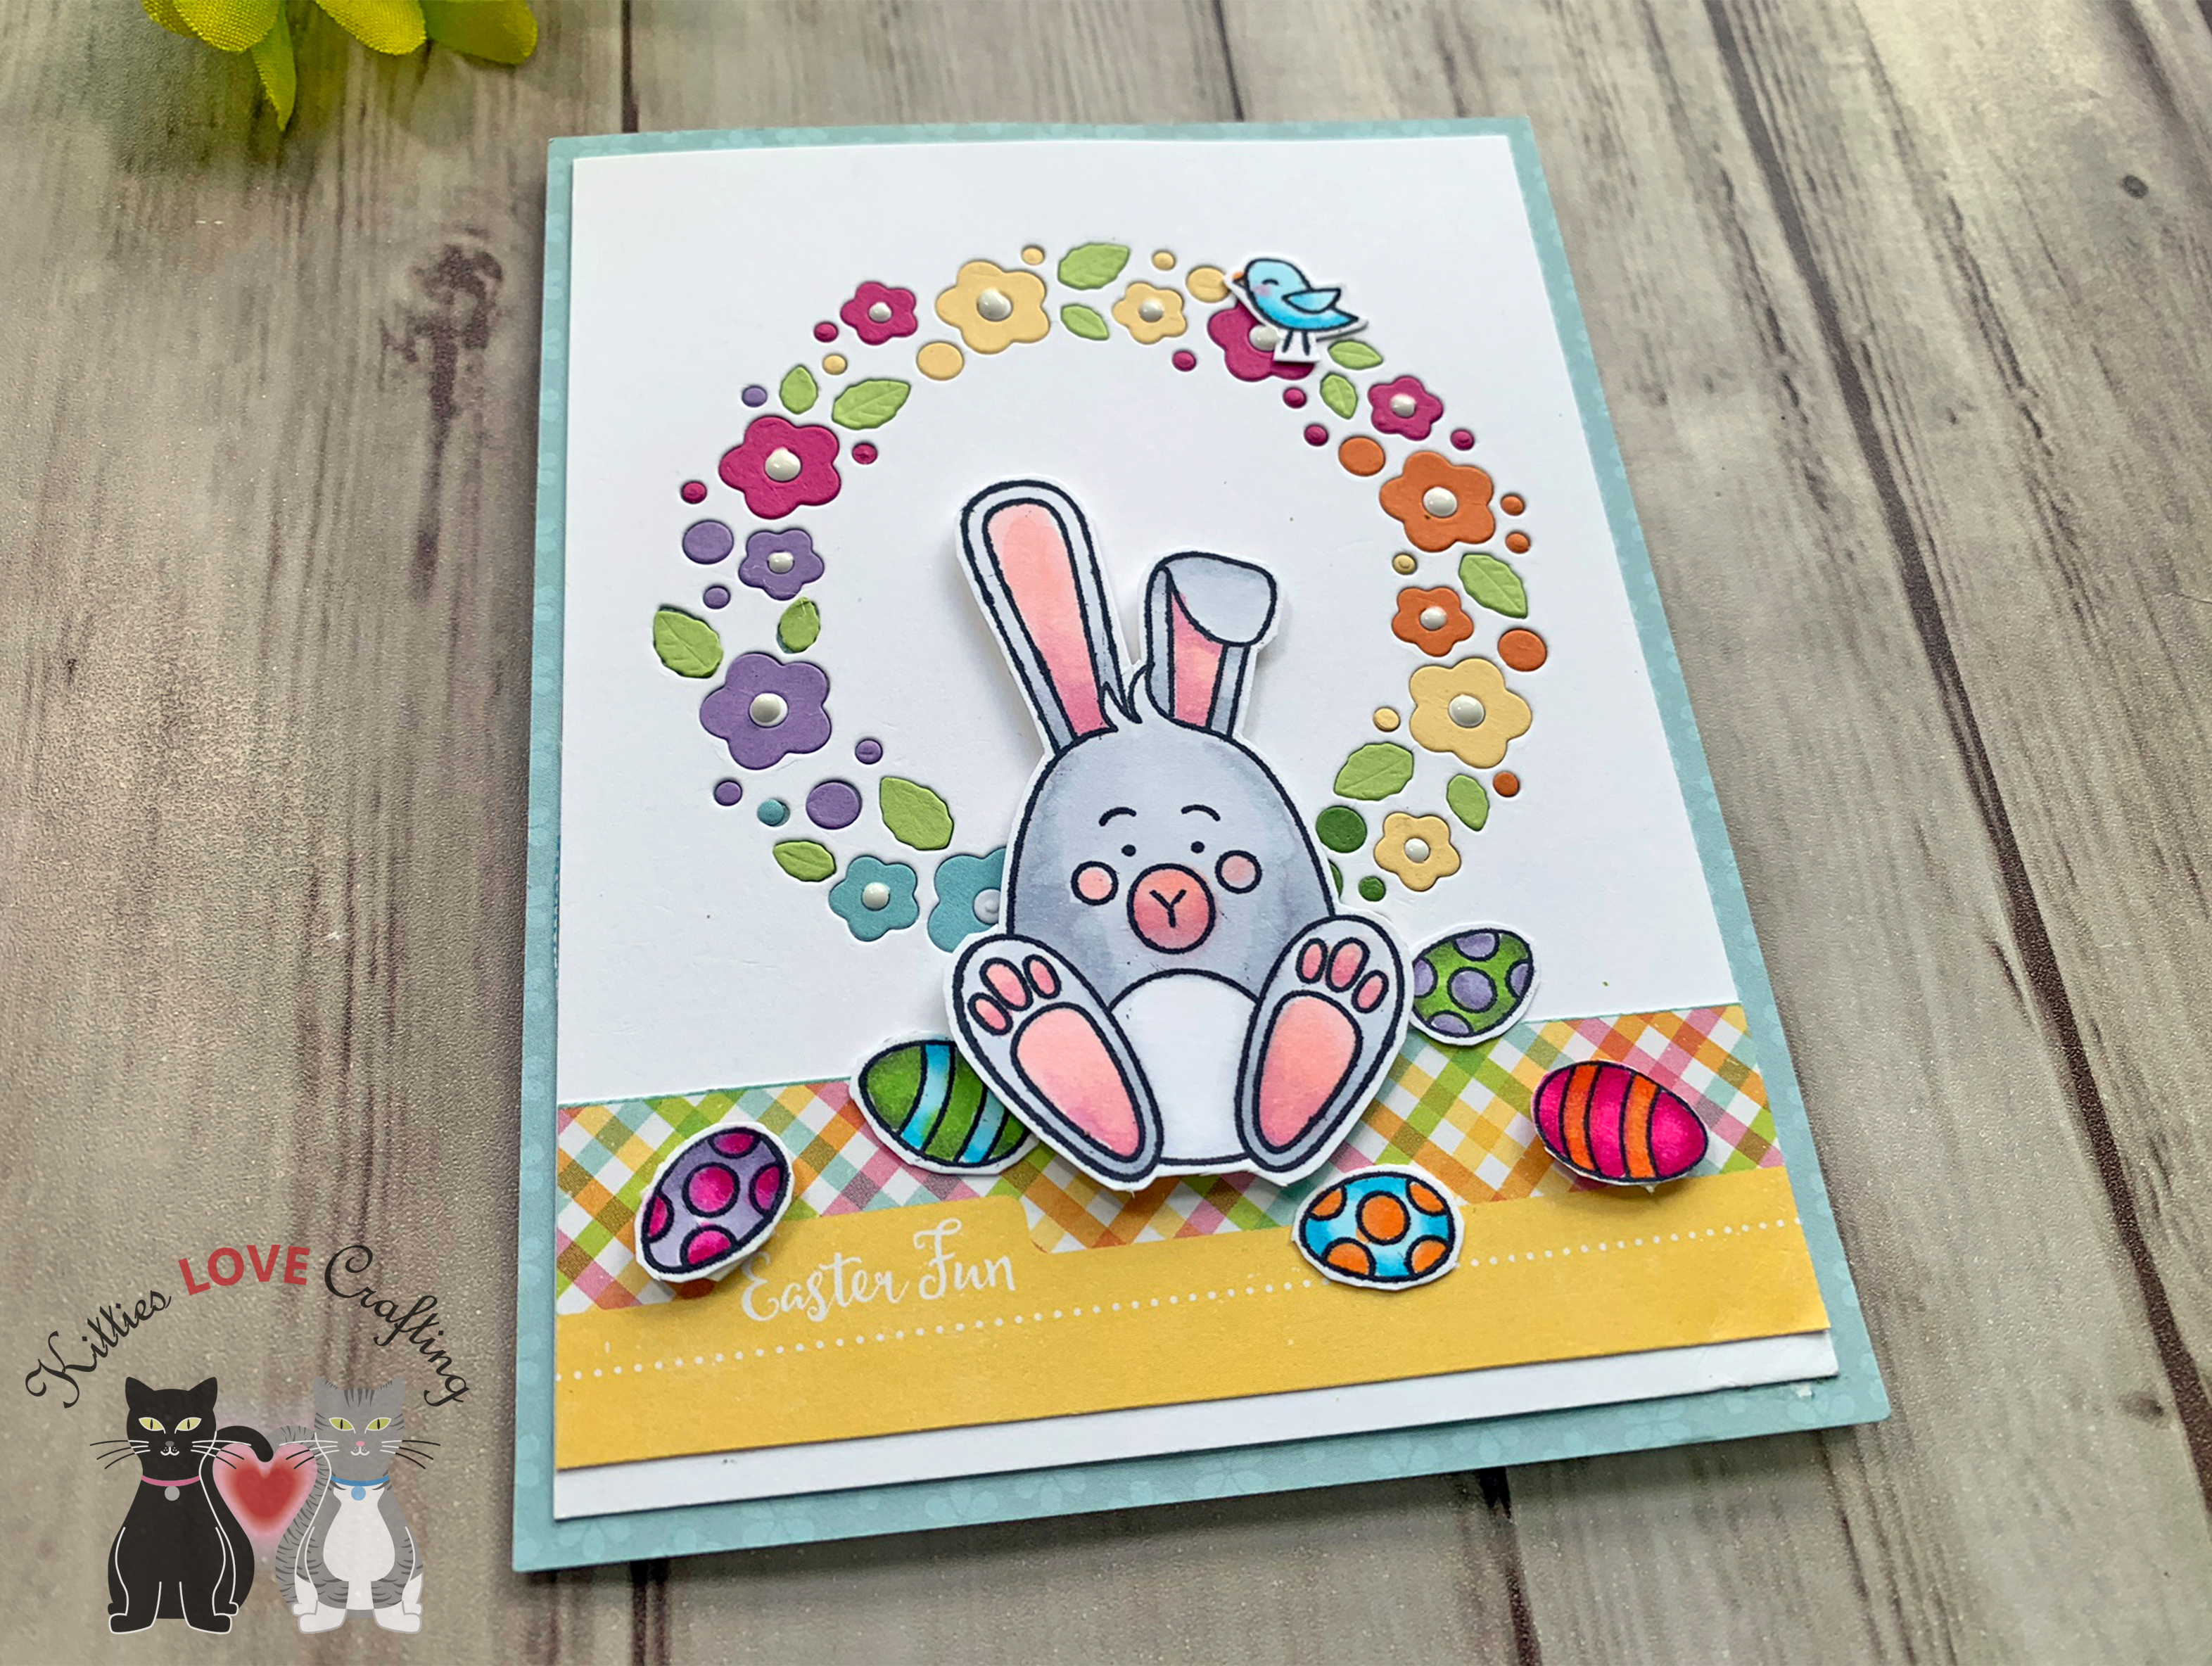
Card 2 turned into a Mother’s Day Card. When I started working on these cards I had no idea what the theme would be so I didn’t pick sentiments. But after adding the daisy pattern paper (from Doodlebug 6 x 6 Double-sided Paper Pad-Easter Express (discontinued)), I decided to make into a Mother’s Day card. I used the Simon Says Stamp Blooming Wave Wafer, to create a border then inlaid the flowers after diecutting several pieces of scrap yellow and green cardstock. I used Lawn Fawn Happy Happy Happy Sentiments and the Lawn Cuts Happy Happy Happy to creqte this dimensional sentiment. Finished it off by adding Nuvo Crystal Drops in Ivory Seashell.
Hope you’ve enjoyed this process post and I hope I’ve inspired you to create some cards of your own. Thanks for stopping by and once again please leave questions in the comments or feel free to email me if you prefer.


 https://linkdeli.com/widget.js?id=f5e8378456858c916708