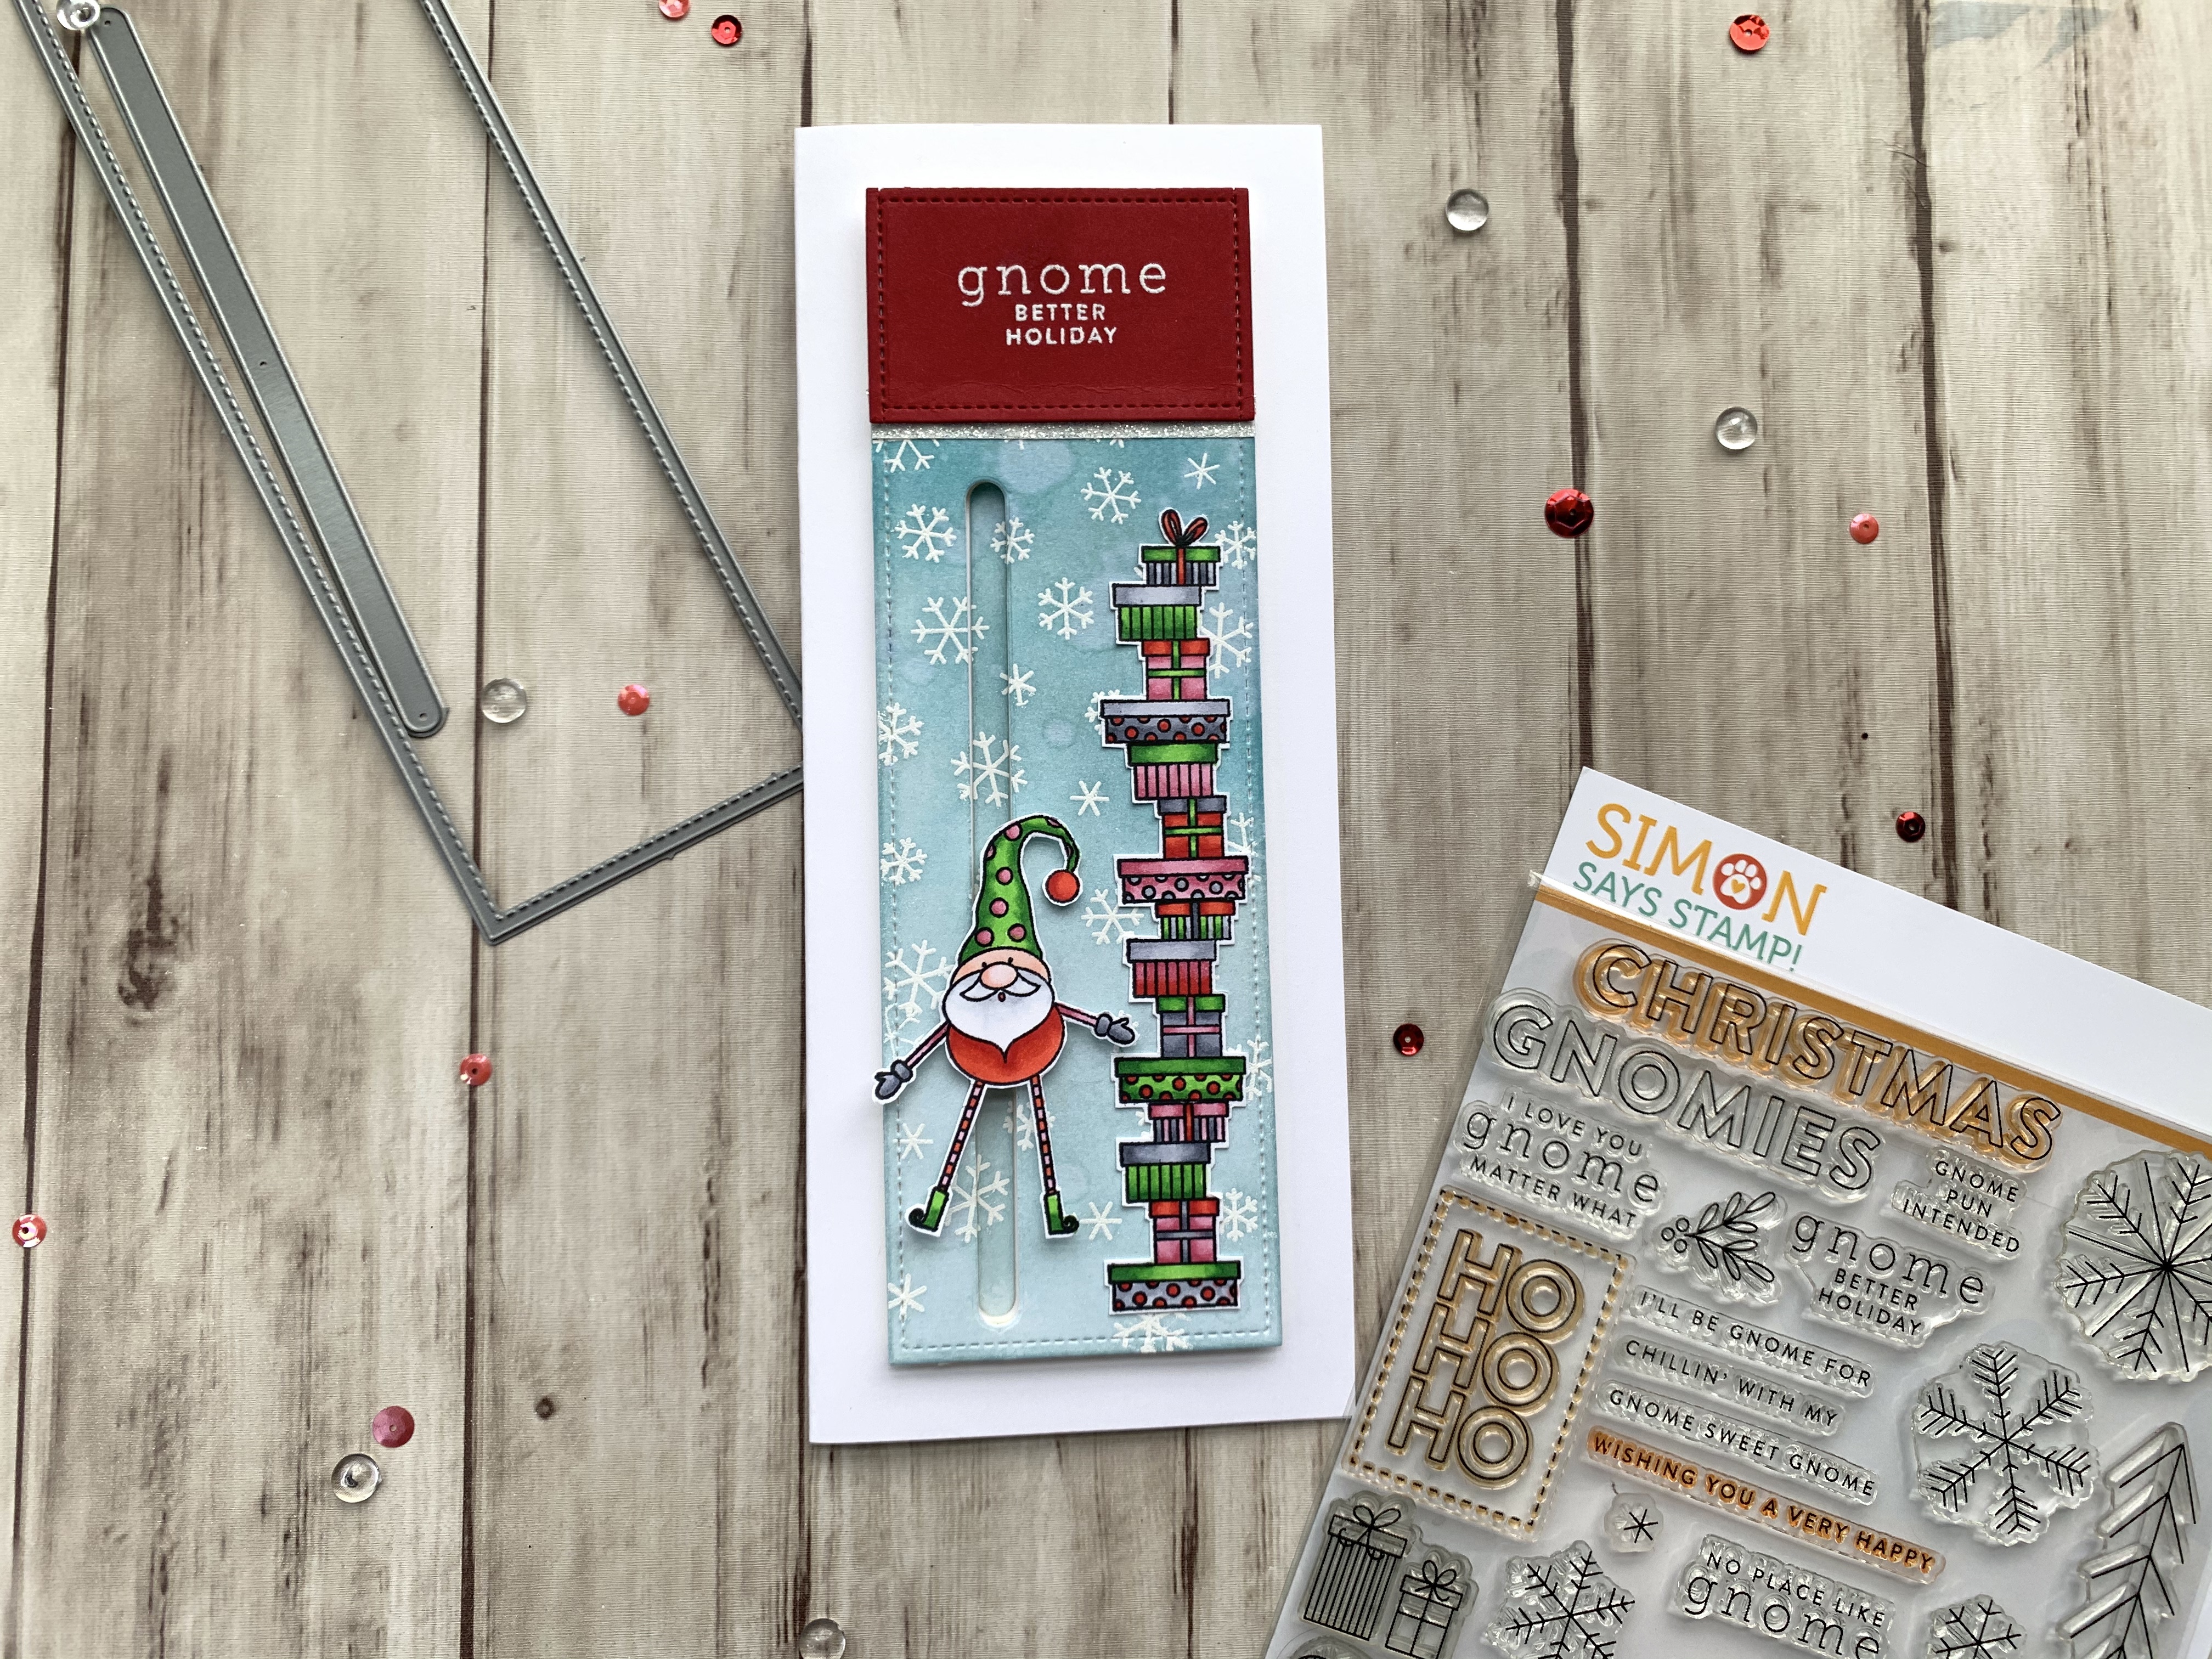
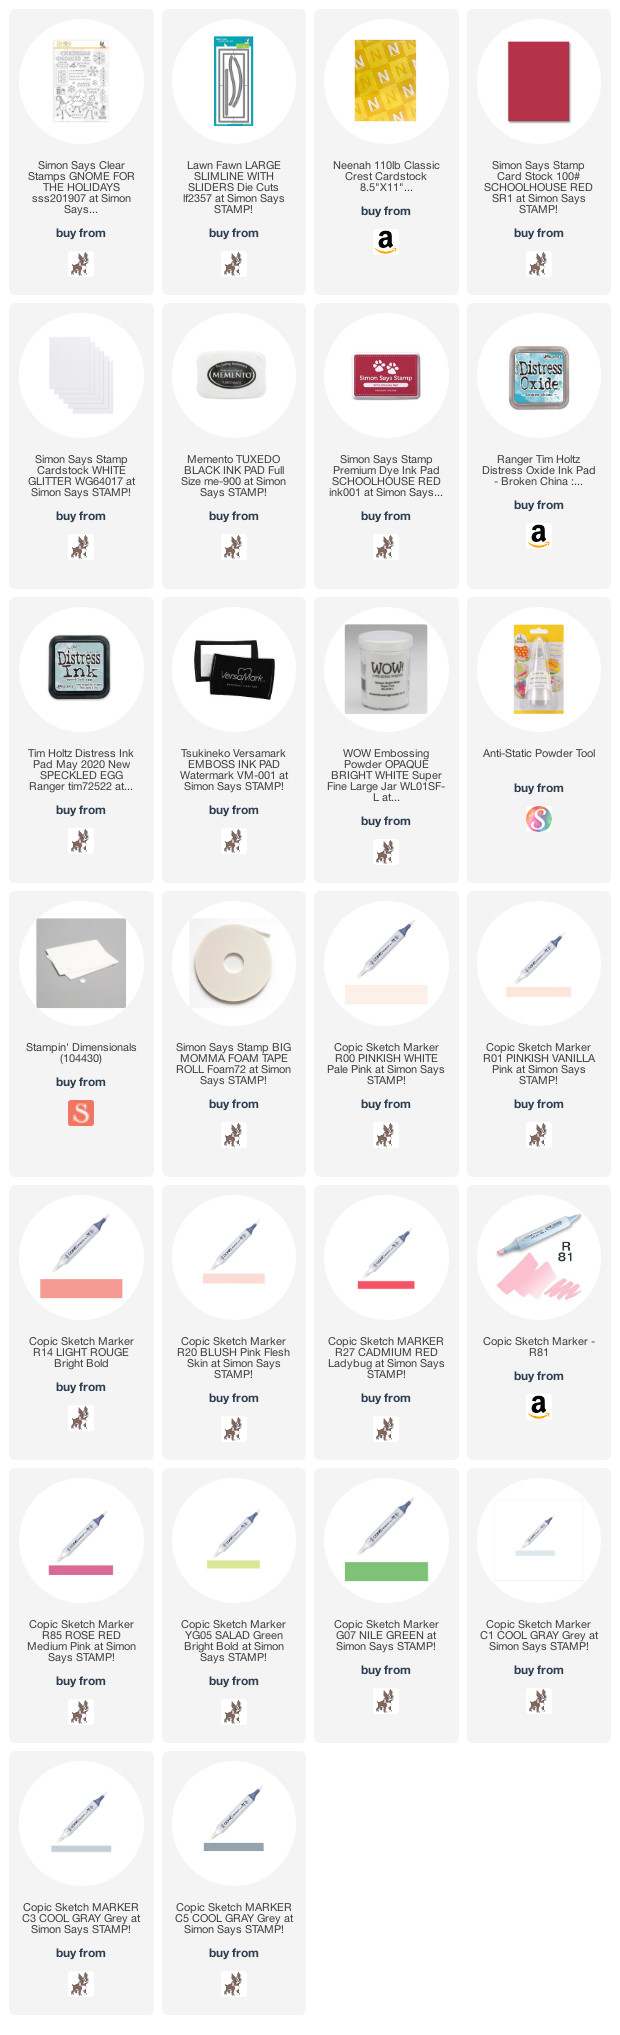
Happy Wednesday friends! I thought I would revisit an old Simon Says Stamp Card Kit. The ‘Gnome for the Holidays’ Card Kit was released in December 2019 and features the cute 6 x 8″ Gnome for the Holidays stampset. I thought it might be fun to make a slimline slider card with the little gnomes. It was fairly easy to make and can be even more simplified by skipping th eheat embossing and doing simple coloring on the images.
I colored the image with COPIC markers. I used YG05 + G07 (body), R20 (cheeks), R14 + R27 (gloves and socks), C3 + C5 (shoes) and C1 (arms) for the tree gnome; R14 + R27 (body), YG05 + G07 (hat), C1 + 0 (beard), R00 + R01 (face), R81+ R27 (socks), R81+ R85 (hat dots and sleeves), and C1 + C3 (gloves) for the second gnome; and R14, R27, R81, R85, YG05, G07, C1, C3, and C5 for the gifts.
I fussycut the images out and decided where they would go on my card. Then diecut the slider with the Lawn Fawn Large Slimline With Sliders Die Cuts. I added Foam Tape and a penny for the slider element and adhered it to the card base.
Thanks for reading this post. I hope you enjoyed and I’ve inspired you to give this card a try for yourself. Leave comments or questions below or feel free to email.
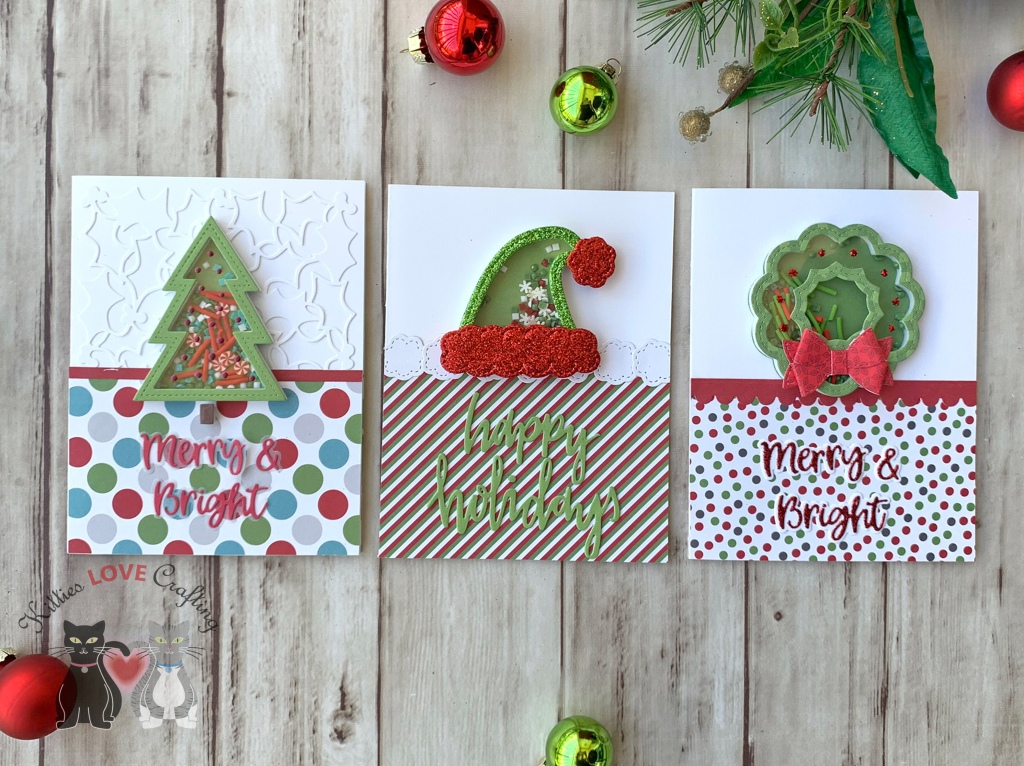
I love most of their shaker kits, but this one by far, the North Pole Kit, is my favorite Queen and Company Card Kit. It pairs great with their Glitter Foam (I used some for the hat card). The kit Includes: 25 steel dies, 6×6 paper pad, 4×6 stamp set, 11 custom toppings and 21 foam and acetate shakers. Tons of goodies to make tons of cards and they sell refills for the paper pad, shaker foam, acetate and toppings!
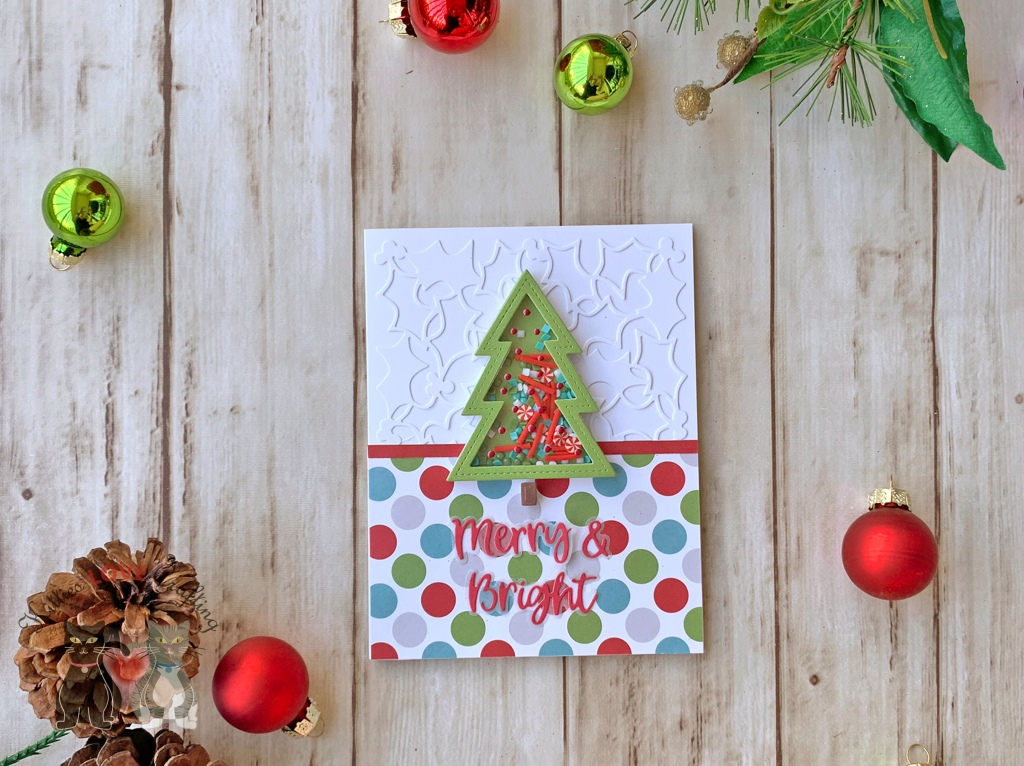
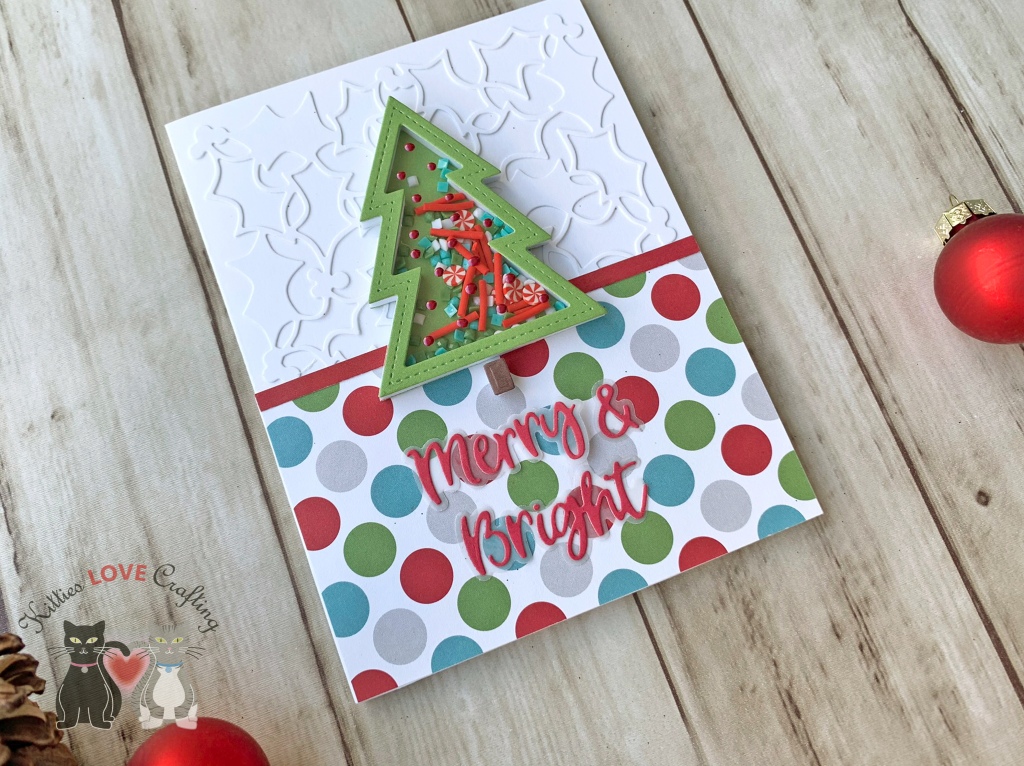
I started these cards by cutting some Neenah 110lb Classic Crest Cardstock 8.5 X 11″ to 5-1/2 x 8-1/2″ and scored at 4-1/4″. I cut three of those to create my card bases. For this first card, I diecut another piece of Neenah 110lb Classic Crest Cardstock 8.5 X 11″ with the Catherine Pooler Designs Holly and Berries Coverplate and adhered it to the card. (Tip: Save the outer border that is cut with this die to use later under the pattern paper. It will even out the papers so there’s no drooping.) I cut a piece of pattern paper from the North Pole Paper Pad (included in the kit) to 2-3/16 x 4-1/4″ and a red strip from the North Pole Solids Paper Pad to 2/16 x 4-1/4″ and adhered them to the card.
I assembled the tree shaker and added the toppings inside. I used the paper from the North Pole Solids Paper Pad for the tree and the trunk (saved the inside (solid) piece of the tree frame). I added some left over foam from the shakers to the tree trunk. I save all the extra foam from the shakers because they can be used on other cards.
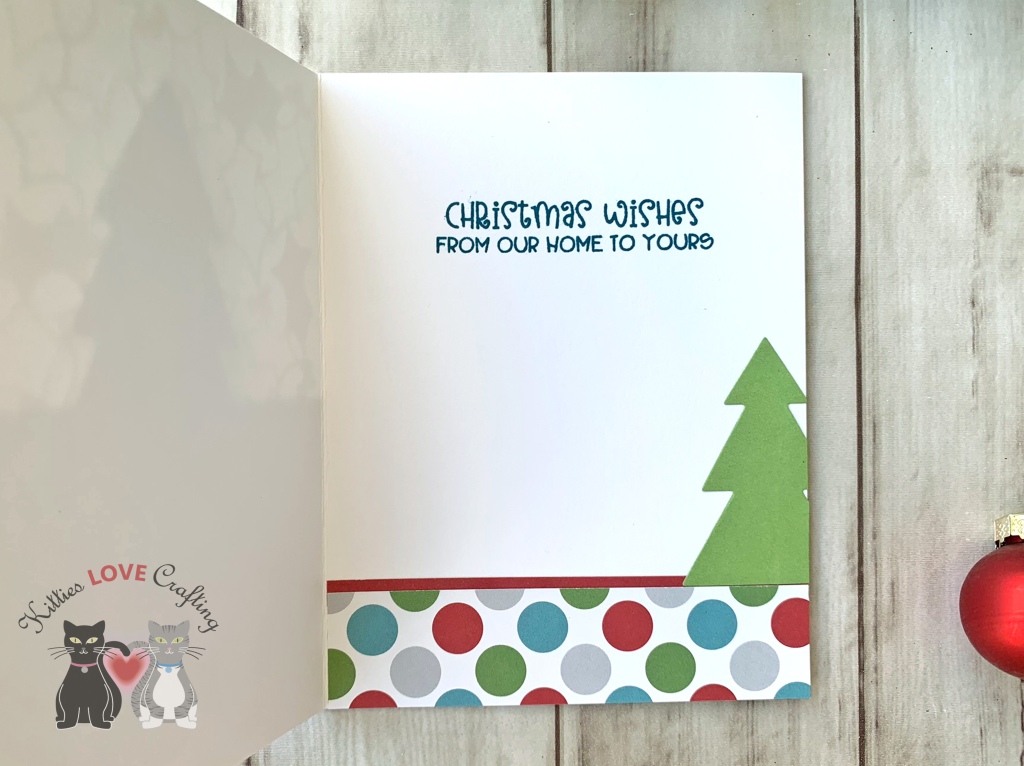
On the inside of the card, I added a red piece of North Pole Solids Paper Pad, measuring 1-1/8 x 4-1/4″and a piece of North Pole Paper Pad, measuring 1″x 4-1/4″ and stamped a sentiment from the stampset included in the kit and Catherine Pooler Daydream Ink. I added the solid inside piece of the tree frame to the bottom of the card.
For the second card, I cut a piece of pattern paper from the North Pole Paper Pad (included in the kit) to 2-7/8 x 4-1/4″ and a red strip from the North Pole Solids Paper Pad to 2/16 x 4-1/4″ and adhered them to the card base. I also used the die for the santa hat’s pom pom and diecut 7 from some Neenah 110lb Classic Crest Cardstock 8.5 X 11″ to create a cute border. I thought they looked like puffy clouds and just adds some more whimsy to the card.
I assembled the hat shaker and added the toppings inside. I used red and green glitter foam from Queen and Company’s Glitter Fun Foam – Rainbow Pack to turn this santa hat into an elf hat. I saw Kristie Marcotte do this last year and thought it was adorable so I created my own. I added some left over foam from the shakers to the pom pom and edges of the hat trim once I adhered them together. this ensures that all of the hat is the same height.
I used the Catherine Pooler Happy Holidays Die and the North Pole Solids Paper Pad to diecut a sentiment and adhered to the card. I added the cute hat to the card, and finished it by adding some shimmer to the sentiment with Spectrum Noir Clear Overlay Sparkle Pens. Look how sparkly that hat is!
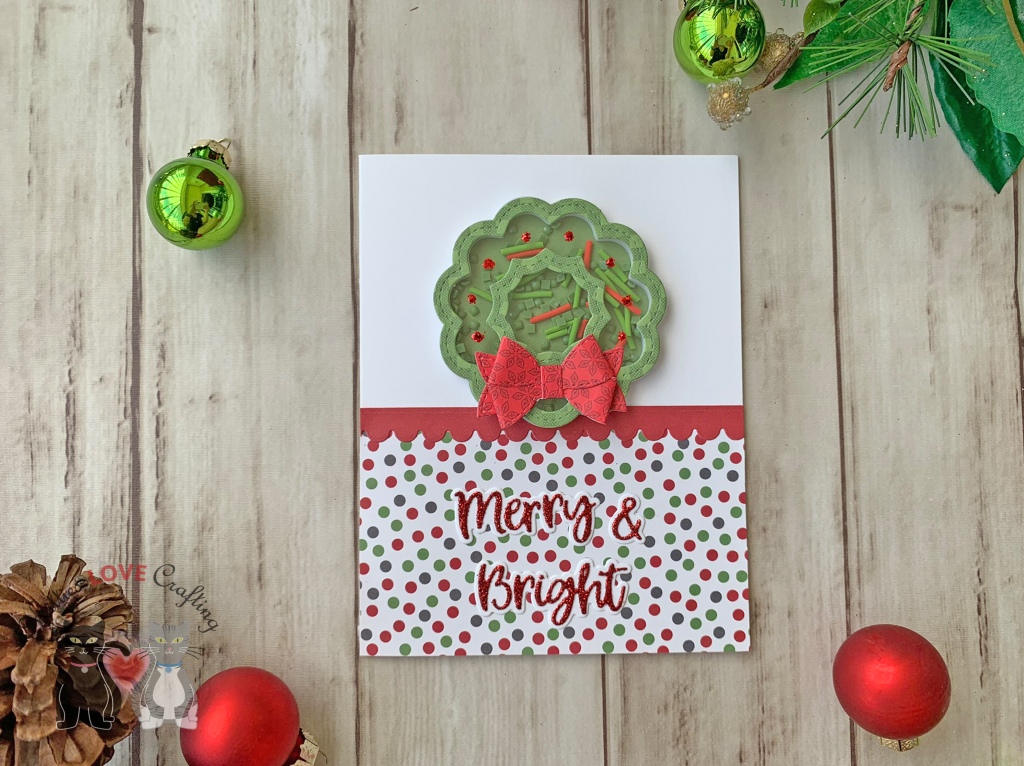
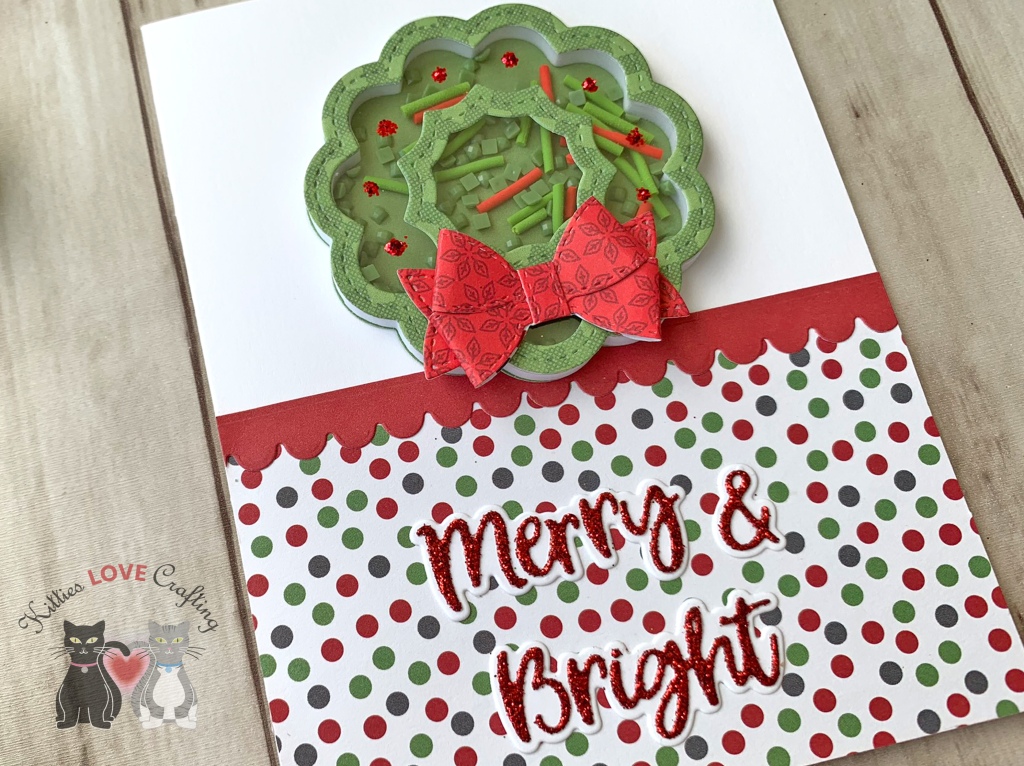
For the third card, I cut a piece of pattern paper from the North Pole Paper Pad (included in the kit) to 2-11/16 x 4-1/4″ and a red strip from the North Pole Solids Paper Pad using the scallop border die from the Honeybee Stamps Gingerbread House Add-on and adhered them to the card. This die is meant for the roof of the house but I though it made a great border!
I assembled the wreath shaker and added the toppings inside (saved the inside (solid) piece of the tree frame). I used green and red pattern paper from the North Pole Paper Pad for the wreath and bow.
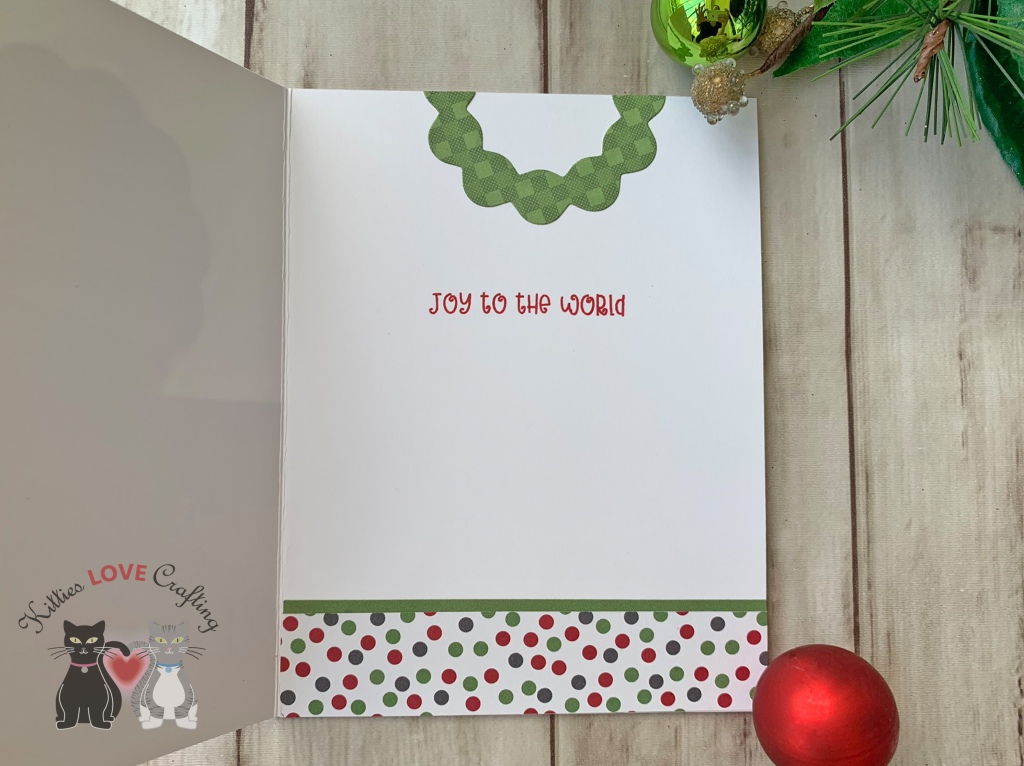
On the inside of the card, I added a green piece of North Pole Solids Paper Pad, measuring 1 x 4-1/4″and a piece of North Pole Paper Pad, measuring 7/8″x 4-1/4″ and stamped a sentiment from the stampset included in the kit and Catherine Pooler Rockin Red Ink. I added the solid inside piece of the wreath frame to the top of the card.
Thanks for reading this post. I hope you enjoyed and I’ve inspired you to try out these adorable House Builder dies and make some fun cards and gift boxes! Leave comments or questions below or feel free to email me.
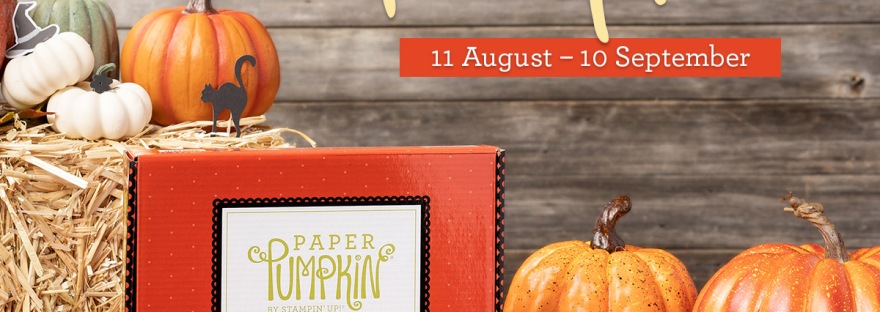
As the autumn season approaches, prepare to celebrate with the September Paper Pumpkin Kit! There’s so much to love about fall—some love the haunts of Halloween, many love the time to give thanks, and others love the changing colors and cooler temperatures. Whatever you love most about fall, September’s kit has everything you need to celebrate the season your way! Between a multi-occasion stamp set and enough supplies to design 20 cracker box treat packages, you can create custom fall crafts to celebrate Halloween, Thanksgiving, pumpkins, and leaves. Whether you make them all the same or mix ‘n’ match your crafts, there’s something for everyone in this kit!
While this kit was designed to offer a unique treat packaging experience to subscribers, the supplies can easily be used to create cards for any autumn occasion. Don’t worry—we’ll be sure to provide plenty of project inspiration to spark your creativity! This month’s kit comes in a one-of-a-kind box which is a fun collectible for long-time subscribers and can also be used to send someone some Fall/Halloween goodies! Get yours today!
This month’s coordinating Colors: Bumblebee, Basic Black, Cajun Craze, Cinnamon Cider, Mossy Meadow, Old Olive, Pumpkin Pie, white
Subscription Information
Subscribe to the September 2020 Paper Pumpkin Kit from 11 August to 10 September at paperpumpkin.com.
Note: Supplies may be limited toward the end of each subscription period.
Well this post is a little late but….better late than never I guess. This kit is very appropriate for the time we are currently in. What I really liked about the included stamp set, Simon Says Stamp Home Sweet Home 6×8 Stamp Set, is that the image of the houses fits across a landscape A2 card or a slimline card.
I colored all the images with COPICS. I used R81 & R85, W1 & W3, Y13 & Y18, G07 & G28 for the first house (top); BG11 & BG53, W1, W3 & W7, G07 & G28, Y13 & Y18, R29 & R56 for the second house; R29 & R56, W3 & W7, Y13 & Y18 for the third house; R29 & R56, BG11 & BG53, W3 & W7 for the Airplane and banner; Y13 & Y18 for the sun and R81 & R85 for the paper plane. I fussycut all the images and adhered them to the card. I used 3M Foam Tape to pop up some of the images for added dimension.
For the third card, I started by cutting a piece of Simon Says Stamp Soft Navy Cardstock to 4-1/4 x 5-1/2″ and scored at 4-1/4″ to create the card base and another piece to 4 x 5-1/4″.
For this card I wanted to try using my prismacolors on the navy cardstock to see if it wouls work. To be honest it is a techinique I have never tried before but have seen Jennifer McGuire and others do it successfully so I figured why not. I also saw Kristina Werner white heat emboss onto the navy cardstock with this kit and looked stunning so I combined the two ideas and came up with this card.
Ok, so how did I fix the stray embossing powder. Well, I tried using a sand eraser and an exacto knife to gently scrape it off but it was starting to pill the paper so I decided to embrace it instead and add white dots (for stars) with my Uni-Ball Signo Broad Point Gel Pen.
I adhered the panel to the card base and then finished it off by adding a wonky stitched line around the edge.
I stamped houses and the paper airplane from Simon Says Stamp’s Home Sweet Home 6×8 Stamp Set onto Neenah Solar White 80lb Cardstock with Memento Tuxedo Black Ink. I colored them with COPIC markers. I used B000 & B01, W1 & W3 (roof), BG0000 & 0 (windows) for the first house; RV10, RV11 & RV14, W1 & W3 (roof), BG0000 & 0 (windows) for the second house; YG09 & YG25 for the trees; W1 & W3, Y06 & Y13 for the lamp post; B24 & B37 for the sky; Y06 & Y13 for the stars and B01 & B24 for the paper airplane and RV10 & RV11 for the background.
I added 3M Foam Tape to the top panel, adhered the images behind the panel and adhered it to the card base. I finished it off by adding three dots of Nuvo Gloss Drops in Midnight Blue at the top and bottom of the card.
I fussycut the images out and adhered them to the card front. I heat embossed a sentiment and some clouds to the top of the card with the same Silver Embossing Powder. To finish it off I added some splashes with Silver Acrylic Paint.
I left the inside of the card blank and just added a strip of the leftover watercolor, measuring 1 x 4-1/4″.
Thanks for reading this post. I hope you enjoyed and I’ve inspired you to make some cards using this kit yourself! If you want to share you creations with me tag me on instagram @kittieslovecrafting. Leave comments or questions below or feel free to email me.
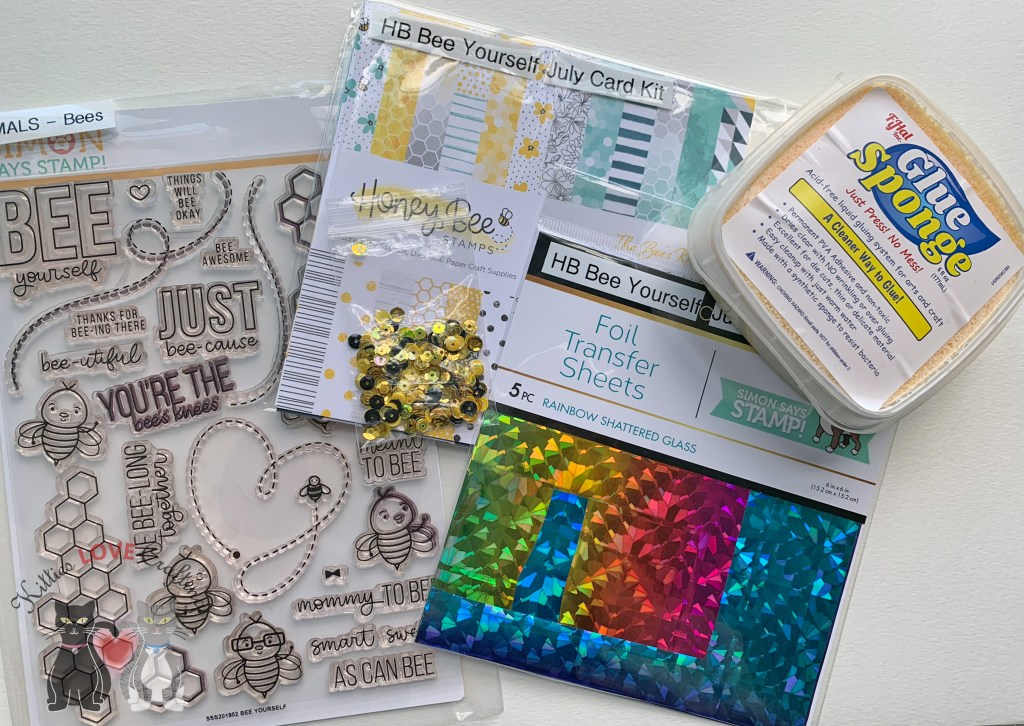
Hello friends. I finally got to play with this adorable bee-themed card kit from Simon Says Stamps. It’s the July Card Kit called Bee Yourself. Lots of fun products to play with and I just adore the stampset. Unfortunately the kit is no longer available but I will link all the available individual products. I almost strictly used only the card kit contents. I did bring in a few of my own products and I will link those below as well.
Card Kit Supplies
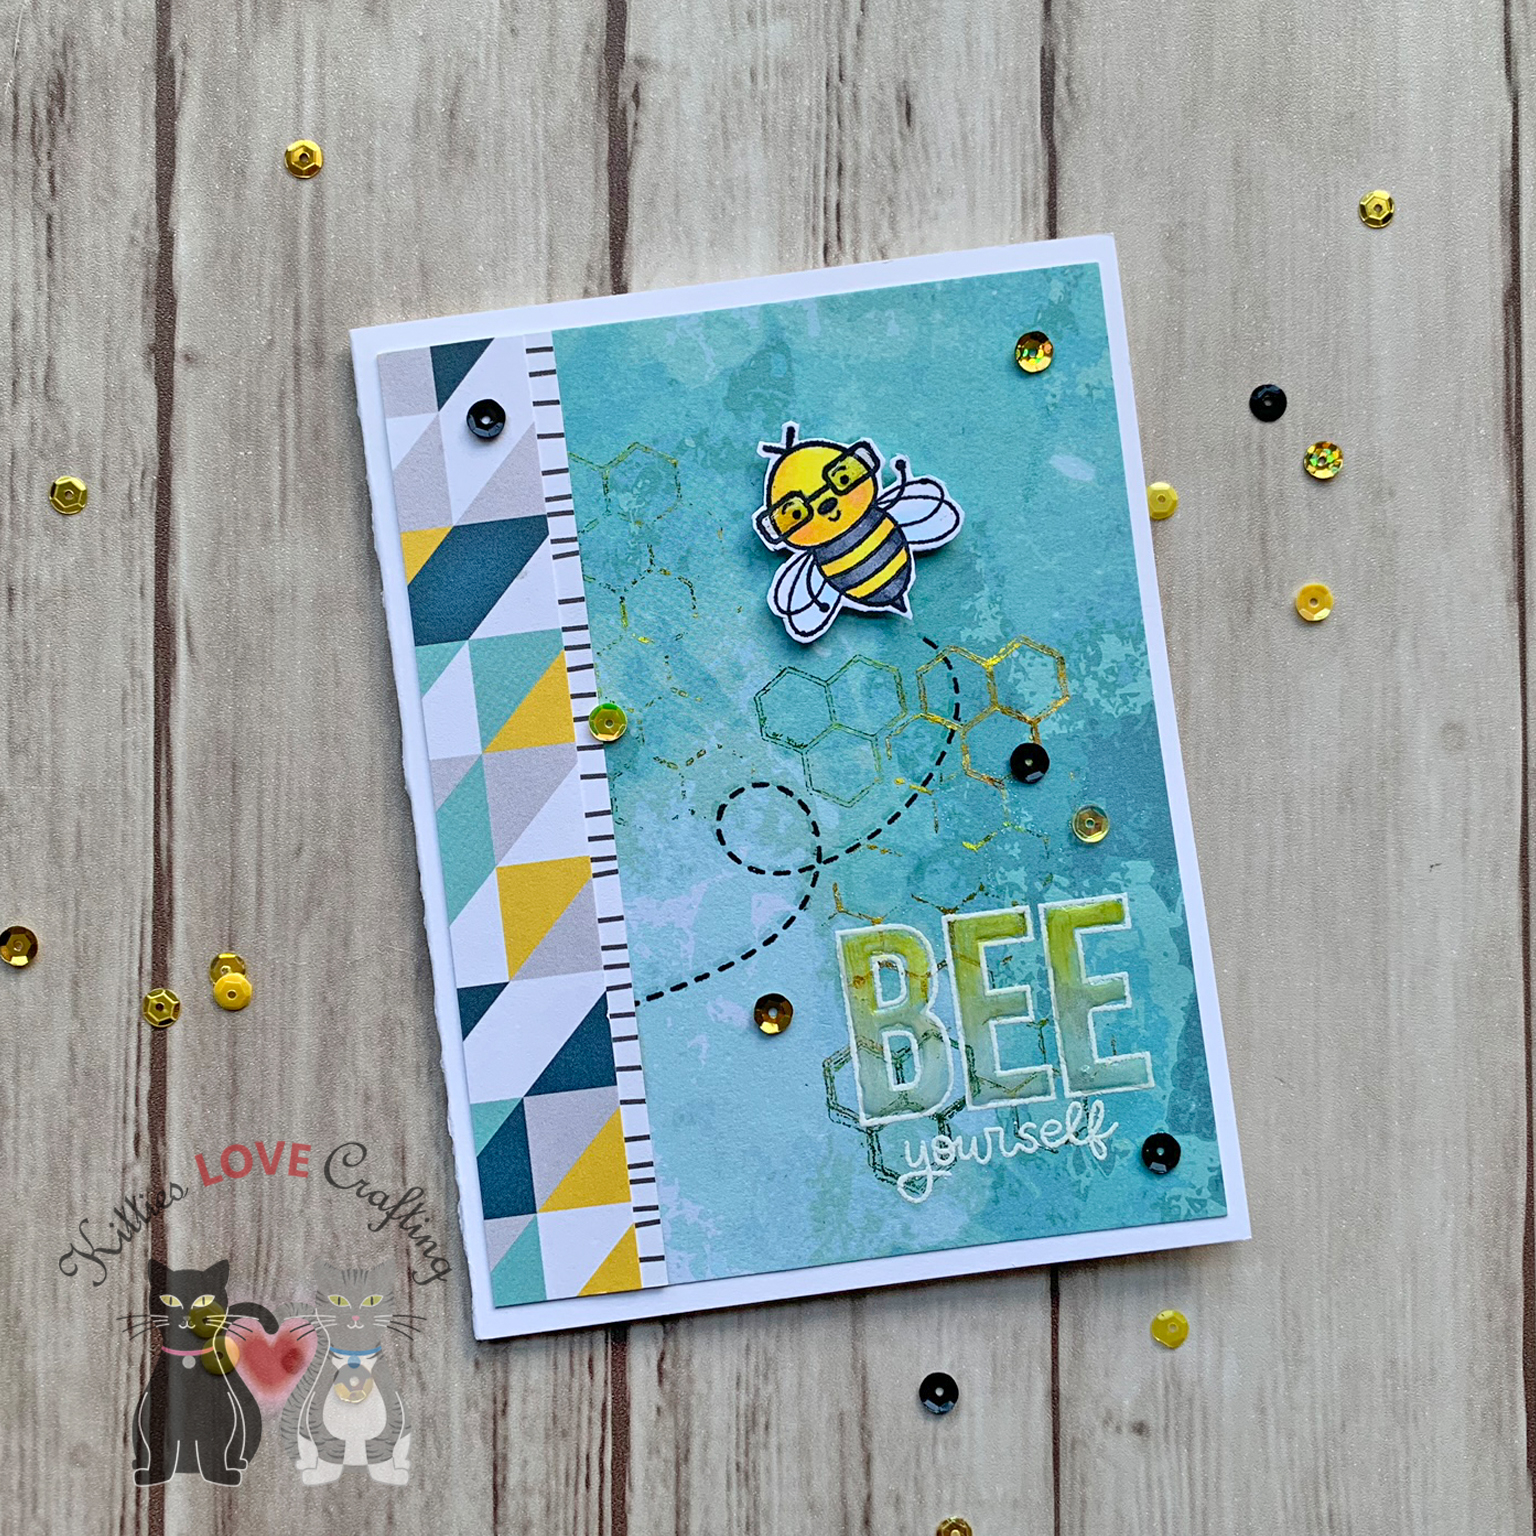
When I first saw the reveal video for this kit, I fell for the paper pad from Honeybee Stamps immediately. I knew I had to use the aqua watercolor pattern first. I kept it simple. I wanted to see if I could foil using a stamp and the glue pad and a stamp (didn’t have transfer gel. I do NOW though 🙂 ).
I diecut a few hexagons from Simon Says Stamp Black cardstock using the Simon Says Stamp Small Hexagon Cluster wafer thin die and a few from some black glitter paper. I added the black hexagon cluster to the card and then inlayed 3 glitter hexagons back into the clusters. I added a black mat behind the sentiment. Then I adhered the flower onto the right side of the card and the sentiment toward the bottom. I adhered the little bees and added some sequins to finish off the card.
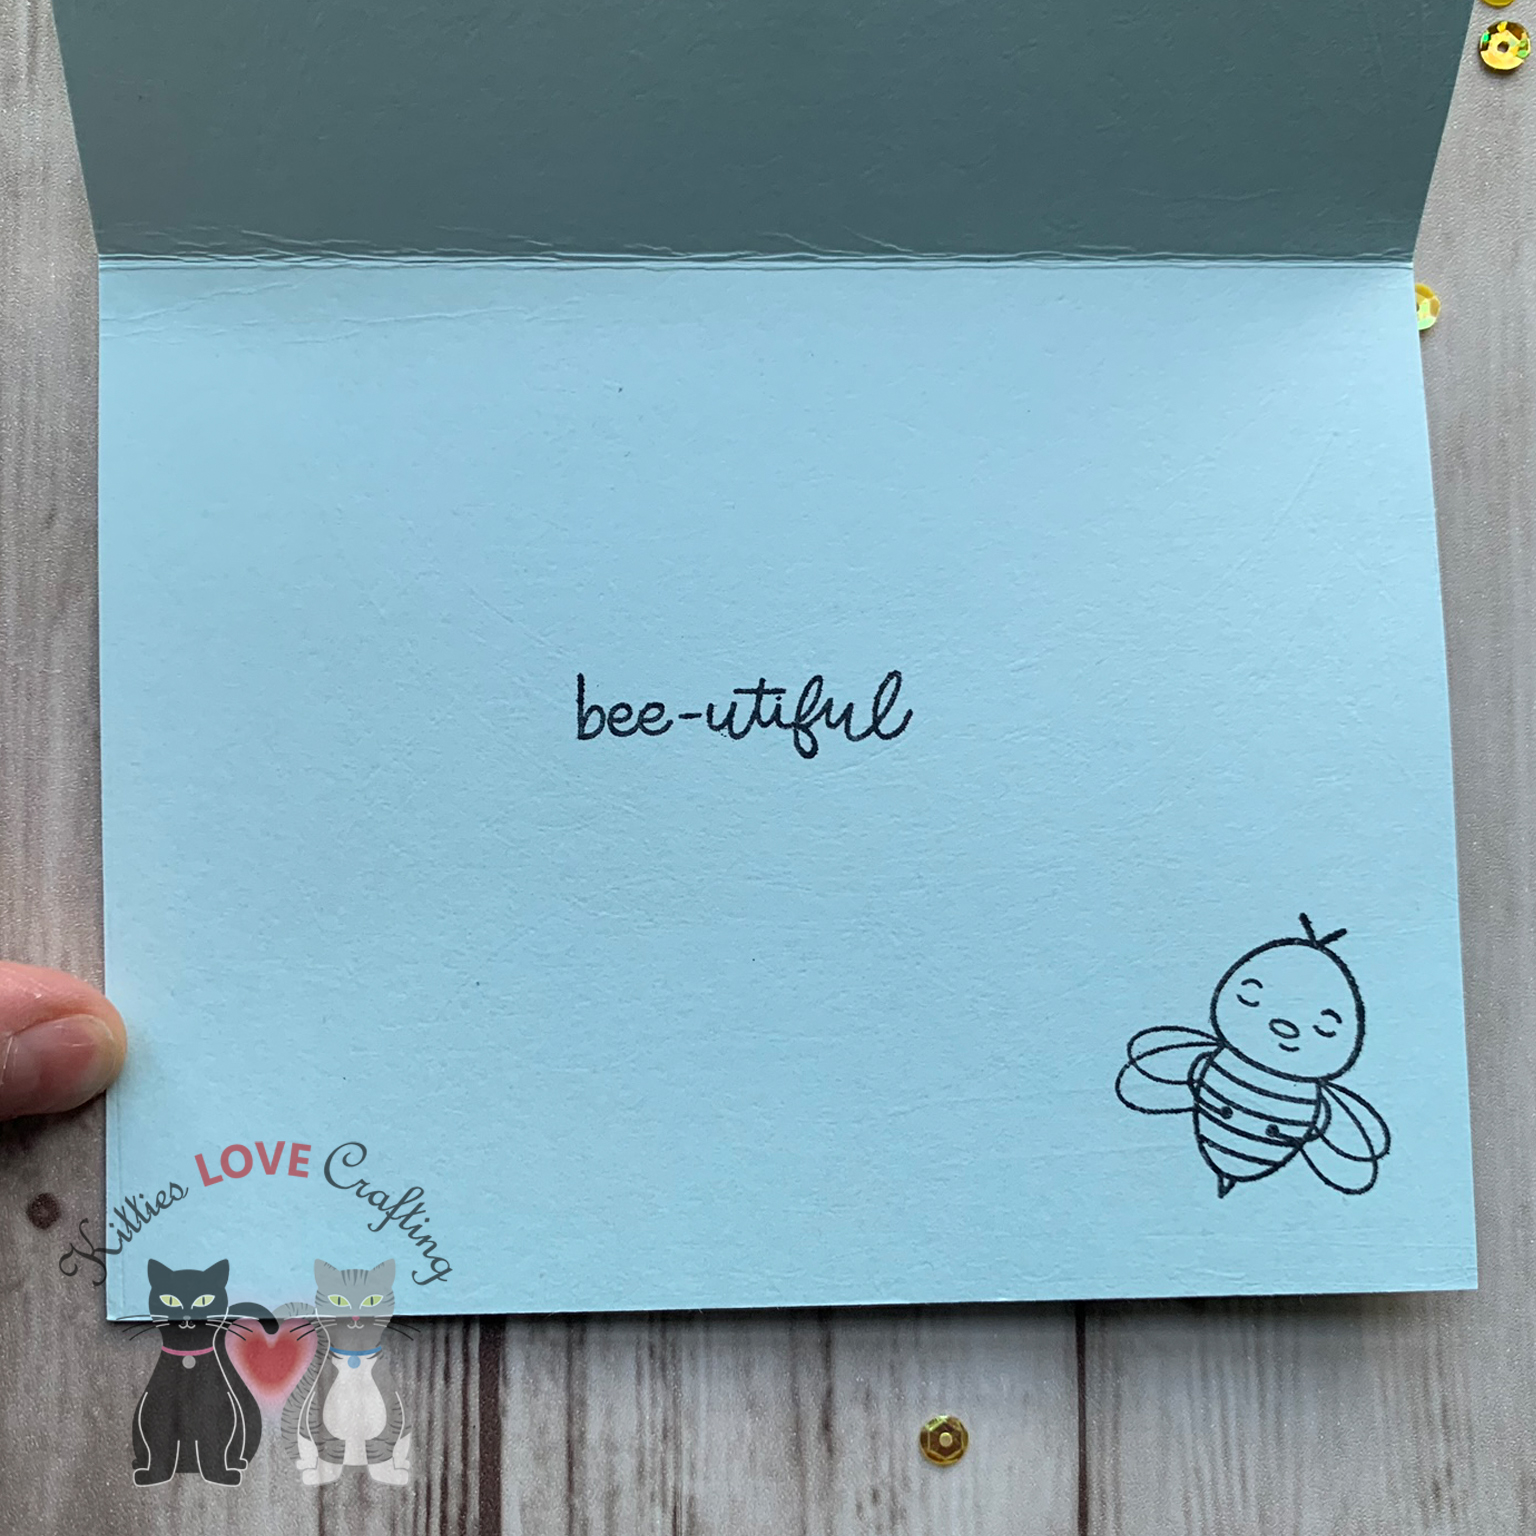
I stamped the “bee-utiful” sentiment and a little bee with Ranger Black Archival Jet Black on the inside of the card. And now this card is done!
3 cards done, 2 to go…
Another paper that I really like for this collection was the black and white wonky (technical term :)) striped one. Another thing I wanted to use was the foilable cards. And the rainbow one of course calls for rainbow foil (duh). I only foiled the rainbow itself and the little bees so that they would stand out. I fussycut around the images and words, leaving a white border around them. I chose the yellow polka dotted pattern paper from the paper pad as my background. I cut a piece to 3 1/4 x 5 1/2”. I adhered a strip of the black and white wonky stripe paper onto and A2 sized card base (Simon Says Stamp Sunshine cardstock), leaving a 1/4 inch on each side, and adhered the yellow polka dot one in the center over that piece. I added some thin Love From Lizi Pin Stripe Black Glitter Peel Offs to separate the patterns a bit. I love the peel offs from Love From Lizi! They add interest to your card with little effort and she sells soooo many colors (glitter, metallic, transparent). Super fun.
I adhered the images down onto the card and added some sequins from the included pack. To finish off the inside I cut a piece of Simon Says Stamp White 120# cardstock to 4 x 5 1/4” and adhered inside the card. I added a 1 x 5 1/4” strip of the yellow polka dotted paper and a 1/2 x 5 1/4” strip of the black and white wonky striped paper to the right side of that panel. And stamped the “JUST bee-cause” sentiment in Ranger Black Archival Jet Black. And this completes card #4.
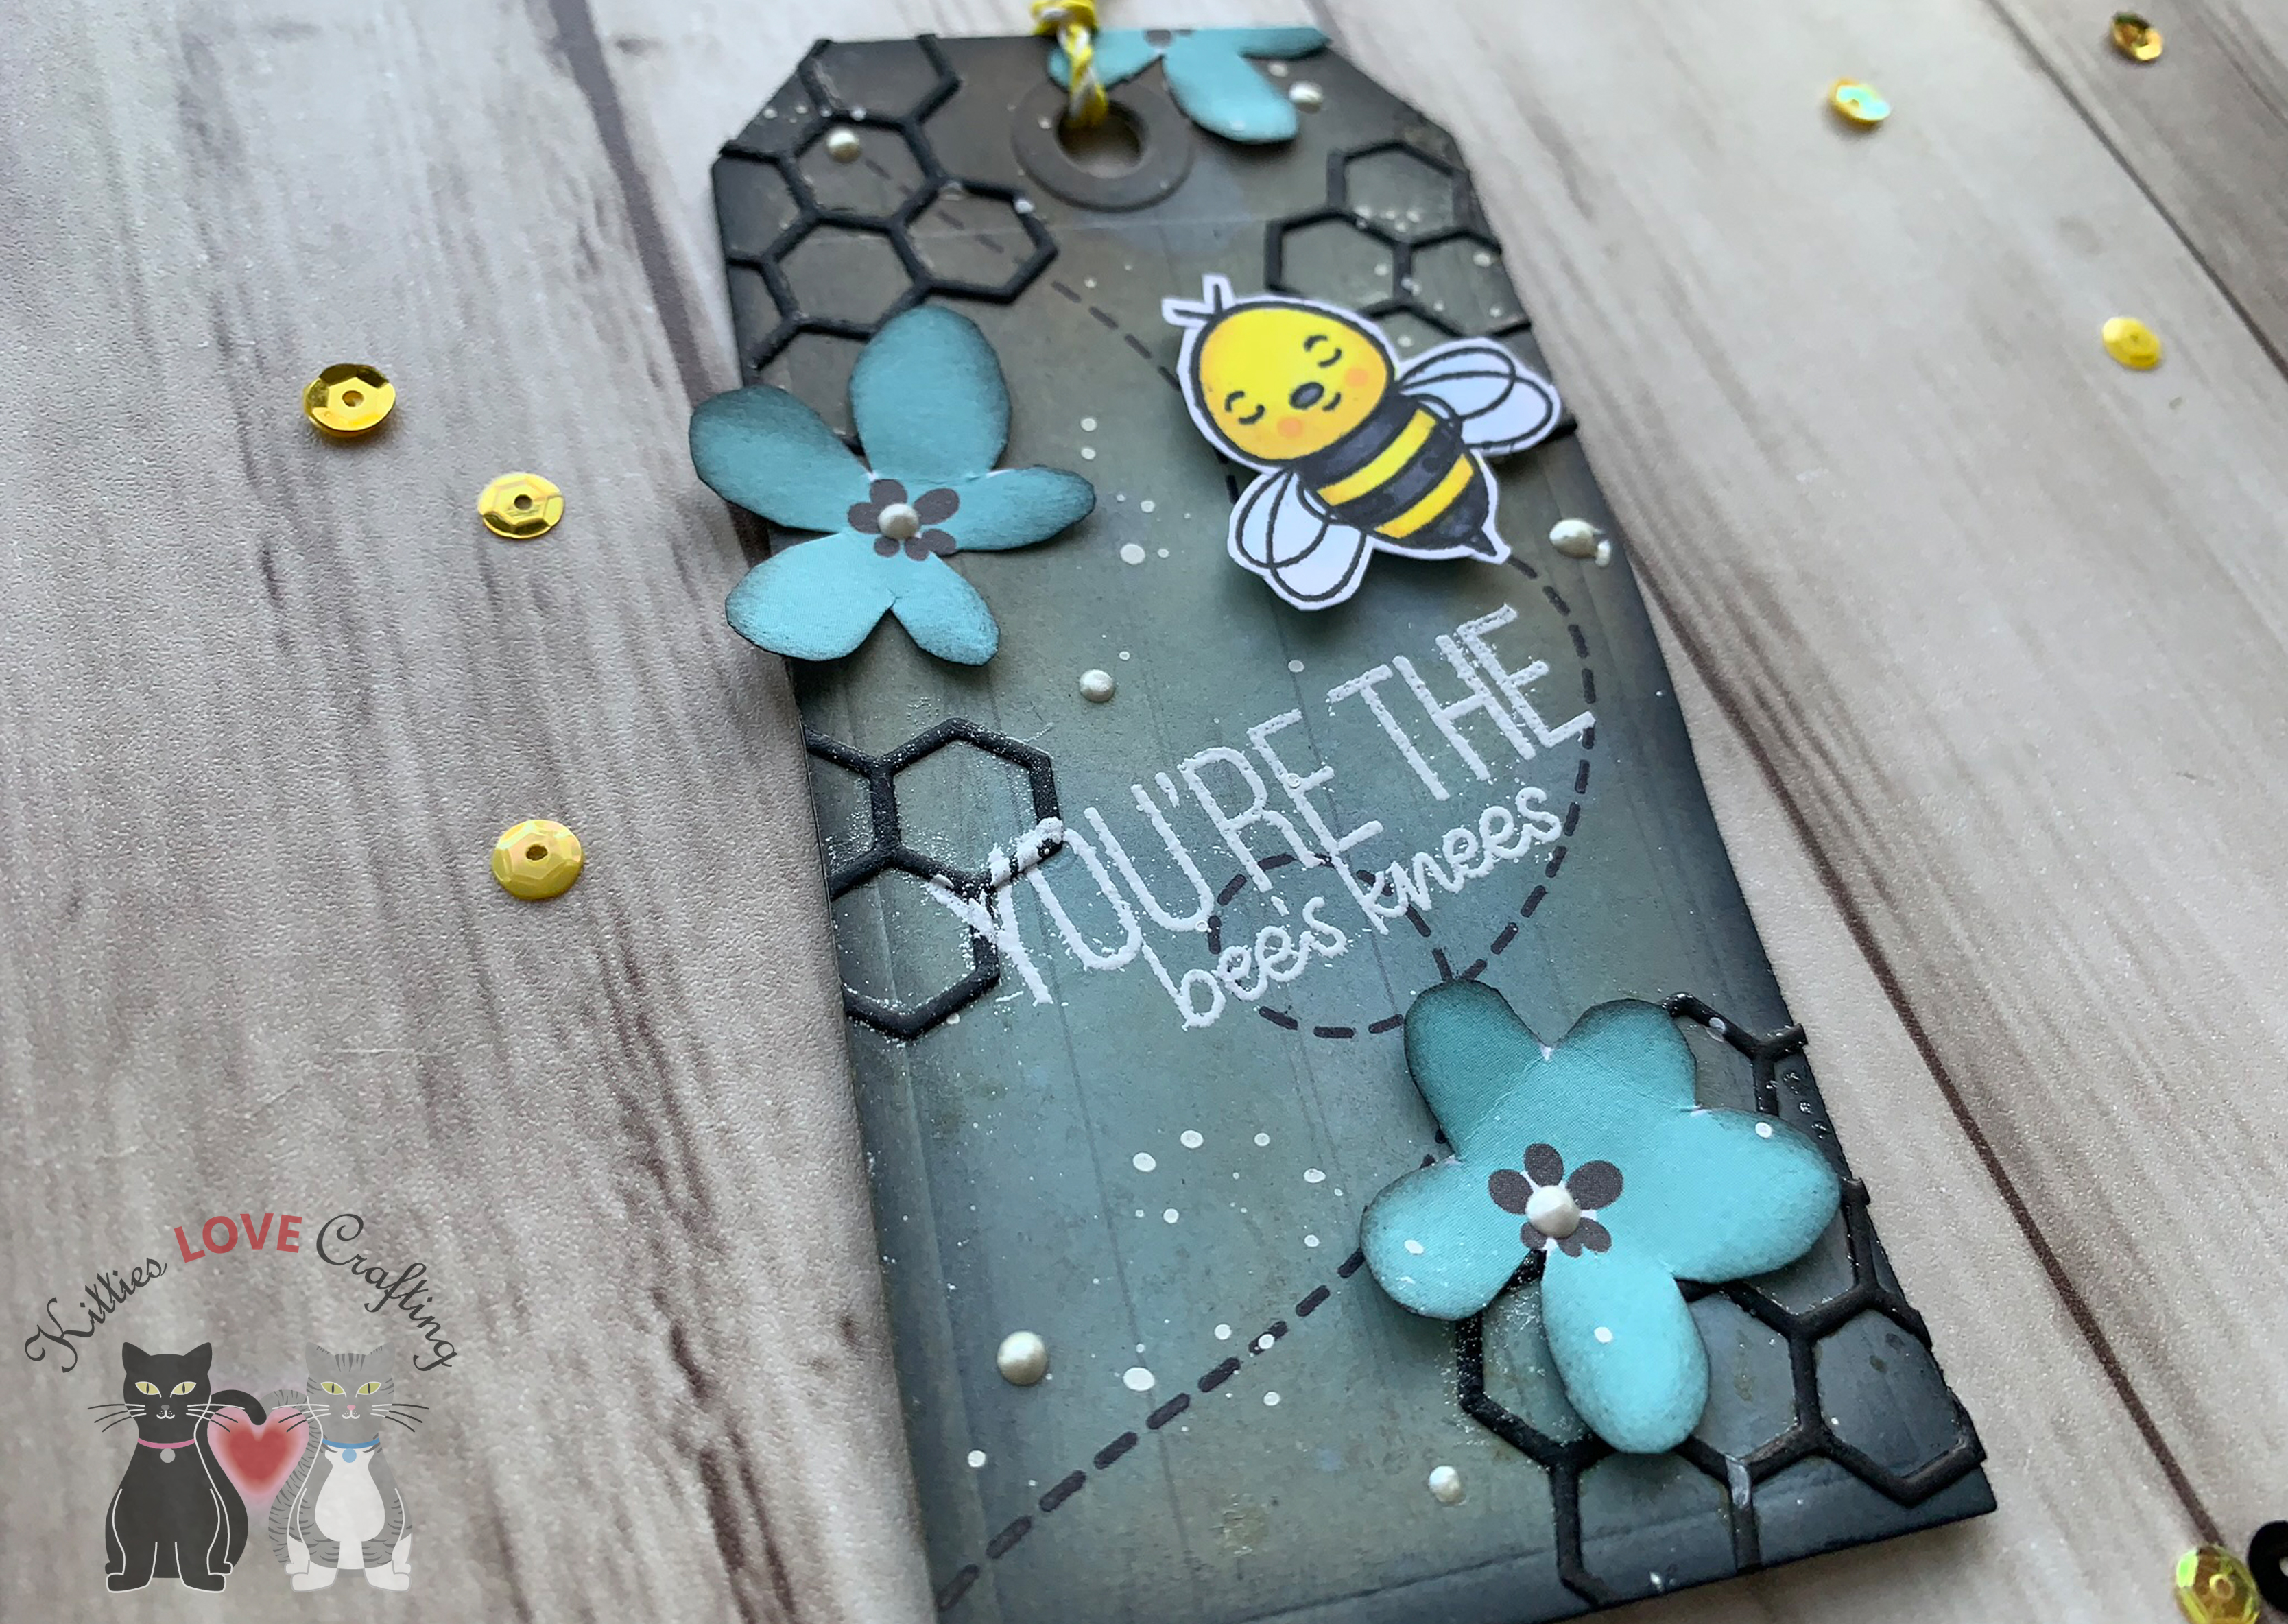
While I was making these cards, I had a thought…how cute would the bees look on a tag??? So I got out my trusty tag die from Tim Holtz (Sizzix Framelit Dies – Tag Collection by Tim Holtz) and diecut 2 tags using the second to largest die from Simon Says Stamp Black cardstock. I chose two pattern papers for my backgrounds, the light wood grain and the black and aqua hexagons, diecut 2 of each of those and glued them onto the front and back of the tag. Then I got to distressing.
I don’t want to leave this tag just as is though. I thought it might look cute as a card instead. So I cut a piece of the yellow hexagon paper to 1-1/4 x 5 1/2” and a piece of the yellow polka dot paper to -1 x 5 1/2” and adhere it to the.back of the hexagon paper and adhered both to an A2 sized card base (Simon Says Stamp Black cardstock).
I adhered the tag to the card base on a slight angle, placing it over the edges. I trimmed off the excess and proceeded to diecut some more hexagon clusters with black cardstock and adhered them to the card. I added one on the black paper so it looks like it’s embossed. I added three little bees and some sequins to complete this card.
Supplies
Card Kit Includes:
Other Supplies Used:
Hope you’ve enjoyed this post. Thanks for reading to the end; I know it was a long one. I hope I’ve inspired you to make some adorable bee cards of your own. Whether you have the kit or not you can make these cards. Leave comments or questions below or feel free toemailme.


 https://linkdeli.com/widget.js?id=f5e8378456858c916708