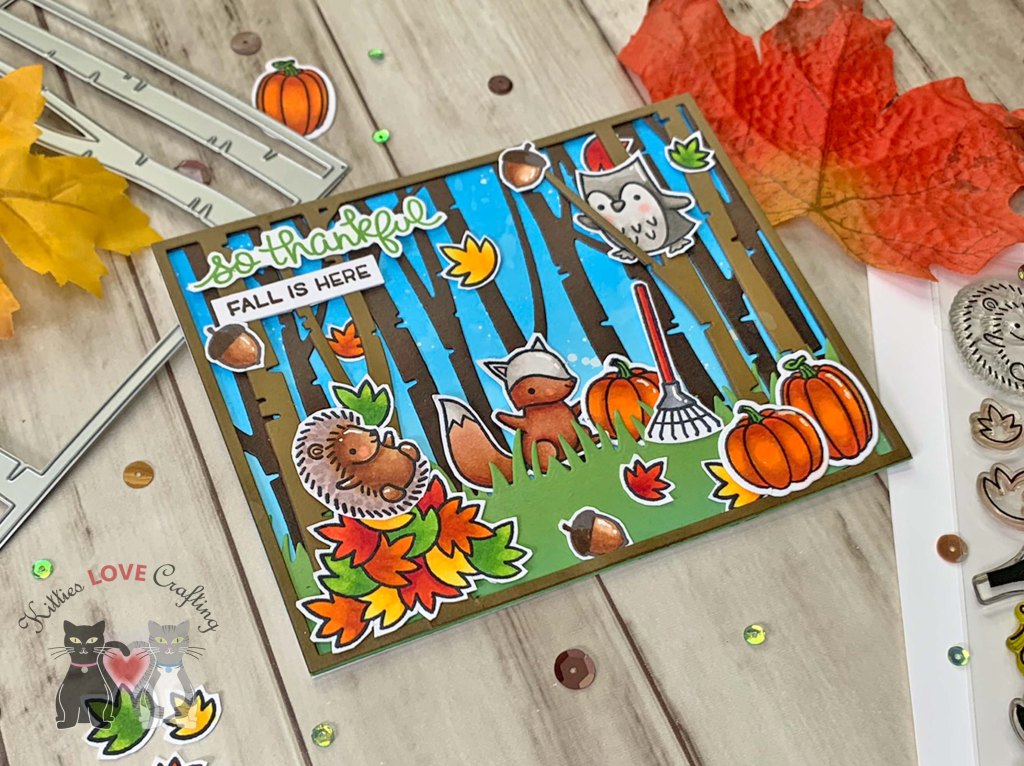
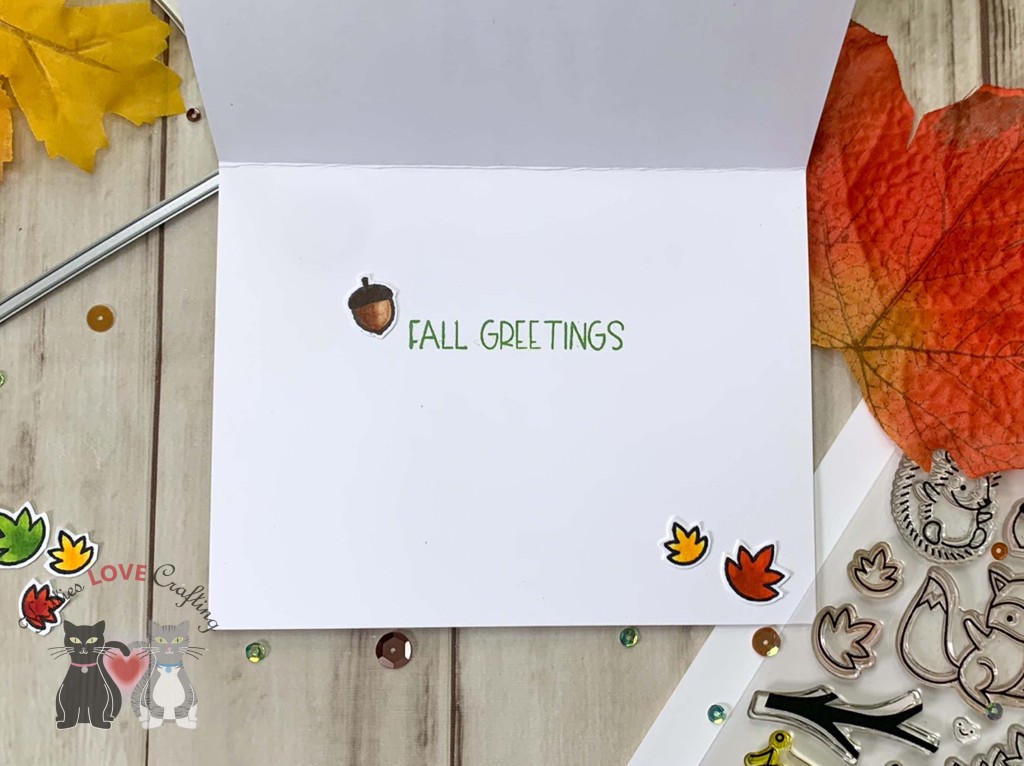
I used YR16, YR27 & YR09, YG25 & YG17 for the pumpkins; R17, R26, & R05, Y17 & Y18, YR09, YR13, YR16 & YR27 for the leaves; E0000, E34 & E37 for the acorns; E70, E74, E34 , E37 & R20 for the porcupine; , W0, W1, W3, W5 & W7, R20 for the owl; E13, E99, E09, E37, R20, W0 & W3 for the squirrel; N2, N4, N5, R05, R17 & R46 for the rake and die cut with the coordinating dies.
Thanks for reading this post! I hope you enjoyed and I’ve inspired you to make this cute critter card yourself! If you want to share you creations with me tag me on instagram @kittieslovecrafting. Leave comments or questions below or feel free to email me.
Hello friends. In part 1 of this post I showed how I created six backgrounds using distress inks, markers, and crayons. It’s time to make some cards with these. I kept them pretty simple to show that you don’t need to always make complicated cards (even though I tend to).
For the first set of backgrounds, I started the cutting a piece of Stampin’ Up! Crumb Cake 8-1/2″ X 11″ Cardstock and a piece of Simon Says Stamp 100# Black Cardstock to 5-1/2 x 8-1/2″ and scored at 4-1/4″ to create the two card bases. I cut the watercolor paper panel down to 4 x 5-1/4″ and left the Strathmore Bristol Smooth Paper one 4-1/4 x 5-1/2″.
Watercolor Paper Panel
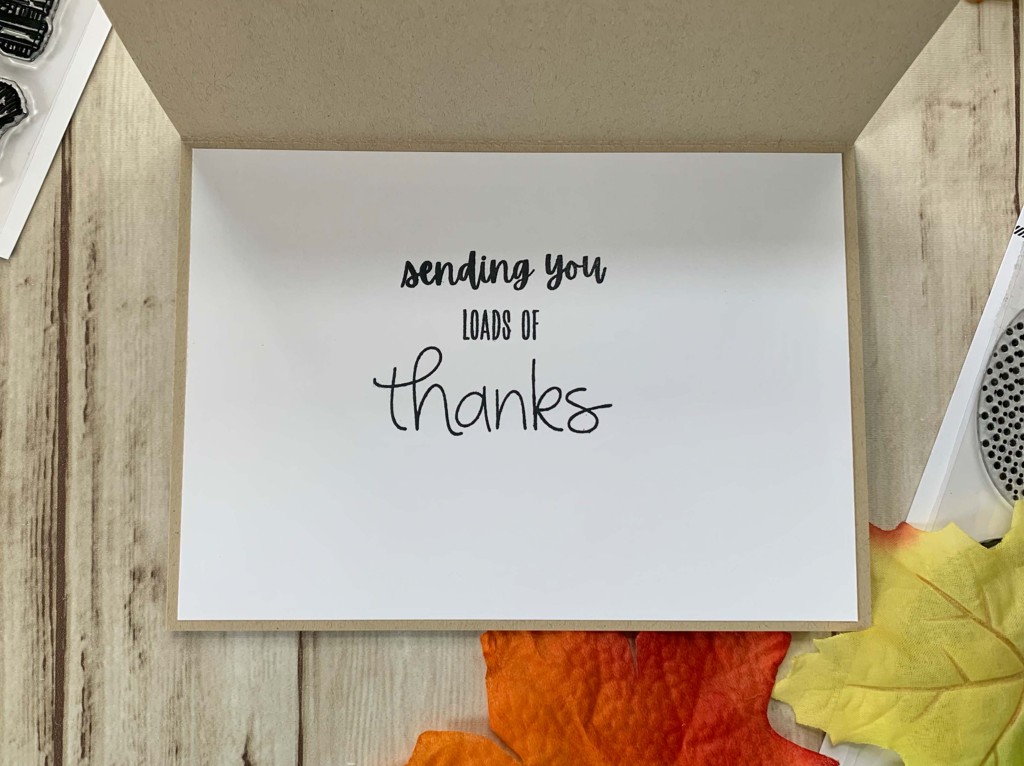
For this card I decided to make a shaker card. I diecut a stitched rectangle from the center with the Catherine Pooler Scallops & Dots Dies. Then added a piece of acetate and 3M Foam Tape behind it, added some pink, black and white sequins from my stash (I tried to pick flat ones) and adhered the panel to the card. I diecut the sentiment from Neenah 110lb Classic Crest Cardstock 8.5 X 11″ and the shadow from Simon Says Stamp 100# Black Cardstock using the Honey Bee Stamps Thanks Die (this is an older die and I don’t think it’s been retired). I finished it off by adding some additional black sequins.
For the third set of backgrounds, I started the cutting two pieces of Stampin’ Up! Early Espresso 8-1/2″ X 11″ Cardstocktock 5-1/2 x 8-1/2″ and scored at 4-1/4″ to create the two card bases. I cut both panels down to 4 x 5-1/4″.
Watercolor Paper Panel
I diecut a scalloped circle (measuring 2-1/2″) from the center with the Stampin’ Up! Layering Circles Dies. (Just a note about these layering circles as well as the other layering dies from SU!. I never thought I would get so much use out of them but I actually have so they kinda paid for themselves by now, And that’s crafty win in my book!).
Thanks for reading this post. I hope you enjoyed and I’ve inspired you to give these easy cards a try for yourself. Leave comments or questions below or feel free to email.
Hi friends. I used the House Builder Card Base Diesfrom Honey Bee Stamps along with the Treat Shop Add-On Dies and Stamps to make this cute Valentine’s Day Card. I couldn’t pass up the opportunity to make another card with these dies. They are still one of my faves!
I colored them with Copic Markers. I used BG000 and Copic Blender 0 for all glass elements (cake dome, candy dome and gumball machine); R81 & R83, C1, C3, & C5 for the chairs and table; R14 & R27, R81 & R83 for the umbrella. E25 & E29, R81, R83 & R85, C1 & 0 for the cupcakes; R14 & R27, C00 & 0, BG000, G94 and E25 for the gumball machine; E25 & E29 for the chocolates; R81, R83 & R85 for the present; and G94 & G99, R81 & R83, E25 & E29, R14 & R27 for the candies.
Thanks for reading this post. I hope you enjoyed and I’ve inspired you to give this cute Valentine’s Day card a try for yourself. Leave comments or questions below or feel free to email me.
I cut a piece of Catherine Pooler Sand Dunes 8-1/2 x 11″ Cardstock (retired) to 10 x 7″ and scored at 5″ to make the card base. I also cut a piece of Honey Bee Stamps Halloween Harvest 6×6 Paper Pad to 4-3/4 x 6″. Since this paper pad is only 6 x 6 I had to get creative and fill in the sides with more paper. So I cut two pieces of patter paper to 1/2 x 4-3/4″ and adhered it behind the larger piece.
I colored the images with Copic Markers. I used B00, B02, and B06 for the truck; N1, N2 & N4 for the metal portions such as the mirror; N5 and N8 for the tires; BG000 & 0 for the windows; R05 & R27 for the lights; R05 & R27 for the doggy bandana, E29, E23, & E37 for the dog; YR14 & YR21 for the license plate; YG61, G94, YG99, & E15 for the jug; YR16, YR04 & Y18, Y13 & Y16, YG61, G94, & YG99, YG91 & E15 for the pumpkins; R05 & R27, E55, E57 & E29 for the apple bucket.
Thanks for reading this post. I hope you enjoyed and I’ve inspired you to give this cute fall card a try for yourself. Leave comments or questions below or feel free to email me.
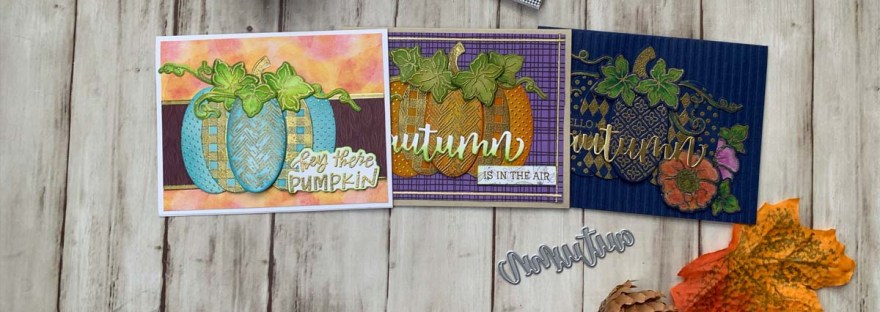
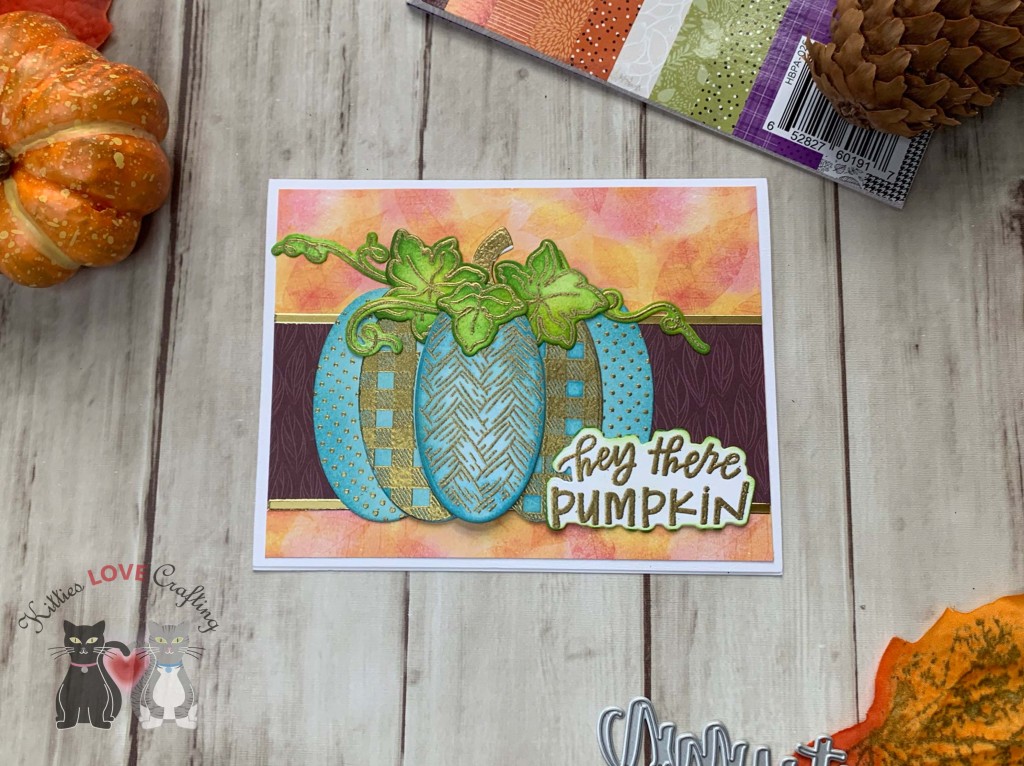
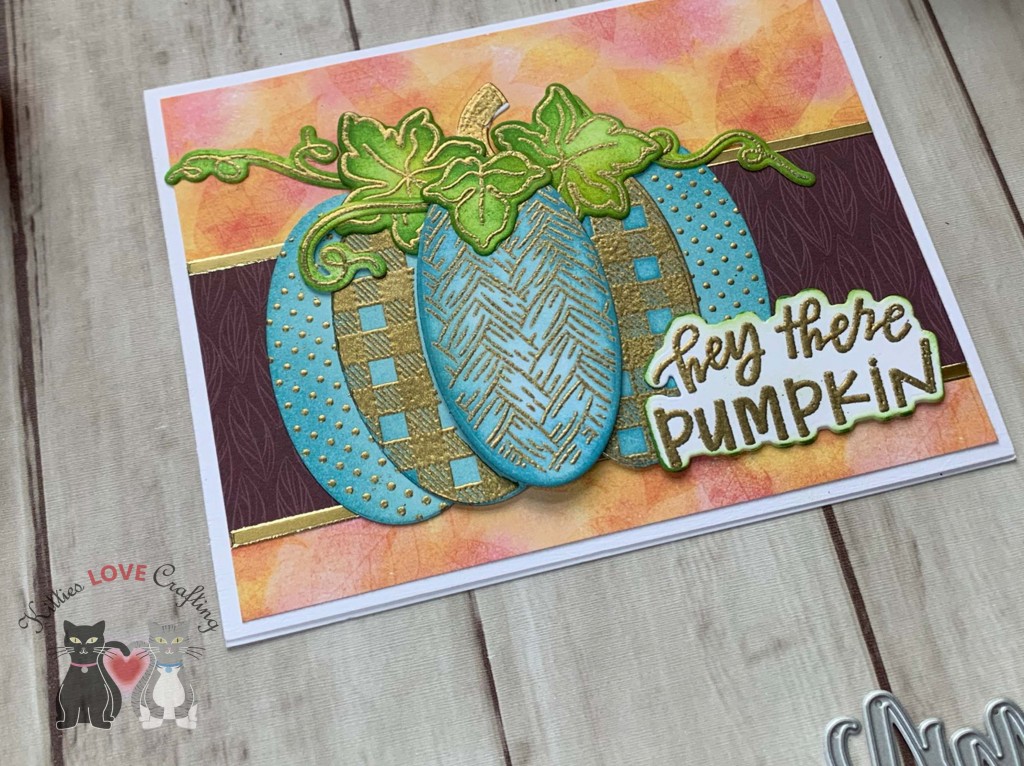
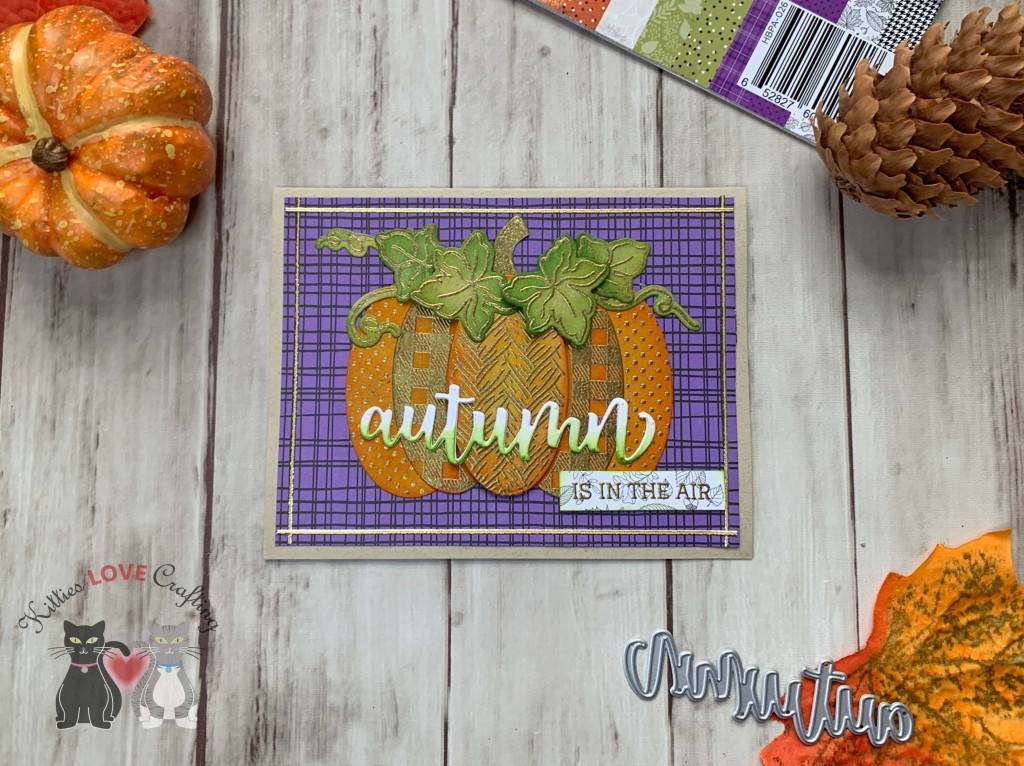
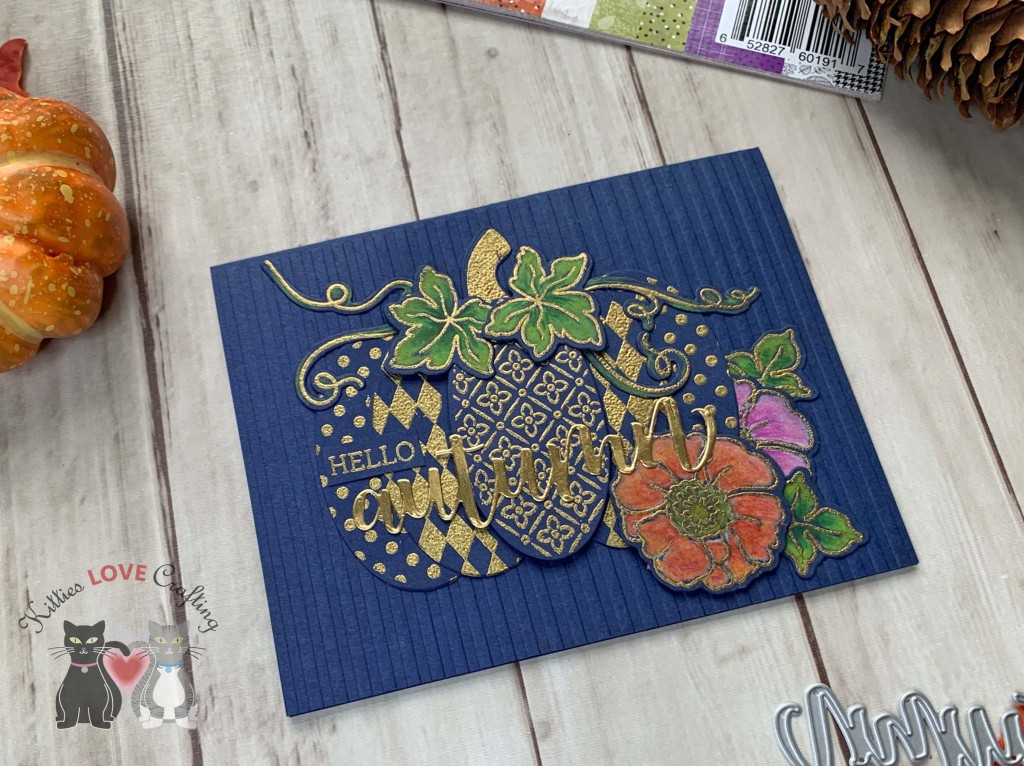
I love this new Patchwork Pumpkin Stampset from Honey Bee Stamps! You can create all kinds of cute pumpkins. You can also add flowers and the coordinating dies makes it easy to cut everything out. I made three cards using different color papers and coloring methods but with the same embossing powder. I wanted to see how to create different cards by just making subtle changes. Using pattern papers and embossing folders is also an easy way to add interest.
For the second card, I started by cutting a piece of Catherine Pooler Sand Dunes 8-1/2 x 11″ Cardstock (discontinued-any kraft cardstock will work) to 5-1/2 x 8-1/2″ and scored at 4-1/4″ to make the card base and cut a piece of the purple paper from the Honey Bee Stamps Halloween Harvest 6×6 Paper Pad to 4 x 5-1/4″.
I used Versamark Ink to stamp several of the pattern pumpkins, leaves, curly vines and the stem from the Honey Bee Stamps Patchwork Pumpkin Stampset onto some Catherine Pooler Sand Dunes 8-1/2 x 11″ Cardstock (retired) and heat embossed with Gold Embossing Powder. Then diecut all the pieces with the oval die included in the coordinating dieset. I used Tim Holtz Mustard Seed and Carved Pumpkin Distress Inks to color the pumpkin and Crushed Olive and Mowed Lawn to color the leaves and vines. I used 3M Foam Tape to pop up the center piece of the pumpkin and some of the leaves.
Thanks for reading this post. I hope you enjoyed and I’ve inspired you to give these cute Fall cards a try for yourself. Leave comments or questions below or feel free to email me.
Thanks for reading this post. I hope you enjoyed and I’ve inspired you to give this cute Halloween shaker card a try for yourself. Leave comments or questions below or feel free to email me.
Hi friends. I’m back after some unplanned time off!It’s great to be creating again. I’m cutting it close but let’s start with a cute Halloween card. This stampset from Pretty Pink Posh, Halloween Wreath is so cute! I love all the fun images. They are easy to color with markers, pencils etc or leave them uncolored. You can also make a wreath from the singular images instead of using the wreath image.
Thanks for reading this post. I hope you enjoyed and I’ve inspired you to give this sweet and easy Halloween card a try for yourself. Leave comments or questions below or feel free to email me.
Hi friends. When I saw Jennifer McGuire’s video featuring the Slimline Bird House Pop Up Card Dies and add-on dies from Scrappy Tails, I knew I had to have them. They remind me of the Honey Bee Stamps House Card Dies and Add-ons which as you may have figured out I love so much! These dies are just as versatile and allow you to make tons of different types of cards for all occasions.
I cut out the two windows using the circle from the birdhouse die set. I adhered the scallop bosrders on the window as well as the roof. Then diecut some grass using the Lawn Fawn Grassy Border from Stampin’ Up! Granny Apple Green 8-1/2 x 11″ Cardstock, trimmed it down to size and adhered it to the bottom of the card. I added the white base on top of the grass.
I colored the images with COPIC Markers. I c olored the peppermints and candy canes with R27, R46 and C1, YG17 and YG25 for the trees, E34, E37, R20, C1 and 0 for the gingerbread people, and R81 and R85 for the gumdrops.
Thanks for reading this post. I hope you enjoyed and I’ve inspired you to give these cute cards a try for yourself. Leave comments or questions below or feel free to email me.
Another great add-on dieset from Honey Bee Stamps! The Treat Shop Add-On Dies and Stamps coordinate with the House Builder Card Base Dies and allow you to make lots of sweet cards. You can create a bakery, ice cream shop or candy shop. The possibilities are endless with this set.
I stamped images from the Honey Bee Stamps Treat Shop Add-On Stamp Set onto Neenah 110lb Classic Crest Cardstock 8.5 X 11″ with Memento Tuxedo Black Ink and colored them with Copic Markers. I used Y17, BG01, R09, and E29 for the banners; BG000 and 0 for the glass display case and cake display; C3 and C5 for the cake base, RV06, RV09, and RV21 for the three tier cake, and E25, E29 and E49 for the heart on the cake. RV06 and RV09, E24 and E29, Y13 and Y17, and C1 and C3 for the cupcakes; YG05 and YG17 for the bush and E24, E29 and E49 for the planter. C1 and C3 for the bakery and specials signs and the table; Y13 and Y17, BG000 and BG01, RV06 and RV21 for the balloons; and BG000 and BG01, RV06, RV09 and RV21 for the umbrella.
Thanks for reading this post. I hope you enjoyed and I’ve inspired you to give these cute treat shop card a try for yourself. Leave comments or questions below or feel free to email me.
Another great add-on dieset from Honey Bee Stamps! The Farmhouse Add-on Dies and Stampset coordinate with the House Builder Card Base Dies and allow you to make lots of cute cards. The last card I made was very patriotic but for this one I decided to make a more traditional farmhouse which can be used for any occasion.
I diecut the flowers and leaves from the House Builder Card Base with green, pink, yellow and navy blue cardstock from my stash.
I stamped the decorative star, two rooster weathervanes, two lanterns, two hanging pots, the table, chair, one plant and a mailbox onto some Neenah 110lb Classic Crest Cardstock 8.5 X 11″ with Memento Tuxedo Ink and colored them with Copic Markers. I used B23, B24 and B26 for the star and hanging pots, B21 and B23 for the chair, YG11 and YG17 for the plants, Y02 and Y13 for the flower pot, mailbox and lantern light, C1 and C3 for the lanterns and W3 and W5 for the table.
Thanks for reading this post. I hope you enjoyed and I’ve inspired you to give this cute farmhouse card a try for yourself. Leave comments or questions below or feel free to email me.


 https://linkdeli.com/widget.js?id=f5e8378456858c916708