It’s always fun to find new ways to use your dies and this is one of my favorite techniques to stretch my dies. It’s a faux embossing technique; no embossing folder needed.
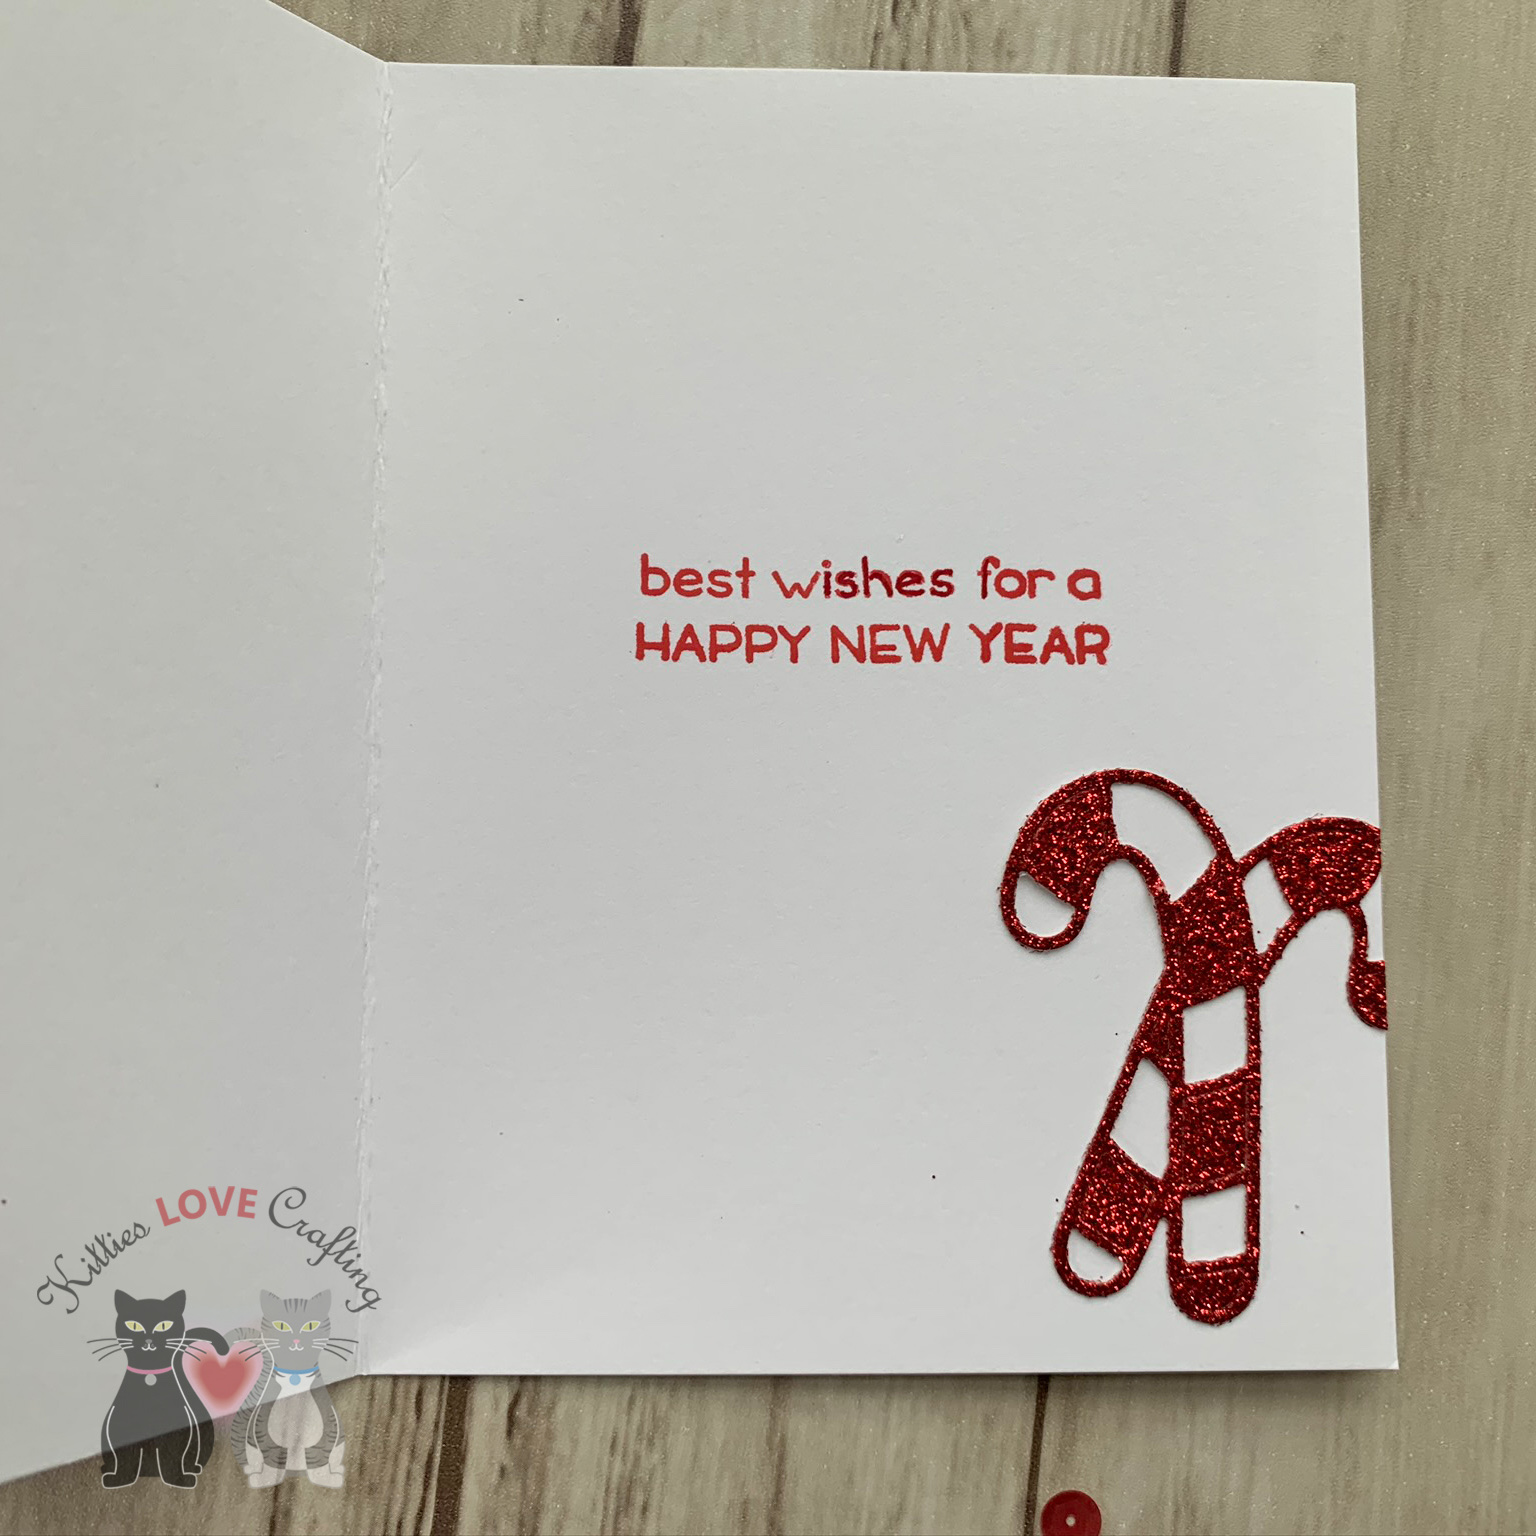
I adhered the white candy cane diecuts randomly around the card, creating a pattern and a faux embossed look. This is a quick way to add dimension to your backgrounds. I made one of the candy canes the focal point by inlaying the red and white glitter paper pieces inside the candy cane outlines. Then added the bow from the same die. Don’t get rid of the leftover glitter diecut candy cane pieces, you can use them on the inside of the card.
On the inside of the card,I stamped another sentiment from the Merry Messages Stampset by Lawn Fawn with Festive Berries Distress Oxide and adhered the leftover red glitter candy cane diecut and Inlayed some of the interior stripe pieces. And that completes this card. Pretty easy and quick to make.
Thanks for reading this post and I hope I’ve inspired you to give this card a try on your own. Leave comments or questions below or feel free to email me.
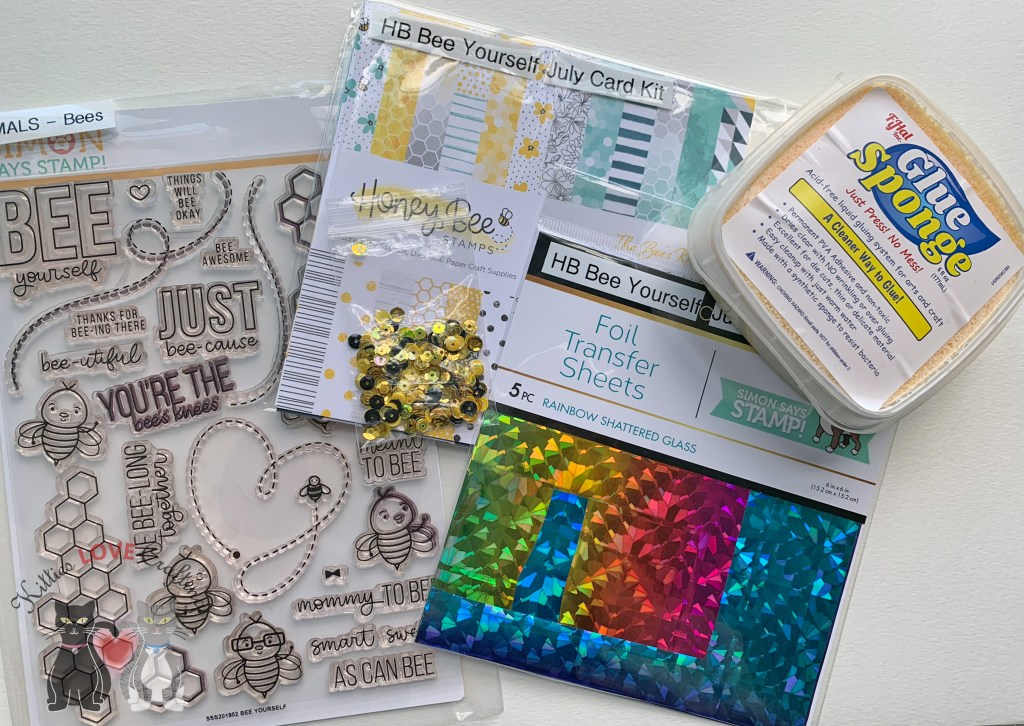
Hello friends. I finally got to play with this adorable bee-themed card kit from Simon Says Stamps. It’s the July Card Kit called Bee Yourself. Lots of fun products to play with and I just adore the stampset. Unfortunately the kit is no longer available but I will link all the available individual products. I almost strictly used only the card kit contents. I did bring in a few of my own products and I will link those below as well.
Card Kit Supplies
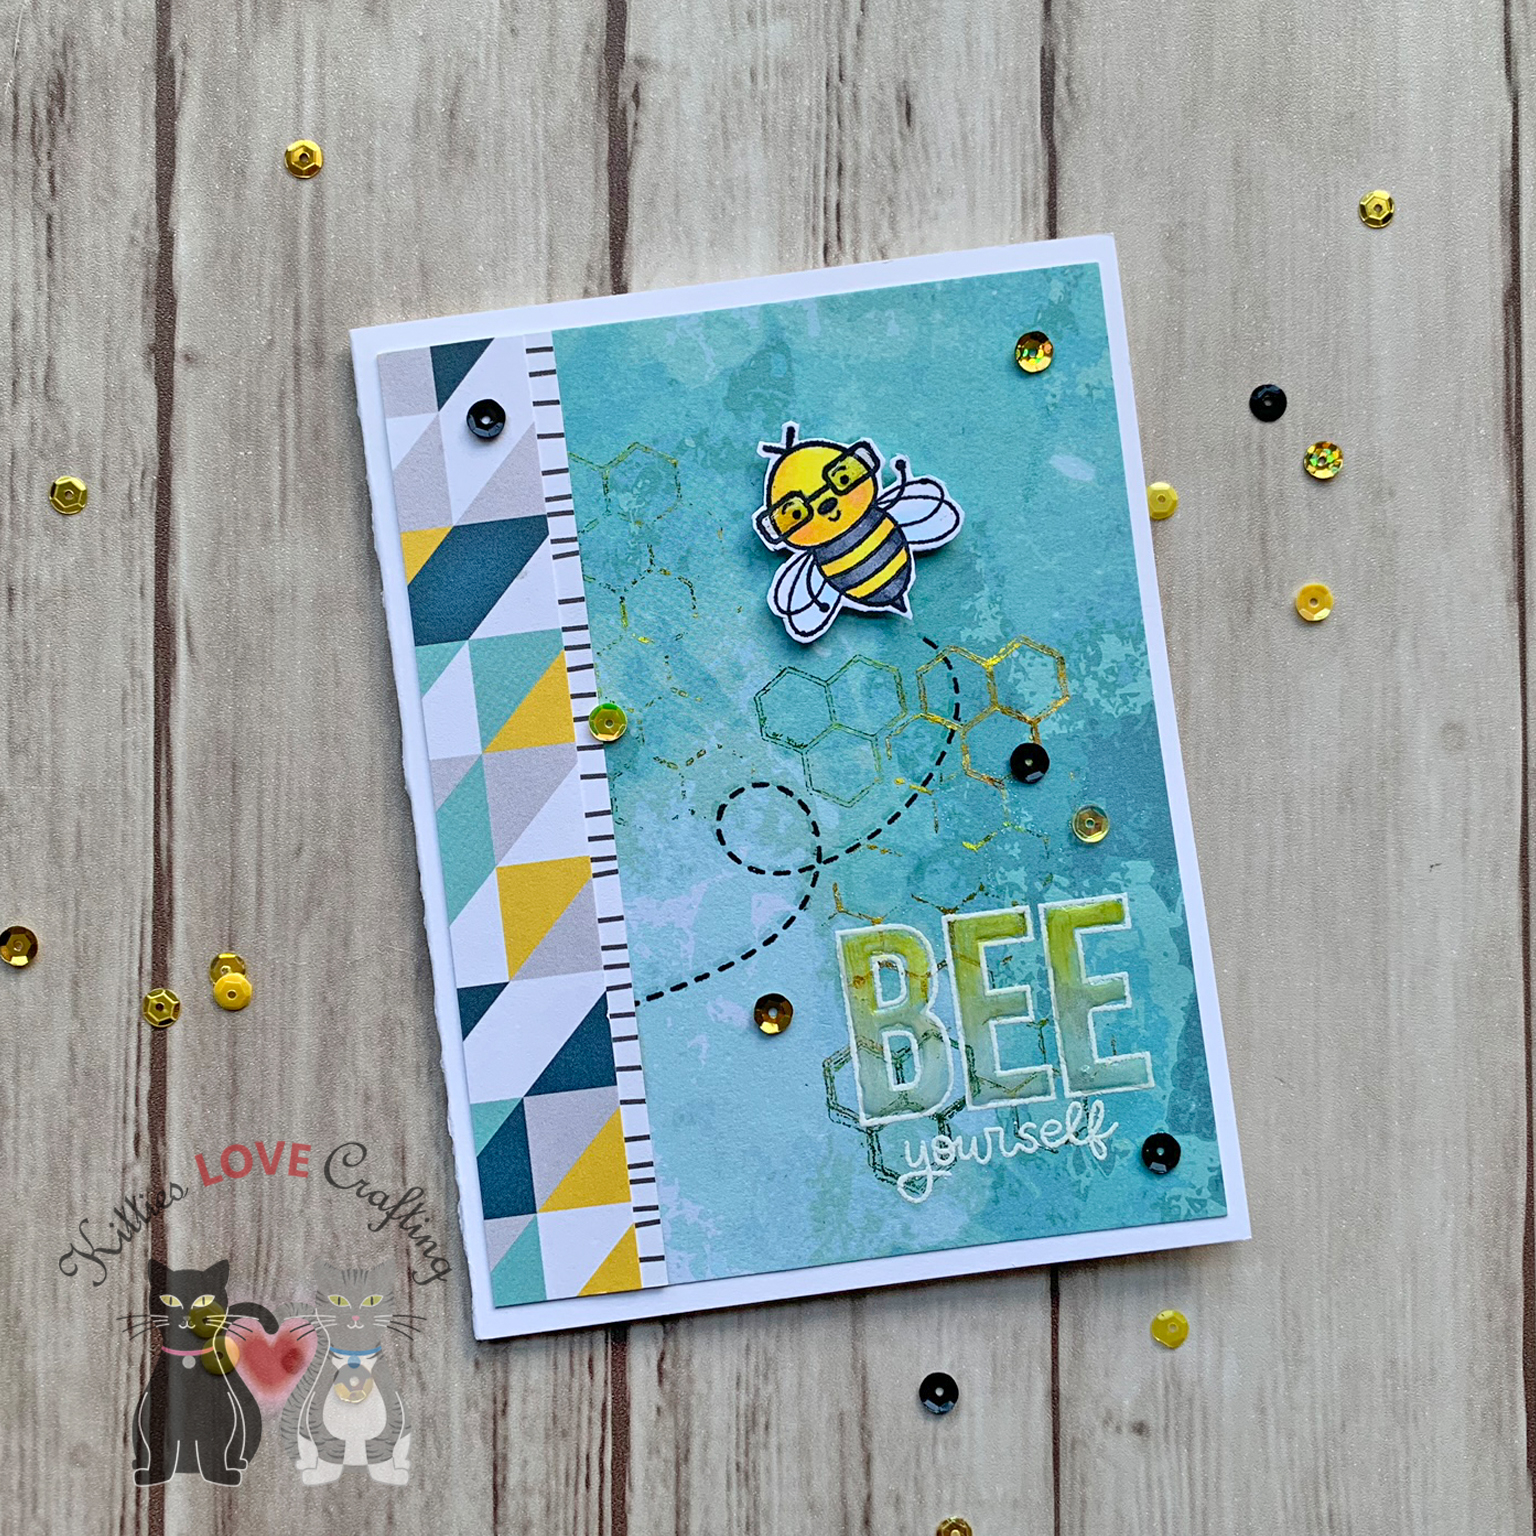
When I first saw the reveal video for this kit, I fell for the paper pad from Honeybee Stamps immediately. I knew I had to use the aqua watercolor pattern first. I kept it simple. I wanted to see if I could foil using a stamp and the glue pad and a stamp (didn’t have transfer gel. I do NOW though 🙂 ).
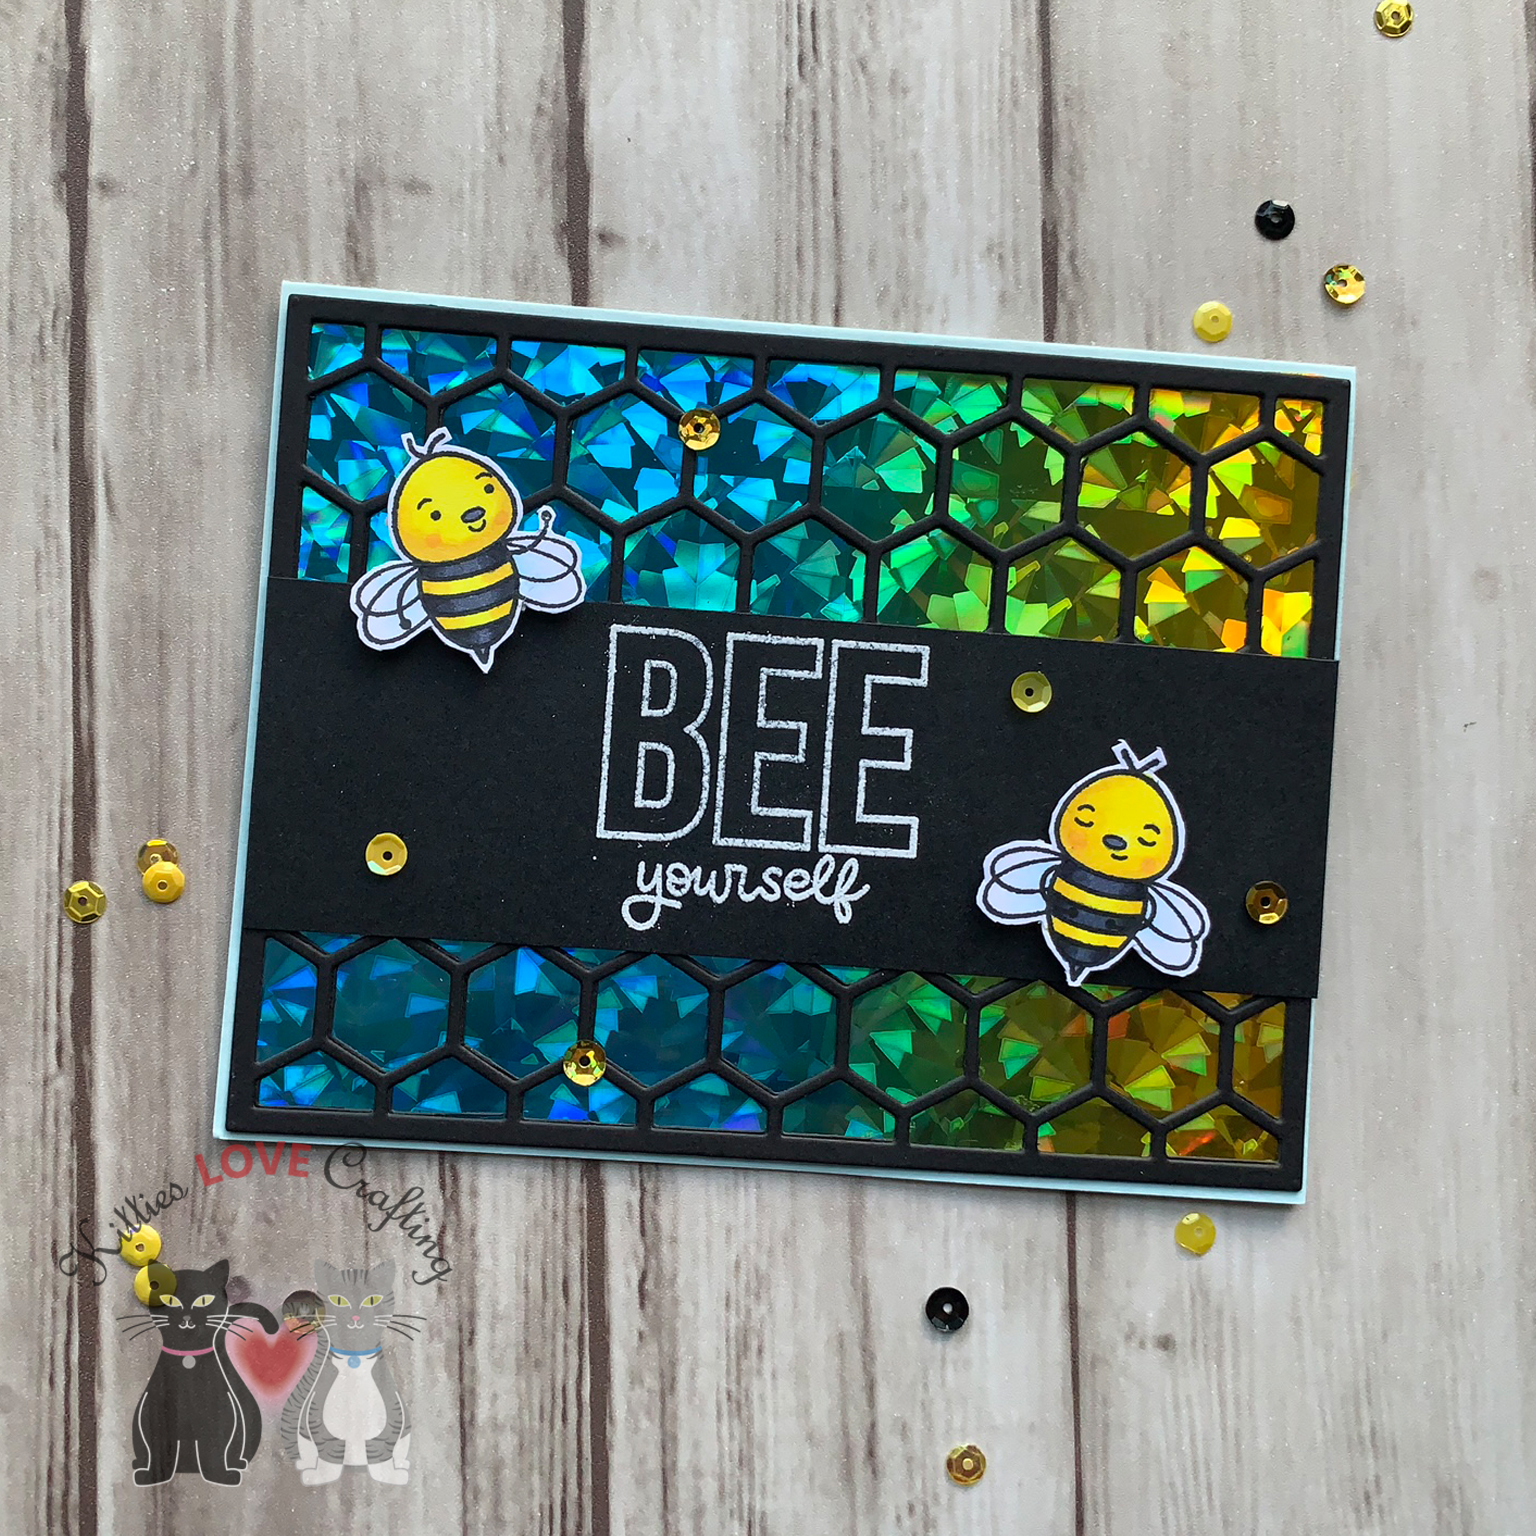
I diecut a few hexagons from Simon Says Stamp Black cardstock using the Simon Says Stamp Small Hexagon Cluster wafer thin die and a few from some black glitter paper. I added the black hexagon cluster to the card and then inlayed 3 glitter hexagons back into the clusters. I added a black mat behind the sentiment. Then I adhered the flower onto the right side of the card and the sentiment toward the bottom. I adhered the little bees and added some sequins to finish off the card.
Another paper that I really like for this collection was the black and white wonky (technical term :)) striped one. Another thing I wanted to use was the foilable cards. And the rainbow one of course calls for rainbow foil (duh). I only foiled the rainbow itself and the little bees so that they would stand out. I fussycut around the images and words, leaving a white border around them. I chose the yellow polka dotted pattern paper from the paper pad as my background. I cut a piece to 3 1/4 x 5 1/2”. I adhered a strip of the black and white wonky stripe paper onto and A2 sized card base (Simon Says Stamp Sunshine cardstock), leaving a 1/4 inch on each side, and adhered the yellow polka dot one in the center over that piece. I added some thin Love From Lizi Pin Stripe Black Glitter Peel Offs to separate the patterns a bit. I love the peel offs from Love From Lizi! They add interest to your card with little effort and she sells soooo many colors (glitter, metallic, transparent). Super fun.
Anyways back to my card…
I adhered the images down onto the card and added some sequins from the included pack. To finish off the inside I cut a piece of Simon Says Stamp White 120# cardstock to 4 x 5 1/4” and adhered inside the card. I added a 1 x 5 1/4” strip of the yellow polka dotted paper and a 1/2 x 5 1/4” strip of the black and white wonky striped paper to the right side of that panel. And stamped the “JUST bee-cause” sentiment in Ranger Black Archival Jet Black. And this completes card #4.
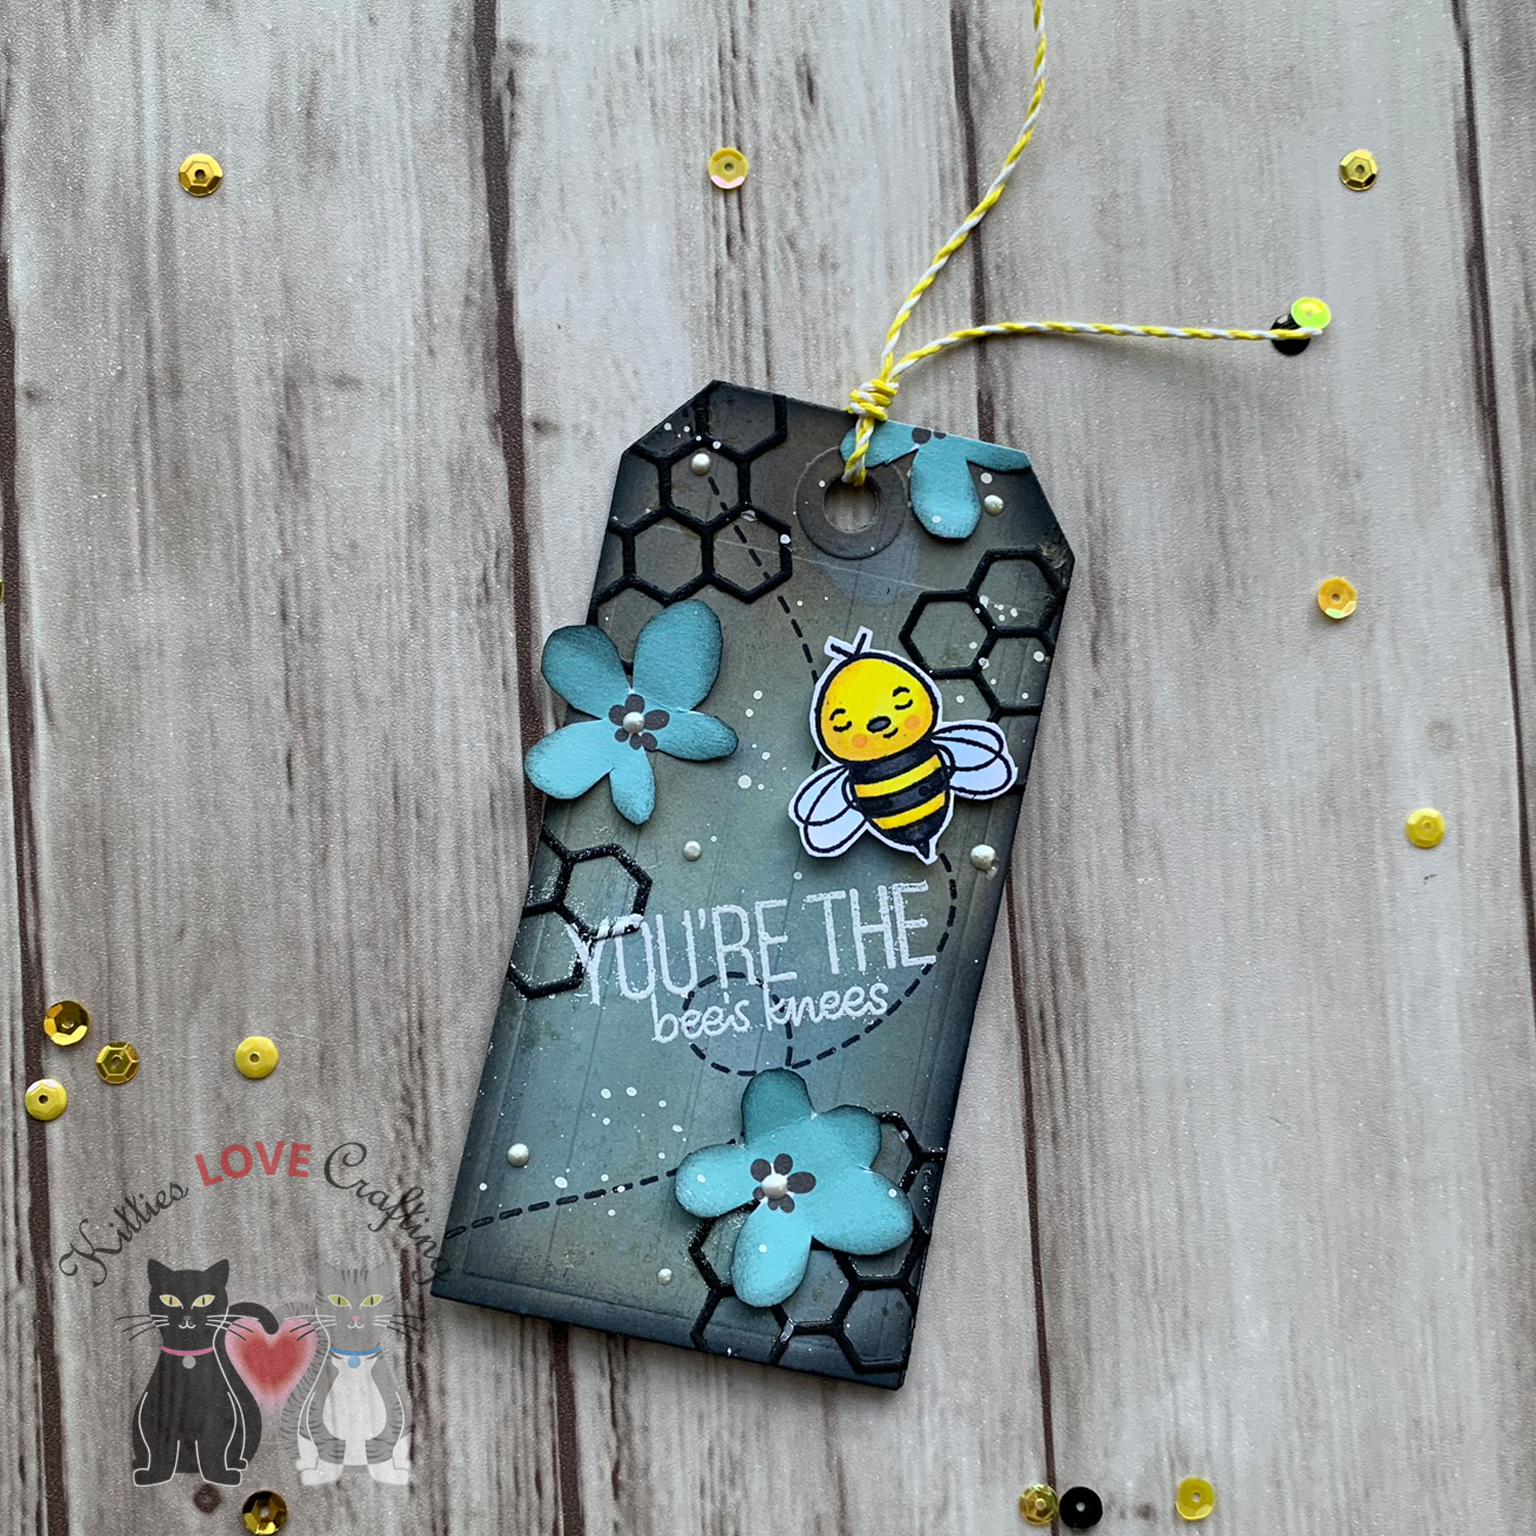
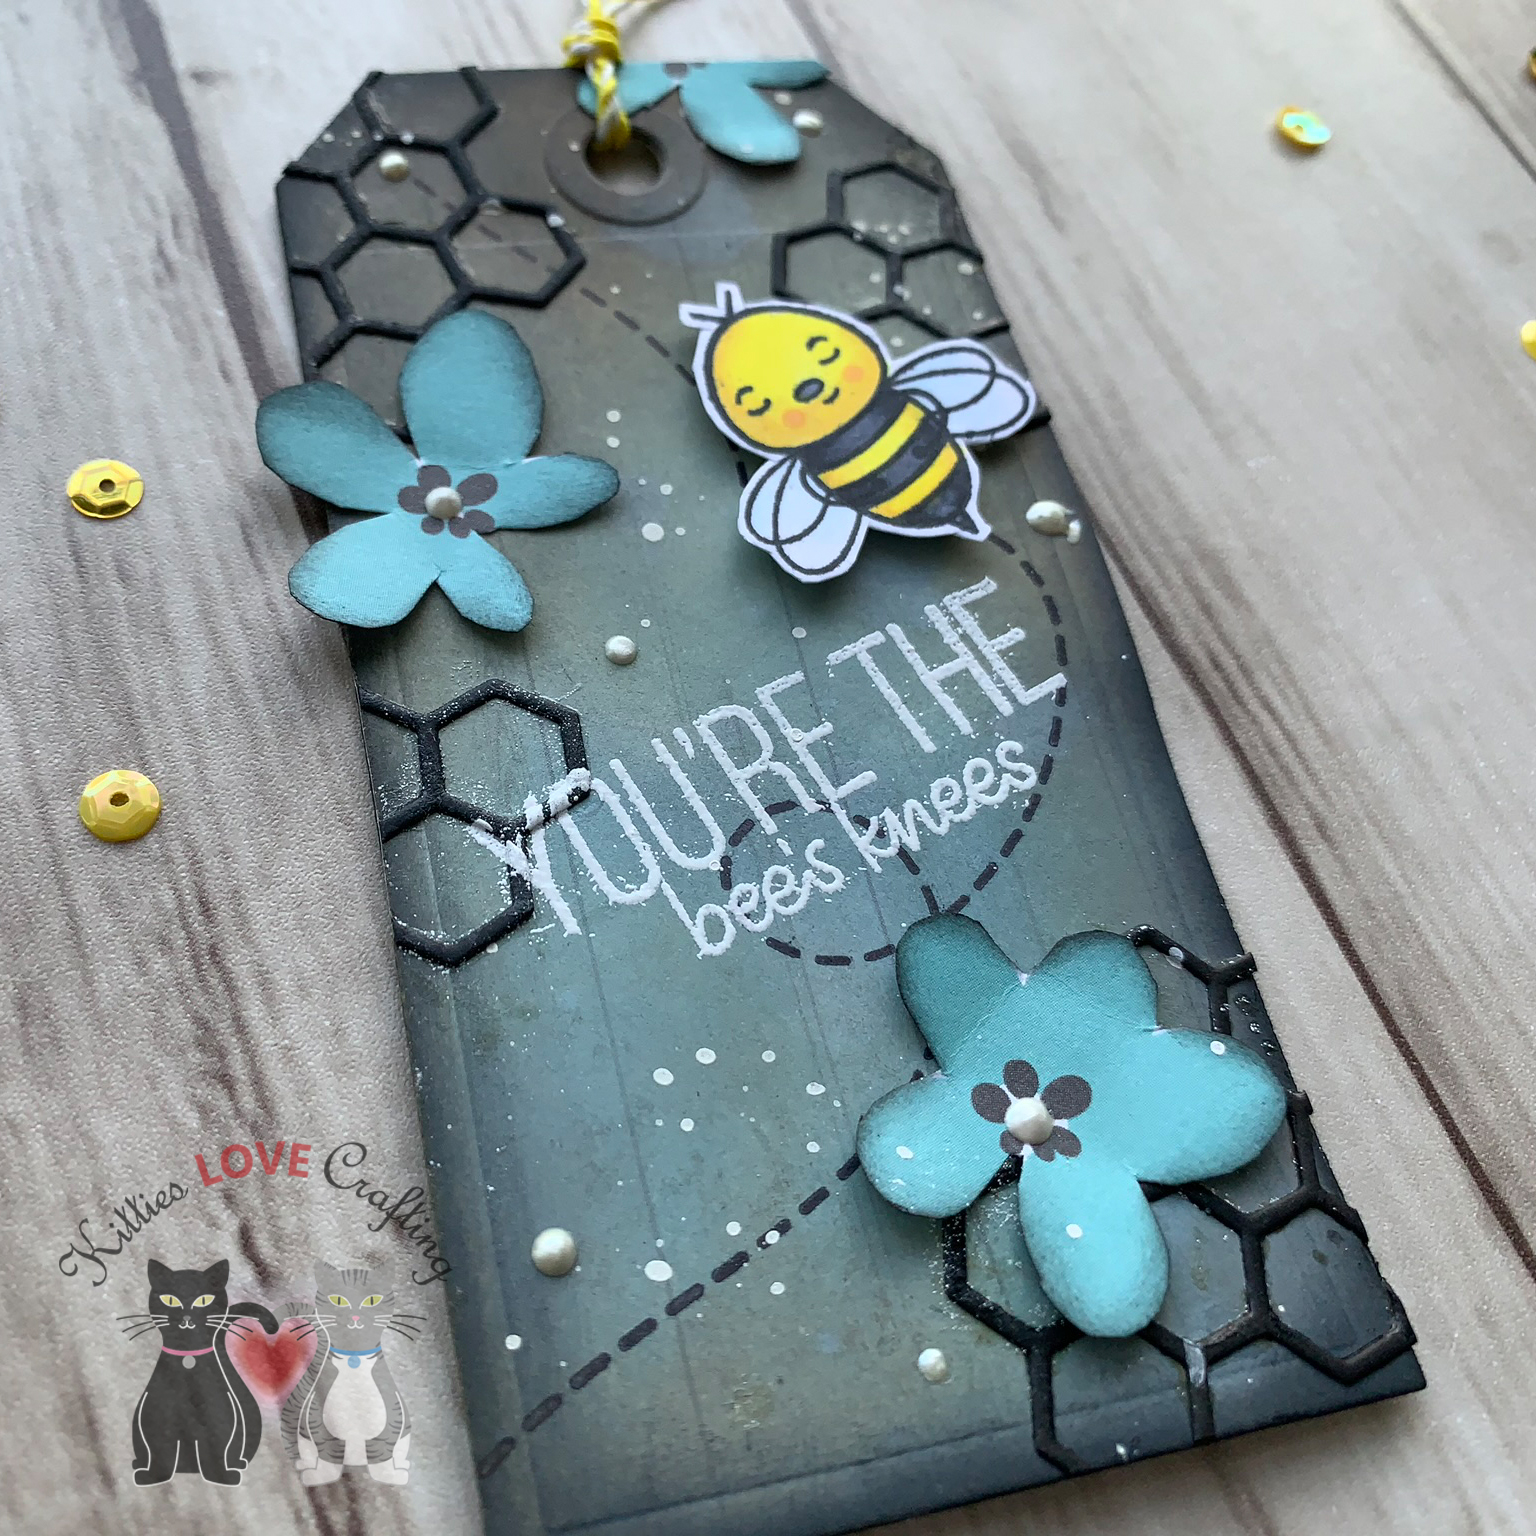
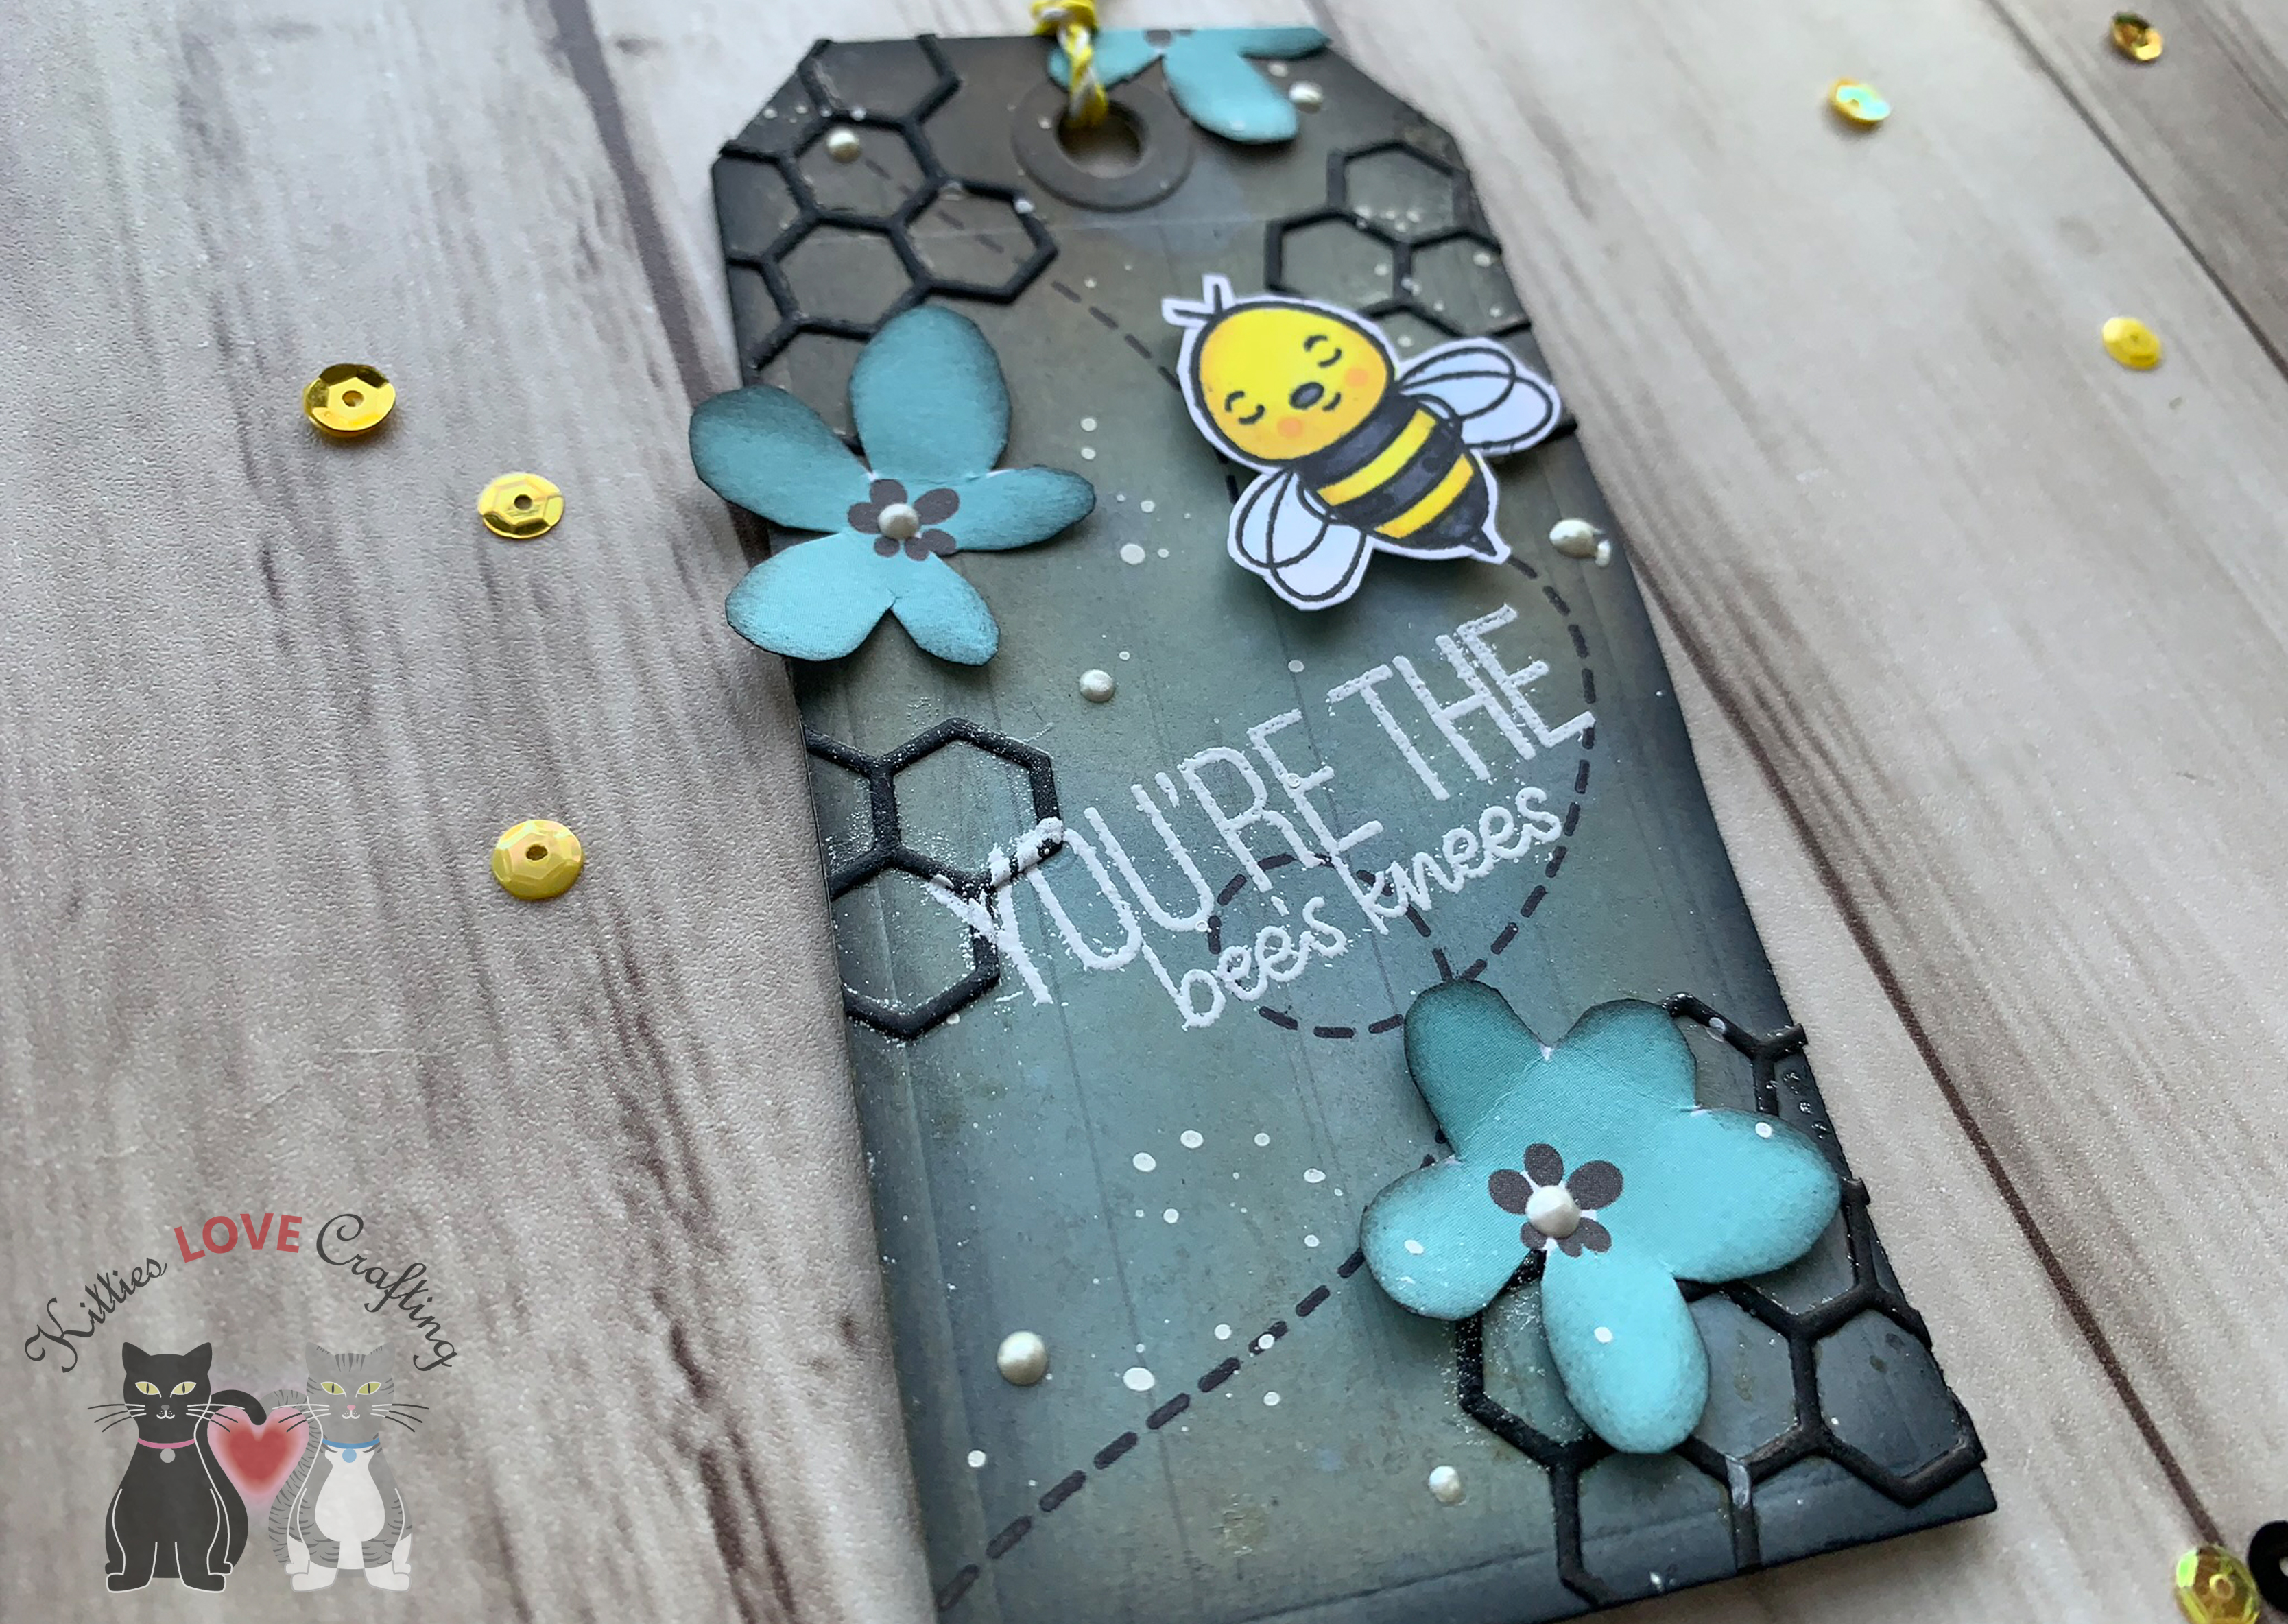
While I was making these cards, I had a thought…how cute would the bees look on a tag??? So I got out my trusty tag die from Tim Holtz (Sizzix Framelit Dies – Tag Collection by Tim Holtz) and diecut 2 tags using the second to largest die from Simon Says Stamp Black cardstock. I chose two pattern papers for my backgrounds, the light wood grain and the black and aqua hexagons, diecut 2 of each of those and glued them onto the front and back of the tag. Then I got to distressing.
I don’t want to leave this tag just as is though. I thought it might look cute as a card instead. So I cut a piece of the yellow hexagon paper to 1-1/4 x 5 1/2” and a piece of the yellow polka dot paper to -1 x 5 1/2” and adhere it to the.back of the hexagon paper and adhered both to an A2 sized card base (Simon Says Stamp Black cardstock).
I adhered the tag to the card base on a slight angle, placing it over the edges.i trimmed off the excess and proceeded to diecut some more hexagon clusters with black cardstock and adhered them to the card. I added one on the black. paper so it looks like it’s embossed. I added three little bees and some sequins to complete this card.
Supplies
Card Kit Includes:
Other Supplies Used:
Hope you’ve enjoyed this post. Thanks for reading to the end; I know it was a long one. I hope I’ve inspired you to make some adorable bee cards of your own. Whether you have the kit or not you can make these cards. Leave comments or questions below or feel free toemailme.
Hello friends. I finally got to play with this adorable bee-themed card kit from Simon Says Stamps. It’s the July Card Kit called Bee Yourself. Lots of fun products to play with and I just adore the stampset. Unfortunately the kit is no longer available but I will link all the available individual products. I almost strictly used only the card kit contents. I did bring in a few of my own products and I will link those below as well.
Card Kit Supplies
When I first saw the reveal video for this kit, I fell for the paper pad from Honeybee Stamps immediately. I knew I had to use the aqua watercolor pattern first. I kept it simple. I wanted to see if I could foil using a stamp and the glue pad and a stamp (didn’t have transfer gel. I do NOW though 🙂 ).
I diecut a few hexagons from Simon Says Stamp Black cardstock using the Simon Says Stamp Small Hexagon Cluster wafer thin die and a few from some black glitter paper. I added the black hexagon cluster to the card and then inlayed 3 glitter hexagons back into the clusters. I added a black mat behind the sentiment. Then I adhered the flower onto the right side of the card and the sentiment toward the bottom. I adhered the little bees and added some sequins to finish off the card.
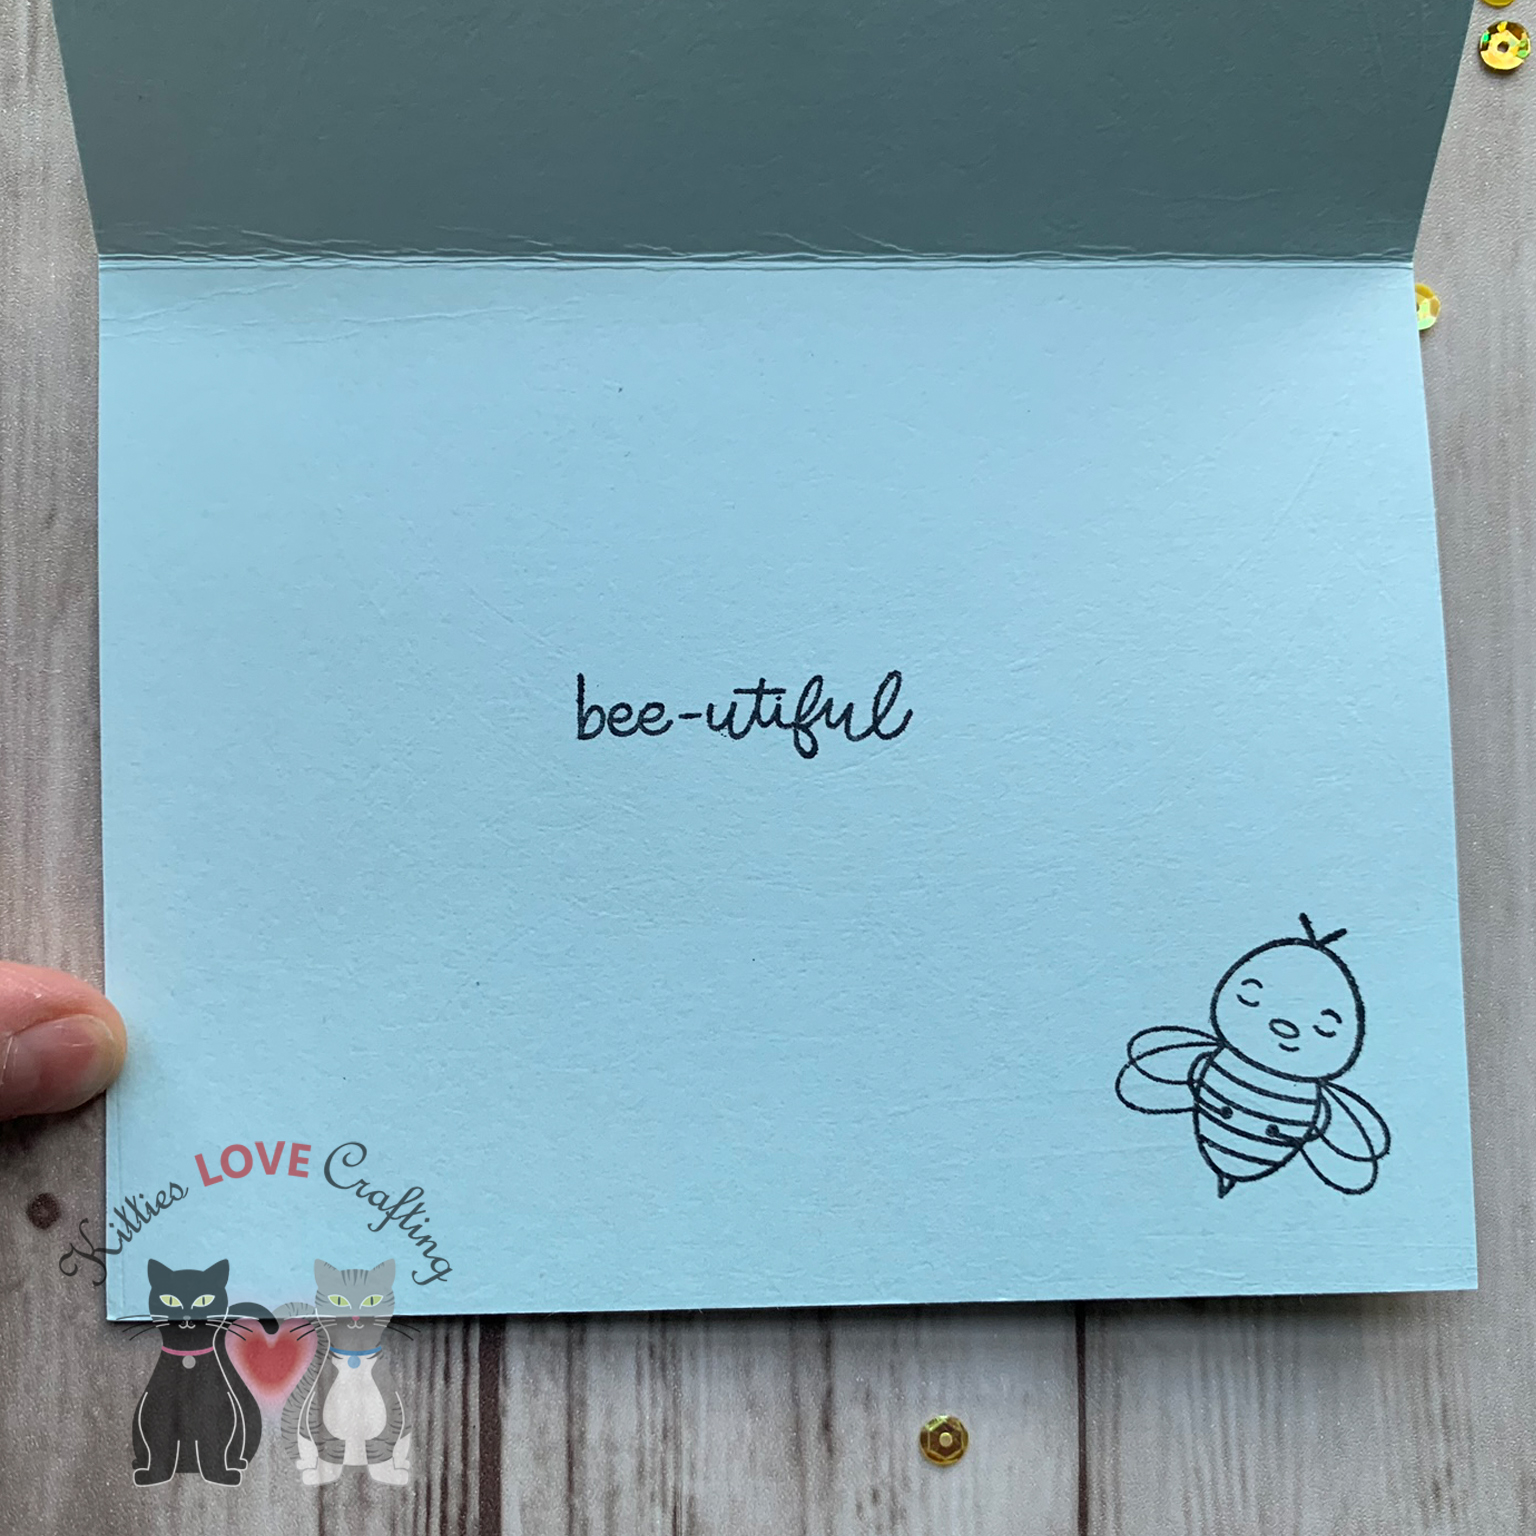
I stamped the “bee-utiful” sentiment and a little bee with Ranger Black Archival Jet Black on the inside of the card. And now this card is done!
3 cards done, 2 to go…
Another paper that I really like for this collection was the black and white wonky (technical term :)) striped one. Another thing I wanted to use was the foilable cards. And the rainbow one of course calls for rainbow foil (duh). I only foiled the rainbow itself and the little bees so that they would stand out. I fussycut around the images and words, leaving a white border around them. I chose the yellow polka dotted pattern paper from the paper pad as my background. I cut a piece to 3 1/4 x 5 1/2”. I adhered a strip of the black and white wonky stripe paper onto and A2 sized card base (Simon Says Stamp Sunshine cardstock), leaving a 1/4 inch on each side, and adhered the yellow polka dot one in the center over that piece. I added some thin Love From Lizi Pin Stripe Black Glitter Peel Offs to separate the patterns a bit. I love the peel offs from Love From Lizi! They add interest to your card with little effort and she sells soooo many colors (glitter, metallic, transparent). Super fun.
I adhered the images down onto the card and added some sequins from the included pack. To finish off the inside I cut a piece of Simon Says Stamp White 120# cardstock to 4 x 5 1/4” and adhered inside the card. I added a 1 x 5 1/4” strip of the yellow polka dotted paper and a 1/2 x 5 1/4” strip of the black and white wonky striped paper to the right side of that panel. And stamped the “JUST bee-cause” sentiment in Ranger Black Archival Jet Black. And this completes card #4.
While I was making these cards, I had a thought…how cute would the bees look on a tag??? So I got out my trusty tag die from Tim Holtz (Sizzix Framelit Dies – Tag Collection by Tim Holtz) and diecut 2 tags using the second to largest die from Simon Says Stamp Black cardstock. I chose two pattern papers for my backgrounds, the light wood grain and the black and aqua hexagons, diecut 2 of each of those and glued them onto the front and back of the tag. Then I got to distressing.
I don’t want to leave this tag just as is though. I thought it might look cute as a card instead. So I cut a piece of the yellow hexagon paper to 1-1/4 x 5 1/2” and a piece of the yellow polka dot paper to -1 x 5 1/2” and adhere it to the.back of the hexagon paper and adhered both to an A2 sized card base (Simon Says Stamp Black cardstock).
I adhered the tag to the card base on a slight angle, placing it over the edges. I trimmed off the excess and proceeded to diecut some more hexagon clusters with black cardstock and adhered them to the card. I added one on the black paper so it looks like it’s embossed. I added three little bees and some sequins to complete this card.
Supplies
Card Kit Includes:
Other Supplies Used:
Hope you’ve enjoyed this post. Thanks for reading to the end; I know it was a long one. I hope I’ve inspired you to make some adorable bee cards of your own. Whether you have the kit or not you can make these cards. Leave comments or questions below or feel free toemailme.


 https://linkdeli.com/widget.js?1559654439292