
The Stampin’ Up!’s Magic in This Night Suite has this very cool looking Metallic Mesh Ribbon. I wasn’t sure how to use it at first but then started playing with it to see how it reacted to stretching etc and my brain immediately saw a web! It also adds some sparkle to your card because it glistens in the light. It’s just Stunning! This suite can be found in the new Aug-Dec Mini Catalog on page 52.
For my first card I used the ribbon as a background. I cut a piece of Basic Black 8-1/2″ X 11″ Cardstock to 5-1/2 x 8-1/2″ and scored at 4-1/4″ to create a card base and one piece to 4 x 5-1/4″ for the top panel. I added some Tear & Tape Adhesive to the top and bottom of the back of the panel and wrapped the Metallic Mesh Ribbon around it. Then added more tape to the rest of the card to adhere it to the card base.
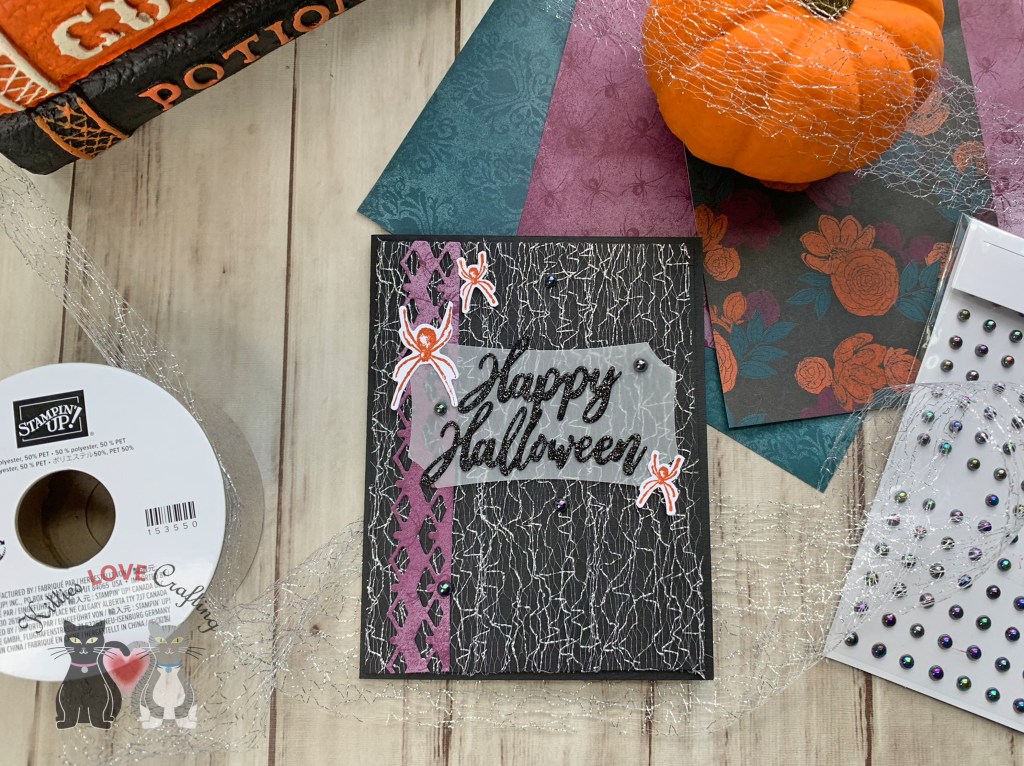
I used the border die from the Halloween Magic Dies to cut a border from the Magic in the Night 12 x 12 Designer Series Paper. I die it two so it was long enough. I also cut a piece of 8-1/2 x 11” Vellum Cardstock with the label die for the same dieset and ‘Happy Halloween’ with the Word Wishes Dies from Black Glitter Paper.
I stamped three spiders from the Hallows Night Magic Stampset with Cajun Craze Ink onto Whisper White 8-1/2″ X 11″ Cardstock and die cut them with the coordinating dies from the Halloween Magic Dies. I adhered all the diecuts and images to the card and finished by adding some of the Iridescent Pearls.
On the inside of this card, again I cut a piece of Whisper White 8-1/2″ X 11″ Cardstock to 4 x 5-1/4” and stamped a sentiment from the Hallows Night Magic Stampset with Cajun Craze Ink and spiders with Tuxedo Black Memento Ink.

Dimensions
- Card Base = 5-1/2 x 8-1/2″ and scored at 4-1/4″ Basic Black 8-1/2″ X 11″ Cardstock
- Top Panel = 4 x 5-1/4 Basic Black 8-1/2″ X 11″ Cardstock
- Inside Panel = 4 x 5-1/4″ Whisper White 8-1/2″ X 11″ Cardstock

For my second card, I cut a piece of Basic Black 8-1/2″ X 11″ Cardstock to 5-1/2 x 8-1/2″ and scored at 4-1/4″ to create a card base and one piece to 4 x 5-1/4″ for the top panel. I added some Tear & Tape Adhesive to the top and bottom of the back of the panel and wrapped a piece of the Metallic Mesh Ribbon around it.
Again I diecut a border using the border die from the Halloween Magic Dies to cut a border from the Magic in the Night 12 x 12 Designer Series Paper and adhered it to the card panel. I added some Black Twine (from the September Paper Pumpkin Kit) and adhered the card panel to the card base. I also cut a piece of 8-1/2 x 11” Vellum Cardstock with the label die for the same dieset and ‘Happy Halloween’ with the Word Wishes Dies from Black Glitter Paper.
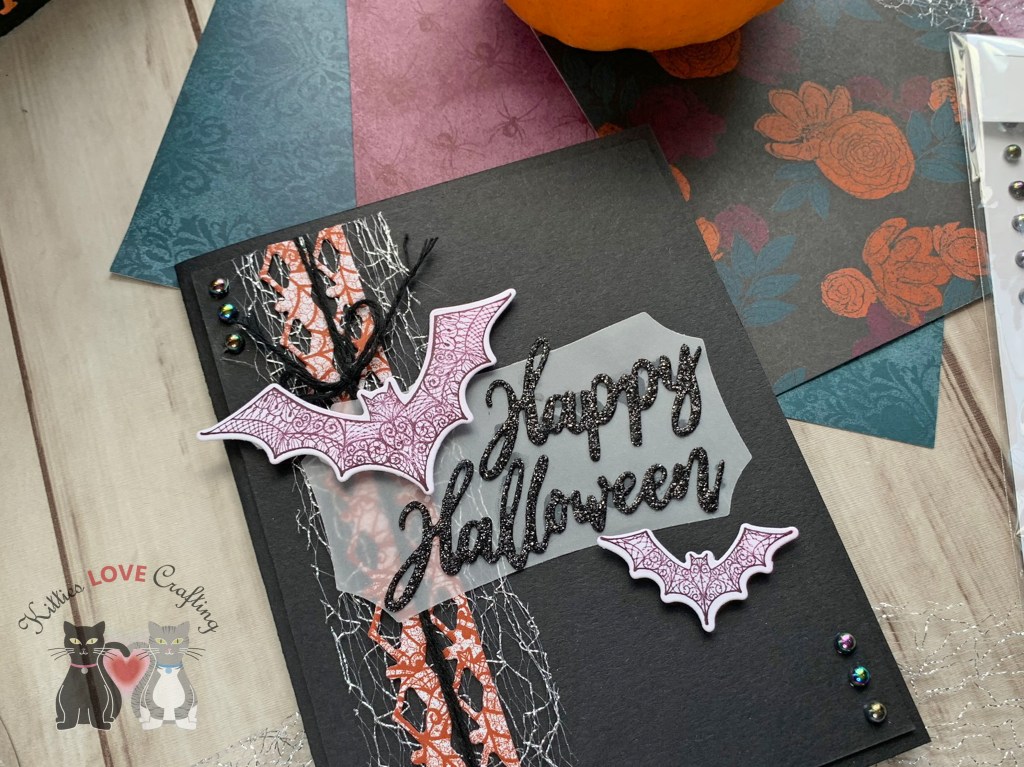
I stamped two bats from the Hallows Night Magic Stampset with Blackberry Bliss Ink onto Whisper White 8-1/2″ X 11″ Cardstock and die cut them with the coordinating dies from the Halloween Magic Dies. I adhered all the diecuts and images to the card and finished by adding some of the Iridescent Pearls.
On the inside of this card, again I cut a piece of Whisper White 8-1/2″ X 11″ Cardstock to 4 x 5-1/4” and stamped a sentiment from the Hallows Night Magic Stampset with Blackberry Bliss Ink and bats with Tuxedo Black Memento Ink.

Dimensions
- Card Base = 5-1/2 x 8-1/2″ and scored at 4-1/4″ Basic Black 8-1/2″ X 11″ Cardstock
- Top Panel = 4 x 5-1/4 Basic Black 8-1/2″ X 11″ Cardstock
- Inside Panel = 4 x 5-1/4″ Whisper White 8-1/2″ X 11″ Cardstock
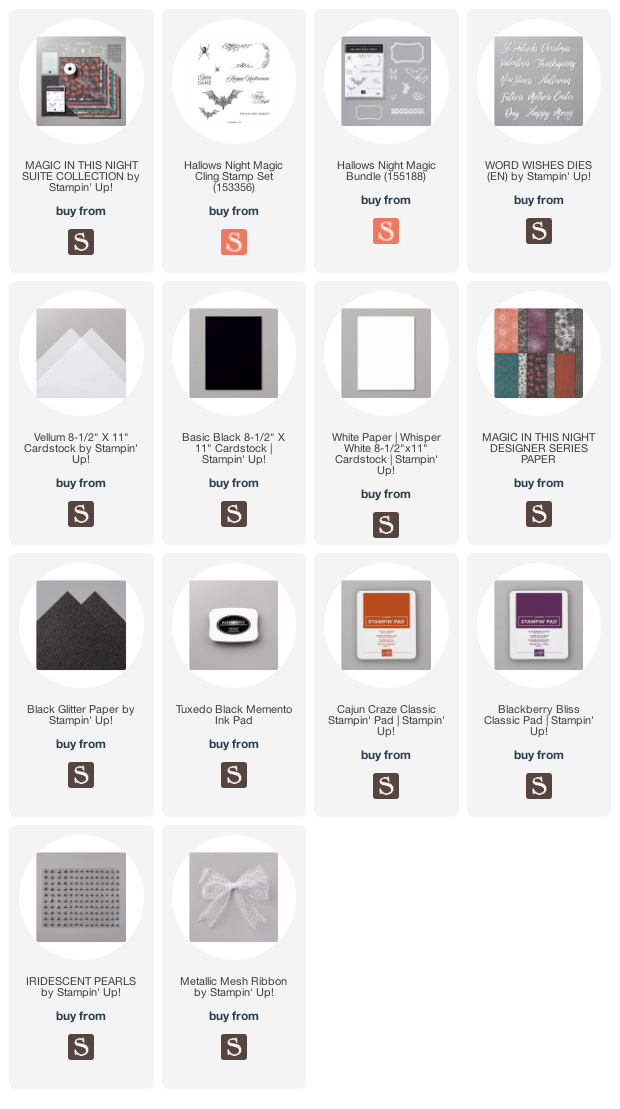
Supplies
 https://linkdeli.com/widget.js?id=f5e8378456858c916708
Thanks for reading this post. I hope you enjoyed and I’ve inspired you to try these Halloween cards for yourself! Leave comments or questions below or feel free to email me. If you want to share you creations with me tag me on instagram @kittieslovecrafting. If you would like a Stampin’ Up! catalog, please email me as well. All current catalogs can be found on the right side of this post and the Stampin’ Up! page. All news and fun stuff happening at Stampin’ Up! are listed there!
