Hello friends. So for this card, I thought I’d use a technique that I love to use to create dimensional backgrounds without having to have an embossing folder. You can use your dies to create faux embossed backgrounds. It’s super easy and fun to do!

For this card, I cut a piece of Neenah 100lb Classic Crest Cardstock 8.5 X 11″ to 5-1/2 x 8-1/2″ and scored at 4-1/4″ to create an A2 card base, and another piece to 3-3/4 x 5″, and a piece of pattern paper from the Catherine Pooler Designs Eerie-sistible 6 x 6 Paper (included in the Boo Box) to 4-1/4 x 5-1/2″.
I die cut several words from the Catherine Pooler Designs Made You Eek Die Set (included in the Boo Box) from Neenah 100lb Classic Crest Cardstock 8.5 X 11″ and adhered to the background panel to create a pattern, creating an embossed look.
I stamped the several images from the Catherine Pooler Designs Fright Night Stampset (included in the Boo Box) onto Neenah 100lb Classic Crest Cardstock 8.5 X 11″ with CP Midnight, Orange Twist, Bellini, Catching Rays, Martini, Bellini, Catching Rays and Pixie Dust inks.
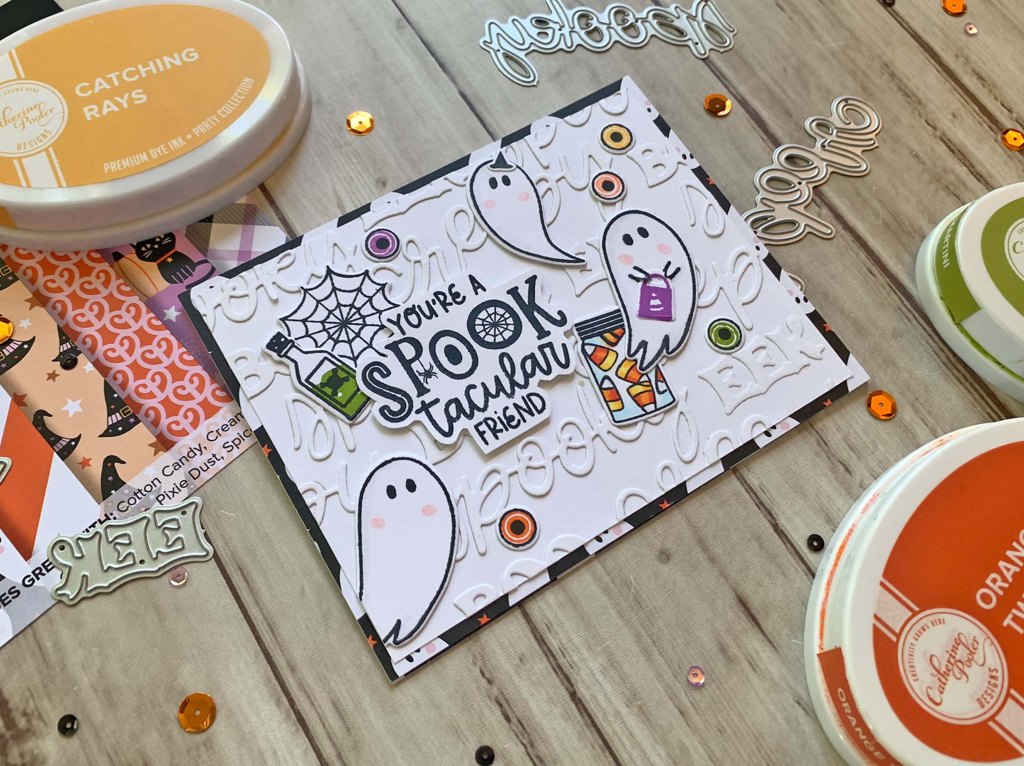
I used Copic markers to color some of the images. I used C0, 0, & R20 for the ghosts; and BG000, 0, C1, YR04, YR09, Y17 & Y06 for the candy corn jar.
Lastly, I stamped the sentiment from Catherine Pooler Designs Fright Night Stampset (included in the Boo Box) onto Neenah 100lb Classic Crest Cardstock 8.5 X 11″ with CP Midnight Ink, fussycut it and popped it up with Foam Tape.

On the inside of the card, I cut a piece of Catherine Pooler Designs Eerie-sistible 6 x 6 Paper (included in the Boo Box) to 1 x 5-1/4″, stamped a sentiment from the Catherine Pooler Designs Fright Night Stampset with CP Martini Ink and just added a purple witch hat.
Dimensions
- Card Base = 5-1/2 x 8-1/2″ and scored at 4-1/4″ Neenah 100lb Classic Crest Cardstock 8.5 X 11″; 4-1/4 x 5-1/2″ Catherine Pooler Designs Eerie-sistible 6 x 6 Paper (included in the Boo Box)
- Background Panel = 3-3/4 x 5″ Neenah 100lb Classic Crest Cardstock 8.5 X 11″
- Inside Panel = 1 x 5-1/4″ Catherine Pooler Designs Eerie-sistible 6 x 6 Paper (included in the Boo Box)
Supplies
 https://linkdeli.com/widget.js?id=f5e8378456858c916708
Thanks for reading this post. I hope I’ve inspired you to give this technique a try and your own faux embossed background! Leave comments or questions below or feel free to email.