Hi friends. Today I am posting something a bit different than my usual card making blogs. I thought I’d try my hand at creating a multimedia canvas. I haven’t tried making a multimedia project in many years (mostly because I didn’t have the space to work or let the piece dry. But now that I have space to work, it’s time to get back to it.
Like many people I was hesitant to start this project or even post it but I figured I’d play and see what happens and if I don’t hate it I’ll post it for you guys. It may inspire someone else get over their fear of doing multimedia.
I was inspired by a Youtuber I came across in my feed, Marta Lapkowska, who makes amazing art journal and multimedia projects. She likes to use stuff around her house as well as things she buys to make her art. Check her out on YouTube at Maremi’s Small Art. Her shop also has cool stuff you can use on your projects. I just got my order and I love all the papers, chipboards, etc I purchased.
In keeping with my pledge to use what I have in my craftroom stash and not overspend this year, I looked through all my chipboard, diecuts, tissue paper, fabrics, and stamps to see what has been under utilized. I also used some cardboard (from an Amazon box) to add to my project. I saw Marta do this in one of her videos and I thought it was a cool idea.


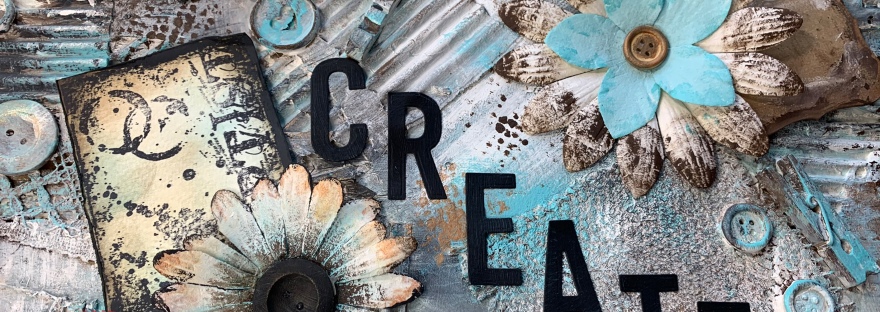
I started with a pre-gessoed canvas, measuring 12 x 16 from Artist’s Loft. I used Matte Gel Medium and added some torn pieces of tissue paper from Tim Holtz® Idea-ology® Melange Tissue Wrap Paper and Ranger 10 Printed/10 Plain Dina Wakley Media Tissue Pack 7.5″X10″ 20/Pkg. You can use any tissue paper in your stash. You can also stamp on your tissue paper before adding it to your project.

I let that dry and then used my Hot Glue Gun to add cardboard from my Amazon box, fabric scraps, Doilies, Burlap Ribbon, Coffee Filters (I always have these in my craftroom for applying glitter and embossing powder), Wood Buttons and Mini Thread Spools, Mini Natural Wood Clothespins and Regular Sized Natural Wood Clothespins, and Planner Discs (yes I said Happy Planner discs) to the canvas. I just placed everything randomly on the canvas, clustering some items to create some interest.

Once I was happy with the composition, I added Gesso over everything. I added two coats of Gesso, allowing to dry in between coats.

Once that was dry, I started adding paint. I used Martha Stewart Acrylic Paints in Surf, Summer Haze, Pool, and Vanilla Bean, plus a Craft Smart® Acrylic Paint, 2 oz, Black and DecoArt Crafters Acrylic, 8-Ounce, White from my stash to add layers of color. This took a while and once I was happy with the background I let it dry. I was trying to create an aged look but I still wanted pops of color which is why I used the three aqua colors. My advice to any of you out there who are afraid to screw up your piece once you add paint, is not to worry. The good thing about acrylics is you can add layers on top of layers (let the paint dry before adding more) or add Gesso over it and start over with the paint. No mistakes are bad and have fun!
I added more texture by using a piece of the burlap ribbon as a stencil with the Vanilla Bean and some Martha Stewart Acrylic Paints in Copper.

While my paints dried, I stamped two of the images from the Stampers Anonymous Creative Collage Stampset onto a piece of Canson Montval Acid-Free Cold Press Watercolor Paper, 140 lb with Ranger Black Archival Ink. Using a stamping platform is very useful here to be able to stamp multiple times over the image. I cut those out and distressed them by adding some Antique Linen Distress Oxide, Broken China Distress Oxide, Ground Espresso Distress Oxide, and Black Soot Distress Ink. I was not happy with the edges being so clean so I took my Tonic Studios Tim Holtz 370 Paper Distresser to rip the edges. Then added more Black Soot Distress Ink around the edges. And to make it look even older I added black acrylic paint around the edges. Next I used Vanilla Bean and Copper to paint the edges of some old chipboard pieces I had as well as added some DecoArt Crafters Acrylic, 8-Ounce, White acrylic to distress it a bit. I used medium and small chipboard shapes. Not sure where these came from as they are extremely old. Again trying to use what I own an don’t buy more stuff. Dig through your drawers people! You are bound to find treasures! 🙂
I also took some white paper flowers in various sizes and painted them with Pool, Vanilla Bean, Craft Smart® Acrylic Paint, 2 oz, Black and Copper. I adhered the stamped images, flowers and chipboard pieces to the canvas using my Hot Glue Gun. I stacked two flowers together and added some Wood Buttons to them which I painted with the acrylic paints also. Lastly, I diecut the word “CREATE” from Simon Says Stamp BLACK Card Stock 100# with the Honey Bee BEE BOLD ALPHABET Dies an adhered it with Matte Gel Medium to my canvass.


 https://linkdeli.com/widget.js?1559654439292
Thanks for reading this post. I hope you enjoyed and I’ve inspired you to give try creating some multimedia projects yourself. I challenge you to check out your supplies and use it to make some art. Have fun and enjoy! Leave comments or questions below or feel free to email.
